
Table of contents
- Market tab
- Pending tab
- Manage tab
- Visualization of deals and orders, modification of trade levels
- Trailing stop
- Breakeven
- Automatic partial closing
- Virtual stop loss and take profit
- Manual closing, reversal
- Bulk Close tab
- Spread, commission settings
Market tab
The Market tab is designed for one-click opening and closing of trades. 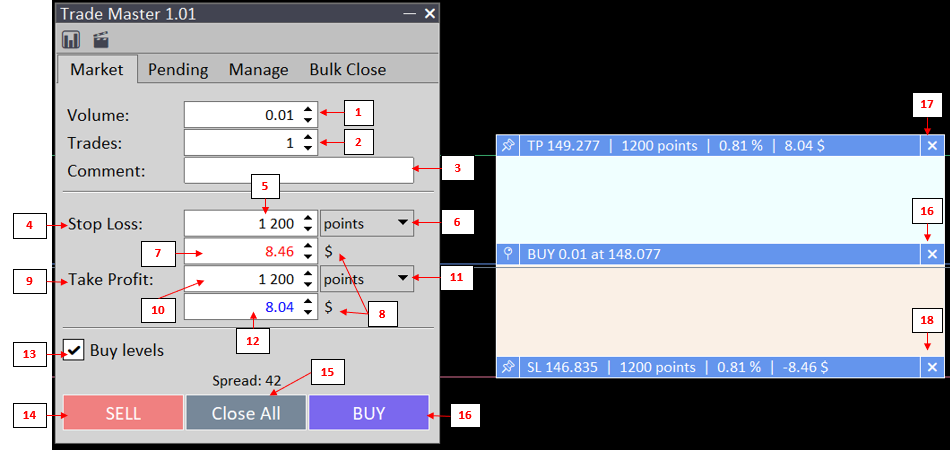
Volume (1). Order volume in lots.
Trades (2). Number of orders to be sent at the same time.
Comment (3). Order comment.
Stop loss. Stop loss settings. Click element (4) to switch between "No S/L" (order sent without a stop loss) and "Stop-loss" (order sent with a stop loss using the specified parameters). The stop loss value is entered in field (5) in points, pips, percentage of the price, or as a fixed price (dropdown menu 6).
Take profit. Take profit settings. Click element (9) to switch between "No T/P" (order sent without a take profit) and "Take profit" (order sent with a take profit using the specified parameters). The take profit value is entered in field (10) in points, pips, percentage of the price, multiples of SL, or as a fixed price (dropdown menu 11).
Money risk, money target (7, 12) are set either in absolute monetary terms or as a percentage of the account balance (element 8). Enter the value using the keyboard, or use the increment/decrement buttons. The step is defined by external inputs (Market Tab section): P&L money: step for absolute money, and P&L % of balance: step for percentage of the account balance. The application will calculate the appropriate volume, recalculate the exact risk and profit for that volume, and automatically fill in the corresponding fields.
Visualization of the order being placed. Make sure checkbox (13) is checked to display the order on the chart. Click the text field to the right of the checkbox to switch between "Buy levels" and "Sell levels". Drag the entry level with the mouse to move the order horizontally. Click (16) to hide the order preview from the chart. Drag the stop loss and take profit with the mouse to the required levels. Set the stop loss and take profit as a fixed price so the levels do not change when the market price changes. Set take profit as a risk-to-reward ratio (SL multiples) so that dragging the stop loss automatically recalculates and redraws the take profit level. Click elements (17, 18) to send an order without a stop loss or take profit. While dragging stop loss or take profit levels, the program recalculates and automatically updates the corresponding fields on the main form.
One-click trading buttons (14, 15, 16). "Buy" and "Sell" will open one or more trades with the settings specified above. "Close All" will close all market orders with the specified magic number.
Send new market order with a specified money risk and a fixed risk to reward ratio
1. Switch to the Market tab. Make sure order preview is enabled (checkbox 13).2. Select "SLs" from the take profit unit dropdown list (11) to set take profit as multiples of SLs.
3. Set the required risk-reward ratio in field (12) or simply drag the take profit to the desired level. The stop loss level will not change, while the take profit value in risk units will be recalculated and displayed automatically.
4. Drag the stop loss to the required level. The take profit level will be recalculated and displayed automatically.
5. Enter the stop loss risk in field (7). The unit is either money or a percentage of the account balance (8).
6. The program will automatically calculate and set the volume, risk, and potential profit in the corresponding fields.
7. Make sure the risk is acceptable to you and click "BUY"/"SELL".
Click to view

Pending tab
The Pending tab is used for placing pending orders. 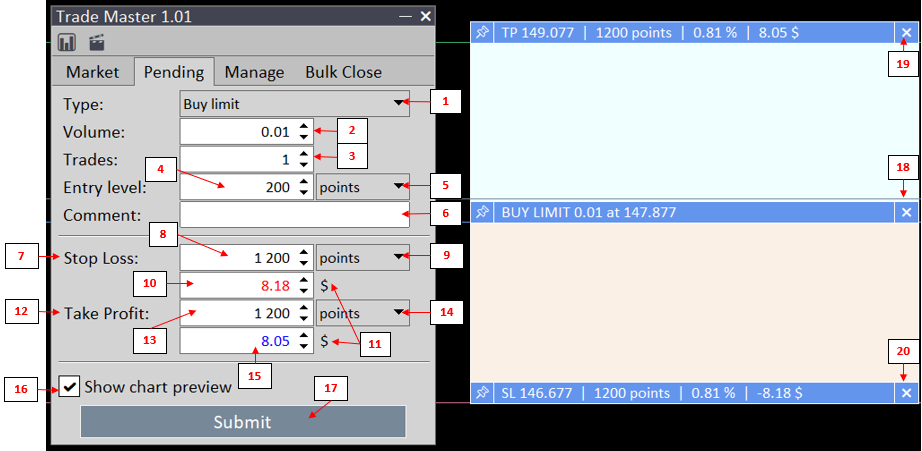
Type (1) sets the type of pending order. Supported types: Buy limit, Sell limit, Buy stop, Sell stop.
Volume (2). Order volume in lots.
Trades (3). Number of orders to be sent simultaneously.
Entry level (4) sets the entry price of a pending order in selected units (5) - points, pips, percentage of the price, or fixed price.
Comment (6). Order comment.
Stop loss. Stop loss settings. Click element (7) to switch between "No S/L" (order sent without a stop loss) and "Stop-loss" (order sent with a stop loss using the specified parameters). The stop loss value is entered in field (8) in points, pips, percentage of the price, or as a fixed price (dropdown menu 9).
Take profit. Take profit settings. Click element (12) to switch between "No T/P" (order sent without a take profit) and "Take profit" (order sent with a take profit using the specified parameters). The take profit value is entered in field (13) in points, pips, percentage of the price, multiples of SL, or as a fixed price (dropdown menu 14).
Money risk, money target (10, 15) are set either in absolute monetary terms or as a percentage of the account balance (element 11). Enter the value using the keyboard, or use the increment/decrement buttons. The step is defined by external inputs (Pending Tab section): P&L money: step for absolute money, and P&L % of balance: step for percentage of the account balance. The application will calculate the appropriate volume, recalculate the exact risk and profit for that volume, and automatically fill in the corresponding fields.
Visualization of the order being placed. Make sure checkbox (16) is checked to display the order on the chart. Drag the entry level with the mouse to move the order horizontally. Click (18) to hide the order preview from the chart. Drag the entry price, stop loss, and take profit with the mouse to the required levels. Set the entry price, stop loss, and take profit as a fixed price so the levels do not change when the market price changes. Set take profit as a risk-to-reward ratio (SL multiples) so that dragging the stop loss automatically recalculates and redraws the take profit level. Click elements (19, 20) to send an order without a stop loss or take profit. While dragging trade levels, the program recalculates and automatically updates the corresponding fields on the main form.
The Submit button (17) will place one or more orders with the settings specified above.
Send new limit order with a fixed entry price
1. Switch to the Pending tab, make sure the "Show chart preview" checkbox (16) is enabled.2. Select the order type from the dropdown list (1).
3. Select "price" from the dropdown list (5) to fix the entry price of the order.
4. Drag the entry price to the desired level. The level will no longer change when the market price changes.
5. Drag the stop loss and take profit to the required distance from the entry level.
6. Make sure the risk is acceptable to you, then click "Submit".
Click to view
Manage tab
This tab is designed for managing open positions and orders. Once the tab is activated, trades and orders opened with the application will be displayed on the chart.Visualization of deals and orders, modification of trade levels
Click on a trade or pending order on the chart, or select it from the dropdown list on the tab. Click "..." to expand the stop loss and take profit levels. To modify a stop loss or take profit, drag the levels on the chart or use the "Modify" tab.Click to view
Trailing stop
Use the Trailing tab to set a trailing stop. The trailing stop is activated once the profit reaches the Trigger value. The stop loss is moved to a Trailing distance from the current market price if the distance between the current and intended stop loss is greater than or equal to the Step value. Units for the levels can be selected from the corresponding dropdown list (Unit).1. Switch to the Manage tab, select a deal from the dropdown list or by clicking directly on a deal on the chart.
2. Click on Trailing to open the trailing stop settings menu.
3. Select Fixed Trailing Stop.
4. Change the trailing Trigger from the menu or from the chart. The Trail level will be recalculated and redisplayed automatically based on the Distance value.
5. Drag the Trail level or change the Distance field value to adjust the minimum distance between the market price and the stop loss.
6. Drag the Trail step or change the Step field value to adjust the minimum distance between the current and new stop loss price.
7. Press Apply.
8. The levels of an already set trailing stop can be modified later from the chart.
Example of setting a fixed trailing stop (click to view)
Breakeven
Use the Breakeven tab to set breakeven parameters. Once the profit reaches the Trigger value, the stop loss is moved to an Offset level. Trigger and Offset are calculated from the order open price and are set in units selectable from the corresponding dropdown list (Unit).1. Switch to the Manage tab, select a deal from the dropdown list or by clicking directly on a deal on the chart.
2. Click on Breakeven to open the breakeven settings menu.
3. Change Trigger and Offset either from the menu or from the chart.
4. Press Apply.
5. The levels can be modified later from the chart.
Example of setting up a breakeven (click to view)

Automatic partial closing
The Auto close tab is used to set up partial closing of a trade from the market. The trade can be split into parts (max 5). Enter a non-zero value in the volume input field to activate a partial close rule. The partial close rule will be marked as "Active". Set the trigger type, value, and unit. "Profit" trigger: the deal will be partially closed once the profit reaches the trigger value, which can be set in points, pips, percentage, market price, or as parts of a hard SL or TP. "Loss" trigger: the deal will be partially closed once the loss reaches the trigger value, which can be set in points, pips, percentage of market price, or as parts of a hard SL or TP. "Bid" and "Ask" triggers: the deal will be partially closed once the Bid or Ask price reaches the trigger level. "Time" trigger: the deal will be partially closed after a set time elapsed from the deal open time. Once the trigger is reached, the partial close rule will be marked as "Triggered". To delete a rule, simply set the volume input field to zero. Change trigger levels using the "Auto close" menu or directly from the chart. If the menu is open, press Apply to confirm changes.Close a trade in parts by time
Example: a trade with 0.02 volume should be closed in equal parts 30 and 60 minutes after the trade was opened.1. Switch to the Manage tab, select a deal from the dropdown list or by clicking directly on a deal on the chart.
2. Click on Auto close.
3. Set Volume to 0.01 for the 1st and 2nd lines.
4. Select Time as the trigger to close the deal.
5. Set the holding time to 30 and 60, and select Minutes as the unit.
6. Press Apply.
Click to view
Split take profit into parts
1. Switch to the Manage tab, select a deal from the dropdown list or by clicking directly on a deal on the chart.
2. Click on Auto close.
3. Set the necessary partial volumes.
4. Select Profit as the trigger to close the deal.
5. Select Parts of TP as the unit, set the required values in the form fields, or simply drag the levels from the chart.
6. Press Apply.
Click to view

Split stop loss into parts
1. Switch to the Manage tab, select a deal from the dropdown list or by clicking directly on a deal on the chart.
2. Click on Auto close.
3. Set the necessary partial volumes.
4. Select Loss as the trigger to close the deal.
5. Select Parts of SL as the unit, set the required values in the form fields, or simply drag the levels from the chart.
6. Press Apply.
Click to view
Virtual stop loss and take profit
The "Virtual" tab is used to show or hide stop loss and take profit from the broker. The triggering of hidden stops is checked on the user's terminal side, not on the broker's side. Once a virtual stop loss or take profit is triggered, the deal is closed at the market price. The application must be running continuously for this to work. Check the corresponding checkboxes and press "Apply". Virtual levels will be marked with "v". Make sure real SL/TP levels are set or deleted as needed.Manual closing, reversal
To partially close a position manually, enter the volume in the input field and make sure the required volume is displayed in the text of the Close ... button, then click this button. For a full close, simply click the Full close button. Click the Reverse button to reverse a buy trade to a sell trade and vice versa. The application will close the current trade and open a new one with the same volume and the same stop-loss and take-profit distance.Click to view
Bulk Close tab
This tab is intended for bulk operations.Setting common stop-loss and take-profit sets Press "Modify", enable the respective checkboxes, and set the values expressed in the account currency. Once the account equity exceeds the take profit value or falls below the stop loss value, the application will close all positions for the chart symbol and, depending on the "Equity SL/TP trigger: Action" input, will not open new ones. Equity triggers are checked only while the program is running.
Bulk closing trades, bulk deleting orders. Set the symbol filter (chart symbol or all symbols), set the magic filter (program magic or any trades). Hover the mouse over the buttons to see a tooltip. The "Profit" column shows the total PnL for the trades to be closed.
Click to view


![[Two Different Approaches to Market Timing]: The Spiral Calendar and the VISTmany Research Project](https://c.mql5.com/6/1012/splash-preview-771691.png "[Two Different Approaches to Market Timing]: The Spiral Calendar and the VISTmany Research Project")

