
GPT Assistant is a powerful tool that provides analysis and insights for your trading. To set it up, you’ll need to add two important URLs to your platform. Here’s how:
-
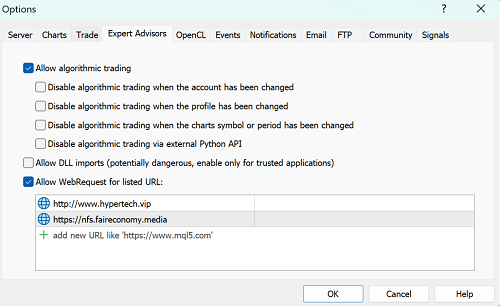
Go to Tools -> Options at the top of your platform and select the Expert Advisor
-
Please check the boxes for “Allow algorithmic trading” and “Allow WebRequest for listed URL”.
-
Add the following URLs: http://www.hypertech.vip and https://nfs.faireconomy.media.
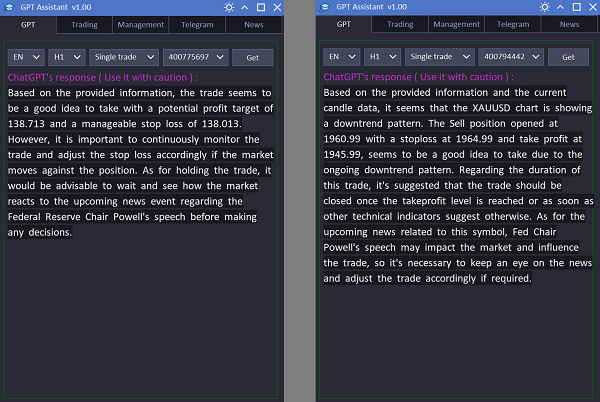
Once you’ve attached GPT Assistant to any chart, two windows will pop up. The first is the main GPT Assistant window, and the second is the Order list. In the GPT tab, you can choose the language and type of analysis you want. Options include time frames from M15 to D1, and analysis types like short term, support & resistance, news, and single trade. For example, if there’s upcoming high-impact news that could affect USD pairs, chatGPT can provide information on what might happen. Simply select “News” and choose the symbol (e.g., USDCHF).
If you have any open trades (either manual or placed by an expert advisor) chatGPT can analyse them for. Select “Single trade” to see a list of ticket numbers for all your current trades on the platform. For instance, if you have a long EURGBP trade open, select “Single trade”, choose the ticket number, and click “Get”. GPT Assistant will provide an overall analysis of the trade, including any upcoming news that could impact its direction.
Trading
The Trading tab has a useful feature called GPT Suggestion. When you select a symbol and click "Get GPT Suggestion," it will tell you whether it's a good time to buy or sell that pair. If there aren't any trading opportunities, it will tell you to try again later and will be highlighted in yellow. If you get a buy or sell recommendation, you'll also get values for Take Profit (TP) and Stop Loss (SL). Just click "Set GPT values" and they'll be copied into the input field below. Once you have the trend direction and TP/SL values, all you need to do is execute the trade by clicking "buy" or "sell" at the bottom.
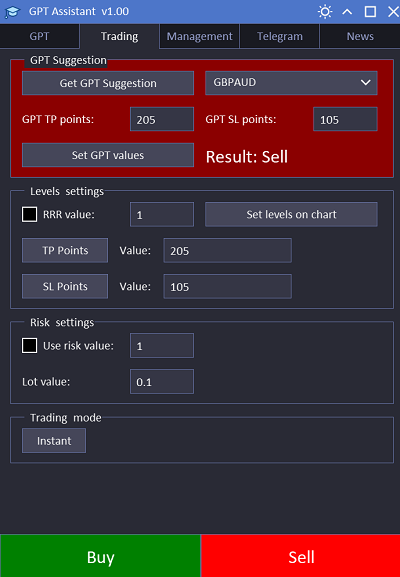
If the Assistant is attached to the AUDJPY chart you can see the levels by clicking the "Set levels on chart" button. Here, you can also choose your Risk-Reward Ratio (RRR) value and risk settings. If you use the risk value, the lot size will be adjusted automatically. If you don't tick it, you can change the lot value in the input box. The trading mode can be either instant or pending. If it's set to instant, you won't be able to move levels on the chart when you click "set levels on chart" because the trade will happen instantly. If you change it to pending, you'll be able to move the levels up and down on the chart and place a pending order.
Setting levels on the chart is a helpful visual aid. In order to amend TP and SL with this feature you have to click at the top or bottom of the green or red field. Once you’ve clicked on it you can move it up and down and depending where you stop, these values will be copied into TP and SL input boxes. You don't have to use this tab only for trades based on GPT Suggestions. You can also choose a symbol and manually enter TP and SL. Please note that if you click on the TP points button, it will change to TP price.
Management
The Management tab helps you manage your trades. To manage your trades, click on the "Orders list" button. Then, select the trades you want to manage by clicking on the white box next to the ticket number. The Management tab is divided into four sections:
1. Trail settings: You can set the values for trailing in the input box on the right. For example, if you set it to 20 and click on the "Trailing stopped" button, it will turn green and trailing will start once your trade is at 20 pips profit. You can also use profit trailing by selecting it in the EA settings.
2. Breakeven settings: You can set the pips profit to activate breakeven. For example, if you set it to 20 pips and click on the breakeven button, breakeven will activate once your trade is at 20 pips profit. By default, it will move the SL 10 points above the entry point so if you are using an ECN account it will be a real breakeven.
3. Martingale: This section is for using martingale. If you want to use martingale, select the trade and click on "Martingale stopped". By default, martingale will be triggered automatically if your trade is at least 20 pips loss already. If your trade is in profit or you've just opened it, when selecting this trade martingale will start if your trades hits 20 pips loss. The martingale value in pips can be amended, additional options can be changed in the settings of the EA (double click on the blue icon in the right corner of the chart).
4. Actions section: This section has buttons for opening the Order list and partially closing selected trades or all of them at once. There's also a drawdown controller that can close all or 50% of trades if they hit a certain drawdown. This is particularly useful for anyone who trades on a prop account and has strict drawdown requirements like 5%. This utility could help you control that.
Telegram
To utilize the Telegram tab in the GPT Assistant, please follow these simple steps:
1) Open the Metatrader options/tools/expert advisors and navigate to the allowed URLs section at the bottom of the window. Add "api.telegram.org" to the list of permitted URLs. This step is crucial to establish communication between the utility and the Telegram API.
2) Launch the Telegram app on your mobile device and use the search bar to find "@BotFather". This is the official Telegram bot responsible for creating and managing other bots.Initiate a chat with @BotFather by sending the command "/start".
3) Proceed by sending the command "/newbot" to @BotFather, which triggers the creation of a new bot.
4) @BotFather will prompt you to provide a name for your bot. Choose a unique name for your bot and send it as a message.
5) Next, @BotFather will request a username for your bot. The username must end in "bot" and should be unique. Send a suitable username for your bot.
6) After providing a valid username, @BotFather will confirm the successful creation of your bot and generate an API token. This API token acts as both a unique identifier and an authentication key for your bot.
7) Copy the API token provided by @BotFather, as it will be necessary to authenticate your bot's requests to the Telegram Bot API.
8) Paste the API token into the designated input field within the EA inputs of your GPT Assistant. This ensures that your utility can authenticate and establish communication with your bot.
9) Activate the bot by setting the corresponding input in the EA inputs to "true". Enabling the bot allows GPT Assistant to interact seamlessly with the Telegram bot.
10) Launch your bot on Telegram by searching for its name and initiating a chat by sending the "/start" command.
11) Once the chat with your bot has commenced, you will need to obtain the chat ID. Send a command such as "/start" to your bot.
12) Retrieve the chat ID from the interface or logs of GPT Assistant. The chat ID serves as a unique identifier for the conversation between your bot and the user.
13) Paste the obtained chat ID into the designated input field within the EA inputs of GPT Assistant. This ensures that the utility knows which chat to send messages to.
14) With the API token and chat ID properly set up, your bot is now successfully connected and ready.
NEWS
News tab is pretty straight forward. You have a selection of low, medium and high impact news. In order to get the relevant, this week's news, you need to click on the button and wait until it turns green. Then click on the NEWS BOARD and the window with your selection of news will pop up.
If something is still not clear, please contact me at any time and I will be happy to help.


")

")