

Very limited offer: 5 copies for $45.
THE DESCRIPTION OF THE INPUT PARAMETERS
The main parameters for orders:
- Comment for order - a comment for orders.
- Magic number - a magic number for orders.
The parameters for the entry/exit rules:
- Open a market order / close an order - allow the EA open/close trades when an entry or exit signal is generated.
- Send a push notification - send a "push" notification when your entry/exit rules generate a signal.
- Send an email - send a notification to your email address, when your entry/exit rules generate a signal.
- Send an alert - notify with an "Alert", when your entry/exit rule generates a signal.
- Take a screenshot of the chart - take a snapshot of your chart when your entry rules generate a signal (for exit rules the parameter does not work). The snapshots will be stored in the "\Files\Pro Indicator Trader\Screenshots" folder or in the "\ tester\files\Pro Indicator Trader\Screenshots" folder if the pictures were created during visual testing.
- Entry and exit rules check interval - an interval check type for your entry/exit rules. There are three interval check types to choose from: "Every Tick", "Every_N_Seconds" and "Once_Per_Bar". If you select "Every Tick", the EA will check your entry/exit rules on each tick. This kind of check will heavily load your system (depending on how many entry/exit rules will be used), so it's recommended to use it only for scalping strategies. If you select "Every_N_Seconds", the EA will check the entry/exit rules only after a certain number of seconds. If you select "Once_Per_Bar", the entry/exit rules will be checked at the opening of a new bar of a specific timeframe. Since "Once_Per_Bar" is the most resource-efficient interval check type, it's recommended to use this type of check in most cases.
- Period for the 'Once_Per_Bar' check type - a period value for the interval check type "Once Per Bar"
- Amount of seconds for the 'Every_N_Seconds' type - number of seconds for the interval check type "Every_N_Seconds".
The entry restriction parameters.
- Max spread - the maximum allowed spread before the EA opens a new trade.
- Max open orders - the maximum allowed open orders.
- Minimum distance between buy orders - the minimum distance between buy trades (in points). If the distance of the closest buy trade to market price, where the EA is about to open a new trade, is less than allowed, then the EA will not open a new buy trade.
- Minimum distance between sell orders - the minimum distance between sell trades (in points). If the distance of the closest sell trade to market price, where the EA is about to open a new trade, then the EA will not open a new sell trade.
- Trade only at a specific time - if ''true'', then the EA will trade only at a specific time.
- Trade period start time - the start time of the trade period.
- Trade period end time - the end time of the trade period.
- Use trade pause time - if ''true'', then the EA will use a pause time during the trade period.
- Pause time start - the start time of the pause time.
- Pause time end - the end time of the pause time.
- Max trades per day - maximum allowed trades per day (24 hours).
- Day start time - the start time when the "Max trades per day" counter will be reset.
- Days of the week - on what weekdays the EA is allowed to trade.
The paramеters for orders management
- Take-profit type - take-profit calculation type. "Fixed Size" - the take-profit size will be fixed. "Based on ATR" - the take-profit will be calculated by the value from the ATR indicator (the first closed bar).
- Take-profit: fixed size value or Atr value - a value for the take-profit depending on the chosen type of calculation. If you select "Fixed Size", then you need to specify the size of the take-profit in points. If you select "Based on ATR", then you need to specify a period for the ATR indicator.
- Take-profit: Atr multiplier - if the take-profit is calculated by the ATR indicator, then in this parameter you must set a multiplier for the received value from ATR.
- Stop-loss type - stop-loss calculation type. "Fixed Size" - the stop-loss size will be fixed. "Based on ATR" - the stop-loss will be calculated by the value from the ATR indicator (the first closed bar).
- Stop-loss: fixed size value or Atr value - a value for the stop-loss depending on the chosen type of calculation. If you select "Fixed Size", then you need to specify a size of the stop-loss in points. If you select "Based on ATR", then you need to specify a period for the ATR indicator.
- Stop-loss: Atr multiplier - if the stop-loss is calculated by the ATR indicator, then in this parameter you must set a multiplier for the received value from ATR.
- Trailing-start: Fixed size, Trailing-stop: Fixed size, Trailing-step: Fixed-size - a fixed size value for the Trailing-start, Trailing-stop, and Trailing-step in points.
- Breakeven - a fixed size value for the breakeven.
- Floating profit type - the type of floating profit for the parameter "Floating profit value (0 = disable)". "Points" - the EA will close all trades when the value of floating profit reaches a certain number of points. "Money" - the EA will close all trades when the value of floating profit will reach a certain amount of money. "Percent" - the EA will close all trades when the value of floating profit will reach a certain percentage of your balance.
- Floating profit value (0 = disable) - a value for the floating profit. When the floating profit (points, money, percent) reaches the value set in this parameter, then the EA will close all open trades.
- Floating loss type/Floating loss value (0 = disable) - works exactly the same as the " Floating profit type" and " Floating profit value (0 = disable)", only the EA closes all open trades, when the floating loss reaches a certain value.
An example of how the take-profit and stop-loss calculation by ATR works. Let's say, we chose the ATR calculation for the take-profit. Our parameters are: "Take-profit: fixed size value or Atr value" is 20 (which means a period for ATR will be 20) and "Take-profit: Atr multiplier" is 2.5. We put the EA on the EURUSD pair (5-digits) H1 и the value of the ATR indicator on the first closed bar is 0.00170. We translate this value to the points: 0.00170 / 0.00001 (the minimum change unit of the pair) = 170 points. Now we multiply the received value by the value of the parameter "Take-profit: Atr multiplier", that is 170 * 2.5 и get the final size of our take profit, which is equal to 425 points. Before setting a stop-loss and take-profit, the EA will print in the "Experts" journal how their values were calculated.
The lot calculation/Money Management parameters.
- Money management type - lot calculation type. "Fixed_Lot" - a lot for orders will be fixed. "LotSize_Per_Balance" - a lot for a certain amount of your balance. Let's say, in the parameters, you set 0.02 lots for every 1000 units of your balance, so when your balance is 2000, the lot for orders will be 0.04. If your balance is 3000, then the lot will be 0.06 (for 4000 the lot will be 0.08 and so on). "RiskPerTrade" - maximum risk percentage for a trade (relative to your balance) based on the stop-loss value.
- Fixed Lot Size, LotSizeStep or Risk Per Trade - if "Fixed_Lot" is selected, then you specify the size of a fixed lot. If "LotSize_Per_Balance" is selected, then you need to specify a lot for a certain amount of balance. If "RiskPerTrade" is selected, then you need to specify a risk percent for a trade.
- BalanceSizeStep (only for LotSize_Per_Balance MM) - If the "LotSize_Per_Balance" type is picked, then you need to specify a specific amount of balance for the lot value, which is specified in the "Fixed Lot Size, LotSizeStep or Risk Per Trade" parameter.
The utility parameters.
- Error notification type - a type of notification for critical errors (time-out, incorrect stops and suchlike). "None" - the EA will not send any notifications when a critical error occurs. "Push" - the EA will send a "push" notification to your phone when a critical error occurs. "Email" - the EA will send a message to your email when a critical error occurs. "Push_and_Email" - the EA will simultaneously send a notification of the critical error to your phone and email. On how to set up your MetaTrader account, so the EA can send notifications, you can read here and here. In general, I recommend using the critical error notifications in case of any unforeseen situations in the market, problems with your broker or a bug in the EA. Better safe than sorry.
- Optimized Flow - if "true", then the order of checking entry rules and entry restrictions will be changed, thereby speeding up testing of the EA. The main change is that the EA will check the entry restrictions first, and only then it will check your entry rules. If at least one entry restriction prohibits the opening of a trade, then the check of the entry rules will be skipped until the next time (also the entry rules values will not be updated on the interface panel). I recommend that you enable this feature during testing (not visual) of the EA.
- Speed up visual testing - speeds up testing of the EA in the visual mode by disabling the emulation of the interface buttons (which means you cannot interact with them) during the "Start" mode. Unfortunately, during visual testing, you have to check the state of the interface buttons on each tick because the special event handler, which indicates which button you are interacting with, is absent in the visual test mode (unlike in the 'live' mode). So you have to use such methods. Note that this parameter only applies to the visual mode. In normal testing or when the Expert Advisor is in "live" mode, enabling this parameter will be meaningless since no button emulation is required in these modes. You can also speed up testing of the EA in the visual mode by simply hiding the interface panel.
- Print detailed information - if ''true'', then the EA will print more detailed information in 'Experts' journal about your entry/exit rules.
The paramaters for working with the interface panel.
- Panel x offset, Panel y offset - a distance between the interface panel and a chart's edge along the 'x' and 'y' axes.
The paramaters for saving/loading the settings of your entry/exit rules.
- Load settings from the previous session - the EA will automatically load your entry/exit rules settings from the previous session of using the EA. Please note, that the EA will load the settings only from the session in which the same currency pair and the same magic number as in the current session were used. For example, if you initialize the EA on the EURUSD pair with magic number "777", then the EA will try to load the settings from the previous session where it was also put on EURUSD and the magic number for orders was "777".
- The entry rule #N settings, The exit rule #N settings - these input parameters are created so that you can easily load your entry/exit rules settings through the ".set" files that were saved through the settings menu. Interacting with these parameters directly is not necessary.
THE EA'S INTERFACE
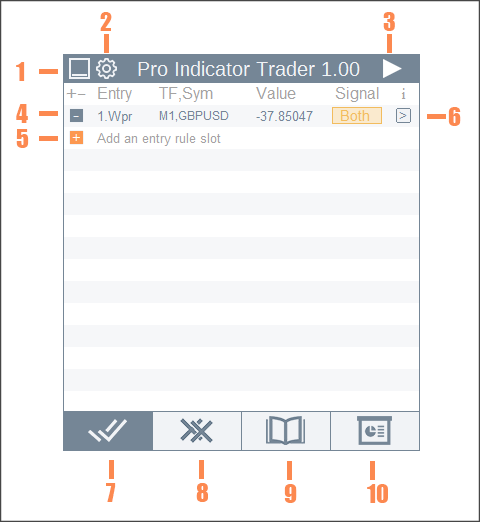
1. The "Minimize" button. When this button is pressed, the interface panel will be hidden.
А: Click on the button next to the "P.I.T." label to restore the panel.
2. The "Settings" button. Opens the window where you can save the EA input parameters and your entry/exit rules in a ".set" file.
А: Before saving, set a name for your ".set" file. B: By clicking on the "Save" button, the Expert Advisor will save the settings of your entry/exit rules (including the values of the input parameters) to the folder "\MQL4\Files\Pro Indicator Trader\Saved Settings". If the parameters were saved in visual mode, then the ".set" file will be saved to the folder "\tester\files\Pro Indicator Trader\Saved Settings".

3. The "Start/Pause" button. When the EA is initialized, the "Pause" mode is automatically turned on, in which the EA is not allowed to open any trade. This is done so that the EA does not open a trade when you haven't yet configured your entry/exit rules conditions.
А: Activates the "Start" mode, in which the EA is allowed to open trades. B: Activates the "Pause" mode, in which the Ea is not allowed to open any new trade.


4. The "Delete the entry/exit rule" button. Deletes an entry or exit rule from your trade configuration.
5. The "Add an entry/exit rule" button. Add a new entry or exit rule to your trade configuration.
6. The "Additional Information" button. When pressed, displays additional information about your entry/exit rules. This button also can be found on the "Orders Execution Statistics" interface, which will display additional information about a specific trade.
7. The "Entry Rules Panel" button. Opens the panel, where you can add an entry rule to your trade configuration.
8. The "Exit Rules Panel" button. Opens the panel, where you can add an exit rule to your trade configuration.
9. The "Order Execution Statistics" button. Opens the panel with the statistics of orders execution, where you can get additional information about a specific order.
10. The "Info panel" button. Opens the panel that shows the statuses of the entry restrictions and other useful information.

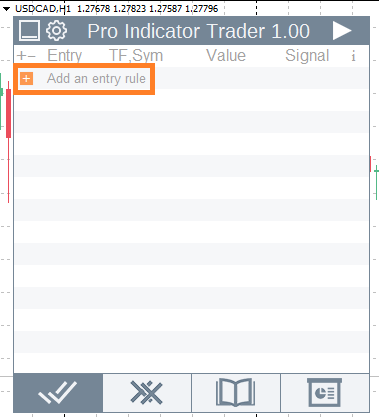
HOW TO ADD AN ENTRY/EXIT RULE.
1. First of all, you need to click the "Add an entry rule slot" button to add an entry rule to your trade configuration, or if you want to add an exit rule, you first need to open the "Exit Rules" panel and there click on the "Add an exit rule slot" button. The following instructions will be simultaneously for the both entry rules and exit rules.
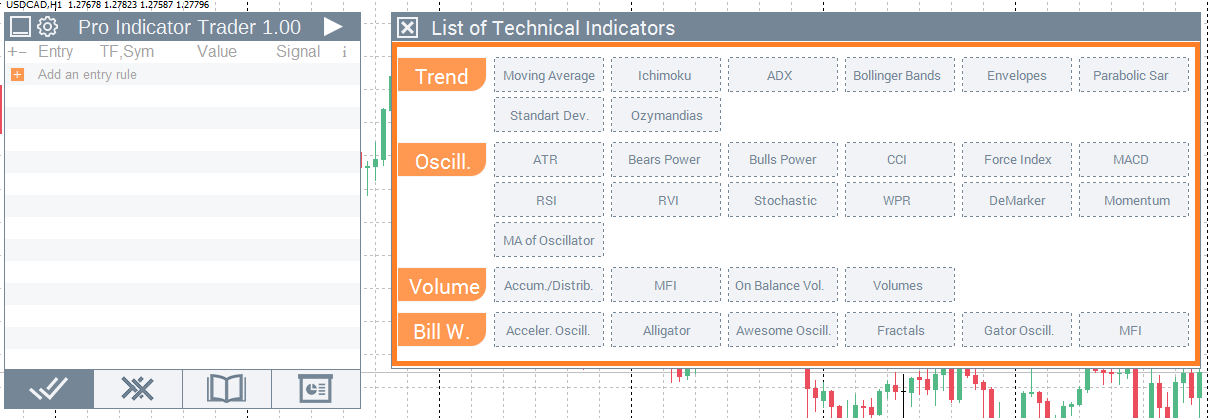
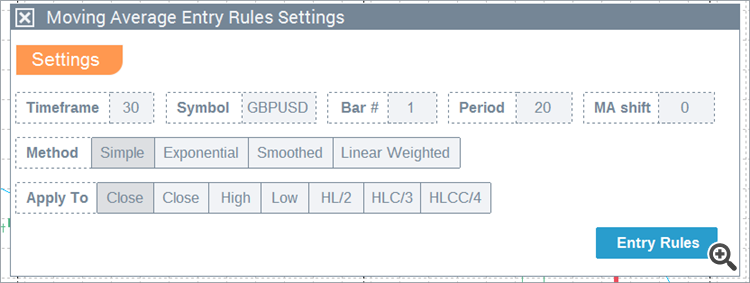
2. Select an indicator that you are going to use for your entry/exit rule.
3. Now you have to change the parameters of the selected indicator.
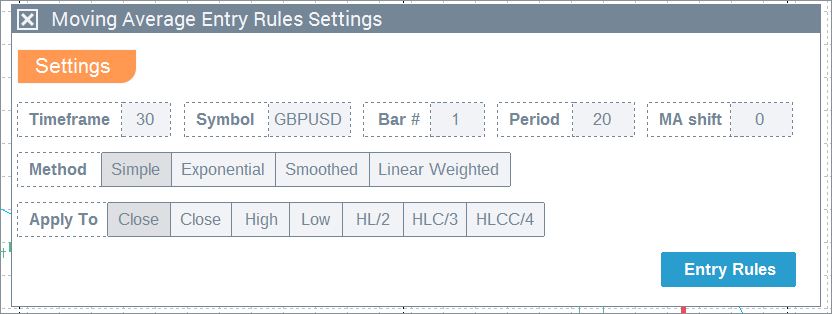
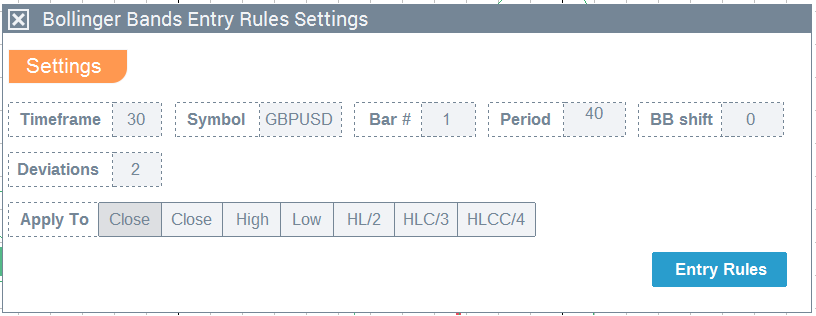
The most indicators have three identical parameters - "Timeframe", "Symbol" and "Bar".
In the parameter "Timeframe" you need to specify timeframe of a chart, on which the selected indicator will be calculated. In this parameter, you can specify a timeframe identificator (m1, m5, m15, m30, h1, h4, d1, w1, mn) or a period value (1, 5, 15, 30, 60, 240, 1440, 10080, 43200).
In the "Symbol" parameter you set a name of a financial instrument on which the selected indicator will be calculated. Even if the EA is initialized on the EURUSD pair, it can get values of the indicator from other financial instruments (for example EURGBP) which allows creating multicurrency strategies. Note that Metatrader 4 doesn't allow multicurrency tests, so don't try to set the "Symbol" parameter to an instrument which is different from the currently tested instrument (Hopefully will add a multicurrency test feature in future updates).
In the parameter "Bar" you set a number (index) of the bar from which the values of the selected indicator will be taken. The standard value of the parameter is "1", which means the indicator's values will be taken from the first closed bar. If you want to get the indicator's values from the second closed bar, then you set "2" in this parameter. If you set "0" in the parameter, then the indicator.
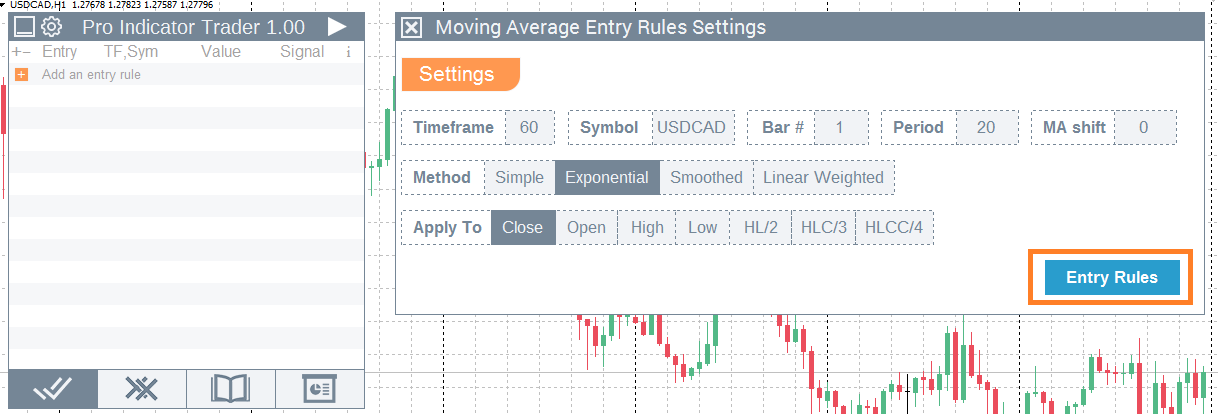
4. At this stage, you must set trading conditions for your entry/exit rule.
You select a type of signal that will be sent when a certain condition of the selected indicator is fulfilled.
The types of signals for entry/exit rules.
"Buy" - the signal for opening a buy trade. / the signal for closing all buy trades.
"Sell" - the signal for opening a sell trade. / the signal for closing all sell trades.
"Both" - the signal for opening simultaneously a buy and a sell trade. / the signal for closing all open trades (buy and sell).
"None" - the signal that prohibits the opening of a new trade. / the signal that prohibits the opening of all open trade.
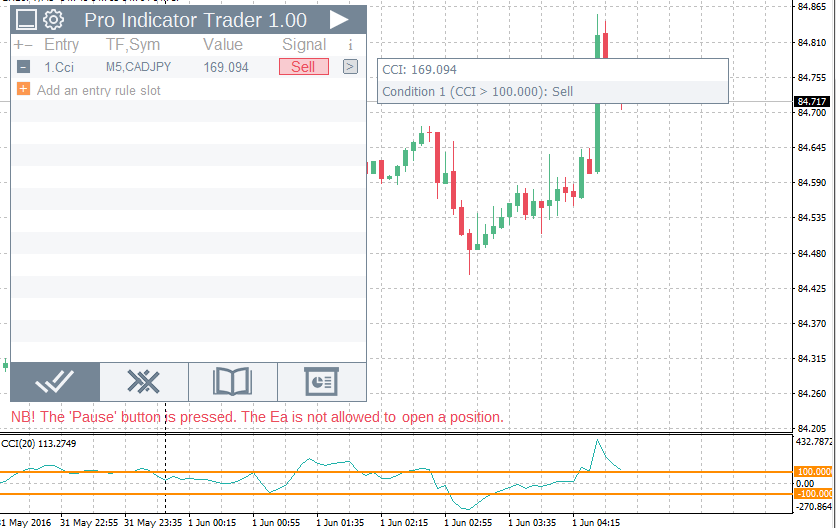
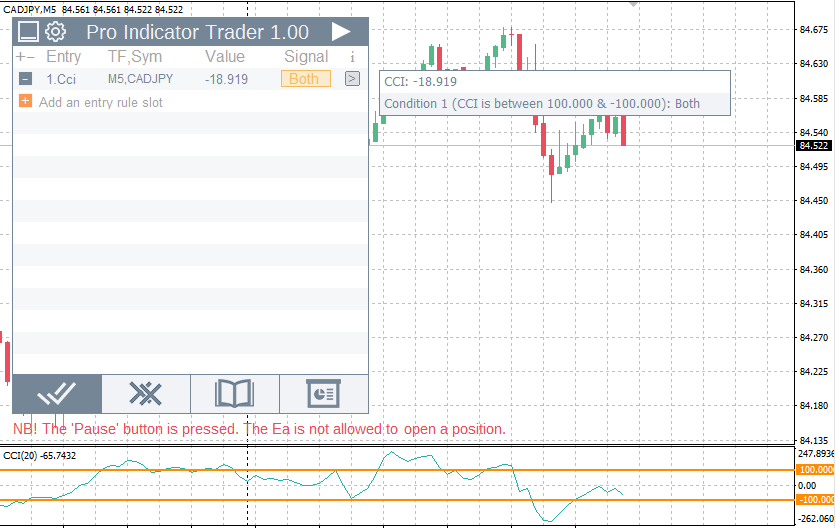
An entry rule example for the CCI indicator.
If the CCI value will be greater than 100, the entry rule will show a 'sell' signal.
If the CCI value will be less than -100, the entry rule will show a 'buy' signal.
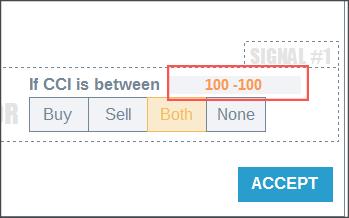
If the CCI value will be between 100 and -100, the entry rule will show a 'both' signal.
Important! When you need to specify two values for one 'if' block (see the screenshot below), you must always set the highest value first, and only after the smallest value, otherwise the data will be read by the EA incorrectly. Also do not forget to put a space between these two values.
5.After setting up the trading conditions, click the "Accept" button to add your entry or exit rule to your trading configuration. Now the EA will check your entry/exit rule after a certain amount of time (depending on the "Entry and exit rules check interval" parameter).

HOW ENTRY/EXIT SIGNALS WORK
In order for the EA to open/close buy or sell trades, all of your entry/exit rules should allow to do so. For example, the EA won't open a buy trade if one of your entry rules doesn't allow that.
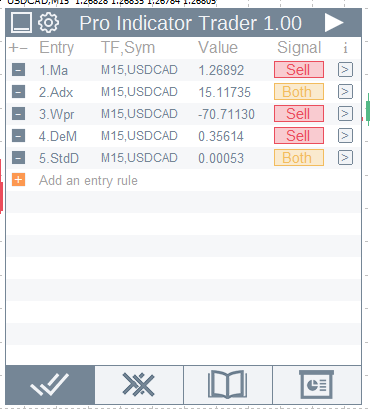
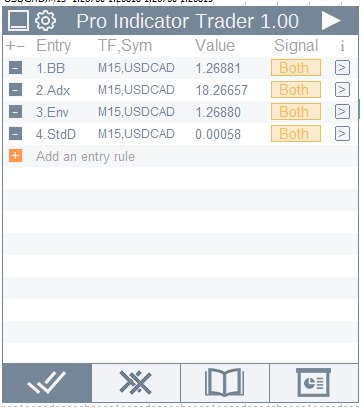
Entry rules:
Signal "Buy" - when your entry rule shows this signal, it means that the rule only allows to open a buy trade.
If you use several rules, then to open a buy trade, all your entry rules must show the 'Buy' signal or a combination of 'Buy' or 'Both' signals.
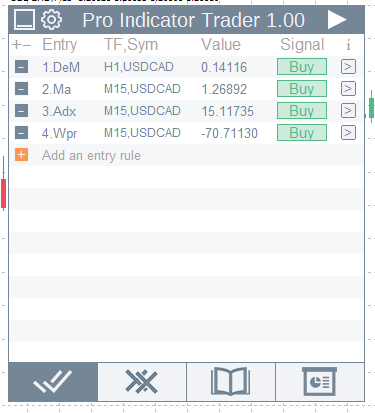
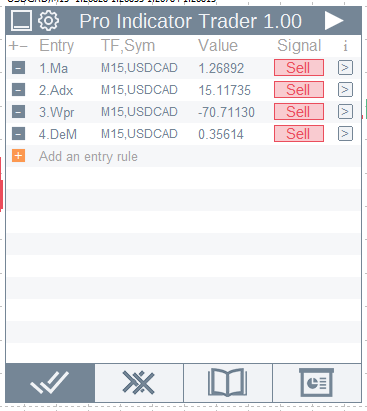
Signal "Sell" - when your entry rule shows this signal, it means that the rule only allows to open a sell trade.
If you use several rules, then to open a sell trade, all your entry rules must show the 'Sell' signal or a combination of 'Sell' or 'Both' signals.
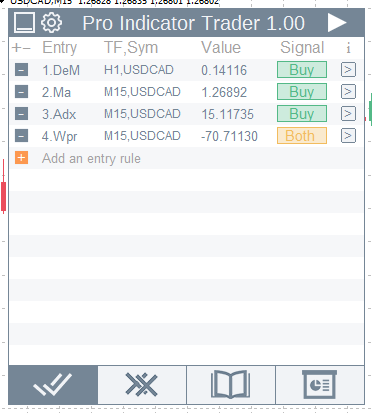
Signal "Both" - when your entry rule shows this signal, it means that the rule allows to open simultaneously a buy trade and a sell trade. Since this type of signal allows to open the both types of trades, it can be combined with the signals "Buy" and "Sell".
The EA will open simultaneously a buy and a sell trade when all your entry rules show the "Both" signal.
Signal 'None'- when your entry rule shows this signal, it means that the rule doesn't allow to open any new trades.
If at least one of your entry rules show the "None" signal, then no trades will be opened.
Exit rules:
The exit rules work exactly the same way as the entry rules, the only difference is that the EA will close a certain type of orders, instead of opening them.
To close all buy trades, all your exit rules must show the "Buy" signal or a combination of "Buy" and "Both" signals.
To close all sell trades, all your exit rules must show the "Sell" signal or a combination of "Sell" and "Both" signals.
To close all trades (buy and sell), all your exit rules must show the "Both" signal.
If at least one of your exit rules will show the "None" signal, then no orders will be closed.
Will remind once more, that in order for the EA to open/close a certain type of trade, all your entry/exit rules should allow to do so.
RULE TYPES AND 'IF' BLOCKS
The description of «if» blocks and an example of how they work.
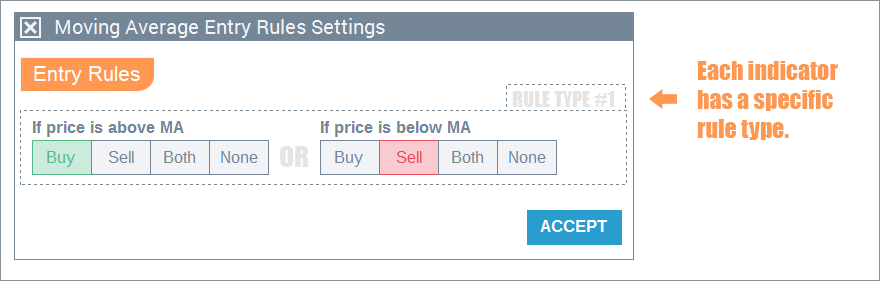
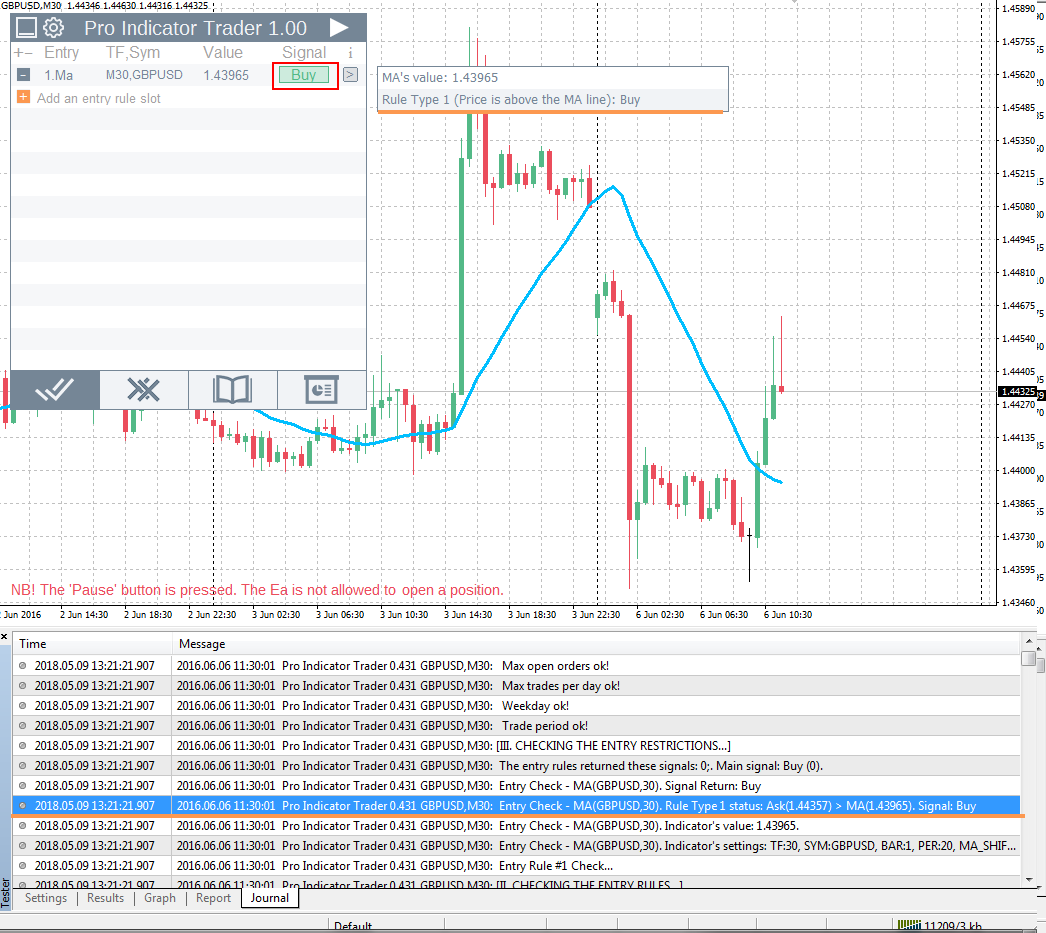
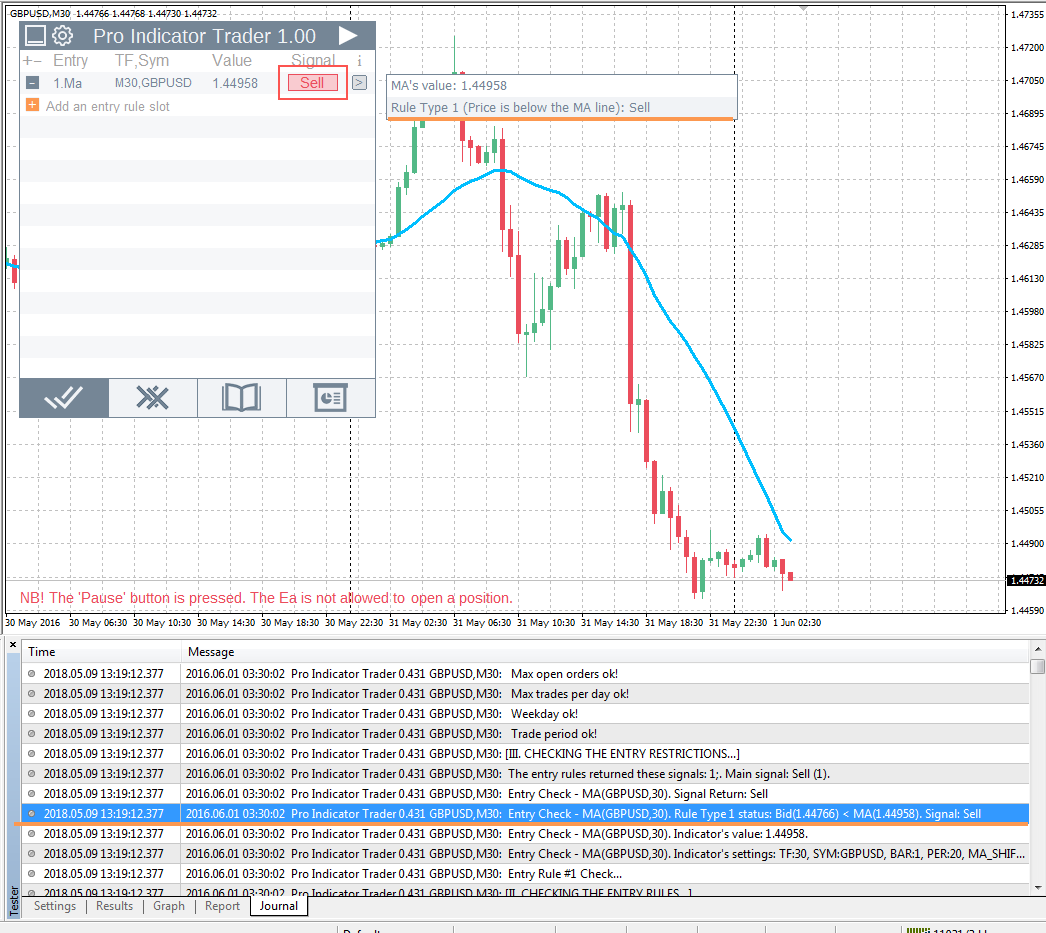
For each indicator there is at least one rule type. For example, for the Moving Average indicator, this is a location of the price relative to the indicator line.
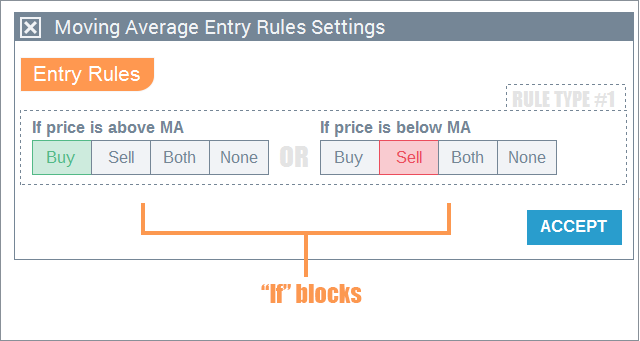
All rule types have «if» blocks. In these blocks you specify a type of signal ("Buy", "Sell", "Both", "None"), which will be active when a specific part of a rule type is executed. For example, the Moving Average has two «if» blocks - «If price is above MA» and «If price is lower MA».
With indicators that have only one rule type, everything is pretty simple. Let's continue the example with the Moving Average and set a "Buy" signal for the «If price is above MA» block, and a "Sell" signal for the «If price is lower MA» block. Parameters of the indicator will be standard.
If the price will be higher than the Moving Average line, then the condition of the «If price is above MA» block is met, and therefore our entry rule will show a «Buy» signal.
If the price will be lower than the Moving Average line, then the condition of the «If price is below MA» block is met, and therefore our entry rule will show a «Sell» signal.
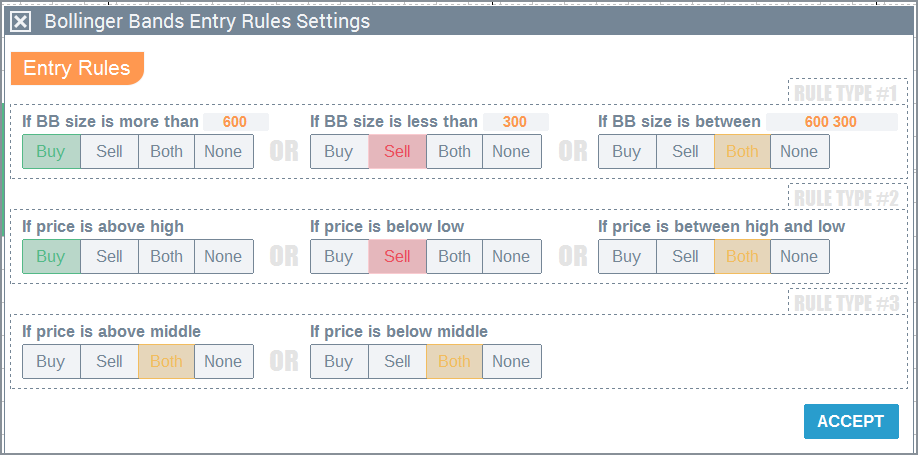
An example with the Bollinger Bands indicator, which has three rule types.
With the moving average indicator, everything is simple, but many indicators have several rule types and some of them have three «if» blocks.
It's important to understand that the EA takes into account the signal from each rule type and works with these signals the same way as with signals from the Entry/Exit rules (see "How entry/exit signals work"). Therefore, the most ideal indicator for further explanations will be Bollinger Bands.
These parameters will be used for our Bollinger Bands entry rule.
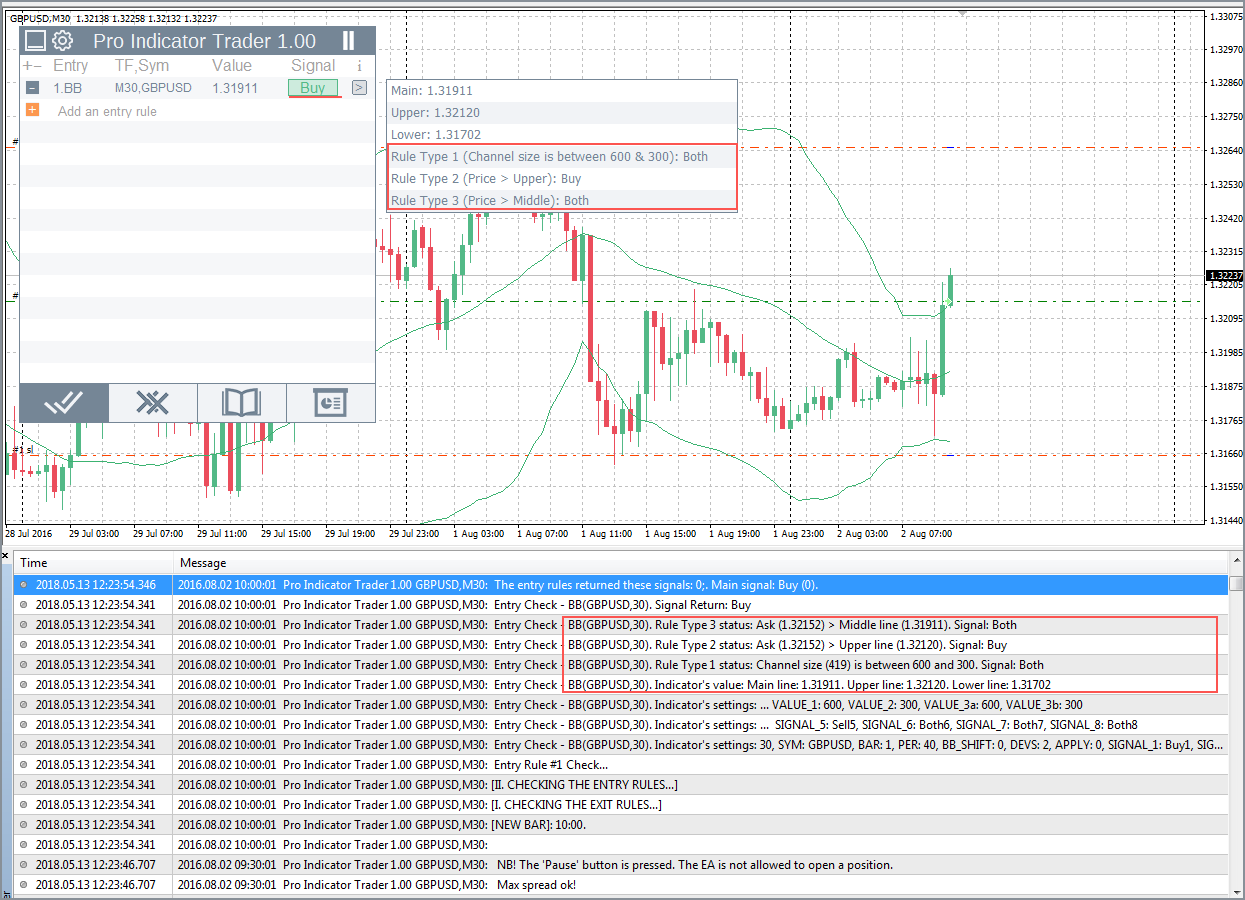
Rule Type #1: The first rule type checks the size of the Bollinger Bands channel. With that, we will allow to open a buy trade, when the channel size is more than 600 points and we will allow to open a sell trade, when the channel size is less than 300 points. If the channel size will be between 600 and 300 points, then we allow to open both types of trades.
Rule Type #2: The second rule type checks where the price is relative to the upper and lower lines of the indicator. If the price is higher than the upper line, then we allow to open a buy trade. If the price is lower than the lower line, then we allow to open a sell trade. If the price is between the upper and lower lines, then we allow to open both types of trades.
Rule Type #3: The third rule type checks where the price is relative to the middle line of the indicator. For this example, we will ignore this rule type and set for both of its blocks the 'Both' signal. This way, the third rule type will not affect the main signal of our entry rule.
As with the entry/exit rules, if all three rule types show the 'Buy' signal or a combination of 'Buy' и 'Both' signals, then the main signal of our entry rule will be 'Buy'.
The rule type #1 shows the 'Both' signal, because the channel size is between 600 and 300 points, thereby the condition of the «If BB size is between» block is fulfilled.
The rule type #2 shows the 'Buy' signal, because the price is higher than the upper line, thereby the condition of the «If price is above high» block is fulfilled.
The rule type #3 will always show the 'Both' signal, regardless of whether the price is above or below the midline.
The signals from the rule types #1 and #3 allows to open a buy trade and a sell trade. However the rule type #2 only allows to open a buy trade and because of that, the main signal of the entry rule will Buy'.
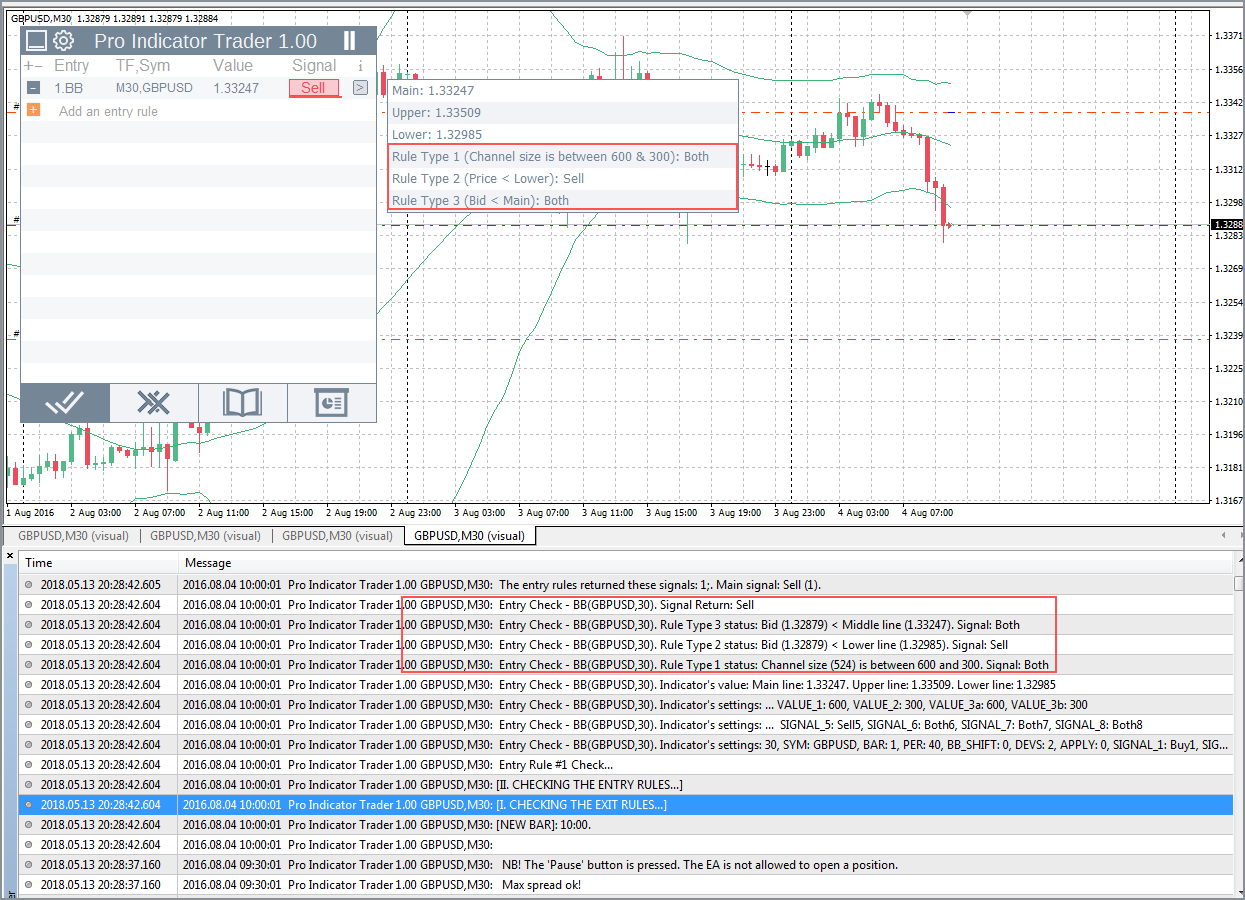
If all three rule types show the 'Sell' signal or a combination of 'Sell' и 'Both' signals, then the main signal of our entry rule will be 'Sell'.
The rule type #1 shows the 'Both' signal, because the channel size is between 600 and 300 points, thereby the condition of the «If BB size is between» block is fulfilled.
The rule type #2 shows the 'Sell' signal, because the price is lower than the lower line, thereby the condition of the «If price is below» block is fulfilled.
The rule type #3 will always show the 'Both' signal, regardless of whether the price is above or below the midline.
As well as with the first example, the signals from the rule types #1 and #3 allows to open a buy trade and a sell trade. However the rule type #2 only allows to open a sell trade and because of that, the main signal of the entry rule will 'Sell'.
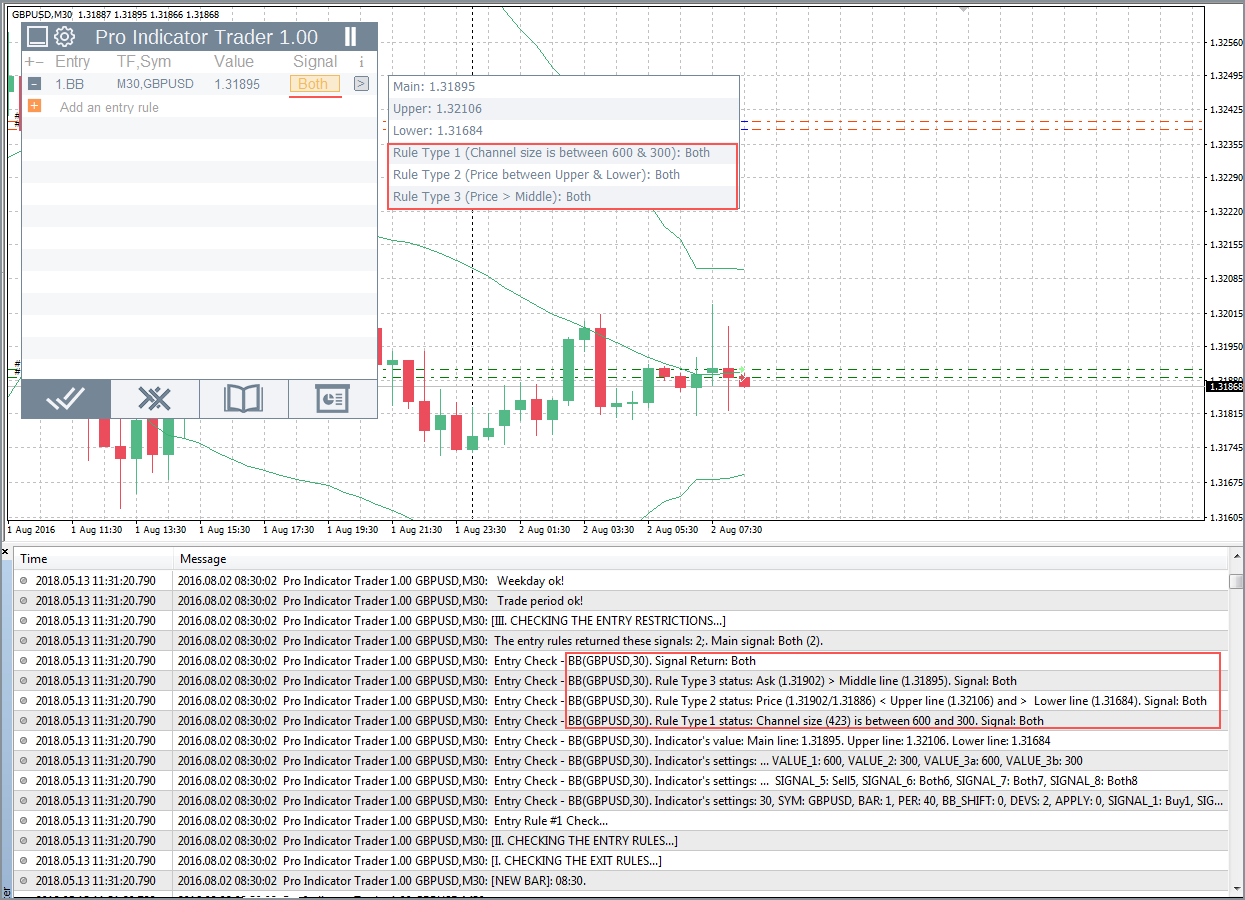
If all three rule types show the 'Both' signal, then the main signal of our entry rule will be 'Both'.
The rule type #1 shows the 'Both' signal, because the channel size is between 600 and 300 points, thereby the condition of the «If BB size is between» block is fulfilled.
The rule type #2 also shows the 'Both' signal, because the price is between the upper and lower lines, thereby the condition of the «If price is between high and low» block is fulfilled.
The rule type #3 will always show the 'Both' signal, regardless of whether the price is above or below the midline.
Because all the signals allow to open both types of trades, our entry rule will show the 'Both' signal and open a buy trade and a sell trade simultaneously.
The main signal of the entry rule will be 'None' if one of the rule types show a 'None' signal or if one of them allows to open only a buy trade, and another only allows to open a sell trade.
The rule type #1 shows the 'Buy' signal, because the channel size is more than 600 points, thereby the condition of the «If BB size is more than» block is fulfilled.
The rule type #2 shows the 'Sell' signal, because the price is lower than the lower line, thereby the condition of the «If price is below» block is fulfilled.
The rule type #3 shows the 'Both' signal.
As you remember, the EA will open a certain type of trade only if all signals allow to do that. In this example, the EA is not allowed to open a buy trade, because the second rule type only allows sell trades and the EA is not allowed to open a sell trade, because the first rule type only allows to open buy trades. And because of that the main signal of the entry rule will be "None".
CONCLUSION
Well, hopefully I explaned clearly how the EA works. If still you have any questions, feel free to ask them here or in the comments section.
Good luck in your trading!


")