
According to statistical information, about 70% to 90% of forex traders lose their money and this is not surprising, because mastering in trading business needs a lot of experience, efforts and dedications.
However, the good news is the long journey of making money in trading, could turn to a short trip of learning how to use a good Expert Advisor.
In the following, I’ll try to explain the general work of my EA, though I recommend you to test the EA in tester until you get familiar, then trade in the demo accounts for 2 weeks and then try it in cent accounts for another two weeks, that should be enough for you to learn how the EA works and how to handle it.

· Time frame,
Selection of time frame depends on your own trading preference, but I usually trade in M5 and M15. If you choose lower time frame like M1, your profit as well as your risk would increase as the EA gets more trading signals and make more deals and if you choose higher time frame like H1 definitely your risk and profit would diminish.
On the other hand, It is a good idea to find the best timeframe for each pair and strategy. For example “Bollinger” strategy in M1 in EURUSD might fit to your desire and “Stochastic” strategy in H1 in Gold could give you good results as well. You should test.
· GMT time,
It is important to check the GMT time in your panel, google “GMT time now” and compare GMT time, they must be the same, if not, you have to change GMT offset time in the EA setting. If you set a time filter for EA to work, robot will use GMT time to implement your filter.
· Spread,
You can see the current spread of chart in top of panel, if it shows a green tick sign it means your current spread is below your “max spread” and robot can take position, if it is cross red sign that means, your current spread is higher than “max spread”. You can change max spread in your EA settings.
Trade Tab:
· Direction of trade,
“Trend is your friend”, this is the first lesson of trading, and my recommendation is always find and follow the trend. To find the trend you can take your own way, once you do, you have to set the direction either to “Buy” or “Sell, however in a more risky approach you can take “Both” as your direction especially in the time of market with no trend. Here, by trend, I mean the general trend of the market which, in my opinion, we can find it better in higher time frames like H1 and D1.
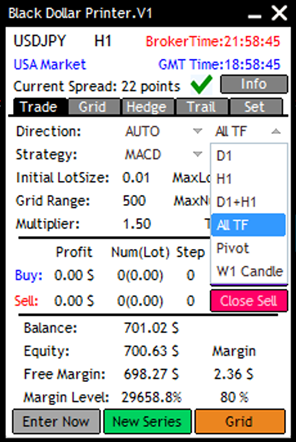
· You have an option to set the direction to “AUTO”. That means robot must find the direction by itself but you can choose how robot must find the trend. Here you have six options:
1. D1: Robot takes the D1 trend of DPI indicator as its trend.
2. H1: Robot takes the H1 trend of DPI indicator as its trend.
3. D1+H1: Robot checks D1 and H1 time frame, if both is Buy it take Up trend, if both Sell, it takes Sell trend. If they are different takes no trend and consequently no trade.
4. All TF: Robot check all timeframe, if all of them are the same it takes the direction, otherwise take no direction and consequently no trade.
5. Pivot: Robot check the price against daily pivot line, if price is above pivot is takes up trend and if it is blow pivot it takes down trend.
6. W1 candle: Robot checks current weekly candle, if it is up, takes up trend and visa versa.
·
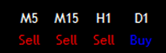
If you turn on “Show Trend Panel” from your EA setting you can see current status of each time frame.

Strategy,
Once you choose the direction of trade you have to set the strategy.
There are six strategies in “Blue Dollar Printer” EA.
1. DPI: The EA can take “Buy” when DPI indicator turns from down to up and can take “Sell” when it turns from up to down.
2. DPIAgg: It is more aggressive strategy, and EA keeps taking buy when DPI indicator is in uptrend and it keeps taking sell when DPI is in down trend.
3. Stochastic: The EA can take “Buy” when stochastic cross up the lower boundary and can take a “Sell” when crosses down the upper boundary. You can change the stochastic parameters from EA input settings.
4. RSI: It is like stochastic strategy but using RSI indicator.
5. MACD: The EA can take a “Buy” when MACD turn positive form negative values and vice versa for “Sell”.
6. Bollinger: the EA will take a sell trade when price is above the upper band of Bollinger and the RSI increases at the same time and only if the candle size is bigger than what you choose in the EA inputs.
Select a strategy that fits to your desire and risk appetite.
After we choose the direction and strategy, the EA will take a trade on that direction by the strategy signal, with the initial lot size volume, if it hits the TP then it looks for another signal to take a new trade. If not and the price goes in the opposite direction as much as “Grid Range”, then the EA will take another trade with the same type(Buy/Sell) but with the volume of “Initial Lotsize*Multiplier”. At this time, you will see a new line of “Breakeven” and “TP”.
Again, if the price hits new TP line, that’s fine, if not it well take another trade when price hits another level of Grid Range and continue to do that until it hits TP or Trail Stop line.
Breakeven price: It is the price where all of your trades with the same type are even and have zero profit.
Initial Lot Size: it is the lot size of first trade.
Grid Range: it is the distance from previous trade to take a new trade.
Max Lot: Robot will increase trade volume in each step, but it won’t take lot size bigger than max lot.
Max Num: Maximum number of levels.
Multiplier: It is the multiplier of lot size in compare to previous lot size.
TP: It is take profit distance in points from breakeven price.
· Choosing the best parameter of Initial lot size, Multiplier, TP and Grid range plays a vital role in your success and it depends on your risk appetite, your balance, your acceptable level of drawdown and the instrument that you trade.
If you choose bigger initial lot size your profit soars but the risk will soar as well. If you choose bigger multiplier your trades will recover very soon with bigger profit, however the draw down gets bigger as well. If you choose bigger TP, profit of each trade is bigger but the chance of hitting that TP is less. If you take short Grid Range, the number of trades becomes more as well as profit, however the risk of taking trades with higher volume gets bigger at the same time.
All I am trying to say, is that choosing each parameters is a tradeoff which in fact you have to find your best choices with testing the EA.
· Enter Now,
If you press “Enter Now” button robot will open a first trade based on your direction. That way you can manually enter a trade if you want and robot will handle it and close it in profit.
· New Series,
If you turn off this button robot won’t open new series any more.
· Grid,
If you turn of this button robot won’t take any new level. (It can take first level trade)
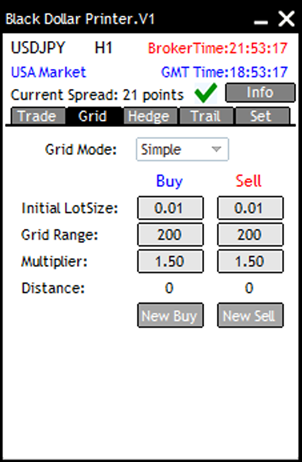
Grid Tab:
In this tab you can choose between Simple grid mode and Dynamic grid mode. In Dynamic grid mode, the EA gives you the ability to choose different “Initial lot size”, “Grid Range” and “multiplier” for you “Buy” and “Sell” trade. It is useful if you trade both ways. For example you are in Uptrend and you have both “Buy” and “Sell” trade. You might want to increase the grid size for your sell trade, because price is not going to get back in the near future, but you want to decrease the grid range for your buy trade because price is going to go up and you want to boost your profit.
· Distance parameters will show you how much you are away from your previous grid trade in points.
· With the help of “New Buy” and “New Sell” button you can take a new level whenever you think it is good to take a new grid level.
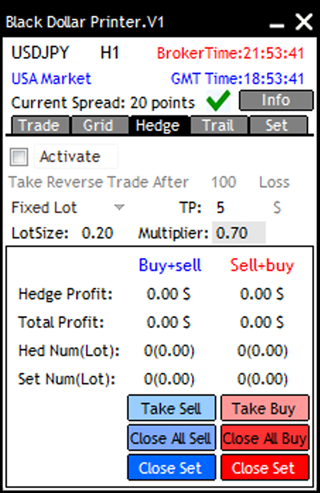
Hedge Tab:
Sometimes you might get stuck in a opposite trend and if keep taking same trade, your drawdown gets bigger and bigger, you might prefer to take a reverse trade is this situation.
If you active this option it will take a reverse trade after your set goes to 100 (that you can change) dollar loss. The lot size of the reverse trade depends on your choice, if you choose fixed lot, it will take a lot size based on LotSize that you set on the panel, if you choose multiplier, it will take a lot size equals to (Multiplier*Total Lot size of your set). For example if you have 5 buy trade with total lot size of 0.13 when it goes to 100 drawdown it will take a 0.7*0.13=0.09 sell trade.
In this situation it will show another breakeven line which is your total buy and sell breakeven price, that means if price pass this line your whole trades goes to profit. You can choose your TP based on dollar, that mean from now on if whole set reaches to 5 dollar profit, the whole trades will be closed.
You can take more reverse trade using “Take Sell” and “Take Buy” button. You can close the reverse trade using “Close Buy” and “Close Sell” button, you can close the whole set (Buy+Sell) using “Close Set” button.
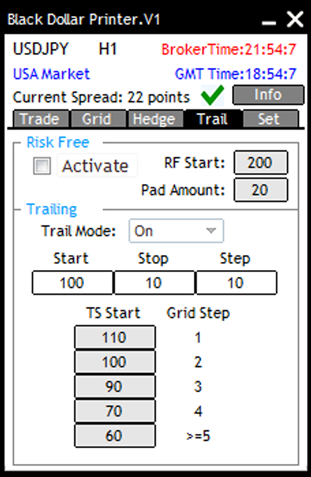
Trail Tab:
If you active Risk Free option when your total set pass breakeven price by 200 points (RF Start) a stop loss is set to 20 point(Pad Amount) after open price. That way, your whole position becomes free risk and it saves 20 points (Pad Amount) profit for you.
The important thing about Risk Free option is that it works in each reverse trades as well, that mean if it could, it would set stop loss for your reverse trade using the same RF Start and Pad Amount values.
You can set your trail option on, if you do so, it will set stop loss to 10 points (Stop value) away from current price when price pass Breakeven price by 110 points (Start value) value and update it every 10 points (Step value).
If you choose dynamic trail stop you can change trail start value for each grid number of steps. For example if you have 3 level grid trade it uses 90 points (TS Start for 3 grid step) as trail start value. This option is here because as steps increase you take bigger lots and your risk increase, so you might want to start trailing in less values when you have more steps.
· Drawdown,
The strategy does not normally set any stop loss, because it is not intend to close positions with negative profit. To reduce drawdowns however, multiple choices has been incorporated into EA functions.
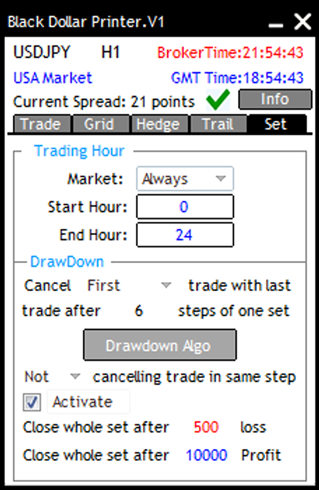
Setting Tab:
Trading hours,
You can set when robot should take the first trade (not grid trades) in GMT time. Robot will take trades between Start Hour and End Hour only, you start hour might be bigger than your end hour as Forex works 24 hours a day. If you choose 20 to 9, robot only takes first trade between 20 of GMT and 9 GMT.
Drawdown,
If robot takes 6 step (you can change it), to reduce your drawdown, it tries to cancel the sixth trade with the first trade or the most negative trade (you can change that). In this situation it shows a new line in yellow color which is the breakeven of first and last trade and Drawdown button turn on, if you press it, it won’t do this action for the current set.
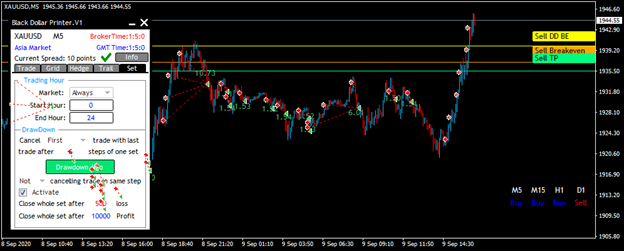
In the nest step again it tries to do the same.
When the sixth trade has cancelled with the first one, after that if robot again takes the sixth trade, it won’t cancel the second trade with the sixth trade (If you choose “Not cancelling trade in the same trade”) or it can again try to cancel the first one with sixth in the second time (If you choose “Keep cancelling trade in the same trade”)
Info Tab:
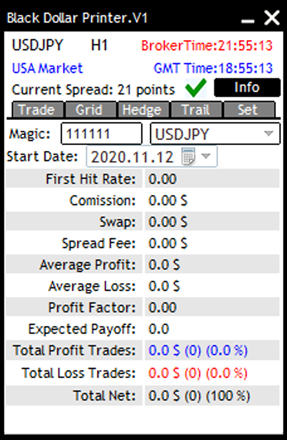
Info tab is pretty clear, the first hit rate is the rate of trades which hit its TP at first level and won’t take any second level.
I put commission, swap and spread fee, so that you can evaluate cost of trading and the quality of your account.
General Notes:
· Basically, if you take a trade but then you realize that the major trend of the instrument has changed to the opposite direction that is when you have to consider one of this choices:
1. Using drawdown algorithm.
2. You can set the EA to close the whole set if it reaches certain amount of loss.
3. You can set your trailing start more strictly to close all positions when price crosses breakeven level.
4. You can close the whole set using the “Close Buy” or “Close Sell” button in the panel.
5. You can increase grid range size to take less trades.
6. And limit you maximum lot and your maximum number of grid levels.
Be aware that this situation is not a daily event, because the major trend of an instrument won’t change very often and the EA has the ability to handle most of price fluctuations.
From this point of view, I don’t expect you to have the exact same result of profit and drawdown that you see in the tester, because you might need sometimes to interfere into EA’s work.
· Spread,
Try to find a broker with the minimum trading cost, as we expect to take a lot of trades in this strategy, you should consider rebates and cash back from your broker as well. However, the EA has the protection against high spread which you can define in the input settings, Be aware that this condition only applies to the first trade of each set and for grid trades we cannot apply that, because we must take those trades to recover our loss. You can see the current spread of the symbol in the top of your panel.
· Magic number,
Magic number is a special number that Experts give to their trades so that we can distinguish one EA trades from another. If you want to work with one symbol but in different chart you must give a special magic number to each EAs. Otherwise you can choose the same magic number.
DPI is abbreviation of Dollar Printer Indicator, it is a kind of Parabolic SAR indicator.


")
