 Balanced Price Range (BPR): Complete Trading Guide + Indicator for MT4/MT5")
(EN) Balanced Price Range (BPR): Complete Trading Guide + Indicator for MT4/MT5

What is Balanced Price Range (BPR)?
Balanced Price Range (BPR) is a market equilibrium zone that forms as a result of overlapping two opposite Fair Value Gaps (FVGs).
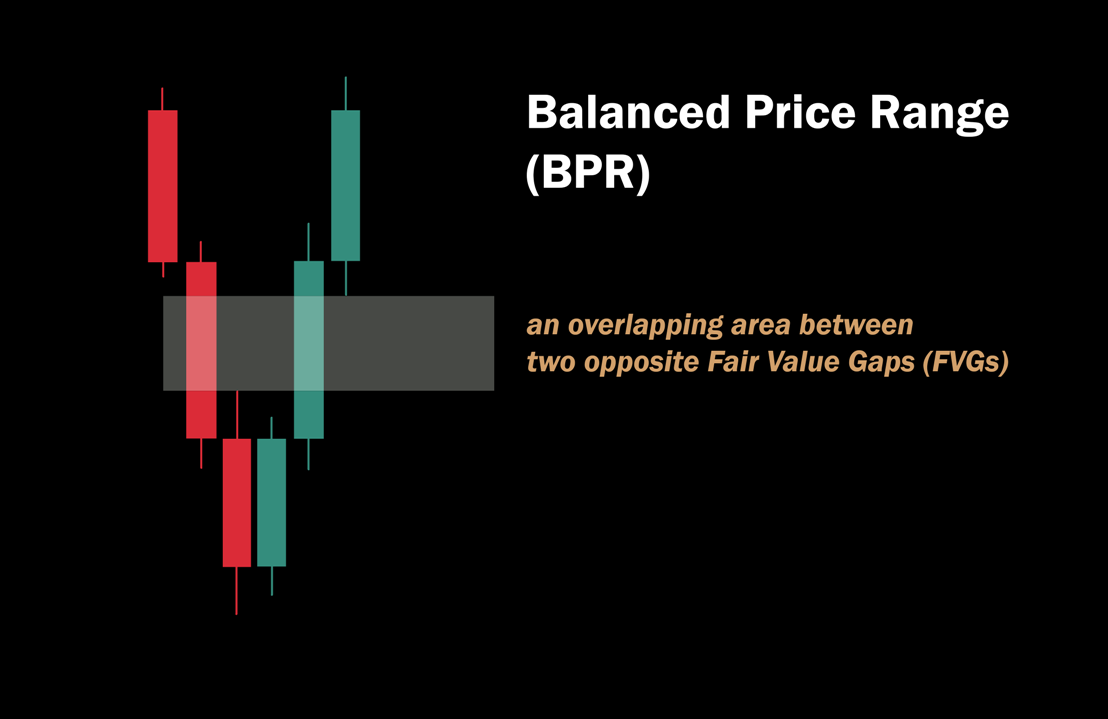
Diagram breakdown (as shown in the image):
- Red candles: Form a bearish impulse (sellers).
- Green candles: Form a bullish impulse (buyers).
- Gray rectangle: This is the BPR. The zone where price "sealed" the inefficiency of the previous movement with counter-movement.
Key rule: BPR is not just a cluster of candles, but a physical intersection of price ranges from two different FVGs.
Why does it work?
Liquidity from both directions concentrates in this zone. For Smart Money algorithms, this area represents interest as a zone for position building or closing losing orders.
Two Types of Balanced Price Range
BPR always forms as a result of conflict between two forces. Depending on who wins in the overlap zone, we get two working structures.
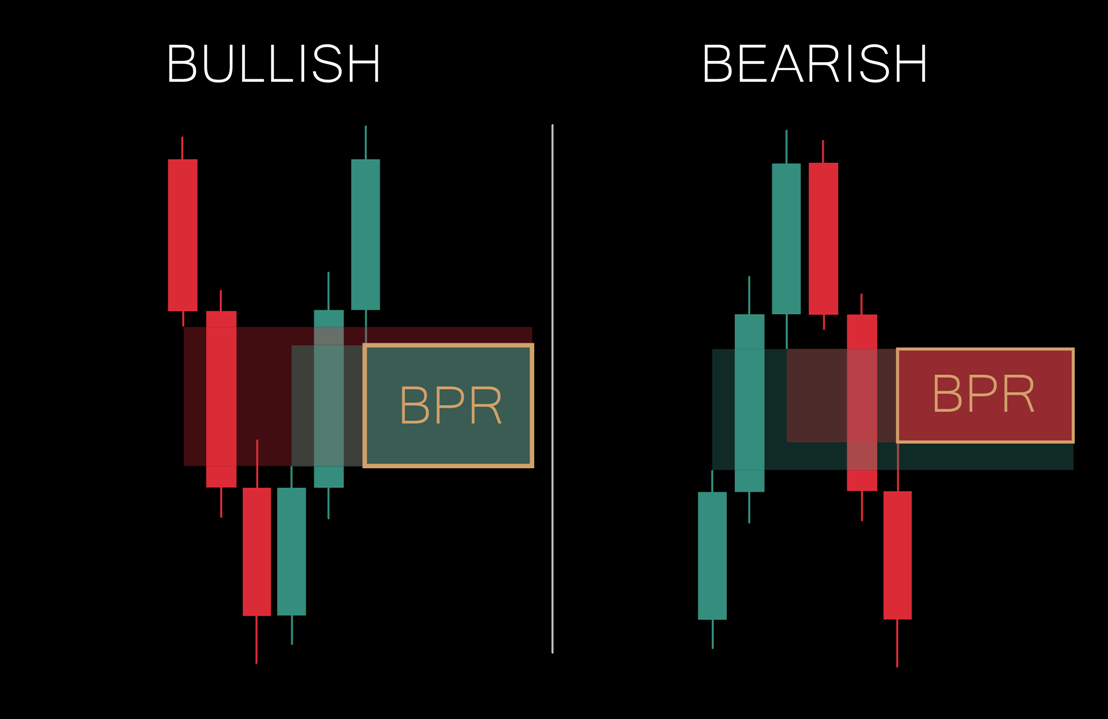
Structure comparison:
| BULLISH BPR | BEARISH BPR |
|---|---|
| Scenario: Bearish impulse is overlapped by Bullish. | Scenario: Bullish impulse is overlapped by Bearish. |
| Logic: Buyers absorbed sellers' supply. The zone becomes support. | Logic: Sellers overwhelmed buyers. The zone becomes resistance. |
| Action: Look for LONG entry from this zone. | Action: Look for SHORT entry from this zone. |
How the indicator sees it:
Our algorithm automatically recognizes the overlap type and colors the zone accordingly (Green for Buy, Red for Sell).
Trading Strategy: Bullish BPR
Let's look at a step-by-step algorithm for entering a buy trade using a bullish BPR zone as an example.
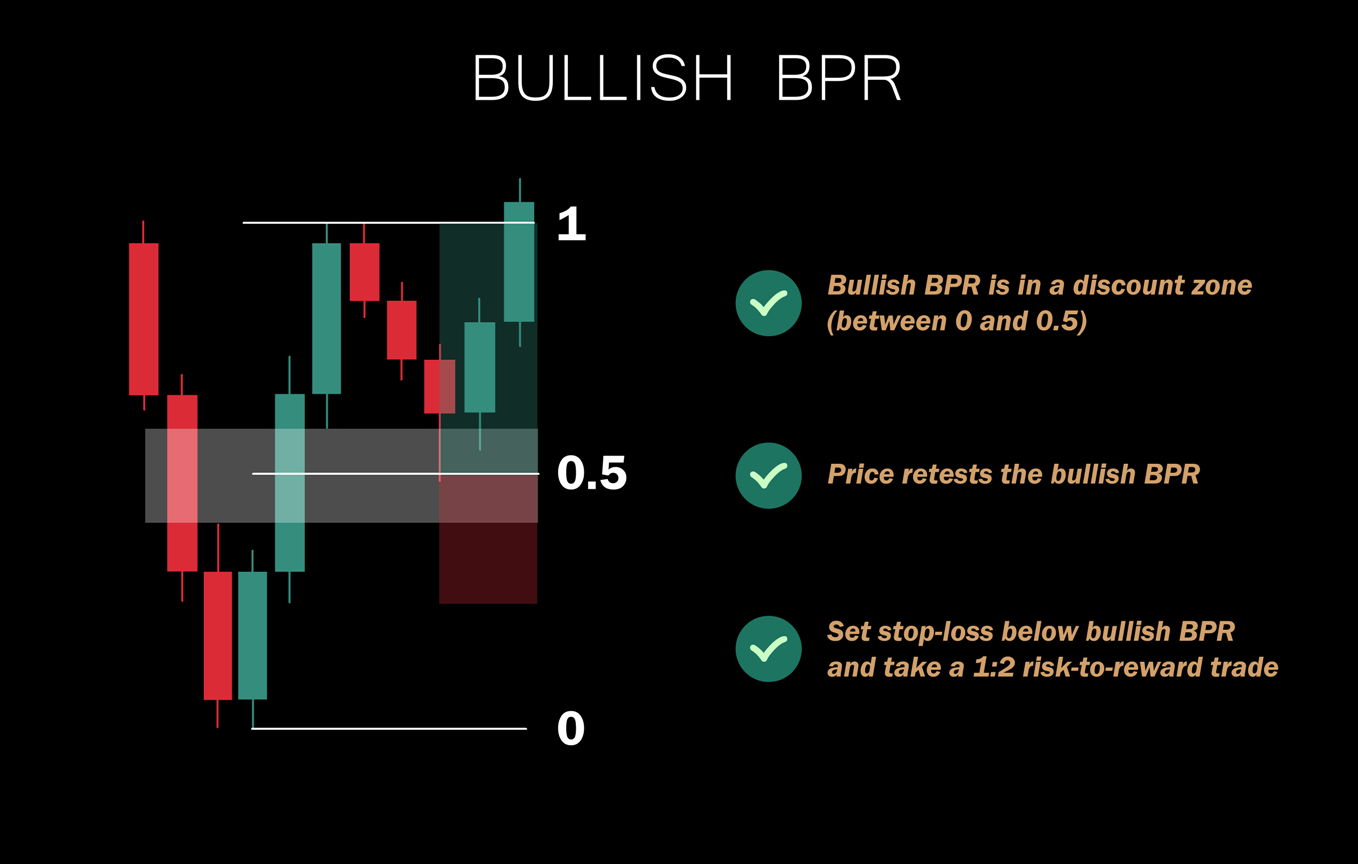
Step 1: Identifying Discount Zone
Bullish BPR should form in the discount zone — below the 0.5 level of the current impulse movement.
| Level 0 | Level 0.5 | Level 1 |
|---|---|---|
| Impulse Low | Midpoint (50%) | Impulse High |
| DISCOUNT ZONE (Buys favorable) | PREMIUM ZONE (Buys unfavorable) | |
Step 2: BPR Zone Retest
After the bullish impulse forms, price should return (retest) to the BPR zone. This is the ideal entry point.
- Entry: At the boundary or inside the BPR zone
- Confirmation: Reversal candlestick pattern (pin bar, engulfing)
Step 3: Risk Management
| Parameter | Placement Rule |
|---|---|
| Stop Loss | Below the lower boundary of Bullish BPR |
| Take Profit | Minimum 1:2 risk-to-reward ratio |
| Example | SL = 20 pips → TP = 40 pips |
Important: If BPR forms above the 0.5 level (in Premium Zone) — don't trade the buy. Wait for Bearish BPR for a sell.
Trading Strategy: Bearish BPR
Mirror strategy for sells. Bearish BPR forms in the premium zone and serves as an entry point for Short positions.
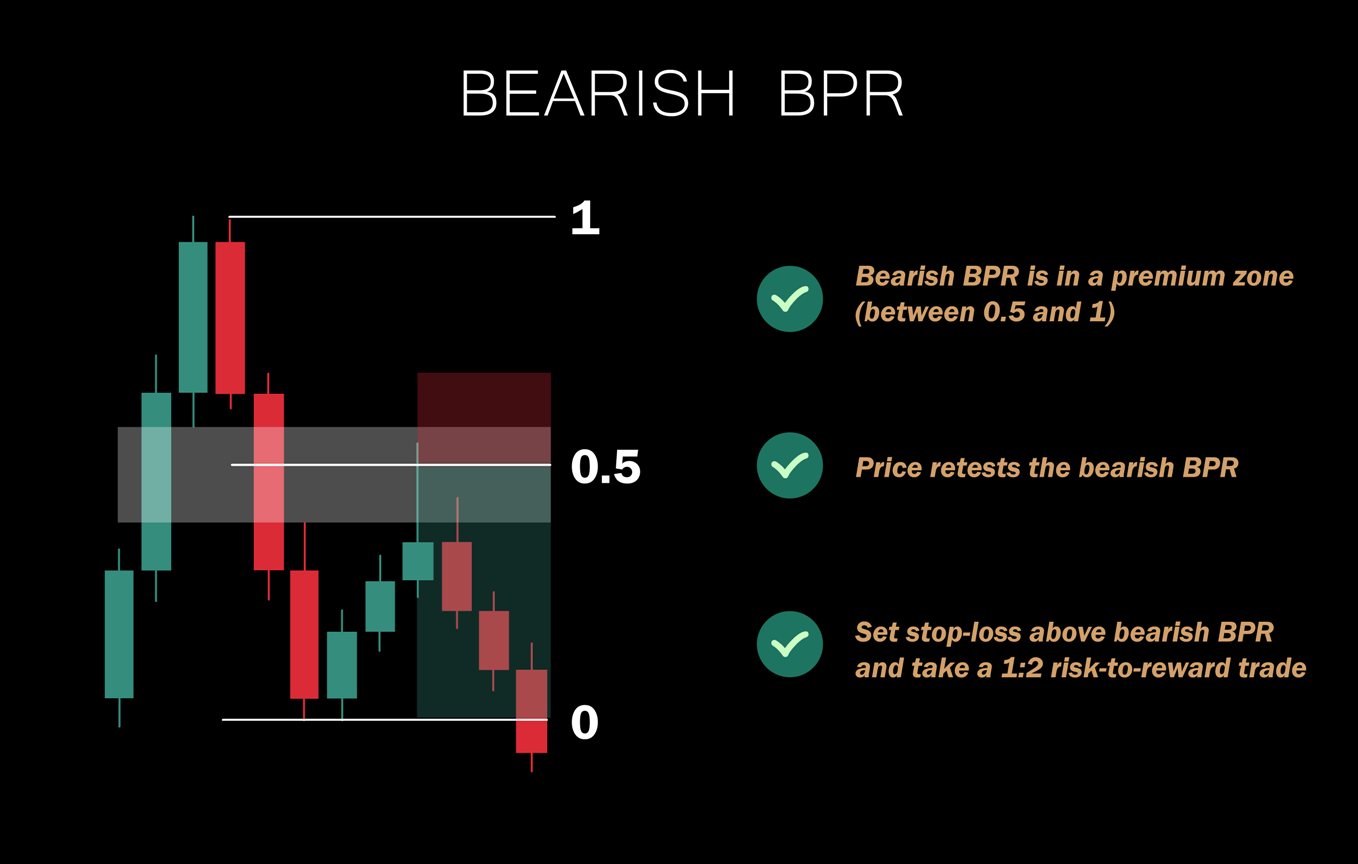
Step 1: Identifying Premium Zone
Bearish BPR should form in the premium zone — above the 0.5 level of the current impulse movement.
| Level 0 | Level 0.5 | Level 1 |
|---|---|---|
| Impulse Low | Midpoint (50%) | Impulse High |
| DISCOUNT ZONE (Sells unfavorable) | PREMIUM ZONE (Sells favorable) | |
Step 2: BPR Zone Retest
After the bearish impulse forms, price should return to the BPR zone from top to bottom. This is the ideal entry point for selling.
- Entry: At the boundary or inside the Bearish BPR zone
- Confirmation: Bearish candlestick pattern (bearish pin bar, engulfing)
Step 3: Risk Management
| Parameter | Placement Rule |
|---|---|
| Stop Loss | Above the upper boundary of Bearish BPR |
| Take Profit | Minimum 1:2 risk-to-reward ratio |
| Example | SL = 20 pips → TP = 40 pips |
Important: If BPR forms below the 0.5 level (in Discount Zone) — don't trade the sell. Wait for Bullish BPR for a buy.
Strategy Summary Table:
| Bullish BPR | Bearish BPR |
|---|---|
| Zone: DISCOUNT (0 - 0.5) | Zone: PREMIUM (0.5 - 1) |
| Direction: LONG | Direction: SHORT |
| Stop Loss: below BPR | Stop Loss: above BPR |
BPR vs IFVG: Key Differences
Many traders confuse these concepts, but there is a fundamental difference in their formation logic.
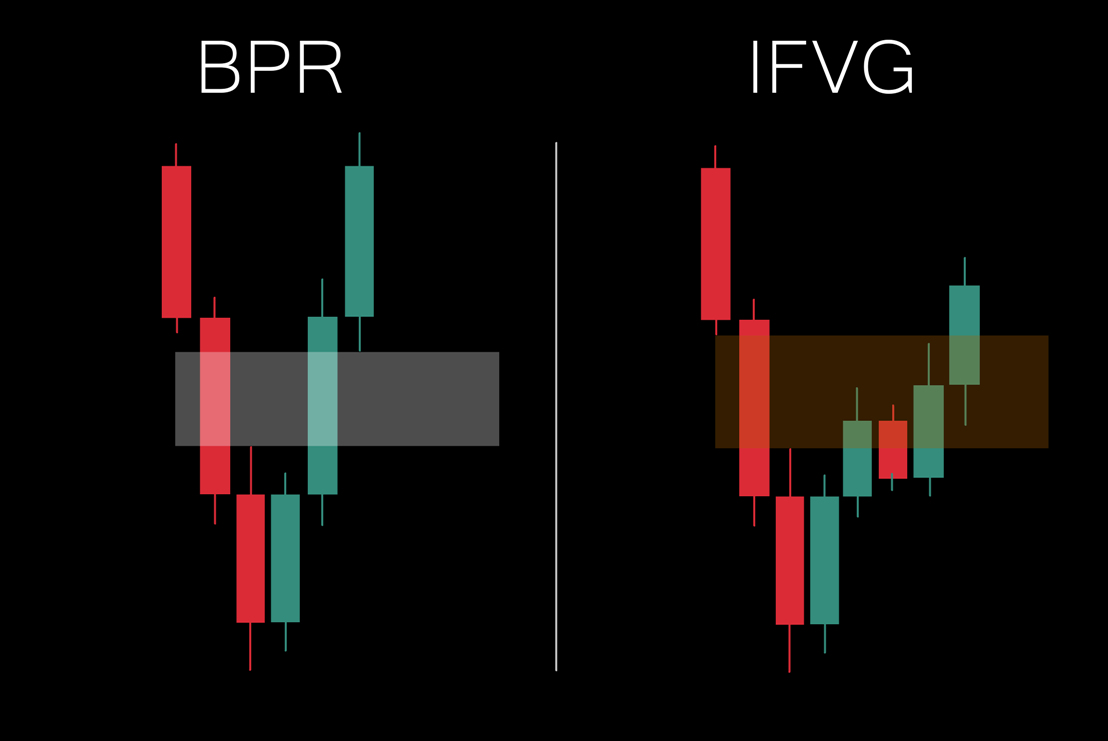
| BPR (Balanced Price Range) | IFVG (Inversion FVG) |
|---|---|
| Forms when bullish FVG overlaps bearish (or vice versa). The overlap zone becomes an equilibrium area. | Forms when FVG is invalidated — price closes or leaves a wick beyond the gap. The level changes role: support → resistance. |
Logical relationship:
All BPRs can be considered a specific case of IFVG, but not all IFVGs are BPRs.
BPR is an enhanced version where two imbalances physically overlap each other, creating a denser zone of interest.
How to Identify BPR:
- Find two opposite FVGs on the chart (bullish and bearish).
- Identify their overlap zone.
- This intersection area is your Balanced Price Range.
Which Timeframes Does It Work On?
BPR forms on any timeframe, but there is an important condition:
- Use higher timeframe analysis to determine the overall trend.
- Trade BPR in the direction of the higher timeframe trend — this filters out false signals.
- On lower timeframes (M1-M5), BPR may be noise without context confirmation.
Practical rule: If unsure — switch to a higher timeframe. If BPR is visible there too, the probability of success increases.
Automate with SMC Venom Model BPR Indicator
Manual BPR search requires constant chart scanning and precise FVG marking.
The indicator takes this work off your hands.

What the Indicator Automates:
| Manual Work | SMC Venom Model BPR |
|---|---|
| Searching for FVGs across multiple timeframes | Instant scanning of all timeframes |
| Visual identification of overlaps | Precise overlap zone calculation |
| Constant chart monitoring | Push notifications for new signals |
Features:
- Automatic recognition of Bullish and Bearish BPR in real-time
- Flexible display modes: BPR only, FVG only, or both patterns
- Customizable zone color scheme (default: light steel blue for bullish, thistle for bearish)
- Arrow signals with choice of icon styles (10+ options)
- Works on all timeframes from M1 to MN1
- Trading session time filtering
- Complete alert system: Popup, Push, Email, Sound
- Indicator does not redraw
Available Versions:
✅ SMC Venom Model BPR for MT5
✅ SMC Venom Model BPR for MT4
Test the indicator in Strategy Tester before purchasing.


")
")
