Volume Profile Sessions and Range Pro
- 지표
- 버전: 1.0
- 활성화: 5

See where the market really traded — not just where price went.
Most tools only show you price. This indicator shows you where the volume actually was — the exact levels where traders committed the most money, the zone that held most of the activity, and the spots that tend to trigger support, resistance, or fast, violent moves. It's the difference between guessing at a level and trading a level the market has already proven matters.
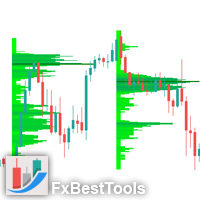
Drop it on any chart and instantly get clean, accurate volume profiles for sessions (Tokyo, London, New York), full days, full weeks, a rolling multi-day view, or any custom range you draw yourself.
Why traders reach for this one
- See the real story, not the candle guess. Profiles are built from granular M1 data, not the timeframe you're looking at — so a single 1-hour candle can't smear its volume evenly across the whole bar and hand you a distorted level.
- Never trade a blind level. POC, Value Area High/Low, and real peak-detected High/Low Volume Nodes are drawn automatically, using the same Value Area method used on professional platforms.
- Get alerted the moment it matters. Set a POC touch alert and get a popup, a phone push, or a sound the second price comes back to a level worth watching — with a cooldown so you're not spammed.
- Run it your way, live. Flip sessions, lines, and histograms on or off from an on-chart panel — no digging through settings mid-trade. Your layout is remembered across timeframes.
- It won't lie to you when data is thin. If your broker doesn't provide real volume, it switches to tick volume automatically and tells you in the log — so you're never staring at a blank or misleading profile.
What you get
- Session profiles — a separate volume profile for the Tokyo, London and New York sessions, each in its own dashed box.
- Daily and Weekly profiles — one profile per day or per week, with start times you can set to match your broker's daily rollover.
- Right-side multi-day profile — one combined profile of the last several trading days (you choose how many), pinned next to the price scale, with rows growing to the left. Stays put as you scroll and zoom, and can hide itself once you scroll back into history so it never gets in the way.
- Manual profile on any range — tap two points on the chart and get a full profile for exactly that range. On desktop, drag the box to move it or drag a corner to resize it, and the profile rebuilds automatically.
- POC, VAH and VAL lines — Point of Control, Value Area High and Value Area Low, using the standard Value Area method.
- HVN and LVN lines — High and Low Volume Nodes found by real peak-and-valley detection, so small bin-to-bin noise never gets marked as a node.
- Buy / sell colors — split each row into buy volume and sell volume, or keep it a clean single color.
- POC touch alert — popup, phone push notification, and/or sound when price comes within your chosen distance of a POC.
- On-chart control panel — switch sessions, lines and the histogram on or off, change how many days back to show, hide everything with one tap, and draw manual profiles — all without opening the settings window.
Built for accuracy
- Built from lower-timeframe data (M1 by default), not the candles you happen to be viewing.
- Up to 1000 price rows per profile for a fine, detailed histogram — or fewer for a chunkier look.
- Automatic tick-volume fallback with a log notice, so you're never left with a blank or misleading profile.
- Thin rows near the high and low of a profile stay visible even when you zoom out.
Good to know
- Session hours are in your broker's server time and must be set for your broker — offsets vary between brokers.
- Many forex and gold (CFD) brokers only provide tick volume, not real traded volume. The profile then runs on tick volume, still widely used to see where activity concentrated.
- Volume profile is an analysis tool. It shows where trading happened; it does not predict the future and does not guarantee profit.
Full input parameters
Session hours (server time, 0–23)
- Tokyo / London / New York start hour and end hour — when each session begins and ends. An end hour earlier than the start hour means the session passes midnight.
- Daily start hour / end hour — the window of the Daily profile. Set both to the same hour for a full 24-hour day starting at that hour (e.g. 17 and 17 for a 17:00 rollover).
- Weekly start day / start hour — when the Weekly profile begins (0 = Sunday … 6 = Saturday). The week runs for exactly 7 days from that moment.
Sessions to show
- Show Tokyo / London / New York session, Show Daily profile, Show Weekly profile — choose which profiles are drawn, or switch them live from the control panel.
Accuracy
- Data timeframe — the timeframe used to build the profile. Lower is more accurate (M1 by default) but needs more history.
Profile settings
- Price rows per profile — how many price rows each profile has. More rows give a finer profile.
- Gap between rows — space between rows as a percent of row height. 0 gives a solid "mountain" look.
- Widest bar — width of the longest bar as a percent of the session width.
- Minimum bar width — the smallest width, in pixels, any row can have, so low-volume rows stay visible. 0 turns it off.
- Days to show / Weeks to show — how many days or weeks back to draw (also changeable on the control panel).
- Value Area % — share of volume inside the Value Area. 70 is the usual setting.
- Use real volume — on for real volume, off for tick volume. Falls back to tick volume automatically if the symbol has none.
- Show volume profile bars / POC line / VAL line / VAH line — turn each element on or off.
- Show today's forming session — include the session still in progress, so it updates live.
- Line style — draw lines only inside the session box, or extend them to the right.
- Show session name label / Show price labels on lines — text labels on or off.
High / Low Volume Nodes
- Show HVN lines / Show LVN lines — turn node lines on or off.
- HVN minimum strength / LVN minimum depth — how much a peak or valley must stand out, as a percent of max volume, to count as a node. Higher means fewer, stronger nodes.
- Min gap between nodes — minimum distance between two nodes, as a percent of the price range.
- Max HVN lines / Max LVN lines per session — the most node lines drawn for each profile.
POC touch alert
- Enable POC touch alert — turn the alert on.
- Choose POC lines by clicking them — click POC lines on the chart to pick exactly which ones to watch.
- Which session's POC to watch — Tokyo, London, New York, Daily, Weekly, or all shown sessions.
- Watch only the latest POC per session — on to watch just the newest POC of each session instead of every POC on the chart.
- Touch distance (pips) — how close price must get to count as a touch. 0 means the exact price.
- Minutes between repeat alerts — cooldown before the same level can alert again.
- Popup alert / Push notification to phone / Play sound / Sound file — choose how you're alerted. Push needs your MetaQuotes ID set up in the terminal.
Colors
- Bar colors (buy and sell), POC / VAL / VAH / HVN / LVN line colors, session, Daily and Weekly box colors, label color — set every color to match your chart theme.
Dashboard
- Show control panel, Panel X / Y position, Panel corner — show or hide the on-chart panel and place it where you want.
Manual volume profile
- Manual profile box color — color of manually drawn profiles.
- Max manual profiles kept — how many manual profiles can exist at once. Drawing another removes the oldest.
- Auto-scale bar width to box height, Bar width vs box height, Max bar width — keep manual profiles looking consistent after you change timeframe or zoom.
Right-side profile (multi-day)
- Show right-side profile — turn the whole profile on or off.
- Show profile bars / POC / VAL / VAH line — choose what it displays.
- Trading days covered — how many real trading days it combines. Weekends and holidays are skipped.
- Include today's forming session — count today as one of those days so it updates live.
- Price rows — number of rows for this profile. 0 uses the main row setting.
- Widest bar — width of the longest bar as a percent of the visible chart width.
- Gap to price scale — space in pixels between the profile and the price scale.
- Extend lines back to today's open — lets its POC / VAH / VAL lines run back to today's open.
- Gap between rows, Single color, Bar color — control how the rows look.
- Show outline box and label, Outline box color — optional frame and title.
- Hide when scrolled off the live edge, Live-edge tolerance — hides the profile when you scroll back into history.
Feedback and support
Questions, ideas, or a feature you'd like to see? Send a message here on MQL5 or leave a comment on the product page — I read every one. If the indicator helps you, a review is very much appreciated.