Singan Dynamic Trap
- Experts
- 버전: 1.0
- 활성화: 5

MT5 Grid EA Auto Risk Calculation Adaptive ADX BUY / SELL Visual Dashboard
Singan (心眼) — See What Others Cannot
"Singan (心眼)" means "Mind's Eye" in Japanese — the ability to perceive what the naked eye cannot see.
Most grid EAs run indefinitely while keeping risk invisible. Singan Dynamic Trap was built on the opposite philosophy.
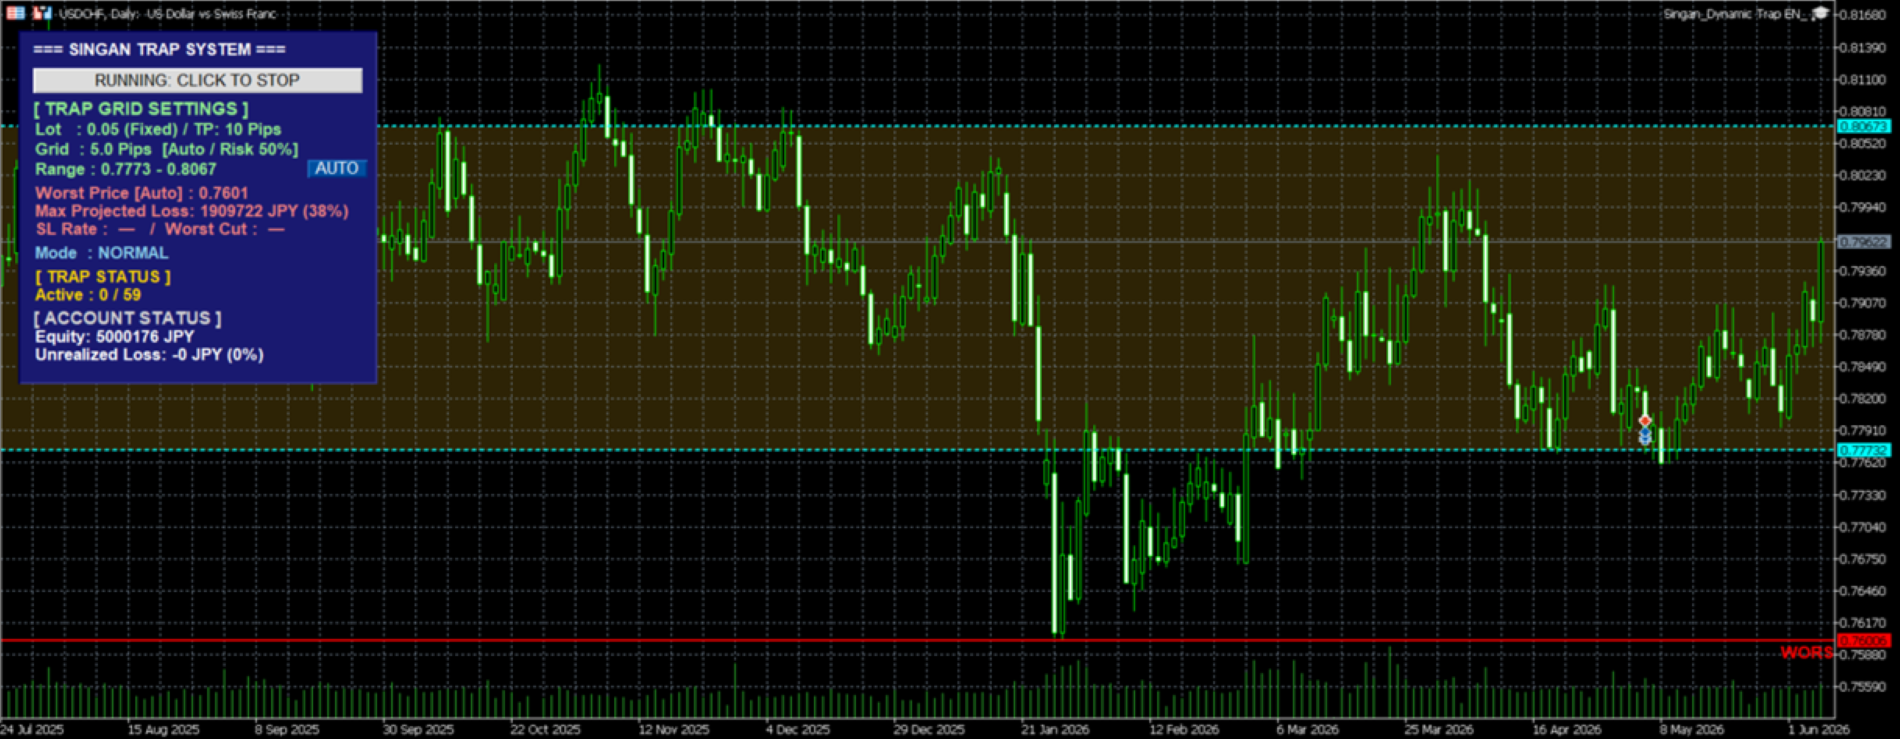
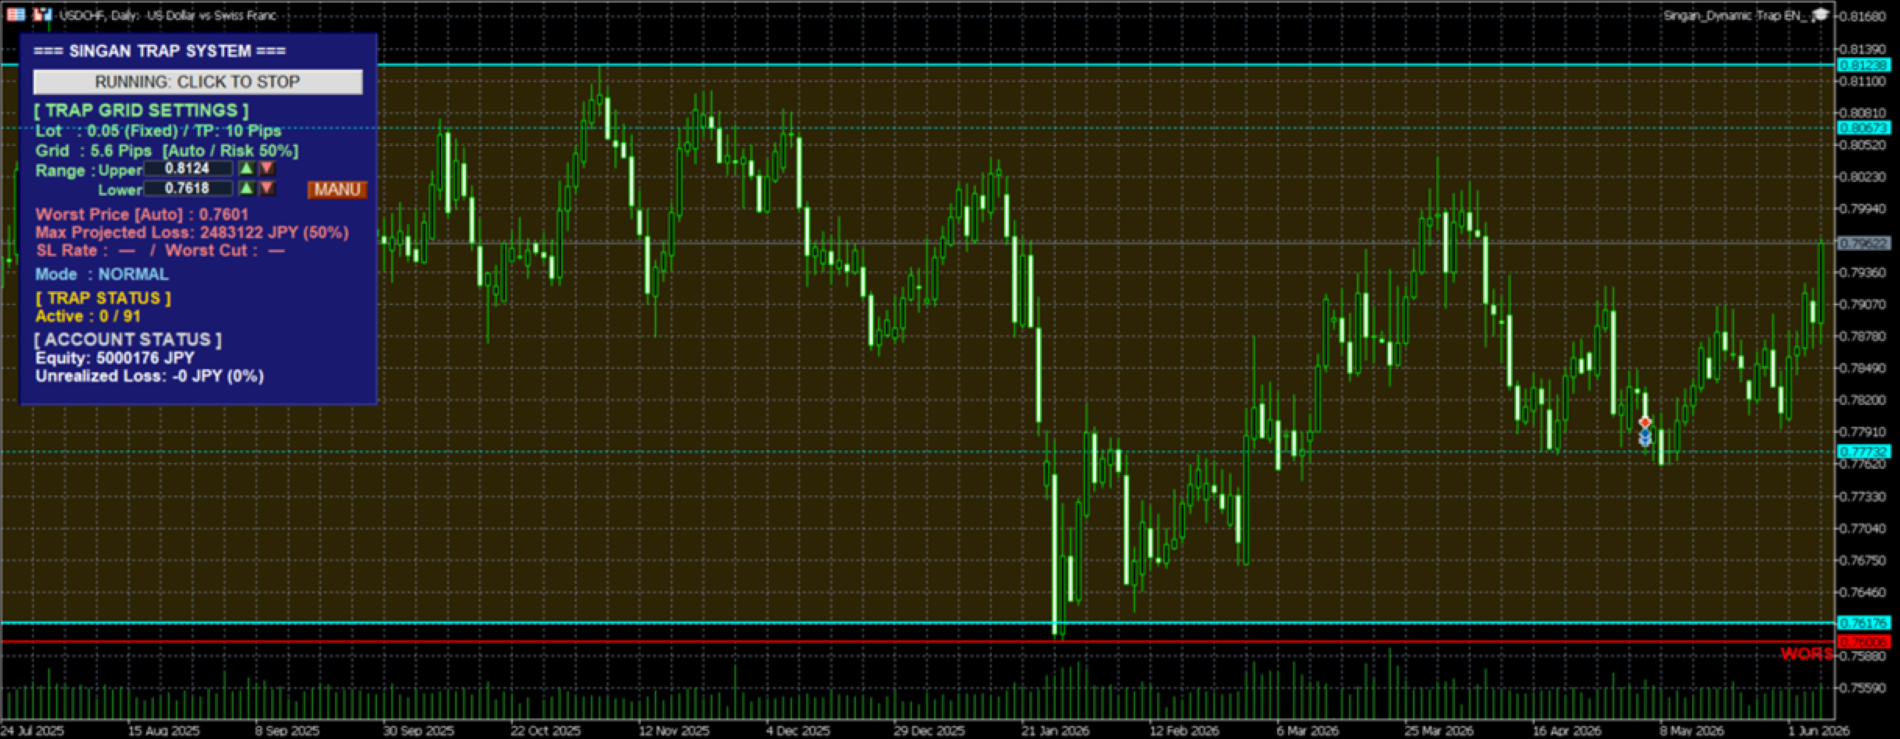
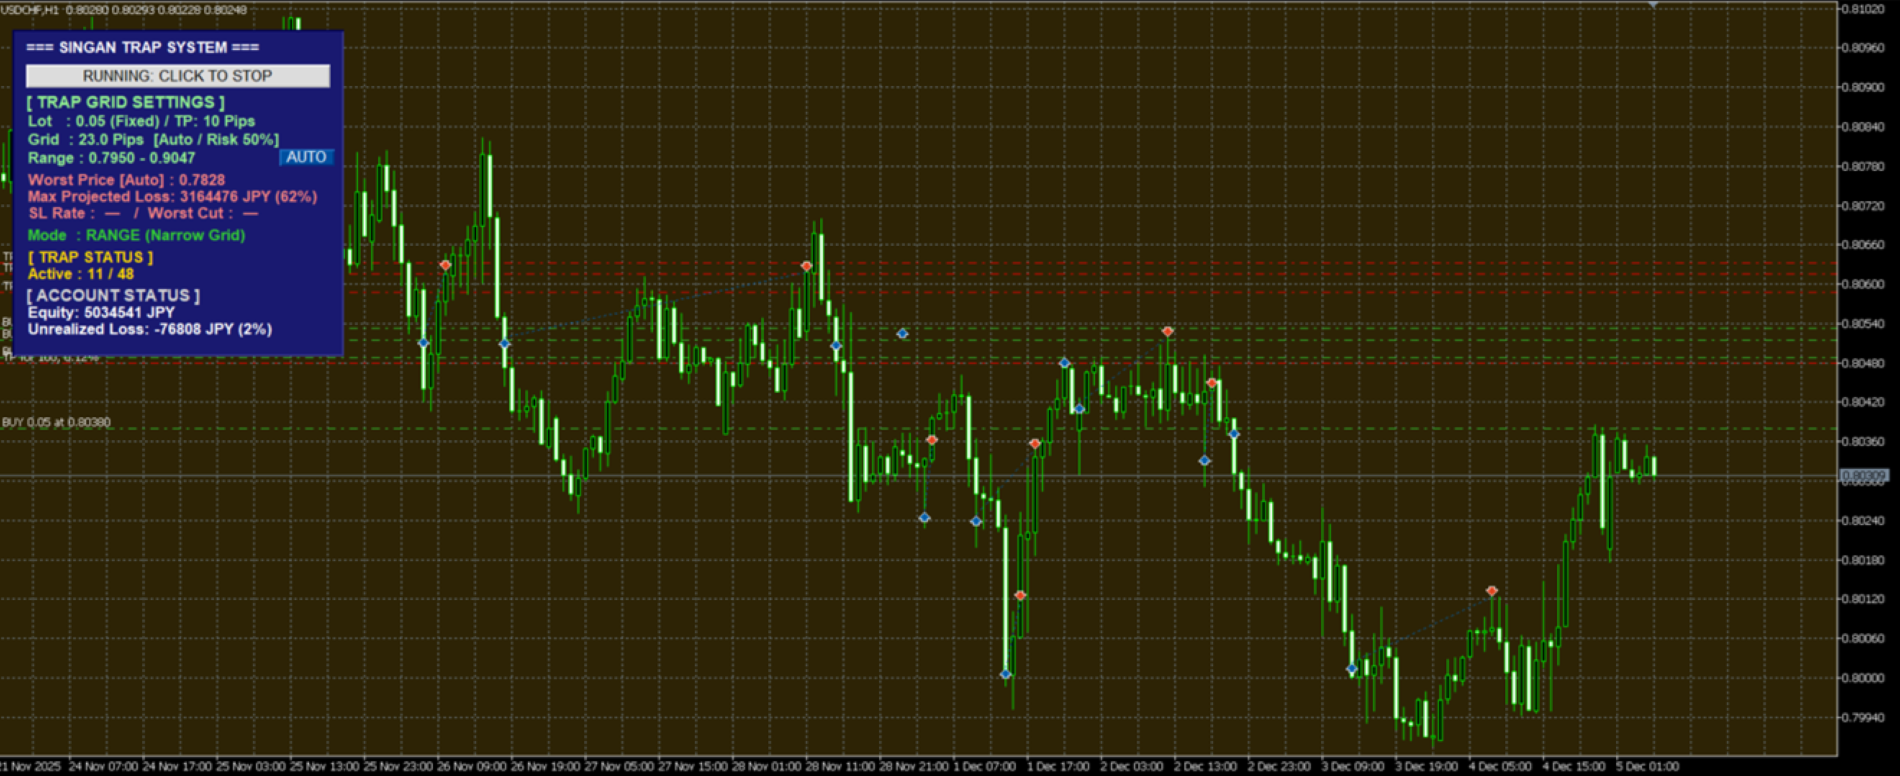
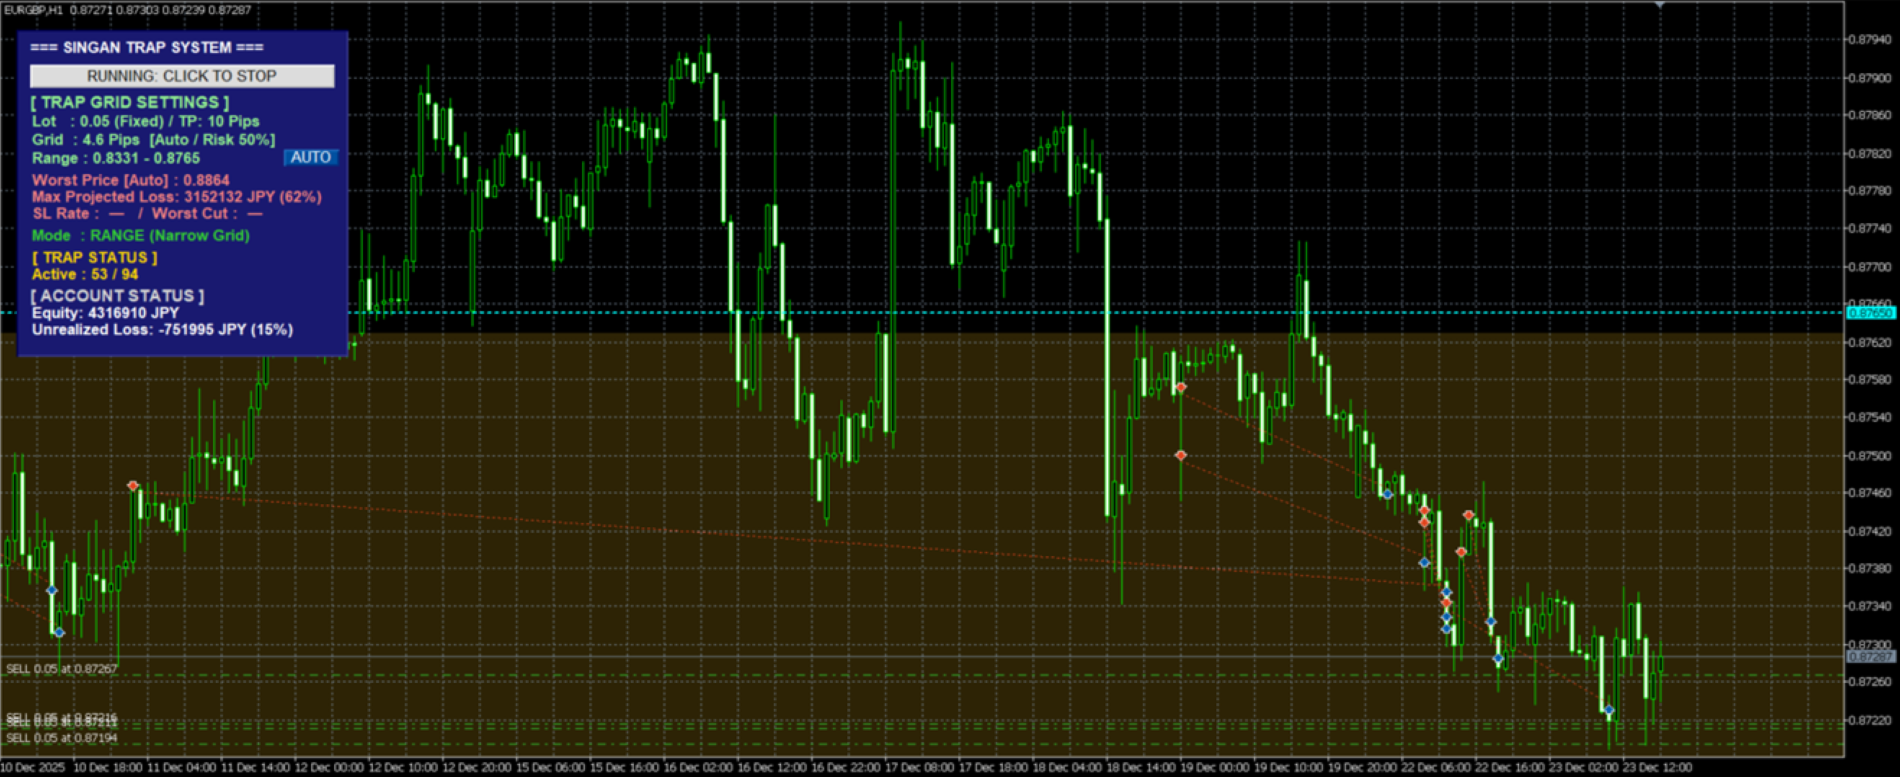
Worst price, operating range, grid size, and maximum projected loss are all calculated automatically and displayed on your chart in real time. When the market shifts suddenly, the grid width adjusts automatically to stay aligned with current conditions. Because the risk is always visible, you can act with confidence instead of panic. That is the core of Singan Dynamic Trap.
What Does This EA Do?
Singan Dynamic Trap places trap orders at fixed intervals (grid) within a defined operating range. When the price reaches a grid level, a position is opened. Once the position hits its Take Profit target, it is closed — and the trap resets, ready to fire again. This is a repeat-style grid EA.
The key difference from conventional grid EAs is that grid size and step count are automatically calculated in reverse from your chosen risk level. Simply select how much drawdown you are willing to tolerate as a percentage of your account balance, and the EA calculates the optimal grid parameters — displaying the projected maximum loss on the dashboard before a single trade is placed.
The logic flows as follows:
- Worst price and operating range are automatically derived from historical data
- Grid size and step count are reverse-calculated from your lot size and chosen drawdown tolerance
- Daily ADX is monitored — grid narrows in ranging markets, widens in trending markets
- A position is opened the moment price touches a grid level
- Position closes at TP → trap resets and waits again
Key Features
1. Full Risk Visualization
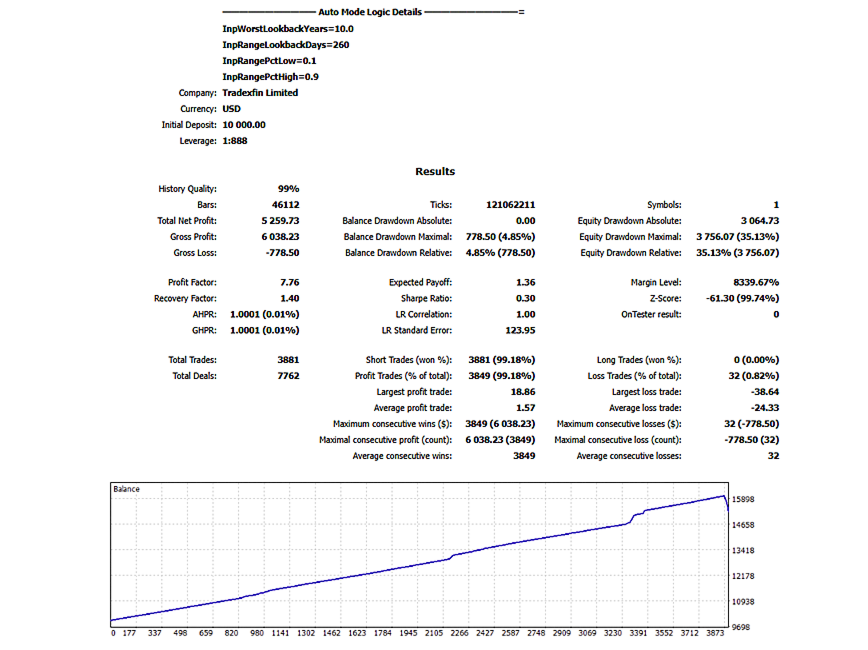
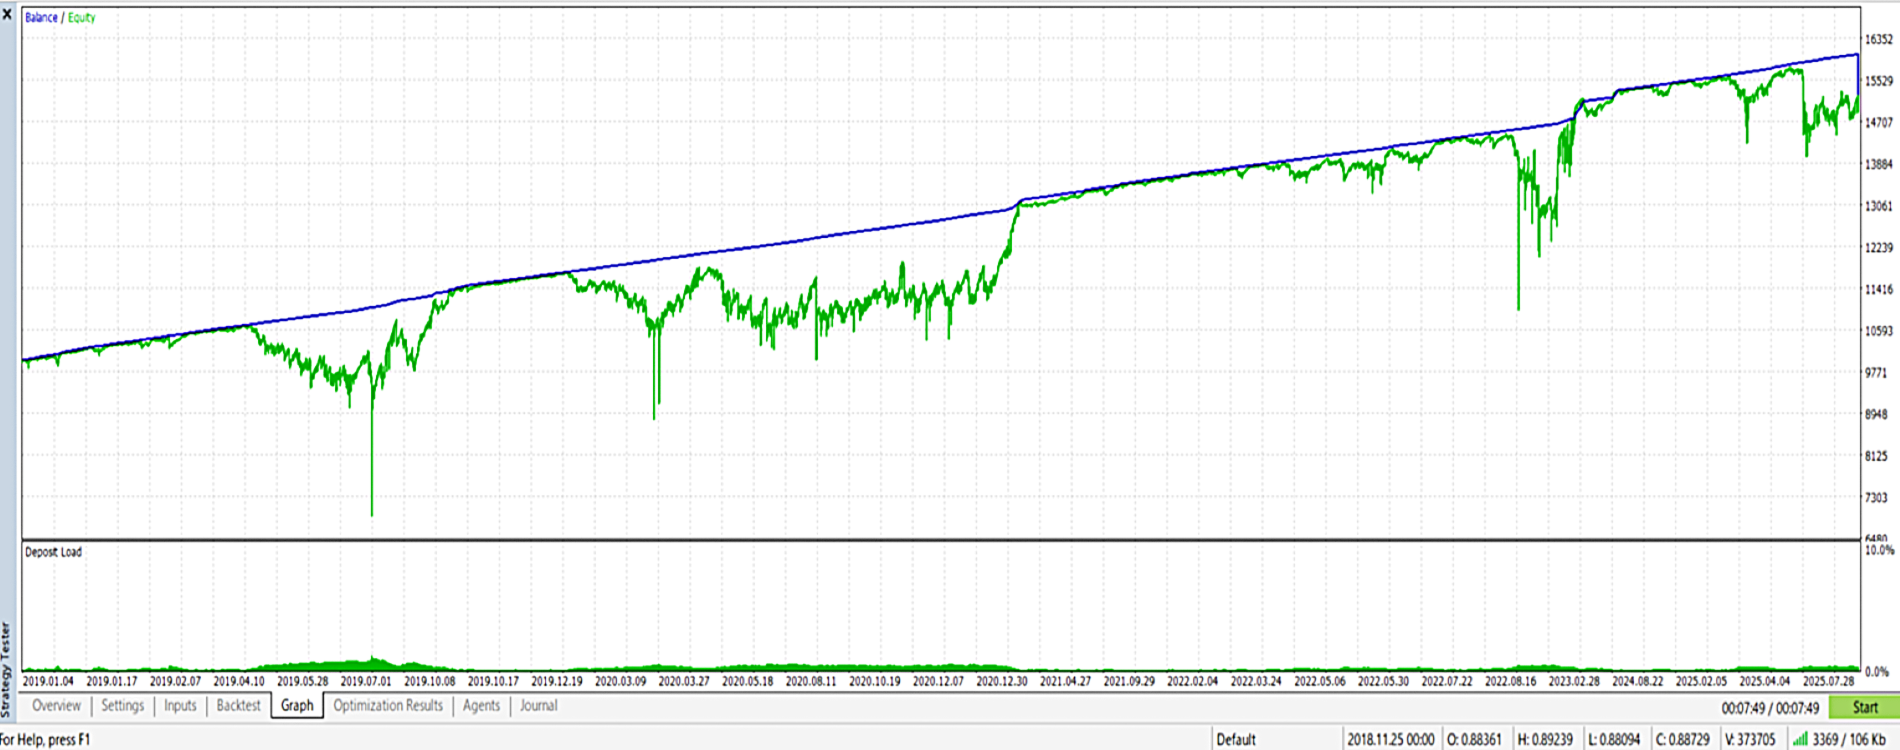
Worst price, maximum projected loss, and current drawdown percentage are displayed on the chart in real time. You always know exactly where you stand — before and during every trade.
2. Automatic Grid Calculation
Grid size and step count are automatically calculated from your lot size and selected drawdown tolerance (5 levels: 15% to 100%). No complex parameter tuning required — the EA determines the optimal grid for your risk profile automatically.
3. ADX Adaptive Grid
The EA monitors the daily ADX in real time. In ranging markets, the grid narrows to capture more frequent TP hits. In trending markets, the grid widens to reduce trap frequency. The EA adapts autonomously to sudden changes in market conditions.
4. Auto Range Calculation / Manual Override
The operating range is automatically calculated from the past 260 days of daily closing prices. However, after a strong trend the range may be calculated too wide, and after a prolonged range market it may be too narrow — causing traps to be placed ineffectively. In such cases, switch to MANUAL mode with one click and fine-tune the upper and lower bounds using the input boxes and ▲▼ buttons directly on the dashboard.
5. Worst Price Stop Function
The worst price is automatically set from 10 years of monthly candlestick data. You can configure what happens when that level is breached — close all positions, stop the EA, or both — independently.
6. Interactive Dashboard
A dedicated panel is displayed in the upper-left corner of the chart at all times. Balance, drawdown, maximum projected loss, and grid status are visible at a glance. The operating range is shaded directly on the chart for easy visual reference.
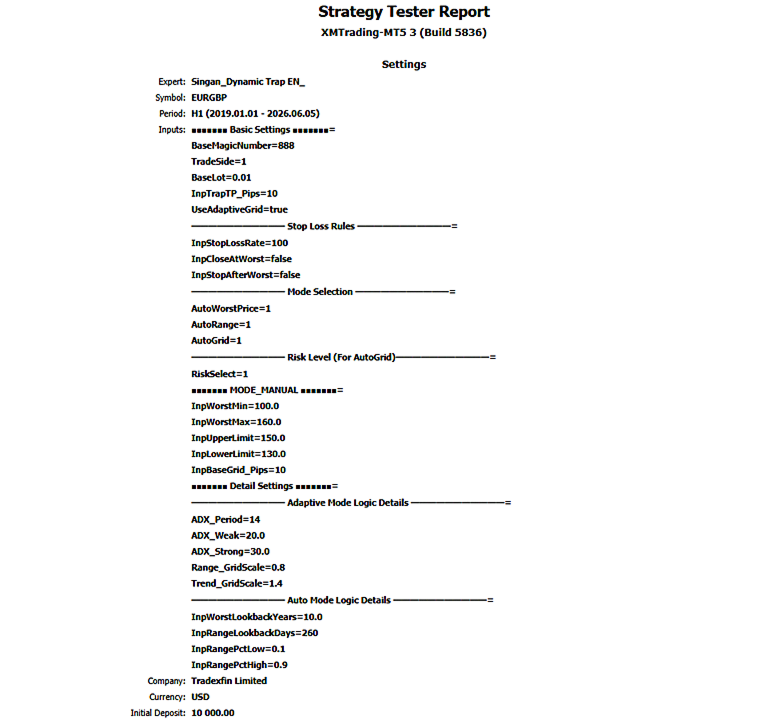
Input Parameters
| Parameter | Description |
|---|---|
| BaseMagicNumber | Magic number to identify this EA's orders |
| TradeSide | Trade direction (BUY / SELL) |
| BaseLot | Fixed lot size per trap |
| InpTrapTP_Pips | Take Profit distance per trap (in pips) |
| UseAdaptiveGrid | Enable / disable ADX-based adaptive grid |
| RiskSelect | Drawdown tolerance level (Level 1–5) |
| AutoWorstPrice | Auto / Manual mode for worst price |
| InpWorstMin / Max | Manual worst price (BUY / SELL) |
| AutoRange | Auto / Manual mode for operating range |
| InpUpperLimit / LowerLimit | Manual upper / lower range boundaries |
| AutoGrid | Auto / Manual mode for grid size |
| InpBaseGrid_Pips | Base grid size when in Manual mode (pips) |
| InpStopLossRate | Maximum drawdown stop rate (%) — set to 100 to disable |
| InpCloseAtWorst | Close all positions when worst price is breached |
| InpStopAfterWorst | Stop EA after worst price is breached |
| ADX_Period | ADX calculation period |
| ADX_Weak / Strong | ADX thresholds for ranging / trending market detection |
| Range_GridScale | Grid scale factor in ranging market (narrows grid, <1.0) |
| Trend_GridScale | Grid scale factor in trending market (widens grid, >1.0) |
How to Set BaseLot
Start with the minimum lot size (0.01). Once the EA is running, the dashboard will display the projected maximum loss and its percentage of your account balance in real time. If there is sufficient margin within your risk tolerance, gradually increase the lot size — while always checking the dashboard figures before making any adjustment.
Increasing the lot size grows potential profit, but also increases the maximum projected loss proportionally. Never increase lot size without verifying the dashboard numbers first.
When to Switch Operating Range to Manual
Auto mode calculates the range statistically from the past 260 daily closing prices. This works well in most conditions, but manual override is recommended in the following situations:
- Range calculated too wide — After a prolonged trend, price dispersion is large and the range may be set excessively wide, causing traps to be spaced too far apart and missing profit opportunities.
- Range calculated too narrow — After a long sideways period, prices are clustered tightly and the range may be too narrow, causing traps to fire outside the intended zone.
- You want to target a specific price zone — When you have a view on key support/resistance levels or price structure, manual mode lets you set the range based on your own analysis.
In Manual mode, adjust the upper and lower bounds in real time using the input boxes and ▲▼ buttons on the dashboard.
Recommended Environment
Platform
MetaTrader 5 (MT5) only
Supported Symbols
Works on all currency pairs. The EA automatically reads your account currency (USD, JPY, EUR, etc.), so no manual adjustment is needed regardless of your broker or account denomination.
For best results, we recommend choosing currency pairs that meet all three of the following criteria:
- Tends to trade in a range — Allows TP levels to be hit repeatedly
- Has room to move in the direction of your position over the long term — Reduces the risk of sustained drawdown
- Positive swap in the direction of your position — Generates swap income while holding unrealized losses
Examples of pairs currently considered to meet these criteria:
| Pair | Direction | Notes |
|---|---|---|
| USD/CHF | BUY | USD strength / CHF weakness bias. Positive BUY swap. Safe-haven pair with range-prone characteristics. |
| EUR/GBP | SELL | EUR weakness / GBP strength bias. Positive SELL swap. Directional bias supported by ECB/BoE policy divergence. |
Timeframe
No specific timeframe is required. The EA references the daily ADX directly, so the chart timeframe you display has no effect on trade execution. Feel free to switch to any timeframe that is easiest for you to monitor at any given time.
Recommended Account Type
Because grid EAs hold multiple positions simultaneously, we recommend starting on a micro account (minimum 1,000 units per trade) if your capital is limited. Begin with a small lot size, monitor the maximum projected loss on the dashboard, and scale up gradually at a pace that stays within your comfort zone.
Risk Disclosure
This EA uses a repeat grid strategy. Please read and understand the following risks before use.
Drawdown Accumulation Risk
If the market moves strongly in one direction, multiple positions may simultaneously carry unrealized losses, causing total drawdown to accumulate rapidly. The dashboard displays a projected maximum loss figure, but this is an estimate only. Actual losses may exceed the projection due to spread widening, slippage, or reduced liquidity.
Worst Price Breach Risk
The worst price is set automatically based on historical data. However, if an unprecedented spike or crash occurs, price may move beyond the worst price level. Past price ranges do not guarantee future behavior.
Swap and Market Condition Changes
Swap rates and directional bias on recommended pairs can change without notice due to shifts in monetary policy or global economic conditions. Review your chosen pairs periodically.
Capital Management
Only trade with funds you can afford to lose. Never use essential living expenses or funds that cannot be replaced.
Setup Guide
Open MT5 and load a chart for your chosen currency pair on any timeframe. Drag Singan Dynamic Trap from the Navigator panel onto the chart, or double-click to attach it.
Set the following parameters first:
- TradeSide — Select BUY or SELL
- BaseLot — Start with 0.01 (recommended)
- RiskSelect — Choose your drawdown tolerance from Level 1 to 5
- InpTrapTP_Pips — Set the TP distance per trap in pips
- UseAdaptiveGrid — Default is ON. The EA adjusts grid size automatically based on daily ADX. Keep it ON if you want the EA to adapt to changing market conditions. Switch to OFF if you prefer a fixed grid width.
All other parameters (worst price, range, grid size) can be left in AUTO mode to start.
Once the EA is running, check the dashboard in the upper-left corner of the chart. Verify the following before allowing any trades:
- Worst Price — Is it set at a reasonable level?
- Max Projected Loss — Is it within your acceptable loss range?
- Range — Does the operating range reflect current market conditions?
If the auto-calculated range does not match current market conditions, click the AUTO/MANU button on the dashboard to switch to Manual mode. Use the input boxes and ▲▼ buttons to set your preferred upper and lower bounds. The maximum projected loss updates in real time with every adjustment.
Once you are satisfied with the dashboard figures, the EA will begin managing traps automatically. Check the dashboard periodically to stay aware of your current risk state.
The dashboard features a "RUNNING: CLICK TO STOP" button at the top. Pressing it halts all new trap entries immediately. Existing positions remain open and will close one by one as each TP is hit.
A grid EA is not meant to run forever. When you sense the market has shifted, want to reset your positions, or simply want to lock in profits cleanly — press this button, wait for all open positions to close at TP, then reconfigure and restart.
Knowing when to exit is just as important as knowing when to enter. This button gives you full control over your exit.