HotZone
- 지표
- 버전: 1.0
- 활성화: 5

🔥 HotZone
- "Why does price keep bouncing at this level?"
- "Why does it always consolidate in this zone?"
- "Where is the next support or resistance?"
MT5 OnlyM1 to MNCustom Indicator
⚠️ HotZone is a custom indicator for MT5. It is NOT an Expert Advisor (EA) and does not trade automatically.
Who is this for?
✅ Perfect For Traders Who...
- Draw support & resistance "by feel" and want more precision
- Need to quickly identify key price zones for day trading
- Want to track weekly/monthly key zones for swing trading
- Need to instantly check how price relates to their MAs
- Want a clean chart without sacrificing information density
- Want to eliminate the tedious manual work of multi-TF analysis
Section 01
Product Overview
What Is HotZone?
HotZone is a custom indicator exclusively for MetaTrader 5 (MT5).
It goes far beyond simple lines or oscillators. HotZone analyzes historical price data — counting how many times price visited each price band — and visualizes that density as a color heatmap directly on your chart.
What Is Price Density Analysis?
Price density analysis is a quantitative method of evaluating how frequently price visited a given price band within a specific time period.
|
| Density Level | Meaning | Chart Behavior
| High Density (Hot Zone) | A zone where many traders have historically bought and sold | Likely to act as strong support or resistance in the future
| Low Density (Cold Zone) | A zone where very little trading activity occurred | Price tends to pass through smoothly — breakouts are more likely
This concept is well-established as the Value Area and Congestion Zone analysis used by professional traders and institutional investors. HotZone automates and visualizes this analysis directly on your MT5 chart.
Problems HotZone Solves
|
| Common Pain Point | HotZone's Solution
| Hard to identify reliable support/resistance | Density heatmap instantly shows price concentration zones
| Multi-TF analysis is time-consuming | All TFs from M1 to MN switch and display automatically
| Confusing MA relationships at a glance | MA Table ranks price and MAs in order at all times
| Charts become cluttered with too many tools | Clean heatmap visualization keeps charts readable
| Drawing high/low lines manually is tedious | High and low lines are drawn automatically per period block
Section 02
Features & Strengths
🔬
Quantitative & Objective Analysis
Instead of "gut-feel" support/resistance, HotZone uses numerical price density data. Two traders looking at the same chart will reach the same conclusions.
🕐
Optimized for Every Timeframe
From M1 to MN, each timeframe has its own optimized period block for density calculation. Just switch TFs — the density map adapts automatically.
📊
Information-Rich Yet Clean
The combination of heatmap + MA Table gives you everything you need while keeping the chart uncluttered. No need to stack multiple indicators.
⚡
High-Performance Design
The MaxPeriods limit keeps rendering fast. All parameters switch automatically on TF change — no manual reconfiguration needed.
🎨
Fully Customizable
Color scheme, band width, analysis depth, MA type, and table size — everything is adjustable. Works on both dark and light chart themes.
Section 03
Key Features
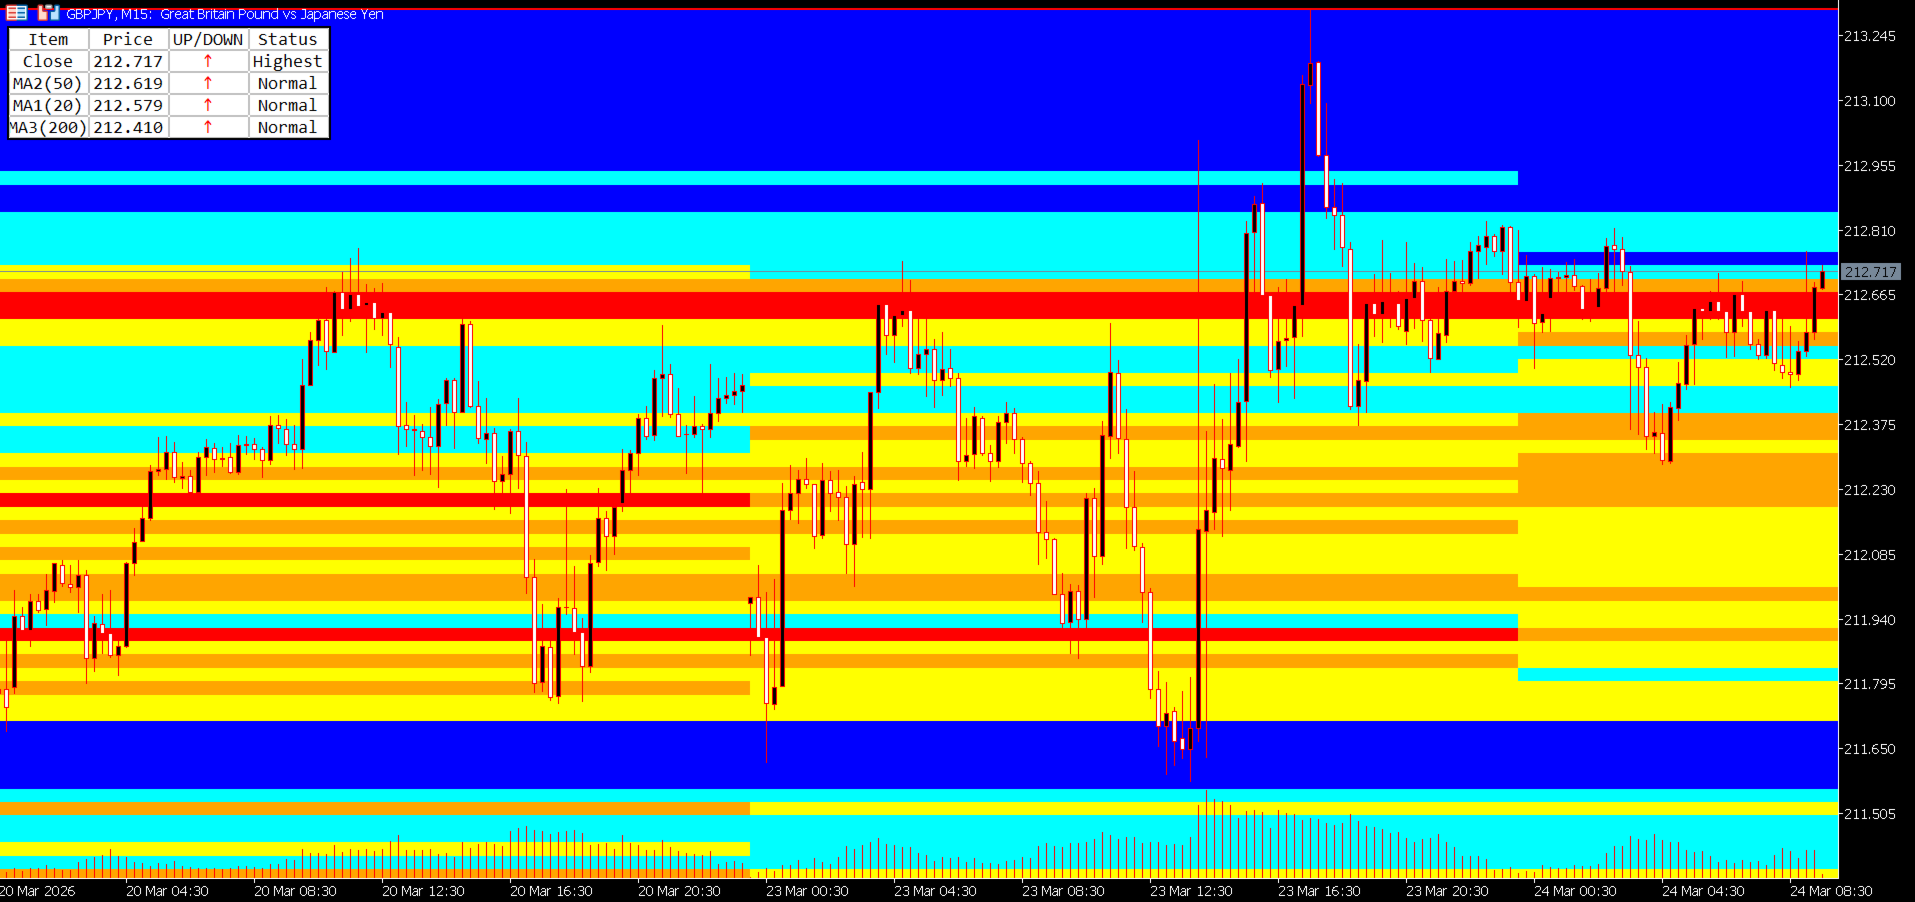
■ Feature 1: 5-Level Color Price Density Heatmap
The core of HotZone. For each period block, it analyzes price data and counts how many times price (close) visited each pip-width band. That density is then displayed as a 5-level color heatmap.
Level 5 (Red)Highest density zone — 80% or more of peak density
Level 4 (Orange)High density zone — 60–79%
Level 3 (Yellow)Medium density zone — 40–59%
Level 2 (Aqua)Low density zone — 20–39%
Level 1 (Blue)Lowest density zone — below 20%
All colors are fully customizable to match your chart style.
■ Feature 2: Multi-Timeframe Support with Auto Period Blocks
HotZone supports all timeframes from M1 to MN (Monthly). Simply change the timeframe and the optimal period blocks are automatically configured.
|
| Timeframe | Period Block Boundary | Density Unit
| M1 (1-minute) | Every 2 hours | 2-hour block density
| M5 (5-minute) | Every 12 hours (00:00 / 12:00) | Half-day block density
| M15 (15-minute) | Daily (00:00) | Daily block density
| M30 (30-minute) | Half-week (Mon 00:00 / Wed 12:00) | Half-week block density
| H1 (1-hour) | Weekly (from Monday) | Weekly block density
| H4 (4-hour) | Half-month (1st / 16th) | Half-month block density
| D1 (Daily) | Every 6 months (Jan / Jul) | Semi-annual block density
| W1 (Weekly) | Annually (January) | Annual block density
| MN (Monthly) | Annually (January) | Annual block density
■ Feature 3: Automatic High/Low Line Drawing
HotZone automatically draws High and Low lines for each period block, marking the highest and lowest price reached within that block. These lines serve as dynamic support/resistance references. Colors are customizable, and lines update automatically at each period boundary.
■ Feature 4: Band Grid Lines (Optional)
Set IsDrawBandLine = true to display the underlying band grid used for density calculation directly on the chart.
|
| Timeframe | Default Band Width
| M1 | 1 pip
| M5 | 2 pips
| M15 | 3 pips
| M30 | 5 pips
| H1 | 10 pips
| H4 | 25 pips
| D1 | 50 pips
| W1 | 100 pips
| MN | 250 pips
■ Feature 5: MA Table (Moving Average Analysis Table)
A compact table in the top-left of your chart displays the current price alongside 3 moving averages, sorted by price in real time.
|
| Item | Price | Direction | Status
| Close | Current price | ↑↓ | Normal / Highest / Lowest
| MA1 (20) | MA1 value | ↑↓ | Normal / Highest / Lowest
| MA2 (50) | MA2 value | ↑↓ | Normal / Highest / Lowest
| MA3 (200) | MA3 value | ↑↓ | Normal / Highest / Lowest
↑ (red): price rose from previous bar / ↓ (blue): price fell / - (black): unchanged
Highest: highest value within the lookback period / Lowest: lowest value / Normal: standard
■ Additional Smart Features
Auto Timeframe Switching: All parameters auto-adjust when you change the TF — no manual reconfiguration needed
DPI Scaling Support: The MA Table renders correctly on high-resolution and 4K displays
Performance Optimization: MaxPeriods limits rendering to only the range you need
Universal Symbol Support: Works with any MT5 symbol — FX pairs, Gold, Oil, Indices, and more
Section 04
How to Use HotZone in Your Trading
▶ Day Traders
Recommended Timeframes: M1, M5, M15
Example scenario: Trading USD/JPY during the Tokyo session on M5
- Review the previous day's M5 heatmap → Identify the red and orange zones from yesterday's morning (00:00–12:00) and afternoon (12:00–24:00) blocks
- At the Tokyo open (09:00), check current price position → Is price near yesterday's high-density zone (red)?
- Price approaches a red zone → Consider a mean-reversion entry anticipating a bounce
- Confirm MA20 direction in the MA Table → ↑ favors long, ↓ favors short
- Target the next high-density zone as take profit → Use the distance between red zones as your TP guideline
💡 M1/M5 heatmaps use 2-hour and half-day blocks, making it easy to pinpoint hot zones within the current session. Effective for scalpers too.
▶ Swing Traders
Recommended Timeframes: H1, H4, D1
Example scenario: Swing trading EUR/USD on the H4 chart
- Switch to D1 → Identify the red zones (highest density) from the last 6-month block — these are your key medium-term support/resistance candidates
- Switch to H4 → Check if the half-month block's red zones overlap with D1 zones (confluence check)
- Confirm MA50 and MA200 positions in the MA Table → Use the price-vs-MA arrangement to determine medium-term trend direction
- Use H1 to time your entry → Check the weekly block heatmap on Monday to identify the week's key zones
- Set stop-loss just below the auto-drawn Low Line of the most recent period block
💡 Overlapping D1 (6-month blocks) and H4 (half-month blocks) makes it easy to spot multi-timeframe confluence zones with high conviction.
▶ Professional Traders
Recommended Approach: Multi-TF confluence analysis
Professional traders focus on "confluence zones" — areas where density is high across multiple timeframes simultaneously.
- W1 heatmap: Identify annual-level key zones (red) → establish the long-term value area baseline
- D1 heatmap: Confirm whether those zones are also high-density in the 6-month block → validate with medium-term data
- H4 heatmap: Check if the same zone is still high-density in the half-month block → confirm short-term market interest
- H1 heatmap: Confirm weekly block density → narrow down your entry window
- MA Table: Review the arrangement of Close, MA20, MA50, MA200 → gauge trend strength and direction
- A zone where 2–3 TFs show high density → Maximum Confluence Zone → Highest-confidence entry point
【Long Setup Example】✓ Price approaches the lower edge of W1 red zone✓ D1 red / orange zone also present at the same level✓ MA Table: MA200 < MA50 < MA20 < Close (bullish alignment)✓ MA Table: MA20 direction arrow = ↑ (rising)→ Strong support confluence → Long entry candidate【Short Setup Example】✓ Price approaches the upper edge of H4 red zone✓ D1 red zone also aligns at the same level✓ MA Table: Close < MA20 < MA50 (bearish alignment)✓ MA Table: MA20 direction arrow just flipped to ↓→ High-density zone rejection → Short entry candidate
▶ Entry & Exit Summary
|
| Use Case | Market Condition | Action
| Counter-trend entry | Price approaching a high-density zone (red/orange) | Bounce entry candidate
| Breakout entry | Price breaking through a high-density zone | Breakout entry (confirm momentum first)
| Trend following | Price passing through a low-density zone (blue) | Hold / continue in trend direction
| Take Profit (TP) | Next high-density zone ahead | Use as TP price target
| Stop Loss (SL) | Break of high/low auto-drawn line | Use as SL reference
| Position scaling | MA direction reverses in MA Table | Consider partial close
Section 05
Parameter Reference
─ General Display Settings ─
|
| Parameter | Default | Description
| MaxPeriods | 10 | Maximum number of period blocks to process and display. 0 = all periods. Lower values reduce chart processing load.
| HighLineColor | Red | Color of the high line for each period block
| LowLineColor | Red | Color of the low line for each period block
| IsDrawBandLine | false | Set to true to display the band grid lines on the chart
| BandLineColor | Silver | Color of band grid lines. Light colors (Silver, LightGray) recommended.
─ Heatmap Color Settings ─
|
| Parameter | Default | Density Level
| BandBgColor5 | Red | Level 5 — Highest density (≥ 80% of peak)
| BandBgColor4 | Orange | Level 4 — High density (60–79%)
| BandBgColor3 | Yellow | Level 3 — Medium density (40–59%)
| BandBgColor2 | Aqua | Level 2 — Low density (20–39%)
| BandBgColor1 | Blue | Level 1 — Lowest density (< 20%)
─ Per-TF Analysis Period (Number of Bars) ─
More bars = wider historical lookback. Fewer bars = density based on more recent data.
|
| Parameter | Default | Approximate Coverage
| AnalysisPeriodM1 | 1440 bars | ≈ 1 day
| AnalysisPeriodM5 | 1440 bars | ≈ 5 days
| AnalysisPeriodM15 | 1440 bars | ≈ 15 days
| AnalysisPeriodM30 | 1440 bars | ≈ 30 days
| AnalysisPeriodH1 | 1440 bars | ≈ 60 days
| AnalysisPeriodH4 | 1440 bars | ≈ 240 days
| AnalysisPeriodD1 | 1200 bars | ≈ 5 years
| AnalysisPeriodW1 | 520 bars | ≈ 10 years
| AnalysisPeriodMN | 240 bars | ≈ 20 years
─ Per-TF Band Width (pips) ─
|
| Parameter | Default | Notes
| BandWidthPipsM1 | 1 pip | Fine granularity for scalping
| BandWidthPipsM5 | 2 pips |
| BandWidthPipsM15 | 3 pips |
| BandWidthPipsM30 | 5 pips |
| BandWidthPipsH1 | 10 pips |
| BandWidthPipsH4 | 25 pips |
| BandWidthPipsD1 | 50 pips |
| BandWidthPipsW1 | 100 pips |
| BandWidthPipsMN | 250 pips | Coarse granularity for monthly
💡 Default values work well for major FX pairs (USD/JPY, EUR/USD, etc.). For high-volatility instruments (XAU/USD, exotic crosses), consider widening band widths by 1.5–2×.
─ MA Table Settings ─
|
| Parameter | Default | Description
| ShowMATable | true | Set to false to hide the MA Table
| MA1Period | 20 | Calculation period for MA1 (short-term MA)
| MA2Period | 50 | Calculation period for MA2 (medium-term MA)
| MA3Period | 200 | Calculation period for MA3 (long-term / trend MA)
| MA1Method / MA2Method / MA3Method | SMA | Choose from: SMA / EMA / SMMA / LWMA
| LookbackBars | 20 | Number of bars used for Highest / Lowest status detection
| HighestColor | Red | Text color for "Highest" status in MA Table
| LowestColor | Blue | Text color for "Lowest" status in MA Table
| UpArrowColor | Red | Color of the up arrow (↑) in MA Table
| DownArrowColor | Blue | Color of the down arrow (↓) in MA Table
| TableFontSize | 8 | Font size of the MA Table (pt)
| TableScale | 1.0 | Display scale of the MA Table. Recommended: 1.5–2.0 for 4K/WQHD displays.
Section 06
Installation & Setup Guide
Installation Steps
- Purchase & Download: After purchasing on MQL5 Market, download HotZone from the "Market" tab inside MetaTrader 5.
- Apply to Chart: In the MT5 Navigator panel → "Indicators" → drag and drop HotZone onto your desired chart.
- Settings Dialog: A configuration dialog will appear. Click OK with the default settings to get started immediately.
- Verify Display: Once the heatmap, high/low lines, and MA Table appear on the chart, setup is complete.
Recommended Settings by Use Case
|
| Scenario | Recommended Settings
| Major FX pairs (USD/JPY, EUR/USD, GBP/USD, etc.) | Band widths: default values / MaxPeriods: 10 / MA: 20, 50, 200 (SMA)
| High-volatility instruments (XAU/USD, exotic crosses, etc.) | Widen band widths 1.5–2× per TF (e.g. H1: 10 → 20 pips)
| High-resolution displays (4K / WQHD) | TableScale = 1.5–2.0 / TableFontSize = 10–12
Important Notes
⚠️ HotZone is MT5 only. It does not work on MT4.
⚠️ On first load, processing a large amount of historical data may take a few seconds to tens of seconds.
⚠️ If AnalysisPeriod is set very high, some brokers may not have sufficient historical data. A warning will appear in the console if data is insufficient.
⚠️ HotZone is an analysis tool. It does not generate trade signals automatically. All trading decisions remain your responsibility.
Section 07
Frequently Asked Questions
Does it work on MT4?
No. HotZone is MT5 only and is not compatible with MT4.
Which symbols does it support?
HotZone works with any symbol available in MT5 — FX pairs (major, minor, and exotic), precious metals (XAU/USD, XAG/USD), oil (USOIL), stock indices (US30, DAX40), and more.
Will it slow down my chart?
The MaxPeriods parameter limits the number of rendered period blocks to control performance. The default value of 10 runs smoothly on typical hardware (Core i5+, 8GB RAM). Reduce to 5 on lower-spec machines if needed.
Can I use it alongside other indicators?
Yes. HotZone renders in the chart window but does not conflict with other indicators. That said, too many overlapping indicators can reduce readability — manage the number of active indicators accordingly.
Do I need to reconfigure it every time I change the timeframe?
No. HotZone automatically switches to the optimal parameters when you change the timeframe. Band widths and analysis periods are all pre-optimized per TF and applied automatically.
Does it work with any broker?
It works with any MT5-compatible broker. However, the amount of available historical data varies by broker. On brokers with limited data history, longer-term TFs (W1, MN) may not produce fully accurate density calculations.
Will I receive updates after purchase?
Yes. When updates are released through MQL5 Market, your copy will be updated automatically at no additional cost.
Is there a refund policy?
Refund policy follows MQL5 Market terms. Please refer to the MQL5 help page for details.
Section 08
Version Information & Changelog
Version: 1.00
Last Updated: January 22, 2026
Developer: CAPS LLC
Website: https://traders.tokyo/
Platform: MetaTrader 5 (MT5)
Changelog
|
| Version | Date | Changes
| v1.00 | 2026-01-22 | Initial Release
- 5-level color price density heatmap (M1 to MN, all timeframes)
- Per-TF optimized period block auto-segmentation
- MA Table (3 MAs + current price, direction arrows, DPI scaling support)
- Automatic high/low line drawing per period block
- Customizable band widths and analysis periods per TF
Disclaimer
HotZone is provided for informational and analytical purposes only. The developer and distributor accept no responsibility for any trading results arising from the use of this indicator. All trading and investment decisions are made at your own risk. Past price data and density patterns do not guarantee future performance.
© 2026 CAPS LLC. All rights reserved. / https://traders.tokyo/