Gold SMC Setup on MT5: Liquidity Sweep, CHoCH, Order Block and FVG with 4 Free Indicators

A Smart Money Concepts setup on Gold (XAUUSD) has four parts that happen in order: liquidity is swept, structure changes, an order block is left behind and a fair value gap opens. Each part is easy to mark by hand on one chart and slow to follow on five. These four indicators mark one part each, on closed bars, and all four are open source on the MQL5 Code Base.
This guide shows the order to read them, the settings that matter and what each one does not tell you. None of them opens a trade. They draw lines, labels and rectangles, and the decision stays with you.
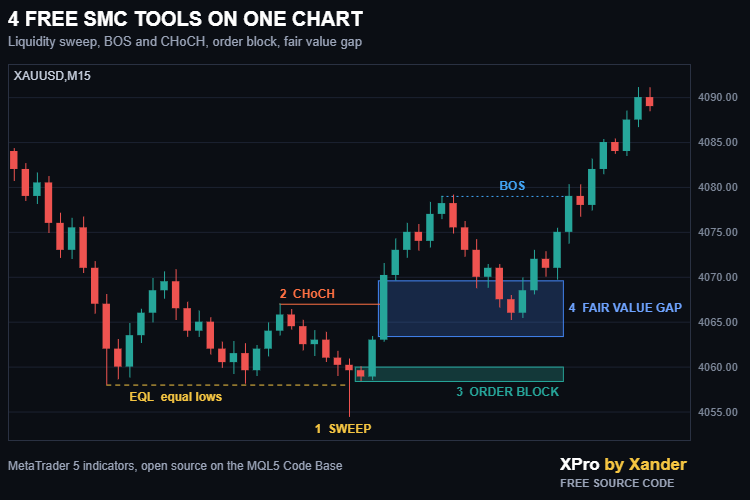
The image is a drawn example of the sequence, not a screenshot of a trade.
1. Liquidity sweep: where the stops were taken
Tool: Liquidity Sweep Equal Highs Lows.
It draws equal highs and equal lows as liquidity lines: two or more confirmed swings that end within a small distance, measured as a fraction of ATR (default 0.10, swing length 3). When a later candle trades beyond the line and closes back inside, the level is marked as swept. When the candle closes beyond the line, the level is marked as taken, so a breakout is not confused with a sweep.
How to read it: a sweep of equal lows is the first thing to wait for before you look for a long, a sweep of equal highs before a short. A level marked as taken is not a sweep, skip it.
2. BOS and CHoCH: did structure change
Tool: Smart Money Concepts BOS CHoCH.
It labels swings as HH, HL, LH and LL (default swing length 5), draws a BOS line when price breaks a swing in the direction of the trend and a CHoCH line when the break goes against it. Breaks are marked on candle closes. It also keeps four arrow buffers, so an EA can read BOS and CHoCH with iCustom.
How to read it: after a sweep of lows, the piece you want is a bullish CHoCH. Without it the sweep is only a spike. A later BOS in the new direction tells you the new leg is still alive.
3. Order block: where the move started
Tool: Order Blocks Zones.
It marks the last opposite candle before the move that breaks structure, from high to low or body only. The leg must show a real impulse, at least one candle with a body larger than a multiple of ATR (default 1.0), so slow drifts do not create zones. A fresh zone is coloured, a tested zone is dimmed and the zone is removed when a candle closes through it.
How to read it: the order block of the leg that printed the CHoCH is the zone to watch. Fresh is better than tested.
4. Fair value gap: the imbalance left by the move
Tool: Fair Value Gap Zones Tracker.
It draws the three candle gap only when the third candle closes and skips gaps smaller than a fraction of ATR (default 0.20). When price comes back, the box shrinks to the part still unfilled. A gap is mitigated by touch, by the 50 percent line or by a full fill, as you choose.
How to read it: a gap left by the same leg, sitting above a bullish order block or below a bearish one, gives you two zones for the return of price. The gap is usually reached first.
The four steps in one table
| Step | Wait for | Tool | What cancels it |
|---|---|---|---|
| 1 | Equal highs or lows marked as swept | Liquidity Sweep Equal Highs Lows | The level is marked as taken (close beyond the line) |
| 2 | CHoCH against the old trend | Smart Money Concepts BOS CHoCH | No CHoCH, or a BOS that continues the old trend |
| 3 | Fresh order block from that leg | Order Blocks Zones | A candle closes through the zone |
| 4 | Open gap from the same leg, price returns to it | Fair Value Gap Zones Tracker | The gap is mitigated by your rule before the setup is complete |
Settings to keep in line
- BOS CHoCH and Order Blocks Zones both start with swing length 5, so they read the same swings. If you change one, change the other.
- Liquidity Sweep starts with swing length 3 to catch smaller pools. Raise it if you only want the main highs and lows.
- Every tool has its own object prefix, so the four can share one chart without touching each other.
- All four have popup, push and sound alerts. Turn on only the ones for the step you are waiting for.
- M15 and H1 are a good place to start for intraday on XAUUSD, EURUSD, GBPUSD, US30 and NAS100. Compare before you choose.
What this does not do
Swings are confirmed after the bars on both sides have closed, so lines and zones appear a few bars after the move and do not repaint. That also means you never get the exact low. A zone shows where price reacted before, not where it must turn, and the full sequence can still fail. Test it on your symbol and timeframe before you trade it, and size the position for the case where it fails.
Get the four codes
- Liquidity Sweep Equal Highs Lows
- Smart Money Concepts BOS CHoCH
- Order Blocks Zones
- Fair Value Gap Zones Tracker
Related: Supply Demand Zones, PDH PDL Sweep Levels, Premium Discount OTE Zones.
All of them are open source. Use them as they are, adapt them, build your own version on top of them. New tools and updates are announced first on my MQL5 channel: https://www.mql5.com/en/channels/xander. Questions, suggestions and your own backtests are welcome in the Xander Lab group: https://www.mql5.com/en/messages/02eec85e4364dd01. More tools on my profile: https://www.mql5.com/en/users/09151993a
XPro by Xander