Multiple indicators on one chart (Part 02): First experiments

Introduction
In the previous article "Multiple indicators on one chart" I presented the concept and the basics of how to use multiple indicators on one chart, without populating the screen with too many different details. The only purpose of that article was to present the system itself, to show how to create databases and how to take advantage of such databases, I did not provide the system code previous time. Here, we will start implementing the code, and in future articles we will expand the system functionality, making it more versatile and complete, as the system looks promising and has great possibilities for further improvement.
Planning
For make the idea easier to understand, but above all to make the system expandable, it has been divided into two separate files while the main code uses OOP (Object Oriented Programming) principles. All this ensures that the system can develop in a sustainable, secure and stable manner.
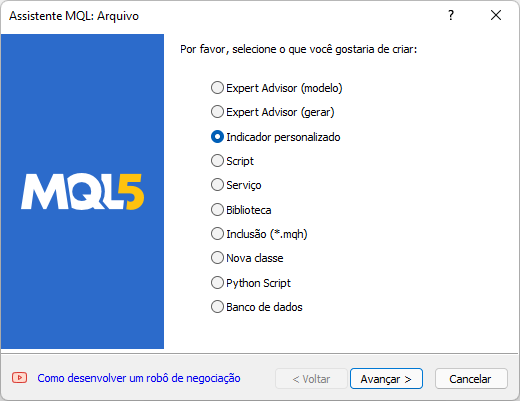
In this first step, we will use the indicator, so let's create one for this window:
Why do we use an indicator, and not any other file type? The reason is that with an indicator, we don't need to implement additional internal logic in order to create the subwindow — instead, we can instruct the indicator to do it, which saves us time and speeds up the system development. The indicator header will look as follows:
#property indicator_plots 0
#property indicator_separate_window
With just these two lines, we can create a subwindow on a symbol chart (for those who don't know how they work, please see the table below):
| Code | Description |
|---|---|
| indicador_plots 0 | This line informs the compiler that we will not track any data types; it prevents the compiler from showing warning messages. |
| indicator_separate_window | This line instructs the compiler to add the necessary logic to create a subwindow. |
This should be easy. For those who are not familiar with programming, some things in the source code may seem strange, but they simply follow widely used protocols that are accepted by the entire programming community. Since MetaTrader 5 uses the MQL5 language, which is very similar to C++, with slight differences, we can use the same way of programming that we use in C++. Thus, things become much easier. So, taking advantage of this fact, we can use a C language directive as follows:
#include <Auxiliary\C_TemplateChart.mqh> This directive instructs the compiler to include a header file which exists at a certain location. Shouldn't the full path be like Includes \ Auxiliary \ C_TemplateChart.mqh!? Yes, the full path looks like this, but MQL5 already knows that any header file should be located in the 'includes' directory, so we can omit the first part. If the path is enclosed in angle brackets, then it is an absolute path; if it is enclosed in quotation marks, then the path is relative, i.e. <Auxiliary \ C_TemplateChart. mqh> differs from "Auxiliary \ C_TemplateChart.mqh".
Continuing with the code, we get the following lines:
input string user01 = "" ;       //Used indicators
input string user02 = "" ;       //Assets to follow
String values can be input here. If you clearly know what command you want to use when opening the indicator, you can specify a default value here. For example, you always want to use RSI with the line width of 3 and MACD with the line width of 2. Specify it by default as follows:
input string user01 = "RSI:3;MACD:2" ;  //Used indicators
input string user02 = "" ;              //Assets to follow
The command can still be changed later, but the default value makes opening the indicator easier, as it will be already preconfigured to use the command. The next line will create an alias, through which we can access the object class that contains all the "heavy" code, allowing us to access its public functions.
C_TemplateChart SubWin;
Our code inside the custom indicator file is almost ready and we only need to add 3 more lines to get everything ready and functioning. Of course, our object class does not contain errors, but in this class we will see this inside. So, to finish the indicator file, add the following lines highlighted in green:
 //+------------------------------------------------------------------+
int OnInit ()
{
         SubWin.AddThese(C_TemplateChart::INDICATOR, user01);
         SubWin.AddThese(C_TemplateChart::SYMBOL, user02);

         return INIT_SUCCEEDED ;
}
//+------------------------------------------------------------------+

//...... other lines are of no interest to us ......

//+------------------------------------------------------------------+
void OnChartEvent ( const int id,
                   const long &lparam,
                   const double &dparam,
                   const string &sparam)
{
         if (id == CHARTEVENT_CHART_CHANGE ) SubWin.Resize();
}
//+------------------------------------------------------------------+
This is exactly what the custom indicator will have. Now, let's take a closer look at the black box in the file that contains our object class. From now on, attention should be focused on two functions, but to make it easier, let's start by looking at the functions that are present in our object class and see what each of them is used for.
| Functions | Description |
|---|---|
| SetBase | Creates an object required to display indicator data |
| decode | Decodes the command passed to it |
| AddTemplate | Adjusts things accordingly depending on the type of data presented |
| C_Template | Default class constructor |
| ~ C_Template | Class destructor |
| Resize | Change the subwindow size |
| AddThese | Function responsible for accessing and constructing internal objects |
That's it. As you see, we use functions RESIZE and ADDTHESE in our custom indicator. These are the only public functions at the moment, which means we have little to worry about as everything else is hidden inside our object ensuring that they will not be modified without the need. This provides high reliability of our final code. Let's proceed with the code that starts with the following definition:
#define def_MaxTemplates 6
This line is very important for our object class — it defines the maximum number of pointers that can be created. To add more or fewer of them, simply change this number. With this simple solution we have dynamic memory allocation and limit the number of indicators. Probably, this is the only point which you may want to change, but I think that 6 is a suitable number for most people and monitors used.
The next line is an enumeration which makes it easier to manage data at some points of the program:
enum eTypeChart {INDICATOR, SYMBOL}; The fact that this line is inside our class guarantees that it can have the same name in a different class, but the data specified in it belongs only to this object class. So, in order to correctly access this enum, use the form provided in the OnInit function of our custom indicator file. If the class name is omitted, it will be considered a syntax error and the code will not compile. The next line is a reserved word.
private :
It means that all that comes further will be private for this object class and will not be visible outside the class. I.e. access to anything further will be impossible if you are not inside the class. This improves code security, making class-specific private data inaccessible from anywhere else. Further lines declare some internal and private variables, until we get to the first real function of our class.
 void SetBase( const string szSymbol, int scale)
{
#define macro_SetInteger(A, B) ObjectSetInteger (m_Id, m_szObjName[m_Counter], A, B)

...

         ObjectCreate (m_Id, m_szObjName[m_Counter], OBJ_CHART , m_IdSubWin, 0 , 0 );
         ObjectSetString (m_Id, m_szObjName[m_Counter], OBJPROP_SYMBOL , szSymbol);
        macro_SetInteger( OBJPROP_CHART_SCALE , scale);
...
        macro_SetInteger( OBJPROP_PERIOD , _Period );
        m_handle = ObjectGetInteger (m_Id, m_szObjName[m_Counter], OBJPROP_CHART_ID );
        m_Counter++;
#undef macro_SetInteger
};
Let's consider this SetBase code segment in more detail. We start by declaring the macro - it tells the compiler how the simplified code with the macro name should be interpreted. I.e., if we have to repeat something several times, we can use this feature of the C language to produce something simpler. If by chance we have to change something, we'll change it only in the macro. This greatly speeds up work and reduces the possibility of errors in codes where only one or another argument will be modified.
By doing so, we create an object of type CHART. This may seem strange. Why are we using something that can be changed to changed things? Yes, it's true. The next step is to declare the asset to be used. The first point here: if at the time of chat saving there is no asset present, then the object will be linked to the currently used asset. If it is a specific asset chart, exactly this asset will later be used. Important detail: you can indicate a different asset and use generic settings with it, but I will explain it in detail in the next article. Because we will implement some improvements in this code to be able to do things which are currently not possible. Next, there is an information densification level which is indicated in the OBJPROP_CHART_SCALE property. We will use values from 0 to 5. Although we can use values out of this range, better keep it.
The next thing to pay attention to is the OBJPROP_PERIOD property. Please note that we are using the current chart period and if we change it, this one will also change. In the future, we will make some modifications that will allow to lock it. If you want to try it, you can use a period defined by MetaTrader 5, for example PERIOD_M10, which will indicate the display of data in a fixed 10 minute period. But this will be improved later. After that, we increment the number of sub0indicators by one and destroy the macro. I.e. it will no longer have a representation and will have to be redefined to be used elsewhere. Didn't I forget something! Yes, it's the line which is perhaps the most important part of this code.
m_handle = ObjectGetInteger (m_Id, m_szObjName[m_Counter], OBJPROP_CHART_ID );
This line captures something that can be considered as a pointer, though it's not really a pointer itself, but it allows us to do some extra manipulations over the OBJ_CHART object we have created. We need this value to apply some settings inside the object. They are in the settings file we created earlier. Continuing with the code, we come the following function, which can be seen in full below:
 void AddTemplate( const eTypeChart type, const string szTemplate, int scale)
{
	if (m_Counter >= def_MaxTemplates) return ;
	if (type == SYMBOL) SymbolSelect (szTemplate, true );
	SetBase((type == INDICATOR ? _Symbol : szTemplate), scale);
	ChartApplyTemplate (m_handle, szTemplate + ".tpl" );
	ChartRedraw (m_handle);
}
First we check whether it is possible or not to add a new indicator. If it is possible, check whether it is a SYMBOL, and if so, then the SYMBOL must be present in the Market Watch window, which is guaranteed by the function. Based on this, we create an object that will receive information. Upon execution, the template is applied to OBJ_CHART, and that's when the magic happens: we call the object again, but now it will contain data according to the definitions contained in the settings file that was used to define OBJ_CHART. Now it is simple, beautiful and understandable.
A lot could be done using these two functions. But we need at least one more function - its full code is shown below:
 void Resize( void )
{
         int x0 = 0 , x1 = ( int )( ChartGetInteger (m_Id, CHART_WIDTH_IN_PIXELS , m_IdSubWin) / (m_Counter > 0 ? m_Counter : 1 ));
         for ( char c0 = 0 ; c0 < m_Counter; c0++, x0 += x1)
        {
                 ObjectSetInteger (m_Id, m_szObjName[c0], OBJPROP_XDISTANCE , x0);
                 ObjectSetInteger (m_Id, m_szObjName[c0], OBJPROP_XSIZE , x1);
                 ObjectSetInteger (m_Id, m_szObjName[c0], OBJPROP_YSIZE , ChartGetInteger (m_Id, CHART_HEIGHT_IN_PIXELS , m_IdSubWin));
        }
         ChartRedraw ();
}
What the above function does is that it puts everything in its place, keeping the data always inside the subwindow area and there is nothing more to add here. Thus, we have finished all the necessary code for everything to work perfectly. But what about other functions?! Don't worry, the rest of the routines are not necessary at all, while they simply support the interpretation of command lines. However, let's have a look at something which is important for anyone who wants to modify this code in the future. It is the reserved word which appears in our object class code:
public : This word guarantees that from this moment on all data and functions can be accessed and viewed by other part of the code, even if they are not part of the object class. So here we declare what actually can be changed or accessed by other objects. In fact, the behavior of good object-oriented code is to never allow direct access to an object's data. In well-designed code, we will only have access to methods. The reason is simple - security. When we allow external code to modify data within a class, we run the risk that the data will not match what the object expects, and this would cause a lot of problems and headaches when trying to resolve inconsistencies or defects when everything seems right. So here is some advice I can give to someone who has been programming in C++ for years: NEVER allow external objects to modify or directly access data in a class you create. Provide functions or routines so that data can be accessed, but never allow access to data directly and ensure that the functions and routines support the data as expected by the class you created. With this in mind, let's move on to the last two functions of our tutorial, one of which is public (AddThese) and the other private (Decode). You can see them in full below:
void Decode( string &szArg, int &iScale)
{
#define def_ScaleDefault 4
         StringToUpper (szArg);
        iScale = def_ScaleDefault;
         for ( int c0 = 0 , c1 = 0 , max = StringLen (szArg); c0 < max; c0++) switch (szArg[c0])
        {
                 case ':' :
                         for (; (c0 < max) && ((szArg[c0] < '0' ) || (szArg[c0] > '9' )); c0++);
                        iScale = ( int )(szArg[c0] - '0' );
                        iScale = ((iScale > 5 ) || (iScale < 0 ) ? def_ScaleDefault : iScale);
                        szArg = StringSubstr (szArg, 0 , c1 + 1 );
                         return ;
                 case ' ' :
                         break ;
                 default :
                        c1 = c0;
                         break ;
        }
#undef def_ScaleDefault
}
//+------------------------------------------------------------------+
// ... Codes not related to this part...
//+------------------------------------------------------------------+
void AddThese( const eTypeChart type, string szArg)
{
         string szLoc;
         int i0;
         StringToUpper (szArg);
         StringAdd (szArg, ";" );
         for ( int c0 = 0 , c1 = 0 , c2 = 0 , max = StringLen (szArg); c0 < max; c0++) switch (szArg[c0])
        {
                 case ';' :
                         if (c1 != c2)
                        {
                                szLoc = StringSubstr (szArg, c1, c2 - c1 + 1 );
                                Decode(szLoc, i0);
                                AddTemplate(type, szLoc, i0);
                        }
                        c1 = c2 = (c0 + 1 );
                         break ;
                 case ' ' :
                        c1 = (c1 >= c2 ? c0 + 1 : c1);
                         break ;
                 default :
                        c2 = c0;
                         break ;
        }
}
These two functions do exactly what I explained above: they enforce data integrity within the object's class by preventing inconsistent data from becoming part of the class's internal data. They receive a command line and decode it following a predefined syntax,. However, they don't say that the received command has an error, as it is not their purpose. Their purpose is to ensure that inconsistent data does not enter the object and does not cause side effects that can be difficult to detect and fix.
The end result will be as follows:
Conclusion
I hope this code inspires you! I got interested in programming because it's beautiful and exciting. Although sometimes it gives us a lot of headaches if we want to be able to achieve some special results. But most of the time it's worth it. In the next article I will tell you how to make all this even more interesting. This article attachment contains the full code of the indicator, which can already be used as described in this and the previous article.
Translated from Portuguese by MetaQuotes Ltd.
Original article: https://www.mql5.com/pt/articles/10230
Warning: All rights to these materials are reserved by MetaQuotes Ltd. Copying or reprinting of these materials in whole or in part is prohibited.
This article was written by a user of the site and reflects their personal views. MetaQuotes Ltd is not responsible for the accuracy of the information presented, nor for any consequences resulting from the use of the solutions, strategies or recommendations described.

 Multiple indicators on one chart (Part 03): Developing definitions for users
 Learn how to design a trading system by ADX
 Tips from a professional programmer (Part III): Logging. Connecting to the Seq log collection and analysis system
 What you can do with Moving Averages
- Free trading apps
- Over 8,000 signals for copying
- Economic news for exploring financial markets
You agree to website policy and terms of use
The translation was made by a native linguist who has professionally studied Russian and has been living in Russia for a long time, so there is no machine translation. Perhaps, some terms and concepts of MQL5 language were translated a bit unusual for a programmer, but the style and essence of the original have been fully preserved.
Make a machine translation and see the difference.
I'm not a programming expert, but I'm having trouble installing the Chart_In_SubWindow_k_Version_1.0a.zip file, so that I can run multiple assets in the same window. Could you help me?
But there are no major difficulties... Since you say you're not a programming expert ... You simply download the ZIP file, unzip it into the MQL5 directory, use MetaEditor to compile the indicator. It will then be available for use in MetaTrader 5. It's as simple as that. Now, to actually use it. You need to read the ARTICLE and follow what is explained there. Because you don't just have to compile it and everything will work. You need to take a few extra steps, without skipping any of the ones shown in the articles where I explain the indicator. Then the indicator will actually work as shown in the animations. 🙂👍
Good evening!
I have done all the steps as shown in the article, but my chart does not load the SubWindow sub-windows. when applying three indicators, it only enters a blank space, the asset flashes and everything disappears, I have tried everything, but it does not fix. Could you send me a tamplate, with the main window being WINZ23 on 2m, with a subwindow with THE ASSETS: WINZ23 on 5m, WINZ23 15M, WINZ23 60M. And a WINZ23 2M asset template, with indicators, RSI, MACD, VOLUME. I think that the Chart In SubWindo file is not correct and is blocking. In addition, it would be interesting to provide a video teaching people. Without further ado, thank you in advance for your attention and help.