 MetaTrader 5
 Experts
 Indicators
 Scripts
 Libraries
 Storage
Join our fan page

Swing Trading Dashboard - indicator for MetaTrader 5

https://www.mql5.com/en/market/product/183575
ZigZag Maturity — Multi-Timeframe Swing Maturity & Reversal Probability Dashboard
- Views:
- 1508
- Rating:
- Published:
- Updated:
-
 You are missing trading opportunities:
- Free trading apps
- Over 8,000 signals for copying
- Economic news for exploring financial markets
Registration Log inYou agree to website policy and terms of use
If you do not have an account, please register -
 Need a robot or indicator based on this code? Order it on Freelance
Go to Freelance
Need a robot or indicator based on this code? Order it on Freelance
Go to Freelance
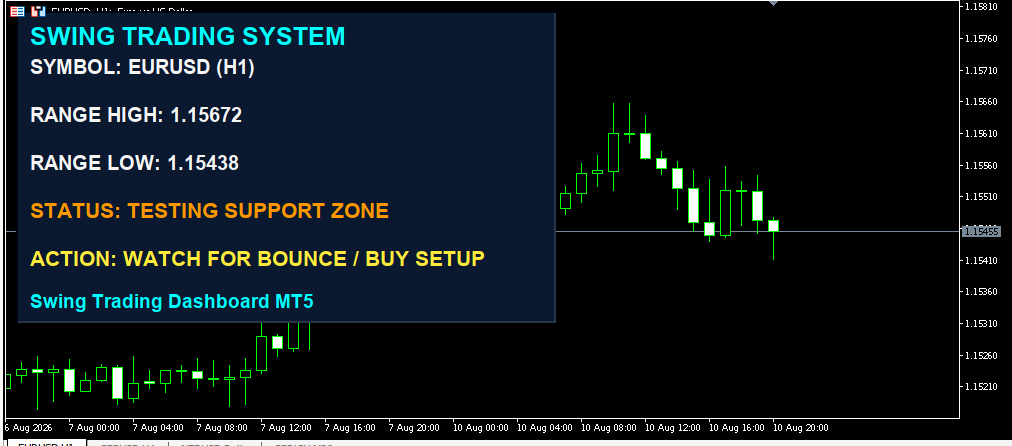
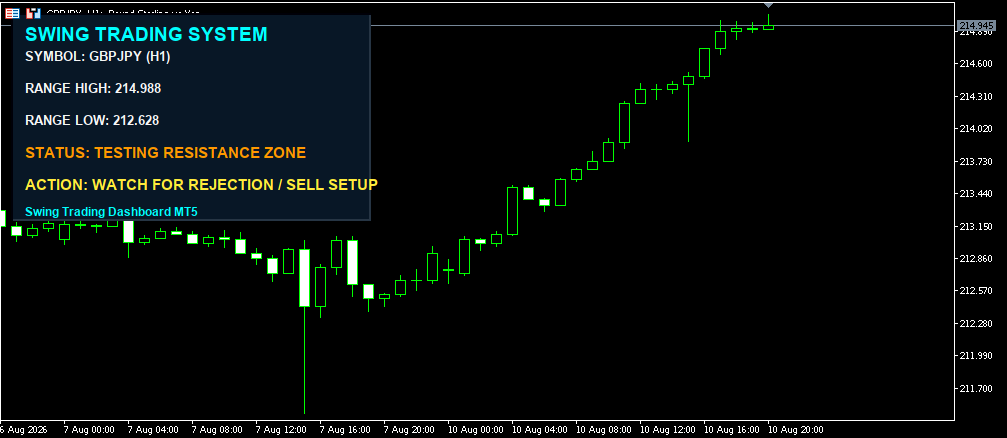
How the logic works:
- Takes the last InpLookbackBars closed candles (excludes the current, unfinished bar).
- Finds the highest High ( RANGE HIGH ) and lowest Low ( RANGE LOW ) within that lookback.
- Calculates a "buffer zone" ( InpZonePercent ) near each boundary — a resistance zone near the high and a support zone near the low.
- Compares the current closing price against these levels and displays a status:
- BULLISH BREAKOUT – price has broken above the range high
- BEARISH BREAKDOWN – price has broken below the range low
- TESTING RESISTANCE ZONE – price is in the upper zone, near the high
- TESTING SUPPORT ZONE – price is in the lower zone, near the low
- MID-RANGE OSCILLATION – price is somewhere in the middle, no clear signal
The panel refreshes every InpTimerSeconds seconds (via OnTimer ), not on every tick.
How it can be used in real trading
It's essentially a context tool, not a standalone entry signal. You can use it to:
- Quickly identify the current range without manually drawing support/resistance lines.
- Filter entries — avoid buying/selling in the middle of the range (where whipsaw risk is high) and wait for price to reach a marked zone.
- Confirm breakouts — when the status switches to BULLISH BREAKOUT / BEARISH BREAKDOWN, you can combine this with volume or another confirmation indicator before entering a trade.
- Monitor multiple symbols at once — since it's lightweight, you can run it on several charts to quickly scan which markets are near a range break.
It doesn't account for overall trend, volume, or volatility (ATR) — so it's best combined with other indicators or with contextual analysis (news, trading session, etc.).
Explanation of each input
Swing Settings:
- InpLookbackBars (default 20) — how many historical bars are used to calculate range high/low. Smaller = more reactive range but noisier. Larger = more stable range but slower to react.
- InpZonePercent (default 15%) — how "thick" the resistance/support layer is near the range edges, as a percentage of the range's span. Larger = wider zones, so the "testing" status triggers earlier.
- InpTimerSeconds (default 1) — how often (in seconds) the panel recalculates and redraws.
UI Position & Scaling:
- InpShowPanel — shows/hides the entire panel.
- InpPanelX , InpPanelY — panel offset from the chart's top-left corner, in pixels.
- InpBaseFontSize (default 10) — base font size; all other dimensions (title, text, panel width/height) auto-scale from this number.
Colors:
- InpColorBackground — background color theme for the panel (dropdown with 5 preset options).
- InpColorTitle — color of the title and footer text.
- InpColorText — color of standard text (symbol, range high/low).
- InpColorNeutral — color used for status/action when it's neither breakout, breakdown, nor testing a zone (default yellow).
- InpColorBorder — color of the panel's border.
(The breakout/breakdown/testing signal colors — green, red, orange — are hardcoded in the code, not configurable inputs.)
A few trading methods using this indicator
- Breakout + retest — wait for a BULLISH BREAKOUT / BEARISH BREAKDOWN status, then wait for price to pull back and retest the old range boundary (now acting as support/resistance) before entering, to avoid false breakouts.
- Range fading (mean reversion) — when the status is TESTING RESISTANCE ZONE, look for sell signals (rejection, reversal pattern), assuming the range holds; symmetrically for TESTING SUPPORT ZONE with buy signals. Works best in non-trending markets.
- Multi-timeframe trend confirmation — put the indicator on H4 or D1 for overall context (where the larger range sits), then take entries on M15/H1 only in the direction of the higher-timeframe status.
- "Do not trade" filter — if the status is MID-RANGE OSCILLATION, simply stay out; only enter once price reaches one of the marked zones.
Keep in mind the indicator doesn't manage risk, stop-loss, or position size — any of the methods above should be combined with your own risk management.
Scalping Dashboard
This indicator is a professional Scalping Dashboard utility designed specifically for MetaTrader 5 (MT5). It displays real-time vital market status information and scalping strategy conditions (based on Exponential Moving Arrows/EMAs), automatically computing spreads, momentum, and moving averages to output instant BUY/SELL SETUP visual signals.
Previous Week High Low Indicator
Plots the previous trading week's High and Low as horizontal reference levels across the current week, with optional multi-week history for context. No repainting, no discretion — the levels are read directly from the completed Weekly bar.
XAUUSD MTF Liquidity OB Reversal Breakout
XAUUSD MTF Liquidity & Order Block Reversal Strategy A professional Smart Money Concepts (SMC) based MT5 indicator designed primarily for **XAUUSD (Gold)**. The strategy combines multi-timeframe liquidity, order blocks, liquidity sweeps, breakout/reversal confirmation, and M1 swing-based risk management to identify high-probability BUY and SELL opportunities. Strategy Features Multi-Timeframe Liquidity Detection The indicator identifies important liquidity and order-block levels from: * Best Day-wise Liquidity * H4 Liquidity & Order Blocks * M30 Liquidity & Order Blocks * M15 Liquidity & Order Blocks * M5 Liquidity & Order Blocks The strongest day-wise liquidity replaces simple Previous Day High/Low logic and searches historical daily candles for significant liquidity concentrations.
 MT5 Cash Risk Probe - Read-Only Sizing
Read-only MT5 script that estimates stop-distance cash loss in account currency, reserves explicit cash costs and floors volume to the broker grid. It never sends or modifies an order.