Building a Multi-Stage Confirmation Indicator for Chaining Trend and Volume Signals in MQL4

Introduction:
Anyone who has spent time in trading knows the main problem isn't finding an indicator that gives signals; it's finding one that doesn't give you too many of them, like gold on the lower timeframes is noisy. A moving average crossfires, the price fakes out, and you're stopped! And five minutes later the real move starts without you because you've already lost trust in the tool.
I ran into this constantly while trading. My charts were cluttered with three or four separate indicators, and I was mentally trying to line them up by eye. Okay, the trend indicator flipped.
Did momentum confirm? Now, is there an actual reversal candle?
That mental checklist is accurately the kind of thing that should be automated, so that's what I built: a single indicator that only prints a signal once three independent tools agree, in the correct order, within a defined time window.
This article walks through the logic, not just the finished code. If you understand the state machine behind it, you can plug in your own three or more indicators and build the same kind of tool for whatever pair or timeframe you trade.
Why chaining beats combining:
There are two common ways people try to reduce false signals. Averaging multiple indicators into one composite value or requiring several indicators to agree at the same candle.
Both have a weakness! Averaging blurs the individual signals into something that doesn't clearly mean anything. Requiring simultaneous agreement is too strict. Real trend changes don't happen on a single candle; they unfold over a few candles as different aspects of price behavior (direction, momentum, and then confirmation) show up one after another.
What worked for me instead was a sequential chain:
Stage 1 has to happen first, then Stage 2 has to happen after Stage 1 and in the same direction, then Stage 3 has to happen after Stage 2 and, again, in the same direction. If any stage fires in the opposite direction before the chain completes, the whole sequence resets. Only when all three stages line up in order does the indicator draw a final signal arrow and fire an alert.
This mirrors how a plenty of discretionary traders actually read prices.
First you notice the trend character change, then you look for momentum to back it up, then you wait for a confirmation candle before pulling the trigger. I just wanted the platform to do that watching for me instead of me doing it manually at 2 am during the London-New York overlap.
Stage 1—Trend shift with a Hull Moving Average:
The first filter needs to be sensitive enough to catch a shift early but smooth enough that it isn't flipping every other candle.
A Hull Moving Average is a good fit here because it reduces lag compared to a simple or exponential moving average while still smoothing out a lot of tick noise.
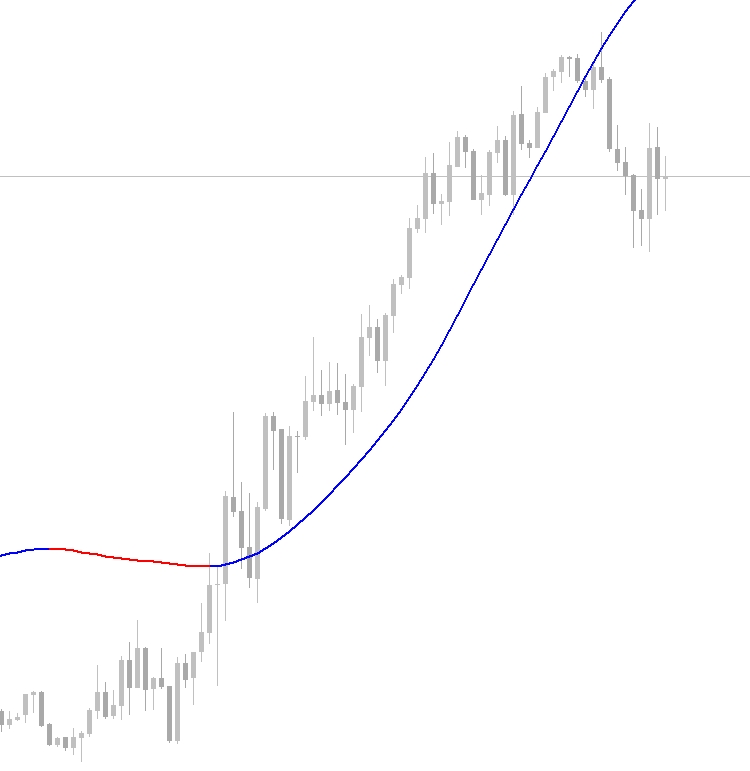
I use a color-change model. When the Hull Moving Average slope changes from falling to rising, that's a bullish Stage 1 event; the reverse for bearish. The important part isn't the Hull Moving Average
formula itself that's well documented; it's how you store the state so the next stage can reference it:
// Simplified Stage 1 detection
int stage1Direction = 0; // 1 = bullish, -1 = bearish, 0 = none
datetime stage1Time = 0;

if(hmaColor[1] != hmaColor[2])
  {
   stage1Direction = (hmaColor[1] == BullishColorIndex) ? 1 : -1;
   stage1Time = Time[1];
  }
The design decision is that Stage 1 doesn't draw anything on the chart and doesn't alert.
It just sets a flag and a timestamp. This is where a lot of "combo" indicators go wrong.
They treat every intermediate step as a tradeable signal, which just recreates the original noise problem one layer up.
Stage 2—Momentum confirmation with a follow line:
Once Stage 1 flags a possible direction change, the indicator starts watching for a follow line event in the same direction.
A follow line (sometimes called a SuperTrend-style line) flips above or below price based on a volatility band, so it acts as a decent proxy for whether momentum is actually behind this move now.
The logic checks two things: Does the following line flip match the Stage 1 direction, and did it happen after Stage 1 within a reasonable number of candles? (I use a lookback window rather than an unlimited one.)
if momentum doesn't confirm within 15–20 candles, the setup is probably dead and the chain should reset rather than sit around waiting indefinitely.
if(stage1Direction != 0 && followLineFlip == stage1Direction
   && Time[1] > stage1Time
   && (Time[1] - stage1Time) <= maxLookbackSeconds)
  {
   stage2Direction = stage1Direction;
   stage2Time = Time[1];
  }
This is the part that took the most tuning in practice. Too short a lookback window and the chain resets before momentum has a chance to catch up; too long and you end up matching a Stage 1 event from hours ago to a completely unrelated momentum flip.
I settled on a window scaled to the timeframe rather than a fixed candle count since gold's volatility character shifts noticeably between the Asian session and the London open.
How the follow-line-lead tolerance recovers missed signals
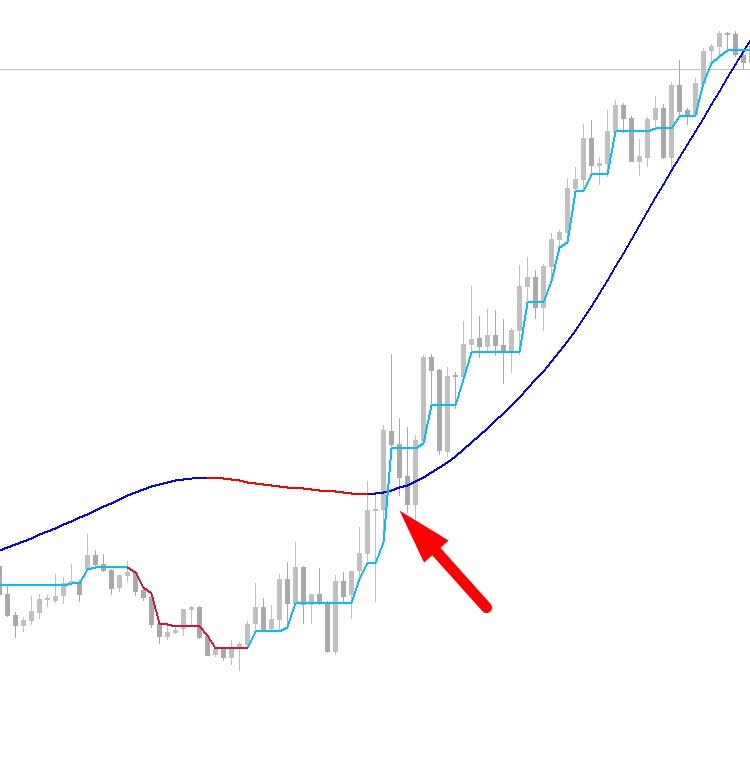
In a strict three-stage chain, the system only arms once Hull MA flips first and Follow Line confirms afterward in that exact order.
That ordering works well in slow, grinding markets, but in fast, impulsive moves, the two trend tools often flip almost on top of each other, and it's genuinely a coin toss which one reacts first.
The following is built on a Bollinger break plus an ATR trailing stop, so it's inherently quicker to react to a sudden expansion in range than the smoother, more heavily averaged Hull MA.
When price explodes off a low with real momentum, the follow line frequently snaps to the new trend a handful of candles before the Hull MA catches up, and under the strict rule, that's treated as an invalid sequence.
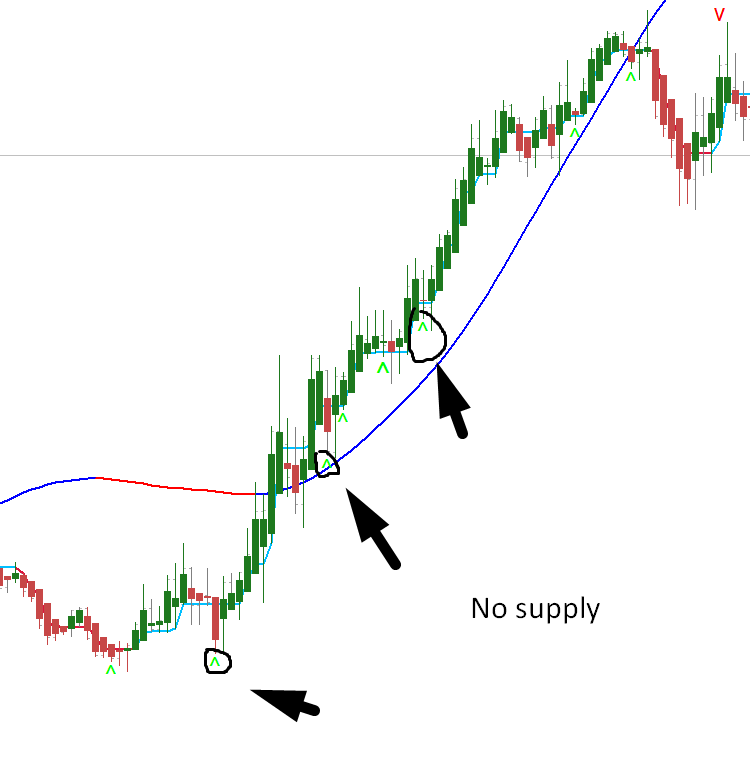
The chain never arms, stage 3's APB confirmation candle fires into a void with nothing to confirm, and the entire move gets skipped, exactly like the case you boxed on the chart. The FLBeforeHMATolerance setting closes that gap without loosening the actual confirmation logic;
it simply holds a "leading" follow line flip in memory for a defined window, and if Hull MA subsequently flips the same direction within that window, the chain arms retroactively flip at the point Hull MA confirms.
Nothing about stage 3 or the NSND strength check changes. You still need the APB candle, and you still only get the gold circle when a real supply/demand imbalance backs it up. All you've done is stop penalizing the system for indicator lag when both tools ultimately agree.
Stage 3—The confirmation candle
The final stage is a dedicated confirmation candle pattern.
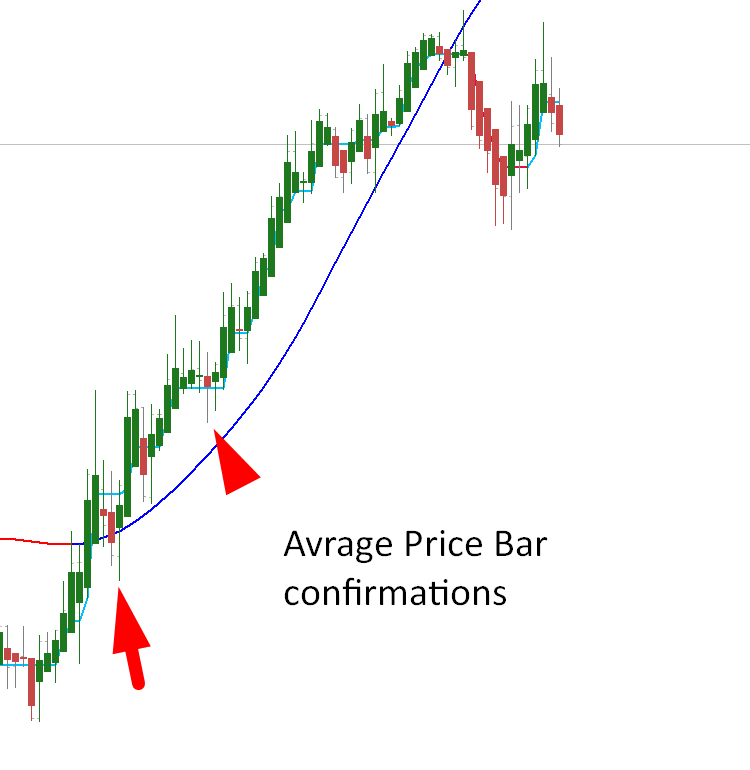
Similar in spirit to an APB accelerator/price-bar type confirmation candle, a candle that closes clearly in the direction of the move with a body large enough relative to the average recent range to suggest real conviction rather than a doji drifting through.
Only when this fires, in the same direction as Stage 2 and after it, does the indicator actually draw the arrow and send the alert.
if(stage2Direction != 0 && confirmationCandle == stage2Direction
   && Time[1] > stage2Time)
  {
   DrawArrow(Time[1], stage2Direction);
   Alert("Confirmed ", (stage2Direction == 1 ? "BUY" : "SELL"),
         " signal on ", Symbol());
   ResetChain();
  }
Notice the chain resets immediately after firing.
This stops the same three-stage sequence from producing repeated signals as price continues in one direction;
you get one clean arrow per confirmed setup, not a cluster of them.
Layering in a volume-based strength filter.
Even with three stages of confirmation, not every signal is equal.
Some come at genuinely strong turning points; others are technically valid but happen in a dead zone with no real participation behind them.
To separate the two, I added a no supply / no demand (NSND) check, which is a volume spread analysis concept.
A no-demand candle is a narrow up-candle on below-average volume in a downtrend context (weak buying), and a no-supply candle is the mirror image for downtrends.
Rather than using NSND as its own signal, which would just be a fourth stage and slow everything down further, I use it as a retroactive strength filter. When Stage 3 fires, the indicator looks at a small window around that candle (the signal candle itself, the three candles before it, and two candles after) for a matching NSND event.
If one is found, the original arrow gets a conviction signal without changing whether the alert fires.
bool strongSignal = false;
for(int i = -2; i <= 3; i++)
  {
   if(IsNSNDCandle(signalCandleIndex + i, stage2Direction))
     {
      strongSignal = true;
      break;
     }
  }

if(strongSignal)
   DrawCircleAroundArrow(signalTime);
This turned out to be the single most useful addition because it lets you keep every confirmed signal on the chart for context while still being able to glance at the chart and immediately see which ones had volume behind them.
In practice, the circled signals were noticeably more reliable on gold M5 than the uncircled ones.
Not a guarantee, but enough of a pattern that I now treat an uncircled arrow as "watch, don't act" and a circled one as "worth taking."
Testing notes:
I ran this on Gold M5 demo before touching anything live, which I'd recommend to anyone building a chained indicator like this.
The interactions between stages are accurately the kind of thing that looks fine in isolation and behaves differently once real spread and slippage are involved. A few things I'd flag from that process:
- Trade timing matters more than you'd expect.
The lookback window between Stage 1 and Stage 2 that worked well during the London/New York overlap was too tight during the Asian session, where gold moves more slowly. If you're trading across sessions, consider scaling the window by recent average true range instead of a fixed value. - Alerts need throttling.
Even with the chain reset, a choppy range can still produce a handful of valid-looking sequences in a short span. I added a minimum time gap between alerts to stop the indicator from talking over itself. - Backtest chained indicators candle by candle, not just on the final result.
Because each stage depends on the timing of the one before it, a subtle bug in Stage 2's window logic can silently swallow valid Stage 3 signals without ever throwing an error. Step through the Strategy Tester visually before trusting the alert count.
Why this matters specifically in trending markets
Why this matters specifically in trending markets
Trend-following systems live or die on capturing the early, high-momentum leg of a move rather than chasing it after the fact, and that early leg is precisely where lagging trend filters disagree on timing the most.
A market that's about to trend hard rarely gives you the polite, sequential "MA turns, then trend line turns, then confirmation candle" textbook order. It often gaps or thrusts, and every tool scrambles to catch up in whatever order its own math dictates. Without the tolerance window,
A strategy built on strict ordering systematically under-participates in exactly the conditions it's designed for it either enters late, well after the initial thrust, with a worse entry price and a smaller share of the total move left to capture, or it misses the leg entirely and has to wait for the next pullback-and-continuation setup, if one even comes before the trend exhausts.
By allowing the following to lead by a few candles, the system keeps its full three-part confirmation discipline intact while getting out of its own way on timing, which means more of the genuinely strong trending runs get taken near their origin instead of near their middle or end. That's the difference between a filter that's technically correct but chronically late and one that's still selective but actually present for the moves that pay.
None of the three individual components here, a Hull MA, a follow line, a confirmation candle, or a VSA no-supply/no-demand filter, is new.
What changes the outcome is refusing to treat them as separate tools you eyeball together and instead encoding the order and timing dependency between them directly into the indicator.
That's really the core idea worth taking away: when you're fighting noise on a pair like gold, the fix usually isn't a better single indicator; it's a stricter sequence.
If you're building something similar, I'd start with just two stages before adding a third.
Get the state machine and reset logic solid first, since that's where almost all the real bugs live, and only then layer in the strength filter on top.


![[Action Required]: Manual EA Pause Recommended](https://c.mql5.com/6/1027/splash-preview-775266.png "[Action Required]: Manual EA Pause Recommended")