

When I started developing ANDROMEDA, the goal wasn't to find "the one perfect signal" for Gold. Anyone who has traded XAUUSD for more than a few weeks knows that's a losing game, the market simply doesn't behave the same way in every session. Some days it grinds sideways in a tight range. Other days it moves 500 points in an hour on a news release. A strategy tuned for one of those conditions will inevitably struggle in the other.
So instead of chasing a single "holy grail" signal, I built ANDROMEDA around a different idea: run several independent trading systems at the same time, each one designed to recognize a different type of market behavior, and let the portfolio as a whole absorb the fact that no single approach works all the time.
A Portfolio, Not a Patchwork
Under the hood, ANDROMEDA is made up of a number of independent trading systems running in parallel. Some are built to catch short-term overbought/oversold conditions. Others are tuned to range or trend behavior on higher timeframes. One is built entirely around classic price-action tools — Alligator, Awesome Oscillator, and fractal breakouts, the kind of confluence-based logic Bill Williams traders will recognize immediately.
To keep this manageable from the trader's side, these systems are grouped into four portfolio profiles, each one can be switched on or off independently from the input panel. You don't need to understand what's running behind each profile to use the EA — you just decide how much of the portfolio you want active.
Grid Spacing That Actually Pays Attention
Averaging into a position when price moves against you is one of the most debated techniques in retail trading, and for good reason — done carelessly, it's how accounts blow up. ANDROMEDA does use this kind of basket management, so I want to be upfront about it rather than dress it up as something else.
Where I spent the most development time was on how new positions get added to a basket. Most grid systems either use a fixed point distance, or scale that distance with ATR. Both approaches share the same blind spot: they don't care whether the market is still moving against you or not. A fixed grid will happily keep adding positions straight into a strong trend, because that's all it knows how to do.
ANDROMEDA checks the market's short-term direction before adding anything. If price is still moving against the basket, no new position is added — the EA waits for the short-term bias to turn back in its favor first. It's a small difference on paper, but it changes how the system behaves during the exact conditions that hurt grid strategies the most: sustained, one-directional moves.
Drawdown Control, Built In and Optional
Because this is a grid-based portfolio, I didn't want drawdown management to be an afterthought bolted on with a warning label. It's a first-class setting.
ANDROMEDA includes a Drawdown Control input with four modes: close in $ and continue, close in $ and remove the EA from the chart, close in % and continue, or close in % and remove the EA from the chart. Once floating loss across all open baskets hits the threshold you set, every open position across every active strategy is closed. Whether the EA then keeps trading or detaches itself entirely is your choice, some traders want an automatic reset, others want to be forced to manually review what happened before restarting.
It's disabled by default, so it's there for traders who want that extra layer of control, not forced on anyone who prefers to manage risk their own way.
Testing It Honestly
I didn't test ANDROMEDA on a convenient two-year window that happened to look good. It's been run across the longest available Gold price history I could source, using data from multiple brokers and price feeds, and under a range of execution conditions, fixed slippage of 100ms, 200ms, and 500ms, plus randomized delay, over a seven-year span with no skipped or cherry-picked date ranges.
Under those conditions, on a 0.01 lot, the maximum drawdown recorded was $300 (2019–2026). That's not a "guaranteed" number going forward, markets change, brokers change, and past testing is exactly that: past. But it's a real figure from a real test, not a curve-fit backtest with the worst months quietly excluded.
Why a Dashboard Matters
One thing I noticed testing earlier versions of the portfolio: once you're running multiple independent strategies at once, "black box" behavior becomes a real problem. You open the chart and see... positions. No context.
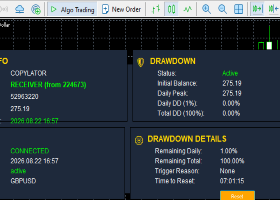
That's why ANDROMEDA includes a built-in on-chart dashboard — balance, equity, floating P/L, which strategies currently have baskets open, and the status of every filter, all visible at a glance. It's collapsible with one click and it's purely informational, so it doesn't touch execution speed.
Who This Is For
ANDROMEDA isn't built for someone looking for a "set it and forget it, zero risk" system, no honest grid-based EA can promise that, and I'm not going to pretend otherwise. It's built for traders who understand what basket averaging is, want a portfolio approach instead of a single signal, and want real controls (adaptive spacing, drawdown protection, per-profile toggles) rather than a black box.
If that sounds like your kind of system, the demo version is available to test directly in the Strategy Tester before you commit to anything. I'd genuinely recommend running it on your own broker's price feed first — spread and execution quality matter more for grid systems than for single-position EAs, so what works well on one broker's data won't automatically translate to another's.
You can also follow live performance directly through the signal page linked on the product's main listing.
Understanding the Inputs
ANDROMEDA's input panel is intentionally kept simple — most of the fine-tuning happens internally, behind the four portfolio profiles. What's exposed to you are the settings that actually matter for risk, environment, and scheduling. Here's what each one does.
Account identifier / Contact
These two fields are just informational — they identify the product and provide a contact reference. They have no effect on trading behavior.
Show UI Dashboard
Turns the on-chart dashboard on or off. It's purely visual and doesn't touch trading logic, but rendering it does use some resources — so if you're running a large batch of backtests and want maximum speed, turn it off. On a live or demo chart, there's no real reason not to leave it on.
Enable Journal
Controls whether ANDROMEDA prints its activity to the Experts log. Same idea as the dashboard — useful for keeping track of what the EA is doing, but disabling it shaves a bit of overhead off backtests when you're optimizing or running long historical tests.
Lot Sizing Mode
Choose between Fixed (you set an exact lot size) or Automatic (lot size is calculated from your account balance, based on the risk level you select). Automatic mode is mainly there for backtesting convenience — it lets you test how the portfolio scales as balance grows or shrinks, without recalculating lot size by hand.
Automatic Lot — Risk Level
Only relevant if Lot Sizing Mode is set to Automatic. Four presets — Conservative, Balanced, High, Extreme — each tied to a different balance-to-lot ratio. Balanced is the default and the one most of the testing has been done around.
Fixed Lot
The exact lot size used when Lot Sizing Mode is Fixed. Defaults to 0.01, which is also what the published backtest results are based on.
Drawdown Control Mode / Drawdown Threshold
Covered in more detail earlier in this post — four modes (close in $ or %, then either continue trading or remove the EA from the chart), with the threshold value set here. Disabled by default.
Magic Number
The identifier ANDROMEDA uses to recognize its own trades. Only relevant if you're running other EAs on the same account and want to make sure they don't interfere with each other. No need to touch this unless you have a specific reason to.
Maximum Spread
A safety filter — if the current spread on XAUUSD is wider than this value (in points), ANDROMEDA won't open new trades. Protects you from entering during unusually wide-spread conditions, like right around news releases or rollover.
Trading Direction Type
Lets you restrict the whole portfolio to Buy Only, Sell Only, or leave it as Both Directions (Per Strategy) — the default, where each system trades whichever direction it's designed for.
Profile Selection
This is where you choose between the built-in broker presets or Custom mode. Presets automatically enable the profile combination that testing showed works well for that broker group. Custom mode hands full control back to you — you decide which of the four profiles run, using the toggles below it.
Profile Toggles (Mix 1–4)
Only active in Custom mode. Each toggle switches one of the four portfolio profiles on or off. All four are enabled by default, meaning the full portfolio runs unless you decide to scale it back.
NFP Friday Filter
When enabled, ANDROMEDA won't open new trades on the first Friday of the month — when Non-Farm Payrolls is released and Gold volatility tends to spike unpredictably. On by default.
Close Trading Friday Night
When enabled, ANDROMEDA stops opening new trades and starts winding down positions ahead of the weekend, from the hour you set below. On by default, to avoid holding exposure through the weekend gap.
Friday Night Close Hour
The hour (server time) after which Friday trading stops, if the setting above is enabled. Defaults to 22:00.
Trade on [Day]
Simple day-of-week toggles — Monday through Friday are trader-configurable and on by default. Saturday and Sunday exist internally for completeness but aren't relevant for Gold trading and aren't exposed as adjustable settings.


![[iVISTscalp5]: XAUUSD. Forecast First. Market Reaction Afterwards](https://c.mql5.com/6/1035/splash-preview-777232.png "[iVISTscalp5]: XAUUSD. Forecast First. Market Reaction Afterwards")
