TRADEOPS USER MANUAL
IMPORTANT: TradeOps does not work in the MetaTrader 5 Strategy Tester. It is designed for interactive use on a normal MetaTrader 5 chart. For testing before using real funds, attach TradeOps to a chart on a broker demo account.
CONTENTS
1. Introduction
2. Installation
3. Panel Overview
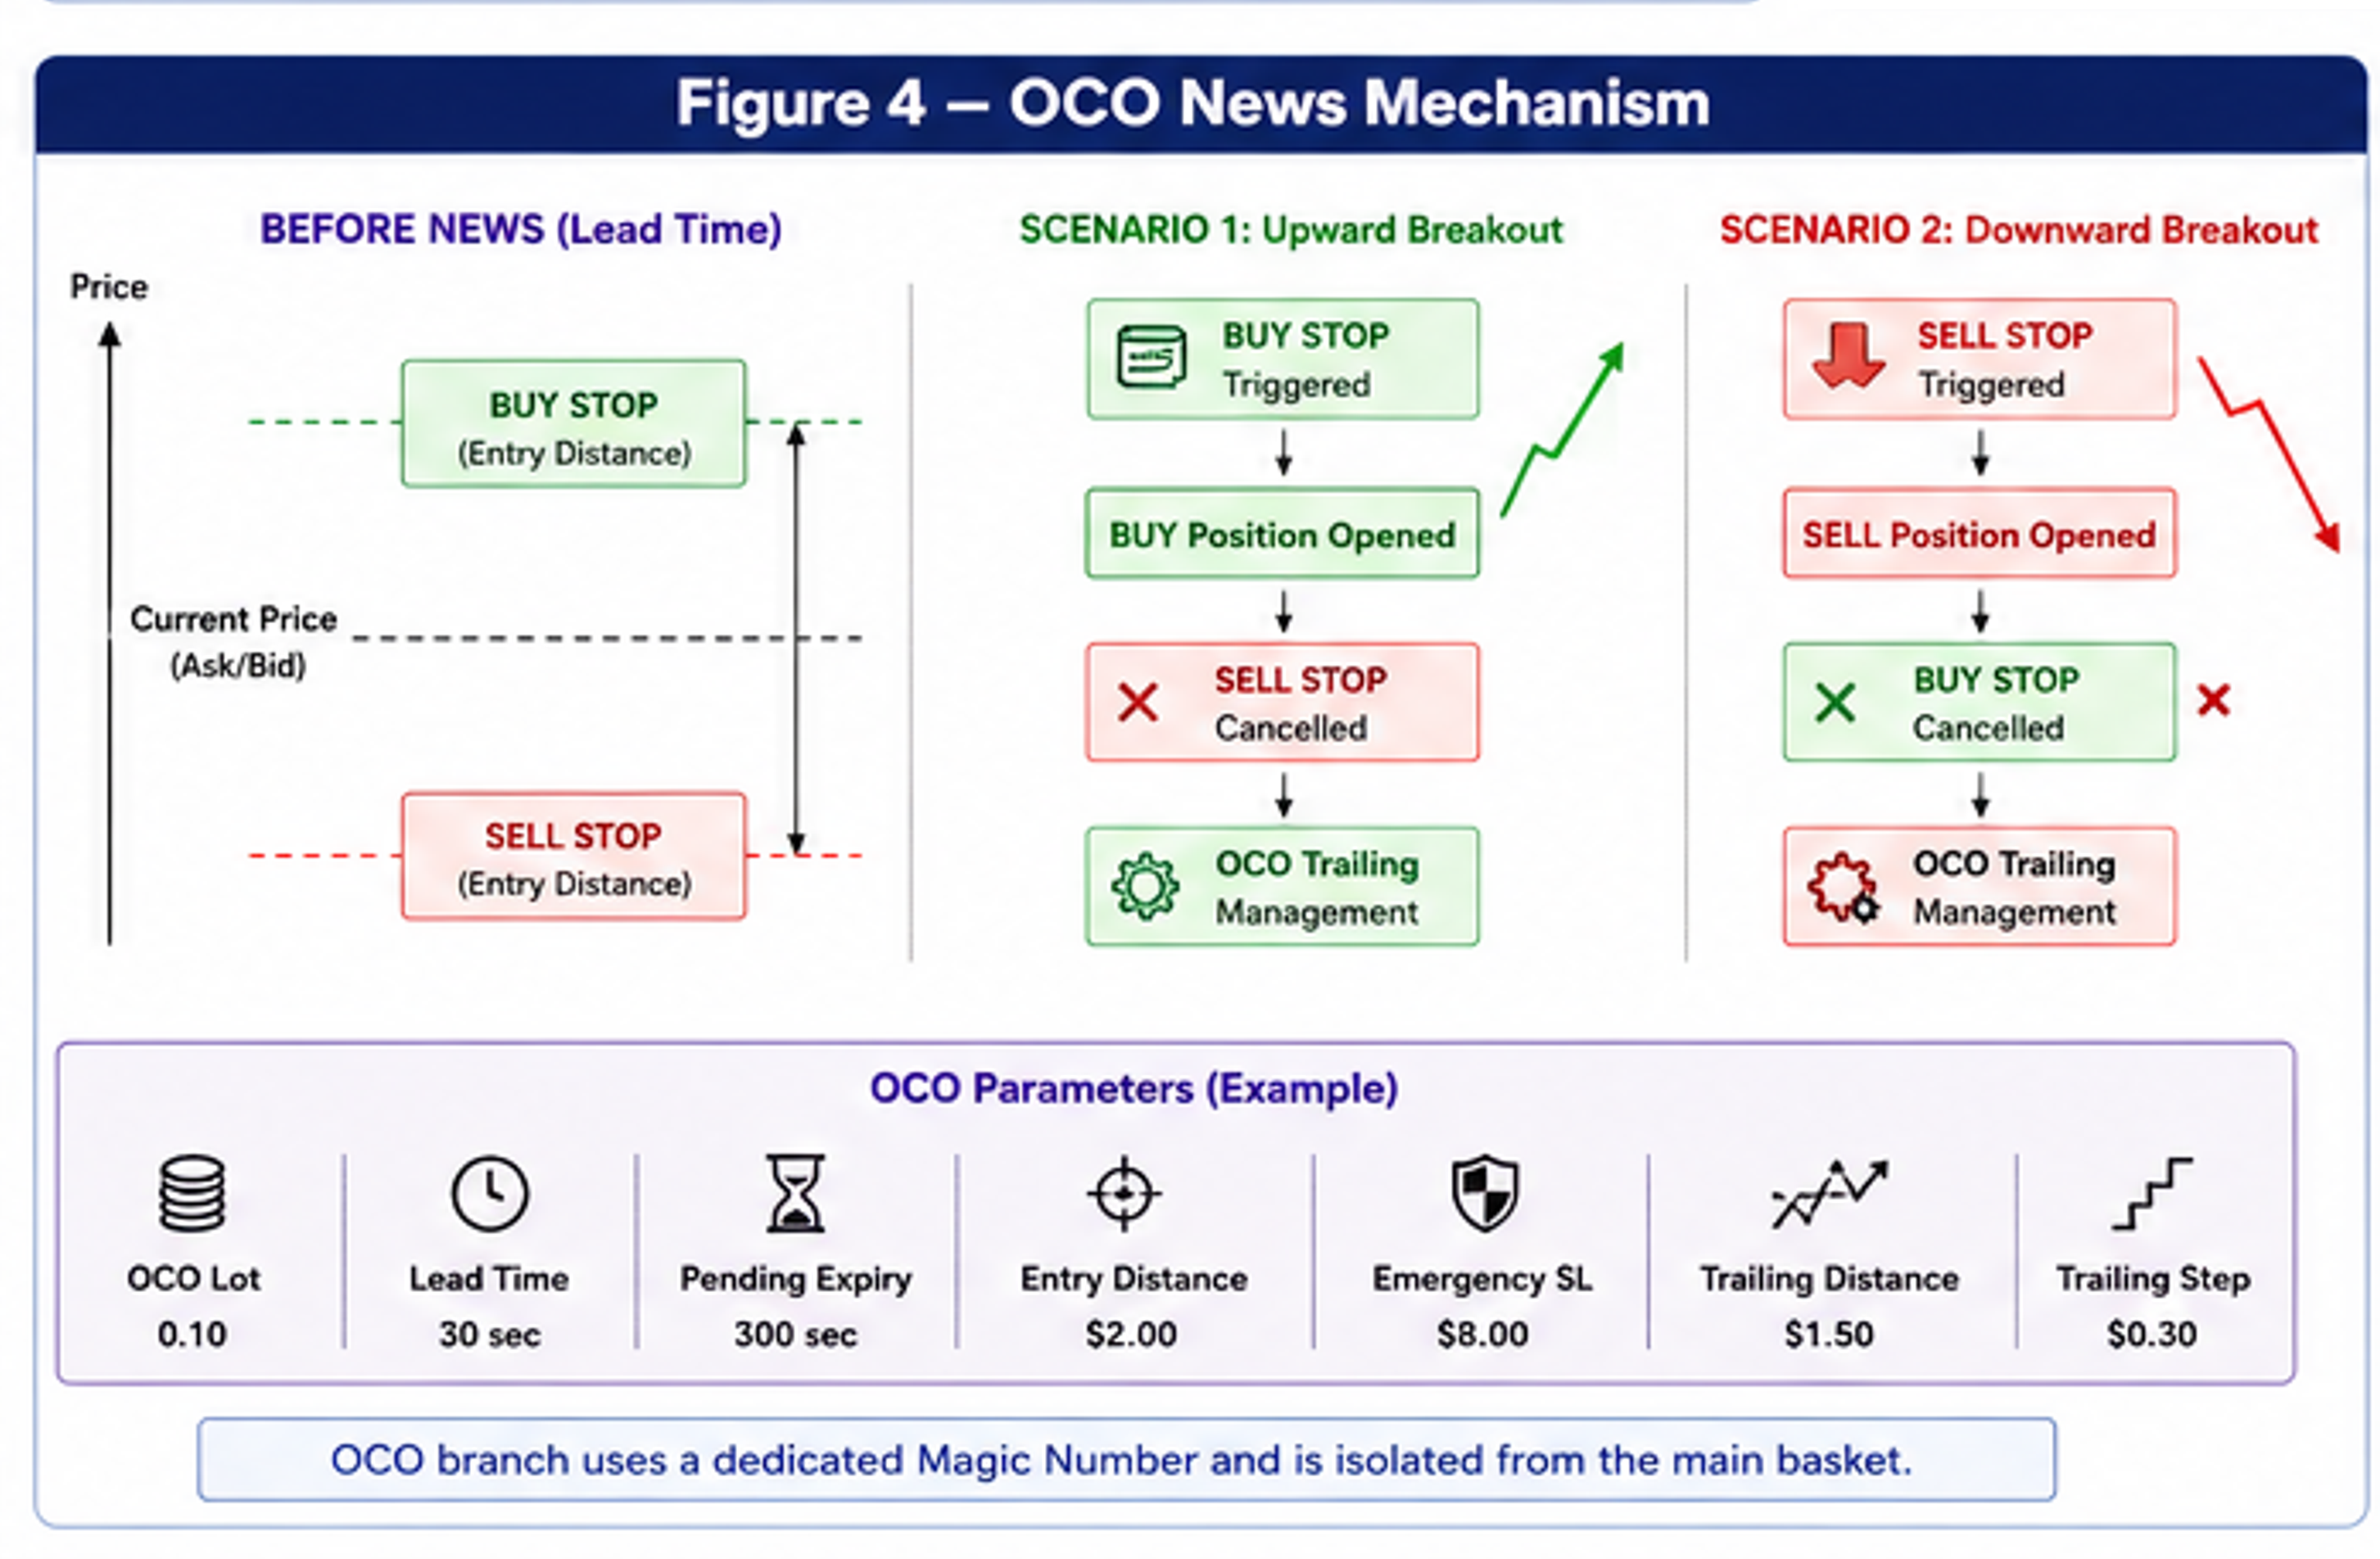
4. Trade Tab
5. The Risk:Reward (RR) Tool
6. OCO - One-Cancels-The-Other Orders
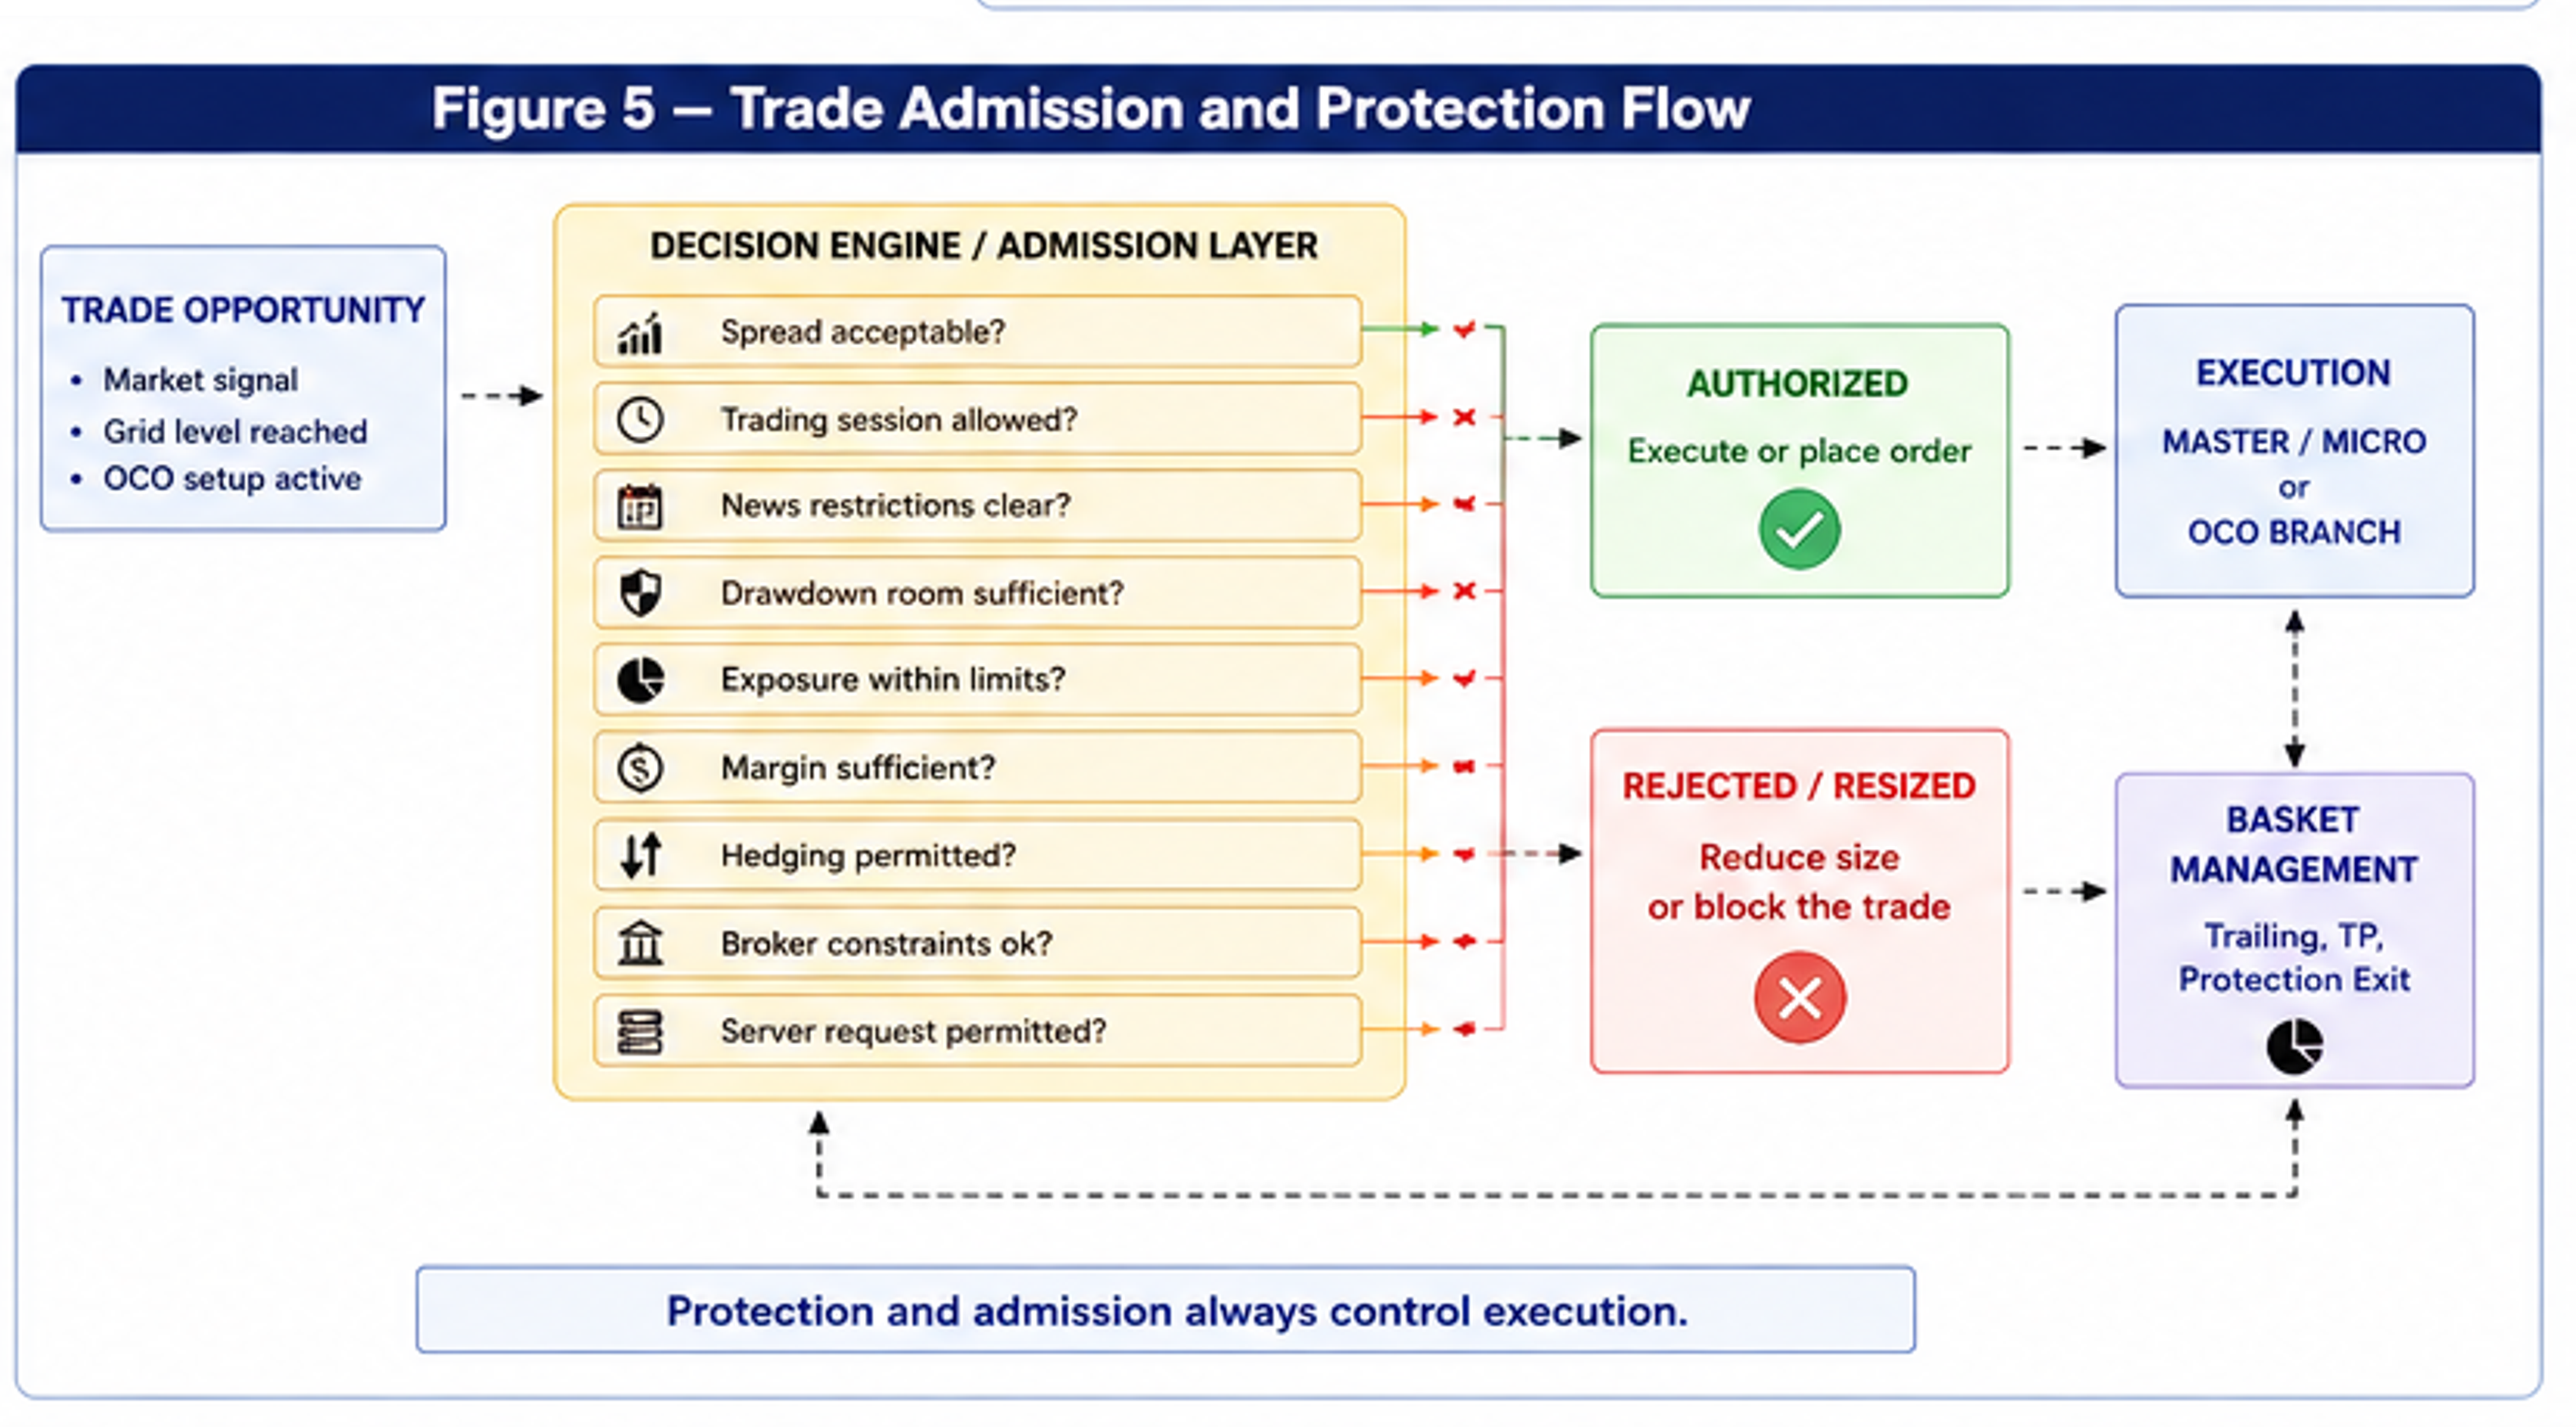
7. Rules Tab
8. Close Tab
9. Grid Tab
10. Trailing Tab
11. Breakeven Tab
12. Partial Tab
13. Settings Tab
14. Trade History On The Chart
15. Alerts
16. Hotkeys
17. Performance Dashboard
18. Risk Monitor
19. Panel Appearance: Scale, Theme & Colours
20. Full Input Reference
21. Operating Requirements And Limitations
22. Troubleshooting And FAQ
23. Risk Disclaimer
1. INTRODUCTION
TradeOps is a MetaTrader 5 trade management panel designed to help you plan, place, and manage trades directly from your chart. It replaces manual order-ticket entry with a visual, drag-and-drop workflow, and adds a full suite of trade-management automation: trailing stops, breakeven, partial closes, grid averaging/hedging, One-Cancels-the-Other (OCO) order pairs, a pre-trade rules engine, and a Performance Dashboard.
TradeOps does not generate trading signals or open an initial strategy trade without your instruction. Every initial trade is started by you through the panel, the on-chart Risk:Reward tool, or a configured hotkey. After you have opened a trade and explicitly enabled a management feature, TradeOps can manage it according to your settings. This can include modifying Stop Loss levels, moving a trade to breakeven, closing part of a position, or placing additional Average-In or Hedging grid legs when the Grid feature is armed.
This manual explains each panel feature, control, field, and workflow from the user perspective; it does not cover internal code or proprietary calculation formulas.
Key Features at a Glance
TradeOps is a trade-management utility, not a guarantee of execution or profitability. Orders are still checked and executed by your broker under the broker's symbol specifications, trading conditions, and account rules.
2. INSTALLATION
A separate TradeOps MT5 Installation Guide is supplied with this manual. It covers installation from the MQL5 Market, installation of an officially supplied time-limited demo file, trading permissions, updates, activations, and common setup problems.
Quick Installation Summary
TradeOps does not require DLL imports or WebRequest permissions. Do not enable those permissions solely for TradeOps. For your first setup, use a demo trading account and place a very small test trade before relying on any management automation.
3. PANEL OVERVIEW
The main TradeOps panel is divided into a header area, a secondary information bar, and eight working tabs.
Managed Symbol and Managed Ticket
The panel can be dragged to another chart position and rescaled through the panel/input settings. For full visual management of several symbols at the same time, use separate TradeOps instances on separate symbol charts.
Magic Number and Multiple Instances
TradeOps uses its configured magic number to identify the trades it places. Use distinct magic numbers when multiple instances should manage separate trade sets. Using the same magic number across instances can make their management scope overlap.
MetaTrader 5 permits only one Expert Advisor per chart. Attach each additional TradeOps or other Expert Advisor instance to a separate chart.
4. TRADE TAB
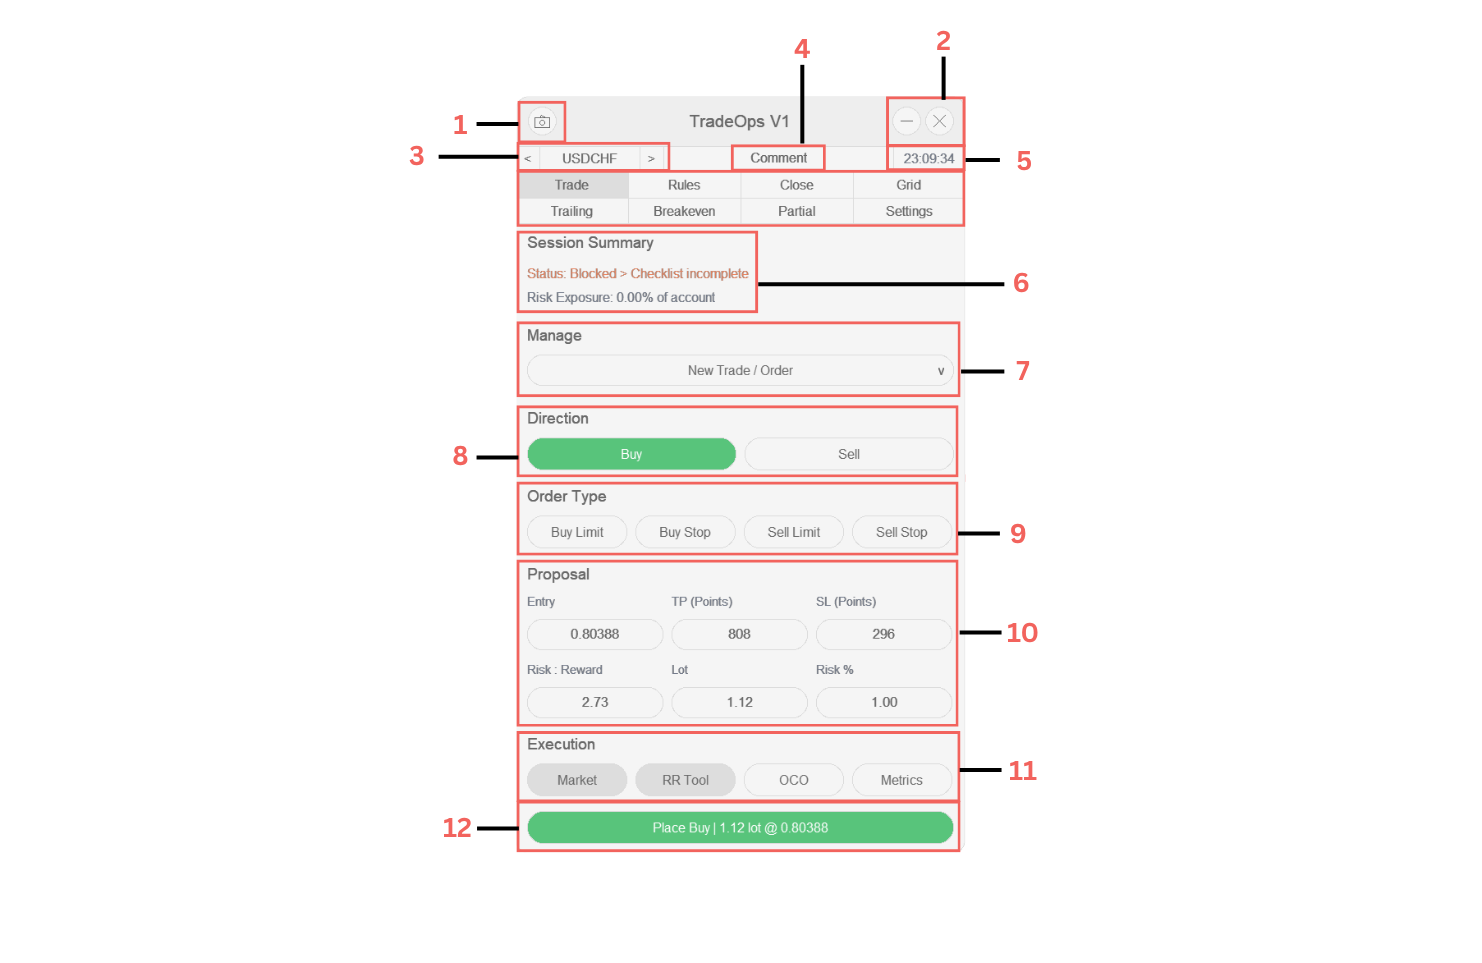
Permanent Panel Controls
Trade Controls
Managing Existing Trades
Use 7 to switch from New Trade / Order to an existing position, pending order, or OCO pair. The other tabs then show or edit the management settings associated with that selection rather than a new trade setup.
Example: Placing a Market Trade
Example: Placing a Pending Order
Broker Validation
TradeOps prepares and sends the request, but the broker makes the final acceptance decision. Requests can be rejected because of invalid price/stops, Stops Level or Freeze Level, margin, market closure, unsupported order type, volume rules, or other broker-side conditions. Check Experts and Journal when an order is not accepted.
5. THE RISK:REWARD (RR) TOOL
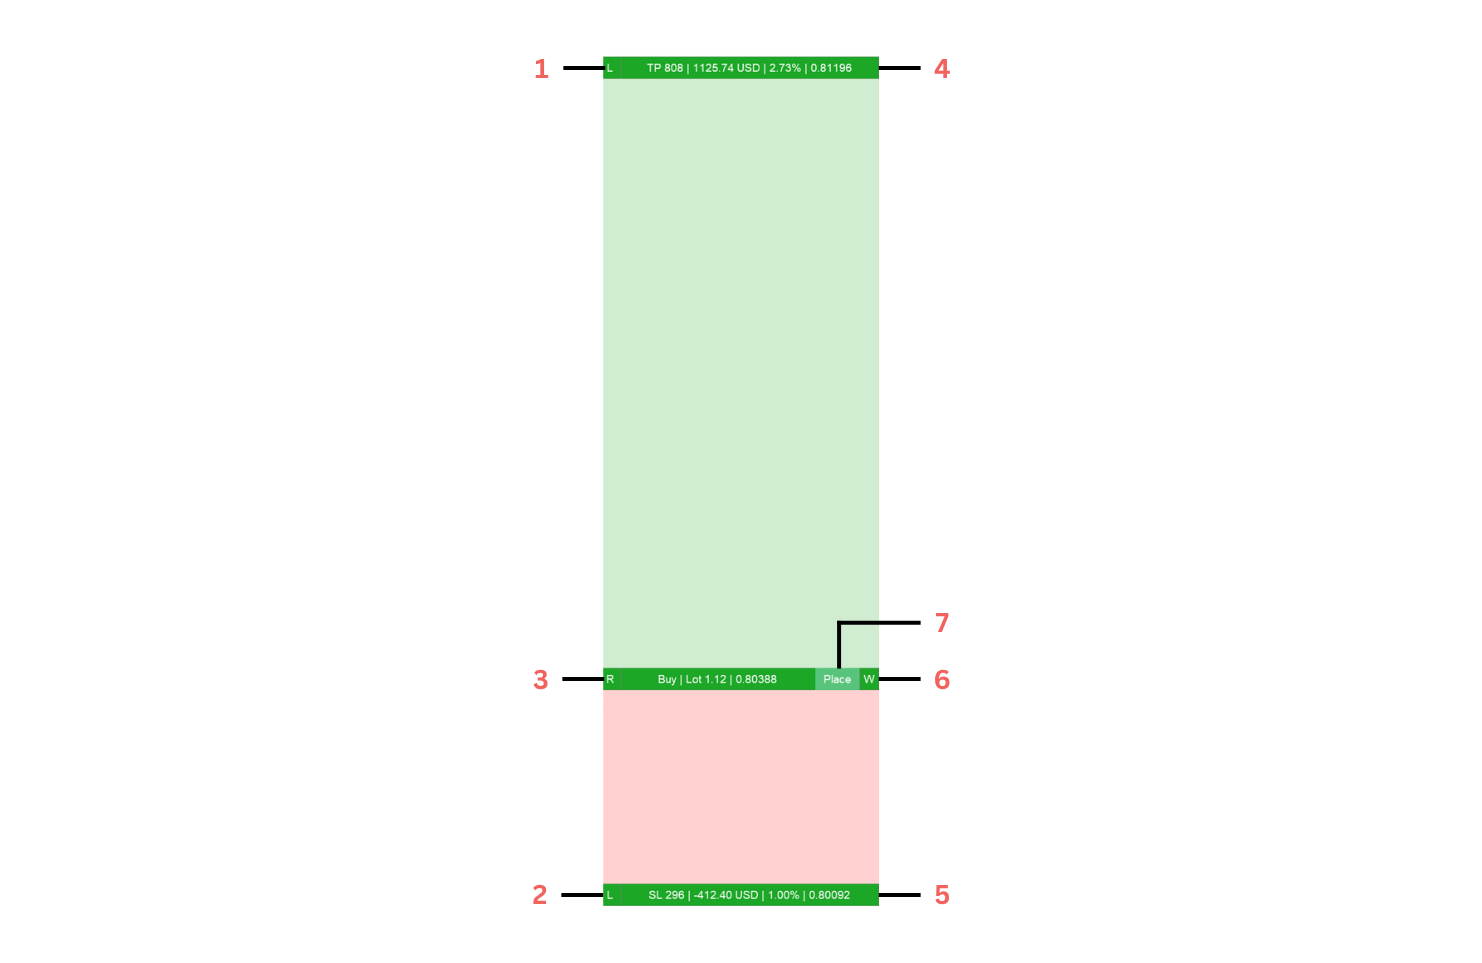
Enable the RR tool with the RR Tool control at 11. When enabled, it draws a visual trade plan directly on the chart with Take Profit, Entry, and Stop Loss levels. The green area represents the planned reward zone between Entry and Take Profit, while the red area represents the planned risk zone between Entry and Stop Loss.
1 - Take Profit Lock
The "L" button on the Take Profit bar locks the TP distance from Entry. When active, moving the Entry level carries the Take Profit level with it so the locked point distance is maintained. When unlocked, the Take Profit level can remain at its own price while Entry is moved.
2 - Stop Loss Lock
The "L" button on the Stop Loss bar works in the same way for the SL distance. When active, moving Entry carries the Stop Loss level with it and keeps the locked point distance unchanged.
3 - Reverse Direction
The "R" button reverses the planned trade direction from Buy to Sell or Sell to Buy. TradeOps mirrors the setup around Entry, swaps the Stop Loss and Take Profit sides as required, and updates the applicable pending-order type. This control is available when planning a new trade rather than managing an existing ticket.
4 - Take Profit Bar
The Take Profit bar is draggable. Move it vertically to change the planned Take Profit price and TP distance. The bar displays the current TP distance in points, estimated monetary value, percentage value, and price, with the displayed values updating live as the bar is moved.
5 - Stop Loss Bar
The Stop Loss bar is draggable. Move it vertically to change the planned Stop Loss price and SL distance. The bar displays the current SL distance in points, estimated monetary value, percentage risk, and price, with the displayed values updating live as the bar is moved.
6 - Width Handle
The "W" handle on the right side of the Entry bar is draggable and changes the horizontal width of the RR tool. This lets you make the visual tool wider or narrower on the chart without changing the Entry, Stop Loss, or Take Profit prices.
7 - Place Trade / Order
The Place button submits the trade or pending order currently configured by the RR tool. The request remains subject to the active TradeOps rules and checklist, your configured confirmation behaviour, account conditions, and final broker validation.
Dragging the RR Tool
All displayed values update live as you drag, so you can see the effect of each adjustment before placing the trade or order.
Market Snap
The Market control at 11 also affects the RR tool directly. While active, the Entry level follows the live Bid/Ask price as the market moves. Toggle Market off to plan an entry at a fixed price instead.
Helper Preview Lines
When Grid, Trailing, Breakeven, or Partial features are enabled for the currently selected trade, the RR tool can also show additional preview lines indicating where those features will act - for example, Average-In or Hedge grid levels, Breakeven Start/Offset levels, Trailing Start/Distance levels, and Partial TP/SL levels. These update as the relevant settings are changed so the wider management plan can be reviewed directly on the chart.
Calculation and Execution Notes
RR values are planning estimates based on current price, account data, and broker specifications. Actual execution can differ because of spread, slippage, commission, price gaps, volume rounding, Stops Level, Freeze Level, or changing market conditions. If a request is rejected, review the affected levels and check the Experts and Journal tabs.
6. OCO - ONE-CANCELS-THE-OTHER ORDERS
OCO lets you place two opposite pending orders at once (for example, a Buy Stop above the market and a Sell Stop below it) so that whichever one triggers first automatically cancels the other. This is useful for breakout setups where you don't know which direction the market will move.
Placing an OCO Pair
While the Pair Is Active
Managing/Closing an OCO Pair
The Close tab (see Section 8) automatically relabels its buttons when an OCO pair is selected - for example "Delete OCO Pair" instead of "Delete Selected" - so you can cancel both legs together with one click.
Important OCO Operating Requirement
Automatic cancellation of the remaining OCO leg is performed by TradeOps. Keep MetaTrader 5 open, connected, and allowed to trade until the pair is resolved. After a restart, confirm the linked pair is restored in Manage before relying on automatic cancellation.
7. RULES TAB
1 - Rules
The Rules area contains the numerical limits that can block a new trade before it is placed.
Set a rule to 0 where the corresponding rule is designed to be disabled by zero. When a rule blocks trading, the Place button at 12 is disabled and the Session Summary at 6 identifies the blocking reason.
2 - Checklist
The Checklist area contains the eight configurable pre-trade checks. Click each item to mark it complete, or use Tick All where appropriate. If a required item remains unticked, the trade is blocked and 6 reports that the checklist is incomplete.
If checklist reset-after-trade is enabled, the items return to their unticked state after each placed trade so they must be confirmed again before the next trade.
How Daily Rules Reset
Trades Per Day, Max Daily Losses, Max Daily Profit %, and Max Daily Loss % use the broker server day shown at 5. They reset when the broker server reaches midnight, which may differ from your local time.
Rules block new trade placement; they do not automatically close existing positions. Existing management features can continue to operate. Grid legs are additionally controlled by Follow Rules at 1 on the Grid tab.
A Ready status at 6 means TradeOps rules allow the request; it does not guarantee broker acceptance or execution.
8. CLOSE TAB
1 - Open Positions
Shows the bulk position-closing actions and the live P/L and total counts for each action. Available actions include Close Buy, Close Sell, Close Profit, Close Loss, and Close All. The displayed totals show what is currently within scope before you act.
2 - Pending Orders
Shows the bulk pending-order deletion actions: Delete Stop, Delete Limit, and Delete All. When an OCO pair is specifically selected, the action adapts so the linked pair can be removed together.
3 - Scope
This Symbol limits actions to the currently managed symbol. Whole Account applies the bulk action across the account. If a specific ticket or OCO pair is selected at 7 on the Trade tab, the action can narrow to that selection and the button wording changes accordingly.
4 - Profit/Loss Thresholds
Profit >= and Loss <= optionally restrict position-closing actions to positions meeting the entered account-currency threshold. Leave the values at 0 when no threshold filter is required.
Close-Action Safety
Bulk close and delete actions can affect multiple positions/orders immediately and cannot be undone. Before clicking, confirm the selected item at 7 on the Trade tab, the scope at 3, the action row at 1 or 2, and any threshold at 4.
A close/delete request can be rejected or only partly completed because of market conditions, execution rules, or a connection problem. Always verify the remaining positions and orders in MetaTrader 5 after a bulk action.
9. GRID TAB
1 - Global Grid Settings
Max Trades excl. initial limits the number of additional grid legs beyond the original trade. Follow Rules decides whether grid placement remains subject to applicable TradeOps risk-rule limits.
2 - Average In
Controls same-direction additional exposure. The Lines button shows or hides draggable Average-In preview lines on the chart without arming the feature, so levels can be positioned first. % Increase controls how lot size changes for successive legs; Start (pts) sets the first trigger distance; Step (pts) sets the spacing between later levels; Close % sets the combined basket profit target used to close the whole basket.
3 - Hedging
Controls opposite-direction hedge exposure. The Lines button works the same way as Average In's, showing or hiding the draggable Hedging preview lines without arming the feature. % Increase, Start, Step, and Close % work in the same general way as Average In but apply to hedge legs.
4 - Grid Activation / Status
Shows the arming state for whichever method's Lines button (2 or 3) is currently on. Grid Inactive means no method is selected yet. Activate Average In / Activate Hedging means that method's lines are shown and can be dragged into position, but Grid has not been armed. Average In Active / Hedging Active means Grid is armed and TradeOps can place configured legs as trigger levels are reached. Once armed, dragging a line or editing a field commits the new value to the live grid immediately - there is no separate re-confirmation step.
The RR tool draws preview lines for the currently selected method's levels as soon as its Lines button is on, whether or not Grid has been armed yet, helping you see and adjust the planned Average-In and Hedge levels on the chart before committing to them.
Account Type: Netting and Hedging
On a netting account, same-symbol entries combine into one net position and opposite trades can reduce, close, or reverse it. On a hedging account, separate same-symbol and opposite-direction positions can coexist. This materially changes how 2 and 3 behave in practice.
Grid Availability and Risk
Grid placement is terminal-side. MetaTrader 5, the internet connection, TradeOps, and Algo Trading must remain active for new grid legs to be sent. Increasing exposure as price moves against a trade can rapidly increase margin use and losses; use strict limits and a tested exit plan.
10. TRAILING TAB
1 - Method Selector
Chooses the trailing method used for the currently managed trade.
2 - Method Settings
Displays the inputs required by the selected method. In Points mode, the screenshot shows Start and Distance. Other methods replace these fields with their own parameters.
3 - Show Lines / Activate / Active
Controls Trailing in two steps. The first press shows the draggable Start/Distance preview lines on the chart without arming Trailing, so they can be positioned first, and the button then reads Activate. The second press arms Trailing at the current line positions and the button reads Active. Pressing it again while Active turns Trailing off completely and returns to the first step.
Available Trailing Methods
Trailing and Breakeven cannot both be shown or active on the same trade. If Breakeven's lines are shown or it is active, disable it before starting Trailing at 3, and vice versa.
Trailing Stop Operating Requirement
Trailing logic runs inside MetaTrader 5. The terminal must remain open, connected, and allowed to trade for the Stop Loss to continue moving. A Stop Loss already accepted by the broker remains server-side if the terminal closes, but it will not continue trailing until TradeOps runs again.
11. BREAKEVEN TAB
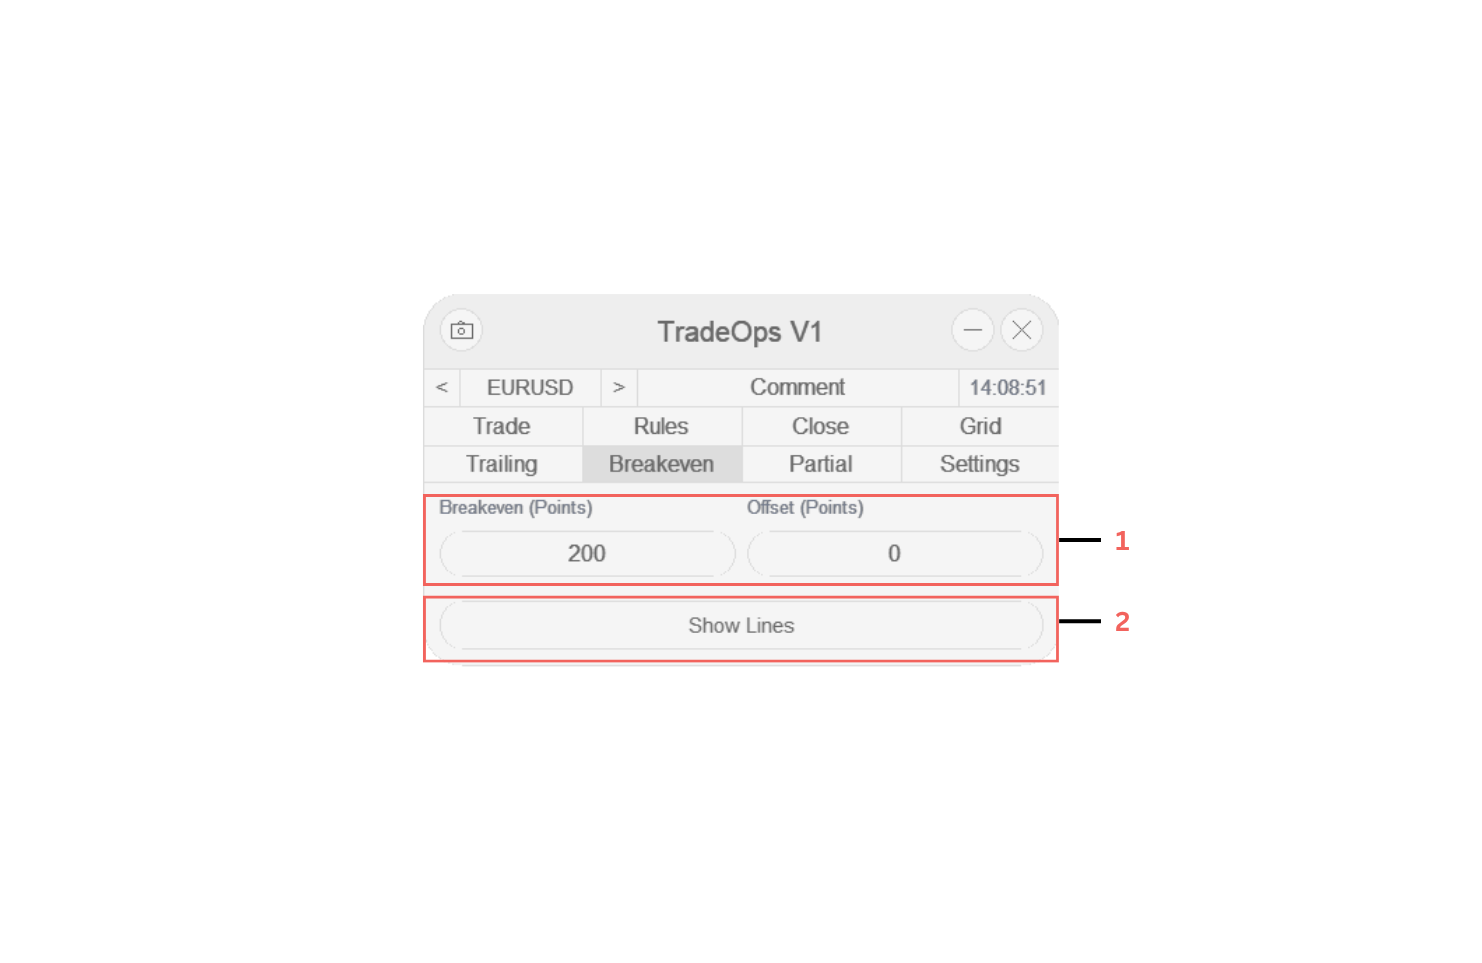
1 - Breakeven Settings
Breakeven (Points) is the profit distance required before the Stop Loss move is triggered. Offset (Points) controls how far beyond exact entry the new Stop Loss is placed. Where configured, the offset can automatically follow spread instead of using a fixed value.
2 - Show Lines / Activate / Active
Controls Breakeven in two steps. The first press shows the draggable trigger/offset preview lines on the chart without arming Breakeven, so they can be positioned first, and the button then reads Activate. The second press arms Breakeven at the current line positions and the button reads Active. Pressing it again while Active turns Breakeven off completely and returns to the first step.
Breakeven and Trailing cannot both be shown or active on the same trade. Disable Trailing at 3 on the Trailing tab before starting Breakeven at 2 where necessary.
Breakeven Operating Requirement
The trigger is detected and submitted by TradeOps, so MetaTrader 5 must be running, connected, and allowed to trade when the trigger is reached. Once the new Stop Loss is accepted, that Stop Loss is held by the broker.
12. PARTIAL TAB
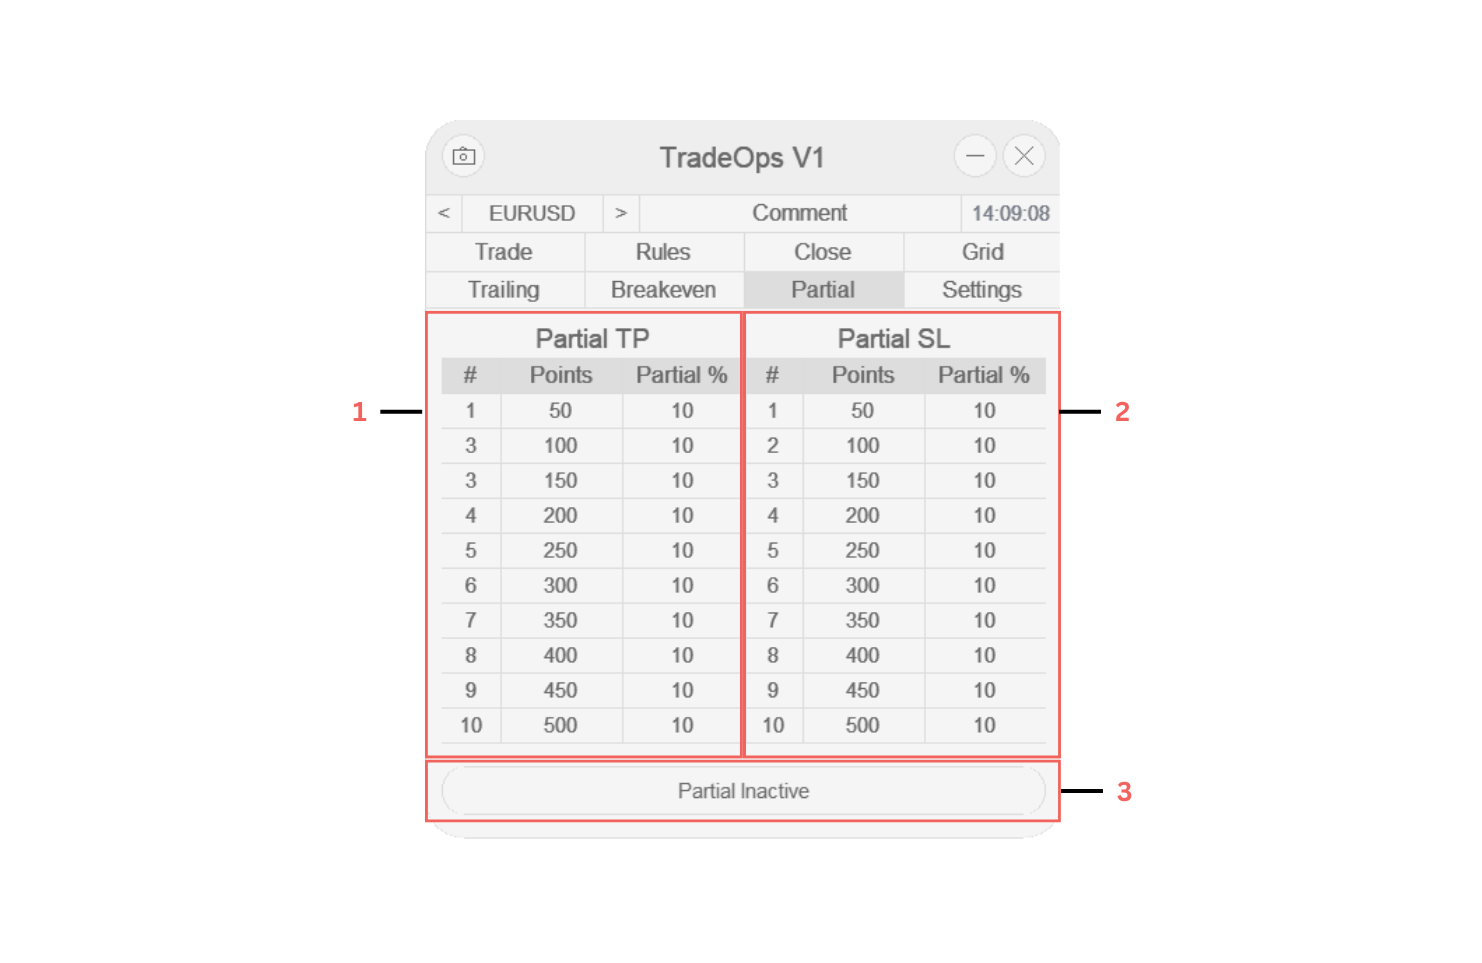
1 - Partial TP
Configures partial closes as price moves in the profitable direction. Click a row's number tag to enable or disable that level; each enabled row contains a Points trigger and Partial % to close.
2 - Partial SL
Configures partial closes as price moves against the trade. Each enabled row likewise uses a Points trigger and Partial %.
Enable only the rows you intend to use. For example, TP rows can be enabled to take profit progressively while the SL table remains unused, or both sides can be configured as part of a more complex management plan.
3 - Master Activate Button
Arms every currently enabled TP/SL row at once. With no row enabled the button reads Partial Inactive. Enabling at least one row changes it to Activate; pressing it then arms all enabled levels together and it reads Active. This lets you check the levels you want, see and drag their preview lines on the chart first, and only then commit them live with one press. Individual rows can still be enabled or disabled afterwards without needing to press Activate again, and disabling every row automatically disarms this button.
When the RR tool is visible, enabled Partial TP/SL levels are shown as preview lines such as TP1, TP2, SL1, and SL2 as soon as their row is checked, whether or not the master button at 3 has been armed yet.
Partial-Close Volume Rules
Broker minimum-lot and lot-step rules apply to every partial close. TradeOps must round requested close volume to a valid broker volume; very small remaining positions can therefore close by a different amount than expected or become too small for a later partial action.
Partial triggers are monitored by TradeOps and require the terminal, connection, Expert Advisor, and trading permission to remain active until each trigger is processed.
13. SETTINGS TAB
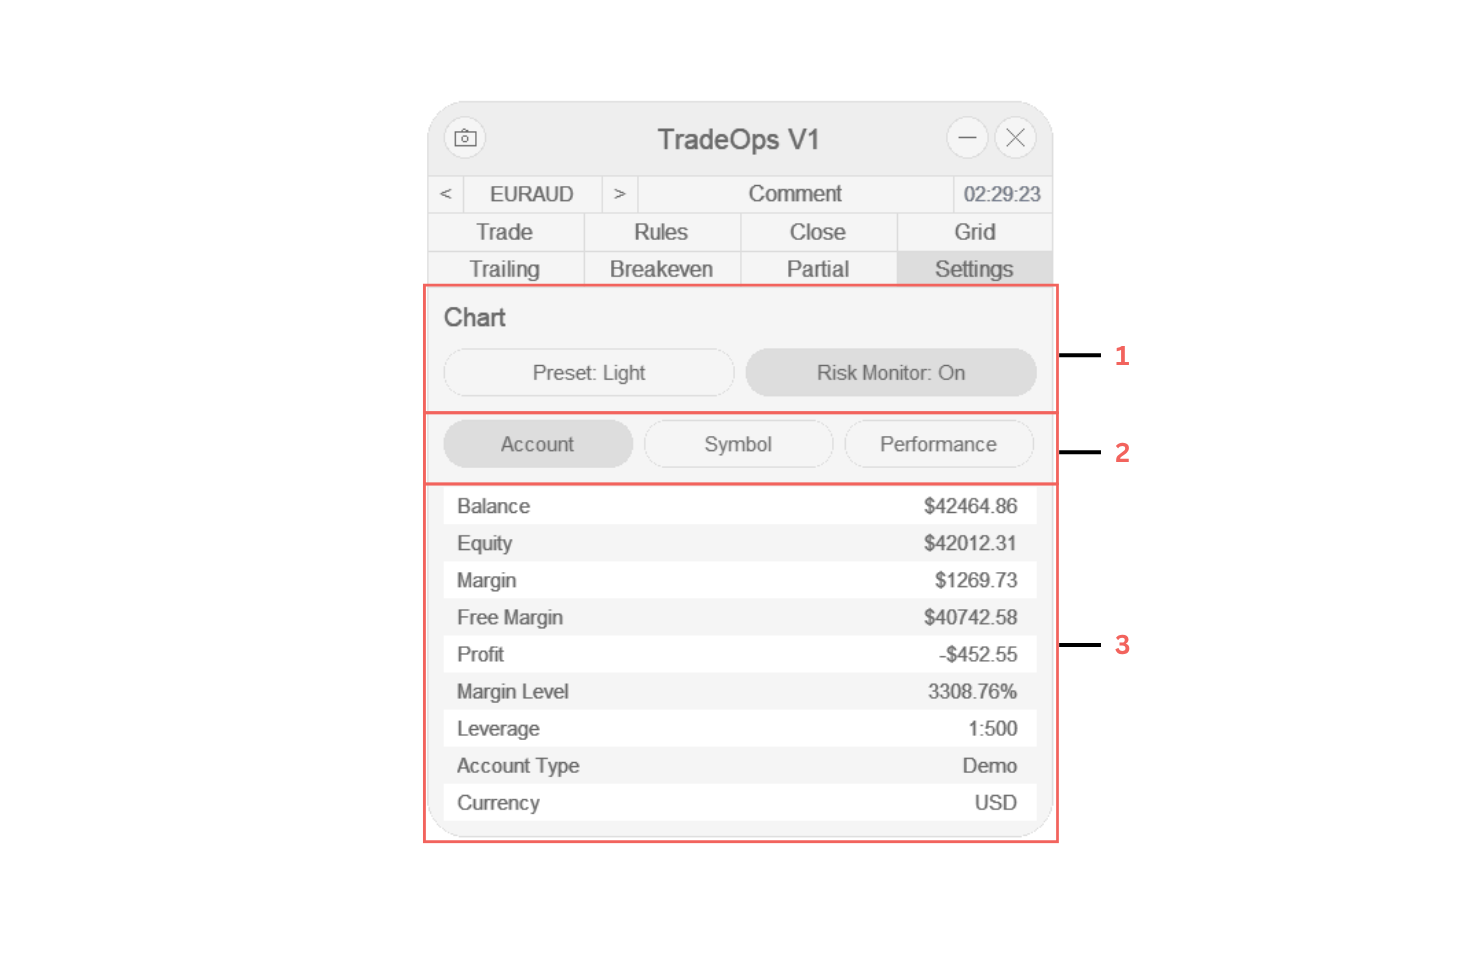
1 - Chart Controls
The Chart area contains two controls:
The Settings-tab Risk Monitor button controls the monitor's current on-chart visibility. Its startup state when TradeOps is first attached or reloaded is controlled separately by the InpShowStatsOverlay Expert Input.
2 - Account / Symbol / Performance Tabs
Selects which information category is displayed in the table below.
3 - Information Table
Displays the data for the category selected at 2.
Account View
Shows Balance, Equity, Margin, Free Margin, floating Profit, Margin Level, Leverage, Account Type, and Currency.
Symbol View
Shows symbol-specific information such as Spread, Stops Level, volume limits/step, lot limit, and swap information where available.
Performance View
Shows a compact performance summary including net/gross results, Profit Factor, trade count, wins, Win Rate, direction breakdown, averages, and best/worst period figures. For the full analytics interface, open Metrics at 11 on the Trade tab and use the Performance Dashboard described in Section 17.
14. TRADE HISTORY ON THE CHART
By default, TradeOps leaves MetaTrader 5's own trade-history markers on your chart untouched. If you'd prefer TradeOps' own visualization instead - which always draws neatly behind the panel and RR tool rather than potentially overlapping them - enable InpReplaceTradeHistory in the Expert Inputs.
When enabled, TradeOps draws, for every closed trade on the current symbol:
TradeOps can only draw history that is available in the MetaTrader 5 account history. If older trades are missing, open the Toolbox History tab, request the required history period, and reopen or refresh the TradeOps display.
15. ALERTS
TradeOps can notify you of important events via MetaTrader's popup alerts and/or push notifications to your phone (via the MetaQuotes ID system - configure this under MT5's Tools > Options > Notifications first).
Turn alerts on overall with the master "Alerts Enabled" switch, then choose your delivery method(s): Popup and/or Push. Each of the following events has its own on/off toggle, so you can be notified only about what matters to you:
Alerts are generated by the running TradeOps instance. Popup and push alerts cannot be sent while MetaTrader 5 or TradeOps is stopped. Push notifications also require a valid MetaQuotes ID and successful notification test under Tools > Options > Notifications.
16. HOTKEYS
Hotkeys let you trigger common actions instantly from the keyboard while your chart is focused, without touching the panel at all. Enable them with the master "Hotkeys Enabled" switch, then customize each key to your liking (all default to a single letter, shown below):
An optional confirmation "click" sound can play whenever a hotkey fires, so you get audible feedback even if you're not looking at the screen.
USE HOTKEYS CAREFULLY - several of them (Buy, Sell, Close All, Cancel Pending) execute immediately with no confirmation popup.
Hotkeys are processed while the TradeOps chart is active. Before using an execution hotkey, confirm the chart, managed symbol, lot size, direction, and management scope. Avoid pressing execution hotkeys while editing another field or application, and disable Hotkeys Enabled when they are not required.
17. PERFORMANCE DASHBOARD
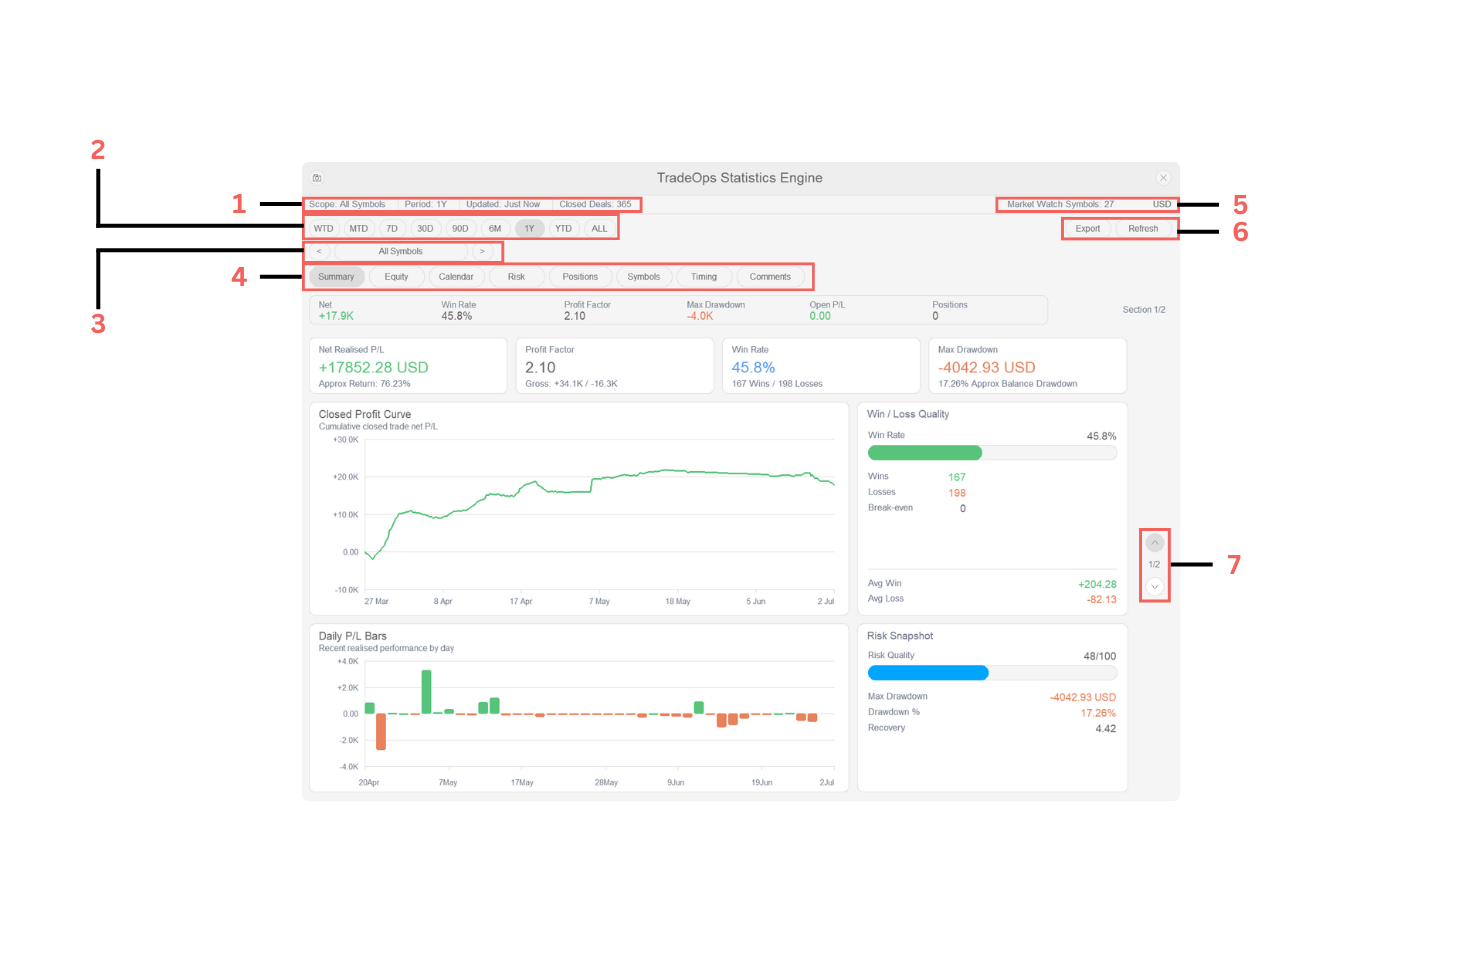
Open the dashboard by clicking Metrics at 11 on the Trade tab.
1 - Dashboard Status Strip
Shows the active Scope and Period, when the dashboard was last updated, and the number of closed deals included in the current analysis.
2 - Quick Period Buttons
WTD, MTD, 7D, 30D, 90D, 6M, 1Y, YTD, and ALL quickly change the history window used by the dashboard.
3 - Symbol Scope Selector
Uses the left/right controls and selector to analyse All Symbols or a specific symbol from the available scope or Market Watch choices.
4 - Dashboard Tabs
Summary, Equity, Calendar, Risk, Positions, Symbols, Timing, and Comments switch between the dashboard's analysis views.
5 - Market Watch / Currency Information
Shows the number of Market Watch symbols available to the dashboard and the account currency used for monetary values.
6 - Export / Refresh
Export writes the current scoped trade data to CSV inside MQL5\Files. Refresh forces the dashboard to recalculate from the currently available account history.
7 - Page Controls
Moves between multiple pages within dashboard tabs where additional charts or tables are available. The centre indicator shows the current page, for example 1/2.
A compact summary strip remains visible across the dashboard and reports key figures such as Net, Win Rate, Profit Factor, Max Drawdown, Open P/L, and Positions for the current scope/period.
Dashboard Tabs
Hovering for Detail
Hover over supported charts, bars, and calendar cells to see the exact values behind the data point.
Auto-Refresh and History Availability
The dashboard refreshes on its configured timer and can also be refreshed manually at 6. It can analyse only the trading history currently available to MetaTrader 5 for the chosen scope and period. If data appears incomplete, load the required history range and refresh again.
Performance statistics describe past account activity; they are not forecasts and do not guarantee future results.
18. RISK MONITOR
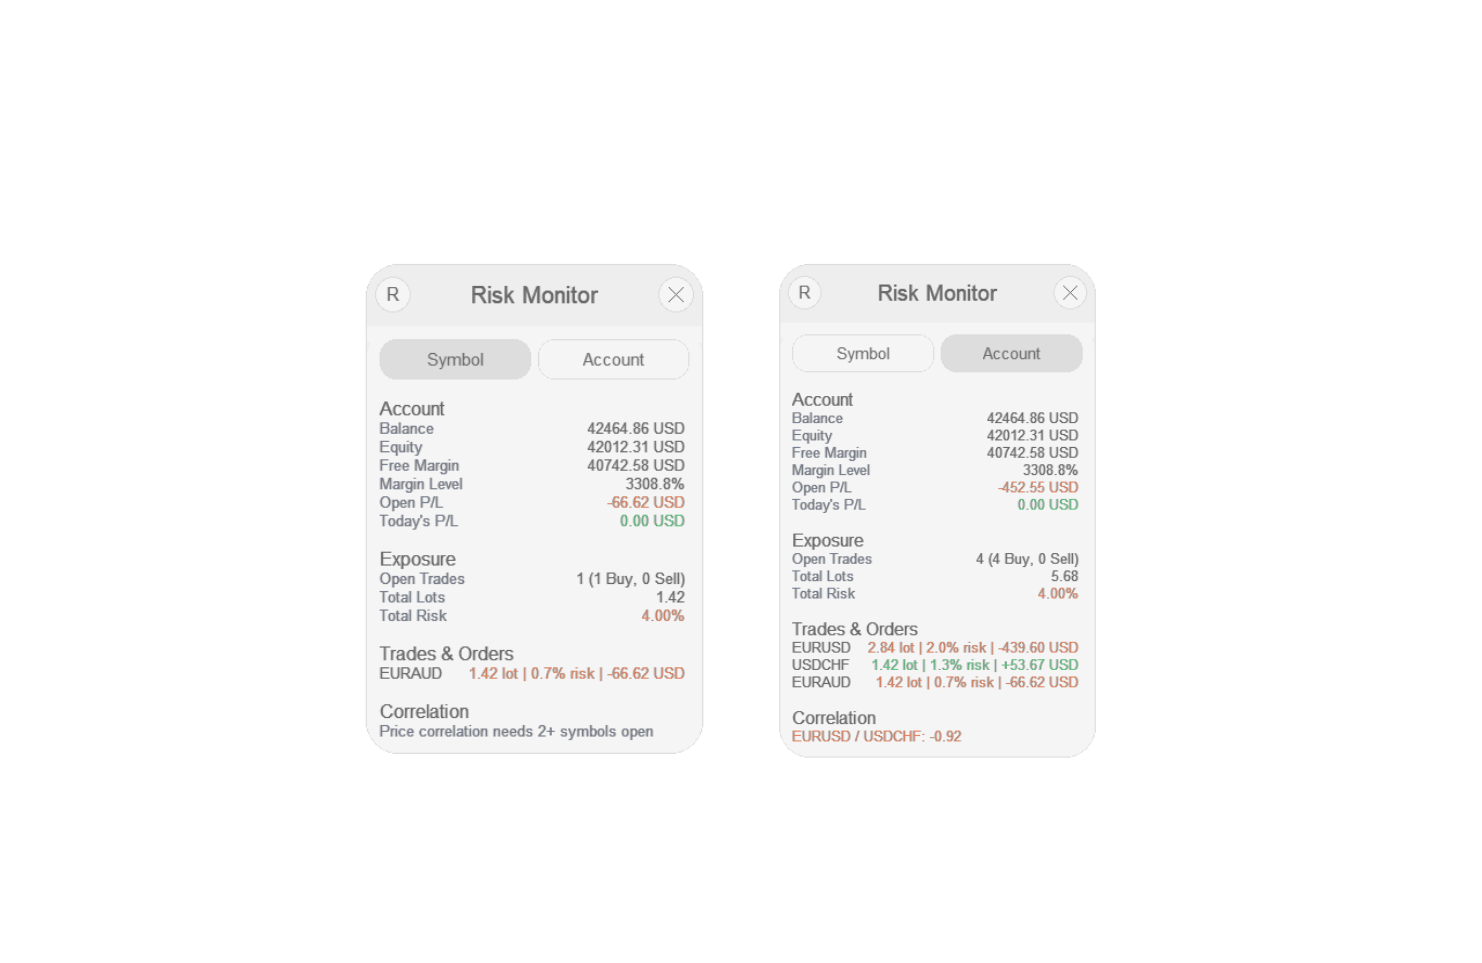
The Risk Monitor is a compact floating overlay that gives you a live view of account status and open-position exposure without opening the full Performance Dashboard. It runs independently of the main TradeOps panel, so it can remain visible while the panel is on another tab or minimised. It is shown by default when InpShowStatsOverlay is enabled and can also be turned on or off from the Settings tab.
Risk Monitor Controls and Sections
The Risk Monitor can be dragged by its header to another position on the chart and scales with the main TradeOps panel scale. It can be shown or hidden at any time using the Risk Monitor: On / Off button in the Chart area of the Settings tab. Closing the monitor with X hides it and updates that Settings button to Off; use the same button to show it again. Correlation is a read-only exposure aid and depends on sufficient daily price history being available in MetaTrader 5.
Risk Monitor Inputs
19. PANEL APPEARANCE: SCALE, THEME & COLOURS
20. FULL INPUT REFERENCE
TradeOps inputs are organised into 33 numbered groups. Cosmetic colour, spacing, and font groups are summarised because their defaults normally require no change.
Input Settings Best Practices
21. OPERATING REQUIREMENTS AND LIMITATIONS
TradeOps combines broker-held orders with management logic that runs inside MetaTrader 5.
Terminal, Connection, and Trading Permission
Keep TradeOps attached, MetaTrader 5 open and connected, and Algo Trading enabled whenever you rely on Grid placement, Trailing, Breakeven, Partials, OCO cancellation, alerts, hotkeys, or dashboard updates.
Broker-Held and Terminal-Side Functions
Broker and Symbol Differences
Brokers control order types, volume rules, Stops/Freeze Levels, margin, execution, spread, commission, and available symbols. Test each broker and non-Forex symbol on demo before relying on automation.
Netting and Hedging Accounts
Account type changes how multiple same-symbol and opposite-direction entries behave. Confirm the account type before using Grid or workflows that require separate positions.
Strategy Tester and Demo Use
TradeOps is designed for interactive chart use, not the standard Strategy Tester workflow. Test with a broker demo account or an officially supplied time-limited demo build.
Updates and Activations
Install Market updates from the Purchased area of the owning MQL5.community account and save customised inputs first. A new computer or material OS/configuration change may use another Market activation.
Information to Collect for Support
Record the TradeOps version, broker, account type, symbol, issue time, ticket numbers, active settings, screenshots, and relevant Experts/Journal messages. Never share private account credentials.
22. TROUBLESHOOTING AND FAQ
Q: The Place button at 12 is greyed out.
A: Read the Session Summary at 6 for the blocking rule/checklist condition, then confirm Algo Trading and the account connection.
Q: The RR Tool control at 11 is greyed out.
A: The managed symbol must match the chart symbol for on-chart RR objects. Switch the managed symbol or use the correct chart.
Q: TradeOps did not open a trade by itself.
A: TradeOps does not generate initial trade signals. You place the initial trade; only explicitly armed management features such as Grid can later place additional legs.
Q: Trailing or Breakeven will not turn on.
A: They cannot both be active on the same trade. Disable the other feature first. Trailing is controlled at 3 on the Trailing tab and Breakeven at 2 on the Breakeven tab.
Q: A management feature stopped while my computer was off.
A: Grid, Trailing, Breakeven, Partials, OCO cancellation, and alerts require TradeOps to be running. Restart, confirm permissions, and inspect all open trades.
Q: An order says invalid price, invalid stops, or was rejected.
A: Check Experts and Journal. Common causes are Stops/Freeze Level restrictions, an invalid pending-order side, closed market, insufficient margin, or invalid size/price.
Q: The final lot or risk differs slightly from the displayed value.
A: Broker lot steps, minimum volume, tick value, spread, commission, slippage, and price movement can cause rounding or execution differences.
Q: Average-In or Hedging trades are merging or closing each other.
A: The account may be netting. Netting accounts combine same-symbol exposure and opposite trades can reduce or reverse the position.
Q: One OCO leg triggered but the other remained pending.
A: Cancel the remaining order manually. Automatic cancellation requires TradeOps to be running and connected; also check the OCO comment-link setting and Journal.
Q: TradeOps disappeared after I attached another Expert Advisor.
A: MetaTrader 5 allows one Expert Advisor per chart. Use another chart for the second EA.
Q: Alerts are not showing.
A: Check Alerts Enabled, the event toggle, and delivery method. For push alerts, configure and test the MetaQuotes ID in Tools > Options > Notifications.
Q: The dashboard or chart history is missing older trades.
A: Load the required account-history period, then refresh or reopen the dashboard/history display.
Q: Where are screenshots and CSV exports saved?
A: Inside the terminal's MQL5\Files folder; screenshots may use the configured subfolder.
Q: Can I test the full panel in Strategy Tester?
A: Use a demo trading account or the officially supplied time-limited demo build; the full interactive panel is not intended as a normal Strategy Tester workflow.
Q: What should I provide when asking for help?
A: Provide the version, broker, account type, symbol, issue time, ticket numbers, screenshots, and relevant Experts/Journal messages, with private credentials removed.
23. RISK DISCLAIMER
Trading foreign exchange, CFDs, and other leveraged instruments carries a high level of risk and may not be suitable for all investors. TradeOps is a trade-management and automation utility. It does not provide investment advice, generate guaranteed trading signals, guarantee order execution, eliminate risk, or guarantee profit.
TradeOps operates according to the settings you select and depends on MetaTrader 5, the broker connection, broker symbol specifications, account type, and market conditions. Terminal-side functions can stop during a platform, computer, internet, VPS, or permission interruption. Grid and position-increasing features can materially increase exposure, margin use, and losses.
You are responsible for every initial trade, every enabled management feature, the settings and scope you select, and the ongoing monitoring of your account. Past performance displayed in the dashboard is not indicative of future results. Test TradeOps and all intended settings on a demo account before using them with real funds.
IMPORTANT: TradeOps does not work in the MetaTrader 5 Strategy Tester. It is designed for interactive use on a normal MetaTrader 5 chart. For testing before using real funds, attach TradeOps to a chart on a broker demo account.
CONTENTS
1. Introduction
2. Installation
3. Panel Overview
4. Trade Tab
5. The Risk:Reward (RR) Tool
6. OCO - One-Cancels-The-Other Orders
7. Rules Tab
8. Close Tab
9. Grid Tab
10. Trailing Tab
11. Breakeven Tab
12. Partial Tab
13. Settings Tab
14. Trade History On The Chart
15. Alerts
16. Hotkeys
17. Performance Dashboard
18. Risk Monitor
19. Panel Appearance: Scale, Theme & Colours
20. Full Input Reference
21. Operating Requirements And Limitations
22. Troubleshooting And FAQ
23. Risk Disclaimer
1. INTRODUCTION
TradeOps is a MetaTrader 5 trade management panel designed to help you plan, place, and manage trades directly from your chart. It replaces manual order-ticket entry with a visual, drag-and-drop workflow, and adds a full suite of trade-management automation: trailing stops, breakeven, partial closes, grid averaging/hedging, One-Cancels-the-Other (OCO) order pairs, a pre-trade rules engine, and a Performance Dashboard.
TradeOps does not generate trading signals or open an initial strategy trade without your instruction. Every initial trade is started by you through the panel, the on-chart Risk:Reward tool, or a configured hotkey. After you have opened a trade and explicitly enabled a management feature, TradeOps can manage it according to your settings. This can include modifying Stop Loss levels, moving a trade to breakeven, closing part of a position, or placing additional Average-In or Hedging grid legs when the Grid feature is armed.
This manual explains each panel feature, control, field, and workflow from the user perspective; it does not cover internal code or proprietary calculation formulas.
Key Features at a Glance
| - Visual planning and placement of market and pending orders. - Live Risk:Reward planning with draggable Entry, Stop Loss, and Take Profit levels. - Risk rules and a configurable pre-trade checklist. - Per-trade Trailing Stop, Breakeven, Partial Close, Grid, and OCO management. - Bulk position-closing and pending-order cancellation tools. - Alerts, hotkeys, screenshots, CSV export, a dedicated performance dashboard, and a live Risk Monitor overlay. |
TradeOps is a trade-management utility, not a guarantee of execution or profitability. Orders are still checked and executed by your broker under the broker's symbol specifications, trading conditions, and account rules.
2. INSTALLATION
A separate TradeOps MT5 Installation Guide is supplied with this manual. It covers installation from the MQL5 Market, installation of an officially supplied time-limited demo file, trading permissions, updates, activations, and common setup problems.
Quick Installation Summary
| 1. Open MetaTrader 5 and sign in to the MQL5.community account used to obtain TradeOps. 2. Install TradeOps from the Market/Purchased area, or install the official TradeOps demo file using the method described in the separate installation guide. 3. In Navigator, find TradeOps under Expert Advisors and attach it to a chart. 4. In the Expert Advisor properties, allow algorithmic trading and review the Inputs tab. 5. Enable the platform-wide Algo Trading button on the MetaTrader 5 toolbar. 6. Confirm that the panel appears and that the status is ready before placing a trade. |
TradeOps does not require DLL imports or WebRequest permissions. Do not enable those permissions solely for TradeOps. For your first setup, use a demo trading account and place a very small test trade before relying on any management automation.
3. PANEL OVERVIEW
The main TradeOps panel is divided into a header area, a secondary information bar, and eight working tabs.
| - Header area - contains the screenshot control, panel title, minimise control, and close control. - Secondary bar - shows the managed symbol selector, trade comment field, and broker server time. - Tabs - Trade, Rules, Close, Grid, Trailing, Breakeven, Partial, and Settings. Select a tab name to open that section. |
Managed Symbol and Managed Ticket
| - Managed symbol - the symbol TradeOps is currently controlling. On-chart objects such as the RR tool require the managed symbol to match the chart symbol. - Managed ticket - the position, pending order, or OCO pair selected through the Manage control on the Trade tab. When New Trade / Order is selected, the panel is configuring a new trade rather than an existing ticket. |
The panel can be dragged to another chart position and rescaled through the panel/input settings. For full visual management of several symbols at the same time, use separate TradeOps instances on separate symbol charts.
Magic Number and Multiple Instances
TradeOps uses its configured magic number to identify the trades it places. Use distinct magic numbers when multiple instances should manage separate trade sets. Using the same magic number across instances can make their management scope overlap.
MetaTrader 5 permits only one Expert Advisor per chart. Attach each additional TradeOps or other Expert Advisor instance to a separate chart.
4. TRADE TAB
Permanent Panel Controls
| 1 - Screenshot button: Captures a screenshot using the TradeOps screenshot settings. Screenshot files are stored inside the terminal's MQL5\Files area, using the configured screenshot subfolder where applicable. 2 - Minimise and Close controls: The minus button collapses the panel to its compact view and can be used to restore it. The X closes the TradeOps panel/instance on that chart, so check any active terminal-side management before closing it. 3 - Managed symbol selector: The left and right arrows move through symbols available in Market Watch. The symbol shown between the arrows is the symbol TradeOps is currently managing. On-chart objects such as the RR tool require the managed symbol to match the chart symbol. 4 - Comment field: The panel's trade-comment field. Where a custom comment is used, it is attached to TradeOps order requests subject to broker/platform support. OCO recovery can also use broker order comments internally, so do not disable the OCO comment-link option when you rely on restart recovery. 5 - Broker server time: Shows the current server time supplied by the connected broker. Daily rules use the broker's server day rather than your computer's local day. |
Trade Controls
| 6 - Session Summary: When configuring a new trade, shows whether TradeOps is Ready or Blocked and displays the reason when a Rules-tab limit or checklist condition prevents a new trade. When an existing trade is selected at 7 instead, this line switches to "Currently Managing Via" followed by whichever management methods are actively armed for that trade (Partial, Breakeven, Trailing, and/or Grid), or "None" if nothing is armed yet - since whether a new trade could be placed is not relevant while you are managing an existing one. It also shows current Risk Exposure as a percentage of the account. 7 - Manage: Selects what TradeOps is currently managing. New Trade / Order starts a fresh setup. Existing positions and pending orders appear with their ticket details, while a linked OCO pair appears as one combined entry. A position that anchors an active Grid basket appears as a single entry labelled with "(Grid Basket x[N])", where [N] is the number of Average-In/Hedging legs included, rather than one row per grid fill. Selecting a ticket loads that trade's own management settings. 8 - Direction: Buy and Sell choose the intended trade direction. The active direction is highlighted. When a linked OCO pair is selected, both directions can be represented because the pair contains opposite pending orders. 9 - Order Type: Buy Limit, Buy Stop, Sell Limit, and Sell Stop identify pending-order types. TradeOps also determines the valid pending type from the selected direction and Entry relative to the live market. A market-price Entry is treated as a market trade instead. 10 - Proposal: Contains Entry, TP (Points), SL (Points), Risk : Reward, Lot, and Risk %. Entry, TP/SL distance, and lot/risk settings define the proposed trade; calculated fields update as the setup changes or the RR tool is dragged. 11 - Execution controls: Market snaps Entry to the live Bid/Ask; RR Tool opens the on-chart planning tool; OCO starts the linked two-pending-order workflow; Metrics opens the performance dashboard. Controls can be greyed out when their requirements are not met. 12 - Main execution button: Places the proposed Buy/Sell or performs the context-specific Place/Modify action. Review the full text on the button and the confirmation popup before submitting. |
Managing Existing Trades
Use 7 to switch from New Trade / Order to an existing position, pending order, or OCO pair. The other tabs then show or edit the management settings associated with that selection rather than a new trade setup.
Example: Placing a Market Trade
| 1. Select New Trade / Order at 7. 2. Choose Buy or Sell at 8. 3. Enable Market at 11 so Entry follows the current Bid/Ask. 4. Configure the Proposal fields at 10. 5. Confirm the status at 6 is Ready and complete the Checklist at 14. 6. Click the main execution button at 12, review the confirmation, and submit. |
Example: Placing a Pending Order
| 1. Select New Trade / Order at 7 and choose the intended direction at 8. 2. Disable Market at 11 and set an Entry away from the current price, either in 10 or with the RR tool. 3. Confirm the pending type at 9 and set Entry, SL, TP, and sizing at 10. 4. Confirm the setup meets broker stop-distance and trading rules. 5. Complete the Checklist at 14 and click 12. 6. After placement, verify the order in MetaTrader 5 and in the Manage list at 7. |
Broker Validation
TradeOps prepares and sends the request, but the broker makes the final acceptance decision. Requests can be rejected because of invalid price/stops, Stops Level or Freeze Level, margin, market closure, unsupported order type, volume rules, or other broker-side conditions. Check Experts and Journal when an order is not accepted.
5. THE RISK:REWARD (RR) TOOL
| 1 - Take Profit Lock 2 - Stop Loss Lock 3 - Reverse Direction 4 - Take Profit Bar 5 - Stop Loss Bar 6 - Width Handle 7 - Place Trade / Order |
Enable the RR tool with the RR Tool control at 11. When enabled, it draws a visual trade plan directly on the chart with Take Profit, Entry, and Stop Loss levels. The green area represents the planned reward zone between Entry and Take Profit, while the red area represents the planned risk zone between Entry and Stop Loss.
1 - Take Profit Lock
The "L" button on the Take Profit bar locks the TP distance from Entry. When active, moving the Entry level carries the Take Profit level with it so the locked point distance is maintained. When unlocked, the Take Profit level can remain at its own price while Entry is moved.
2 - Stop Loss Lock
The "L" button on the Stop Loss bar works in the same way for the SL distance. When active, moving Entry carries the Stop Loss level with it and keeps the locked point distance unchanged.
3 - Reverse Direction
The "R" button reverses the planned trade direction from Buy to Sell or Sell to Buy. TradeOps mirrors the setup around Entry, swaps the Stop Loss and Take Profit sides as required, and updates the applicable pending-order type. This control is available when planning a new trade rather than managing an existing ticket.
4 - Take Profit Bar
The Take Profit bar is draggable. Move it vertically to change the planned Take Profit price and TP distance. The bar displays the current TP distance in points, estimated monetary value, percentage value, and price, with the displayed values updating live as the bar is moved.
5 - Stop Loss Bar
The Stop Loss bar is draggable. Move it vertically to change the planned Stop Loss price and SL distance. The bar displays the current SL distance in points, estimated monetary value, percentage risk, and price, with the displayed values updating live as the bar is moved.
6 - Width Handle
The "W" handle on the right side of the Entry bar is draggable and changes the horizontal width of the RR tool. This lets you make the visual tool wider or narrower on the chart without changing the Entry, Stop Loss, or Take Profit prices.
7 - Place Trade / Order
The Place button submits the trade or pending order currently configured by the RR tool. The request remains subject to the active TradeOps rules and checklist, your configured confirmation behaviour, account conditions, and final broker validation.
Dragging the RR Tool
| - Drag the Entry bar to move the planned entry price. The Stop Loss and Take Profit behaviour depends on whether their locks at 1 and 2 are active. - Drag the Take Profit bar at 4 to adjust Take Profit independently. - Drag the Stop Loss bar at 5 to adjust Stop Loss independently. - Drag the width handle at 6 horizontally to change the displayed width of the RR tool without changing its price levels. |
All displayed values update live as you drag, so you can see the effect of each adjustment before placing the trade or order.
Market Snap
The Market control at 11 also affects the RR tool directly. While active, the Entry level follows the live Bid/Ask price as the market moves. Toggle Market off to plan an entry at a fixed price instead.
Helper Preview Lines
When Grid, Trailing, Breakeven, or Partial features are enabled for the currently selected trade, the RR tool can also show additional preview lines indicating where those features will act - for example, Average-In or Hedge grid levels, Breakeven Start/Offset levels, Trailing Start/Distance levels, and Partial TP/SL levels. These update as the relevant settings are changed so the wider management plan can be reviewed directly on the chart.
Calculation and Execution Notes
RR values are planning estimates based on current price, account data, and broker specifications. Actual execution can differ because of spread, slippage, commission, price gaps, volume rounding, Stops Level, Freeze Level, or changing market conditions. If a request is rejected, review the affected levels and check the Experts and Journal tabs.
6. OCO - ONE-CANCELS-THE-OTHER ORDERS
OCO lets you place two opposite pending orders at once (for example, a Buy Stop above the market and a Sell Stop below it) so that whichever one triggers first automatically cancels the other. This is useful for breakout setups where you don't know which direction the market will move.
Placing an OCO Pair
| 1. On the Trade tab, click OCO at 11 to enter OCO mode. 2. Configure the first leg using Direction (8), Order Type (9), and the Proposal fields (10). 3. Click the main execution button at 12. TradeOps saves this as Leg 1 and shows a preview of it on the chart, along with a status message telling you to now configure the opposite leg. 4. TradeOps automatically flips the direction for you. Configure Entry, SL, and TP for the second, opposite-direction leg. 5. Click 12 again. Both legs are sent to your broker together as a linked pair. |
While the Pair Is Active
| - Both legs appear together in the Manage dropdown at 7 as one linked entry. - Selecting the pair shows both legs' Entry/SL/TP previewed on the chart at once, with the direction and order type buttons on the Trade tab reflecting both legs simultaneously (e.g. both Buy and Sell highlighted, since the pair covers both directions). - You can click between the two legs on the chart to switch which one TradeOps is actively focused on for editing. - If one leg is triggered (fills) or is manually deleted, TradeOps automatically cancels the other leg for you - you never end up with an unwanted stray order. |
Managing/Closing an OCO Pair
The Close tab (see Section 8) automatically relabels its buttons when an OCO pair is selected - for example "Delete OCO Pair" instead of "Delete Selected" - so you can cancel both legs together with one click.
Important OCO Operating Requirement
Automatic cancellation of the remaining OCO leg is performed by TradeOps. Keep MetaTrader 5 open, connected, and allowed to trade until the pair is resolved. After a restart, confirm the linked pair is restored in Manage before relying on automatic cancellation.
7. RULES TAB
| 1 - Rules 2 - Checklist |
1 - Rules
The Rules area contains the numerical limits that can block a new trade before it is placed.
| - Max Risk % - blocks a single trade above the allowed account-risk percentage. - Min Risk : Reward - blocks a trade below the required TP/SL ratio. - Max Spread Points - blocks trading when the current spread is above the limit. - Trades Per Day - blocks new trades after the daily trade-count limit is reached. - Max Trades Open - blocks new trades when the allowed number of open positions/orders is reached. - Max Daily Losses - blocks new trades after the allowed number of losing trades for the broker day. - Min SL Points - blocks a trade whose Stop Loss is closer than the minimum distance. - Max Daily Profit % - optional daily profit stop; once reached, new trades are blocked for the remainder of the broker day. - Max Daily Loss % - blocks new trades when the configured daily loss percentage is reached. |
Set a rule to 0 where the corresponding rule is designed to be disabled by zero. When a rule blocks trading, the Place button at 12 is disabled and the Session Summary at 6 identifies the blocking reason.
2 - Checklist
The Checklist area contains the eight configurable pre-trade checks. Click each item to mark it complete, or use Tick All where appropriate. If a required item remains unticked, the trade is blocked and 6 reports that the checklist is incomplete.
If checklist reset-after-trade is enabled, the items return to their unticked state after each placed trade so they must be confirmed again before the next trade.
How Daily Rules Reset
Trades Per Day, Max Daily Losses, Max Daily Profit %, and Max Daily Loss % use the broker server day shown at 5. They reset when the broker server reaches midnight, which may differ from your local time.
Rules block new trade placement; they do not automatically close existing positions. Existing management features can continue to operate. Grid legs are additionally controlled by Follow Rules at 1 on the Grid tab.
A Ready status at 6 means TradeOps rules allow the request; it does not guarantee broker acceptance or execution.
8. CLOSE TAB
| 1 - Open Positions 2 - Pending Orders 3 - Scope 4 - Profit/Loss Thresholds |
1 - Open Positions
Shows the bulk position-closing actions and the live P/L and total counts for each action. Available actions include Close Buy, Close Sell, Close Profit, Close Loss, and Close All. The displayed totals show what is currently within scope before you act.
2 - Pending Orders
Shows the bulk pending-order deletion actions: Delete Stop, Delete Limit, and Delete All. When an OCO pair is specifically selected, the action adapts so the linked pair can be removed together.
3 - Scope
This Symbol limits actions to the currently managed symbol. Whole Account applies the bulk action across the account. If a specific ticket or OCO pair is selected at 7 on the Trade tab, the action can narrow to that selection and the button wording changes accordingly.
4 - Profit/Loss Thresholds
Profit >= and Loss <= optionally restrict position-closing actions to positions meeting the entered account-currency threshold. Leave the values at 0 when no threshold filter is required.
Close-Action Safety
Bulk close and delete actions can affect multiple positions/orders immediately and cannot be undone. Before clicking, confirm the selected item at 7 on the Trade tab, the scope at 3, the action row at 1 or 2, and any threshold at 4.
A close/delete request can be rejected or only partly completed because of market conditions, execution rules, or a connection problem. Always verify the remaining positions and orders in MetaTrader 5 after a bulk action.
9. GRID TAB
| 1 - Global Grid Settings 2 - Average In 3 - Hedging 4 - Grid Activation / Status |
1 - Global Grid Settings
Max Trades excl. initial limits the number of additional grid legs beyond the original trade. Follow Rules decides whether grid placement remains subject to applicable TradeOps risk-rule limits.
2 - Average In
Controls same-direction additional exposure. The Lines button shows or hides draggable Average-In preview lines on the chart without arming the feature, so levels can be positioned first. % Increase controls how lot size changes for successive legs; Start (pts) sets the first trigger distance; Step (pts) sets the spacing between later levels; Close % sets the combined basket profit target used to close the whole basket.
3 - Hedging
Controls opposite-direction hedge exposure. The Lines button works the same way as Average In's, showing or hiding the draggable Hedging preview lines without arming the feature. % Increase, Start, Step, and Close % work in the same general way as Average In but apply to hedge legs.
4 - Grid Activation / Status
Shows the arming state for whichever method's Lines button (2 or 3) is currently on. Grid Inactive means no method is selected yet. Activate Average In / Activate Hedging means that method's lines are shown and can be dragged into position, but Grid has not been armed. Average In Active / Hedging Active means Grid is armed and TradeOps can place configured legs as trigger levels are reached. Once armed, dragging a line or editing a field commits the new value to the live grid immediately - there is no separate re-confirmation step.
The RR tool draws preview lines for the currently selected method's levels as soon as its Lines button is on, whether or not Grid has been armed yet, helping you see and adjust the planned Average-In and Hedge levels on the chart before committing to them.
Account Type: Netting and Hedging
On a netting account, same-symbol entries combine into one net position and opposite trades can reduce, close, or reverse it. On a hedging account, separate same-symbol and opposite-direction positions can coexist. This materially changes how 2 and 3 behave in practice.
Grid Availability and Risk
Grid placement is terminal-side. MetaTrader 5, the internet connection, TradeOps, and Algo Trading must remain active for new grid legs to be sent. Increasing exposure as price moves against a trade can rapidly increase margin use and losses; use strict limits and a tested exit plan.
10. TRAILING TAB
| 1 - Method Selector 2 - Method Settings 3 - Show Lines / Activate / Active |
1 - Method Selector
Chooses the trailing method used for the currently managed trade.
2 - Method Settings
Displays the inputs required by the selected method. In Points mode, the screenshot shows Start and Distance. Other methods replace these fields with their own parameters.
3 - Show Lines / Activate / Active
Controls Trailing in two steps. The first press shows the draggable Start/Distance preview lines on the chart without arming Trailing, so they can be positioned first, and the button then reads Activate. The second press arms Trailing at the current line positions and the button reads Active. Pressing it again while Active turns Trailing off completely and returns to the first step.
Available Trailing Methods
| - Points - Start defines how far price must move into profit before trailing begins; Distance defines how far behind the best price the Stop Loss follows. - Fractal - trails to a recent chart fractal using selected timeframe, scan range, indent, and start threshold. - Moving Average - trails to a selected moving average using timeframe, period, MA method, applied price, indent, and start threshold. - Parabolic SAR - trails to Parabolic SAR using timeframe, step, maximum, indent, and start threshold. - ATR - trails by an Average True Range multiple using timeframe, period, coefficient, and start threshold. - By Partial - uses configured Partial TP levels as trailing anchors. - Previous Bar High/Low - trails from a previous candle high/low using timeframe, bars-back/offset settings, and a start threshold. |
Trailing and Breakeven cannot both be shown or active on the same trade. If Breakeven's lines are shown or it is active, disable it before starting Trailing at 3, and vice versa.
Trailing Stop Operating Requirement
Trailing logic runs inside MetaTrader 5. The terminal must remain open, connected, and allowed to trade for the Stop Loss to continue moving. A Stop Loss already accepted by the broker remains server-side if the terminal closes, but it will not continue trailing until TradeOps runs again.
11. BREAKEVEN TAB
| 1 - Breakeven Settings 2 - Show Lines / Activate / Active |
1 - Breakeven Settings
Breakeven (Points) is the profit distance required before the Stop Loss move is triggered. Offset (Points) controls how far beyond exact entry the new Stop Loss is placed. Where configured, the offset can automatically follow spread instead of using a fixed value.
2 - Show Lines / Activate / Active
Controls Breakeven in two steps. The first press shows the draggable trigger/offset preview lines on the chart without arming Breakeven, so they can be positioned first, and the button then reads Activate. The second press arms Breakeven at the current line positions and the button reads Active. Pressing it again while Active turns Breakeven off completely and returns to the first step.
Breakeven and Trailing cannot both be shown or active on the same trade. Disable Trailing at 3 on the Trailing tab before starting Breakeven at 2 where necessary.
Breakeven Operating Requirement
The trigger is detected and submitted by TradeOps, so MetaTrader 5 must be running, connected, and allowed to trade when the trigger is reached. Once the new Stop Loss is accepted, that Stop Loss is held by the broker.
12. PARTIAL TAB
| 1 - Partial TP 2 - Partial SL 3 - Master Activate Button |
1 - Partial TP
Configures partial closes as price moves in the profitable direction. Click a row's number tag to enable or disable that level; each enabled row contains a Points trigger and Partial % to close.
2 - Partial SL
Configures partial closes as price moves against the trade. Each enabled row likewise uses a Points trigger and Partial %.
Enable only the rows you intend to use. For example, TP rows can be enabled to take profit progressively while the SL table remains unused, or both sides can be configured as part of a more complex management plan.
3 - Master Activate Button
Arms every currently enabled TP/SL row at once. With no row enabled the button reads Partial Inactive. Enabling at least one row changes it to Activate; pressing it then arms all enabled levels together and it reads Active. This lets you check the levels you want, see and drag their preview lines on the chart first, and only then commit them live with one press. Individual rows can still be enabled or disabled afterwards without needing to press Activate again, and disabling every row automatically disarms this button.
When the RR tool is visible, enabled Partial TP/SL levels are shown as preview lines such as TP1, TP2, SL1, and SL2 as soon as their row is checked, whether or not the master button at 3 has been armed yet.
Partial-Close Volume Rules
Broker minimum-lot and lot-step rules apply to every partial close. TradeOps must round requested close volume to a valid broker volume; very small remaining positions can therefore close by a different amount than expected or become too small for a later partial action.
Partial triggers are monitored by TradeOps and require the terminal, connection, Expert Advisor, and trading permission to remain active until each trigger is processed.
13. SETTINGS TAB
| 1 - Chart Controls 2 - Account / Symbol / Performance Tabs 3 - Information Table |
1 - Chart Controls
The Chart area contains two controls:
| - Preset: Light / Dark - switches the TradeOps panel theme between Light and Dark. This changes the TradeOps interface theme rather than the underlying chart colours. - Risk Monitor: On / Off - shows or hides the floating Risk Monitor described in Section 18. When the button shows On, the Risk Monitor is displayed; click it to hide the monitor and change the button to Off. Click it again to restore the monitor. Closing the Risk Monitor with its X button also changes this Settings control to Off, so it can be reopened from here at any time while TradeOps is running. |
The Settings-tab Risk Monitor button controls the monitor's current on-chart visibility. Its startup state when TradeOps is first attached or reloaded is controlled separately by the InpShowStatsOverlay Expert Input.
2 - Account / Symbol / Performance Tabs
Selects which information category is displayed in the table below.
3 - Information Table
Displays the data for the category selected at 2.
Account View
Shows Balance, Equity, Margin, Free Margin, floating Profit, Margin Level, Leverage, Account Type, and Currency.
Symbol View
Shows symbol-specific information such as Spread, Stops Level, volume limits/step, lot limit, and swap information where available.
Performance View
Shows a compact performance summary including net/gross results, Profit Factor, trade count, wins, Win Rate, direction breakdown, averages, and best/worst period figures. For the full analytics interface, open Metrics at 11 on the Trade tab and use the Performance Dashboard described in Section 17.
14. TRADE HISTORY ON THE CHART
By default, TradeOps leaves MetaTrader 5's own trade-history markers on your chart untouched. If you'd prefer TradeOps' own visualization instead - which always draws neatly behind the panel and RR tool rather than potentially overlapping them - enable InpReplaceTradeHistory in the Expert Inputs.
When enabled, TradeOps draws, for every closed trade on the current symbol:
| - An entry arrow (colour-coded for Buy or Sell) at the entry time and price. - An exit marker at the close time and price. - A dotted connecting line between the two, coloured green for a winning trade or red for a loss. |
TradeOps can only draw history that is available in the MetaTrader 5 account history. If older trades are missing, open the Toolbox History tab, request the required history period, and reopen or refresh the TradeOps display.
15. ALERTS
TradeOps can notify you of important events via MetaTrader's popup alerts and/or push notifications to your phone (via the MetaQuotes ID system - configure this under MT5's Tools > Options > Notifications first).
Turn alerts on overall with the master "Alerts Enabled" switch, then choose your delivery method(s): Popup and/or Push. Each of the following events has its own on/off toggle, so you can be notified only about what matters to you:
| - Trade Placed - Trade Closed - Stop Loss Hit - Take Profit Hit - Partial Close Fired - Stop Loss Moved to Breakeven - Trade Blocked (by a Rules-tab limit) |
Alerts are generated by the running TradeOps instance. Popup and push alerts cannot be sent while MetaTrader 5 or TradeOps is stopped. Push notifications also require a valid MetaQuotes ID and successful notification test under Tools > Options > Notifications.
16. HOTKEYS
Hotkeys let you trigger common actions instantly from the keyboard while your chart is focused, without touching the panel at all. Enable them with the master "Hotkeys Enabled" switch, then customize each key to your liking (all default to a single letter, shown below):
| B - Instantly place a Buy market order at the current lot size. S - Instantly place a Sell market order at the current lot size. P - Place the trade currently configured on the Trade tab / RR tool (same as clicking Place). X - Immediately close every position TradeOps is managing, across all symbols. R - Toggle the Risk:Reward tool on/off. C - Cancel every pending order TradeOps is managing. N - Minimize or restore the panel. |
An optional confirmation "click" sound can play whenever a hotkey fires, so you get audible feedback even if you're not looking at the screen.
USE HOTKEYS CAREFULLY - several of them (Buy, Sell, Close All, Cancel Pending) execute immediately with no confirmation popup.
Hotkeys are processed while the TradeOps chart is active. Before using an execution hotkey, confirm the chart, managed symbol, lot size, direction, and management scope. Avoid pressing execution hotkeys while editing another field or application, and disable Hotkeys Enabled when they are not required.
17. PERFORMANCE DASHBOARD
Open the dashboard by clicking Metrics at 11 on the Trade tab.
| 1 - Dashboard Status Strip 2 - Quick Period Buttons 3 - Symbol Scope Selector 4 - Dashboard Tabs 5 - Market Watch / Currency Information 6 - Export / Refresh 7 - Page Controls |
1 - Dashboard Status Strip
Shows the active Scope and Period, when the dashboard was last updated, and the number of closed deals included in the current analysis.
2 - Quick Period Buttons
WTD, MTD, 7D, 30D, 90D, 6M, 1Y, YTD, and ALL quickly change the history window used by the dashboard.
3 - Symbol Scope Selector
Uses the left/right controls and selector to analyse All Symbols or a specific symbol from the available scope or Market Watch choices.
4 - Dashboard Tabs
Summary, Equity, Calendar, Risk, Positions, Symbols, Timing, and Comments switch between the dashboard's analysis views.
5 - Market Watch / Currency Information
Shows the number of Market Watch symbols available to the dashboard and the account currency used for monetary values.
6 - Export / Refresh
Export writes the current scoped trade data to CSV inside MQL5\Files. Refresh forces the dashboard to recalculate from the currently available account history.
7 - Page Controls
Moves between multiple pages within dashboard tabs where additional charts or tables are available. The centre indicator shows the current page, for example 1/2.
A compact summary strip remains visible across the dashboard and reports key figures such as Net, Win Rate, Profit Factor, Max Drawdown, Open P/L, and Positions for the current scope/period.
Dashboard Tabs
| - Summary - headline metrics, equity/profit curve, win/loss quality, daily P/L, risk snapshot, and additional statistics/cost/rolling/best-worst views on further pages. - Equity - larger equity analysis, monthly performance, recent trades, trade frequency, and P/L distribution. - Calendar - calendar heatmaps, weekday results, daily bars, hourly statistics, and session breakdowns. - Risk - expectancy, streaks, recovery, drawdown/risk measures, symbols/exposure, direction analysis, and account snapshot information. - Positions - live open-position table, open P/L, volume/side totals, margin information, and exposure. - Symbols - performance and volume broken down by traded symbol, including best/worst and side comparisons. - Timing - results by hour, weekday, and trading session. - Comments - notes/journal area for your own trading comments where supported by the current build. |
Hovering for Detail
Hover over supported charts, bars, and calendar cells to see the exact values behind the data point.
Auto-Refresh and History Availability
The dashboard refreshes on its configured timer and can also be refreshed manually at 6. It can analyse only the trading history currently available to MetaTrader 5 for the chosen scope and period. If data appears incomplete, load the required history range and refresh again.
Performance statistics describe past account activity; they are not forecasts and do not guarantee future results.
18. RISK MONITOR
The Risk Monitor is a compact floating overlay that gives you a live view of account status and open-position exposure without opening the full Performance Dashboard. It runs independently of the main TradeOps panel, so it can remain visible while the panel is on another tab or minimised. It is shown by default when InpShowStatsOverlay is enabled and can also be turned on or off from the Settings tab.
Risk Monitor Controls and Sections
| - Symbol / Account - switches the position view between the currently managed symbol and the whole trading account. Open P/L, open-trade counts, Total Lots, the per-symbol breakdown, and Correlation follow this scope. - Account - shows Balance, Equity, Free Margin, Margin Level, Open P/L, and Today's P/L. Today's P/L is the account's net closed P/L for the current broker day. - Exposure - shows the number of open trades with Buy/Sell counts, Total Lots, and Total Risk. Total Risk is account-wide, estimated from open positions that have a valid Stop Loss, and expressed as a percentage of account equity. - Trades & Orders - breaks down current open-position exposure by symbol, showing total lots, estimated risk %, and current P/L for each displayed symbol. - Correlation - when two or more symbols are open, shows the pair with the strongest absolute Pearson correlation based on daily percentage returns. The lookback is controlled by InpStatsOverlayCorrelationBars and defaults to 20 daily bars. - R - resets the Risk Monitor to its default top-right chart position. - X - hides the Risk Monitor without closing TradeOps. It can be shown again from the Settings tab. |
The Risk Monitor can be dragged by its header to another position on the chart and scales with the main TradeOps panel scale. It can be shown or hidden at any time using the Risk Monitor: On / Off button in the Chart area of the Settings tab. Closing the monitor with X hides it and updates that Settings button to Off; use the same button to show it again. Correlation is a read-only exposure aid and depends on sufficient daily price history being available in MetaTrader 5.
Risk Monitor Inputs
| - InpShowStatsOverlay - controls whether the Risk Monitor is shown on startup. - InpStatsOverlayCorrelationBars - sets the number of daily bars used for the correlation calculation; a minimum of 5 bars is enforced by TradeOps. |
19. PANEL APPEARANCE: SCALE, THEME & COLOURS
| - Scale - set the main panel's size via InpPanelScaleSetting (Auto, or a fixed 25%-150%). "Auto" picks a comfortable size based on your chart's dimensions. The dashboard has its own independent scale setting. - Theme - Light or Dark, toggled from the Settings tab Preset at 1, or set as a default via InpChartThemePreset. - Colours - every colour used anywhere in TradeOps (panel backgrounds, buttons, the RR tool's zones and bars, chart preview lines, the dashboard's own palette, and the Settings tab's data tables) is exposed as its own input, with separate Light and Dark variants where relevant. You do not need to touch any of these to use TradeOps - the defaults are a complete, matched Light/Dark pair - but they're there if you want to personalize the look. See Section 20 for the full colour group list. |
20. FULL INPUT REFERENCE
TradeOps inputs are organised into 33 numbered groups. Cosmetic colour, spacing, and font groups are summarised because their defaults normally require no change.
| - 01 - General Display & Account Settings - language, panel/dashboard scale, lot-sizing mode/base, theme, and default scope. - 02 - Default Trade Setup - default lot, risk %, SL/TP, RR, and magic number. - 03 - Panel Position - initial panel X/Y position. - 04 - Panel Colours (Light) - Light-theme panel colours. - 05 - Panel Colours (Dark) - Dark-theme panel colours. - 06 - Statistics Colours - Settings-tab performance colours. - 07 - Risk Rules - the Rules limits at 13. - 08 - Average-In Management (20) - lot increase, start, step, and basket target. - 09 - Hedging Management (21) - equivalent settings for Hedging. - 10 - Pre-Trade Checklist (14) - eight checklist labels and reset-after-trade option. - 11 - Partial Take Profit Rows - enable/disable each of 10 TP rows. - 12 - Partial Stop Loss Rows - enable/disable each of 10 SL rows. - 13 - Feature Start-Up Toggles - startup states for Breakeven, Trailing, Average-In, Hedging, and RR locks. - 14 - OCO Pending Orders - OCO enable/startup, companion cancellation, and broker-comment recovery link. - 15 - Partial Take Profit Values - points and percentage for 10 TP rows. - 16 - Partial Stop Loss Values - points and percentage for 10 SL rows. - 17 - Stop Loss to Break Even - trigger, offset, and automatic spread-based offset. - 18 - Trailing Stop - trailing method and Points-mode start/distance; other method settings are available on the Trailing tab. - 19 - Hotkeys - master switch, sound, and key assignments. - 20 - Screenshots - screenshot subfolder inside MQL5\Files. - 21 - Sounds - screenshot/button sounds and sound files. - 22 - Risk : Reward Tool Colours - RR zones, bars, borders, and guide lines. - 23 - Management Line Colours (Light) - Light-theme Grid/Trailing/Breakeven/Partial lines. - 24 - Management Line Colours (Dark) - Dark-theme equivalents. - 25 - Trade History Display - TradeOps history drawing, native trade-level visibility, and history colours. - 26 - Alerts - master switch, delivery methods, and event toggles. - 27 - Performance Dashboard - dashboard position/size, scaling, defaults, history range, display options, and CSV settings. - 28 - Dashboard Colours (Light) - Light dashboard palette. - 29 - Dashboard Colours (Dark) - Dark dashboard palette. - 30 - Settings Tab Table Colours (Light) - Light Account/Symbol/Performance table colours. - 31 - Settings Tab Table Colours (Dark) - Dark equivalents. - 32 - Chart Property Automation - controls which native chart properties TradeOps applies automatically. Chart on foreground is always forced off so panel/tools remain above candles. - 33 - Risk Monitor Overlay - controls whether the floating Risk Monitor is shown on startup and the number of daily bars used for its correlation calculation. |
Input Settings Best Practices
| - Record values changed from defaults and save a .set file before major changes or updates. - When troubleshooting, restore one feature group at a time instead of changing many settings together. - Recheck broker-specific minimum lot, lot step, Stops Level, spread, and margin behaviour when changing broker or symbol. |
21. OPERATING REQUIREMENTS AND LIMITATIONS
TradeOps combines broker-held orders with management logic that runs inside MetaTrader 5.
Terminal, Connection, and Trading Permission
Keep TradeOps attached, MetaTrader 5 open and connected, and Algo Trading enabled whenever you rely on Grid placement, Trailing, Breakeven, Partials, OCO cancellation, alerts, hotkeys, or dashboard updates.
Broker-Held and Terminal-Side Functions
| - Successfully placed positions, pending orders, Stop Loss, and Take Profit levels remain at the broker if the terminal closes. - Actions TradeOps still needs to detect or send cannot occur while the terminal, connection, EA, or trading permission is unavailable. - After an interruption, check all positions, pending orders, OCO pairs, and armed management features before continuing. - When a managed trade fully closes, TradeOps automatically turns off Trailing, Breakeven, Partial, Grid, and the RR tool for that trade and removes their preview lines from the chart, so a leftover setting does not silently carry over and act on the next trade you open. |
Broker and Symbol Differences
Brokers control order types, volume rules, Stops/Freeze Levels, margin, execution, spread, commission, and available symbols. Test each broker and non-Forex symbol on demo before relying on automation.
Netting and Hedging Accounts
Account type changes how multiple same-symbol and opposite-direction entries behave. Confirm the account type before using Grid or workflows that require separate positions.
Strategy Tester and Demo Use
TradeOps is designed for interactive chart use, not the standard Strategy Tester workflow. Test with a broker demo account or an officially supplied time-limited demo build.
Updates and Activations
Install Market updates from the Purchased area of the owning MQL5.community account and save customised inputs first. A new computer or material OS/configuration change may use another Market activation.
Information to Collect for Support
Record the TradeOps version, broker, account type, symbol, issue time, ticket numbers, active settings, screenshots, and relevant Experts/Journal messages. Never share private account credentials.
22. TROUBLESHOOTING AND FAQ
Q: The Place button at 12 is greyed out.
A: Read the Session Summary at 6 for the blocking rule/checklist condition, then confirm Algo Trading and the account connection.
Q: The RR Tool control at 11 is greyed out.
A: The managed symbol must match the chart symbol for on-chart RR objects. Switch the managed symbol or use the correct chart.
Q: TradeOps did not open a trade by itself.
A: TradeOps does not generate initial trade signals. You place the initial trade; only explicitly armed management features such as Grid can later place additional legs.
Q: Trailing or Breakeven will not turn on.
A: They cannot both be active on the same trade. Disable the other feature first. Trailing is controlled at 3 on the Trailing tab and Breakeven at 2 on the Breakeven tab.
Q: A management feature stopped while my computer was off.
A: Grid, Trailing, Breakeven, Partials, OCO cancellation, and alerts require TradeOps to be running. Restart, confirm permissions, and inspect all open trades.
Q: An order says invalid price, invalid stops, or was rejected.
A: Check Experts and Journal. Common causes are Stops/Freeze Level restrictions, an invalid pending-order side, closed market, insufficient margin, or invalid size/price.
Q: The final lot or risk differs slightly from the displayed value.
A: Broker lot steps, minimum volume, tick value, spread, commission, slippage, and price movement can cause rounding or execution differences.
Q: Average-In or Hedging trades are merging or closing each other.
A: The account may be netting. Netting accounts combine same-symbol exposure and opposite trades can reduce or reverse the position.
Q: One OCO leg triggered but the other remained pending.
A: Cancel the remaining order manually. Automatic cancellation requires TradeOps to be running and connected; also check the OCO comment-link setting and Journal.
Q: TradeOps disappeared after I attached another Expert Advisor.
A: MetaTrader 5 allows one Expert Advisor per chart. Use another chart for the second EA.
Q: Alerts are not showing.
A: Check Alerts Enabled, the event toggle, and delivery method. For push alerts, configure and test the MetaQuotes ID in Tools > Options > Notifications.
Q: The dashboard or chart history is missing older trades.
A: Load the required account-history period, then refresh or reopen the dashboard/history display.
Q: Where are screenshots and CSV exports saved?
A: Inside the terminal's MQL5\Files folder; screenshots may use the configured subfolder.
Q: Can I test the full panel in Strategy Tester?
A: Use a demo trading account or the officially supplied time-limited demo build; the full interactive panel is not intended as a normal Strategy Tester workflow.
Q: What should I provide when asking for help?
A: Provide the version, broker, account type, symbol, issue time, ticket numbers, screenshots, and relevant Experts/Journal messages, with private credentials removed.
23. RISK DISCLAIMER
Trading foreign exchange, CFDs, and other leveraged instruments carries a high level of risk and may not be suitable for all investors. TradeOps is a trade-management and automation utility. It does not provide investment advice, generate guaranteed trading signals, guarantee order execution, eliminate risk, or guarantee profit.
TradeOps operates according to the settings you select and depends on MetaTrader 5, the broker connection, broker symbol specifications, account type, and market conditions. Terminal-side functions can stop during a platform, computer, internet, VPS, or permission interruption. Grid and position-increasing features can materially increase exposure, margin use, and losses.
You are responsible for every initial trade, every enabled management feature, the settings and scope you select, and the ongoing monitoring of your account. Past performance displayed in the dashboard is not indicative of future results. Test TradeOps and all intended settings on a demo account before using them with real funds.