Understanding Order Blocks- The Foundation of Professional Breakout Trading

The Science Behind Break Out Zone
Break Out Zone is built on rigorous order block detection, utilizing both Average True Range analysis and cumulative means filtering to identify where institutional orders have been placed. Unlike conventional indicators that rely on simple price levels, this system recognizes the actual footprints of large market participants. The indicator identifies two distinct types of order blocks: swing order blocks that mark major turning points in price structure, and internal order blocks that reveal shorter-term institutional positioning within larger trends.
When price interacts with these zones, something remarkable happens. The market doesn't simply bounce or break through randomly. Instead, institutional algorithms are either defending their positions or allowing breakouts to occur when their orders are filled. Break Out Zone alerts you the moment this critical decision point is reached, giving you the clarity needed to enter trades with institutional backing rather than against it.
Why Traditional Breakout Trading Fails
Most traders approach breakouts with hope rather than methodology. They draw horizontal lines at round numbers or recent highs and lows, then wonder why price repeatedly fakes them out. The reason is simple: these aren't real institutional levels. They're retail constructs that smart money exploits.
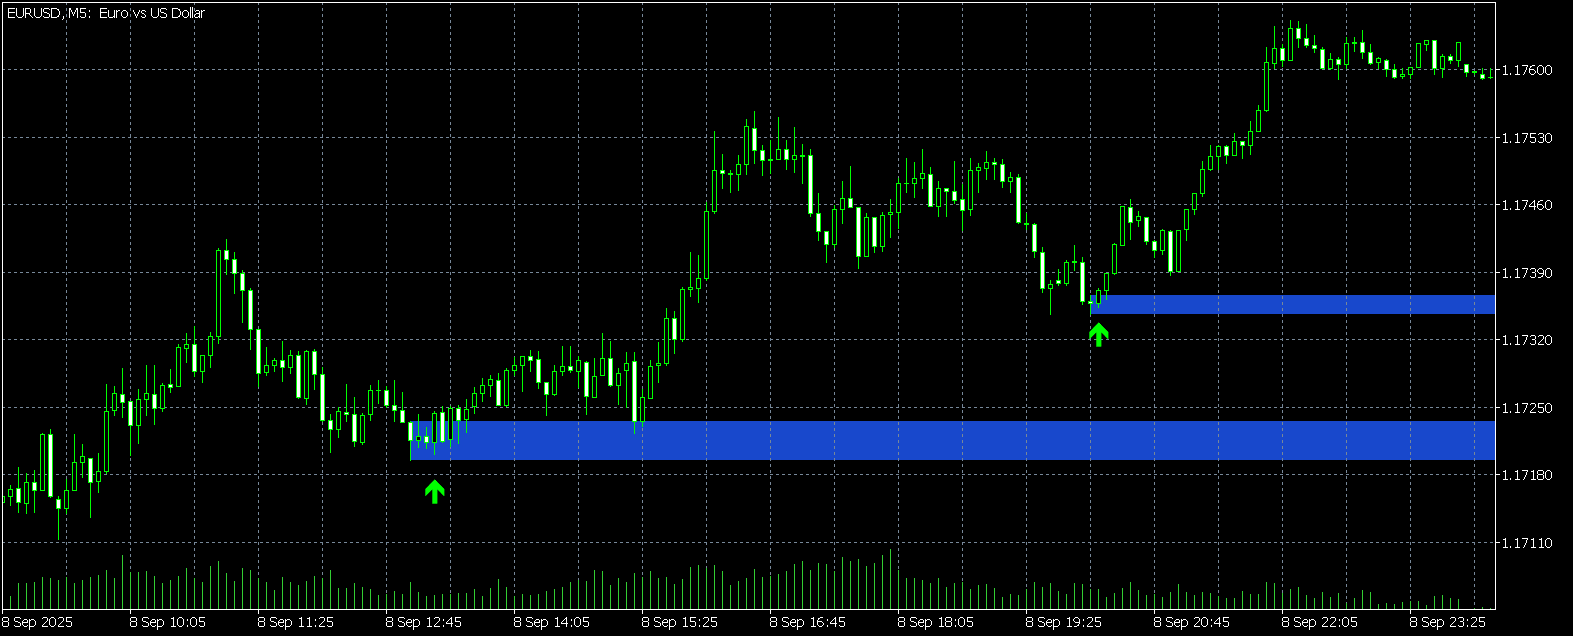
True order blocks form where institutions have left unfilled orders. When price returns to these zones, one of two things occurs. Either the institution defends the zone with fresh capital, causing price to reverse, or they allow the breakout because their orders have been sufficiently filled. Break Out Zone captures this transition moment, alerting you when a bearish or bullish breakout is confirmed.
The indicator's intelligence lies in its filtering mechanism. ATR analysis ensures that only significant zones are identified, eliminating the noise of minor fluctuations. Cumulative means filtering adds another layer of validation, confirming that the zone represents genuine institutional interest rather than temporary volatility. This dual-filter approach dramatically reduces false signals while highlighting the setups that matter.
Integrating Break Out Zone Into Your Trading System
The most powerful aspect of Break Out Zone is its compatibility with various trading methodologies. For trend traders, the indicator serves as an entry trigger when breakouts align with the prevailing direction. When price breaks a bearish zone in a downtrend, you're not catching a falling knife but rather joining institutional momentum at a validated level.
Momentum traders can combine Break Out Zone with oscillators such as RSI or Stochastic. When an overbought or oversold reading coincides with a breakout alert, you have both momentum exhaustion and institutional validation working in your favor. This confluence creates high-probability setups that individual signals cannot provide.
Price action purists will appreciate how Break Out Zone complements classical chart patterns. When a head and shoulders formation's neckline coincides with an order block zone, the breakout becomes exponentially more reliable. The same applies to triangles, flags, and wedges. You're no longer guessing whether the pattern will resolve as expected because you have institutional confirmation.
For those using market structure concepts, Break Out Zone's Break of Structure markers provide clear guidance. When BOS aligns with a zone breakout, you're witnessing a genuine shift in market character rather than a temporary pause. These moments offer entries with clearly defined risk parameters.
Managing The Retests That Fool Everyone Else
One characteristic of institutional order blocks often confuses traders: the retest. Price may break through a zone, then return to test it again on the very next bar before continuing in the breakout direction. Retail traders see this as invalidation and exit their positions, often right before the real move begins.
Break Out Zone accounts for this behavior. When a breakout occurs and price retests the zone, the indicator understands this is natural market mechanics, not signal failure. Institutions often allow price to sweep back into the zone to gather additional liquidity before pushing through decisively. This is why proper stop loss placement below the lower boundary of bearish zones or above the upper boundary of bullish zones is essential.
The zone bands provide your risk parameter. As long as price remains outside the complete zone structure after the initial breakout, the signal remains valid. This approach protects you from being shaken out during normal market breathing while maintaining strict risk control if the breakout genuinely fails.
Building High-Probability Setups
The highest-probability trades occur when multiple factors align with your Break Out Zone signal. Consider combining the indicator with moving average systems. When price breaks a bearish zone while trading below a key moving average, you have both institutional and technical confirmation of downside momentum. The same principle applies to bullish scenarios above moving averages.
Volume analysis adds another dimension. While Break Out Zone operates effectively without volume data, traders with access to volume indicators can look for expansion as breakouts occur. Institutional breakouts typically coincide with increased volume as large orders are executed. This confluence validates that real money is behind the move.
Elliott Wave practitioners can use Break Out Zone to confirm wave counts. When a suspected third wave begins with a strong breakout signal, you have both pattern recognition and institutional validation working together. This removes much of the subjectivity that typically plagues wave analysis.
Fibonacci traders will find natural synergy as well. Order blocks frequently form near Fibonacci retracement levels because institutions use similar mathematical frameworks for positioning. When a 61.8% retracement coincides with an order block zone, the breakout from that level becomes particularly significant.
The Practical Advantage
Break Out Zone transforms abstract concepts into actionable signals on your current timeframe. Whether you trade five-minute charts or daily timeframes, the indicator adapts to your chosen perspective, identifying order blocks relevant to that specific context. You're not overwhelmed with information from multiple timeframes but rather focused on the institutional levels that matter right now.
The alert system ensures you never miss critical moments. When a breakout occurs, you're notified immediately, allowing you to assess the setup while it's still fresh. This real-time notification is crucial because the best entries often come within the first few bars after a breakout confirmation.
Stop loss placement becomes mechanical rather than emotional. The zone boundaries provide objective levels where your thesis is invalidated. This removes the guesswork and second-guessing that destroys so many trading accounts. You know exactly where you're wrong before entering the trade.
Why Professional Traders Choose Order Block Methodology
Institutional trading leaves traces in price action. Large orders cannot be hidden because they require significant liquidity to fill. Order blocks mark where this liquidity was found. By trading these zones, you're positioning yourself alongside the market's strongest participants rather than against them.
Break Out Zone makes this professional approach accessible. You don't need years of screen time to identify order blocks manually or access to proprietary institutional data. The indicator's ATR and cumulative means filtering does the heavy lifting, presenting only the zones that meet rigorous statistical criteria.
The combination of swing and internal order block detection provides complete market coverage. Swing blocks identify major turning points suitable for position trades, while internal blocks reveal shorter-term opportunities within existing trends. This flexibility allows you to adapt your trading style to current market conditions without changing tools.
Moving Forward With Confidence
Trading doesn't have to be complicated to be effective. Break Out Zone simplifies the complex world of institutional order flow into clear visual zones and actionable alerts. You're not predicting the future but rather responding to evidence that institutional participants have made their decisions.
When you integrate this indicator into a comprehensive trading system, checking for alignment with your trend analysis, momentum indicators, and price action patterns, you create a framework that filters out low-probability trades while highlighting genuine opportunities. The result is a trading approach grounded in how markets actually function rather than hopeful theories.
The indicator is available now on MQL5, ready to enhance your trading methodology with professional-grade order block analysis. Every moment you continue trading without understanding where institutions have positioned themselves is a moment you're operating with incomplete information in a market driven by those very institutions.
Break Out Zone provides that information clearly, immediately, and reliably on your chosen timeframe. The question isn't whether order blocks matter in your trading. The question is how much longer you'll trade without them.
[Break Out Zone. Available Here - https://www.mql5.com/en/market/product/160564]
Risk Disclaimer: Trading foreign exchange on margin carries a high level of risk and may not be suitable for all investors. Past performance is not indicative of future results. The high degree of leverage can work against you as well as for you. Before deciding to trade foreign exchange, you should carefully consider your investment objectives, level of experience, and risk appetite. Only trade with capital you can afford to lose.


 Trading Guide")
