

The EA is designed to place Automated Trades on Supply and Demand Zones. There are some input paraneters that you can use according to your trading style and according to your personal preference.
MT4 Version: https://www.mql5.com/en/market/product/116645
MT5 Version: https://www.mql5.com/en/market/product/117023
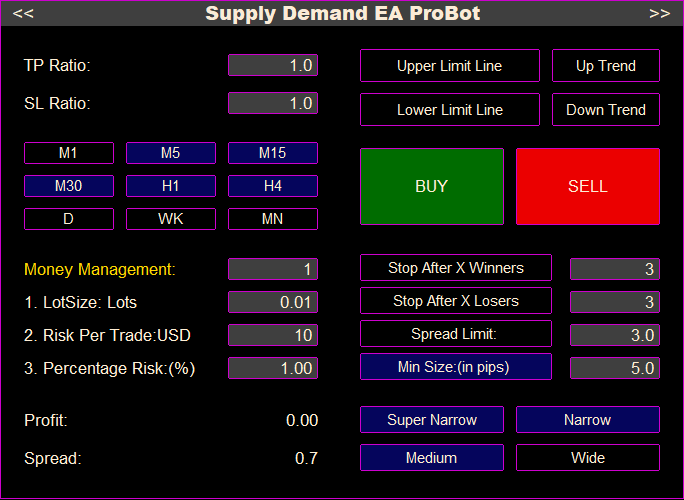
Panel Settings
TP Ratio and SL Ratio: From these input parameters, you can set the stop loss and take profit ratio. Also from input variables you have two ways to calculate the TP and SL. if you want the stop loss and take profit to be a zone based or ATR based. if you select zone based, then the take profit and stop loss is calculated according the zone size . For example if the zone size is 10 pips, and TP is 2 and SL is 3 then the TP will be 2*10=20 pips and SL will be 3*10=30 pips. If you select the ATR based will be calculated according to ATR price of the current timeframe.
Money Management: From this section, you can choose your money management approach. There are three options available:
- Fixed Lot Size: If you choose this option, the lot size will remain constant for every trade you place.
- Risk-Based Lot Size: Opting for this method will automatically adjust the lot size based on your predetermined risk per trade.
- Capital Percentage Calculation: By selecting this option, the lot size will be calculated relative to a percentage of your total capital.
Upper Limit Line: When you press the upper limit line button then an upper limit line is created on chart. You can drag the line in the price level thhat you want. When an upper limit line exist it means that the ea will place trades on zones that are only below this upper limit line.
Lower Limit Line: When you press the lower limit line button then a lower limit line is created on chart. You can drag the line in the price level thhat you want. When a lower limit line exist it means that the ea will place trades on zones that formed above this lower limit line.
You are able to have at the same time an upper limit line and a lower limit line. This way you can create a price range that the EA will place trades only within this price range.Timeframes Section: From this section you can select the timeframes you want to place trades. The ea is multitimeframe. That means that it is not necessary to open multiple timeframes of the same pair. From a single timeframe you can get trades on any timeframe you want.
Up Trend: When you press this button a bullish channel is being created. After you have created the channel you can transform it as you want. This channel is not dynamic. That means that it is not changing while new candles are forming. From input parameters you have the possibilty to create a bullish trendline instead of a channel. When this channel exists on chart the EA will place trades only on supply and demand zones that are formed within this channel. You can combine the channel with an upper or lower limit line if you want. When you have created a bullish trendline, automatically the trading direction becomes Buy. You can unclick the buy direction and select Sell direction if you want but that would be risky.
Down Trend: When you press the button then a bearish channel is being created. When you have created the channel you can transform it as you want. From input parameters you have the possibilty to create a bearish trendline instead of a bearish channel. After you create the bearish channel the The EA will place trades only on zones that are formed within this channel. You can combine the channel with an upper or lower limit lines if you want. When you have created a bearish trendline, automatically the trading direction becomes Sell. You can unclick the Sell direction and select Buy direction if you want but it is not recommended.
Important note: You cannot place trades above current timeframe when you have activated bullish or bearish channels and trendlines , because trendlines and channels cannot work in higher timeframes than the current timeframe. This is a platform limitation and it has nothing to do with the EA itself. For that reason all the timeframes above current are being deactivated automatically when you press the “Up Trend” or “Down Trend” button. For example if you are on 1hr timeframe and you click the “Up Trend” button all timeframes above 1hr will be deactivated. You should place your trades from 1hr and lower.
Stop After x Winners: With this button you can set after how many winning trades the EAwill stop. For example if you click the button and set the input parameter into 2 the EA will stop after two winning trades. After the desired amount of winning trades has reached, you get a message that the EA has stopped. In order to start over you need to unclick and click again the button and you can start over. The ea will start to work again .
Stop After X Losers: With this button you can set after how many losing trades the EA will stop. For example if you click the button and set the input parameter into 4 the EA will stop after two losers trades. After the total amount of loser trades has reached, you get a message that the EA has stopped. In order to start over you need to unclick and click again the button and you can start over. The ea will start to work again.
BUY and SELL : From this section of the Panel you can select the trading direction. You can activate buy direction if you believe that the bias of the market is bullish. In this case the EA will place only buy trades on demand zones. If you believe that market bias is bearish then you can activate sell direction. In that case the EA will place only sell trades on supply zones. Also you are able to activate both Buy and Sell direction. In that case EA will place buy trades on demand zones and sell trades on supply zones. If none of the direction buttons are pressed then the EA does not place any trades at all.
Min Size (in pips): This setting prevents the EA from placing trades on zones that are too small. If you enable it, the EA will only trade on zones larger than the Min Size value. For example, if Min Size is set to 20 (pips), the EA will ignore zones smaller than 20 pips. You can choose to set Min Size manually or let the EA calculate it automatically. When automated, the Min Size is based on the current spread and the min size multiplier (you can find this option on the input parameters ): [Min Size Price = Current Spread × Min Size Multiplier]. The automated Min Size is always at least 5 pips. You can disable automation and enter your own Min Size if preferred. This feature helps avoid trades in small zones where wide spreads could reduce profits.
Wide, Medium, Narrow, SuperNarrow: There are four types of zones you can choose from. These refer to the relative size of the supply and demand zones compared to the entire chart — not their size in pips. You can select which types of zones the EA should trade from. For example, you might choose to place trades only on Narrow and SuperNarrow zones, and skip Wide or Medium ones. Narrower zones usually offer better opportunities for a higher risk-to-reward ratio, which can lead to more efficient and profitable trades.
Extension Panel Button : On the right upper corner of the Trading Panel you can see the Extension Panel button ">>". If you click it then you can see the extension panel that it is offering some more features.
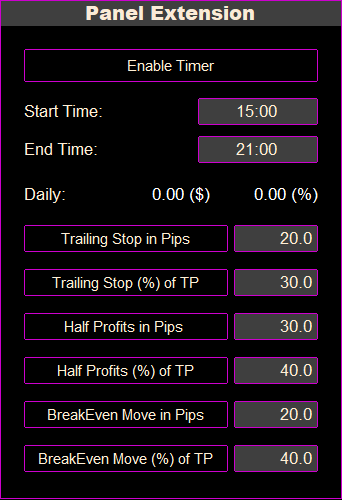
Extension Panel Settings
Enable Timer: If you enable this button then the EA will place trades only within this specific time range. This is the current time of your PC or VPS and is not the time of the Broker's Server . So if the start time is 15:00 and end time is 20:00 the ea will place trades only within those specific times.
Spread Limit: The EA will not place trades above when spread of the current pair is more than this price input. Some times the spreads during volatile situtations, like news releases are very wide and for that reason this input parameters avoids trading when spreads are very wide. For example if you are on EURUSD and you dont want to place trades when spread is more than 2 pips then you press the button and you put the input parameter into 2.
Trailing Stop in pips: This indicates at which level the trailing stop loss will be activated and what will be the distance in pips from current price. For example if you click the button and set the input parameter into 20 it means that when price is 20 pips in profit then the trailing stop loss is activated and it is set at 20 pips away from current price.
Trailing Stop (%) of TP: This acts the same as above but instead of pip level you set a percentage level. For example if you click the button and set the input parameter into 40 and the take profit level is 30 pips away from the Order Open Price. it means that when price reaches 40%*30pips=12 pips in profit then the trailing stop loss is activated and it is set at 12 pips away from current price.
Half Profits in pips: This indicates at which level you want to take for of your profits. So lets say your input parameter is 30pips and you have an open trade of 2 lots. When price is into 30pips in profit then 1 lot partial will be closed and you will have open an 1 lot trade.
Half Profits (%) of TP: This acts the same as above but instead of pip level you set a percentage level. For example if you click the button and set the input parameter into 20 and the take profit level is 100 pips away from the Order Open Price, it means that when price reaches 20%*100pips=20pips in profit then 1 lot partial will be closed and you will have open an 1 lot trade.
BreakEven Move in pips: This indicates in which level the stop loss will be moved to break even. If you set this parameter into 20 pips it means that when price moves 20 pips in profit then the stop loss will be moved at break even and this way you are going to lock your profits.
BreakEven Move (%) of TP: This acts the same as above but instead of pip level you set a percentage level. For example if you click the button and set the input parameter into 60 and the take profit level is 50 pips away from the Order Open Price, it means that when price reaches 50%*60pips=30 pips in profit then the stop loss will be moved at break even.

WebRequest URL: If you want use the News Filter you need to copy and paste this link on Tools->Options->Expert Advisors , the tick the Allow WebRequest for listed URL and paste the link on like on the photo below.
Automated Direction Settings
You can enable up to four Timeframes Above, which represent the market direction of the four higher timeframes above the timeframe that a zone was formed. These directions help the EA decide whether to take a trade or not, based on the trend of higher timeframes.
You can view the direction of each timeframe using the Directional Panel indicator. However, the Automated Direction feature works even if the Directional Panel is not attached to the chart — it functions independently.
How it works:
The EA checks the Timeframes Above that you have enabled in the input parameters. A trade will only be placed if all the "enabled" Timeframes Above are aligned in the same direction.
For example:
-
If you’ve enabled the 2nd and 3rd Timeframe Above, and price touches a demand zone, a buy trade will be placed only if the 2nd and 3rd timeframe above the timeframe where the zone was formed both show an up direction.
-
If price touches a supply zone, a sell trade will be placed only if the 2nd and 3rd timeframe above the timeframe where the zone was formed both show a down direction.
This helps filter out trades that go against the trend and improves overall trade quality.
You can enable multiple filters simultaneously. For example, you can activate the 1st, 2nd, and 4th filters, and all of them must align for a trade to be executed.
For Mild strength you can enable only 1st Timeframe Above
For Medium strength you can enable 1st Timeframe Above and 2nd Timeframe Above
For Strong strength you can enable 1st Timeframe Above, 2nd Timeframe Above and 3rd Timeframe Above
For Super Strong strength you can enable 1st Timeframe Above, 2nd Timeframe Above, 3rd Timeframe Above and 4th Timeframe Above
If at least one of the Timeframe Above Settings is true then Automated Direction is enabled. If none of the Timeframe Above settings are enabled, the Automated Direction feature is disabled.
1st Timeframe Above
- Demand Zone:
When the price touches a demand zone, this filter checks the direction of the 1st higher timeframe (above the demand zone's timeframe). If the direction is BUY, the EA places a buy order. If it is SELL, no trade is placed. - Supply Zone:
When the price touches a supply zone, this filter checks the direction of the 1st higher timeframe (above the supply zone's timeframe). If the direction is SELL, the EA places a sell order. If it is BUY, no trade is placed.
Example:
If the price touches a 30-minute demand zone, and the 1st Timeframe Above filter is true, the EA will only place a buy trade if the 1-hour timeframe's direction is BUY. Similarly, if the price touches a 30-minute supply zone, the EA will only place a sell trade if the 1-hour timeframe's direction is SELL.
If this filter is false, the EA will not consider the 1st timeframe direction.
2nd Timeframe Above
- Demand Zone:
When the price touches a demand zone, this filter checks the direction of the 2nd higher timeframe (above the demand zone's timeframe). If the direction is BUY, the EA places a buy order. If it is SELL, no trade is placed. - Supply Zone:
When the price touches a supply zone, this filter checks the direction of the 2nd higher timeframe (above the supply zone's timeframe). If the direction is SELL, the EA places a sell order. If it is BUY, no trade is placed.
Example:
If the price touches a 30-minute demand zone, and the 2nd Timeframe Above filter is true, the EA will only place a buy trade if the 4-hour timeframe's direction is BUY. Similarly, if the price touches a 30-minute supply zone, the EA will only place a sell trade if the 4-hour timeframe's direction is SELL.
If this filter is false, the EA will not consider the 2nd timeframe direction.
3rd Timeframe Above
- Demand Zone:
When the price touches a demand zone, this filter checks the direction of the 3rd higher timeframe (above the demand zone's timeframe). If the direction is BUY, the EA places a buy order. If it is SELL, no trade is placed. - Supply Zone:
When the price touches a supply zone, this filter checks the direction of the 3rd higher timeframe (above the supply zone's timeframe). If the direction is SELL, the EA places a sell order. If it is BUY, no trade is placed.
Example:
If the price touches a 30-minute demand zone, and the 3rd Timeframe Above filter is true, the EA will only place a buy trade if the Daily timeframe's direction is BUY. Similarly, if the price touches a 30-minute supply zone, the EA will only place a sell trade if the Daily timeframe's direction is SELL.
If this filter is false, the EA will not consider the 3rd timeframe direction.
4th Timeframe Above
- Demand Zone:
When the price touches a demand zone, this filter checks the direction of the 4th higher timeframe (above the demand zone's timeframe). If the direction is BUY, the EA places a buy order. If it is SELL, no trade is placed. - Supply Zone:
When the price touches a supply zone, this filter checks the direction of the 4th higher timeframe (above the supply zone's timeframe). If the direction is SELL, the EA places a sell order. If it is BUY, no trade is placed.
Example:
If the price touches a 30-minute demand zone, and the 4th Timeframe Above filter is true, the EA will only place a buy trade if the Weekly timeframe's direction is BUY. Similarly, if the price touches a 30-minute supply zone, the EA will only place a sell trade if the Weekly timeframe's direction is SELL.
If this filter is false, the EA will not consider the 4th timeframe direction.
- Dual Trading Option: To allow the EA to place both buy and sell trades automatically, make sure both the AUTO BUY and AUTO SELL buttons on the trading panel are enabled.
- Single Direction Option: If you want the EA to only place buy orders, activate AUTO BUY only; similarly, activate AUTO SELL only for sell orders. This setting allows for greater control over trade direction in specific market conditions.
Max Global Open Orders: This is the number of the total open orders that the EA has placed on the platform. It counts al the trades that the EA has placed on all pairs that is attached. For example if you set this variable at 5 , then the maximim amount of open orders will be maximum 5. So if the EA has already opened 5 trades on the platform no more trades will be opened on the current pair. This is not affect the trades are placed manually. Even if there are 5 trades open you can still place trades manually. It affects only the number of trades that have placed automatically by the EA.
Max Symbol Open Orders: This is the number of the maximum total open orders that the EA will place on the specific symbol. It counts al the trades that the EA has placed on the current pair that EA is attached. For example if you set this variable at 2 , then the maximim amount of open orders on the current pair will be maximum 2. This also not affects the trades are placed manually. Even if there are 2 trades open you can still place trades manually. It affects only the number of trades that have placed automatically by the EA.
TP/SL Ratio: There are two ways to calculate the TP and SL ratio. Risk Based and ATR Based. If you set this variable into Risk Based then the TP and SL level will be calculated according to the size of the zone that the trades is placed. If you set this variable into ATR based then the TP and SL loss wll not be affected by the size of the zone that the trades has placed but it will be calculated according to the ATR price of the timeframe that the trade was placed. On the following parameter you can set the ATR Period you prefer for your TP and SL calculations.
ATR Period: Here you can set the atr period that the TP and SL will be calculated. This variable is in use when the TP/SL Ratio is set in ATR Based calculation mode.
Stop Winners/Losers Difference: This variable affects the way “Stop After X Winners” Button and “Stop After X Losers” Button are calculated. For example if you enable “Stop After X Winners” Button and you set the price at 3, if “Stop Winners/Losers Difference “ is false then EA will stop after 3 closed winning trades on the current pair. , if “Stop Winners/Losers Difference “ is true then EA will stop when the difference (Winning Trades-Losing Trades) is 3 on the current pair. In the same way if you enable “Stop After X Losers” and you set the price at 4, if “Stop Winners/Losers Difference “ is false then EA will stop after 4 closed losing trades on the current pair , if “Stop Winners/Losers Difference “ is true then EA will stop when the difference (Losing Trades-Winning Trades) is 4 on the current pair.
Zones Labels Number: Here you can set how many number of zones labels can appear next to Supply and Demand zones. For example, If you set this number to 5 means that zone labels will appear on the first 5 demand zones and on the first 5 supply zones.
Zone Labels Font Size: From this parameter you can set the size of the zone labels and make it larger or smaller according to the size of your chart and resolution of your screen.
Trend Style: You can choose between trendline and channel. if you select channels then when you press "Up Trend" or "Down Trend" button then a bullish or bearish channel will be created. If you select trendlines then a bullish or a bearish trendline will be created.
Chart On Top: If this variable is true then when a new trade is being placed by the EA, automatically the pair and the chart that the trade was created it will come on top.
Enable Manual Trading: From this variable you can enable Manual Trading and place Market or Limit orders by clicking the zone label next to a zone.
Nested Zones Filter: When enabled, this setting restricts the EA to place trades only within Nested Zones. A Nested Zone is a supply or demand zone that forms within a higher timeframe zone, indicating a stronger supply or demand area due to alignment across multiple timeframes. This filter can enhance trade quality by focusing on areas with potentially higher reliability. By enabling the Nested Zones Filter, the EA will wait for the price to enter these nested areas before placing any trades, avoiding trades in isolated zones that lack higher timeframe support. For the EA to execute buy or sell orders within Nested Zones, ensure that both the BUY and SELL buttons on the trading panel are active. Activating only one (BUY or SELL) will limit the EA to that direction within Nested Zones.
Panel Settings
Panel Vertical Size: The default value for this setting is also 1.1. You can modify the height of the panel by changing the value in steps of 0.1, either increasing or decreasing it. For example, setting the value to 1.3 or 1.4 will increase the panel height. Adjust this setting to match the optimal size for your screen.
Panel Text Size: The default value for this setting is 1.2. To adjust the size of the text displayed on the panel, you can modify this value in increments of 0.1. For example, increasing the value to 1.3 or 1.4 will make the text larger, while decreasing it will make the text smaller. Adjust this setting to achieve the ideal text size for your screen.
Theme Color: You are able to change the colors of the panel. You have 6 options to choose from. You can use the one that you like and it suits most with the colors of your chart.
Visual Settings
Enable First MTF: When you attach the EA on the chart you see forming some dotted lines. Those dotted lines indicates the supply and demand zones from the first timeframe above the current. From this input variable you can enable or disable those lines.
Enable Second MTF: Also on the chart you can see forming some solid lines. Those solid lines indicates the supply and demand zones from the second timeframe above the current. From this input variable you can enable or disable those lines.
Enable Third MTF: Moreover you are able to see forming some dashed lines. Those dashed lines indicates the supply and demand zones from the third timeframe above the current. From this input variable you can enable or disable those lines.
Show Wide Zones: From this input variable you can enable or disable Wide Zones. If you disable this variable then Wide Supply and Demand Zones will not appear on the chart.
Show Medium Zones: From this input variable you can enable or disable Medium Zones. If you disable this variable then Medium Supply and Demand Zones will not appear on the chart.
Show Narrow Zones: From this input variable you can enable or disable Narrow Zones. If you disable this variable then Narrow Supply and Demand Zones will not appear on the chart.
Show SuperNarrow Zones: From this input variable you can enable or disable SuperNarrow Zones. If you disable this variable then SuperNarrow Supply and Demand Zones will not appear on the chart.
Supply MTF Zones Number: From this variable you can set the number of higher timeframes Supply Zones you want to appear on chart.
Demand Zones MTF Number: From this variable you can set the number of higher timeframes Demand Zones you want to appear on chart.
Show Size Labels: From this input parameter you can enable or disable the labels next to the zones that indicate the size of the zones (Wide, Medium, Narrow, SuperNarrow.
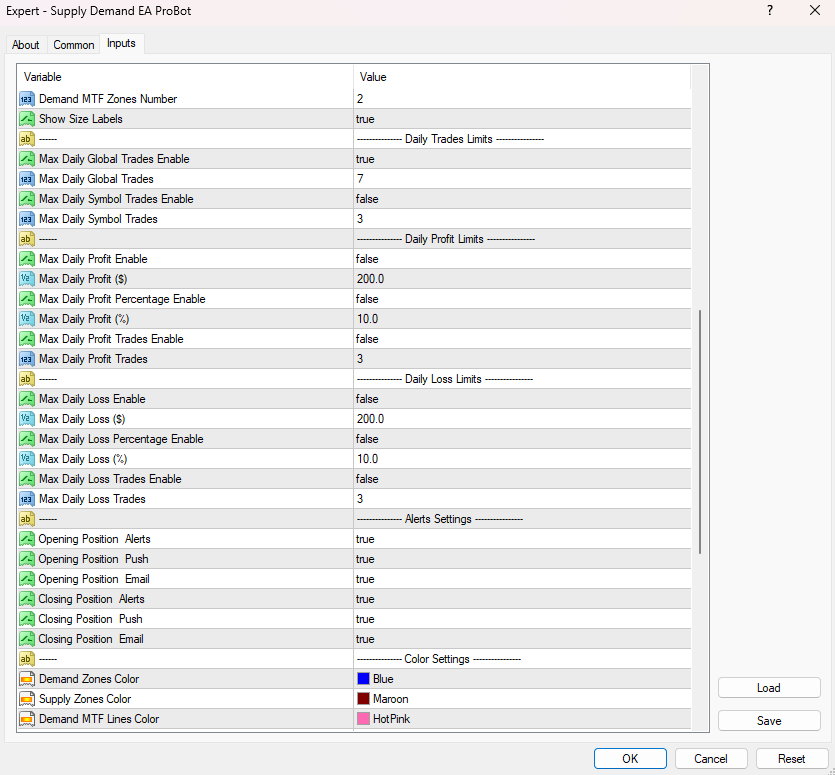
Daily Trades Limit
Max Daily Global Trades: This variable determines when the trading will stop on the current pair according to the number of the number of trades the EA has placed across the platform. For example if you set this variable to 7 , when EA has placed 7 trades in total across the platform(closed and open positions) then it will not place any more trades on the current pair. It affects only the number of trades that have placed automatically by the EA. . After EA has placed 7 trades you can still place trades manually on the current pair.
Max Daily Symbol Trades : This variable determines when the trading will stop on the current pair according to the number of the number of trades the EA has placed on the current pair. For example if you set this variable to 5 , when EA has placed 5 trades on the current pair(closed and open positions) then it will not place any more trades on the current pair. It affects only the number of trades that have placed automatically by the EA. . After EA has placed 5 trades you can still place trades manually on the current pair.
Daily Loss Limits
Max Daily Loss Enable: This option turns on the daily loss limit for the EA. When enabled, the EA will monitor the total loss from all trades it has placed across your account, not just on the current pair. If the total loss reaches the set limit, the EA will stop trading on the current pair and close all open trades on that pair. This is useful for limiting losses across your whole platform. Set it to True to activate or False to disable.
Max Daily Loss ($): This sets the maximum amount of money you're willing to lose in a day before the EA stops trading on the current pair. If, for example, you set it to $2000, once the total loss across all trades (open and closed) on all pairs exceeds $2000, the EA will stop trading and close all open trades on the current pair. This helps control risk by capping daily losses.
Max Daily Loss Percentage Enable: This option enables the daily loss limit based on a percentage of your account balance. When turned on, the EA tracks the total loss as a percentage of your account's equity. If the loss reaches the set percentage, the EA will stop trading on the current pair and close all open trades on it. Set to True to activate or False to disable.
Max Daily Loss (%): This sets the maximum percentage of your account equity that you are willing to lose in a day before the EA stops trading on the current pair. For example, if you set it to 5%, once your total loss from all trades (open and closed) across all pairs reaches 5% of your account balance, the EA will stop trading and close all open trades on the current pair. This helps limit losses based on your account size.
Max Daily Loss Trades Enable: This option enables the daily loss limit based on the number of losing trades. When turned on, the EA counts how many losing trades have been made across all pairs. Once the set limit is reached, the EA will stop trading on the current pair and close all open trades on it. Set it to True to activate or False to disable.
Max Daily Loss Trades: This sets the maximum number of losing trades allowed before the EA stops trading on the current pair. For example, if you set this to 5, once the EA records 5 losing trades (open or closed) across all pairs, it will stop trading and close all open trades on the current pair. This helps control risk by limiting the number of losses in a day.
Daily Profit Limits
Max Daily Profit Enable: This option enables the daily profit limit based on a set dollar amount. When activated, the EA will track total profits from all trades across all pairs. Once the profit target is reached, the EA will stop trading on the current pair. Set it to True to enable or False to disable.
Max Daily Profit ($): This sets the maximum amount of profit in dollars that you want to earn in a day before the EA stops trading on the current pair. For example, if you set this to $2000, once the EA’s total profit across all trades reaches $2000, it will stop trading on the current pair. This helps secure daily gains.
Max Daily Profit Percentage Enable: This option enables the daily profit limit based on a percentage of your account balance. When turned on, the EA will monitor the total profit as a percentage of your equity. Once the set percentage is reached, the EA will stop trading on the current pair. Set to True to enable or False to disable.
Max Daily Profit (%): This sets the maximum percentage of your account equity that you want to earn in a day before the EA stops trading on the current pair. For example, if you set it to 5%, once the EA’s total profit reaches 5% of your account balance, it will stop trading. This helps secure daily profits based on your account size.
Max Daily Profit Trades Enable: This option enables the daily profit limit based on the number of profitable trades. When activated, the EA will count the number of winning trades across all pairs. Once the limit is reached, the EA will stop trading on the current pair. Set to True to enable or False to disable.
Max Daily Profit Trades: This sets the maximum number of winning trades allowed before the EA stops trading on the current pair. For example, if you set this to 5, after the EA achieves 5 winning trades across all pairs, it will stop trading on the current pair. This helps lock in profits after a set number of wins.
Alert Settings
You can get alerts, push notifications and emails when a new trade is opened or when a trade is closed. So even if you are away from your PC you can have a real time view of what is going on with your trades. In order to get push notifications you have to download the mt4/mt5 application on your phone. Also those type of alerts are very useful if you run the EA in a VPS and you want to get notifications about all the trading activity that is going on.
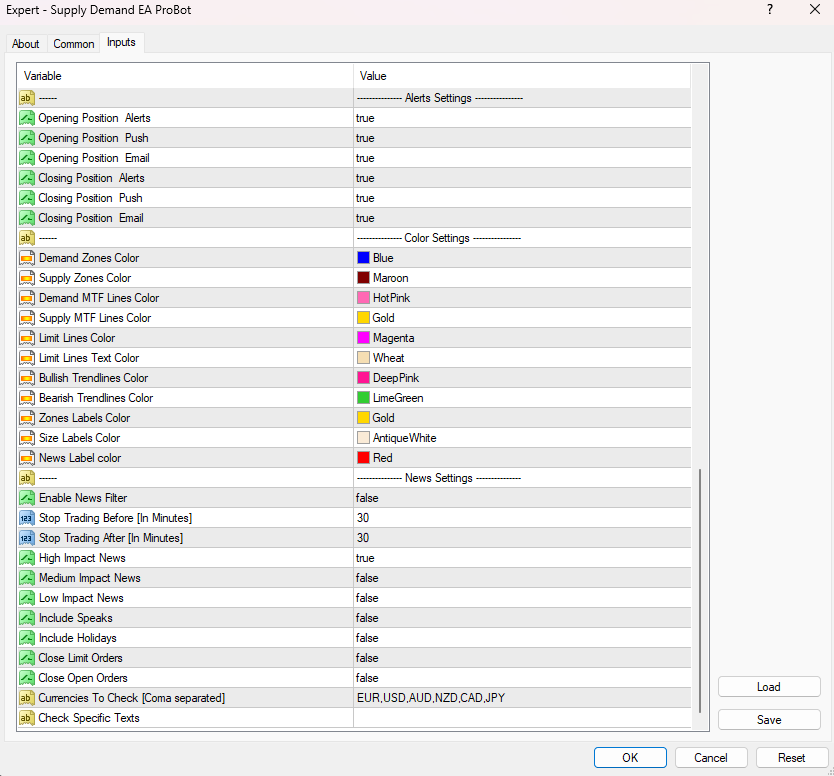
Color Settings
From those input parameters you can customize the color of all objects that appear on the chart, including supply and demand zones, trendlines, zone labels, and multi-timeframe (MTF) lines for higher timeframe zones. This allows you to visually organize and easily identify key elements on your chart. For example, you can set different colors for each object to differentiate between them, making your chart according to your personal preference.
News Settings
Enable News Filter: This setting enables or disables the news filter functionality in the EA. If this variable is true , the EA will check for scheduled news events and adjust trading behavior to avoid high-risk market conditions during these events, otherwise the EA will ignore news events and continue trading regardless of upcoming news.
Stop Trading Before [In Minutes]: This setting defines how many minutes before a scheduled news event the EA should stop opening new trades. For example, If set to 30, the EA will stop opening new trades 30 minutes before the news event. This helps prevent getting caught in volatile price movements caused by the news.
Stop Trading After [In Minutes]: This setting determines how long the EA will wait to resume trading after the news event has occurred. For example, If set to 60, the EA will wait 60 minutes after the news event to start opening new trades again. This allows the market to stabilize after potential volatility.
High Impact News: This setting controls whether the EA should filter out high-impact news events. High-impact news (such as interest rate announcements or unemployment reports) can cause significant market movements. If it is enabled, the EA will stop trading before and after high-impact news. If not, the High-impact news will not influence the EA’s trading.
Medium Impact News: This setting determines if medium-impact news events (which may cause moderate market movements) are included in the news filter. If it is enabled, the EA will stop trading around medium-impact news events. If not, the Medium-impact news will be ignored by the EA.
Low Impact News: This setting controls whether the EA should account for low-impact news events, which generally cause minor market movements. If it is enabled, the EA will stop trading before and after low-impact news. . If not, the Low-impact news will not affect the EA’s trading.
Include Speaks: This setting determines if speeches by key figures (such as central bank officials) should be considered in the news filter. Speeches can often influence the market unpredictably.
Include Holidays: This option controls whether the EA should pause or adjust trading during public or bank holidays. On holidays, market conditions can be irregular due to low liquidity.
Close Limit Orders: This setting determines whether the EA will automatically close any pending limit orders (orders that are set to trigger at a certain price level) before a news event. If it is enabled, all limit orders will be closed before news events, avoiding execution during high volatility.
Close Open Orders: This setting controls whether the EA will close all open positions before a news event to avoid losses due to high volatility. If it is enabled, the EA will close all active positions before news events.
Currencies To Check [Comma Separated]: This field allows you to specify which currency pairs the EA should monitor for news events. You can list multiple currency pairs, separated by commas. For example If you input EUR, USD, the EA will apply the news filter only to those specific currency pairs.
Check Specific Texts: This setting allows you to define specific keywords or phrases in the news that the EA should watch for. If these keywords are detected, the EA will apply the news filter to avoid trading during those events. For example, If you input "Interest Rate", "CPI", or "GDP", the EA will stop trading whenever news containing this text is detected.
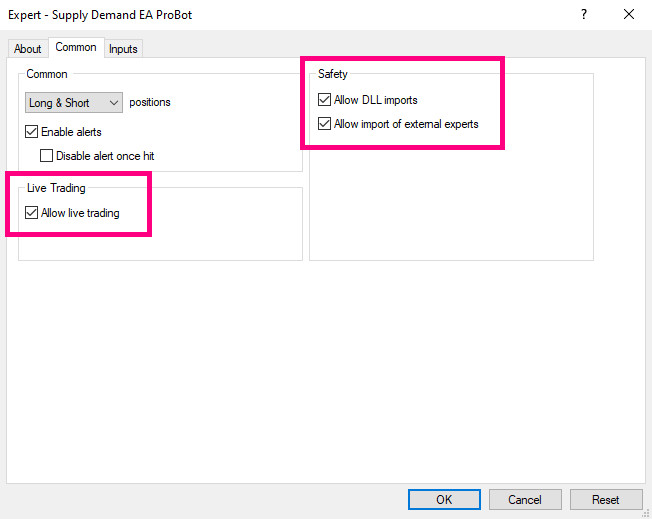

When you attach the Supply Demand EA ProBot on the chart for the first time be sure that the above tickbox are ticked.
Also make sure that "AutoTrading" button on the trading platform it is enabled. Otherwise the EA cannot place any trades automatically.
If you find any bugs or you have any recommendation about how to make this tool even better just send me a dm. I would glad to listen to your suggestions.


