
PART 1: THE VISION
As an active trader, I have always been stunned by the countless traders struggling with the detrimental impact of emotions on their performance.
When emotions run the show, and you let those bad behaviors take over, you can undermine proper risk management and end a trading career in a matter of days.
As you might know, institutions employ dedicated risk managers to supervise traders and prevent catastrophic losses. This provides institutions a significant advantage over retail traders.
The division between trader and risk manager is where the trading desk has the real edge over retail traders. The good news is that technology now enables traders to focus on trading while delegating risk management to software tools.
That is why I developed EmoGuardian as the ultimate risk management solution for MT5 traders. It empowers traders to control emotions by setting a multitude of risk parameters. EmoGuardian is a dynamic project, continuously evolving based on trader feedback. More and more options will be implemented over the following months, ensuring EmoGuardian remains at the forefront of risk management innovation.
Although EmoGuardian has been devised mainly for discretionary traders, it can also be used to control EAs.
PART 2: INSTALLATION INSTRUCTIONS
- Load the EAs with the interactive GUI.
- Set the risk parameters on each tab of the interactive GUI.
- Update the parameters by clicking on the Update Parameters button.
- Activate EmoGuardian by switching the On / Off button on the top right corner.
After completing the initial four steps, if no warnings are encountered, the three central buttons will transition to blue, indicating that EmoGuardian is functioning correctly.
At this stage, if you want, you can hide the "Interactive GUI" by clicking on Hide Interactive Panel! button to switch to the "Light GUI" mode.
In subsequent installation of the EA, the first of the 3 warning labels in the center will say "Parameters Not Updated Yet" , this means that unless you change and update parameters, you will be using the same parameters of the previous installation.
The first time you install the EA there will be no previous settings and all the fields of the tabs will be empty. You can just set the risk parameters as desired and press the Update Parameters button once you are done.
Initial input variables
Mobile Phone Notification Options
The notification options allow you to decide which notifications to receive on your mobile phone.
Any operation taken by EmoGuardian to reduce size, flatten trades, closing trades partially etc. is reported on the Light GUI, however it might be annoying to receive mobile notifications for every operation. Thus, you can choose these three options:
- Not receiving notifications at all.
- Receiving only Main notifications (these are notifications about reaching any level of min/max equity or min/max loss that appear on the "Daily Limits" tab or in the "Time Ranges" tab.
- Receiving all notifications.
In other words, by choosing option 2, you will not be notified when a position size is reduced, or a single trade is flattened because it exceeds a risk value.
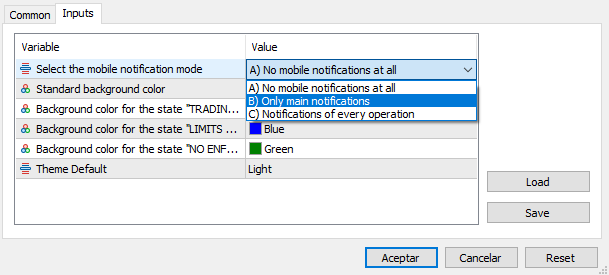
Standard background color
The color parameters specified here will only take effect when the 'Use background colors to signal trading state' option is selected in the interactive GUI. When enabled, the chart background will visually represent the current trading situation using distinct colors. If you use the default parameters, the background will turn:
Red> means no trade is allowed. Blue> if there are any limitations. Green> means there is no active limitation in place.

PART 3: THE INTERACTIVE GUI EXPLAINED
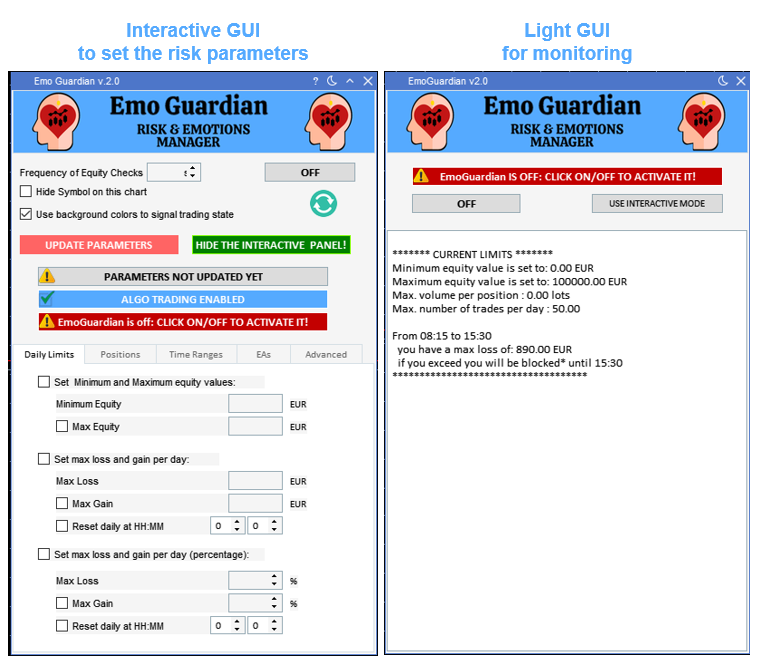
EmoGuardian offers two GUIs (Graphic User Interfaces):
Interactive GUI: This interface enables users to set risk options. Due to its graphical demands, we highly recommend switching to the Light GUI as soon as the risk parameters are configured and updated.
Light GUI: Designed for monitoring risk management operations, this interface efficiently displays real-time EA operations and current parameters. To switch, simply click Hide the interactive panel button. Transitioning to the Light GUI is not mandatory but recommended to save RAM and CPU. EmoGuardian will work independently on the GUI that you decide to use.
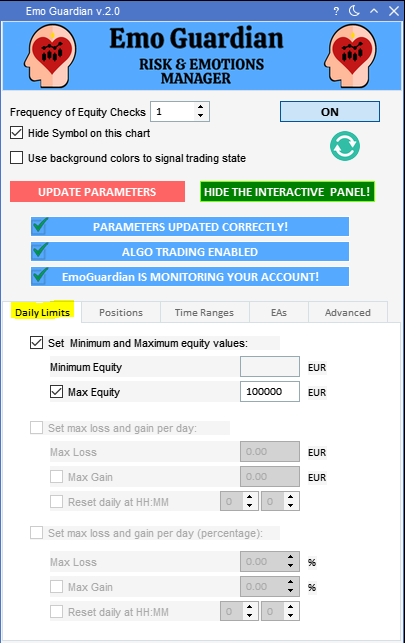
The INTERACTIVE GUI consists of these options:
- Frequency of Equity Checks box: Allows you to specify how often you want to check your equity. A value of “1” will mean every 1 second, a value of "3" will mean every 3 seconds etc... the change in frequency checks will take place only after clicking on Update Parameters.
- Hide Symbol on this chart checkbox: If selected it will hide the graph that appears on the chart.
- Use background colors to signal trading state checkbox: If selected the state of trading will be signaled with a different background color. The colors used are those specified in the input parameters window when installing the EA. See some examples below.
- Update Parameters button: Once you click on it, the risk parameters that appear on the tabs Daily Limits, Position Limits, Time Range, EAs and Advanced Settings will be loaded on the EA and used to monitor the account. After clicking this button, EmoGuardian will conduct cross-check of all entered parameters to prevent any potential inconsistencies. During this check, any parameter value that will result in an immediate flattening of some positions will be flagged with a pop-up window. This safety feature will avoid inserting wrong parameters. When parameters are updated, they are automatically saved and used in the next installation of the EA.
- ON/OFF button: On the top right corner is used to turn on and off the EA. As for the Update Parameters button a check on parameters is performed before turning on the EA. Any inconsistency will result in a warning, and it will prevent the EA from being switched on.
- The refresh button: the circled symbol below on/off. When clicked, this symbol will display in the tabs sections the parameters currently used, that is the parameters that were successfully updated the last time. You can always restore the parameters currently in use by clicking the Refresh button.
- Hide The Interactive Panel! button: Used to switch from the Interactive GUI to the Light GUI. In the Light GUI you will have a similar button to switch back to the interactive panel at any moment.
- The three WARNING LABELS in the center: They warn the user about any issue. If everything is fine, no label should appear in red. The state of the EA is clearly shown on the third of the warning label in the center. If the EA is not ON it will be clearly signaled with a red warning label.
- The tabs Daily Limits, Position Limits, Time Ranges etc. in which you can insert the risk parameters to be used. The number of tabs and parameters will probably increase with every update of the program. In the following sections each tab will be explained in detail.
- On the top bar you will see these 4 icons:
- The question mark is extremely useful to obtain a quick tip on what a button is for: just click on the question mark and then hover over a button to see some additional info.
- The moon sign allows to switch to a dark mode, once in a dark mode it will turn into a sun symbol. Clicking on the sun mode will go back to the default GUI color.
- The small arrow allows to reduce the GUI. Be careful this does not really reduce the resources consumption of the interactive GUI. The only way to reduce RAM consumption is to hide the interactive panel by clicking on the relative button.
- The X (close sign) will remove the EA from the chart.
General definitions:
- The word "Loss": Whenever you see the word loss, in any of the EA fields, the sign of the number is not relevant. The EA will always interpret the number as a negative number. For example, in the field "maximum loss per day", you can insert either -200 USD or +200 USD and they will all be interpreted as a maximum allowed loss of 200 USD.
- The word "Day"/"Daily": Unless specified otherwise, the term day or daily means starting from 00:00:00 platform time to 23:59:59 platform time.
- The word "Break": In the time ranges section of the EA the term break can extend beyond the end of the interval. So, if you set a max loss of 1000 USD in the time range 8am to 4pm and a break of 3 hours, in case you hit the loss limit at 2:15pm you will have to wait until 5:15 pm to be able to trade again.
- Time, hours, and minutes: All timestamps (hh:mm:ss) displayed on the EA are expressed in platform time.
- The term "Trade": In the section Max n. of trades, a new operation is considered a ''trade'' only when it opens a new position. Closing an existing position entirely or partially is not considered a new trade. Adding to an existing position (scaling in) is also considered a new trade since in MT5 it will result in a new position being opened on the same symbol. Opening and order is not considered a trade, until the order is executed successfully.
Examples for point 3:
- Example 1. Daily Limits tab: If you impose a minimum equity of 45300 USD to your account in the Daily Limits Tab, when your equity goes below this threshold, EmoGuardian will close all the positions and any trade will be inmediately flatten until the next day. In that case the background will turn red.
- Example 2. Time Ranges tab: If the same limit is imposed in a time range, using the Time Ranges tab, the background will turn red until the end of the time-range. The red color signals that any further trade will be flattened until the risk parameters are changed and updated or until the end of the time range or day to which the restriction applies. On the contrary, if you impose a max number of trades in a time range, once the max number of trades is reached, any further trade will be closed but current open trades will not be flattened. This condition is signal (by default) using a blue background.
- Example 3. Single symbol vs overall trading: Position limits that affect just one symbol and not the overall trading activity will not result in any background change. To clarify further, if you impose limits on number of trades per day and volume per day, in the Position Limits tab, once either limit is reached, the background will turn blue. This will indicate that existing trades will remain open, while any new trades will be flattened. If the maximum number of consecutive losers is reached in the Position Limits tab, the background will turn red. This limit will prompt the immediate closure of all open positions and any subsequent trade will be inmediately flatten.

1. Switch ON/OFF the EA.
2. Load the parameters that appear on the GUI.
3. Warning labels.
4. Tabs to set different risk parameters.
5. Tooltip (Question mark): click and hover over GUI elements to have some additional info
Moon sign: click to use the dark theme.
6. Refresh button: click to display on the interactive GUI the current parameters.
7. Switch to the light GUI to save resources.
PART 4: INCONSISTENCIES CHECK: DEFINITIONS AND EXAMPLES FOR CLARIFICATION
Prior to updating the parameters, EmoGuardian conducts multiple checks to avoid inconsistencies. Any setting or condition that would trigger an immediate flattening of the positions is considered an inconsistency.
Let’s see some examples of inconsistencies:
Example 1: In the Positions Limit tab, you decide to impose a limit of 30 trades per day (starting from 00:00:00 platform time to 23:59:59 platform time), and you already took 35 trades. This is considered an inconsistency, and you will be warned after clicking the update button. Updating the risk values will not be permitted until this inconsistency is removed (in this case increasing the number of permitted trades).
Example 2: In the Positions Limit tab, you decide to allow only 300 USD of risk per symbol, but you have several positions opened on EUR/USD that are currently generating a loss of -430 USD. This is considered an inconsistency, and you will be warned after clicking the update button. Updating the risk values will not be permitted until this inconsistency is removed (in this case increasing the allowed symbol risk or closing some of the losing position).

PART 5: LET’S START! SET YOUR PARAMETERS
The first time you install the EA there will be no previous settings and all the fields of the tabs will be empty. You can just set the risk parameters as desired and press the update button when you are done.
There is no room for misunderstanding about the parameters in use since they are visible in the interactive GUI interface.
DAILY LIMITS TAB
1. Set Minimum and Maximum equity values / Set max loss and gain per day: In the Daily Limits tab, you can specify a minimum or maximum of equity values, or a max loss/gain per day. When either one of these levels is reached the EA will:
- Flatten all open positions.
- Close all pending orders.
- Close every chart except the chart on which the EmoGuardian is attached.
- Close all working EAs.
- Inmediate flatten any trade until the reset time of 00:00:00 (platform time or the specified reset daily time), or until the parameters are reset (in case of imposing a max/minimum equity).
2. Set max loss and gain per day (percentage): In this third section, figures are expressed in percentages. The percentage is computed taking as a reference the Account equity at 00:00:00 or at the time specified in the Reset daily at HH:MM section.
To enable one section, you must select the corresponding checkbox.
To avoid misunderstanding the three "sections" of this tab are incompatible, so once one section is selected the other two will be disabled.
To impose an upper limit on Equity, select the relative checkbox Max Equity or Max Gain.
**Remember** Whenever you see the word loss, in any of the EA fields, the sign of the number is not relevant. The EA will always interpret the number as a negative number.
For example, in the field Maximum loss per day, you can insert either -200 USD or +200 USD and they will all be interpreted as a maximum allowed loss of 200 USD.
**Remember** Losses and gains include both open and closed operations.
For each section imposing a "lower limit" on equity either through Minimum Equity or Max Loss is mandatory, whereas imposing an upper limit is optional.
Example: Current time 8:30---- Reset time: 2:15--- max loss 3%--- Current balance 80345 USD
Imagine you have an open position with a Loss of 150 USD. From 2:15 to 8:30 you took several trades with a total closed loss of 500 USD. At 2:15 you had no open position. This means that at 2:15 your balance was 80345 + 500 USD= 80845 USD. This balance will be taken as a reference. From 2:15 to now (8:30) you have a total loss (closed + open) of 500 + 150 USD = 650 USD which represents a 650/80845 = 0.804% loss. EmoGuardian will allow you to keep trading, since you are allowed to lose up to 3%.
3. Reset daily at HH:MM checkbox: The sections that permit to set a max loss/max gain consent to establish the time in which the day will start. In case this option is not selected the day will start at 00:00:00 platform time and end at 23:59:59 Platform time. To understand how using a different reset time will be interpreted see these examples:
Example 1: Reset time 15:31 ---- Current time 12:45 ---- Max loss 1000 USD ---- current loss 930 USD. In this case the day started yesterday at 15:31:00 and will end today at 15:30:59. The loss of 930 USD is computed taking this time span into account. In this situation you can still trade but you have a “buffer of only" 70 USD, let's say you take a trade, and you lose 71 USD: the trade will now be blocked until 15:30:59. Any open position or order will be closed and any further attempt to trade will be blocked. If you select "allow background colors to signal trading state", then the background will turn red until the trade is allowed again. At 15:31 the day will reset, and you will have a new " budget" of 1000 USD to trade.
Example 2: Reset time 09:15 ---- Current time 16:45 ---- Max loss 1000 USD ---- current profit 780 USD. In this case the day started today at 09:15:00 and will end tomorrow at 09:14:59. Since the start of the day you have accrued a profit of +780 USD. This means that till tomorrow at 9:14:59 you have a total "buffer" of 1780 USD. If you lose this money, you will be blocked. Tomorrow at 9:15 the new profit and loss will reset to zero.
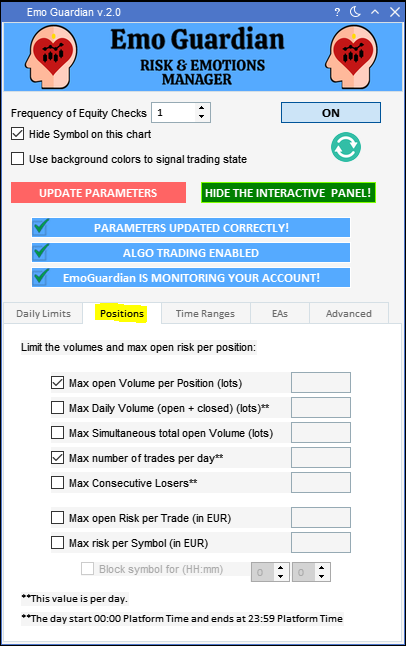
THE POSITION LIMITS TAB
This tab allows you to impose very specific risk limits on the account. In the following I will use the words "Positions", "Symbol" and "Trade". The term "Trade" is a deal that resulted in a successful opening of a position. Each position is the result of opening a trade. Multiple trades open multiple positions. Once a position is opened it might be closed with multiple partial closings, each one of them will be considered as a trade.
To put it simply, a trade is a "line" in the history tab of your MT5 platform.
Not all limits will result in the same kind of "blocking", although the behavior of the EA for each limit is quite "logical" please read the relative explanation to avoid misunderstandings.
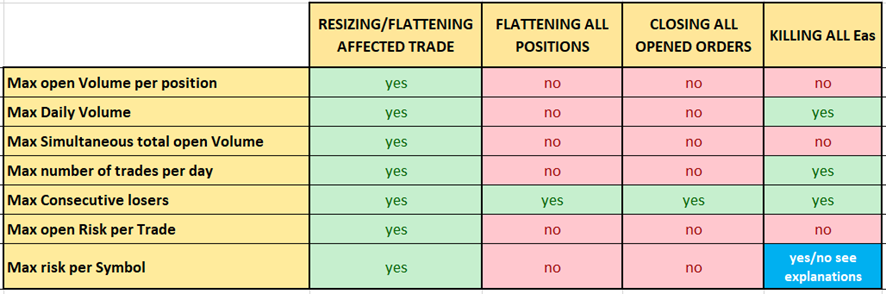
1. Max open Volume per Position (lots): this is the max number of lots that you allow for a single position. If you have multiple positions on the same symbol, each position will be treated separately, and the limit will apply on each single position and not on the symbol tot. volume. ACTION TAKEN: when the max volume per position is reached, the position will be resized and automatically capped at the max allowed volume.
2. Max Daily Volume (open + closed) (lots): this is the max number of lots that you are allowed to trade during the day. It takes into account both closed operations as well as opened positions, from 00:00:00 to 23:59:59. ACTION TAKEN: when the max volume per day is reached, every further trade will be closed. The last trade that causes the limit to be surpassed will be resized so that it is according to the max size allowed before surpassing the limit. All EAs will be killed. The reason why EAs must be killed is simple: we want to avoid EAs taking trades that would be immediately flattened because they surpass the max daily volume. This might result in tens or hundreds of trades being taken and immediately flattened and could destroy the whole account with commissions costs.
Example: Max daily Volume is 100 lots, you have closed a total volume of 74 lots and have still opened 12 lots. In this case you can still trade 14 lots for the day (100-74-12). If you take a trade of 30 lots, it will be immediately resized to 14 lots.
3. Max Simultaneous total open Volume (lots): this is the max number of lots that you are allowed to have opened at the same time. ACTION TAKEN: once this limit is reached any further trade will be closed or resized accordingly. The resize will take place so that the total open volume will stay below the imposed limit.
4. Max number of trades per day: this is the max number of trades that you are allowed to take from 00:00:00 platform time to 23:59:59 platform time. A trade is a successful deal that results in an open position. ACTION TAKEN: once this limit is reached no further trade will be allowed. As soon as a position is opened it will be flattened. All EAs will be killed. The reason EAs must be killed is simple: we want to avoid EAs taking trades that would be immediately flattened because they surpass the max daily volume. This might result in tens or hundreds of trades being taken and immediately flattened and could destroy the whole account with commissions costs.
5. Max Consecutive losers: this monitors the length of the longest losing streak of trades. ACTION TAKEN: once this limit is reached, the trade will be blocked until the next day. All position will be flattened, all orders will be canceled and all EAs will be killed. On top of this any further trade will be immediately flattened. The strong "punishment" for violating the "max consecutive losers" condition is easily explained: this condition is normally violated when traders are in strongly emotional and irrational states. In these conditions a trader can blow up an account and they need to be immediately stopped.
6. Max open Risk per Trade in USD: this section allows you to set a max open risk per each position, multiple positions on the same symbol will be treated separately. ACTION TAKEN: once the max loss per position is reached, the position will be flattened.
7. Max risk per Symbol in USD: this section allows you to set a max open risk per each symbol. The open risk is computed "flat to flat", meaning that it starts when there is no open position on the symbol, and it ends when all open positions have been closed. Multiple positions on the same symbols will all contribute to the computation of the max open risk per symbol. Computing the max risk this way doesn't allow the trader to "circumvent" the EA by scaling out part of the position to reduce the open risk. (See the video below with some clear examples).
This section allows you to block the symbol for a certain amount of time. The blocking time is computed from when the last flattening takes place and will be "reset" every time there is a new attempt to trade the blocked symbol. ACTION TAKEN: once the max symbol risk is reached all positions on that symbol will be flattened. If the "block symbol for (HH:mm)" is selected, the symbol will be blocked for the specified amount of time. EAs will be killed only if the "block symbol for (HH:mm)" is selected. The symbol will be tradable again after the blocking time has passed. The state of blocked symbols will be clearly displayed on the Light GUI. We decided to kill the EAs if their symbols are blocked for some time to avoid a situation in which an EA take multiple trades that are immediately flattened and retaken.
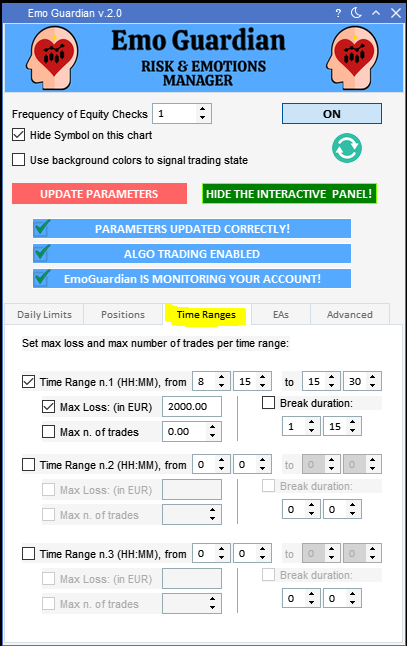
THE TIME RANGES TAB
This tab allows to set a max loss and a max number of trades on different ranges.
Keep in mind that if the HH:mm in the 'from' section is smaller than the HH:mm in the 'to' section, the time range will be considered to span across two days.
1. Time Range n.1; n.2 or n.3 (HH:mm): in this section is possible to define multiple time ranges even if they overlap. In that case if any of the time ranges impose a ‘Trading not allowed’ condition, trading will not be enabled.
2. Max Loss (in USD): ACTION TAKEN: after the max loss is reached in the specified time range EmoGuardian will close all positions, flatten all EA and trading will not be allowed until the end of the range. As always, the Max Loss values will be interpreted as negative numbers even if they are inserted as positive numbers.
3. Max. n. of trades: ACTION TAKEN: If the max number of trades is reached within the specified time range, EmoGuardian will close all opened charts and kill all EAs and flatten any additional trade taken in that time range, but it will not flatten open positions (as it would do upon reaching a max loss).
4. Break duration: It is possible to impose a break duration that can extend beyond the time range. ACTION TAKEN: if break duration ends within the time range it won't be possible to trade until the time range's end.
**Key point to remember** What is considered a trade? In the section Max n. of trades, a new operation is considered a ''trade'' only if it opens a new position. Closing an existing position entirely or partially is not considered a new trade. Adding to an existing position (scaling in) is also considered a new trade since in MT5 it will result in a new position being opened on the same symbol. Opening and order is not considered a trade, until the order is executed successfully.
THE EAs TAB
The new EA tab, introduced in version 2.0, enables users to reload specific EAs after the limits set in the Daily Limits or Time Ranges tabs are reset.
This functionality empowers users to utilize EmoGuardian for managing EA behavior, facilitating unloading, and reloading when certain limits are reached or reset.

For example, if you have three EAs (EA_1, EA_2 and EA_3) running on a VPS server you can impose a max loss per day in the Daily Limit tab. Once the loss is reached all EAs will be killed, and all positions and orders will be flattened. This might prevent the erratic behavior of some EAs in case of abnormal market conditions. The following day the EA can be reloaded automatically at midnight (Platform Time). The parameters of the Daily Limit tab also allow you to customize the beginning and ending of each day.
The same can be done for the limits imposed using the Time Ranges tab. It is thus possible to create up to three different time ranges in which you can assign a max loss or a max number of trades. If the limits imposed by the time ranges are reached, the EAs will be killed. By selecting the checkbox in the EAs tab you can decide to reload the EAs after the limits are reset.
How to use this function:
1. Load the EA that you would like to reload any chart.
2. Right click on the chart and select "Save Template as".
3. Create a template, save it in the folder MQL5>Files>EMOG_EA (see the image below and the video).
4. Repeat for all the EAs that you would like to load (for instance you can create TemplateA.tpl to load the EA_A, you can create Template_B.tpl for the EA_B ...etc...).
5. Select the checkbox in the EA tab.
6. Insert the name of the Templates that contain the EA that you would like to load.
If you wish to attach the EA to a specific symbol, use this notation: TemplateName.tpl!SYMBOL (i.e. Template_A.tpl!EURUSD to load EA_A to EUR/USD).
If you do not need to specify any symbol, the EA will be attached to a random symbol.
The templates need to be created only the first time, they do not need to be recreated and resaved every time. For the next use of the same template, you can just select the checkbox and specify the template name.
If your EA has some specific settings (Input variables) these must be specified and saved when creating the template that will 'host' the EA.
When you right click on the chart, and select Save Template option, you will be proposed the folder MQL5 > Profile > Template to save the template.

Click on MQL5 and select the folder MQL5 > Files > EMOG_EA instead and save the template there.

As usual EmoGuardian will make sure that the template exists and that the notation used in the EA tab is correct, otherwise the user will be notified.
The procedure might seem complicated but after it's understood the whole process takes (literally) 30 seconds. For more clarity, check the video below:
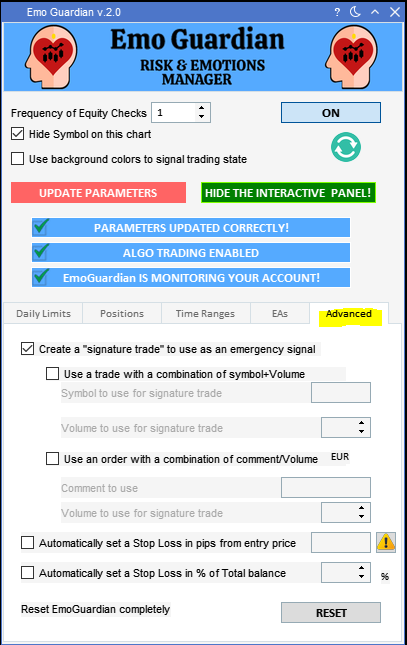
THE ADVANCED SETTINGS TAB
1. Create a “signature trade” to use as an emergency signal: this checkbox allows you to create a 'signature' trade that will be interpreted by the EmoGuardian as an emergency signal. ACTION TAKEN: When this signal is received all open positions will be closed, all EAs will be killed, and any open order will be removed. Here you have two options:
a) Use a trade with a combination of symbol + volume.
b) Use an order with a combination of comment/Volume: open MT5 and create an order on any symbol with a random price, insert the comment and volume that create the signature.
2. Use a trade with a combination of symbol + volume symbol to use for signature trade: the signature trade can be created using a combination of "symbol + volume" or a combination of "comment + volume". To use the latter method just open MT5 and create an order on any symbol, and with a random price and insert the comment and volume that create the signature (see video below)
Why might you need an emergency signal?
Many traders use the EmoGuardian on a VPS server to monitor their trading operations, or the operations taken by other EAs. Sometimes an unexpected event might take place that can change the overall market sentiment and that might cause an unwanted behavior of some EAs. In these cases, the best solution might be to stop all trading operations and kill all EAs. By having an emergency signal, this operation can be done using MT5 mobile app or any other device without the need to access the VPS server.
3. Checkboxes: Automatically set a stop loss in pips from entry price and Automatically Set a Stop Loss in % of Total balance.
EmoGuardian's Advanced tab also allows you to automatically add a stop loss (SL) to positions that do not have a SL already. There are two options to do so, the first one sets a stop loss in number of pips from the position's entry price, the second one adds a stop loss in percentage of the account balance.
Since there is no universally accepted definition of a pip, I will adopt the following definition:
- FOREX PAIRS that do not include JPY, we define as pip the 4th decimal value. A change in EUR/USD from 1.12003 to 1.12403 would be a change of 40 pips. A change in USD/CAD from 1.34305 to 1.34375 would be a change of 7 pips.
- FOREX PAIRS that include JPY, we define pip as the 2nd decimal value. A change in USD/JPY to 147.856 to 147.976 would be a change of 12 pips and a change from 147.903 to 148.903 would be a change of 100 pips.
- For All other symbols (including indexes and commodities) the change would be the 4th decimal in case the symbols have 4 decimal values or more. In case the symbol has less than 4 decimal values it’s the last decimal value. A change in USOIL.cash from 77.504 to 77.704 would be a change of 200 pips. A change in Vowg_p from 114.64 to 114.87 would be a change of 23 pips.
The SL calculation will consider market spread and potential minimum requirement of stop level for each symbol.
Since there might be multiple reasons that might prevent the successful insertion of a stop loss to a position, EmoGuardian will make only 5 attempts to place the stop loss, after which the SL will not be placed. This is done in order to avoid saturating the broker servers with multiple queries in case adding the SL is not possible.
4. RESET button: finally, the Advanced Settings tab has a reset button that you can use to reset the EmoGuardian completely. After resetting the EmoGuardian, all the previous parameters will be lost and EmoGuardian will be reinstalled as if it was installed for the very first time. Just click on the RESET button and select ok.
FREQUENTLY ASKED QUESTIONS
How will EmoGuardian behave if I trade multiple accounts using the same MT5 platform?
EmoGuardian saves the settings for each trading account separately, this means that it will load for each account the last settings you used on that particular account. By pressing the refresh button, you can visualize the parameters currently on the account currently active.
Do I have to do something on the first installation of EmoGuardian?
EmoGuardian has been developed to be as user friendly as possible, so there is nothing special to do on the first installation, just load the EA insert the parameters, update and click "on".
The only difference between the first installation and later uses of the EmoGuardian is that on the first installation all parameters will be set to zero.
Upon clicking on the update button, I cannot see all parameters on the interactive GUI, what should I do?
If you cannot see the loaded parameters, just click on the cell that appears in Gray and the loaded parameters should appear.
What happens if I reinstall EmoGuardian after removing it from the chart?
In case you remove the EmoGuardian from the chart, and you then reinstall it, the EA will use the parameters updated in the previous session. When reloaded, EmoGuardian will only start from the “OFF mode”. In that case the first warning label will be colored grey and it will read "PARAMETERS NOT UPDATED YET". You can visualize the parameters that the EA will use by just clicking the "Refresh button" (the circle symbol below the on/off button).
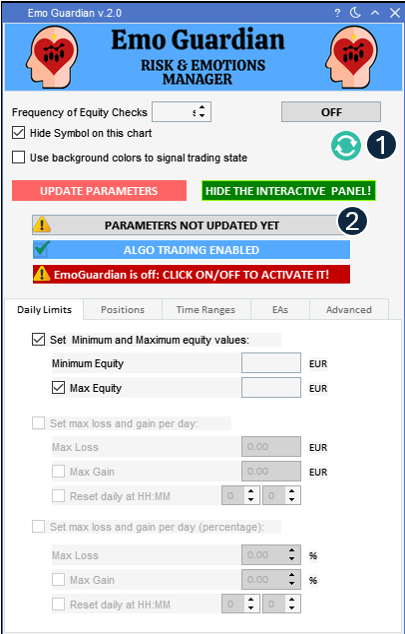
1. The Refresh button will display on the GUI the saved parameters. This will allow us to double-check parameters in used.
2. This warning label in gray color, signals that you are using the risk parameters of a previous session. To change parameters, set it on each tab and select Updates Parameters.
Share it with friends!


 & AMD Framework")