INTRODUCTION
This blog posting is to provide background, usage examples and access to companion scripts for the Coral Trade Planner indicator available in the MQL5 Market for MT4.
BACKGROUND - MY WORKFLOW
I am an active trader, and I position trade using a number of strategies and tools. I found that as I was going about my daily trading activity there were the same set of questions that came up over and over, and there was no simple, automated way to get the answers I needed. I've written so many tools over the years to handle pieces of the puzzle, but I recently realized that all of the questions I had were related to the same bigger picture, and what I really wanted was a single tool to support my personal trading workflow as a position trader. That is:
- Planning a trade's lot size.
- Planning a trade's entry price, stop loss and take profit; while assessing the impact on the risk. And,
- Assessing the impact that this new trade will have on the overall position (the existing trades I'm already it.)
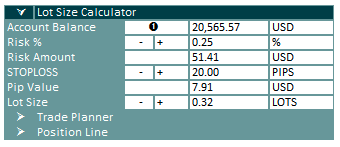
As I'm beginning to think about a trade, the first question I ask is: what position size should I use? This will depend on which instrument I'm trading, my current account equity, how many existing trades I have in place, which strategy I'm following for this entry, how many trades I think I may need to get into before the full position closes, and my overall confidence in the entry that I'm considering. That's a lot to think about to determine lot size! The Lot Size Calculator handles the math part of this problem for me, but there are plenty of lot size calculators out there, why did I need to write my own? Because as I move on to the next steps of my trade planning activity I want to constantly make adjustments based on what I'm risking and see the impact on my portfolio, and be able to quickly assess if the trade I'm planning is actually favorable.
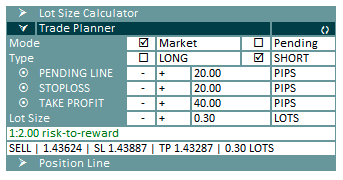
The next question I'm asking is, of course, where to place my entry, stop loss and take profit. I want to visualize this on the chart, and I want to easily see not only the distances from price to my lines, but also the value of those lines based on distance and lot size. As I drag my stop loss around, I want to know what it will cost me if price moves here and takes me out. And I want to know if price reaches the level that I anticipate, will it generate enough profit at this lot size to justify the entry? In the past I was adding lines to the chart by hand and trying to track all of this in my head, which is hard to do when you're trying to make quick decisions about entering a trade. MT4 does not really make it easy to see what a trade is going to look like; you don't get any visual feedback until you're already in the trade, and then it's too late to make adjustments, such as lot sizing.
How many times have you opened the "New Order" dialog in MT4 and immediately had to close it because it wants to know the stop loss price on the chart, rather than, say, the number of pips or points from the open price? Then you have to go figure that out and and come back and try again. Nobody thinks in prices like that! The Trade Planner window has a line that shows all of the price data of the current planned trade, so if you're using the "New Order" dialog in MT4 to enter the trade, all of your planned information is immediately available.
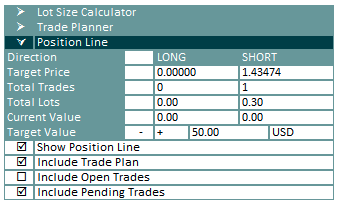
Finally, I want to understand the impact that this trade I'm planning will have on my entire position. As a position trader I am in multiple trades on a single instrument, and I often hold them for days or longer. If I add a new trade to the position, the immediate impact is that it will change where my "break even" point is on the chart. Again, there are tools that will show me where break even is, but I have a couple of problems with that. First, I'm not actually trying to break even! I want to set a profit target that is greater than zero, and that's actually where I want price to go. And second, I need to see this before I execute the trade. I need to make find-tuned adjustments either to my target value (by changing the take profit of the planned trade) or the target price (by changing the lot sizing), and see how these changes impact the overall risk on this trade.
This is why I wrote Coral Trade Planner.
WHY AN INDICATOR?
It is a little unusual, to write an indicator that is intended for executing trades. In fact, MQL does not allow this; the Trade Planner cannot by itself submit any orders, as this is not permitted for indicators. The reason this is an indicator is that I am already using EAs on my charts for other purposes, and I want to continue to do so. Coral Trade Planner is not for automating a trading strategy, it is a tool I use for analysis and manual intervention. So I use the Trade Planner to visualize the entry, stop loss and take profit on the chart, with immediate feedback on the value of these levels when price gets there based on my lot sizing. Once I'm satisfied with my choices and I get an entry signal, I then need to act quickly to execute the trade plan. For that purpose there are three companion scripts that work with Coral Trade Planner:
- EnterTradePlan - TEST. This script will take the inputs from the Trade Planner and do everything except submit the order. You'll see a message in the Trade Planner that it received a test order from the script (as well as in the "Experts" tab in the terminal), and the planned trade will be cleared from the chart.
- EnterTradePlan - NOW. This script will execute the trade plan immediately. You will see a message in Coral Trade Planner with the order type and ticket number; and the planned trade will be cleared from the chart. It's actually visually quite pleasing, as the planned trade lines are replaced with the actual trade lines.
- EnterTradePlan - INPUTS. This version of the script will open an input dialog and let you set your own trade comment and magic number on the trade. If you're working with an EA and you want that EA to manage this trade, then being able to set the magic number is handy. You can't do it after the trade has been created. Same goes for the comment.
The companion scripts are attached to this blog post. They only work with Coral Trade Planner, otherwise they won't do anything. They also won't work on the Strategy Tester.
Note, you can plan trades that don't actually make sense, such as a pending entry that is too close to current price. Coral Trade Planner will not prevent you from doing this, and the EnterTradePlan scripts will not verify this before sending the order. If an error occurs and the trade cannot be sent for any reason, you'll see the error message displayed in the Trade Planner window instead, as well as being written to the "Experts" tab in the Terminal.
SHORTCUTS and HIDDEN FEATURES
There are many little shortcuts programmed in to Coral Trade Planner that I find helpful. There's not a lot of room in the product description to go into such details, so this section of this post will serve that purpose.
| In the Lot Size Calculator, click the "Risk %" field to quickly reset risk % to the initial value (set in your inputs). Changing Risk % will update Risk Amount and Lot Size, but not STOPLOSS. | 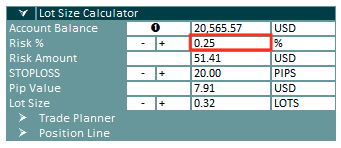 |
| In the Lot Size Calculator, click the "STOPLOSS" field to quickly toggle between 0.00 and the initial value (set in your inputs). Changing STOPLOSS will update Lot Size, but it will not change Risk % or Risk Amount. Also, if you have a stop loss line on the chart, this will update that line. | 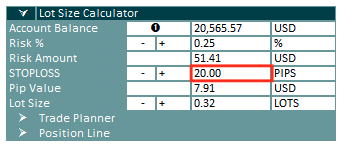 |
| In the Lot Size Calculator, ciick the "Lot Size" field to quickly set the lot size down to lot step (set in your inputs); by default this is 0.01. You can quickly return to a larger lot size by clicking the "Risk %" again to reset risk % to your default, which will also update the lot size. Changing Lot Size will update Risk % and Risk Amount, but it will not change STOPLOSS. | 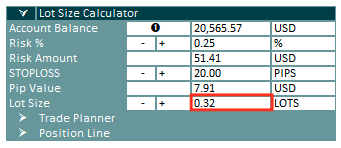 |
| In the Trade Planner, there are behaviors set for the three lines. The PENDING LINE value will quickly reset it to the initial value (set in inputs). The STOPLOSS value will toggle between zero and the STOPLOSS value set in the Lot Size Calculator. The TAKE PROFIT value will toggle between zero and 2x the STOPLOSS value, if STOPLOSS is not zero. That is, it will set a 1-2 risk-reward ratio. As in the Lot Size Calculator, clicking Lot Size will set the lot size value back to Lot Step (0.01 by default), and also update Risk % and Risk Amount in the calculator. Go click Risk % in the calculator to quickly return to a larger lot size, or if you have open positions, see below. | 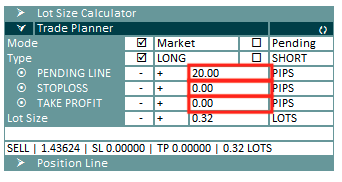 |
| The chart lines will all show you a label that tell you what the line is (e.g., "TAKE PROFIT"), the current distance from whatever is relevant (usually the Bid/Ask price), and the current value in your account currency. These are updated in real-time as the lines are moved around on the chart, or as the you change the value from the dialog box. Also, sometimes it can be hard to see these values on the chart, for instances if two lines are too close together, or if the chart candles are drawing over the lines. These values are also set as tooltips in the Indicator window. For example, hover over the STOPLOSS value in the Trade Planner to quickly see amount in your account currency associated with that number of pips. | 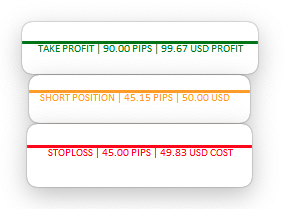 |
| Click the "RESET" icon to quickly remove all of the Trade Planner lines from the chart and set the values back to zero. Click again to set the defaults: STOPLOSS is set to the STOPLOSS value in the Lot Size Calculator and TAKE PROFIT is set to 2x STOPLOSS. | 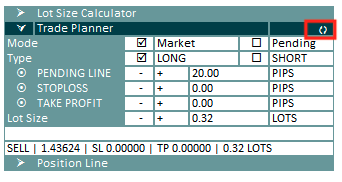 |
| The circles next to the Trade Planner lines are for toggling whether the line is locked or unlocked. When the line is "locked' it will follow price on the chart as it moves. If you "unlock" the line you can instead click-and-drag the line on the chart, and you'll see the values updated in real time to show you the feedback. Only unlocked lines can be selected. When you unlock a line it is immediately selected, both giving you a visual indication of the line being unlocked and moveable, and making it easy to quickly grab and drag that line. When you re-lock the line, it will be deselected. | 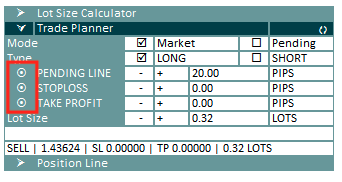 |
| Clicking the Total Lots value in the Position Line dialog will set the lot size for the planned trade to the total lot size from open orders in the position. This is a useful shortcut if, for example, you would normally create a trade with a lot size of 0.5, but you currently have 0.7 lots open in the position and you want to open a new trade with this lot size. If you have "Include Trade Plan" and "Include Open Trades" both selected, then the "Total Lots" will show the sum of both, including the planned trade lots. But if you click that Total Lots value it still only set the planned trade lot size to the total open trade lot size, not including the trade plan lot size. I know that's confusing. In the screenshot to the right, you see that we have 0.14 lots displayed, because that's the value from the trade plan. If you click this value it will set the lot size of the planned trade to zero, because this shortcut only sets the lot size to the total number of lots on open positions. | 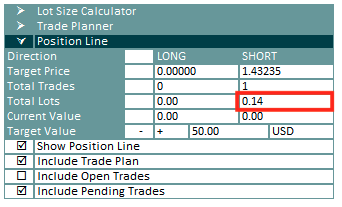 |
CONCLUSION
This tool has changed the way I trade by such a huge degree; it makes it so simple to plan trades and see them visually on the chart; and to make fine-tuned adjustments to things like my stop loss and lot sizing to meet my overall position goals, while keeping a handle on my portfolio risk. It is baffling why this type of feedback is not a built-in feature of MT4! Sure, you an hover over a stop loss line on your chart to see the pip distance and value, but that's only after the trade has been entered; that does nothing to help with planning. I hope the MQL5 trading community finds this tool as interesting as I do! This is my first MQL5 product, so please be kind. :)


