
Correlation Arbitrage Hedging EA
- 专家
- 版本: 1.40
- 更新: 1 十一月 2026
- 激活: 5

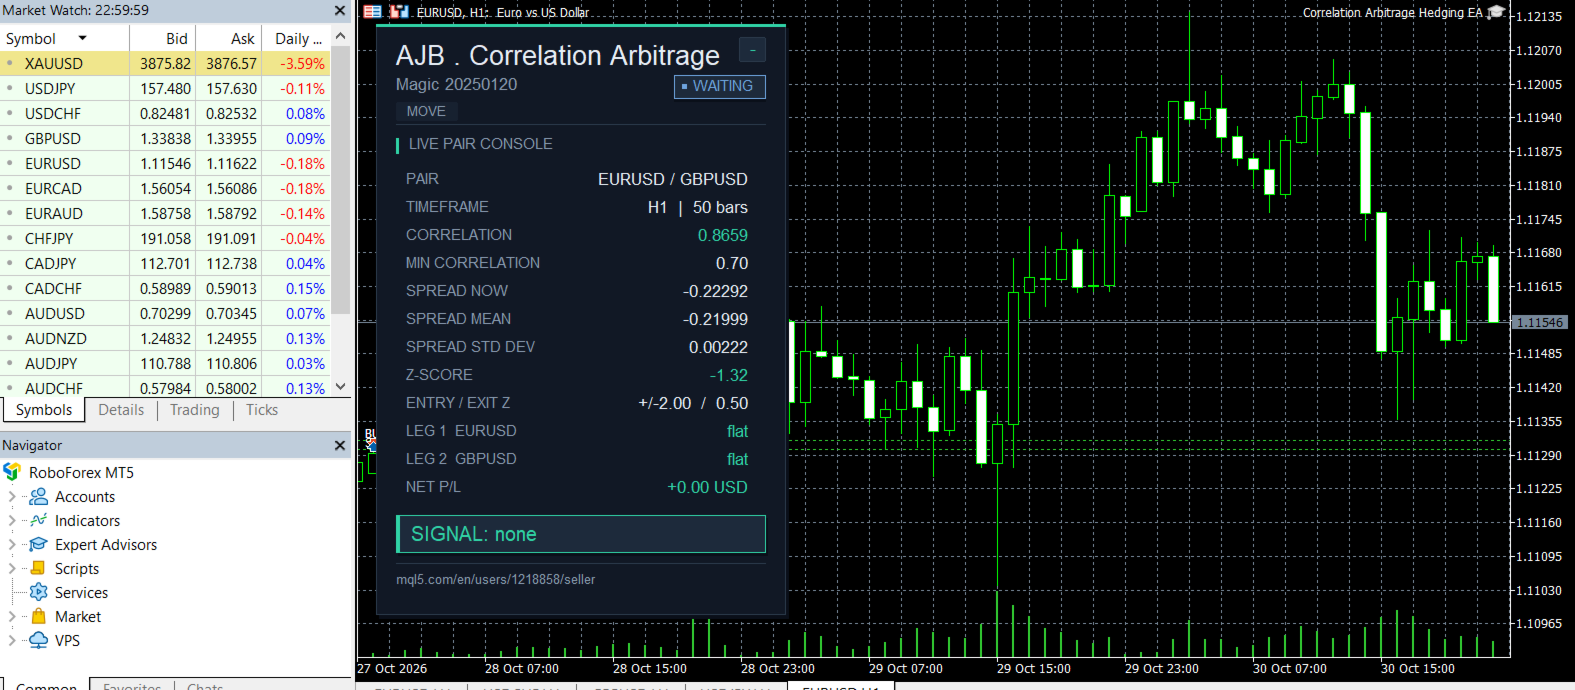
Test it free before anything else: open the Strategy Tester, pick Correlation Arbitrage Hedging EA, enable visual mode and watch the live pair console report correlation, spread and z-score bar by bar.
TWO SYMBOLS, ONE HEDGED IDEA: TRADE THE GAP, NOT THE DIRECTION.
When two closely linked markets drift apart, this expert advisor sells the stretched side, buys the lagging side and waits for the relationship to settle back. Your exposure is spread across a matched pair instead of a single bet on where price goes next.
In short
- Market-neutral pair logic: every entry is a long leg on one symbol and a short leg on the other.
- Correlation filter blocks trading when the two symbols stop moving together.
- Statistical entry and exit levels expressed in standard deviations, fully adjustable.
- Combined margin check for both legs and automatic protection against a lonely, unhedged leg.
- A clean dark console on the left of the chart; the price scale and right side stay free.
START HERE
- Attach the EA to a chart of the first symbol (default EURUSD) on H1.
- Keep the second symbol GBPUSD for a first run; both must be visible in your Market Watch (the EA selects them automatically).
- Leave the lot at 0.01 and the strategy-based exit on.
- Run a visual backtest on your own broker's history, then a demo account, before considering real money.
Why a pair instead of a single chart
Some instruments share the same economic drivers, so their prices tend to travel side by side. Short-term news, liquidity gaps or order flow can still push one of them ahead of the other for a while. The EA measures that temporary gap and treats it as the opportunity. Because one position is long and the other short, a broad move that lifts or drops both markets affects the two legs in opposite ways, which softens the impact of the overall direction.
What happens on each new bar
- Measure the bond. The EA computes the Pearson correlation of the log-returns of both symbols over your chosen window. If the absolute correlation is below your minimum, no new pair is opened and the console shows LOW CORR.
- Measure the gap. It builds the price spread between the two symbols, its average and its standard deviation over the same window, and converts the current spread into a z-score.
- Enter only on a real stretch. When the z-score reaches your entry threshold, the expensive symbol is sold and the cheap one is bought, both with the same normalised lot. The second leg is only sent after the first one is confirmed by the server.
- Stay hedged. If the second leg is rejected, the first leg is closed at once (optional), so the account is never left holding half of a pair by accident.
- Exit when the gap closes. With strategy exit enabled, both legs are closed together as soon as the z-score falls back inside your exit band. Alternatively you can use classic stop loss and take profit per leg.
All calculations use the chart timeframe, and trading decisions are taken once per new bar, so the behaviour in the tester matches live trading.
The live pair console
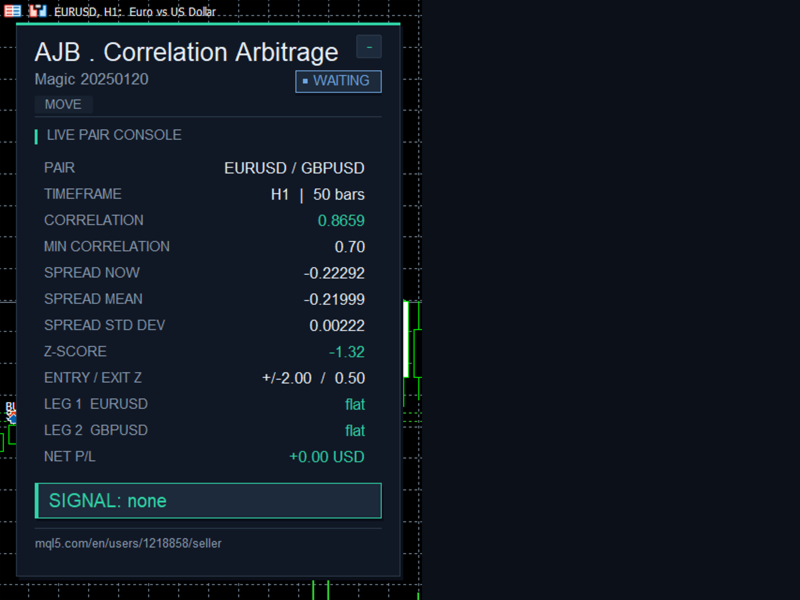
A modern dark panel on the upper left shows the pair, timeframe and window, the current correlation (green when allowed, red when too weak), the minimum correlation, spread now, spread mean, spread standard deviation, the z-score, the entry and exit bands, each leg with its side, lots and floating result, and the net result of the pair. A status pill reads WAITING, SIGNAL, IN POSITION or LOW CORR. The panel can be minimised and dragged with its MOVE handle, its size follows the font-size input so it stays readable on small laptops and large monitors, and it is not drawn at all during fast non-visual optimisation.
Protection you keep in your hands
- Positions are recognised only by your magic number and the two configured symbols, so other EAs and manual trades are never touched.
- Lots are rounded down to the broker's volume step and kept between its minimum and maximum.
- Stop loss and take profit are rounded to symbol digits and pushed outside the broker's stops and freeze distance.
- Free margin is checked for both legs together, with an adjustable safety buffer.
- Every order answer from the server is verified; rejected orders are logged with the reason.
- No martingale, no grid, no averaging: one pair at a time with a fixed lot.
- No hidden limits: every threshold is a visible input.
Every setting explained
Correlation settings
- First Symbol - the first market of the pair (default EURUSD).
- Second Symbol - the second market of the pair (default GBPUSD); must differ from the first.
- Correlation Period - number of bars used for correlation, spread mean and deviation (default 50, minimum 2).
- Min Correlation to Allow Trades - new pairs are opened only when the absolute correlation is at least this value; 0 switches the filter off (default 0.70).
- Entry Threshold - z-score distance from the mean that opens a pair (default 2.0).
- Exit Threshold - z-score band around the mean that closes the pair when strategy exit is on (default 0.5).
- Update Every N Bars - how often trading decisions are taken; 1 means every bar.
Trading parameters
- Lot Size - volume of each leg, normalised per symbol (default 0.01).
- Stop Loss (points) - per-leg stop, used when strategy exit is off; 0 disables it.
- Take Profit (points) - per-leg target, used when strategy exit is off; 0 disables it.
- Use Strategy Based Exit - close both legs together when the spread returns to normal (default on).
- Allow Buy Orders / Allow Sell Orders - permit or block each direction of leg.
- Magic Number - identifies this EA's positions; use a different number on every chart.
- Slippage (points) - maximum accepted price deviation when opening and closing.
- Close first leg if second leg fails - keeps the account hedged when the second order is rejected (default on).
- Free margin buffer for both legs (%) - extra margin required on top of the combined need of the two legs (default 20).
- Min seconds between two entries - quiet time after an entry before another pair can open (default 60).
Visual settings
- Show Info Panel - shows or hides the pair console.
- Show Trade Arrows - marks each entry on the chart.
- Panel Background Color / Panel Text Color - colours of the console.
- Buy Arrow Color / Sell Arrow Color - colours of the entry arrows.
- Panel Font Size - scales the whole console (8 to 24).
- Panel X / Panel Y position - starting position of the console in pixels.
Honest expectations
Correlation is a tendency, not a promise. Pairs can stay apart longer than expected and relationships can weaken, which is why the correlation filter and your own risk settings matter. Spreads, commissions and swaps differ between brokers, so test on your own data first and use a lot size your account can carry comfortably. The EA works on any two symbols your broker offers, on any timeframe, with no DLLs and no external files.
If the EA turns out to be useful in your trading, an honest review on this page would help other traders decide, and it is always appreciated.

























































I had a great experience purchasing Al Moosawi’s Correlation Arbitrage trading bot. Upon purchase, he pleasantly surprised me with a bonus that he indicated would be helpful in my trading. After installing the EA, I encountered a minor issue with backtesting, but Al Moosawi responded promptly and helped resolve it even though it was very late in his timezone. Thanks to his support, I was able to get the backtest running successfully and have already started optimizing the bot for the forex pairs I plan to test live, as outlined in the product description. I will be conducting forward testing and will be sure to leave another review once I have results, including when I begin live trading. What truly stood out to me was his dedication to assisting customers and guiding them through any issues related to his products. I’m very grateful for choosing this robot and appreciate the support he provides. I’m also happy to have made a new friend in the process :)