✔️ Fast Trade Assistant Panel (MT5)©: https://www.mql5.com/en/market/product/197370
Tip: Before buying, you can test the product with the free demo available on the product page — free demo versions of paid MQL5 Market products run in the MetaTrader 5 Strategy Tester. If you prefer to try it on a live chart, use the Rent option for a short period.
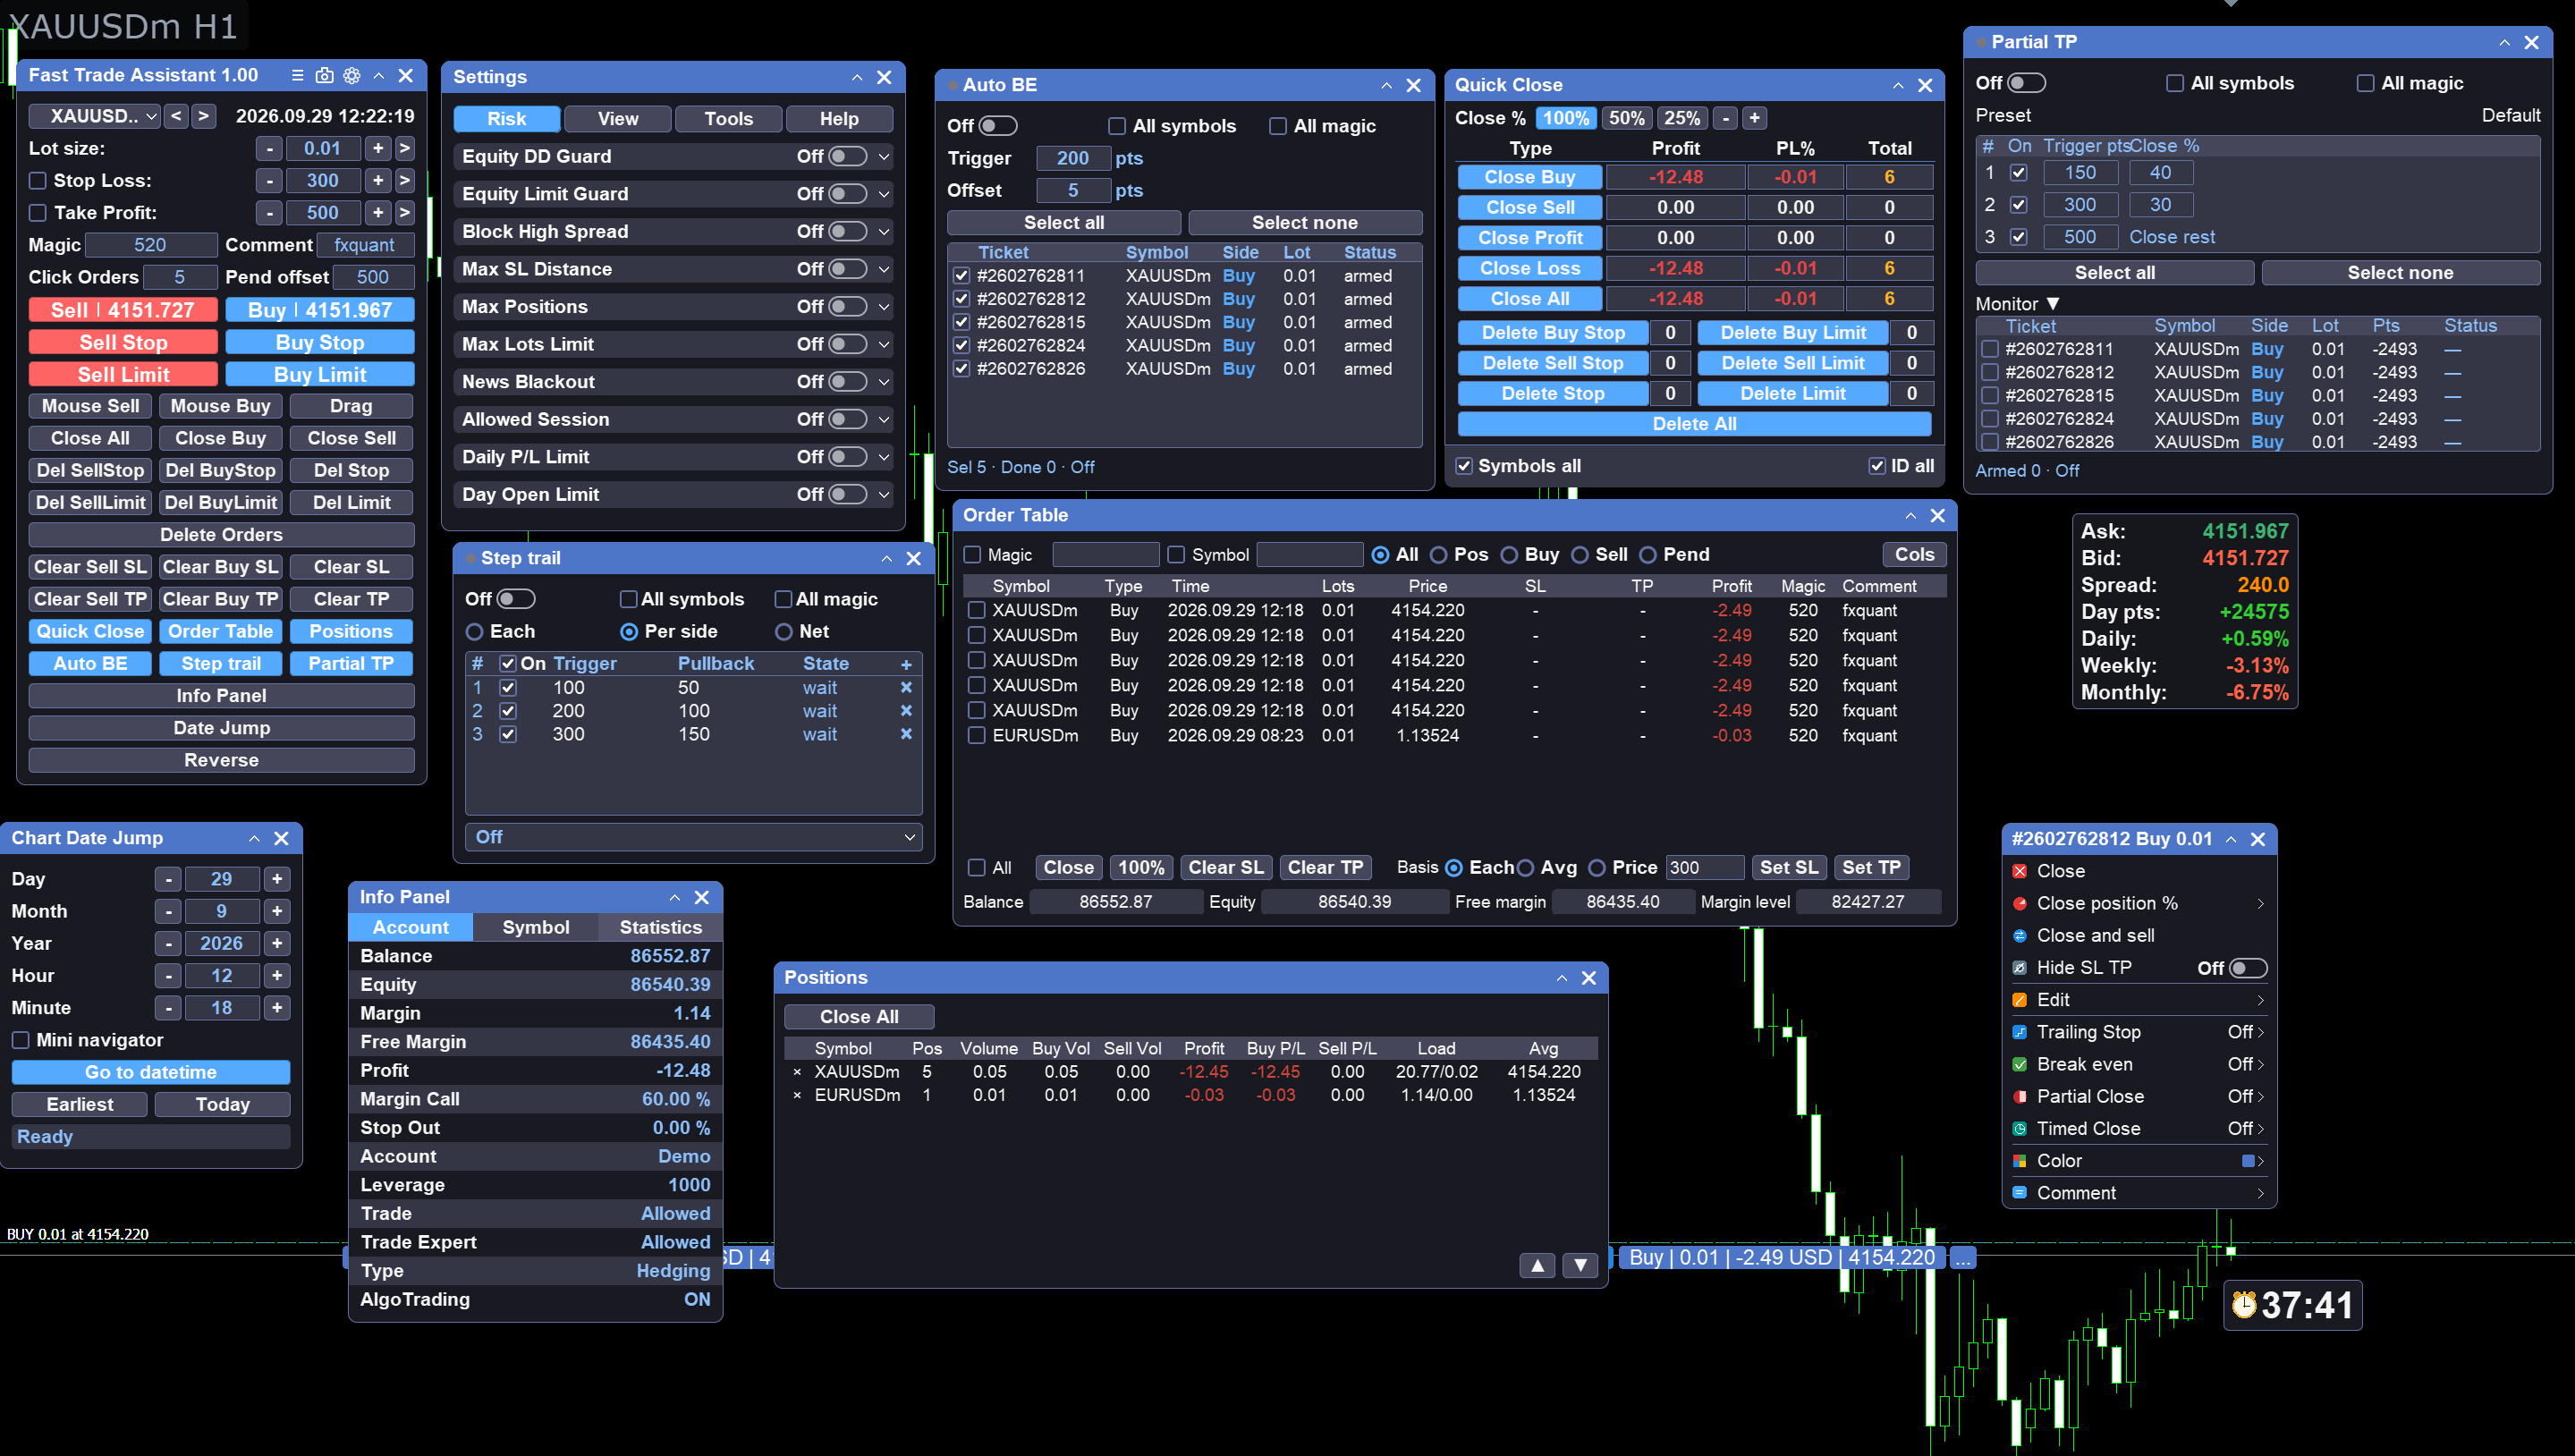
Caption: Fast Trade Assistant Panel — the main panel with its tool windows.
Fast Trade Assistant Panel Description
Fast Trade Assistant Panel is an on-chart trading utility for MetaTrader 5. Market orders, pending orders, risk-based lot sizing, selective close, break-even, step take-profit, keyboard trading, Super Trend, and chart helpers all live directly on the chart. You configure everything from the main panel and the Settings window — no EA Inputs setup is required before you start trading.
The panel was built around one idea: your analysis happens on the chart, so your order entry should happen there too. Instead of switching between the order dialog and the terminal lists, you hover a button to preview your stop loss and take profit, you double-click the chart to place a pending order at that price, and you close whole groups of positions with one clearly labeled button.
The panel is a manual trading tool. It does not generate trading signals and does not open trades on its own — every order is triggered by you, on the chart.
Features
- Market Buy / Sell with lot size and optional Stop Loss / Take Profit set on the panel
- Hover Buy or Sell to preview dashed SL/TP lines on the chart plus a status line (SL / TP / Lot)
- Mouse pending orders: the price line follows the cursor, double-click to place, Esc cancels
- Drag pending orders: drag Entry / SL / TP bars to the prices you want, then confirm
- Lot sizing by fixed lot, risk % of balance, or risk in money (risk modes use the panel SL distance)
- 9 close buttons: all, buy, sell, largest lot, smallest lot, max profit, min profit, earliest, latest
- 7 delete-pending buttons: all, by type (Buy/Sell Stop/Limit) and by family (Stop/Limit)
- Batch remove SL / remove TP for the panel's managed positions
- Quick Close window: checkbox-style selective close by profit / loss / buy / sell and combinations
- Break-even engine: move stop loss to protect capital when floating profit reaches a trigger
- Step take-profit (Step trail) engine: step table with per-ticket / by-side / net modes
- Partial take-profit engine: scale out by volume steps at profit targets
- Keyboard trading window: trade from key tiles, with safe mode and filters
- Magic number and current symbol only filters; several panel copies can coexist with different magics
- Optional hotkeys for buy, sell, close, and delete
- Risk page in Settings: daily P/L limit, equity limit and drawdown guards, max lots, max positions, max SL distance, spread filter, news blackout, allowed session
- Orders table and positions summary windows for monitoring
- Chart helpers: candle close countdown, quote/spread/day-week-month change labels, average price line, Super Trend, date jump, info panel, one-click screenshot
- Alert when the market is closed or the terminal is disconnected — the order is not sent
- Show or hide main-panel buttons and tools so the panel stays compact
- Positions of the main panel and tool windows are remembered across terminal restarts
Fast Trade Assistant Panel Installation
In order to buy Fast Trade Assistant Panel from the MQL5.com Market you need to have a MQL5 community account. If you don't have one, you can register here: https://www.mql5.com/en/auth_register
-
First make sure that you have the necessary funds in your MQL5 account. It is always easier to pay with your MQL5 balance than with a credit card during the buying procedure.
-
Find Fast Trade Assistant Panel in the MQL5.com website and open its product page.
-
Click the Buy or Rent button to continue with your purchase.
-
Choose the payment method and continue with your payment.
-
After your payment is completed, open your MT5 terminal in order to download and install the product.
-
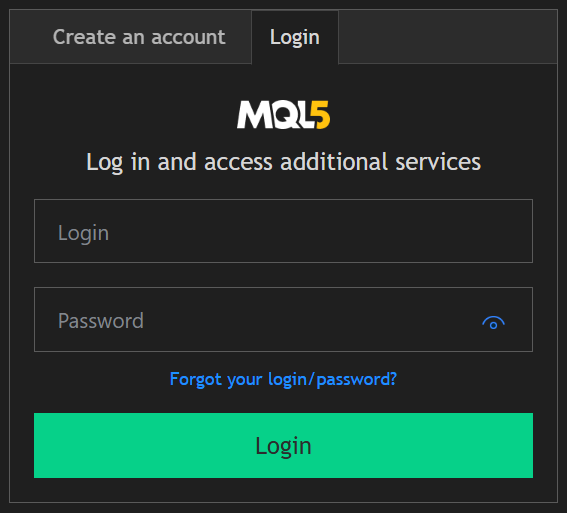
Make sure that you are logged into your MQL5 account inside the terminal with your MQL5 login and NOT with your email. Your login is the last part of your profile URL — for example eleanna74 in https://www.mql5.com/en/users/eleanna74 .
-
Open MT5 >> Tools >> Options >> Community tab and check that you are logged in with your MQL5 account login.
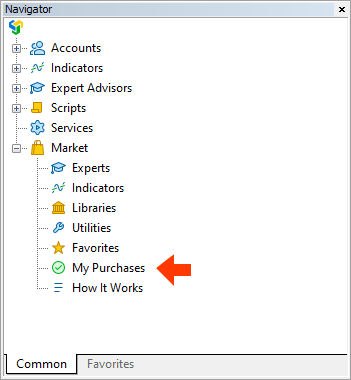
- Open the Market tab at the bottom of the terminal (Toolbox), click Purchased on the left side, then click the Install button on the right side of the product you have just purchased. (The same Purchases list is also available from the Market node of the Navigator window.)
Notice: If you can't see your purchase when you click the Purchased option, check the below mentioned issues:
Make sure that:
- you have all the latest Windows Updates installed
- you have the latest version of Microsoft Edge installed on your computer or VPS
- you are using the latest build of MetaTrader 5
- you are logged into your MQL5 account in MT5 >> Tools >> Options >> Community tab, using your login — NOT your email
- your MQL5 account password is less than 10 characters (if it is 10 or more characters, change your MQL5 account password here: https://www.mql5.com/en/auth_forgotten )
In case you still don't see the product in the list of your purchases in the terminal, try the following:
-
Close ALL your MetaTrader terminals
-
Go to C:\Users{user name}\AppData\Roaming\MetaQuotes\Terminal\Community
-
Delete all files starting with mql5.market.*
-
Open the MetaTrader terminal
-
Try to install your product again
-
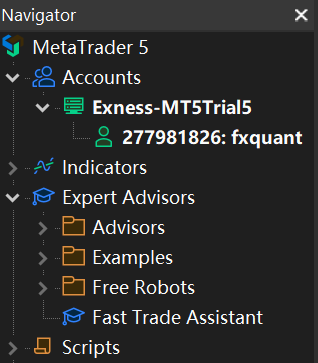
After the installation is finished, open any chart of any symbol at any timeframe. In the Navigator window, find Fast Trade Assistant Panel (under the Market section / Expert Advisors) and drag it onto the chart (or double-click it).
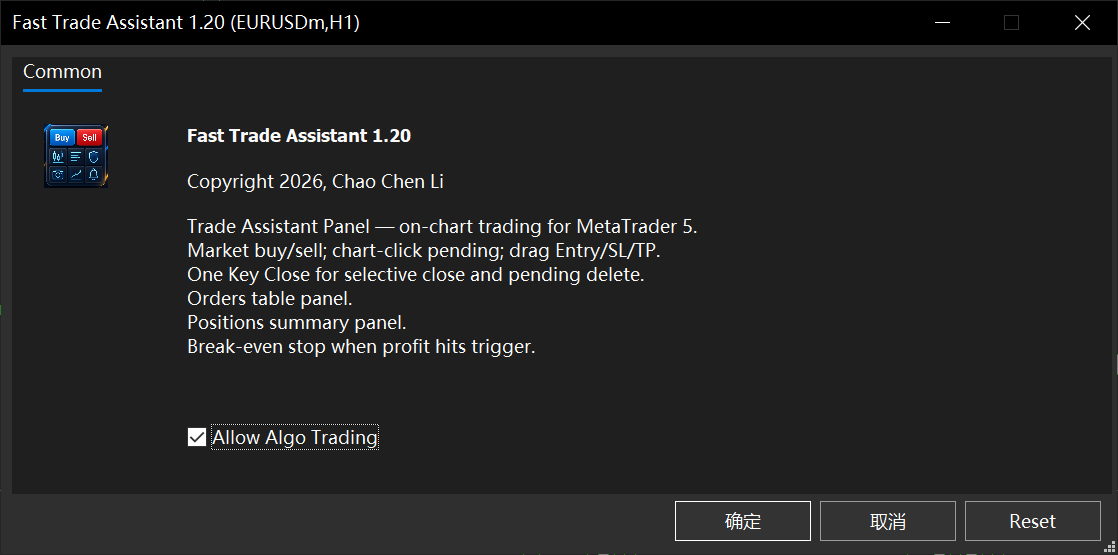
- The Expert Advisor's settings window will open. Tick Allow modification of Signals settings and Allow Algo Trading on the Common tab and click OK. On the Inputs tab you can leave the defaults — all important settings live in the panel's own Settings window, which is described below.
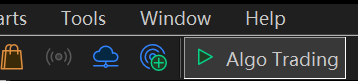
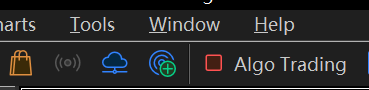
- After the EA is attached, check the top right of your chart: if you see a red mark (or a sad-face style indicator), the EA is not allowed to trade yet. Click the Algo Trading button in the toolbar — the mark turns green and Fast Trade Assistant Panel is working.
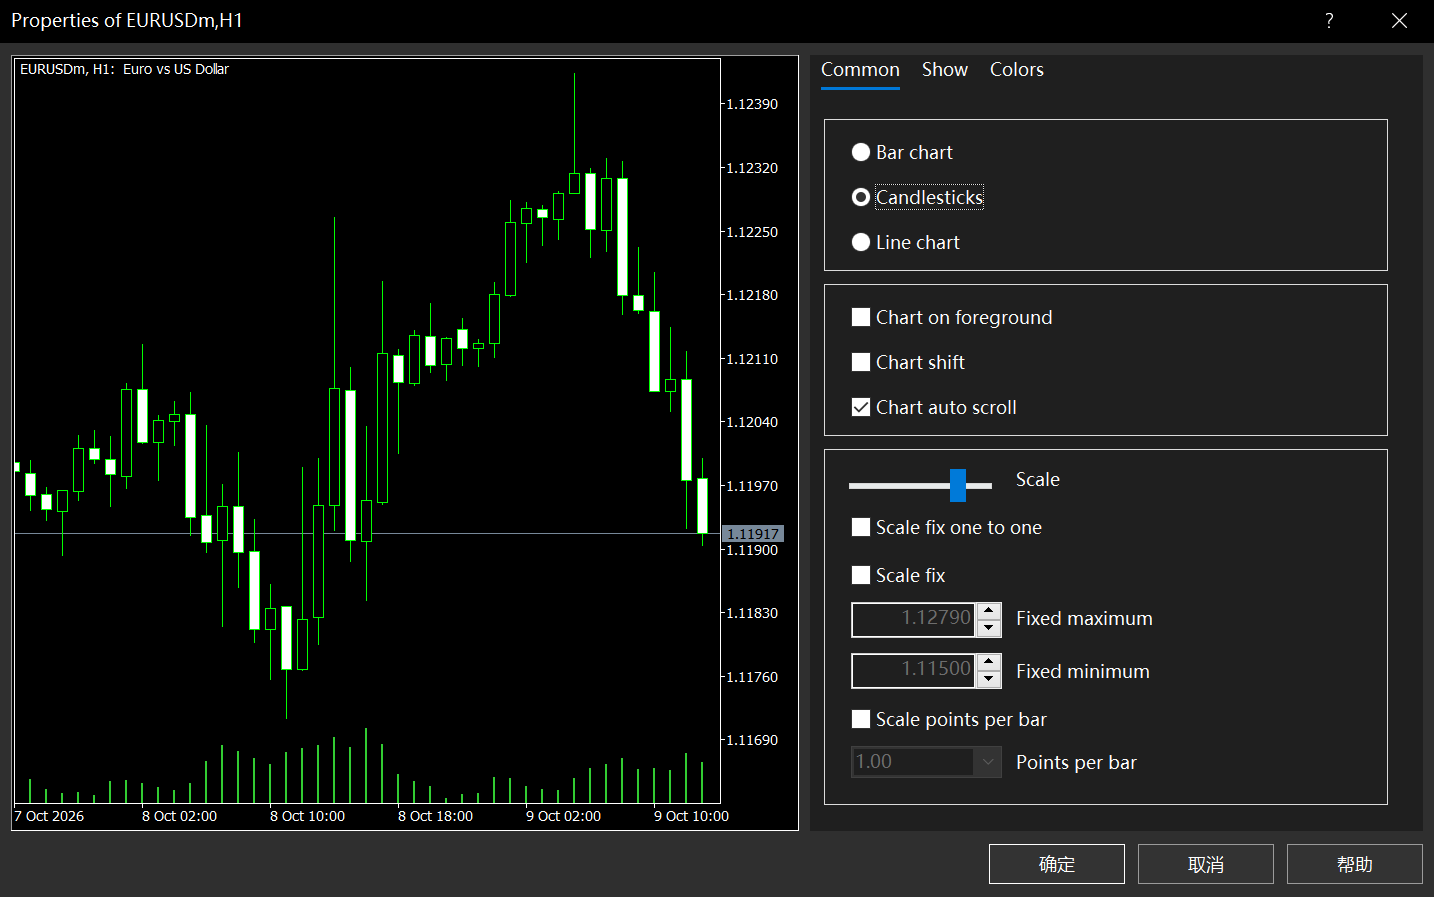
Tip: If the candles of your chart are drawn on top of the panel, right click on the chart >> Properties >> Common tab >> untick Chart on foreground (or use Chart Shift) so the panel stays visible next to the price action.
Getting Started
- Attach Fast Trade Assistant Panel to a chart and enable Algo Trading in the terminal.
- On the main panel, set the lot (or the risk value) and, optionally, the SL and TP distances.
- Click Buy or Sell. If the order cannot be opened, an Alert tells you why. When the market is closed or the terminal is disconnected, a dedicated Alert appears and the order is not sent.
- Open the Settings window (title bar) for lot mode, magic number, symbol filter, button layout, Risk guards, candle timer, Super Trend, or hotkeys.
Main Panel User Guide
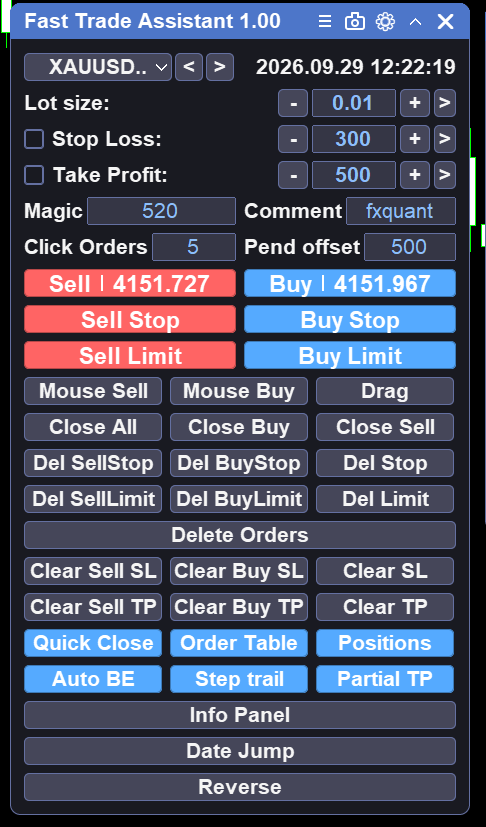
1. Title bar. Settings (opens the Settings window), Screenshot (saves the current chart as PNG and opens the folder), Minimize, and Close (removes the panel and the EA from the chart).
2. Symbol strip. The symbols of your Market Watch, as buttons. Click one and the chart switches to that symbol instantly — the panel now trades the symbol shown on the chart. The names must match your broker's Market Watch exactly, including any prefix or suffix.
3. Lot box. One field, three modes — fixed lot, risk % of balance, risk in account currency. You switch the mode in Settings; you edit the value here. In the risk % mode the panel converts the SL distance into a lot size that loses exactly the chosen percentage of your balance if the stop loss is hit; in the risk money mode it does the same with a fixed amount, for example 100 (USD). Both risk modes require an SL distance on the panel — without a stop loss the risk cannot be calculated.
4. SL / TP rows. The stop loss and take profit distances in points for every new order. 1 pip is 10 points on 5-digit symbols: for example, if your buy opens at 1.15600 and you want the stop loss at 1.15550, you put 50 in the SL field.
5. Parameters row. Magic number (how the panel recognizes the orders it manages), trade comment, orders per click (how many orders, each with the panel lot, one click sends — keep 1 unless you deliberately split an entry), and pending offset (the distance in points from the market price used by the pending buttons and as the initial distance for mouse pending).
6. SELL button. Sends a market sell for the chart symbol with the panel lot and the SL/TP from the rows above. Hover the button to preview the SL/TP lines on the chart before clicking.
7. BUY button. Same as SELL, on the buy side. Hovering either button draws dashed SL/TP preview lines and shows a status line with SL, TP, and the lot that would be used; the lines clear when the cursor leaves.
8. Lock. Enables a press-to-confirm guard on the market buttons so a stray click cannot open a trade. The Buy and Sell buttons can also be hidden individually from Settings.
9. Mouse pending (Mouse Sell / Mouse Buy). Click to arm the tool: a horizontal price line follows your cursor on the chart. Move it to the price where you want the pending order and double-click to place. Esc cancels. The order type is resolved from the price position, and the pending offset from the parameters row is used as the initial distance.
10. Drag pending (Drag). Opens three draggable bars on the chart — Entry, SL, TP. Drag each bar to its price, then confirm to place the order. The lot follows the main panel lot box. Esc closes the tool without placing.
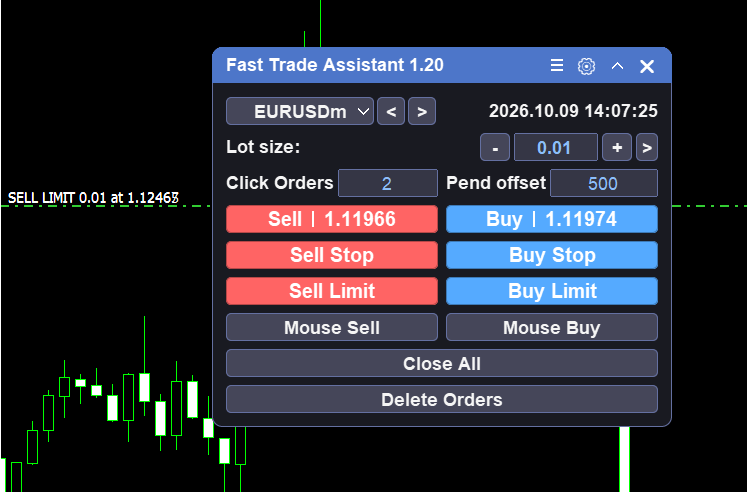
11. Direct pending buttons. Sell Stop, Sell Limit, Buy Stop, Buy Limit — place the corresponding pending order using the pending offset from the parameters row.
12. Close area — 9 buttons. Close All, Close Buy, Close Sell, Largest lot, Smallest lot, Max profit, Min profit, Earliest, Latest. Each button closes the matching open positions of the panel's managed set (filtered by magic / symbol settings). For example, Max profit closes the position with the largest floating profit; Earliest closes the oldest one.
13. Delete pending area — 7 buttons + cancel row. Delete Orders (all pendings), Del SellStop, Del BuyStop, Del Stop (both stop types), Del SellLimit, Del BuyLimit, Del Limit (both limit types). The cancel row removes stop losses or take profits in batch from the managed positions.
14. Tool buttons. Open the panel's helper windows: Quick Close (checkbox-style selective close), Break even, Step trail, Partial TP, Keyboard, Info, the orders table, and the date jump tool. Which entries are visible follows your Settings >> View layout, so you can keep only the tools you use.
Pending Orders on the Chart
Mouse pending. Select Mouse Sell or Mouse Buy, move the cursor so the price line follows the chart, and double-click to place at that price. Press Esc to cancel. Offset and lot follow the main panel.
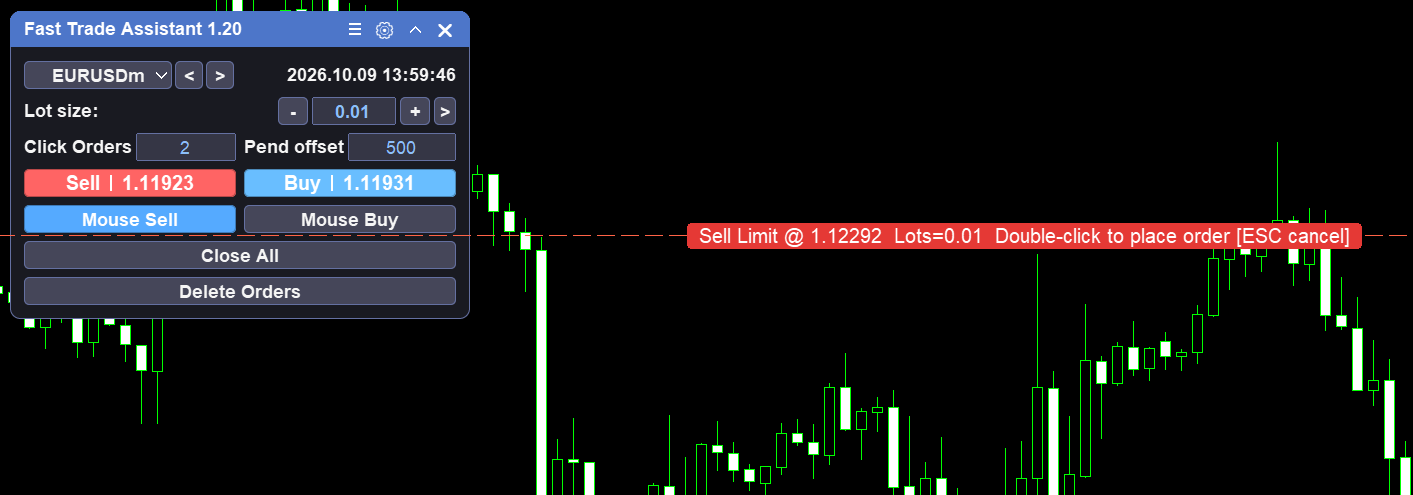
Caption: Mouse pending — the price line follows the cursor; double-click places the order.
Drag pending. Click Drag to open the on-chart Entry / SL / TP bars. Drag the levels to the prices you want, then confirm. The lot follows the main panel lot box; press Esc to close the tool without placing.
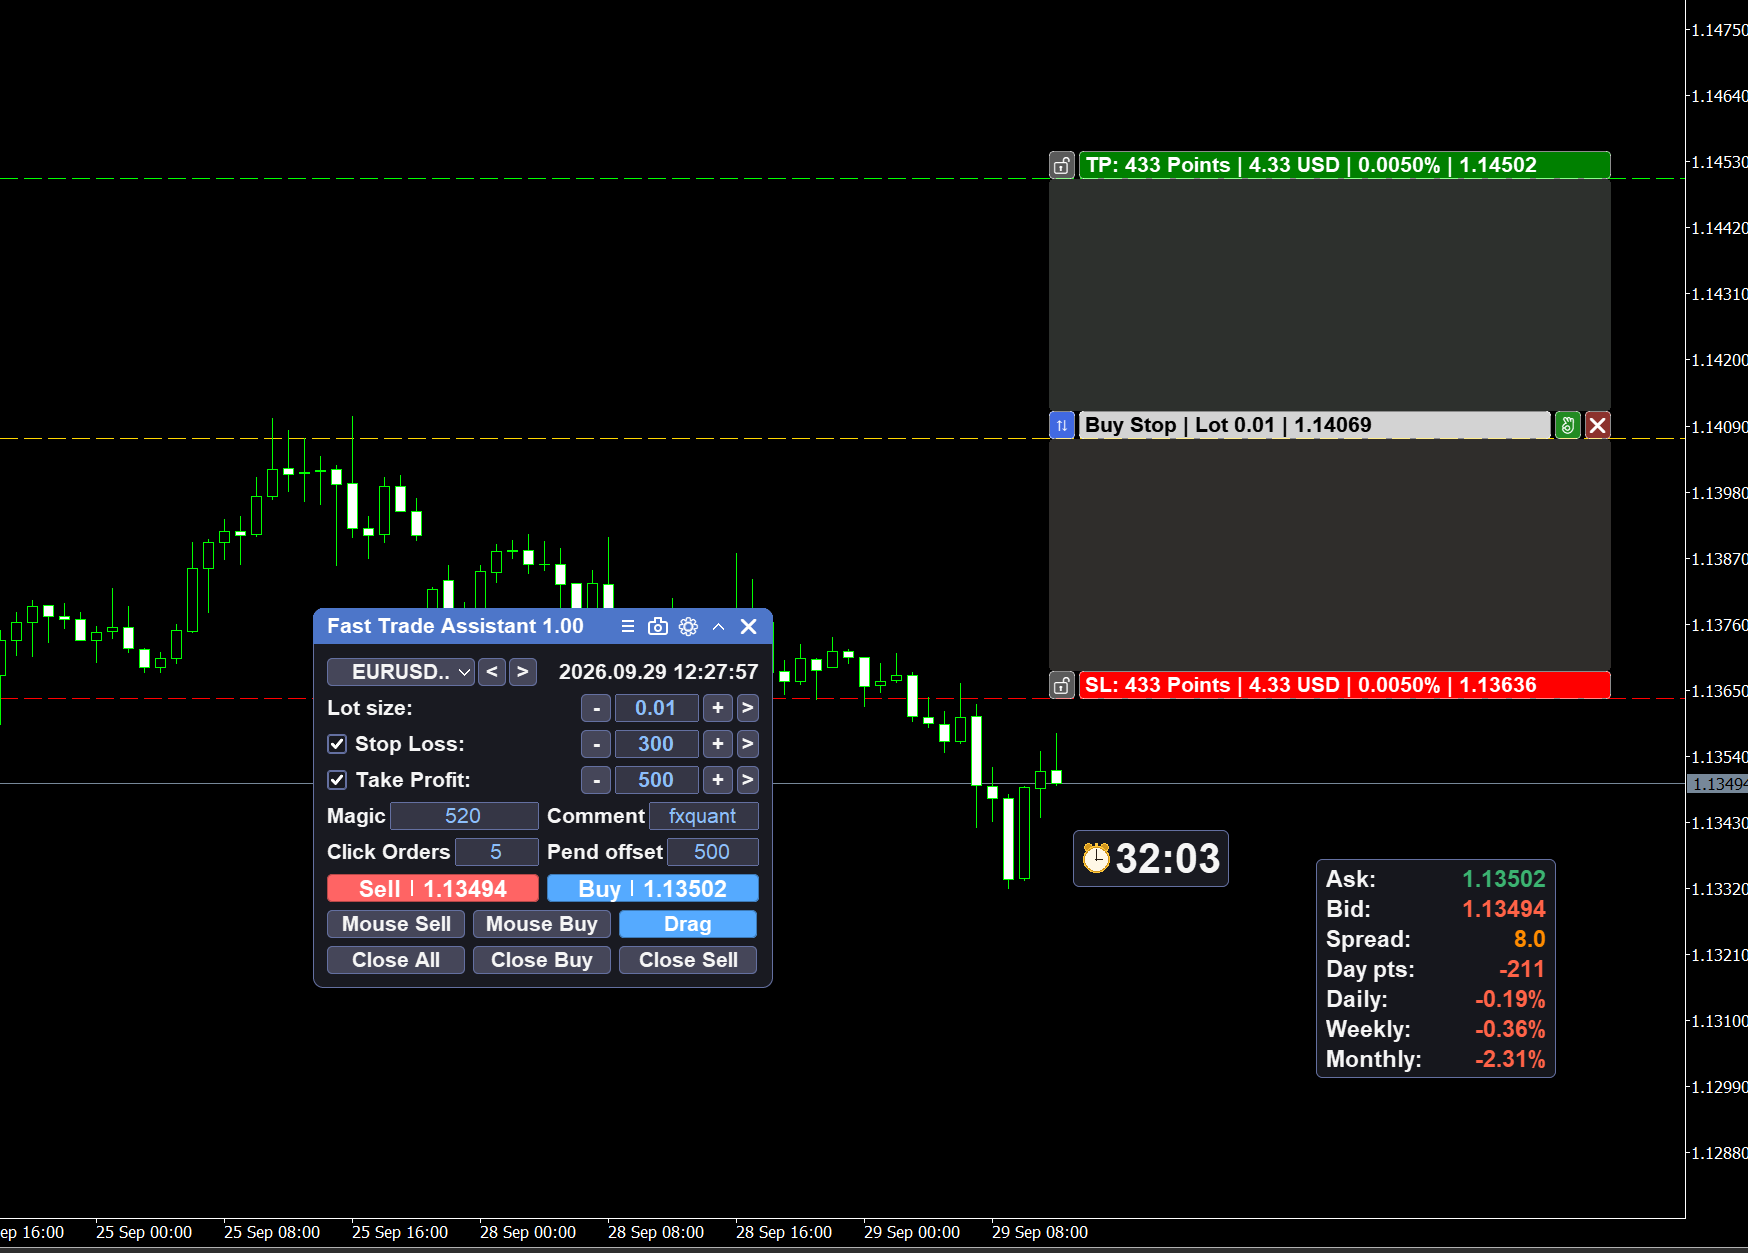
Caption: Drag pending — Entry / SL / TP bars.
Hover preview. Before any market order, hover Buy or Sell: dashed SL/TP lines and a status line (SL / TP / Lot) show exactly where this trade would be stopped out or taken out.
Close Tools
The main panel's close area handles the common cases with one click. For selective work, open the Quick Close window from the main panel: tick the filter conditions — profit, loss, buy, sell, and their combinations — then execute the close. The window can also clear all positions and delete pending orders. The magic / symbol filters of the panel apply.
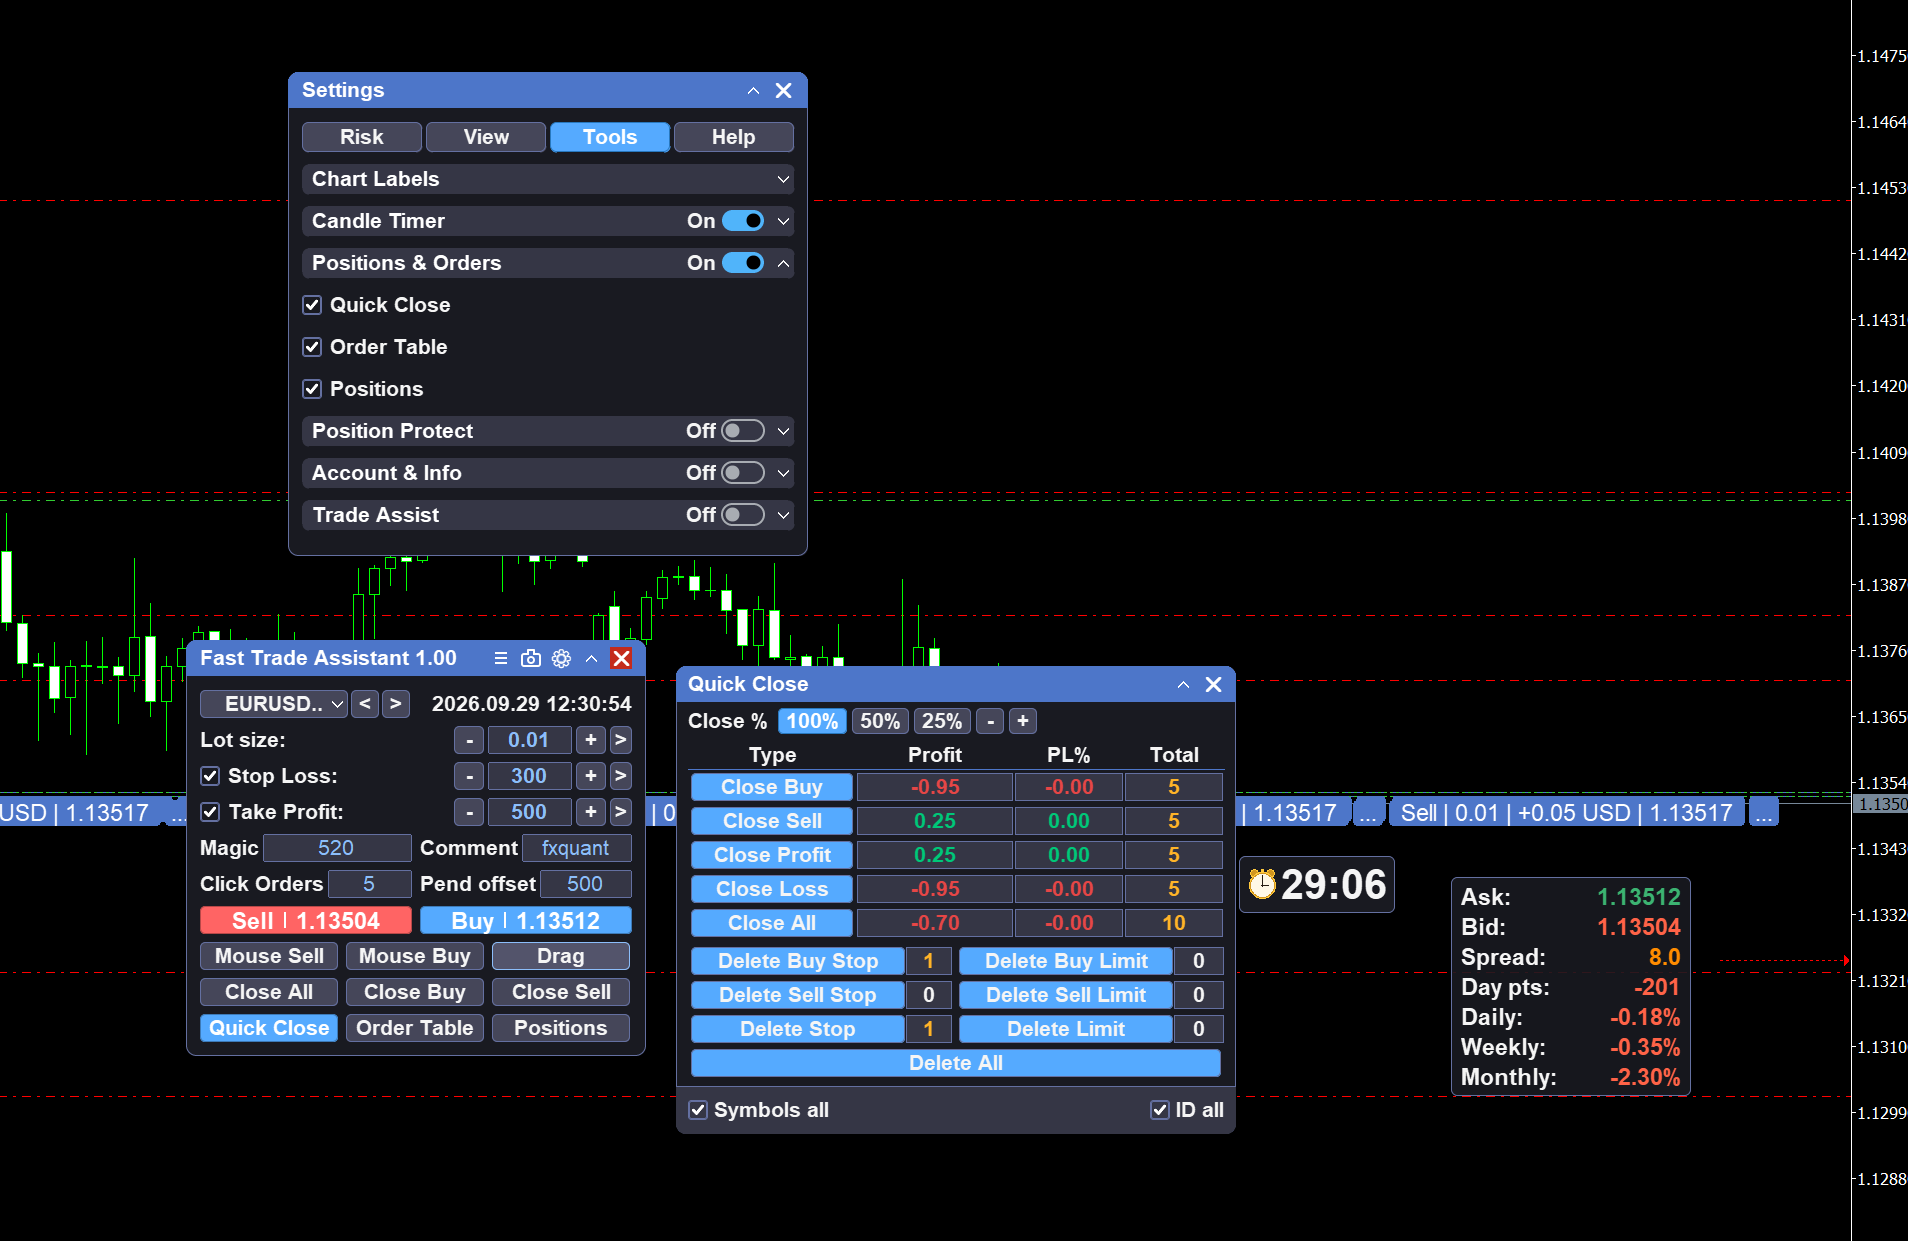
Caption: The Quick Close window — checkbox-style selective close.
Position Protection
Break even. Open from the main panel, set the trigger and the offset. When the floating profit of a managed position reaches the trigger, the engine moves the stop loss to protect capital. Symbol and magic filters apply. The title lamp and the main-button state show whether the engine is running.
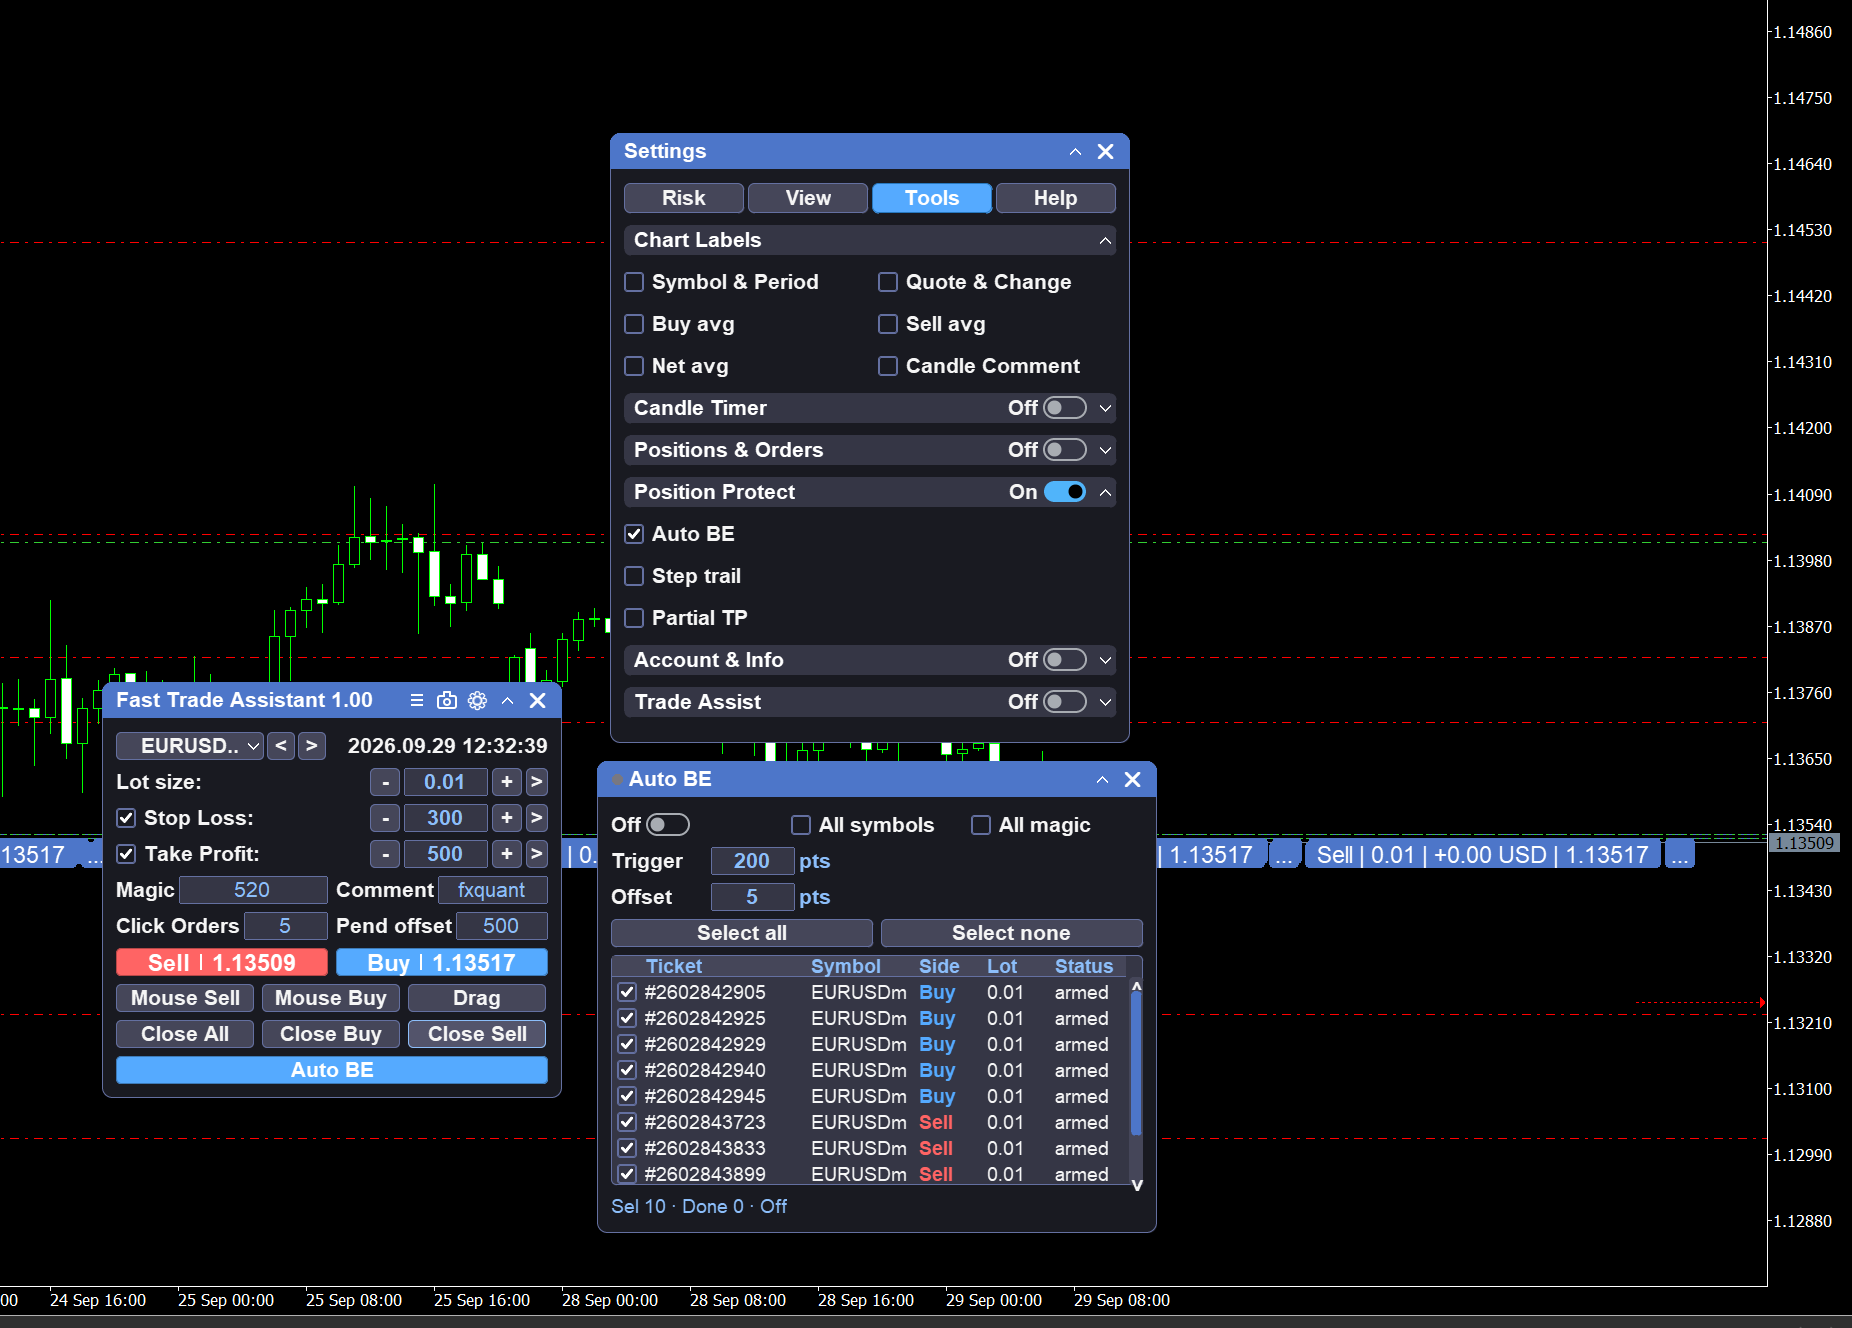
Caption: Break even — trigger, offset, engine on.
Step trail (step take-profit). Open from the main panel and fill the step table — up to 16 levels of trigger / pullback pairs. Choose per-ticket, by-side, or net mode, then enable the engine on the panel. Symbol and magic filters apply.
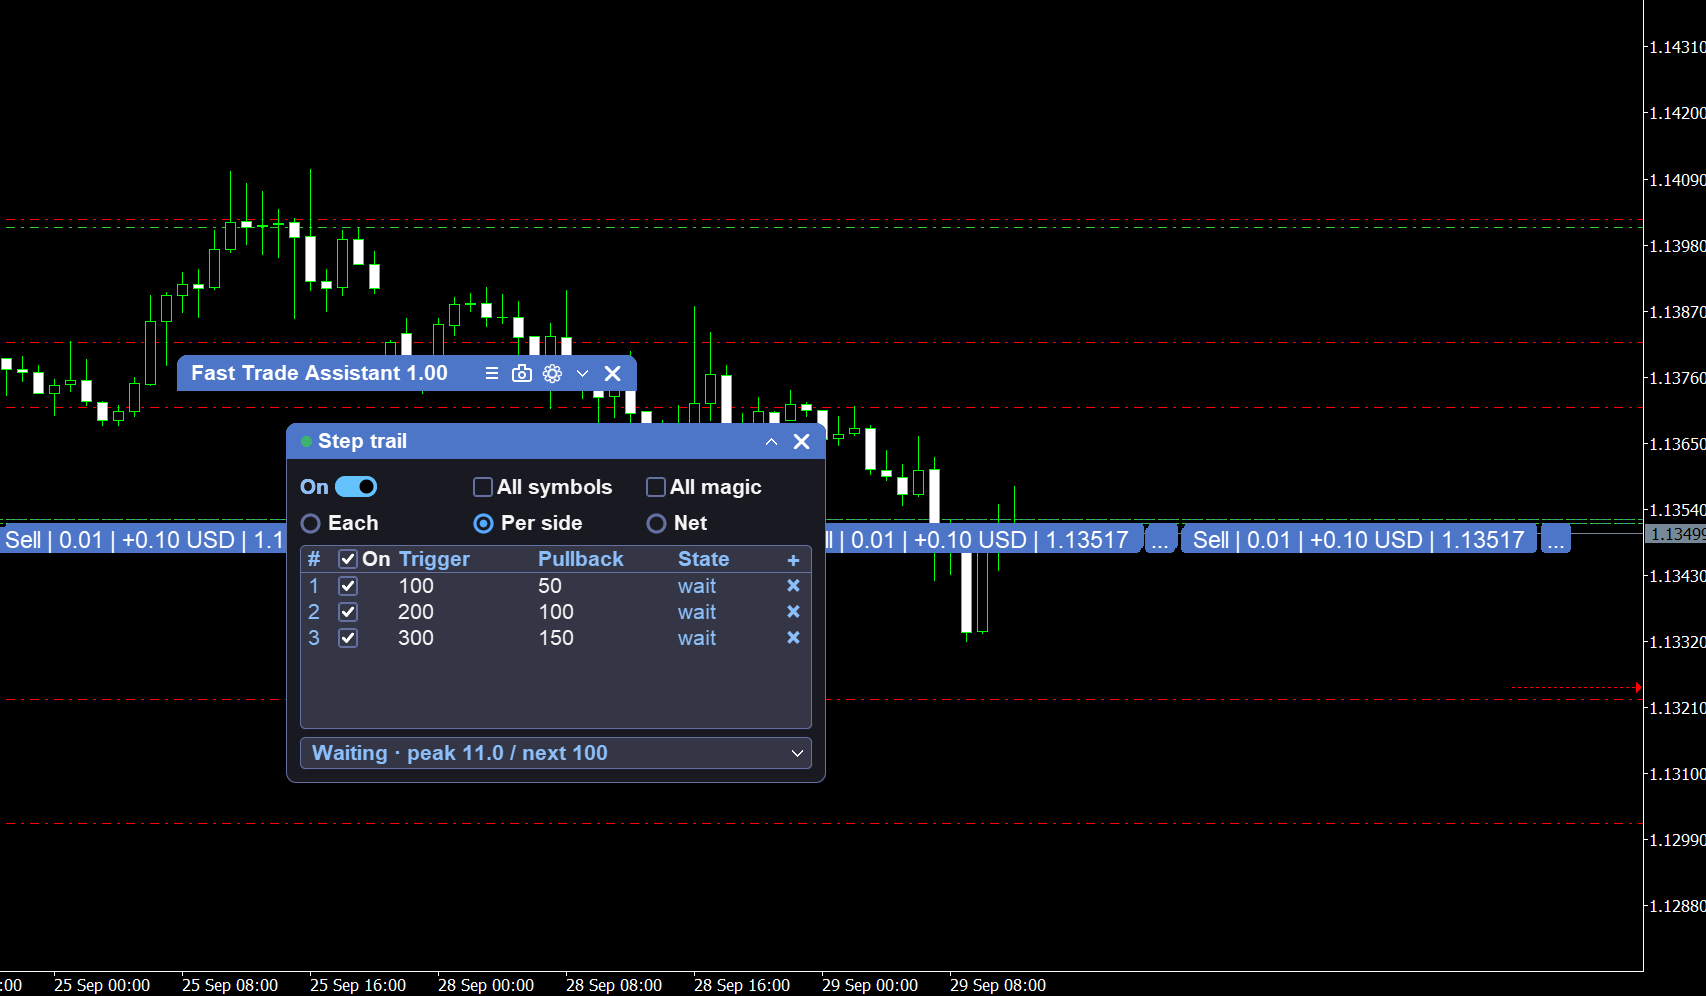
Caption: Step trail — the step table and the mode selector.
Partial take-profit. Define volume steps at profit targets — for example close half at the first level and the rest at the second — and enable the engine when the table is ready.
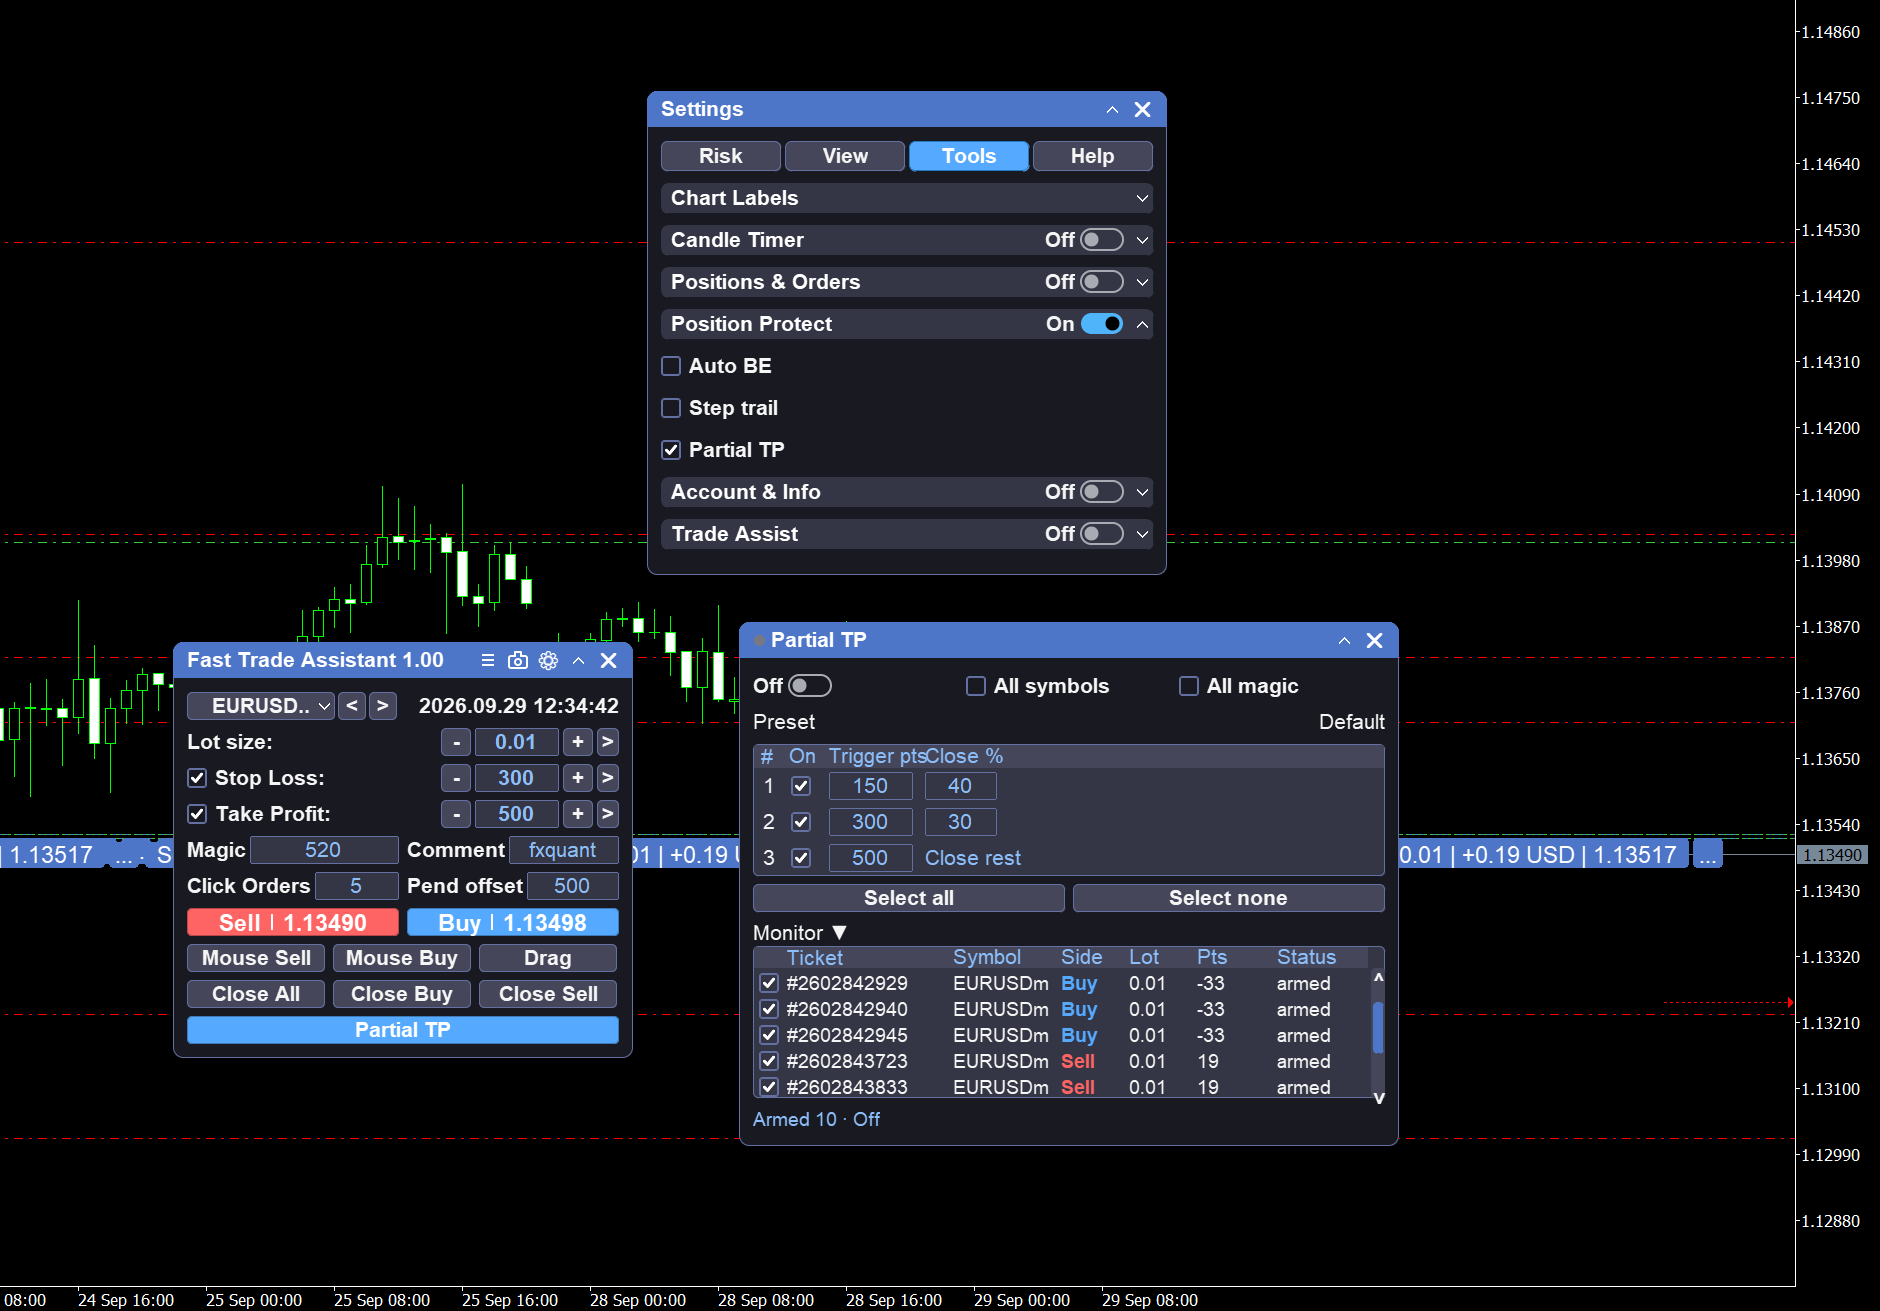
Caption: Partial take-profit — volume steps.
Keyboard Trading
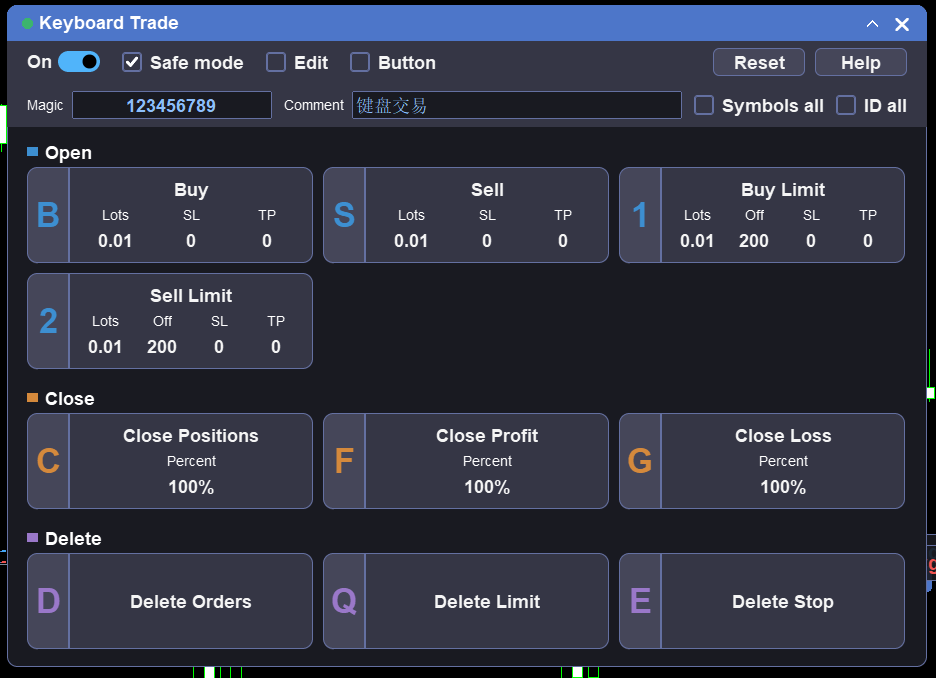
Open Keyboard from the main panel and turn on Enable to trade from the key tiles. Safe mode, Edit, and Button can be checked separately, and the key orders can be filtered by all symbols or all magic numbers instead of the panel's filters.
Orders Table and Positions Summary
The orders table lists open and pending tickets with type, lots, SL/TP, and profit. The positions summary aggregates your exposure by symbol. A per-ticket menu on the position line handles single-order actions.
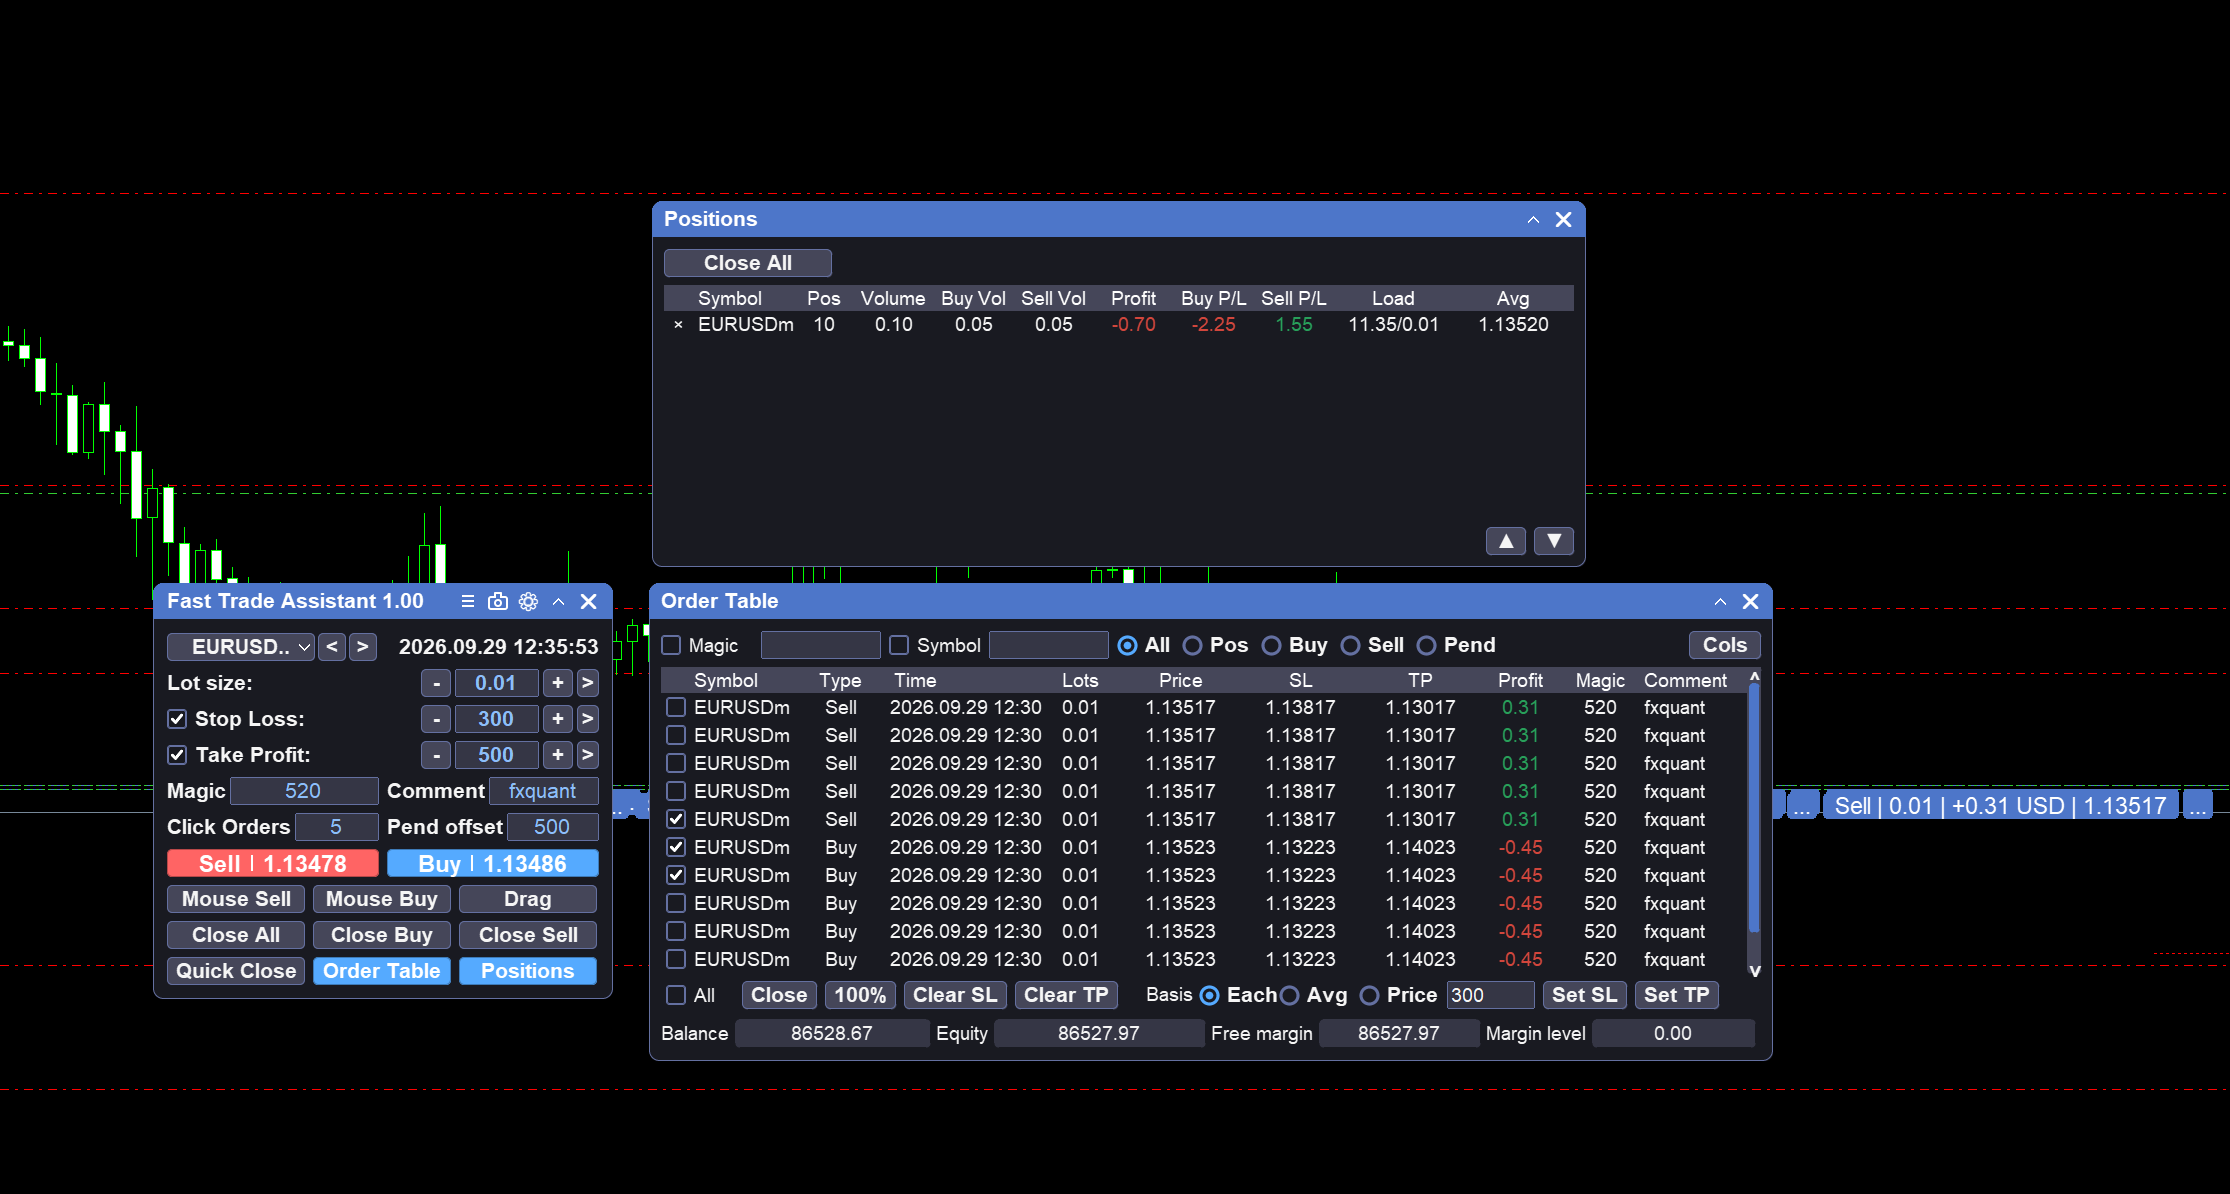
Caption: Orders table and positions summary.
Chart Helpers
- Candle timer — the time left until the current bar closes, by default next to the current bar; placement and style in Settings.
- Chart labels — ask/bid, spread, and day / week / month change overlays on the chart.
- Average price line — the average entry line of your managed position on the chart.
- Super Trend — turn it on under Settings >> Tools; set the ATR period, the multiplier, and whether signals are shown.
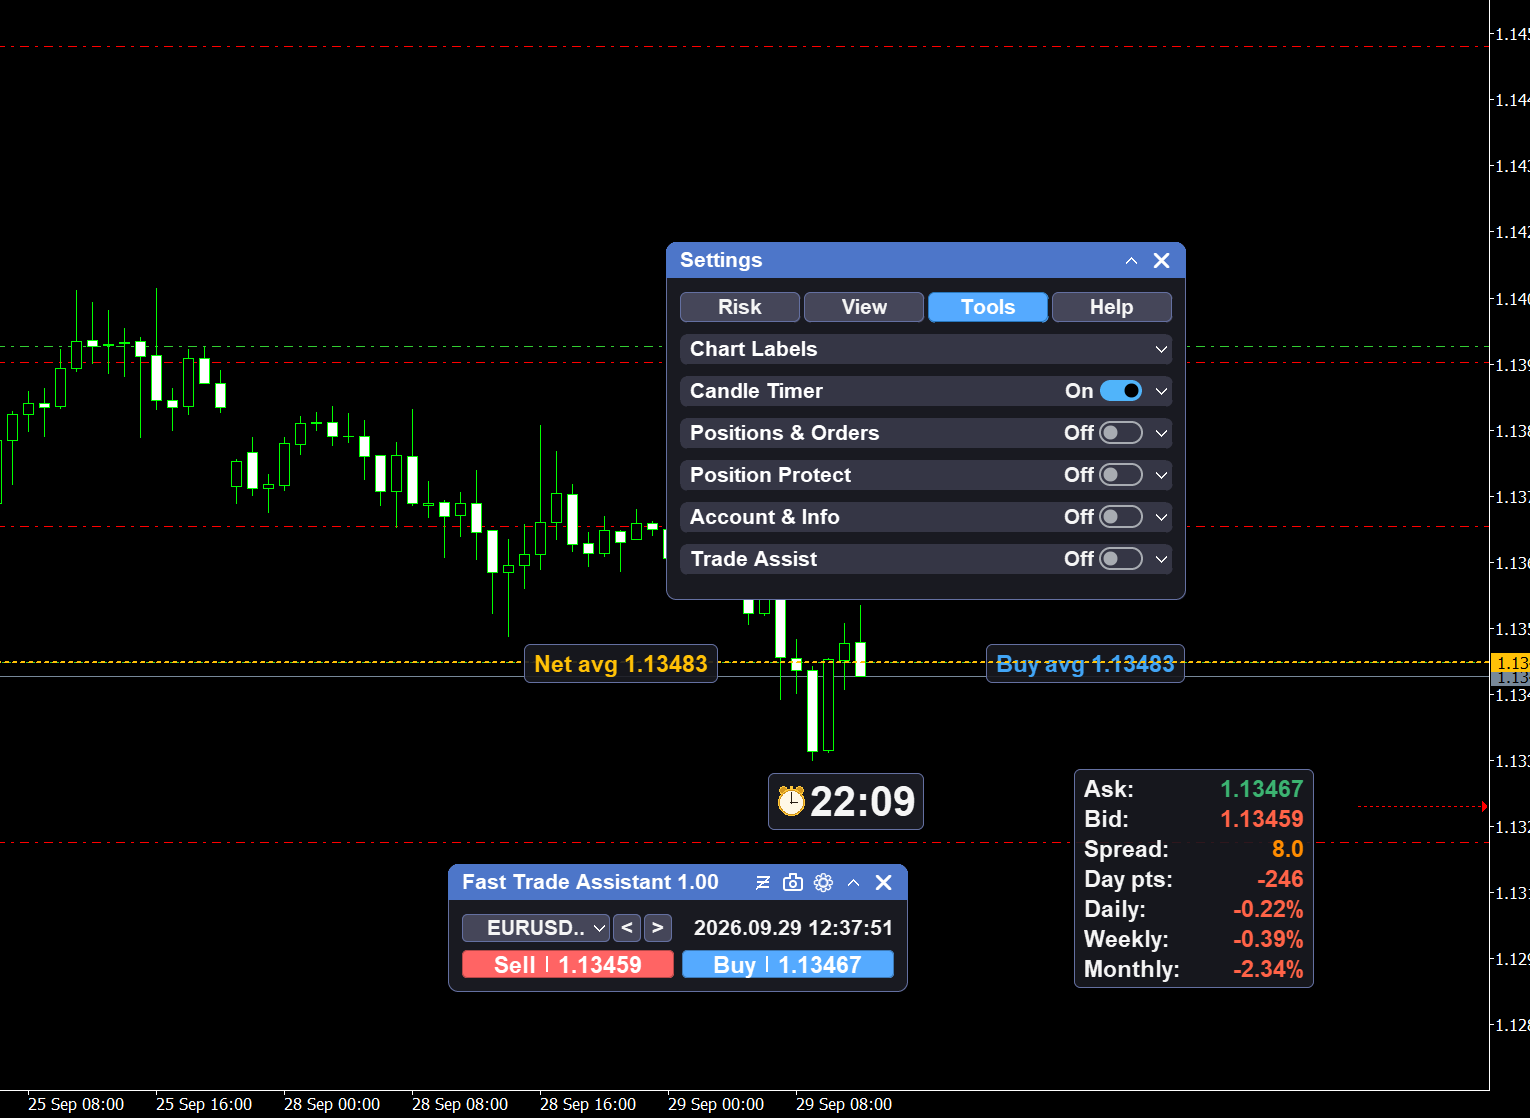
Caption: Candle timer and chart quote / period labels.
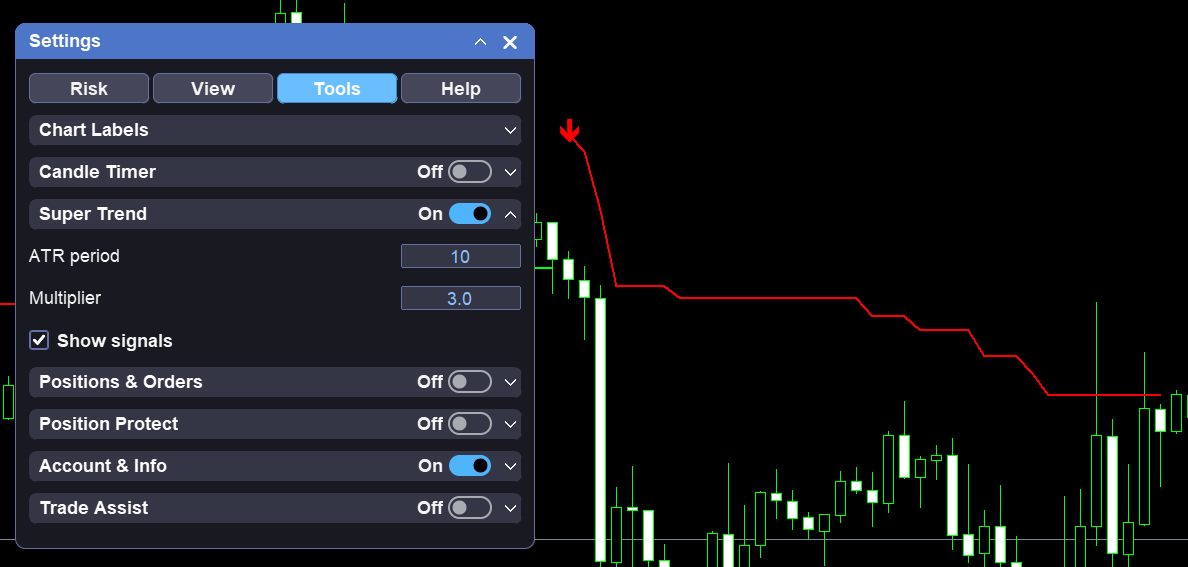
- Date jump — move the chart to a chosen date and time.
- Info panel — account and trading status in a small multi-tab window.
- Screenshot — the camera button on the title bar saves the chart as PNG and opens the folder.
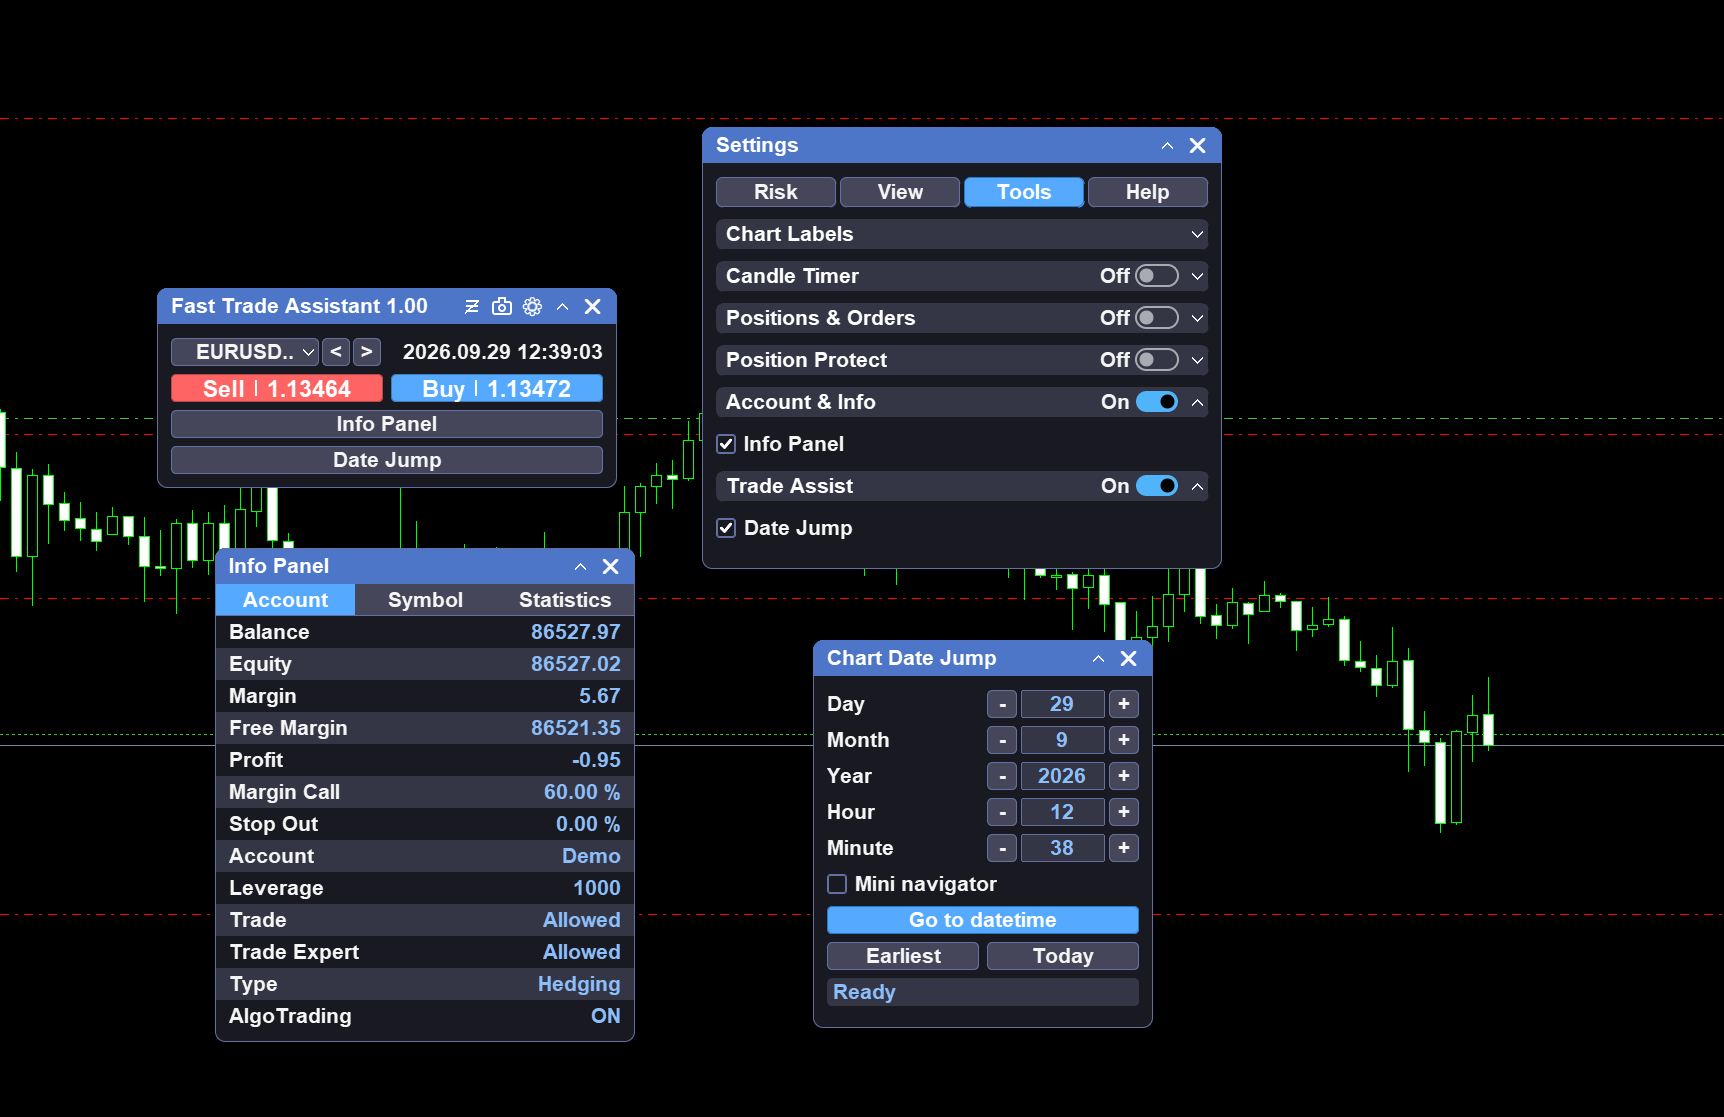
Caption: Date jump and the info panel.
Settings Window Guide
Open Settings from the main panel title bar. The window has four pages.
Risk page — the trading guards that are checked before the panel sends an order:
- Daily P/L Limit — stop trading for the day after a profit or loss limit is reached
- Equity Limit Guard — upper and lower equity levels that block new orders
- Equity DD Guard — drawdown-based guard on account equity
- Max Lots Limit — the maximum total lot size the panel may hold
- Max Positions — the maximum number of open positions
- Max SL Distance — force or clamp stop loss distances
- Block High Spread — block new orders when the spread is too wide
- News Blackout — block new orders around news time
- Allowed Session — trade only inside the allowed hours
- Day Open Limit — the maximum number of orders per day
These guards are separate from the lot-box risk: the lot box sizes the next order; the Risk page constrains the account and the trading environment.
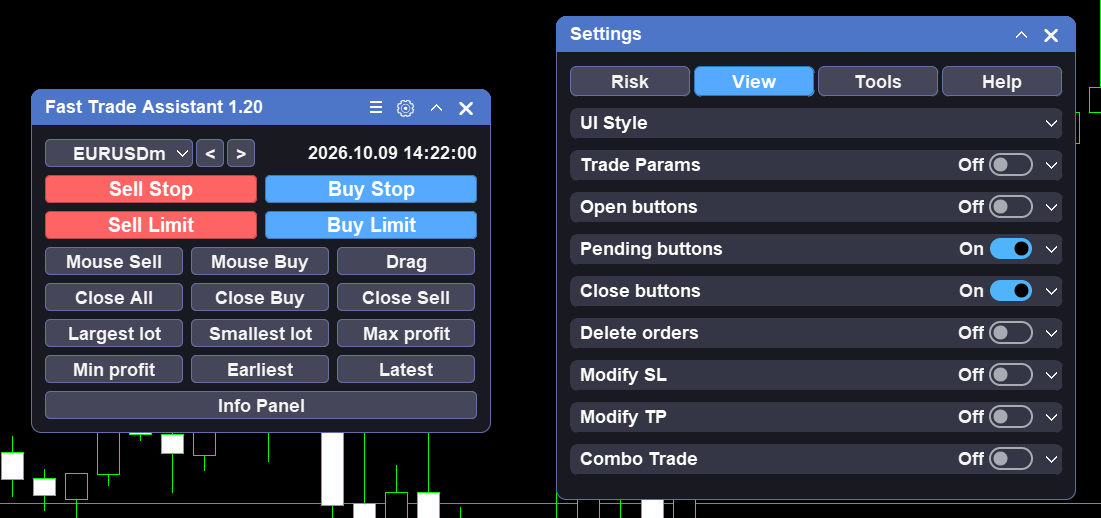
View page — interface style, the screenshot row, trade parameters (including fast async mode for mass-close requests, orders per click), and the show/hide switches for every main-panel button and tool entry.
Tools page — chart overlays and helpers: candle timer placement and style, chart labels, the average price line, Super Trend (ATR period, multiplier, signals), and related tools.
Help page — built-in usage notes.
All Settings are saved and restored after a terminal restart.
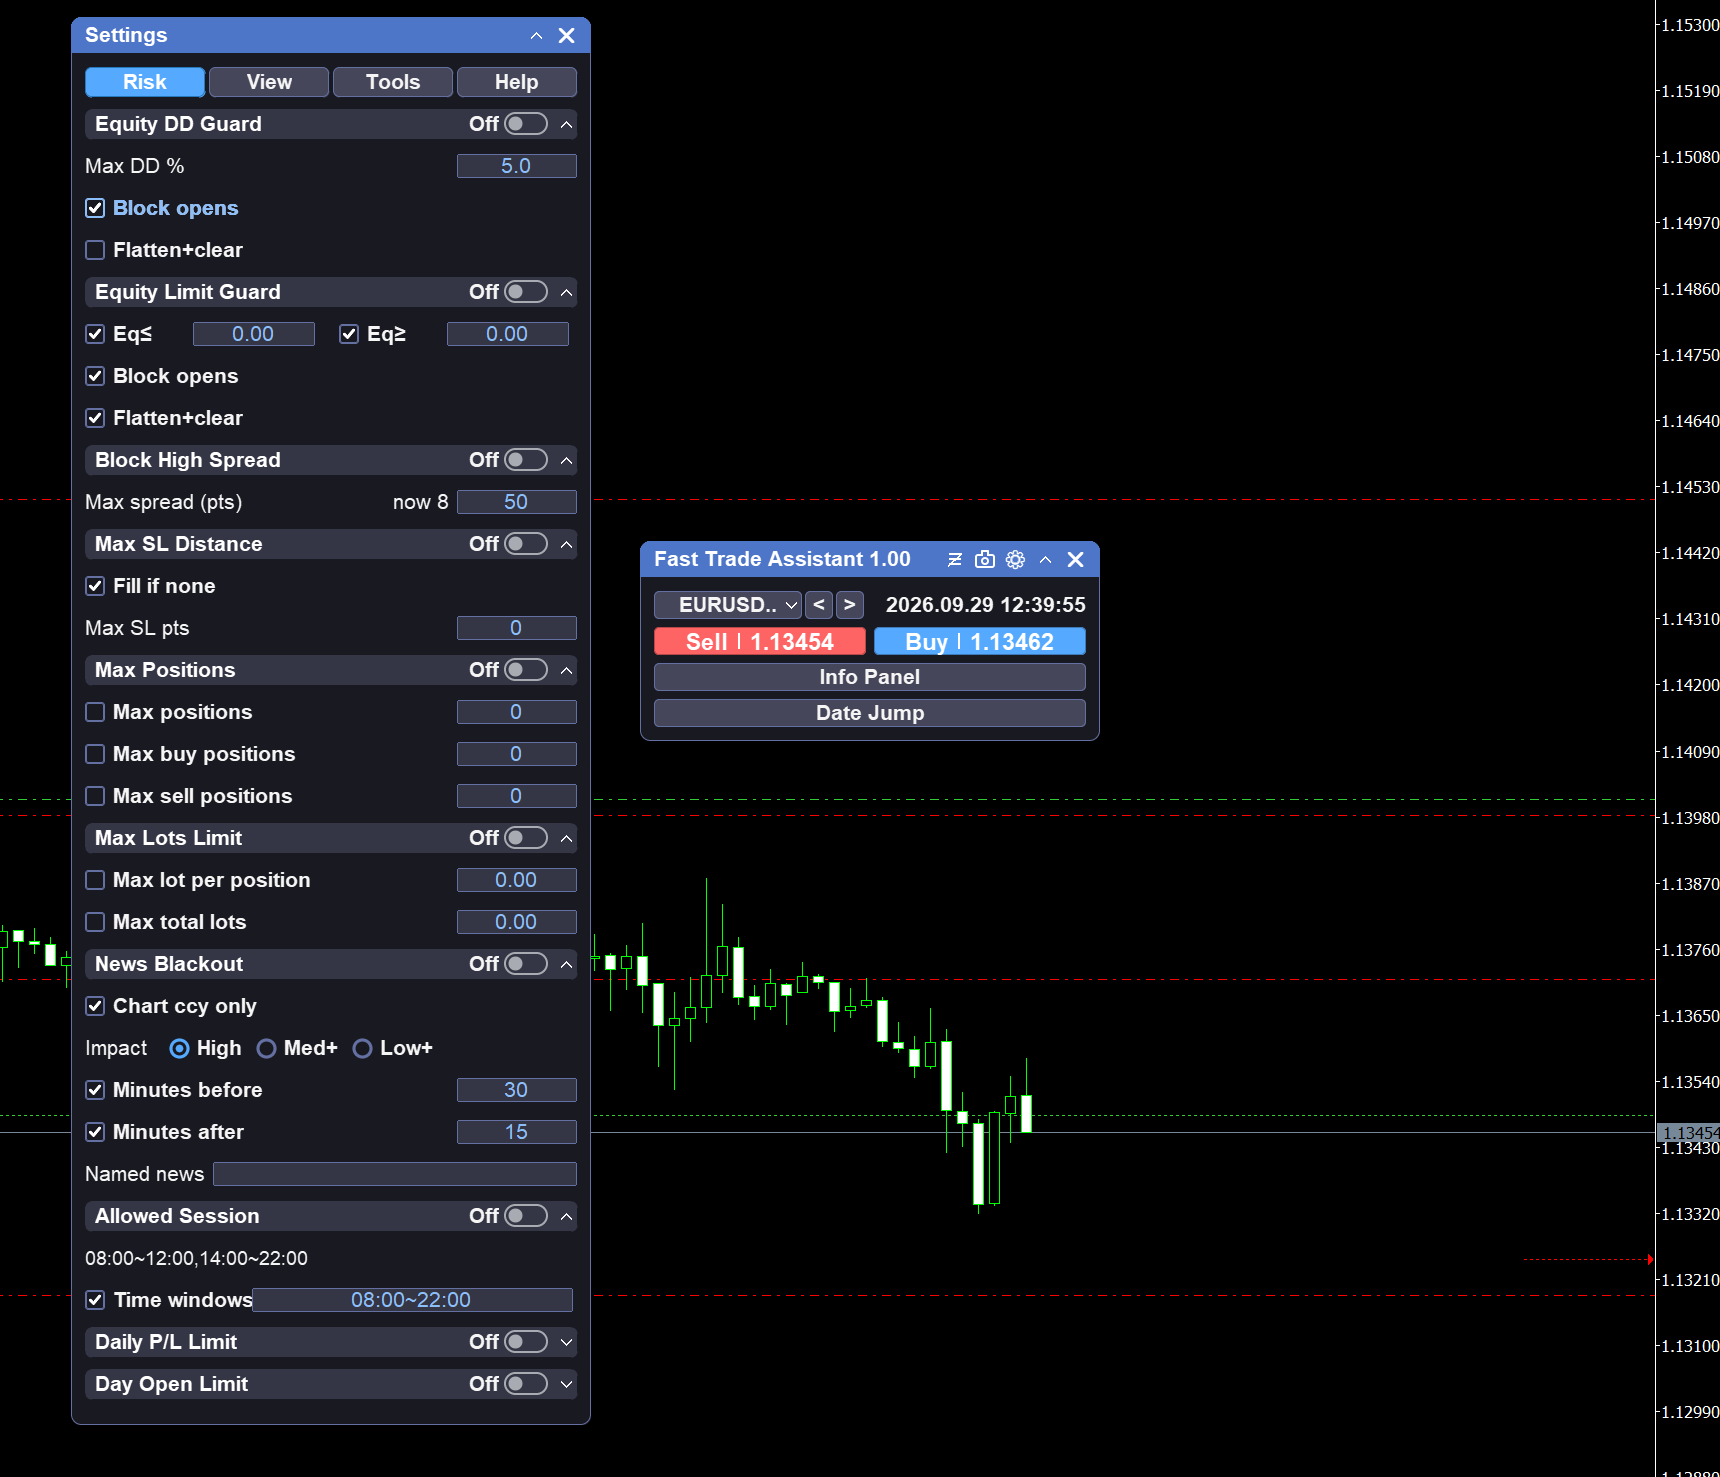
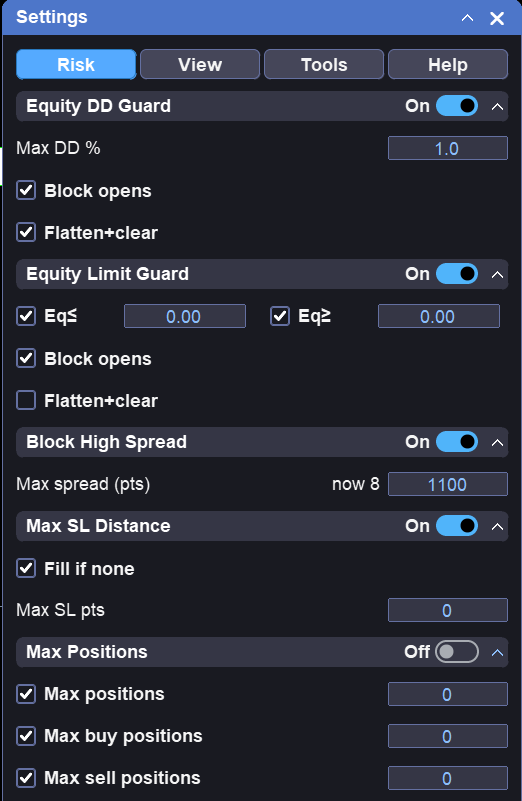
Caption: The Settings window.
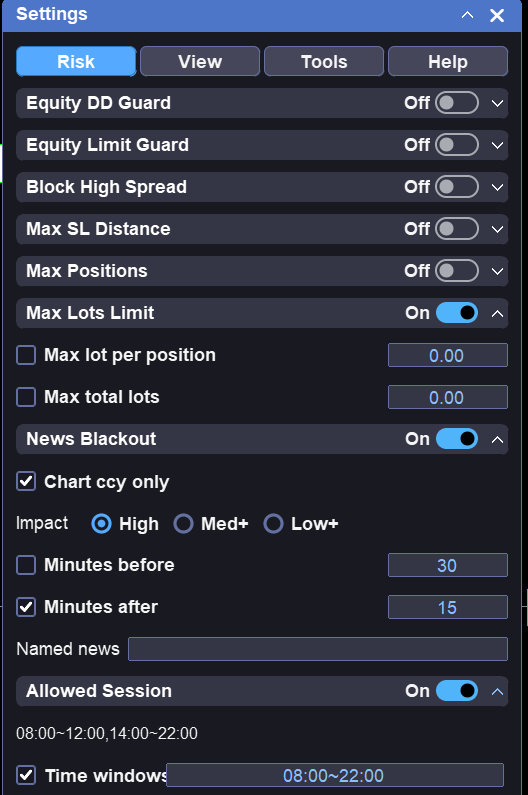
Caption: Max Lots Limit, News Blackout, and Allowed Session expanded.
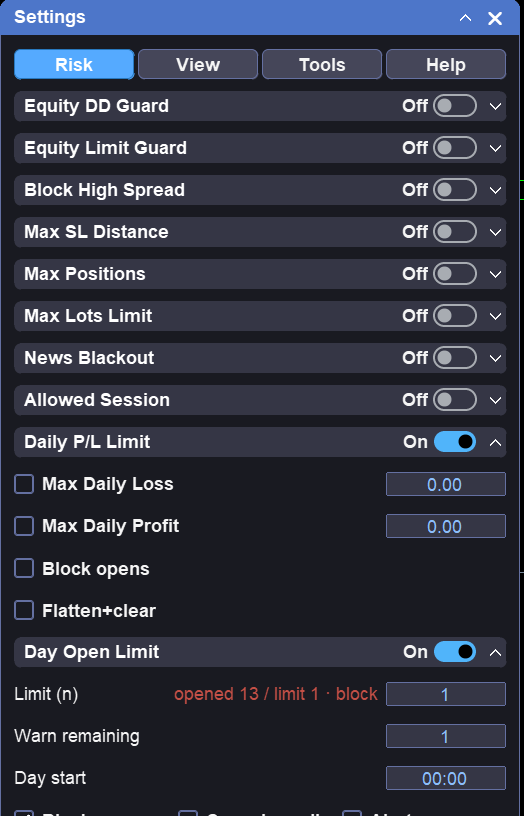
Caption: Daily P/L Limit and Day Open Limit expanded.
Magic Number and Symbol Filter
The panel uses a magic number to identify which positions and orders it manages. By default it works on trades opened under its own magic. In Settings you can change the magic or enable current symbol only so the panel ignores other symbols on the same account. If you run more than one copy on charts of the same symbol, give each copy a different magic so they do not manage each other's tickets.
Tips and Troubleshooting
- The panel does not react? Check the Algo Trading toolbar button and the red/green mark on the top right of the chart.
- Order not sent, Alert "Market is closed!" — the market of that symbol is closed; the panel refuses to send orders that would be rejected.
- Order not sent, Alert about a disconnected terminal — reconnect the terminal and try again.
- Candles drawn over the panel — right click the chart >> Properties >> Common >> untick Chart on foreground.
- Risk % or risk money mode shows no lot — the risk modes need an SL distance on the panel.
- The panel remembers its position and settings; after a terminal restart everything is where you left it.
For any questions or issues with the installation and/or the use of Fast Trade Assistant Panel, please contact me via MQL5: https://www.mql5.com/en/users/mtquant/seller
✔️ Fast Trade Assistant Panel (MT5)©: https://www.mql5.com/en/market/product/197370
Disclaimer: Fast Trade Assistant Panel is a manual trading aid. It does not generate trading signals and does not guarantee any trading results. Trading leveraged products involves a high level of risk and may result in the loss of all invested capital. Test the panel on a demo account before using it on a live account.