Risk Panel is a manual trade-management panel for MetaTrader 5. It sizes every position from the broker's own contract data for the attached symbol, so lot sizing stays correct across forex, metals, indices, and other instrument types without any per-symbol setup. Once a trade is placed, the panel can manage break-even, a trailing stop, and partial closes, all from lines drawn directly on the chart. Risk Panel does not generate entry signals and does not tell you when to buy or sell — it takes the entry you choose and manages the position size and the trade around it.
Contents
- Requirements
- Installation
- Quick start
- The panel
- Break-even, trailing stop and partial closes
- The confirm step
- Keyboard shortcuts
- The chart lines
- How the position size is worked out
- Managing an open trade
- Settings
- What the panel tells you
- Questions and answers
Requirements
- MetaTrader 5.
- A hedging account.
- Algo Trading enabled.
- Any symbol your broker offers, with no per-symbol setup required.
Installation
- After purchase or activation in the terminal, Risk Panel appears in the Navigator panel under Expert Advisors — there is nothing to download or compile.
- In the MT5 toolbar, click the Algo Trading button so it is highlighted.
- Open a chart for your instrument and drag Risk Panel onto it from the Navigator.
- In the dialog that appears, open the Common tab, make sure Allow Algo Trading is checked, and click OK.
- A small icon appears in the top-right corner of the chart. A smiling face means the panel is running; a frowning face means Algo Trading is off.
Quick start
- Attach Risk Panel to a chart with Algo Trading enabled, as described above.
- The panel opens with a starting entry, stop loss, and take profit line already placed.
- Type a risk amount into the risk field, or leave the starting value.
- Leave the mode on Market for your first trade.
- Drag the stop loss and take profit lines to where you want them, and watch the buy and sell rows update.
- Click Buy or Sell, then click the same button again to confirm.
- The trade is now open. Turn on break-even, trailing stop, or partial closes if you want the panel to manage it further, or leave them off and manage the trade yourself.
Take enough time on a demo account to get comfortable with the panel before trading it live.
The panel
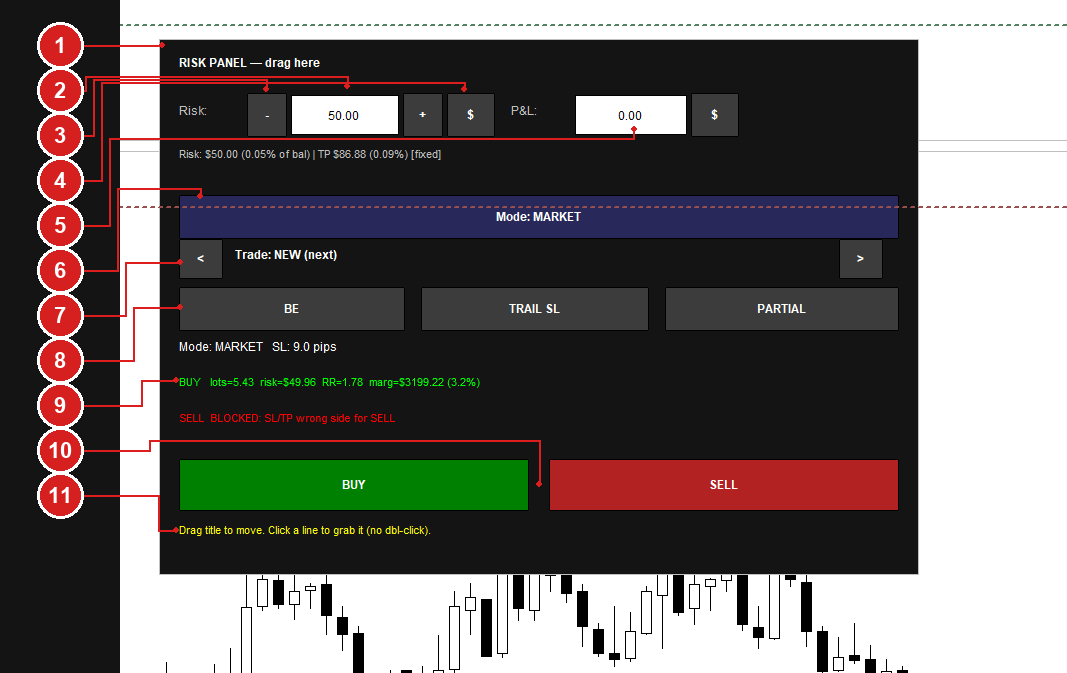
- The title strip — click and drag it to move the whole panel anywhere on the chart.
- The minus and plus buttons — step the risk value down and up.
- The risk field — holds the amount you are willing to risk on the next trade.
- The currency/percentage toggle — switches the risk field between a currency amount and a percentage of your account.
- The profit-target field and its own currency-or-percentage toggle — type a number into the field and the take-profit line moves so the trade is worth that amount.
- The Mode button — switches between Market and Pending. In Market mode the panel trades at the current price. In Pending mode it uses the entry line and works out whether to place a limit or a stop order, depending on where that line sits relative to price.
- The trade picker — steps through "next trade" (the template for the trade you are about to place) and each of your open trades on the current symbol, using the left and right arrow buttons.
- The break-even / trailing stop / partial closes toggle row — clicking one turns that feature on and opens its own settings underneath; clicking it again turns it off and folds those settings away.
- The live order preview line — shows the lot size, risk, RR, and margin the current settings would send, or the reason an order is currently blocked.
- The Buy and Sell buttons — send orders. By default, a first click arms the order and a second click, made within a few seconds, sends it — a safeguard against firing an order on a single accidental click.
- The bottom hint line — a reminder that you can drag the title to move the panel, and click a line on the chart to grab it (no double-click).
Break-even, trailing stop and partial closes
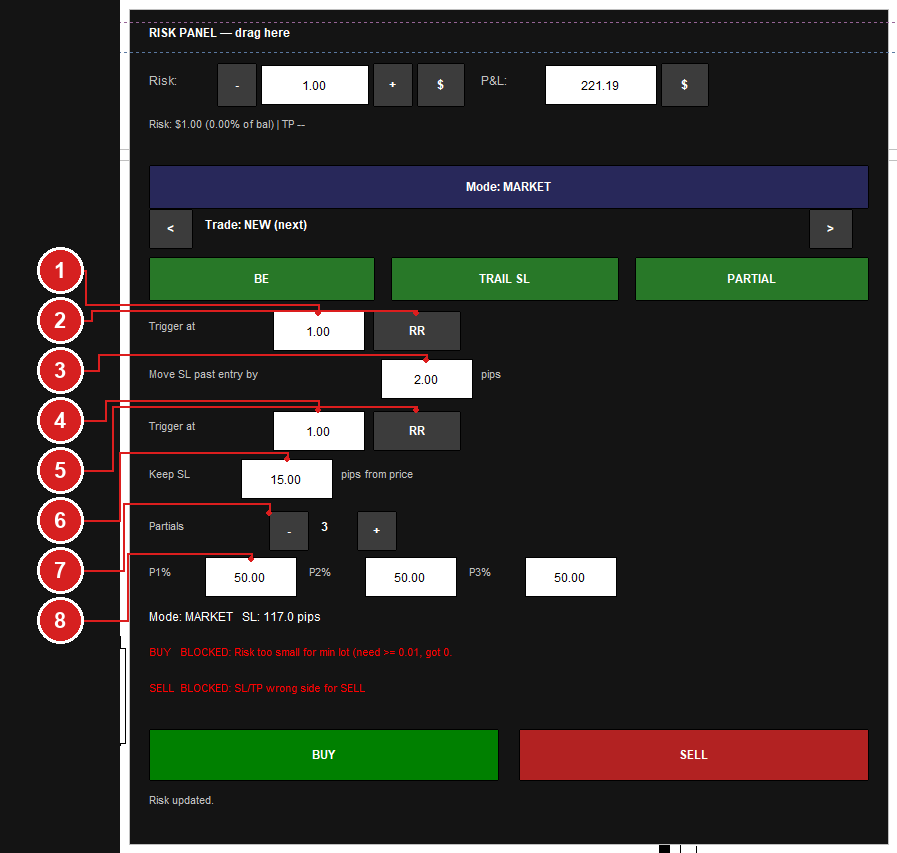
- The break-even trigger field — the value that arms break-even, read as an R multiple of the trade's starting risk or as a fixed number of pips depending on the toggle next to it.
- The break-even R/pips toggle — switches the break-even trigger between an R multiple and a fixed number of pips.
- The break-even offset field ("Move SL past entry by ... pips") — the distance, in pips, the stop is moved past entry once break-even fires.
- The trailing-stop trigger field and its R/pips toggle — the value and unit that arms the trailing stop, read the same way as break-even's trigger.
- The trailing distance field ("Keep SL ... pips from price") — the distance, in pips, the trailing stop keeps behind price.
- The partials counter — lets you choose how many partial levels to use, from one to three.
- The P1% / P2% / P3% row — each field sets how much of the position closes at that partial level.
- The status/blocked message area — reports what happened after every action, or the reason an order is not being sent.
The confirm step
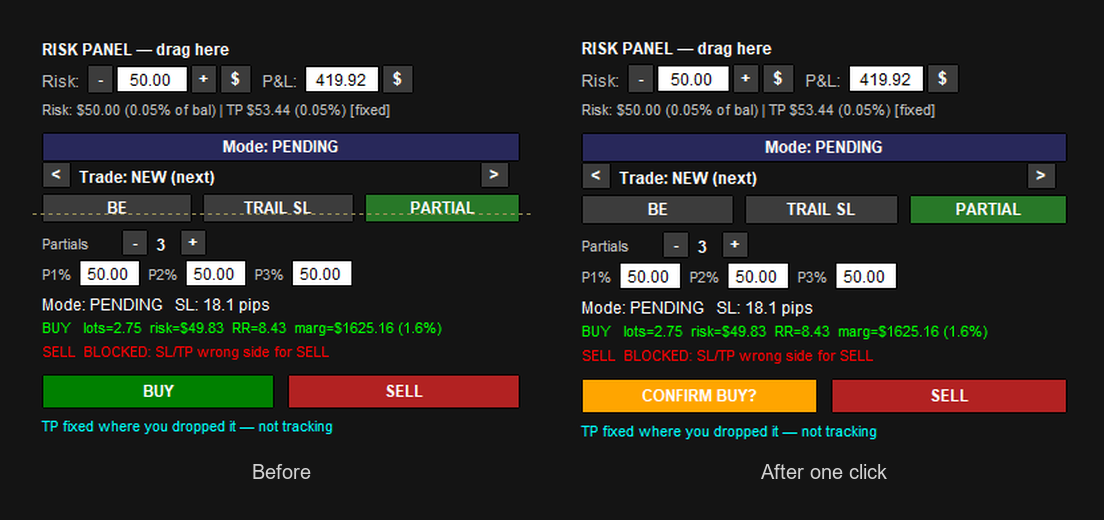
By default the Buy and Sell buttons take two clicks. The first click arms the order: the button turns orange and reads CONFIRM BUY? or CONFIRM SELL?. A second click within four seconds sends it. This exists so a single stray click cannot open a trade.
If the second click does not come in time, the order quietly disarms — the button simply turns back to its normal colour and label. Nothing is written to the status line, so the button itself is the thing to watch.
Arming one side and then pressing the other cancels the first. Arm a Buy, then click Sell, and the Buy is dropped without a message and the Sell arms instead.
To send on a single click, set InpRequireConfirm to false. Every other check still runs — sizing, the wrong-side check, the broker's minimum distances, margin, and the netting rules are all unaffected. Only the second click is removed. InpConfirmSeconds sets how long the armed state lasts, four seconds by default.
Keyboard shortcuts
Shortcuts are off until you turn them on. Set InpEnableHotkeys to true and the buttons change to read BUY (B) and SELL (S), so you can see at a glance that the keys are live.
The chart window must have keyboard focus for the keys to reach the panel — click once on the chart first if you have just been typing somewhere else.
A key press behaves exactly like a click on the matching button. With the confirm step on, the first press arms and a second press sends. The two are interchangeable: you can arm with a click and confirm with a key press, or the other way round. With the confirm step off, one press sends the order immediately.
Holding Shift, Ctrl or Alt while pressing the key does nothing at all, and says nothing — the panel ignores modified key presses on purpose, so that Ctrl+S and similar platform shortcuts cannot fire a trade.
The keys themselves are set by InpHotkeyBuy and InpHotkeySell, which take Windows virtual key codes: 66 is B and 83 is S. The letter shown on the button is taken from that code, so an unusual code will show an unusual character.
The chart lines
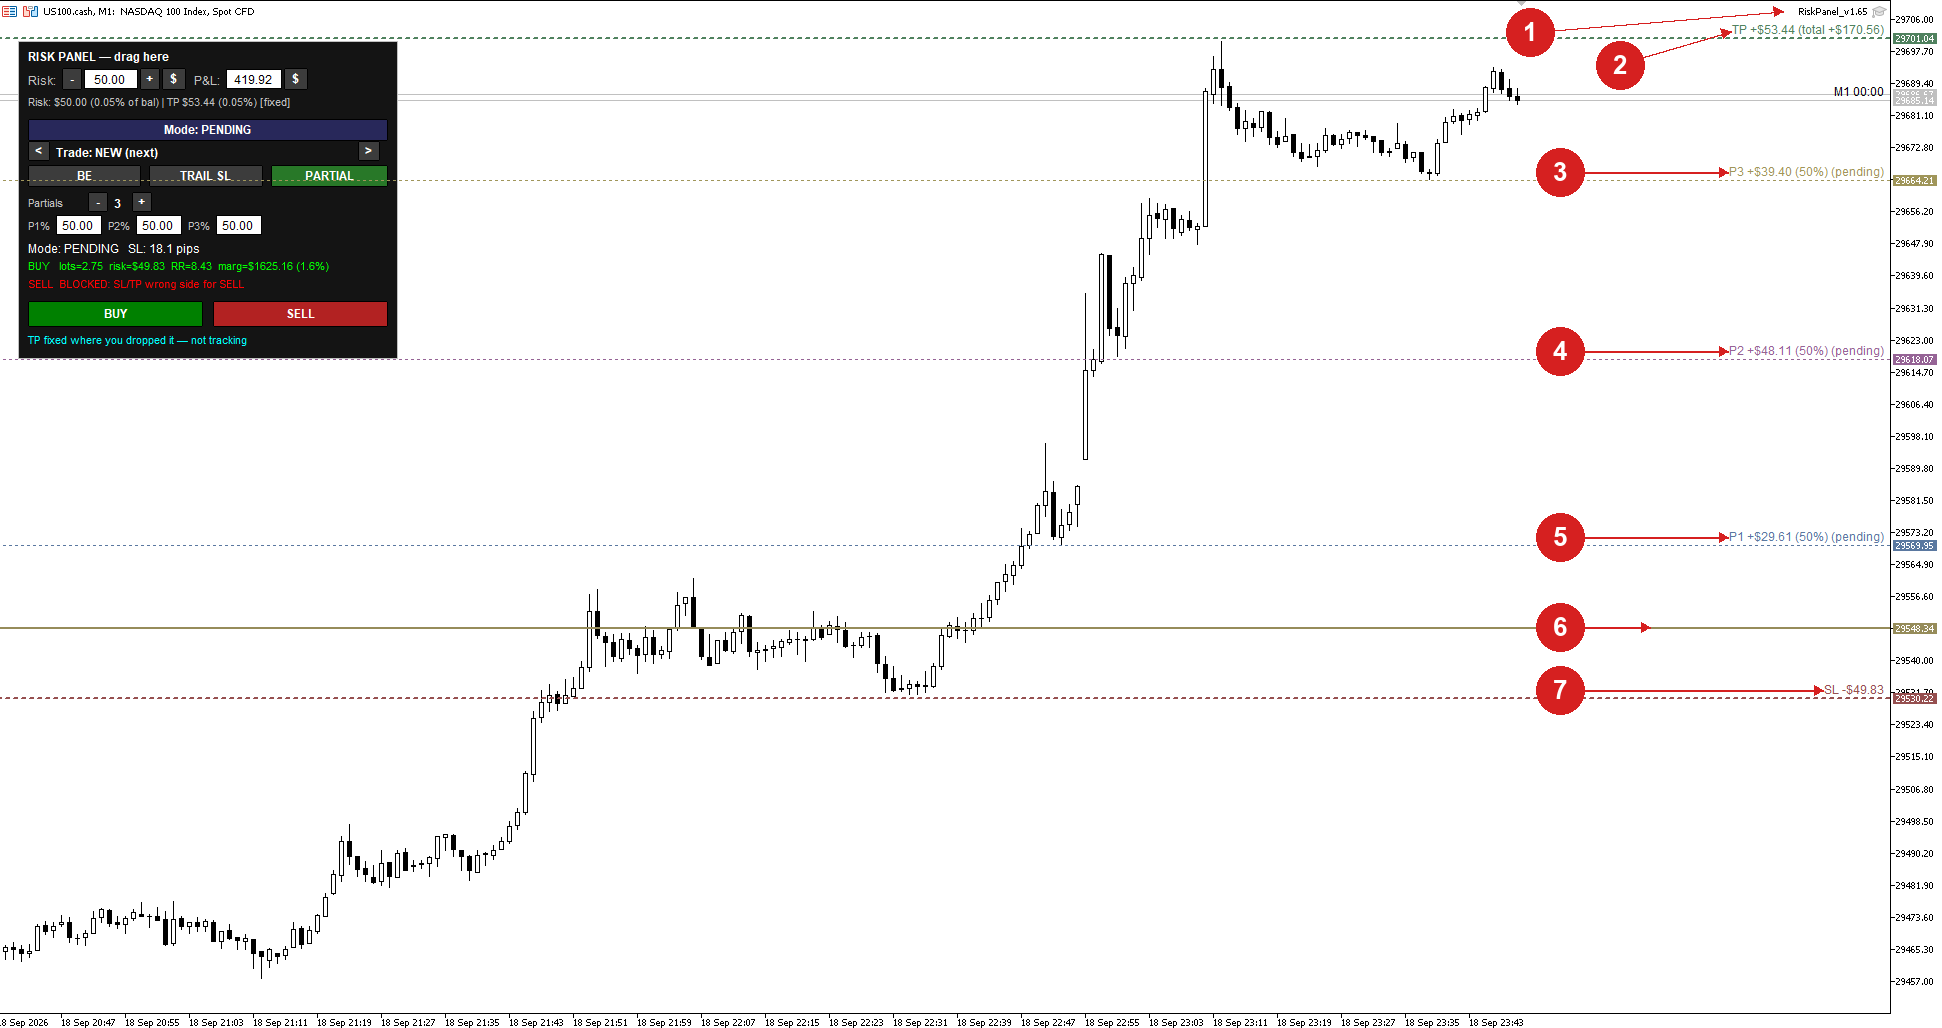
- The RiskPanel version label — confirms which panel is drawing these lines, and its version.
- The take-profit line — its label shows what remains for the final target after any partial closes are subtracted, with the whole plan's total shown alongside it.
- The P3 partial line — the price at which the third partial level closes part of the position (shown when partial closes are on and set to three levels).
- The P2 partial line — the price at which the second partial level closes part of the position.
- The P1 partial line — the price at which the first partial level closes part of the position.
- The entry line — drawn as a solid line, shown only in Pending mode; the panel uses it to work out whether to place a limit or a stop order.
- The stop-loss line — drag it directly on the chart to move it.
Any of these lines can be dragged directly on the chart to move it.
How the position size is worked out
Risk Panel works out lot size from the broker's own pricing data for the symbol being traded, rather than assuming a fixed value per pip. This keeps sizing accurate across instrument types and brokers, including symbols where pip value can otherwise be misreported. The lot size is rounded down to the broker's allowed step, so a trade never risks more than the amount set in the risk field.
When the panel first attaches to a chart, it places a starting stop-loss and take-profit line based on the recent trading range of the instrument, so the starting distances scale to how that instrument actually moves rather than a single fixed distance applied to every symbol.
A slippage reserve is applied by default, sizing the trade so that a fill at the edge of the allowed price deviation still stays inside the typed risk — though that reserve covers slippage within the allowed deviation, and a market that gaps straight through a pending stop entry can fill beyond it.
Pip size is detected automatically from the instrument type. On gold, one pip resolves to one whole dollar of price; a trader who wants ten-cent pips instead sets the pip-size input to 0.10 by hand. The trade's money risk comes from where the stop-loss line sits, not from the pip size, so changing the pip-size input does not change the risk on a given line placement — it changes the pip-based figures such as starting distances, trailing distance, break-even offset, and the pip readouts on the panel.
All money figures on the panel are calculated from price and lot size, and do not include the broker's commission or swap.
Managing an open trade
Once a trade is open, Risk Panel can manage it in three independent ways: moving the stop loss to break-even, trailing the stop as price moves in your favor, and closing part of the position at one or more partial levels. All three can run together, and every stop-loss move only ever improves the stop — it is never loosened.
Break-even and trailing stop each read their trigger in one of two units, chosen with a toggle next to the field: as an R multiple of the trade's starting risk, or as a fixed number of pips. Each trade keeps its own copy of whichever unit was showing when it was opened, so changing the toggle for the next trade does not change how an already-open trade reads its own trigger.
Each partial level combines a draggable line and a percentage: the line sets the price at which that level fires, and its percentage input, in Settings, sets how much of the position closes there. Drag a partial line to where that portion of the position should close. In Market mode, a partial level has to sit a minimum distance ahead of the current price when it is set, or it is held rather than armed until moved far enough ahead.
The panel shows three related profit figures, and they mean different things on purpose: the headline risk-line figure is the money remaining on the final target after earlier partials; the take-profit line's on-chart label shows that same remainder alongside the whole plan's total in parentheses; and the profit-target field shows and targets the whole plan's total, partials included.
A trade's management plan — its break-even, trailing stop, and partial settings — stays with that trade across a chart reload, as long as the position is still open when the panel reattaches.
Settings
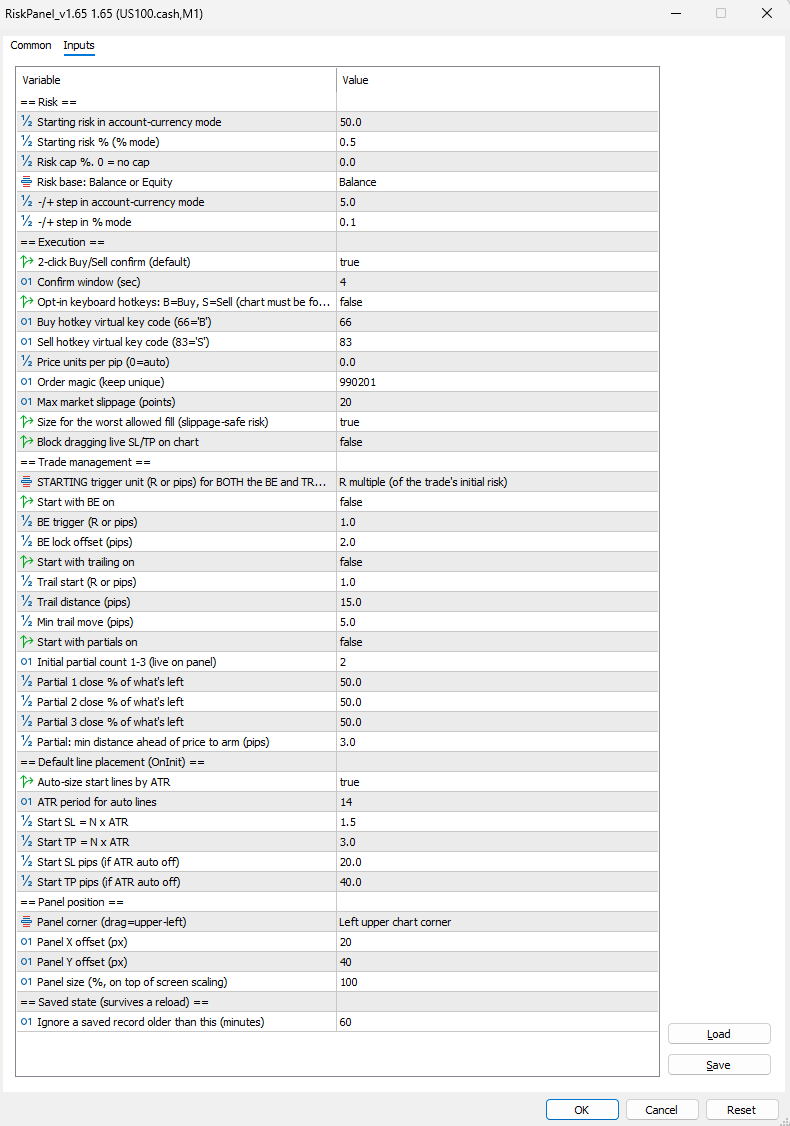
The partial percentages apply to the volume still open when that level fires, not to the position's original size.
Risk
- Starting risk in account-currency mode — 50.0 — Starting risk amount shown in the risk field on attach, in currency mode. (InpDefaultRiskDollars)
- Starting risk % (% mode) — 0.5 — Starting risk value held for when the risk field is switched to percent mode. (InpDefaultRiskPct)
- Risk cap %. 0 = no cap — 0.0 — Optional cap on risk as a percent of balance or equity. Zero means no cap. (InpMaxRiskPct)
- Risk base: Balance or Equity — Balance — Whether risk and the cap are measured against account balance or equity. (InpRiskBase)
- -/+ step in account-currency mode — 5.0 — Amount the minus/plus buttons change the risk field by, in currency mode. (InpRiskStepDollars)
- -/+ step in % mode — 0.1 — Amount the minus/plus buttons change the risk field by, in percent mode. (InpRiskStepPct)
Execution
- 2-click Buy/Sell confirm (default) — true — Requires a second click to confirm Buy or Sell before the order is sent. (InpRequireConfirm)
- Confirm window (sec) — 4 — How many seconds the confirming second click stays valid for. (InpConfirmSeconds)
- Opt-in keyboard hotkeys: B=Buy, S=Sell — false — Lets the B and S keys fire Buy and Sell while the chart has keyboard focus. (InpEnableHotkeys)
- Buy hotkey virtual key code (66='B') — 66 — Key code used for the Buy hotkey (66 is "B"). (InpHotkeyBuy)
- Sell hotkey virtual key code (83='S') — 83 — Key code used for the Sell hotkey (83 is "S"). (InpHotkeySell)
- Price units per pip (0=auto) — 0.0 — Price units treated as one pip. Zero lets the panel detect it automatically. (InpPipSize)
- Order magic (keep unique) — 990201 — Identifying number stamped on every order the panel sends; must be unique per chart. (InpMagic)
- Max market slippage (points) — 20 — Allowed price deviation, in points, requested on market orders. (InpDeviationPoints)
- Size for the worst allowed fill (slippage-safe risk) — true — Sizes the trade to stay inside the typed risk even at the allowed deviation. (InpReserveSlippage)
- Block dragging live SL/TP on chart — false — Blocks dragging a live position's stop loss and take profit directly on the chart. (InpLockTradeLevels)
Trade management
- STARTING trigger unit (R or pips) for BOTH the BE and trailing stop — R multiple (of the trade's initial risk) — Starting unit — R multiple or pips — for the break-even and trailing-stop triggers. (InpMgmtUnit)
- Start with BE on — false — Starts break-even switched on when the panel attaches. (InpUseBE)
- BE trigger (R or pips) — 1.0 — Starting break-even trigger value. (InpBETrigger)
- BE lock offset (pips) — 2.0 — Starting distance, in pips, the stop is moved past entry at break-even. (InpBEOffsetPips)
- Start with trailing on — false — Starts the trailing stop switched on when the panel attaches. (InpUseTrail)
- Trail start (R or pips) — 1.0 — Starting trigger value for the trailing stop. (InpTrailStart)
- Trail distance (pips) — 15.0 — Starting distance, in pips, the trailing stop keeps behind price. (InpTrailDistPips)
- Min trail move (pips) — 5.0 — Minimum improvement, in pips, required before the trailing stop moves again. (InpTrailStepPips)
- Start with partials on — false — Starts partial closes switched on when the panel attaches. (InpUsePartial)
- Initial partial count 1-3 (live on panel) — 2 — Starting number of partial levels, from one to three. (InpNumPartialTPs)
- Partial 1 close % of what's left — 50.0 — Starting percentage of the remaining position closed at partial level one. (InpPartialPct1)
- Partial 2 close % of what's left — 50.0 — Starting percentage of the remaining position closed at partial level two. (InpPartialPct2)
- Partial 3 close % of what's left — 50.0 — Starting percentage of the remaining position closed at partial level three. (InpPartialPct3)
- Partial: min distance ahead of price to arm (pips) — 3.0 — Minimum distance a partial level must sit ahead of price to arm. (InpPartialMinGapPips)
Default line placement (OnInit)
- Auto-size start lines by ATR — true — Sizes the starting stop-loss and take-profit lines from recent volatility. (InpUseATRDefaults)
- ATR period for auto lines — 14 — Number of bars used to measure that recent volatility. (InpATRPeriod)
- Start SL = N x ATR — 1.5 — Starting stop-loss distance as a multiple of that volatility measure. (InpATRSLMult)
- Start TP = N x ATR — 3.0 — Starting take-profit distance as a multiple of that volatility measure. (InpATRTPMult)
- Start SL pips (if ATR auto off) — 20.0 — Fallback starting stop-loss distance, in pips, when volatility sizing is off. (InpDefaultSLPips)
- Start TP pips (if ATR auto off) — 40.0 — Fallback starting take-profit distance, in pips, when volatility sizing is off. (InpDefaultTPPips)
Panel position
- Panel corner (drag=upper-left) — Left upper chart corner — Chart corner the panel is anchored to. (InpPanelCorner)
- Panel X offset (px) — 20 — Starting panel position, in pixels, from the left edge of that corner. (InpPanelX)
- Panel Y offset (px) — 40 — Starting panel position, in pixels, from the top edge of that corner. (InpPanelY)
- Panel size (%, on top of screen scaling) — 100 — Panel size as a percentage, on top of screen scaling. (InpPanelScalePct)
Saved state (survives a reload)
- Ignore a saved record older than this (minutes) — 60 — How long saved panel settings can be restored after an unplanned reload. (InpStateMaxAgeMinutes)
What the panel tells you
Every action the panel takes, or does not take, is reported somewhere: on the status line at the bottom of the panel for anything to do with placing or managing a trade, or in the Experts tab for anything that happens before the panel finishes attaching to the chart. The lists below say what each message means and what to do about it. Text such as <lots>, <ticket>, and <code> stands in for the actual numbers shown.
When an order is not sent
- "BLOCKED: select NEW before sending Buy/Sell." — An existing open trade is selected in the trade picker, and a new order was attempted while it is selected. What to do: Move the picker back to "NEW (next)" before sending a new trade.
- "BLOCKED: no supported FOK/IOC filling mode for market execution." — The broker's fill-mode settings for this symbol do not match anything the panel can send. What to do: This is a broker or symbol setup matter — contact your broker or try a different symbol.
- "BLOCKED: PARTIAL is unsupported on NETTING accounts. Turn it off." / "BLOCKED: PARTIAL is unsupported on NETTING accounts." — The account is a netting account, where partial closes are not available. What to do: Turn partial closes off, or use a hedging account.
- "BLOCKED: SL/TP line missing — refusing to send with no stop" — One of the entry, stop-loss, or take-profit lines is not on the chart. What to do: Drag the missing line back onto the chart before sending.
- "BLOCKED: NETTING — clear existing position/pending order on <symbol> first." — The account is netting, and a position or pending order already exists on this symbol. What to do: Close or cancel the existing position or order first, then send the new one.
- "BLOCKED: Set SL (SL line == entry)" — The stop-loss line sits exactly on the entry price, leaving no distance to size the trade from. What to do: Drag the stop-loss line away from entry.
- "BLOCKED: SL/TP wrong side for BUY" — For a buy, the stop loss has to sit below entry and the take profit above it. What to do: Check the stop-loss and take-profit positions relative to entry.
- "BLOCKED: SL/TP wrong side for SELL" — For a sell, the stop loss has to sit above entry and the take profit below it. What to do: Check the stop-loss and take-profit positions relative to entry.
- "BLOCKED: tickSize==0 (symbol data)" — The broker is not currently reporting a usable tick size for this symbol. What to do: Wait and retry, or check that the symbol is tradeable.
- "BLOCKED: moneyPerLot==0 (symbol data)" — The broker's pricing data returned nothing for this symbol and direction. What to do: Wait and retry, or check that the symbol is tradeable.
- "BLOCKED: sizing could not be verified for this symbol (fallback math)" — The broker's pricing engine did not respond, so the panel will not size from its own backup calculation without confirming it first. What to do: Check the diagnostic line in the Experts tab; if this continues, contact your broker.
- "BLOCKED: volStep==0 (symbol data)" — The broker is not currently reporting a usable minimum lot step for this symbol. What to do: Wait and retry, or check that the symbol is tradeable.
- "BLOCKED: Risk too small for min lot (need >= <lots>, got <lots>)" — The typed risk amount, at this stop-loss distance, works out to less than the broker's smallest tradeable lot. What to do: Increase the risk amount, or widen the stop-loss distance.
- "BLOCKED: Volume limit reached (limit <lots>, used <lots>, min lot <lots>)" — The broker's total volume cap for this symbol would be exceeded. What to do: Reduce the trade size, or close other open volume on the symbol first.
- "BLOCKED: Risk too small after volume rounding" — Rounding the lot size down to the broker's allowed step leaves nothing to trade. What to do: Increase the risk amount, or widen the stop-loss distance.
- "BLOCKED: margin: lots=<lots> need <amount> have <amount>" — The account does not have enough free margin for this trade at this lot size. What to do: Reduce the trade size, free up margin, or add funds.
- "BLOCKED: SL too close (min <distance> pts / broker stops level)" / "BLOCKED: TP too close (min <distance> pts / broker stops level)" — The broker enforces a minimum distance between price and any stop or target, and a line sits inside it. What to do: Drag the line further from the current price.
When the panel does not start
These messages appear only in the Experts tab (View, then Terminal, then Experts, or Ctrl+T) — the panel has not attached to the chart yet.
- "RiskPanel: refusing to init — InpMagic=<code>. Magic 0 ..." — The magic-number input was left at zero, which MetaTrader assigns to hand-placed trades. What to do: Set a unique positive number in the magic-number input before attaching.
- "RiskPanel: refusing to init — partial % input above 100 is not allowed ..." — One of the partial-close percentage inputs is set above 100. What to do: Set that input to 100 or below and reattach.
- "RiskPanel: refusing to init — ownership conflict: another RiskPanel chart is already managing <symbol> with magic <code> ..." — Another chart is already running Risk Panel on this exact symbol and magic-number combination. What to do: Give this chart a different, unique magic number, or remove the other panel.
- "RiskPanel: FATAL — <symbol> has no supported FOK/IOC filling mode for market execution ..." — The symbol's fill-mode settings do not match anything the panel can send. What to do: Broker or symbol setup matter — contact your broker.
- "RiskPanel: FATAL — Entry/SL/TP line object(s) could not be created, aborting init." — The terminal did not create the chart objects the panel needs to draw its lines. What to do: Remove and re-add the panel; restart the terminal if it repeats.
- "RiskPanel: FATAL — EventSetMillisecondTimer(300) failed (err <code>); refusing degraded attach." — The terminal did not grant the panel its update timer. A shorter "FATAL: timer setup failed (err <code>)." also appears briefly on the panel's own status line right before the attach ends. What to do: Remove and re-add the panel; restart the terminal if it repeats.
While a trade is being managed
These appear on the status line while break-even, trailing stop, or partial closes is managing an already-open position. <n> is the partial level number, <ticket> is the position ticket, and <code> is a broker error code and description.
- "PARTIAL disabled for #<ticket>: unsupported on NETTING." — Partial management for this position is off because the account is netting. What to do: No action — partial closes are not available on netting accounts.
- "Partial <n> #<ticket> DISARMED: request never reached server after 10 local attempts ..." / "Trail/BE FAILED #<ticket> (request was not sent)" — The request did not reach the broker's server, usually because Algo Trading is off or the connection is refusing it. What to do: Check Algo Trading is on and the terminal is connected, then re-arm the feature.
- "Partial <n> #<ticket> NOT closed (request was not sent), local attempt <n>/10" — Same as above, and still retrying. What to do: Check the connection; it will keep trying automatically.
- "Partial <n> #<ticket> DISARMED after 5 failed attempts (<code>)" / "Trail/BE FAILED #<ticket> (<code>)" — The broker's server received the request and rejected it five times. What to do: Read the broker's reason in the message; common causes are stops-level or freeze violations.
- "Partial <n> #<ticket> NOT closed (<code>), attempt <n>/<n>" — Same as above, and still retrying. What to do: Will keep retrying automatically.
- "P<n> #<ticket> full-close PARTIALLY filled: closed <lots> lots, <lots> still open — retrying, attempt <n>/5" — A full-close request for a partial level was only part-filled by the broker. What to do: The panel keeps trying to close the remainder; check the position size if this repeats.
- "Partial <n> closed <lots> lots (<percent>% target) #<ticket>" / "P<n> #<ticket> closed ALL <lots> lots (100% target)" — A partial or full-close target fired successfully. What to do: No action — this confirms success.
- "... — WARNING: EXECUTED flag failed to save (err <code>), a crash could re-fire this level" — The close succeeded, but the panel's record of it could not be saved. If the terminal restarts before this saves, the same level could fire again. What to do: Check that the position's volume matches what is expected if the terminal restarts soon after.
- "Partial <n> #<ticket> target too small to size (below broker min volume) — DISARMED" — That partial's percentage, applied to what is left of the position, comes out below the broker's minimum lot. What to do: Increase that partial's percentage, or rely on the remaining levels and the take profit.
- "BE set #<ticket>" / "Trail SL #<ticket>" — Break-even or the trailing stop moved the stop loss successfully. What to do: No action — this confirms success.
- "BE WAIT #<ticket>: <reason>" / "Trail WAIT #<ticket>: <reason>" / "Partial WAIT #<ticket>: <reason>" / "Close WAIT #<ticket>: <reason>" — The action is ready but the broker's minimum-distance or freeze rules do not allow it to touch the position right now. What to do: No action needed — it will act as soon as the broker allows it.
- "WARNING: saved trade plans are near the platform limit; clear old plans." — The terminal's storage for saved trade plans is nearly full. What to do: Close out old trades so their saved plans clear, or remove unused EAs from other charts.
- "P&L target not recalculated: ... — handle manually." — After a partial fill, the panel could not safely recompute the pinned profit target, so it left the take-profit line where it was. What to do: Check the position's take-profit price and adjust it by hand if needed.
- "Filled <lots> of <lots> — profit target recalculated for the smaller size." — A partial fill occurred and the pinned target was recalculated successfully. What to do: No action — this confirms success.
Typing into the risk or profit-target field can also be rejected, always shown on the status line:
- "Rejected: Risk must be a number" / "Rejected: P&L target must be a number" — the entry was not a valid number; the field reverts to its last value.
- "Rejected: <field> must be a number in [<min>, <max>]" — the number entered was outside the field's allowed range; the field reverts to its last value.
- "P&L target must be > 0" — a profit target of zero or below is not valid.
- "Can't set P&L target (sizing unavailable)" — the panel cannot currently size a trade, so it has nothing to base a profit target on.
- "P&L target could not be solved (...)" — the panel could not work out a take-profit price for the typed target from the current stop-loss and price; check the stop-loss line and risk settings, or set the take-profit line by hand.
Questions and answers
Does it give entry signals?
No. Risk Panel takes the entry you choose, by placing lines on the chart, and manages size and trade management around it. It does not identify setups or tell you when to enter.
Does it work on a netting account?
MetaTrader allows one position per symbol on a netting account. On that account type, partial closes are not available, and the panel will not open a new trade while a position or pending order already exists on that symbol.
Are broker fees included in the numbers shown?
No. Every money figure on the panel is calculated from price and lot size only. Commission and swap are set by your broker and are not included.
How many trades can it manage at once?
The panel supports up to 100 open positions per terminal.
Can two charts run the panel on the same symbol?
No. One panel manages one symbol-and-magic-number combination. Give each chart its own unique magic number if more than one should run.
Does my setup survive a restart?
Panel and template settings — planning lines, risk and profit-target values, and trade-management defaults — are restored after a normal terminal restart, provided it happens within a set window and the account is unchanged. An open trade's own management plan is restored as long as the position is still open. The panel's on-screen position is not kept; it returns to its starting corner each time it reattaches.
Does it close my trades if I turn off Algo Trading?
No. That is MetaTrader's own behavior, not the panel's. Risk Panel does not close anything when Algo Trading is switched off.
What happens on gold?
See "How the position size is worked out" above — gold's pip size and the ten-cent convention are covered there.