Smart Conditional Trader
- 实用工具
- 版本: 1.0
- 激活: 10

1. Overview
If you are looking for a conditional trade entry functionality in metatrader 5, you found your solution now with the Smart Conditional Trader. The EA lets you define the price condition to automatically enter into the trade and takes over the position managements afterwards as well - fully customisable.
The Smart Conditional Trader is a manual-assistance Expert Advisor for MetaTrader 5. It automates trade execution based on price-level crossing conditions that you define visually on the chart. Rather than continuously monitoring the chart yourself, you set up to three price conditions, configure your risk parameters, and let the EA watch for the setup and execute the trade when all conditions are met.
This EA is designed for a single-trade workflow: it fires once when your conditions are met, then disarms. You re-arm it by dragging any line on the chart to a new position. This makes it ideal for discretionary traders who want precise, hands-free execution of planned setups.
2. Key Features
• All functionalities are fully customisable
• Ideal for among others break & retest strategies
• Up to three sequential price-crossing conditions with configurable direction, price mode, and sequencing
• Draggable chart lines for conditions, stop loss, and take profit – all fully interactive
• Multiple stop loss modes: fixed price, structure-based, or point-based
• Multiple take profit modes: risk-reward ratio, structure-based, or point-based
• Risk-based, fixed, or investment-based position sizing
• Break-even and trailing stop management (price-based, structure-based, or custom)
• Configurable trading hours with optional daily close
• Daily loss limit safeguard
3. How It Works – The Core Concept
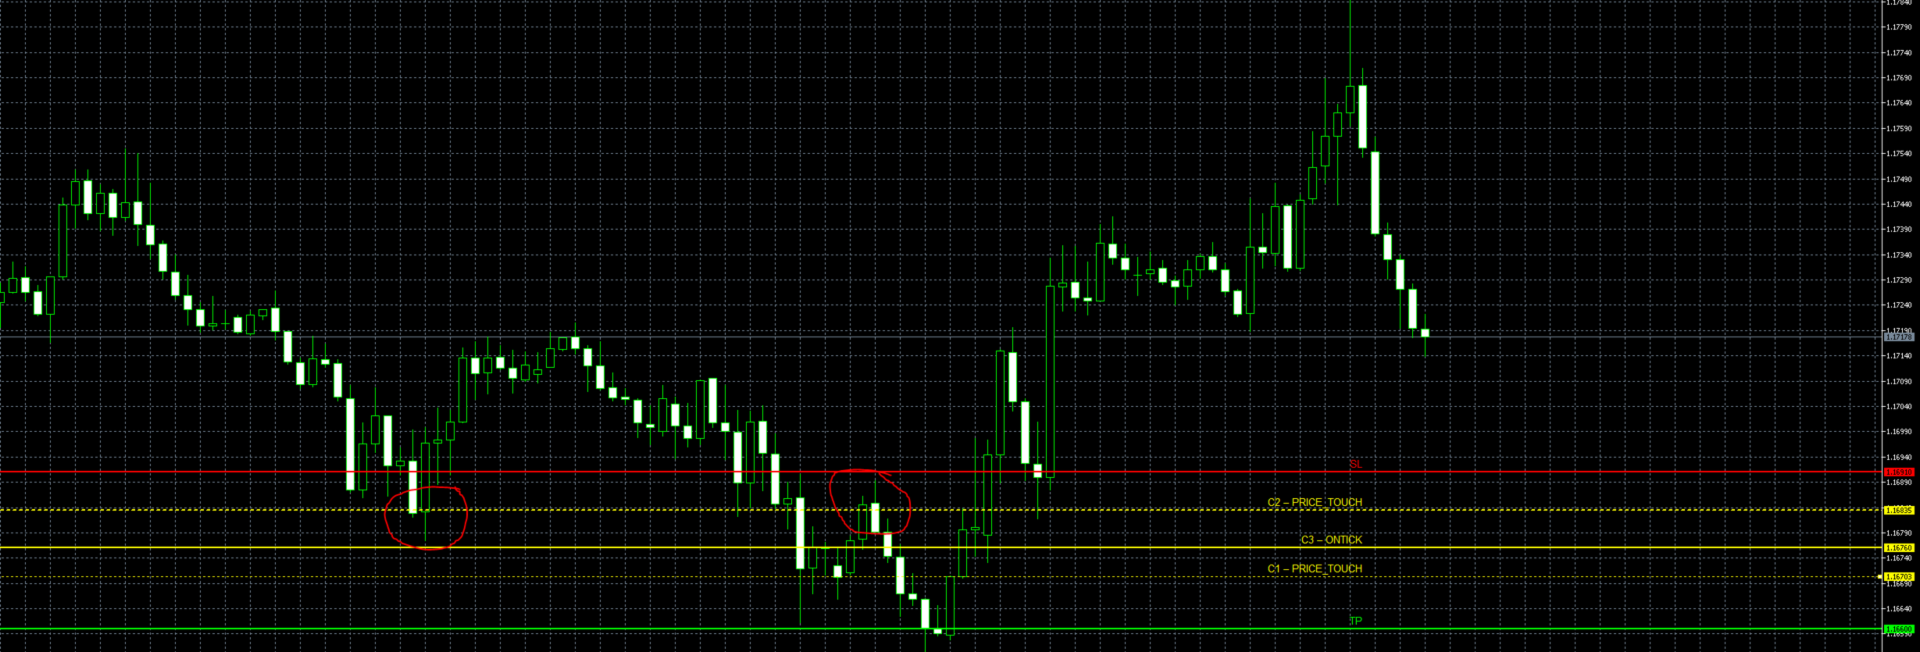
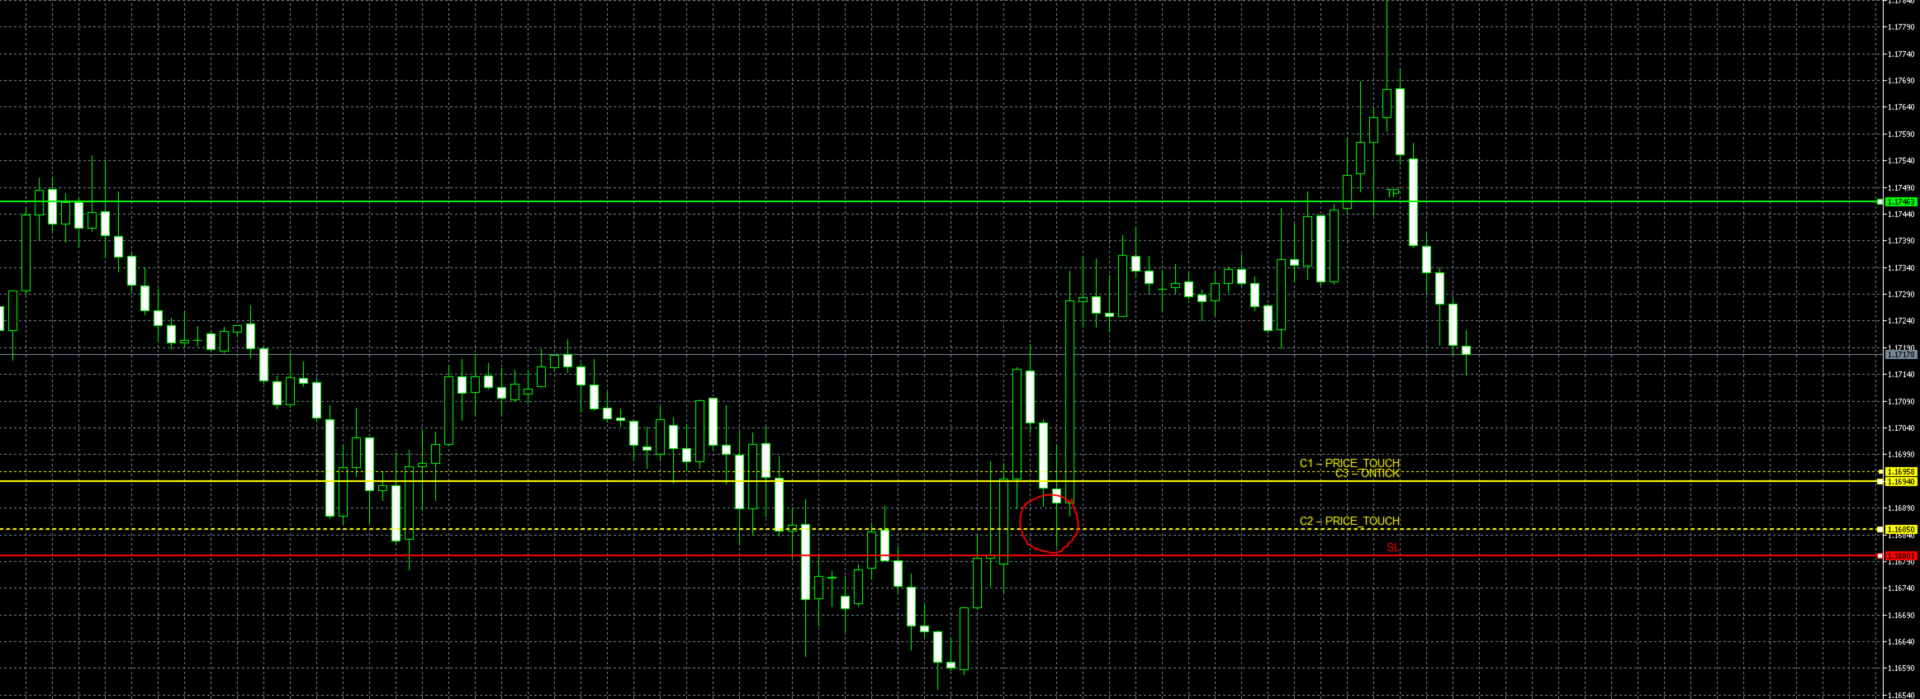
The EA monitors up to three price levels (C1, C2, C3) drawn as horizontal lines on your chart. A trade is triggered when price crosses all three levels in order – from C1 to C2 to C3 – within a configurable number of bars. Think of it as setting up a sequence of checkpoints that price must hit before the EA pulls the trigger.
Example (Long setup):
You expect price to pull back through a support zone before reversing upward. You set C1 at 150.00 (Down crossing), C2 at 148.50 (Down crossing), and C3 at 149.00 (Up crossing). Price must first drop below 150, then below 148.50, and finally cross back above 149 – at which point the EA opens a buy.
Afterwards the EA takes over the position management such as dynamic break even or trailing stops in accordance with your preferences.
After the trade is taken, the EA disarms automatically. To set up a new trade, simply drag any of the condition lines to a new price level – this re-arms the EA and begins watching for the new sequence.
4. Stay in control and have fully transparency
No Black Box, where you just sit and pray that it works, instead you know what the EA is going to do.
With Smart Conditional Trader you wont get blended with picture perfect backtests and then surprised that the performance can't keep up in Live Trading.
Unlike with other EAs, YOU set the entry conditions and YOU set your position management preferences. YOU stay fully in charge of when the EA should enter and have full transparency about the EAs trading.
A detailed explanation of the EA working flow as well as for each input field and particularities of the EA are provided in the User Manual which can be found here.
5. Disclaimer & User Manual
Please test the EA extensively through the Metatrader 5 Backtest function and ideally on a Demo Account before using it on Live Trading. While the EA has gone through an extensive testing, I can't be hold liable for any losses that might occur through a bug or software issues. Trading and using this EA is at your own risk.
However if you encounter a bug, please let me know and I will fix it ASAP.
Please also read fully the user manual to get an understanding of the EA workflow and its particularities. The full detailed User Manual can be found here
6. Quick Set Up
1. Attach the EA to the chart of the instrument you want to trade
2. Set Magic Number to a unique value (especially if running multiple EAs)
3. Set Trade Direction to Long or Short based on your bias
4. Enter price levels for C1, C2, and C3 – or set approximate values and drag the lines into position on the chart. If you need fewer than three conditions, copy the price and direction of an existing condition into the unused one(s)
5. Choose your Crossing Direction for each condition (Up_to_Down or Down_to_Up)
6. Set C3 Price Mode to ONTICK for real-time entries or ONCLOSE for bar-close entries
7. Configure SL Mode: use POINT_BASED and drag the red SL line, or use STRUCTURE_BASED for automatic placement
8. Set Risk USD to the maximum dollar amount you are willing to lose on this trade
9. Optionally enable TP and choose a mode (RR_Based with a 2:1 ratio is a good starting point)
10. Verify trading hours match your market session
11. Enable AutoTrading in MetaTrader and confirm "Allow Algo Trading" in EA properties
12. Monitor the Experts tab for log messages confirming the EA is running
7. Condition Input fields explained
Global Condition Parameters
| Setting | Description |
| Condition Bar Range | How many historical bars back the EA looks to find the completed crossings (C1 and C2, and optionally C3). If your conditions happened more than this many bars ago, they will not be detected. Set this high enough to cover your expected setup time. |
| Conditions within same Bar allowed | When enabled (true), a crossing is also recognized if price penetrates the level intrabar but closes back on the original side. For example, with a Down_to_Up condition, price was above the level, dipped below it within the bar, but closed back above – this still counts as a valid crossing. When disabled, only clean close-to-close crossings qualify. |
| Trade Direction | Determines whether the EA opens a Buy (Long) or Sell (Short) when all conditions are met. |
Per-Condition Parameters (C1, C2, C3)
Each condition has the following settings. All three conditions must have a valid price level set – the EA requires all three to be configured.
| Setting | Description |
| Price | The price level for this condition. This is the initial value – you can change it later by dragging the line on the chart. All three conditions require a non-zero value. If you only need one or two conditions, set the remaining condition(s) to the same price and direction as another condition so they are fulfilled simultaneously. |
| Crossing Direction | Up_to_Down: price must cross from above to below the level. Down_to_Up: price must cross from below to above the level. |
| Price Mode (C1 & C2) | CLOSE_PRICE: the crossing is confirmed only when a bar closes on the other side of the level. PRICE_TOUCH: the crossing is confirmed if the bar's high or low touches the level, even if the close remains on the original side. |
| Price Mode (C3) | ONCLOSE: C3 behaves like C1/C2, evaluated on bar close with historical bars. ONTICK: C3 is evaluated in real time on every tick. The EA watches for price to cross the C3 level live, which provides the most precise entry timing. |