SMC Volume Indicator
- インディケータ
- バージョン: 1.0

SMC Order Block Scorer: Volume Confluence
Order blocks that are ranked for you, so you can see which zones matter most.
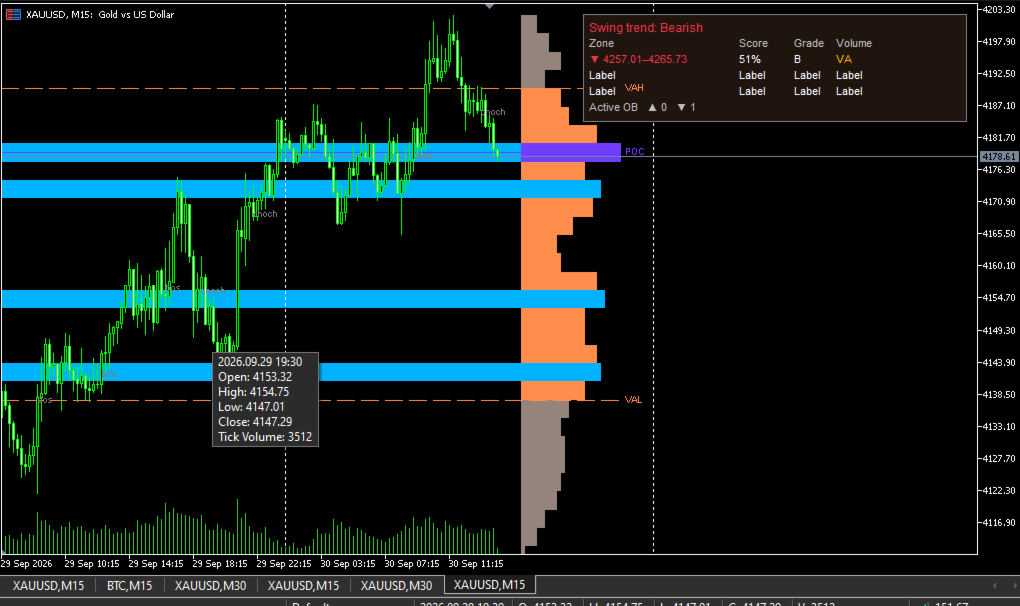
Most Smart Money Concepts indicators draw every order block the same way. You end up with a chart full of boxes and no way to tell which ones are worth your attention. This indicator draws the zones and also scores each one from 0 to 100 and gives it a grade (A+, A, B or C). The score comes from market structure and volume.
The score is a rule-based confluence ranking. It is not a prediction or a backtested probability, and it does not guarantee any result.
What it does
1. Finds market structure
The indicator finds major swing highs and lows and marks two events:
- BOS (Break of Structure): price breaks a swing level in the direction of the current trend.
- CHoCH (Change of Character): price breaks a swing level against the current trend, an early sign of a possible reversal.
2. Draws Order Blocks
When structure breaks, the indicator marks the last opposite candle before the move as an order block. Bullish and bearish zones use different colours, and an optional 50% midline is shown.
3. Builds a volume profile
For each new zone, the indicator builds a volume profile of recent bars and checks whether the zone lines up with:
- POC: the price level with the most traded volume
- Value Area: the range holding about 70% of the volume
- HVN: high volume nodes, where trading concentrated
4. Scores and grades every zone
The score combines:
- Structure type (CHoCH or BOS)
- Volume on the order block candle
- Volume spike on the breakout candle
- Strength of the move away from the zone (measured in ATR)
- The zone's share of total volume
- POC, Value Area and HVN overlap (weights are adjustable)
Stronger zones get a more solid fill and a bolder border. The best zone on the chart is marked with a ★.
5. Tracks mitigation
Once price returns to a zone, the zone is removed, or faded if you choose to keep it. You can define what counts as a return: a touch, the 50% level, a wick through, or a close beyond.
Key features
- Scored and graded order blocks (A+ / A / B / C)
- BOS and CHoCH labels with optional break lines
- CHoCH labels show "Vol" when the breakout candle has a volume spike
- On-chart volume profile with POC, VAH, VAL and shaded HVN zones
- Info table showing the trend and the top 3 zones by score
- Four mitigation modes
- Filter to hide low-score zones
- Skips overlapping zones on the same side to keep the chart clean
- Optional minor (internal) structure labels
- Alerts for CHoCH, CHoCH with volume spike, BOS, new order block and mitigation (popup, push, email)
- Works on any symbol and timeframe
Who it is for
- Traders who use Smart Money Concepts and want a clear way to compare zones
- Traders who want volume added to their structure analysis
- Anyone who wants fewer, better-filtered zones on the chart
Notes
- Signals are calculated on closed bars. A zone touched during the current bar is updated when the bar closes.
- On Forex and CFDs, volume means tick volume by default. Real volume can be selected if your broker provides it.
- This is an analysis tool. It does not open or close trades.
Input parameters
Swing Structure
- Swing Lookback – Bars on each side needed to confirm a major swing. Higher values give fewer, larger structure breaks.
- Show market structure – Master switch for BOS/CHoCH drawing.
- Show BOS labels / Show CHoCH labels – Turn each label type on or off.
- Draw structure break lines – Draws a line from the broken swing to the breakout candle.
- Bullish color / Bearish color – Colours for bullish and bearish elements.
Internal Structure
- Show internal structure – Shows minor BOS/CHoCH labels. These are cosmetic and do not create order blocks.
- Internal Lookback – Pivot strength for the minor structure.
- Internal label color – Colour of the minor labels.
Order Blocks
- Show Order Blocks – Turns zone drawing on or off.
- Max active OBs per side – Maximum bullish and bearish zones kept on the chart. The oldest is removed first.
- OB search lookback – How many bars back to search for the order block candle.
- Mitigation trigger – Touch, 50%, Wick or Close.
- Keep mitigated OBs – Keeps used zones as faded boxes instead of deleting them.
- Skip OBs overlapping a same-side OB – Avoids stacked duplicate zones.
- Show OB 50% equilibrium line – Draws the midline of each zone.
- Hide OBs below score – Zones scoring below this value are not created.
- Show OB labels / Label size – Label visibility and font size.
Volume Profile / Zones
- Show volume profile – Draws the profile at the right of the chart.
- Shade HVN zones across chart – Extends high volume nodes across the chart as shaded bands.
- Profile lookback – Number of bars used to build the profile.
- Profile rows – Number of price levels in the profile.
- Value area % – Share of volume contained in the Value Area (default 70).
- HVN threshold – How far above the average row a level must be to count as an HVN.
- Profile width / Profile offset – Size and distance of the profile from the last bar.
Volume Confirmation
- Volume source – Tick volume or real volume.
- Volume average length – Period of the volume moving average.
- Spike threshold – A bar counts as a spike when its volume exceeds the average by this multiple.
Scoring weights
- OB contains POC – Points added when the zone contains the Point of Control.
- OB overlaps Value Area – Points added when the zone overlaps the Value Area.
- OB overlaps HVN – Extra points when the zone overlaps a high volume node.
Profile colors
- POC / Value area / HVN / Other rows – Colours used in the volume profile.
Info Table
- Show status table – Shows or hides the table.
- Table position – Any of the four chart corners.
Performance / Misc
- Max history bars to process – Limits how much history is analysed and drawn. Use 0 for all bars.
- Enable chart shift – Adds space on the right side of the chart for the profile.
Alerts
- Popup / Push / E-mail – Choose how alerts are delivered.
- CHoCH / CHoCH + volume spike / BOS / New Order Block / Order Block mitigated – Choose which events trigger an alert. Alerts fire on live bars only.