
Nexus Order Block Workspace
- Indicatori
- Versione: 1.15
- Aggiornato: 11 ottobre 2026
- Attivazioni: 10

The same chart, read in the same order, every day.
Structure, the nearest zone, where you sit in the range and which way the trend points — on screen at once, always in the same form.
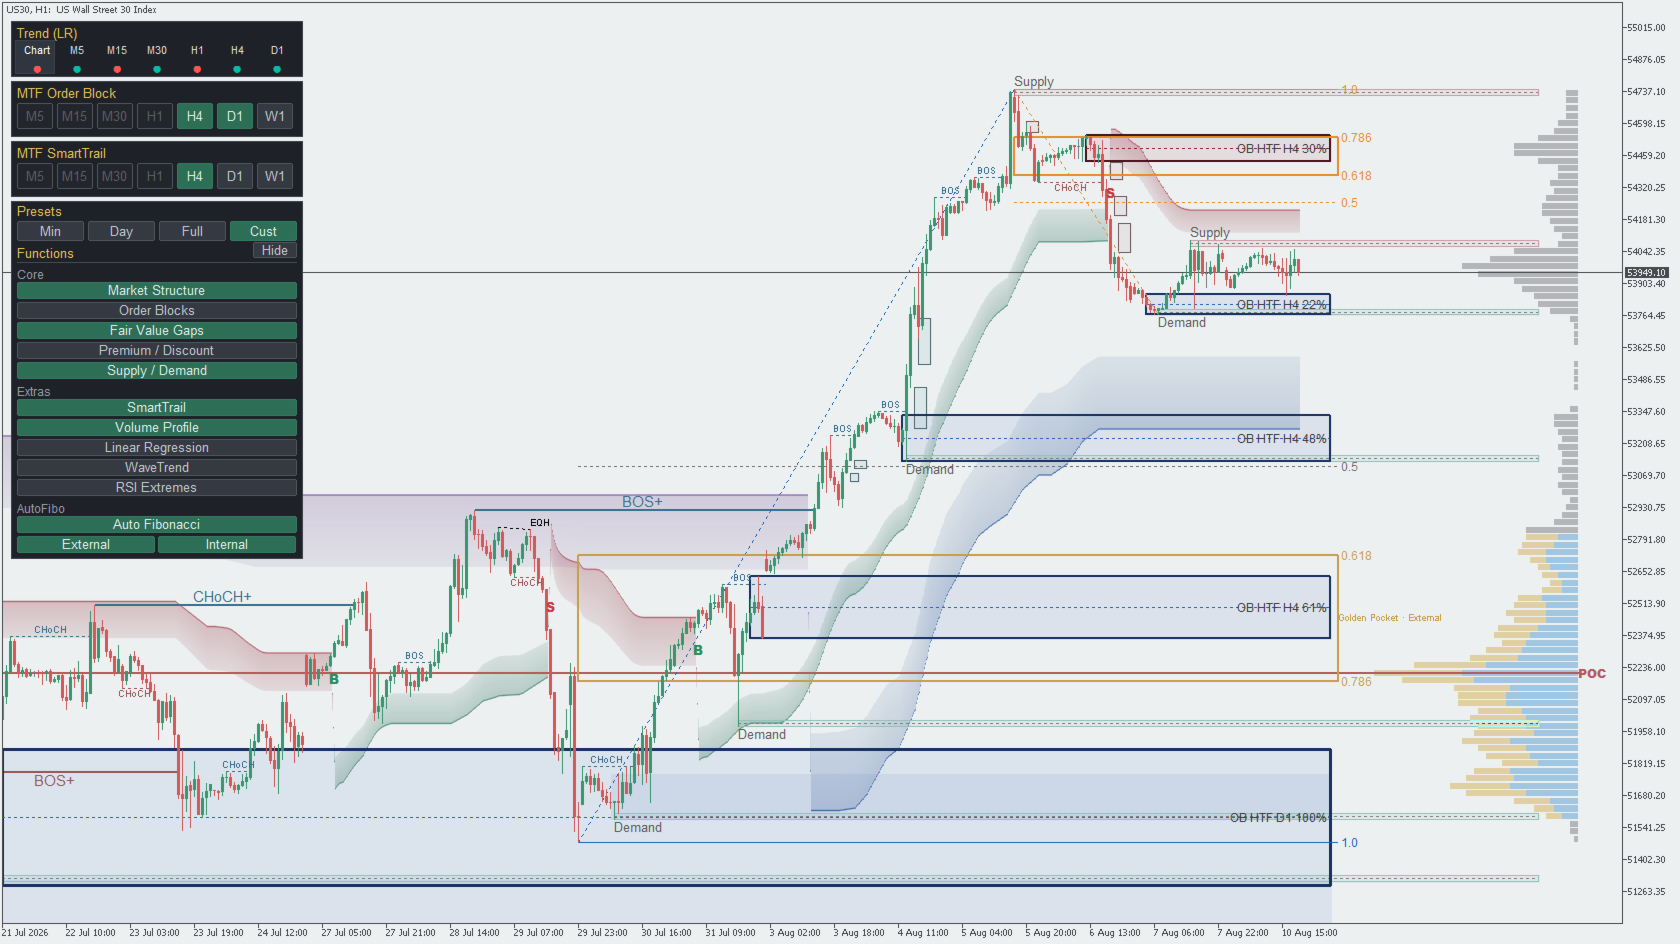
Fourteen layers under one panel: market structure with BOS and CHoCH, order blocks with a strength percentage, fair value gaps, supply and demand, higher-timeframe order blocks, and the context tools most charts need a second indicator for — Volume Profile, Linear Regression, a multi-timeframe Trend Dashboard, Auto Fibonacci on the last structure break, SmartTrail, WaveTrend and RSI Extremes.
That constant order is what separates a process from improvisation — the kind where Monday you wait for the zone, Tuesday you buy the first touch, and Wednesday you widen the stop because the zone looked too wide.
The tool does two things about that. It draws levels that stay where they printed, and it fixes the order in which you check them. Where exactly your own "buy here" shows up is your call, out of the combination: which zone, where in the range, on what confirmation, and which way the trail is pointing while it happens. Working those combinations out once is precisely the job this indicator makes manageable. Holding to your own rules on a bad afternoon is still your part; no software has ever done that one for anyone.
So what follows is not a feature list. It is the working day this indicator is built around.
— WHO THIS IS FOR —
- The intraday trader on M1–M15. Structure, the nearest order block and the side of the trend on one screen — with no manual redrawing of levels before every session.
- The swing trader who builds context first. Zones from H1, H4 and D1 arrive on your working chart by themselves, so you are not switching timeframes just to mark up.
- The EA developer. A documented 25-buffer contract instead of writing structure and zone detection from scratch.
— YOUR TRADING DAY, IN SIX STEPS —
- Read the bias, before you look at price. Open H4. The trend dashboard shows regression bias per timeframe; market structure shows whether the last confirmed break was a BOS (the dominant side still in control) or a CHoCH (it just lost a level). You decide one thing here: which direction you are allowed to look for entries today.
- Mark the higher-timeframe zones. Set the MTF order-block selector to H4 or D1. Those are the areas that matter today. Add supply and demand for the wider bands. Where an order block sits inside a supply/demand band, you have your best area of the day.
- Check where you are in the range. Premium/discount, thirty seconds. This is not a rule that says buy only in discount — it answers how much of the range has already been spent. If you enter from zones, the point is not to buy right under the ceiling of the range. If you trade breakouts the conclusion is the exact opposite: it gets interesting where price leaves the boundary, and equilibrium becomes the line past which a pullback stops being a pullback. One band, two readings — what you trade decides which one applies.
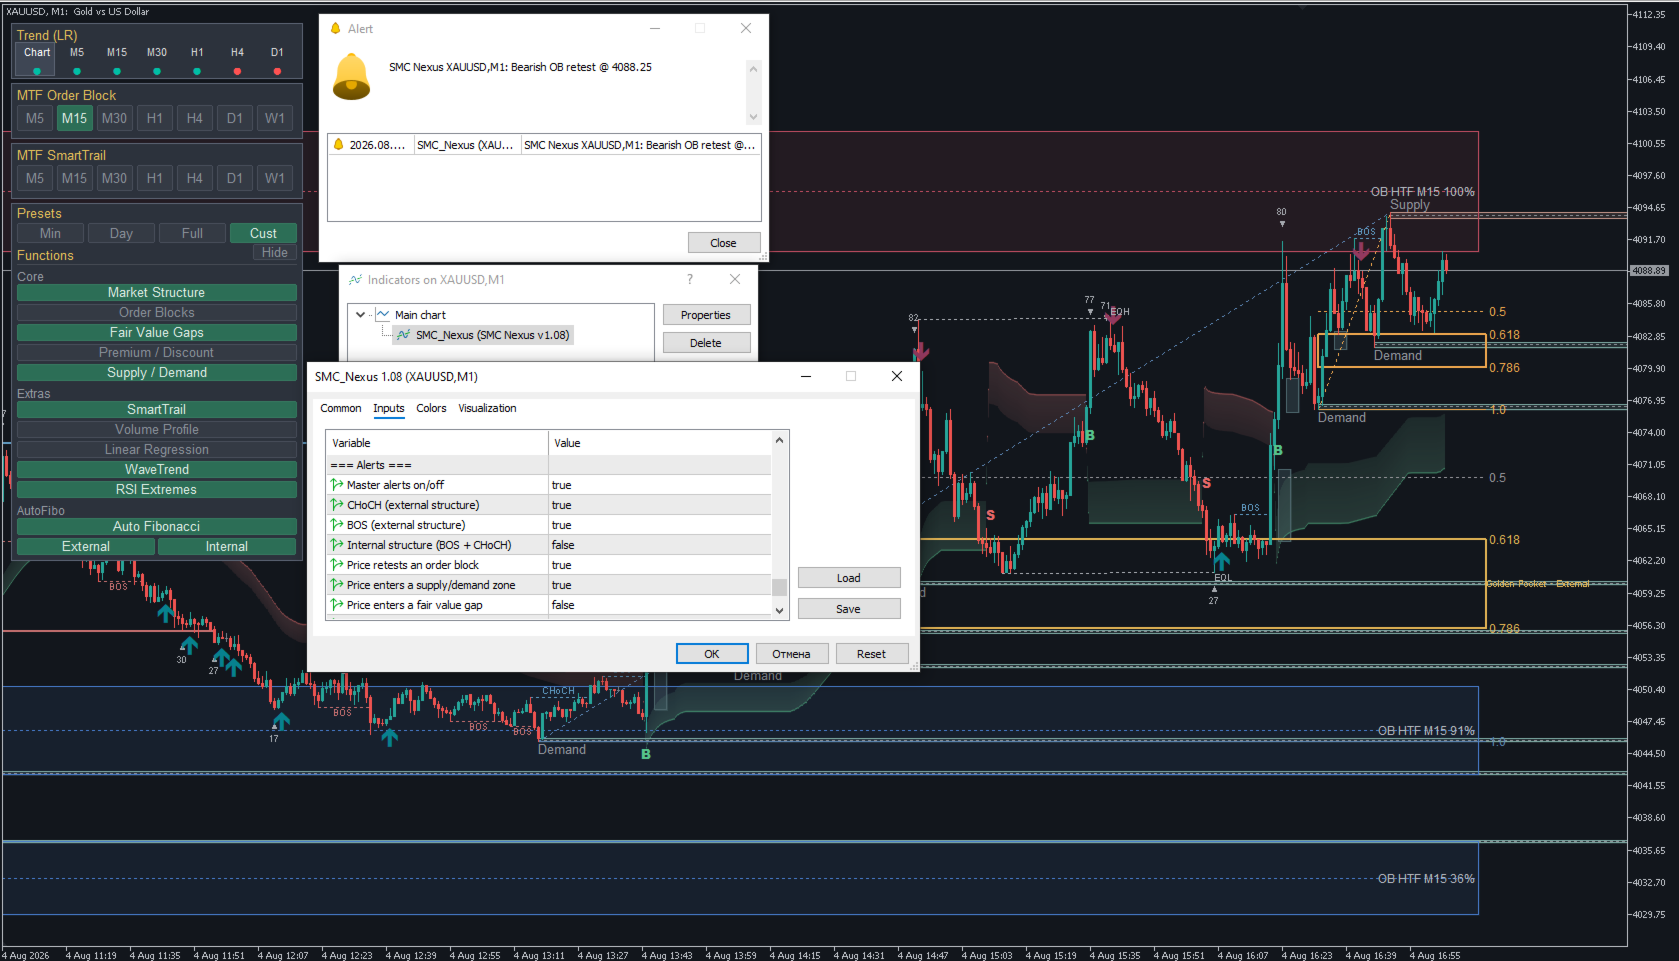
- Drop to the entry timeframe and stop watching. M15 or M5, higher-timeframe zones still on the chart. From here you do not need to sit in front of the screen: set the order-block retest and supply/demand touch alerts, and the terminal calls you when price actually arrives. Alerts fire on closed bars only, so nothing pings you on a wick that gets taken straight back.
- Demand confirmation inside the zone. Price arriving is an invitation to look, not a signal. Take the trade when the market agrees: an internal CHoCH inside the zone, a fair value gap on the reaction away, the zone overlapping the Fibonacci golden pocket, or a high strength percentage on the block itself.
- Let the zone place your stop. Beyond the far edge of the zone you entered from: while price holds inside the zone your read is alive, and leaving that far edge is the one event after which it is not. Not "you were wrong" — the zone simply did not hold, and arguing with that costs more than stepping out. First target is the nearest opposing order block or the range equilibrium, then the range extreme.
There is a second way to carry a stop: the SmartTrail cloud. Its level moves only in the direction of the trade and changes side when a bar closes beyond it. A structural stop holds on to a level, a trail holds on to volatility. Which of the two suits you depends on what you trade, not on which one is "correct".
That is the whole method. Everything below is the machinery that makes those six steps take five minutes instead of forty.
— WHAT MAKES THIS ONE DIFFERENT —
- Non-repainting structure. BOS and CHoCH are confirmed on closed bars only. A level that printed yesterday still sits exactly where it printed. You can verify that on the very first chart you attach it to.
- Closed-bar alerts with anti-spam. One alert per event, a throttle on zone touches, and silence on load, on timeframe changes and on terminal restarts. No alert storm on a busy M1 chart.
- Twenty-five iCustom buffers. Every level an Expert Advisor could want, on a documented, stable contract. Buffers are computed whether or not the layer is visible on screen. The extension to 25 was appended at the end: buffers 0–20 did not change, so an EA written against the previous version runs without a single edit.
- One workspace instead of six indicators. Structure, order blocks, gaps, zones, range, trail and Fibonacci on one chart, driven from one panel, with presets that switch the whole layout in a click.
LAUNCH PRICE $39. The price moves to $79 after the next 30 purchases. It is counted, not a rolling banner: when it gets there, it goes up.
AFTER YOU BUY
Message me on MQL5 and I will send you the buyer kit: the full PDF manual, the zone-reading playbook with the six-step process and a pre-trade checklist, and four ready presets for scalping, intraday, swing and clean-structure charts. I answer these myself, so that message is also the fastest route to me if anything is unclear.
— CORE STRUCTURE & LIQUIDITY —
- Market Structure — dual level (internal + external) BOS and CHoCH, labelled and colour-coded, with EQH/EQL liquidity marks.
- Order Blocks — displacement + imbalance detection, mitigation logic, mid-line and a strength % label.
- Fair Value Gaps — 2-bar imbalance gaps, selectable timeframe (current or higher).
- Premium / Discount — live dealing-range envelope with equilibrium (50%).
- Supply / Demand — pivot-based zones plus a broken-zone (POI) history.
What that strength percentage actually measures, and why it changes when the block itself has not: What the percentage on an order block actually means — in my blog here on MQL5.
— MULTI-TIMEFRAME & CONTEXT —
- MTF Order Blocks — higher-timeframe order blocks drawn on your chart. On-chart selector M5 / M15 / M30 / H1 / H4 / D1 / W1 (multi-select — view several HTFs at once). M5 turns it into a genuine scalping tool on the M1 chart.
- Trend dashboard — a multi-timeframe regression-bias strip (up / down / flat per timeframe).
— SMARTTRAIL: A VOLATILITY TRAIL AND B / S MARKS —
A volatility trailing stop drawn as a cloud: the band between the stop level and the 0.786 retracement of the leg from the last reversal. The level moves only in the direction of the trend and changes side when a bar closes beyond it — meaning it never steps back into a trade you have already carried.
- B and S — marks on the bar where the trail changed side. They print on closed bars only and never move afterwards: the mark you saw in the morning is still on the same bar in the evening.
- Three styles — Scalp, Intraday, Swing (ATR factor 2 / 4 / 6). The ATR period, the smoothing and the timeframe the trail is computed on are all set separately.
- MTF SmartTrail — the same engine from higher timeframes, in its own colour, as a context layer beneath the trail of your working timeframe. The selector takes three timeframes at once and stops there deliberately: a fourth cloud stops adding context and starts covering the chart.
- Alert on the side change — part of the working set and on out of the box.
There is no separate trail line on the chart, and that is on purpose: the level reads off the cloud boundary, and the event is the change of side — which is what the letters are for.
— VOLUME PROFILE, REGRESSION AND OSCILLATORS —
- Volume Profile — histogram, POC and 68% value area.
- Linear Regression Channel — regression mid-line + deviation bands, direction-coloured.
- WaveTrend — reversal signals on the price.
- RSI Extremes — overbought / oversold exhaustion marks.
— AUTO-FIBONACCI —
Auto-anchored to the last confirmed structure break and following the live leg. The External grid is always shown and highlights its own golden 0.618–0.786 pocket (the exact band the optional golden-pocket alert watches). One click adds the Internal overlay — the trade grid, with bright orange levels and its own pocket box — so you instantly see where to manage a trade toward the next order block.
— ONE PANEL, THREE PRESETS —
An on-chart control panel groups every layer into Core, Extras and AutoFibo sections with one-click toggles, plus three presets:
- Minimal — the default view on first launch: market structure with EQH/EQL, order blocks, fair value gaps, SmartTrail, Auto-Fibonacci with the golden pocket and the multi-timeframe trend dashboard. Clean — but you immediately see which way the market is going and where you are getting out.
- Intraday — the day-trading and scalping kit: adds MTF order blocks, supply/demand, premium/discount and the volume profile.
- Full — everything on for analysis and planning.
Any manual toggle drops you into a Custom layout, and your layout is remembered between timeframe changes and terminal restarts. A compact mode collapses the panel to just the presets.
— ALERTS (CLOSED-BAR, NO REPAINT) —
Fire an alert the moment a setup confirms — on closed bars only. Out of the box (the "Core" working set):
- Structure — Bullish / Bearish CHoCH and BOS (internal structure optional).
- Order-block retest — price returns into an active order block.
- Supply / Demand touch — price enters a working zone.
- SmartTrail side change — the trail has turned and a B or S mark printed on the bar.
- Optional: Fair Value Gap and Fibonacci golden-pocket entries.
Delivery: terminal popup, mobile push, sound and email — each independently toggled. Built-in anti-spam (one alert per event, throttle on zone touches) means no alert storm on load or on a busy M1 chart, and an optional bar-close-time stamp lets you cross-check each alert against the candle. Example: SMC Nexus XAUUSD,M1: Bullish OB retest @ 4032.84
Tip: MetaTrader delivers push notifications no matter which chart is in front. To watch more markets, attach the indicator to a background chart per symbol (e.g. EURUSD M15, BTCUSD M15) with alerts on — you'll get their push alerts while another chart stays in focus.
— LIGHT & DARK THEMES —
Auto (adapts to your chart), Light or Dark — the palette re-balances for each so zones, bands and labels stay readable on any background.
— FOR EA DEVELOPERS (iCustom-READY) —
Every level is published on 25 indicator buffers. Buffers 0–20 carry structure direction, BOS/CHoCH signals, order-block / FVG / supply-demand zone bounds and the dealing-range high / equilibrium / low. Buffers 21–24 were added in this version for SmartTrail: stop level, far cloud edge, line and side. The buffers are computed regardless of what is shown visually, so your Expert Advisor reads structure and zones directly via CopyBuffer, independent of the on-chart panel. (Buffer map is documented in the indicator header and in the buyer-kit manual.)
Compatibility. The new buffers are appended strictly at the end and indices 0–20 are unchanged — an EA written against the previous version keeps working with no edits.
Buffer coverage — read this before you build on it. Structure buffers (0–5: direction, BOS, CHoCH) are calculated over the full chart history. Zone buffers (6–20: order blocks, FVG, premium/discount, supply/demand) are populated within the drawing window (input InpDrawBars, 1500 bars by default) — beyond that window they read 0. Raise InpDrawBars if your EA needs zones deeper into history.
Buffers 0–20 are available everywhere, including optimisation mode. The SmartTrail buffers (21–24) are populated on a live chart and in a single test, but not in optimisation: there the indicator computes the structural part only and skips drawing entirely — otherwise a reused optimiser agent stalls on the heavy iCustom call.
— WHAT THIS IS NOT —
- It is not an Expert Advisor. The indicator does not open, modify or close trades.
- B and S are not a recommendation to buy or sell. They mark the bar on which the trail changed side, and nothing beyond that.
- It is not repainting. Structure is confirmed on closed bars; zones extend forward as price develops — that is by design, not a drawn level moving.
- It is not a forecast. No layer computes a probability or promises an outcome. The tool shows what has already happened on the chart, in the same order every day.
FIRST LOAD ON A NEW SYMBOL — PLEASE READ
The first time you attach the indicator to a new symbol, MetaTrader downloads that symbol's history in chunks. During this one-time sync the indicator shows a "loading a fresh symbol" panel (with a live bar counter) instead of drawing on incomplete data — this can take about 1–3 minutes on a slow connection. After the history is in place it is instant, and switching timeframes is instant. This is normal MetaTrader behaviour, not a bug — the panel simply makes the wait visible.
— WANT TO TRY THE ENGINE FIRST? —
The structure core of this product is available free on the Market as SMC Nexus Market Structure: the same non-repainting BOS / CHoCH (internal + external), EQH / EQL, order blocks with strength %, light & dark themes and 6 iCustom buffers. This workspace adds what the free core deliberately leaves out — MTF order blocks (7 timeframes), FVG, supply/demand, premium/discount, SmartTrail with B / S marks and its multi-timeframe layer, Auto-Fibonacci with the golden pocket, volume profile, linear regression, WaveTrend, RSI extremes, closed-bar alerts, the control panel with presets, and the full 25-buffer iCustom contract. An EA written against the free indicator runs on this one unchanged — the buffer indices match.
RECOMMENDED USE
Works on any symbol and timeframe. It starts in the Minimal preset — a clean chart you build up from the panel; higher timeframes may benefit from a larger structure length. This is an analytical framework — not financial advice and not a signals-only "buy/sell" product.


































The developer didn't just blindly follow the program's creation; he delved into the essence of what people need for successful trading and created an excellent product that helps achieve positive results. The program works quickly, reliably, and without glitches. The interface and manual are intuitive. I'd also like to point out the excellent communication: the developer is always available and promptly responds to questions. I'm not a professional trader, but this program makes my charting experience completely different, and it's incredibly helpful. I've previously installed both free and paid programs. For me, it's 5*.