Structure Map
- Indicatori
- Versione: 1.20

Institutional structure, mapped automatically. Order blocks confirmed by real break-of-structure, plus self-scoring support & resistance zones — on every symbol, every timeframe.
Overview
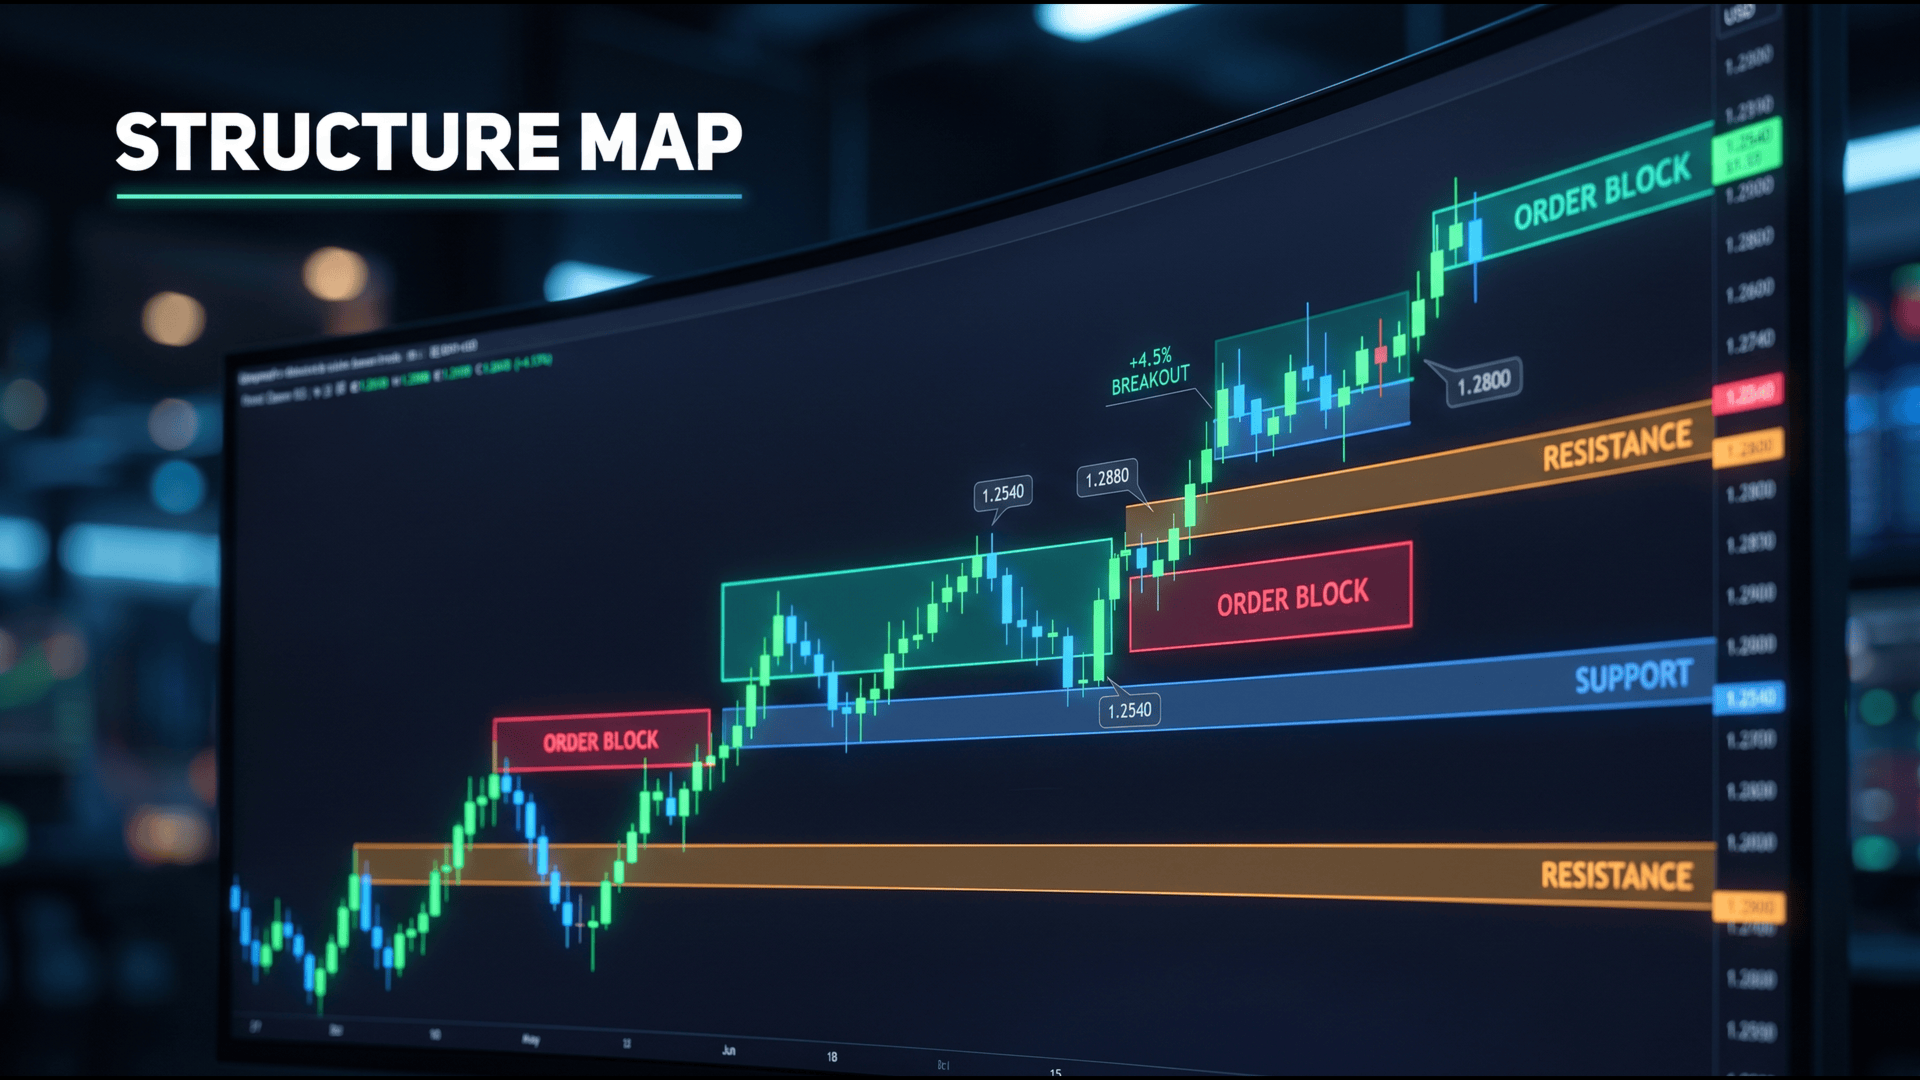
Most "order block" tools just paint the last opposite candle and hope for the best. Structure Map does it the way price actually moves: it waits for a genuine break of structure (BOS) to confirm displacement, then marks the order block that originated the move. On top of that, it builds support and resistance zones by clustering historical swing points and scoring each zone by how many times price has respected it.
The result is a clean, objective map of where institutional interest sits — drawn for you, updated as each candle closes, with zero lines to drag manually.
What It Does
Order Blocks (ICT / Smart Money Concepts)
- Detects bullish and bearish order blocks using confirmed break-of-structure logic, not guesswork.
- Marks each block as a clean zone extended to the right, ready for you to watch for entries.
- Tracks mitigation automatically — once price returns and taps a block, it is recoloured (or hidden, your choice) so your chart only shows what's still live.
- Choose whether zones are drawn from the candle body or the full wick.
Support & Resistance Zones
- Builds zones by clustering swing highs and lows — every pivot that lands in the same area strengthens the level.
- Each zone is scored by touch count and labelled (x2, x3, x4…) so the strongest, most-respected zones stand out instantly.
- Zones are side-aware: they're coloured as resistance above price and support below — and automatically flip colour when price breaks through, exactly like real support-turned-resistance.
- Zone thickness reflects the actual price spread the level was tested across, with a clean minimum width so nothing renders as an invisible hairline.
Why It's Different
- BOS-confirmed, not naive. Order blocks are anchored to confirmed structural breaks on closed candles — no random boxes on every pullback.
- ATR-adaptive. Both the clustering distance and minimum zone thickness scale with volatility (ATR), so it works out-of-the-box on Gold, indices, FX, and crypto without per-symbol re-tuning.
- Strength you can see. Touch-count scoring, thicker borders for stronger zones, and on-chart labels turn a messy chart into a ranked map.
- Stays clean. Mitigated blocks fade or disappear, zone count is capped, and history depth is fully under your control.
How It Works
- Swing detection — a configurable fractal identifies confirmed swing highs and lows across your chosen history depth.
- Order block confirmation — when a candle closes beyond the prior swing (a break of structure), the indicator walks back to the last opposite-coloured candle before the impulse and marks it as the order block.
- Mitigation tracking — every block is monitored; the moment price returns into the zone, it is flagged and restyled.
- Zone clustering — all swing pivots are grouped by proximity (scaled to ATR), counted, and ranked, then the strongest zones are drawn as shaded bands.
Everything recalculates on each new bar close, so your map always reflects the current market structure.
Inputs & Settings
Order Blocks
- Swing strength (fractal lookback)
- History scan depth (bars)
- Show bullish / bearish blocks
- Zone from body or full wick
- Max blocks kept per side
- Right-extension length
- Keep or hide mitigated blocks
- Bullish, bearish & mitigated colours
Support / Resistance Zones
- Show zones on/off
- Cluster width (fraction of ATR)
- Minimum zone thickness (fraction of ATR)
- Minimum touches to qualify
- Max zones drawn (strongest first)
- Touch-count labels on/off
- Support & resistance colours
- Base border width
Every visual element is fully customisable to match your chart theme.
How To Use It
- Pick your bias from the structural order blocks and the strongest S/R zones.
- Watch for confluence — an unmitigated order block sitting inside a high-touch S/R zone is a high-interest area worth your attention.
- Higher swing strength (12–15) gives fewer, cleaner structural zones for swing trading; lower (5–7) gives finer detail for intraday work.
- Combine with your own entry trigger, risk management, and confirmation. Structure Map is built to show you where, leaving the when to your strategy.
Compatibility
- Platform: MetaTrader 5
- Works on all symbols — Forex, Gold/metals, indices, commodities, crypto
- Works on all timeframes, from M1 to monthly
- Lightweight: redraws once per closed bar, not on every tick
Important Note
Structure Map is an analytical charting tool. It highlights market structure and key zones to support your own decision-making. It does not place trades and makes no guarantee of future performance. Always test on a demo account and apply sound risk management.
Map the structure. Trade the reaction.