Support Resistance Break Zones
- Indicateurs
-
Hoai Nam Trinh
 COMMENCEZ ICI - CARTE DES OUTILS GOLD ALGO LAB
Vous ne savez pas quel outil MT5 correspond le mieux à votre processus de trading sur XAUUSD ? - Version: 1.10
- Mise à jour: 30 mai 2026
| After downloading, message me via MQL5 inbox to receive your FREE User Kit - setup guide, practical checklist, and workflow resources built specifically for XAUUSD traders. |
Most traders can draw support and resistance by hand. The hard part is doing it consistently when the session is active, price is moving fast, and the chart is already cluttered with levels from two days ago that no longer matter.
Support Resistance Break Zones Free v1.1 was built for that situation. It maps pivot-confirmed support and resistance automatically, tracks breakout attempts and wick reactions as candles close, and keeps the two most relevant active levels pinned to the right edge so you always know where price stands relative to current structure - without manually cleaning the chart between sessions.
This is not a signal generator. It does not predict the next move or tell you when to buy or sell. It is a structure-reading tool that shows you where the levels are, what happened at them, and how far price currently sits from the nearest active zones.
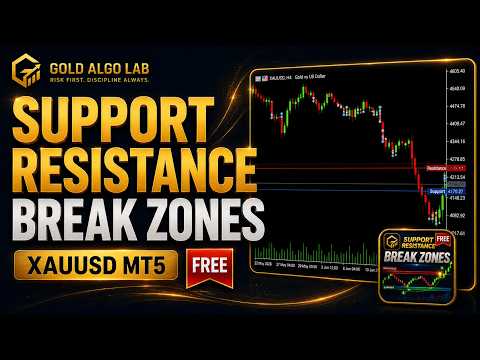
What It Shows
The indicator draws pivot-confirmed resistance lines in red and support lines in blue. The most recent active resistance and support extend to the right edge of the chart with clean price tags, so the relevant levels stay visible even when the chart is zoomed in on recent candles.
A compact panel in the top-left corner shows the nearest active resistance and support with their exact distance from the current price in points. This gives you an instant orientation read without needing to manually measure anything.
When a candle closes beyond a level, a BO UP or BO DN marker appears at that bar. When price reaches a level and closes back inside, a WB UP or WB DN marker records the wick reaction. All markers are confirmed on close - they do not flash or repaint intrabar during fast moves.
The volume filter is optional. When active, breakout markers only appear when the volume oscillator reading meets the configured threshold, reducing low-conviction signals during quiet or thin market periods.
Main Features
Pivot-based support and resistance lines with configurable left and right bar sensitivity. Nearest resistance and support panel showing level price and distance from current price in points. Right-edge tags keeping the two active levels visible at all times. BO UP and BO DN markers for confirmed breakout events at structure. WB UP and WB DN markers for wick reaction and rejection events. Closed-bar confirmation logic for stable, non-flickering event markers. Optional volume oscillator filter for breakout conditions. Popup and sound alerts with configurable cooldown. Clean multi-instance handling and safe object management across chart sessions.
Who This Is For
This tool is built for traders who already understand structure and want a more consistent, lower-friction way to track it in real time.
It suits intraday XAUUSD traders who want to know where the nearest valid levels are before a session opens. It suits swing traders reviewing structure before sizing a position. It suits anyone who finds themselves spending too much time redrawing levels that keep getting invalidated, or losing track of which areas actually held versus which ones were swept and closed back through.
If you trade price action, work with structure-based entries, or use levels as confluence with another method, this gives you a reliable reference that updates itself and stays readable.
How to Use It
Attach it to the chart and let it run. The panel updates on each new bar. Use the nearest resistance and support readings as a quick orientation before looking at candle behavior around those levels.
The right-edge tags are intentional - when multiple levels are stacked on a busy chart, having the active levels locked to the right edge keeps them readable without blocking candle structure in the chart center.
BO markers give you a record of where price closed through a level with enough body to qualify. WB markers show where price tested structure but rejected and closed back inside. Both are useful when reviewing how a session behaved at key areas, or when assessing whether a level held cleanly or needed multiple tests before breaking.
For higher timeframes, wider pivot settings tend to produce cleaner, more significant levels. For lower timeframes, tighter settings work better. Test on demo first and adjust pivot sensitivity to match your symbol, timeframe and broker feed before using it as part of a live workflow.
Free and Pro
The free version is line-based and deliberately lightweight. It gives you a clean structural reference, a basic nearest-level panel, and closed-bar event markers with optional alerts.
The Pro version is built for traders who need more depth. It adds rectangle-based zones with ATR, candle body or fixed-point width modes, automatic zone merging for clustered pivot areas, a five-tier strength ranking system, full retest and false-break detection and labeling, a complete dashboard showing nearest zones with strength rank, last event type and directional bias, approach alerts before price reaches a zone, push notification and email alert channels, advanced cooldown and strength-filter controls, and a smart event label positioning system that avoids candle overlap and panel collision.
If you find the free version useful for tracking structure but want more context around zone quality, break classification and alert depth, the Pro version is the natural next step.
Settings
Pivot sensitivity is controlled by the left bars and right bars inputs. Visible levels sets how many historical levels render on the chart. Line colors, event label display, panel position, right-edge tag behavior, volume oscillator periods and threshold, alert type and cooldown are all adjustable through the inputs panel.
Important Notes
This indicator does not open trades, manage positions, or issue any trading commands. It is a visual analysis tool only.
Support and resistance levels can and do fail - during news releases, low-liquidity sessions, strong trending conditions, and sudden volatility spikes, price can move through structure without clean confirmation. No indicator eliminates that risk.
If you notice different behavior across brokers or symbols, this is usually related to execution timing and price feed differences rather than a problem with the indicator logic itself. A deeper explanation of how broker feed differences affect indicator behavior is available here: https://www.mql5.com/en/blogs/post/769009
Not sure where this tool fits in your trading process?
Each Gold Algo Lab tool is built to solve one specific part of the trading workflow. The Gold Algo Lab Tool Map shows how our MT5 tools connect across 6 practical stages for XAUUSD traders: market context, setup selection, risk planning, trade execution, position management and account protection.
→ Gold Algo Lab Tool Map: Where to Actually Start With MT5 Tools for XAUUSD
https://www.mql5.com/en/blogs/post/771930
You do not need every tool. Start with the stage where your process breaks down most often, then build your workflow one layer at a time.
Risk Disclaimer
Trading financial instruments carries significant risk of loss and is not suitable for all investors. Past performance of any tool, strategy or system is not indicative of future results. This indicator is provided as an analytical reference only. It does not constitute financial advice, a trading recommendation, or a guarantee of any outcome. Always apply proper risk management, define your own trading plan, and never risk capital you cannot afford to lose.
Gold Algo Lab builds practical, risk-first MT5 tools for XAUUSD traders. Shaped by 8 years of live trading and system development, our focus is clear information, safer decision support, no hype, and no profit guarantees.