 MetaTrader 5
 Experts
 Indicateurs
 Scripts
 Bibliothèque
 Stockage
Rejoignez notre page de fans

Order Block Mitigation Tracker - indicateur pour MetaTrader 5

Gmail: Adeolugbadebo500@gmail.com
- Vues:
- 2306
- Note:
- Publié:
- Mise à jour:
-
 Vous manquez des opportunités de trading :
- Applications de trading gratuites
- Plus de 8 000 signaux à copier
- Actualités économiques pour explorer les marchés financiers
Inscription Se connecterVous acceptez la politique du site Web et les conditions d'utilisation
Si vous n'avez pas de compte, veuillez vous inscrire -
 Besoin d'un robot ou d'un indicateur basé sur ce code ? Commandez-le sur Freelance
Aller sur Freelance
Besoin d'un robot ou d'un indicateur basé sur ce code ? Commandez-le sur Freelance
Aller sur Freelance
Order Block Mitigation Tracker
Author: Adeolu Gbadebo
The idea behind it
Most order block tools on the market do one thing well: they draw the zone. They rarely tell you what happened to it afterward. This indicator treats an order block as a hypothesis rather than a permanent mark on the chart. A block is only interesting while it is fresh — once price has traded back through it, its predictive value for a fresh entry drops sharply, and traders need that distinction visible at a glance rather than buried in a static rectangle that looks identical whether it was touched five minutes ago or five days ago.
Detection is built on an ATR-filtered impulse model. For every closed candle, the indicator compares its body size to the current Average True Range multiplied by an adjustable threshold. When a candle's body clears that threshold, it is classified as an impulse leg, and the opposite-colored candle immediately preceding it becomes the order block: the last down-close candle before a strong up-impulse is marked bullish, and the last up-close candle before a strong down-impulse is marked bearish. This keeps detection anchored to genuine displacement rather than every minor swing point. Each confirmed zone is then watched bar by bar, and the moment price re-enters it — either by wick or by close, depending on the selected mode — the block is flagged as mitigated, its box fades to a neutral shade, and an arrow marks the exact bar where mitigation occurred. Works on any symbol and timeframe, though structure-driven instruments like EURUSD or index CFDs on an M15 chart tend to produce the cleanest, most tradeable zones.
How to interpret it
- Order block rectangle — a shaded box drawn from the qualifying candle's high to its low. Blue by default marks a bullish (demand) block, orange marks a bearish (supply) block, and the box extends forward automatically while the zone remains untouched.
- ATR impulse filter — the candle immediately following the order block must displace price by at least InpImpulseMultiplier times the current ATR to confirm the zone. Raising the multiplier filters out weak, noisy structure and leaves only decisive breaks; lowering it surfaces more zones at the cost of some quality.
- Mitigation arrows — a green up-arrow below the bar means a bullish block was just mitigated; a red down-arrow above the bar means a bearish block was just mitigated. Once fired, the corresponding box switches to the faded mitigated color and (optionally) stops extending.
- Practical usage — treat unmitigated (fully colored) zones as the active pool of interest for pullback entries in the direction of the original impulse, and treat faded zones mainly as reference for how price has already reacted; a mitigation arrow printing against the trend can also serve as an early warning that a level is losing significance.
External variables (inputs)
| Input | Default | Purpose |
|---|---|---|
| InpLookbackBars | 150 | Number of historical bars scanned for new order blocks on indicator load. |
| InpATRPeriod | 14 | Period of the ATR used to measure candle displacement for impulse qualification. |
| InpImpulseMultiplier | 1.5 | Minimum multiple of ATR a candle body must reach to be classified as an impulse leg. |
| InpMaxActiveBlocks | Caps the number of tracked blocks; oldest zones are dropped once the limit is exceeded. | 12 |
| InpMitigationMode | Wick | Selects whether a wick touch or a full candle close inside the zone counts as mitigation. |
| InpExtendUnmitigated | true | Extends unmitigated boxes forward to the current bar so active zones stay visible. |
| InpKeepMitigatedBoxes | true | Keeps mitigated zones on the chart in a faded color instead of deleting them immediately. |
| InpMaxBarsToKeepMitigated | 300 | Number of bars a mitigated box is retained before it is automatically removed from the chart. |
| InpBullishColor | DodgerBlue | Fill color used for active bullish order block zones. |
| InpBearishColor | OrangeRed | Fill color used for active bearish order block zones. |
| InpMitigatedColor | Silver | Color applied to a zone's box once it has been mitigated. |
| InpObjectPrefix | OBMT_ | Prefix applied to all chart objects created by the indicator, to avoid naming collisions. |
Recommended use
Load the indicator on a structure-driven pair or index and start with the default 1.5x ATR multiplier; tighten it toward 2.0 on noisier instruments to keep only the strongest displacement legs, or loosen it toward 1.0 on calmer, trend-persistent markets. Pair unmitigated zones with a lower-timeframe confirmation trigger — a rejection wick or a minor break of structure inside the zone — rather than entering the moment price touches the box. Because mitigated zones are kept visible but faded, you can also use the historical fade pattern on a symbol to judge how reliably price tends to react to first-touch versus repeated-touch zones before committing size to a new setup.
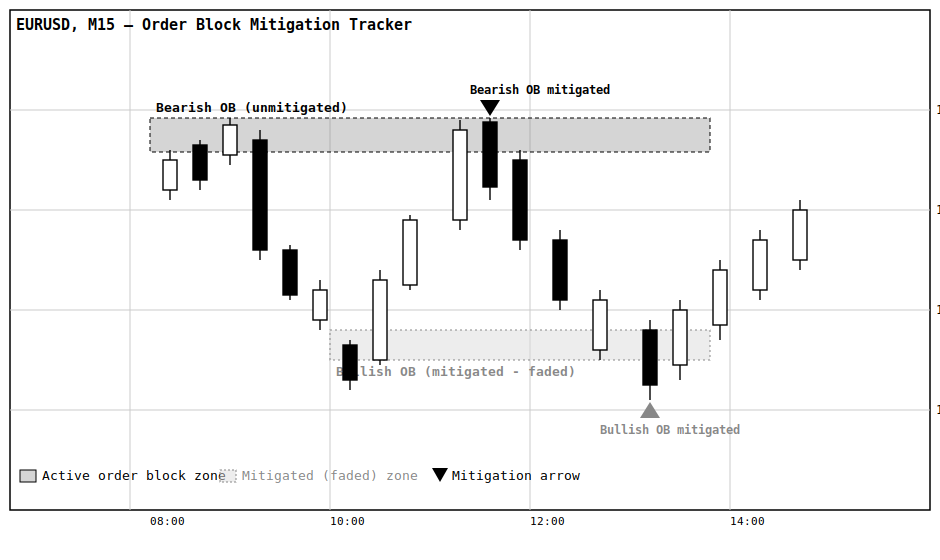
Fig. 1. EURUSD M15 chart showing an active bearish order block (solid outline) get mitigated by a return move, marked with a black arrow, while an earlier bullish order block sits faded in gray after its own mitigation, marked with a gray arrow.
Rolling Return Autocorrelation Regime Oscillator
Tracks lag-N return autocorrelation over a rolling window as a live regime oscillator, distinguishing trending (positive autocorrelation) from mean-reverting (negative autocorrelation) market conditions. Plots a smoothed reading against dynamically-calculated statistical significance bands (±Z/√N), so you can tell a genuine regime shift from window-size noise — comparable across any symbol or timeframe since it works on returns, not raw price.
 MT5 EA Acceptance Harness
Deterministic synthetic acceptance checks for MT5 EA entry-state logic, with no market, account or order access.
Broker Execution Diagnostics MT5
Read-only MT5 script reporting broker volume, price, stops, freeze, spread and execution constraints.
Session Sweep Reversal Detector
arks the prior session's high/low and flags liquidity sweeps that reverse back inside the range within a set number of bars." — category Other, or Trend if you'd rather group it that way.