
Welcome to the comprehensive technical guide for TurboGain EA . This is not a standard, static trading robot; rather, it is a program specifically designed to exploit high-momentum breakouts in the financial markets, with a primary focus on gold (XAUUSD).
Expert Interface
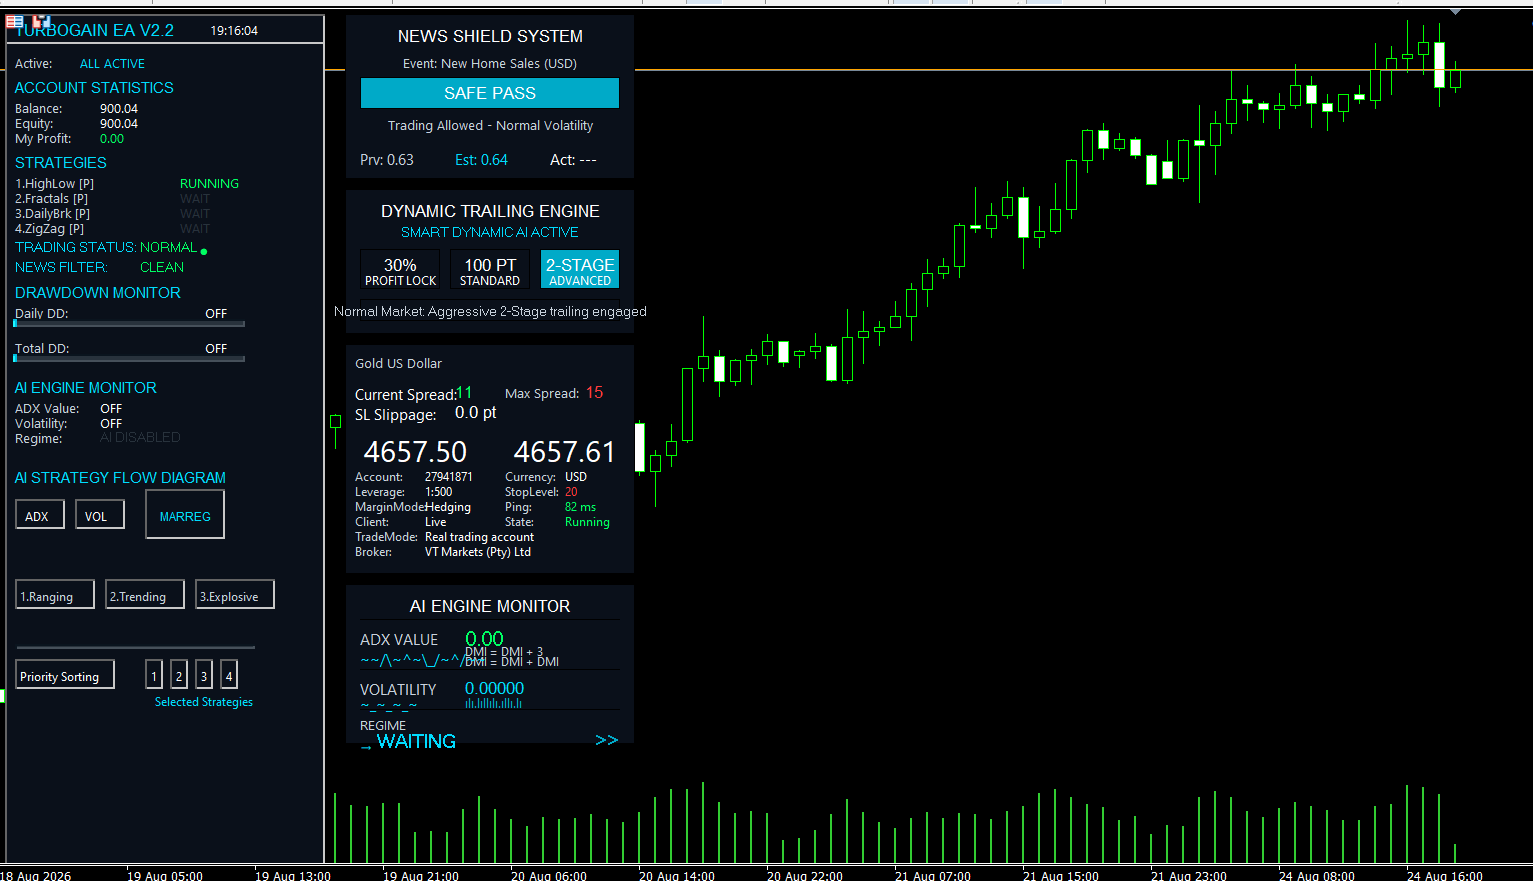
The Cyber-Teal Dashboard looks fantastic and is very professional! Its design combines aesthetics with easy-to-read live data, giving traders a strong impression that they are using a sophisticated tool.
Here is a comprehensive and detailed explanation of each section of the interface, professionally written for easy copying and pasting into the user guide:
1. Main Left Dashboard
This is the central dashboard, providing a comprehensive summary of the account status and the Expert Advisor's activity in real time.
Account Statistics: Displays the current balance, equity, and net floating profit for open trades (My Profit). It updates instantly with every tick in the market.
Strategies: Shows the status of the four strategies. In the image, we see that the HighLow strategy is running, while the other strategies are waiting, based on your settings.
Trading Status & News Filter:
NORMAL: Indicates that trading is permitted and there is no emergency stoppage.
CLEAN: Means that the market is currently free of significant news.
Drawdown Monitor: Displays the Daily DD and Total DD. It appears in the image as OFF because it has been disabled in the settings.
AI Strategy Flow Diagram: A diagram illustrating how the expert advisor combines ADX and VOL readings to determine the market state (oscillating, trending, explosive) and, based on this, prioritizes selected strategies (1, 2, 3, 4). (Note: The AI readings appear as AI DISABLED in the image, based on user input.)
2. News Shield System: This panel is designed to protect your account from extreme volatility during major economic data releases.
Event: Displays the name of the upcoming news item and its currency (e.g., New Home Sales (USD)).
Status: The "SAFE PASS" message appears in a reassuring blue, indicating that the upcoming event is not on the blacklist, the expected volatility is normal, and therefore trading is permitted. During periods of high risk, this panel will turn red as a warning.
Data (Prv, Est, Act): Displays the previous value of the news item, the expected value, and the actual value immediately after its release.
3. Dynamic Trailing Engine: This panel clearly displays the profit-taking mechanism currently being applied by the expert to your open trades.
Active Mode: The SMART DYNAMIC AI ACTIVE panel indicates that the expert is using artificial intelligence to select the tracking system.
Three Systems: The panel highlights the currently active system in bright blue (in the image, it is the 2-STAGE ADVANCED system), while the other systems (30% Profit Lock and 100PT Standard) appear in a dull color as they are currently inactive.
Status Description: The lower text explains why this system was chosen (e.g., "Normal Market: Aggressive 2-Stage Advanced Tracking System Activated").
4. Account & Symbol Info Panel: Provides detailed technical data about the trading environment to ensure transparent execution.
Live Market Data: Displays the pair name (Gold/US Dollar), the current bid and ask prices in large, clear formats, and the current spread versus the maximum recorded spread.
SL Slippage Monitor: An exclusive tool that measures, in pips, any price slippage imposed by the broker when stop-loss orders are triggered.
Account Data: Includes account number, leverage (1:500), account type (Real), and brokerage firm name. It also displays server connection quality (Ping) and connection status (Running).
5. AI Engine Monitor: This lower panel represents the "expert eye" that analyzes the market technically.
ADX Value: Displays the live digital reading of the trend indicator.
Volatility: Measures market liquidity and movement to filter out dead zones.
Market State (Regime): Displays the engine's final conclusion (in the image, it shows "WAITING" indicating that the features are activating or sufficient liquidity is available to begin analysis).
This concludes our explanation of the settings and the graphical interface. Your user guide is now complete and ready.
Explanation of external settings
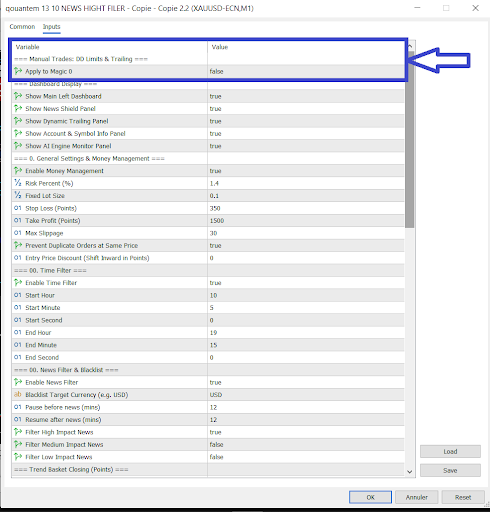
We begin with the first section, shown in the blue box of the file "Sans titre1.png". This section is dedicated to granting the expert advisor additional permissions to manage the trades you open manually.
Manual Trades Management Section (Manual Trades: DD Limits & Trailing)
This section contains one essential but very powerful setting that controls the expert advisor's relationship with the trades you manually open from the platform or your mobile device.
Setting Name: Apply to Magic 0
Available Options: true (enable) or false (disable).
Default Value: false (disabled).
1. Function (What does this setting do?)
On trading platforms (MetaTrader), any trade you manually open (by clicking Buy or Sell) is automatically assigned a secret number called the Magic Number, which is always zero (0). Trades opened by the expert advisor are assigned different numbers (such as 11111, 22222, etc.) to distinguish them from others.
When you change this setting to true, you are telling the expert: "Consider any manual trade (Magic 0) as your own, and manage it."
When activated, the expert will apply the following systems to your manual trades:
Trailing Stops: The expert will start locking profits on your manual trades based on your chosen trailing stop system (fixed, phased, 30%, or AI).
Drawdown Limits: The expert will limit the losses on your manual trades to the daily or total loss limits and will close them to protect you if the maximum limit is reached.
Trend Basket Closing: If you use the trend basket closing feature, your manual trades will be counted towards the profit basket.
Strict SL: The expert will ensure that the slippage of your manual trades is properly adjusted.
2. Usage Tips (When to Use It?)
Set it to false (Recommended for independent automated trading): If you want the expert to operate completely independently with its four strategies, while still allowing you to freely open manual trades without the expert interfering to close them or modify your stop-loss orders.
Set it to true (Recommended for using the expert as an assistant trade manager): If you are a manual trader and find an excellent entry point, but don't have time to monitor the screen, you can open the trade with this setting enabled. The expert will then protect your trade, track its profits, and apply strict money management while you are away from the screen.
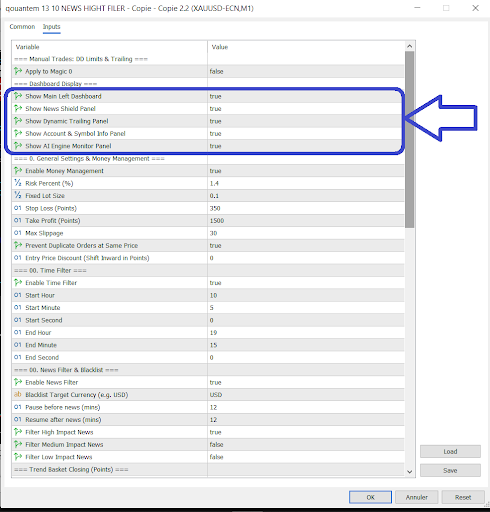
Dashboard Display Section
This section is designed to customize the advanced graphical user interface (Cyber-Teal Dashboard) displayed on the chart. It allows you to freely enable or disable various dashboards, helping you reduce screen clutter if you don't need every detail, or to conserve your computer's resources.
Setting Name: Show Main Left Dashboard
Available Options: true (Show) or false (Hide)
Function: Controls the display of the large main dashboard located on the left side of the screen. This dashboard is the heart of the user interface, displaying live account statistics (Balance, Equity, Floating Profit), as well as the status of the four strategies (Active or Pending), the status of the news filters, and daily and overall drawdown indicators.
Usage Tips: It is recommended to always leave it true to monitor the overall performance of the expert at a glance. Disable it only if you are using the expert on a cloud platform (VPS) with very limited memory and want to conserve resources.
Setting Name: Show News Shield Panel
Available Options: true (Show) or false (Hide)
Function: Shows or hides the custom "News Shield" panel. When enabled, this panel displays details of upcoming economic news (news title, affected currency), the Expert Advisor's status regarding this news (whether it will continue trading or enter PAUSED mode), and the previous and expected values for the news.
Usage Tips: Keep it true if you are using the News Filter and want to know why the Expert Advisor suddenly stopped trading during news releases.
Setting Name: Show Dynamic Trailing Panel
Available Options: true (Show) or false (Hide)
Function: Controls the display of the "Dynamic Trailing" panel. This panel shows you which trailing system is currently being used for your open trades (30%, standard 100-pip, or advanced trailing).
Usage Tips: This is very useful if you have the Expert Advisor set to TRAIL_AI_AUTO smart tracking mode, as it allows you to see how the AI automatically adjusts the profit-taking system when it detects slippage in the market.
Setting Name: Show Account & Symbol Info Panel
Available Options: true (Show) or false (Hide)
Function: Displays a panel containing detailed technical data about your account and the current currency pair. This panel includes: the current and maximum spread, recorded slippage for stop-loss orders (SL Slippage), leverage, account type, and server connection speed (ping).
Usage Tips: Excellent for monitoring the trading environment and the quality of order execution by your broker. If your screen is small and cluttered, you can hide it and use the other panels.
Setting Name: Show AI Engine Monitor Panel
Available Options: true (Show) or false (Hide)
Function: Controls the display of the "AI Engine Monitor" panel. This is your window to see "how the Expert Advisor thinks." The dashboard displays live readings of the ADX (Average Directional Index) and Volatility Indicator, and based on these readings, it tells you the current market condition (Ranging, Trending, or Explosive).
Usage tip: Leave it set to true if you are interested in technical analysis and want to understand the precise reason behind the expert's decision to activate one strategy and deactivate another in real time.
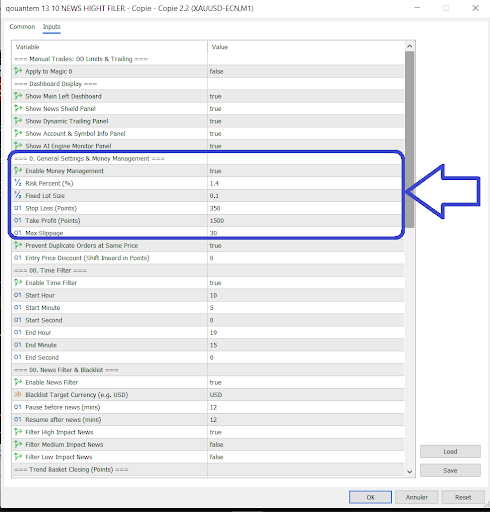
General Settings & Money Management Section
This section is the heart of the expert advisor, defining the risk policy, contract sizes (lots), and fixed profit and loss targets at which the expert advisor begins trading.
Here's a detailed explanation of each setting:
Setting Name: Enable Money Management
Available Options: true (enable) or false (disable)
Function: This is the key to activating the automatic money management system. When enabled, the expert advisor will skillfully calculate the lot size for each new trade based on your current account balance and the risk percentage you set in the following settings, taking into account the stop-loss distance.
Usage Tips: It is highly recommended to leave this setting true. This ensures your profits grow progressively as your account balance increases, while simultaneously automatically reducing the lot size to protect your balance in case of a losing streak.
Setting Name: Risk Percent (%)
Default Value (as shown in the image): 1.4
Function: This setting only works if Enable Money Management is enabled. This specifies the exact percentage of your account balance that you are willing to risk losing on a single trade (if the trade hits your stop-loss order).
Usage Tips: A 1% to 2% risk tolerance is considered excellent professional risk management, especially if you are trading on leveraged accounts (Prop Firms) that impose strict daily drawdown limits.
Setting Name: Fixed Lot Size
Default Value (as shown in the image): 0.1
Function: This setting only works as a backup plan if you have disabled automatic money management (i.e., set Enable Money Management to false). In this case, the expert advisor will open all its orders at this fixed size, regardless of the size of your account balance.
Usage Tips: Only use this option if you prefer the classic manual management of contract sizes and know precisely the appropriate lot size for your current balance.
Setting Name: Stop Loss (Points)
Default Value in Image: 350
Function: Specifies the initial Stop Loss (SL) order distance to protect the trade, measured in points, not pips.
Usage Tips: Remember that 350 points equals 35 pips (on platforms with 5 decimal places). This value is good for giving the price some breathing room before moving in the desired direction.
Setting Name: Take Profit (Points)
Default Value in Image: 1500
Function: Specifies the absolute Take Profit (TP) order distance, also measured in points.
Usage Tips: The value here (1500 points = 150 pips) is relatively large, and this is an excellent tactic! Setting a distant target allows the advanced Trailing Stops in the Expert Advisor to do their job of gradually locking in profits with the extended trend, instead of closing the trade early with a small, fixed target.
Setting Name: Max Slippage
Default Value (as shown in the image): 30
Function: Acts as a safety valve during execution. It sets the maximum allowable price slippage (the difference between the price requested by the expert and the actual price executed by the broker) measured in points. If the market slippage exceeds 30 points, the expert will not execute the order.
Usage Tips: Protects you from entering at very unfavorable prices during periods of extreme volatility or low liquidity. 30 points (3 pips) is a very reasonable percentage for execution flexibility, especially on fast-moving currency pairs like gold (XAUUSD).
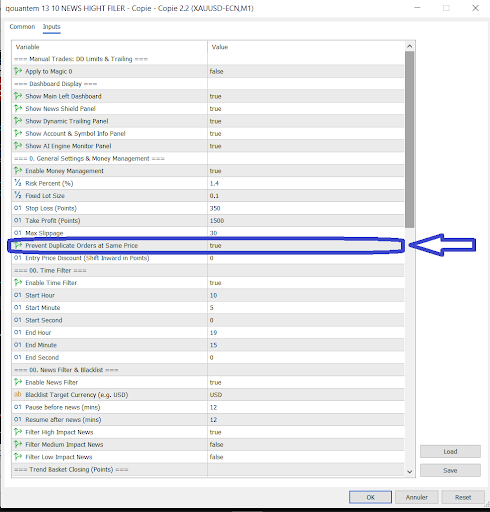
The setting highlighted in blue is an extension of the general settings section and represents a crucial technical safeguard for the security of your orders within the platform.
Setting Name: Prevent Duplicate Orders at Same Price
Available Options: true (enable) or false (disable)
Default Value in the image: true
1. Function (What does this setting do?)
This setting acts as an "Anti-Duplicate Filter." Since the Expert Advisor primarily relies on placing pending orders to capitalize on price breakouts, this option prevents it from piling orders.
Before placing a new pending order, the Expert Advisor scans the platform. If it finds an existing pending order for the same strategy at the exact same price level, it ignores the new signal and will not place an additional order on top of the existing one.
2. Usage Tips (Why is it important?)
It is highly recommended to always leave this setting true: This option is a necessary safety valve for two main reasons:
Preventing Over-leveraging: During periods of extreme sideways volatility, indicators may give consecutive entry signals at the same point. This filter prevents the expert advisor from opening two or more trades at the same point, thus protecting you from doubling your predetermined risk.
Maintaining Server Stability: Sending identical and repetitive pending orders too quickly can lead to your broker classifying your program as "spam," which can result in your account being temporarily suspended. This filter ensures that the expert advisor communicates with the broker's servers professionally and cleanly.
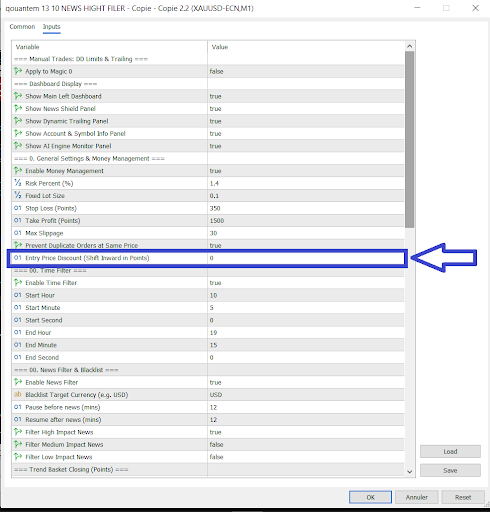
The setting highlighted in blue is an extension of the general settings section and represents a crucial technical safeguard for the security of your orders within the platform.
Setting Name: Prevent Duplicate Orders at Same Price
Available Options: true (enable) or false (disable)
Default Value in the image: true
1. Function (What does this setting do?)
This setting acts as an "Anti-Duplicate Filter." Since the Expert Advisor primarily relies on placing pending orders to capitalize on price breakouts, this option prevents it from piling orders.
Before placing a new pending order, the Expert Advisor scans the platform. If it finds an existing pending order for the same strategy at the exact same price level, it ignores the new signal and will not place an additional order on top of the existing one.
2. Usage Tips (Why is it important?)
It is highly recommended to always leave this setting true: This option is a necessary safety valve for two main reasons:
Preventing Over-leveraging: During periods of extreme sideways volatility, indicators may give consecutive entry signals at the same point. This filter prevents the expert advisor from opening two or more trades at the same point, thus protecting you from doubling your predetermined risk.
Maintaining Server Stability: Sending identical and repetitive pending orders too quickly can lead to your broker classifying your program as "spam," which can result in your account being temporarily suspended. This filter ensures that the expert advisor communicates with the broker's servers professionally and cleanly.
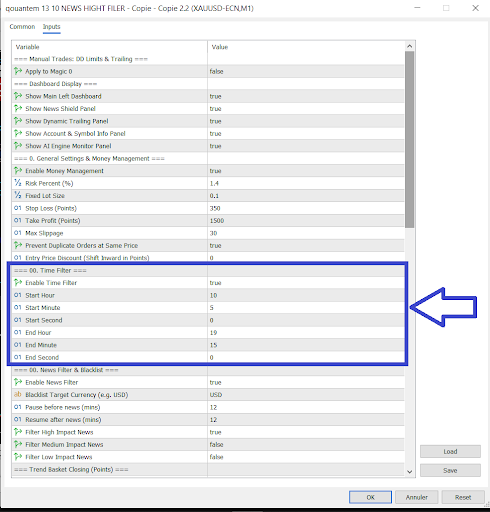
We have now reached a very important section for controlling the Expert Advisor's activity. The shaded area within the blue frame of the file "Sans titre1_6.png" is used to define the trading time window (Time Filter).
Since the Expert Advisor's strategies rely heavily on catching price breakouts, timing and liquidity play a crucial role in the success of these trades.
Here is a detailed explanation of the inputs in this section:
Time Filter Section
Setting Name: Enable Time Filter
Available Options: true (enable) or false (disable).
Default value in the image: true
Function: This is the primary switch to enable or disable the trading timetable.
If true: The Expert Advisor will strictly adhere to the times specified below and will not open any new pending orders outside this time window. It will also delete any pending orders that have not yet been activated once the timeframe expires. (Note: This filter does not close previously opened trades; it allows them to reach their target or stop-loss.)
If false: The expert will operate 24 hours a day, throughout the market trading days.
Start Time Setting:
Start Hour - Value: 10
Start Minute - Value: 5
Start Second - Value: 0
Function: Specifies the exact moment the expert wakes up and begins scanning the market, analyzing indicators (such as fractals and zigzags), and placing pending orders. In this image, the expert is programmed to start working precisely at 10:05:00.
End Time Setting:
End Hour - Value: 19
End Minute - Value: 15
End Second - Value: 0
Function: Specifies the exact moment the expert stops searching for new opportunities. In the image, the expert will stop at 19:15:00. Once this time arrives, the expert advisor will clear any pending orders to protect you from slow price fluctuations and will enter hibernation mode until the next trading day.
💡 Pro Tips: Platform Time (Broker Server Time): Pay close attention! These times are based on the brokerage firm's server time (the time displayed in the Market Watch window within the MetaTrader platform), not your computer's or country's local time. You must calculate your broker's GMT offset when setting these values.
Targeting High Liquidity: The breakout strategies in the expert advisor thrive during periods of high liquidity. The default setting (10 AM to 7 PM platform time) is excellent because it typically covers the overlap between the European (London) and US (New York) sessions, which are the periods when the strongest price movements occur.
Avoid the Asian session: It is generally preferable to avoid trading during the Asian (night) session because the market is slow and sideways (ranging), which may cause false breakouts to be triggered that hit stop-loss orders.
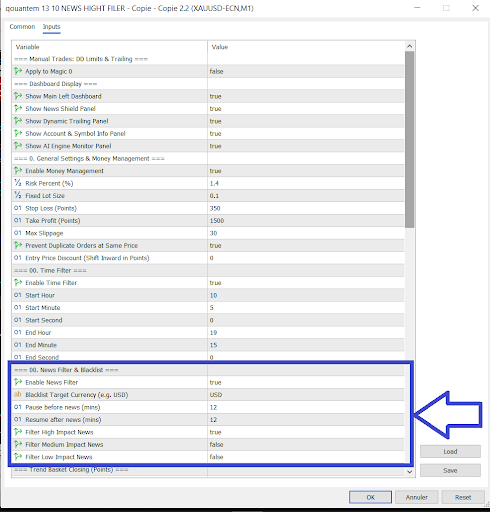
And the primary safeguard against the violent and random fluctuations that accompany the release of major economic data.
Here is a detailed explanation of the "News Filter & Blacklist" section, ready for your user guide:
News Filter & Blacklist Section
This section is responsible for linking the Expert Advisor to the economic calendar integrated into the MT5 platform. The Expert Advisor will automatically pause its activity before and after significant news events to protect your account from dangerous price slippage and spread widening.
Setting Name: Enable News Filter
Available Options: true (enable) or false (disable).
Default Value in the image: true
Function: This is the main activation button for the news system. When enabled, the Expert Advisor will continuously monitor the economic calendar. If it detects significant news, it will enter pause mode and immediately delete all active pending orders to prevent them from being triggered accidentally during the news's fluctuations.
Setting Name: Blacklist Target Currency (e.g., USD)
Default Value in Image: USD
Function: The expert advisor specifies which currency pairs to monitor closely for news. For example, if you are trading gold (XAUUSD), you would only be interested in news about the US dollar (USD).
Smart Blacklist: The expert advisor is internally programmed to recognize keywords for critical news releases (such as FOMC interest rate, NFP jobs, CPI inflation, etc.). This setting tells it to apply this "blacklist" specifically to the USD currency pair.
Setting Name: Pause before news (mins)
Default Value in Image: 12
Function: Specifies the "preemptive safety zone" in minutes. The expert advisor will pause and withdraw its pending orders 12 minutes before the actual news release.
Usage Tips: 12 to 15 minutes is ideal because spreads typically start to widen and liquidity begins to dry up in the minutes leading up to major news releases.
Setting Name: Resume after news (mins)
Default value in image: 12
Function: Specifies the "shock absorption" zone in minutes after the news release. The expert will wait 12 minutes after the news release for the markets to calm down and liquidity and spreads to return to normal levels before resuming activity.
Usage Tips: 12 minutes is more than enough for most news events to allow the market to establish its true direction, moving away from initial random fluctuations (whipsaws).
Impact Level Settings:
Filter High Impact News (High Impact News filter - red) - Value in image: true
Filter Medium Impact News (Medium Impact News filter - orange) - Value in image: false
Filter Low Impact News (Low Impact News filter - yellow) - Value in image: false
Function: Allows you to select which type of news you want to avoid.
Usage Tips: The setting shown in the image is the ideal and professional mode. Enabling only the "High Impact" news filter is sufficient to protect the account from disasters, while disabling the medium and low filters ensures that the expert will not be interrupted all day due to news that does not actually affect price movement.
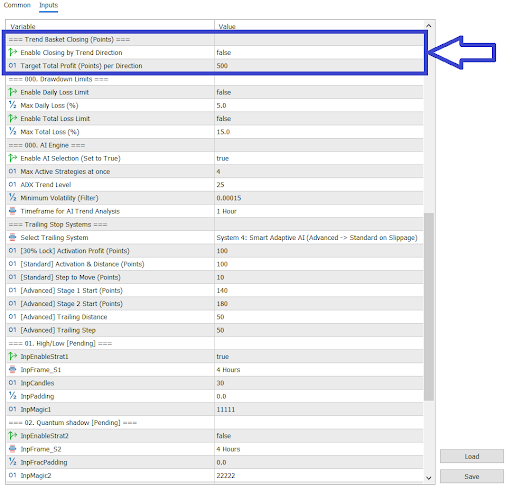
It offers an advanced feature for managing multiple trades: the "Basket Closing" system.
Since the Expert Advisor is designed for complete flexibility and can open buy and sell positions simultaneously and continuously, regardless of market conditions, this section facilitates the cumulative profit-taking process for each trend, rather than relying solely on individual trade targets.
Here's a detailed explanation of the inputs in this section:
Trend Basket Closing Section
Setting Name: Enable Closing by Trend Direction
Available Options: true (enable) or false (disable).
Default Value (as shown in the image): false
Function: When this option (true) is enabled, the Expert Advisor groups open trades into two separate baskets (a buy basket and a sell basket). It calculates the total floating profit for all buy trades combined and the total floating profit for all sell trades combined. Once one of the baskets reaches its target price, the Expert Advisor closes all trades in that trend simultaneously to secure the overall profit.
Usage Tips: Very useful in markets with a strong trend. If you open several consecutive buy strategies, you can combine their profits as a single block to accelerate account growth and avoid sudden reversals. If you prefer each trade to have its own independent target and tracking, leave this setting as false.
Setting Name: Target Total Profit (Points) per Direction
Default Value in Image: 500
Function: This is the target for the basket and only works if the previous setting is enabled. It specifies the total profit (in points) required to close the basket. In the image, if the total profit from all open buy trades reaches 500 points (i.e., 50 pips), they will be closed immediately. The same logic applies to sell trades.
Usage Tips: 500 points is an excellent and balanced target for a basket of trades. You can increase this number if you are using multiple strategies simultaneously to maximize profits from extended trending movements.
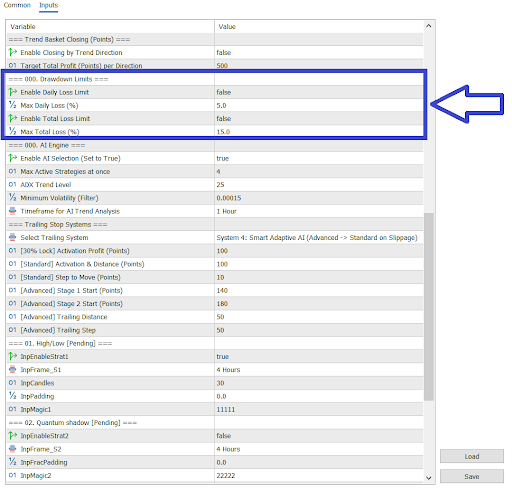
Dedicated to setting drawdown limits.
This section is an indispensable tool, especially if you trade with Prop Firms, which have very strict rules regarding daily and total drawdowns, or if you want to professionally manage your account to avoid significant losses.
Here is a detailed explanation of the entries in this section to add to your user guide:
Drawdown Limits and Account Protection Section
Setting Name: Enable Daily Loss Limit
Available Options: true (enable) or false (disable).
Default value in the image: false
Function: This is the key to activating the daily loss monitor. When activated, the Expert Advisor records your account balance at the beginning of each day (midnight, platform server time). It then monitors the equity (the actual floating balance) throughout the day. If the equity falls to the specified loss percentage, the Expert Advisor will perform an "emergency closure": immediately closing all open positions, deleting all pending orders, and completely halting trading until the start of the next day.
Usage Tips: Enable (true) if you are subject to testing by financial companies to protect you from exceeding the daily loss limit, or to protect your morale from market retaliation on bad days.
Setting Name: Max Daily Loss (%)
Default Value in Image: 5.0
Function: Specifies the maximum percentage loss allowed per day, based on the opening balance. This setting only works if Enable Daily Loss Limit is enabled.
Usage Tips: If your plan or financial company allows a 5% daily drawdown, it's best not to set the value exactly 5.0, but rather 4.5 or 4.8. This leaves a very small margin to accommodate commissions or any minor slippage that might occur when the expert advisor closes trades.
Setting Name: Enable Total Loss Limit
Available Options: true (enable) or false (disable).
Default Value in Image: false
Function: This is the switch for the Total Loss Monitor (maximum overall drawdown). The expert monitors the equity against the account's initial balance. If this threshold is reached, the expert will intervene by closing all positions and permanently disabling trading until you manually assess the situation.
Usage Tips: An excellent tool for protecting your account from a complete loss (Margin Call). If you manage investor accounts, this setting ensures that their maximum possible loss is predetermined.
Setting Name: Max Total Loss (%)
Default Value (as shown in the image): 15.0
Function: Specifies the percentage of the maximum total loss allowed for the account.
Usage Tips: A value of 15% is considered a very reasonable limit for a total portfolio loss. For financial companies, adjust this figure to comply with their rules (which are often between 8% and 12%).
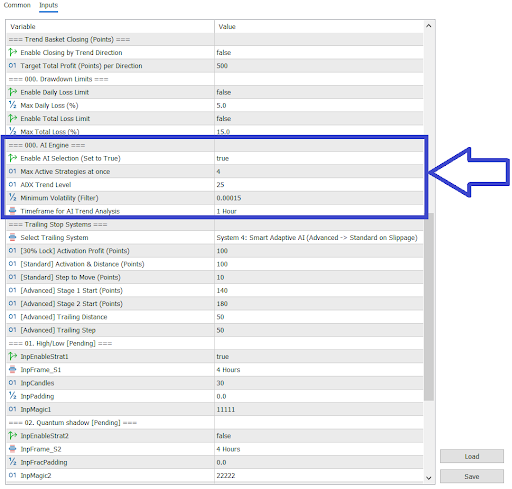
We now come to the "mastermind" of the expert. The shaded section within the blue frame of the file "Sans titre1_11.png" represents the settings of the AI Engine.
This engine doesn't rely on guesswork; instead, it mathematically analyzes the market situation (using volatility and trend indicators) to determine when to trade, when to stop, and how many systems should be running simultaneously.
Here's a detailed explanation of the inputs in this section for inclusion in your user guide:
AI Engine Section
Setting Name: Enable AI Selection (Set to True)
Available Options: true (enable) or false (disable).
Default value in the image: true
Function: This is the key to activating the dynamic market analysis engine. When enabled, the expert continuously monitors trend indicators (ADX) and volatility to determine the current market condition (sideways market, trending market, or volatile market). Based on this analysis, the expert decides whether to activate or deactivate specific strategies to adapt to the current situation.
Usage Tips: It is recommended to leave this setting true for maximum efficiency from the expert advisor, allowing it to automatically adapt to market changes instead of operating blindly.
Setting Name: Max Active Strategies at once
Default Value (as shown in the image): 4
Function: Specifies the maximum number of strategies allowed to operate and place pending orders simultaneously.
Usage Tips: A value of 4 means you allow all of the expert advisor's strategies to operate simultaneously if market conditions are ideal. If your account is small and you want to reduce your market exposure, you can lower this value to 1 or 2, so the engine selects only the strongest strategy and ignores the rest.
Setting Name: ADX Trend Level
Default Value (as shown in the image): 25
Function: This is the numerical threshold that distinguishes between a sideways (volatility) market and a market with a clear trend.
If the ADX reading is below 25, the expert advisor considers the market to be "ranging."
If the reading exceeds 25, the expert considers a trend to have begun.
Usage Tips: 25 is the classic golden value for the ADX indicator. Changing it is not recommended unless you are an expert in technical analysis and want to make the expert more or less trend-sensitive.
Setting Name: Minimum Volatility (Filter)
Default Value (as shown in the image): 0.00015
Function: Acts as a filter to protect against market stagnation or illiquidity. The expert uses the Standard Deviation indicator to measure price movement. If volatility falls below this very precise number, the expert will declare a "low volatility" condition and refrain from trading because the market is too sluggish and lacks sufficient liquidity for successful breakouts.
Usage Tips: This value is set with high mathematical precision. It is best to leave it as is to ensure you do not enter trades during periods of complete market stagnation.
Setting Name: Timeframe for AI Trend Analysis
Default Value (as shown in the image): 1 Hour
Function: Specifies the timeframe on which the AI engine calculates ADX indicators and volatility.
Usage Tips: The 1-hour timeframe is best for this purpose, as it provides an accurate and stable macro reading of the market's performance throughout the day, ignoring the random noise that occurs on smaller timeframes such as the 1-minute and 5-minute timeframes.
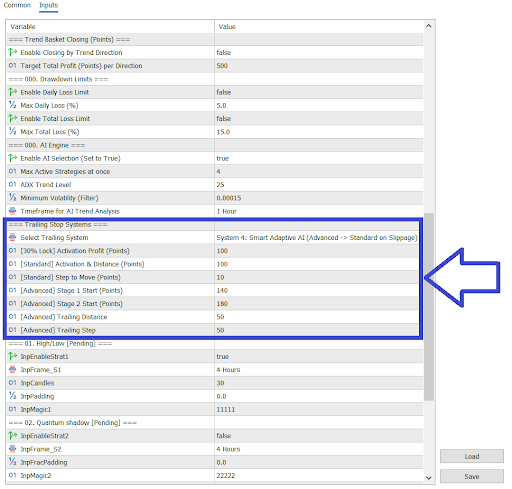
This section is a masterpiece in your Expert Advisor! The shaded area in the blue frame of the file "Sans titre1_12.png" contains the Trailing Stop Systems.
I have programmed four different systems to lock in profits, giving the Expert Advisor tremendous flexibility to handle various market conditions and protect floating profits from sudden reversals.
Here is a detailed explanation of the inputs in this section, ready for your user guide:
Trailing Stop Systems Section
Setting Name: Select Trailing System
Default Value in Image: System 4: Smart Adaptive AI (Advanced -> Standard on Slippage)
Function: This dropdown menu allows you to select the strategy the Expert Advisor will use to lock in profits from trades.
System 4 (Smart - Recommended): The Expert Advisor monitors the broker's order execution. Under normal circumstances, it uses the "Advanced" (Aggressive) system to maximize profits. However, if the expert detects slippage in the market, it automatically switches to the safer "Standard System" to ensure a quick breakout.
You can also manually select other systems (Stop, Standard, Advanced, or 30%).
30% Profit Lock System Settings
This system is designed to continuously lock in one-third of the floating profit once the trade reaches a certain level.
Setting Name: [30% Lock] Activation Profit (Points)
Default Value: 100
Function: When the trade achieves a floating profit of 100 points (10 pips), this system intervenes and triggers a stop-loss order (SL) to always lock in 30% of the trade's maximum profit.
Standard 100-Point System Settings
This is the classic, safe system that tracks the price at a fixed distance.
Setting Name: [Standard] Activation & Distance (Points)
Default Value: 100
Function: Activation condition and tracking distance. When the price gains 100 points, the stop loss moves to the entry point (breakeven). After that, the stop loss continues to follow the price, maintaining a 100-point distance as a protective shield behind the current price.
Setting Name: [Standard] Step to Move (Points)
Default Value: 10
Function: Step to Move. The expert will not burden the broker's servers by adjusting the stop loss with every point the price moves. Instead, it will wait until the price moves an additional 10 points in its favor, then move the stop loss in one go by 10 points.
Advanced 2-Stage System Settings
This aggressive system is designed for strong trends. It starts by securing the entry point early, then begins to follow the price very closely in the second stage.
Setup Name: [Advanced] Stage 1 Start (Points)
Default Value: 140
Function (Stage 1): Once the trade reaches 140 points, the expert advisor moves the stop-loss order to the midpoint (between the entry point and the current price), ensuring you exit with a significant profit even if the price reverses early.
Setup Name: [Advanced] Stage 2 Start (Points)
Default Value: 180
Function (Stage 2): When the price continues to rise and profits reach 180 points, the trailing action is activated.
Setup Name: [Advanced] Trailing Distance
Default Value: 50
Function: In Stage 2, the stop-loss order will be significantly closer, only 50 points (5 pips) behind the current price, to trap the price and lock in maximum profit before any reversal.
Setting Name: [Advanced] Trailing Step
Default Value: 50
Function: Trailing Step for the second phase. The stop loss will move 50 pips each time the price moves in its favor by the same amount.
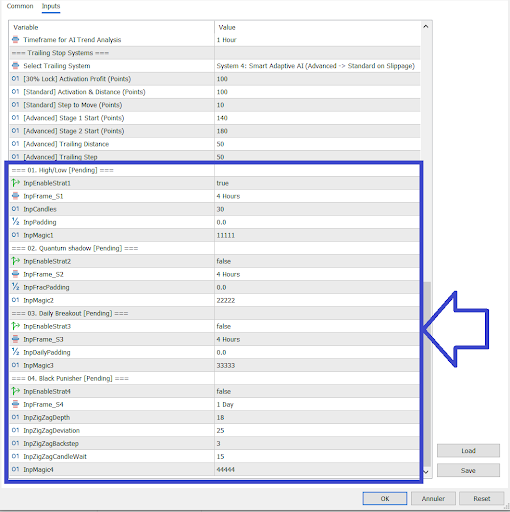
We've reached the final and most exciting part of Expert Advisor! The blue frame in the file "Sans titre1_13.png" displays the actual action engines: the four independent strategies.
I've designed these strategies to operate using a Dual Continuous Breakout system, allowing you to mix buy and sell orders simultaneously to capitalize on opportunities regardless of market direction. Each strategy operates completely independently thanks to its own "Magic Number."
Here's a detailed explanation of the inputs for each strategy to conclude your user guide:
Final Section: The Four Breakout Strategies
Each subsection contains an EnableStrat switch, a custom timeframe (InpFrame), and a Magic Number (InpMagic) to separate the trades. If the AI Engine is enabled, it will automatically select which of these strategies are allowed to run.
1. Tops and Bottoms Strategy (01. High/Low [Pending])
This strategy relies on identifying the highest high and lowest low within a specific timeframe and placing pending orders to break out of these levels.
InpEnableStrat1 (true): The strategy activation key.
InpFrame_S1 (4 Hours): The timeframe used to identify the highs and lows (here, set to 4 hours).
InpCandles (30): The number of previous candles that the expert will scan to find the highest and lowest points (here, it scans the last 30 candles on the 4-hour timeframe).
InpPadding (0.0): The safety margin (in points). If you enter a number here, the pending order will be positioned that distance from the high or low to avoid false breakouts. Zero means entering on the immediate breakout.
InpMagic1 (11111): The digital footprint of this strategy's trades.
2. Quantum Shadow Strategy - Fractals (02. Quantum shadow [Pending])
This strategy uses the classic Fractals indicator to identify geometric support and resistance levels and place orders at them.
InpEnableStrat2 (false): Strategy activation key (disabled in the image).
InpFrame_S2 (4 Hours): Timeframe for reading the Fractals indicator.
InpFracPadding (0.0): Additional safety margin (in points) above or below the Fractals signal for placing a pending order.
InpMagic2 (22222): The magic number for this strategy.
3. Daily Breakout Strategy (03. Daily Breakout [Pending])
Designed to capture strong momentum when the high or low of the previous candles is broken.
InpEnableStrat3 (false): Strategy activation key.
InpFrame_S3 (4 Hours): Timeframe used to identify breakout levels. (Note to the trader: Although its name suggests a daily breakout, it will depend on the timeframe you choose here; in the image, it's 4 hours.)
InpDailyPadding (0.0): Additional safety margin (in points) to slightly distance the pending order from the actual breakout level.
InpMagic3 (33333): The digital footprint of this strategy.
4. Black Punisher - ZigZag Strategy (04. Black Punisher [Pending])
This powerful strategy relies on the ZigZag indicator to capture sharp reversals and establish key tops and bottoms.
InpEnableStrat4 (false): The strategy activation key.
InpFrame_S4 (1 Day): The timeframe for reading the ZigZag indicator (here set to the daily timeframe to capture major price movements).
InpZigZagDepth (18) | InpZigZagDeviation (25) | InpZigZagBackstep (3): These are the three classic mathematical settings for the ZigZag indicator. They determine the indicator's sensitivity to ignoring minor fluctuations and drawing only major peaks and troughs.
InpZigZagCandleWait (15): The number of candles the expert must wait for as a confirmation wait after the formation of a ZigZag point before confirming it and placing pending orders. This is because the ZigZag indicator sometimes repaints.
InpMagic4 (44444): The magic number assigned to trades within this strategy.
Congratulations! We have now completed a professional and detailed analysis and explanation of all the inputs for TurboGain EA v2.2. The text is now ready to be copied and pasted to create a comprehensive and clear user guide that will help any trader understand the power of this expert and use it effectively.


![[BRENT]: Weekly Liquidity Activation Points (LAP), October 12-16, 2026](https://c.mql5.com/6/1035/splash-preview-777303.png "[BRENT]: Weekly Liquidity Activation Points (LAP), October 12-16, 2026")
![[EURUSD]: Weekly Liquidity Activation Points (LAP), October 12-16, 2026](https://c.mql5.com/6/1035/splash-preview-777305.png "[EURUSD]: Weekly Liquidity Activation Points (LAP), October 12-16, 2026")
![[XAUUSD]: Weekly Liquidity Activation Points (LAP), October 12-16, 2026](https://c.mql5.com/6/1035/splash-preview-777299.png "[XAUUSD]: Weekly Liquidity Activation Points (LAP), October 12-16, 2026")