The Session King
- Experts
-
Alex Amuyunzu Raymond
 I’m an experienced MQL5 developer and software engineer specializing in building robust, high-performance algorithmic trading systems for MetaTrader 5. My work goes beyond standard EA development — I design intelligent, scalable solutions that combine market logic, automation, and external
 - 버전: 1.5
- 업데이트됨: 14 8월 2026
- 활성화: 5
THE SESSION KING - Institutional Session Anticipation EA
What is THE SESSION KING?
THE SESSION KING is a precision-crafted Expert Advisor that answers one fundamental question: "What is the single highest-probability institutional setup for the current trading session?" The EA then returns one of three decisions: BUY, SELL, or WAIT.
Unlike conventional EAs that generate dozens of conflicting signals, THE SESSION KING operates on a strict hierarchical principle that mirrors institutional decision-making. Higher timeframes dictate direction, lower timeframes execute with precision. There are never competing setups, never simultaneous BUY and SELL anticipation, and never forced trades when institutional intent remains unclear.
The Core Architecture
One Bias, One Session, One Trade
The EA follows a non-negotiable timeframe hierarchy where each level has a specific, unchangeable role:
D1 (Daily) - Liquidity Map Only
Maps where higher-timeframe liquidity exists. Identifies previous day high/low, confirmed swing highs/lows, equal highs/lows, and unswept buy-side/sell-side liquidity. The Daily timeframe does NOT determine trade direction. H4 controls direction exclusively.
H4 (4-Hour) - Institutional Direction
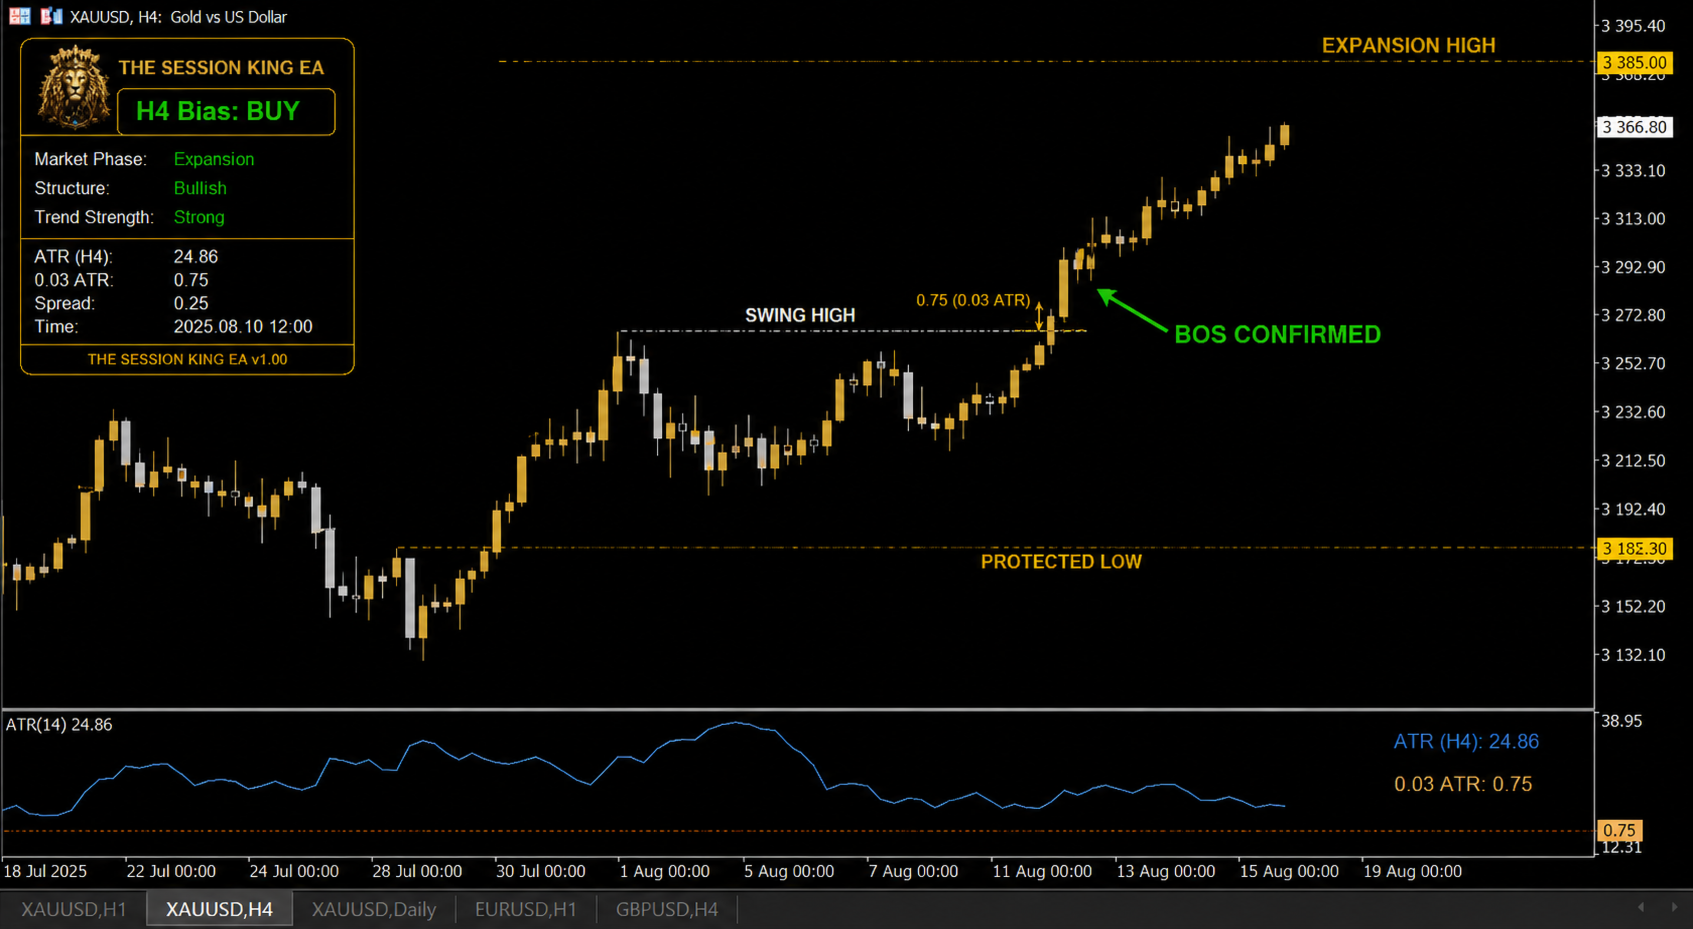
Determines the institutional bias (BUY, SELL, or NEUTRAL/WAIT) based on confirmed external structure. Requires completed candle closes with minimum penetration of 0.03 times H4 ATR. No wick-only breaks of structure. No repainting. When H4 CHoCH (Change of Character) occurs, the EA enters NEUTRAL state and waits for a genuine full-close BOS establishing new direction.
H1 (1-Hour) - Session Confirmation
Confirms institutional participation in the H4 direction. Uses displacement detection: single-candle body ≥ 0.90 times H1 ATR with body/range ≥ 0.60, OR two-candle impulse with combined directional movement ≥ 1.30 times H1 ATR. Full-close BOS with minimum penetration of 0.03 times H1 ATR.
M15 (15-Minute) - Execution Only
Provides precise entry after H4 and H1 have established institutional intent. Must never change H4 direction. Single-candle body ≥ 0.75 times M15 ATR with body/range ≥ 0.60, OR two-candle impulse ≥ 1.10 times M15 ATR. Full-close BOS with minimum penetration of 0.02 times M15 ATR.
Session Engine
THE SESSION KING features a sophisticated session tracking engine that recognizes Asia, London, New York AM, and New York PM sessions. Each session is tracked with open, high, low, midpoint, and range.
Session Classification
Before searching for entries, the EA classifies setups as either REVERSAL or CONTINUATION:
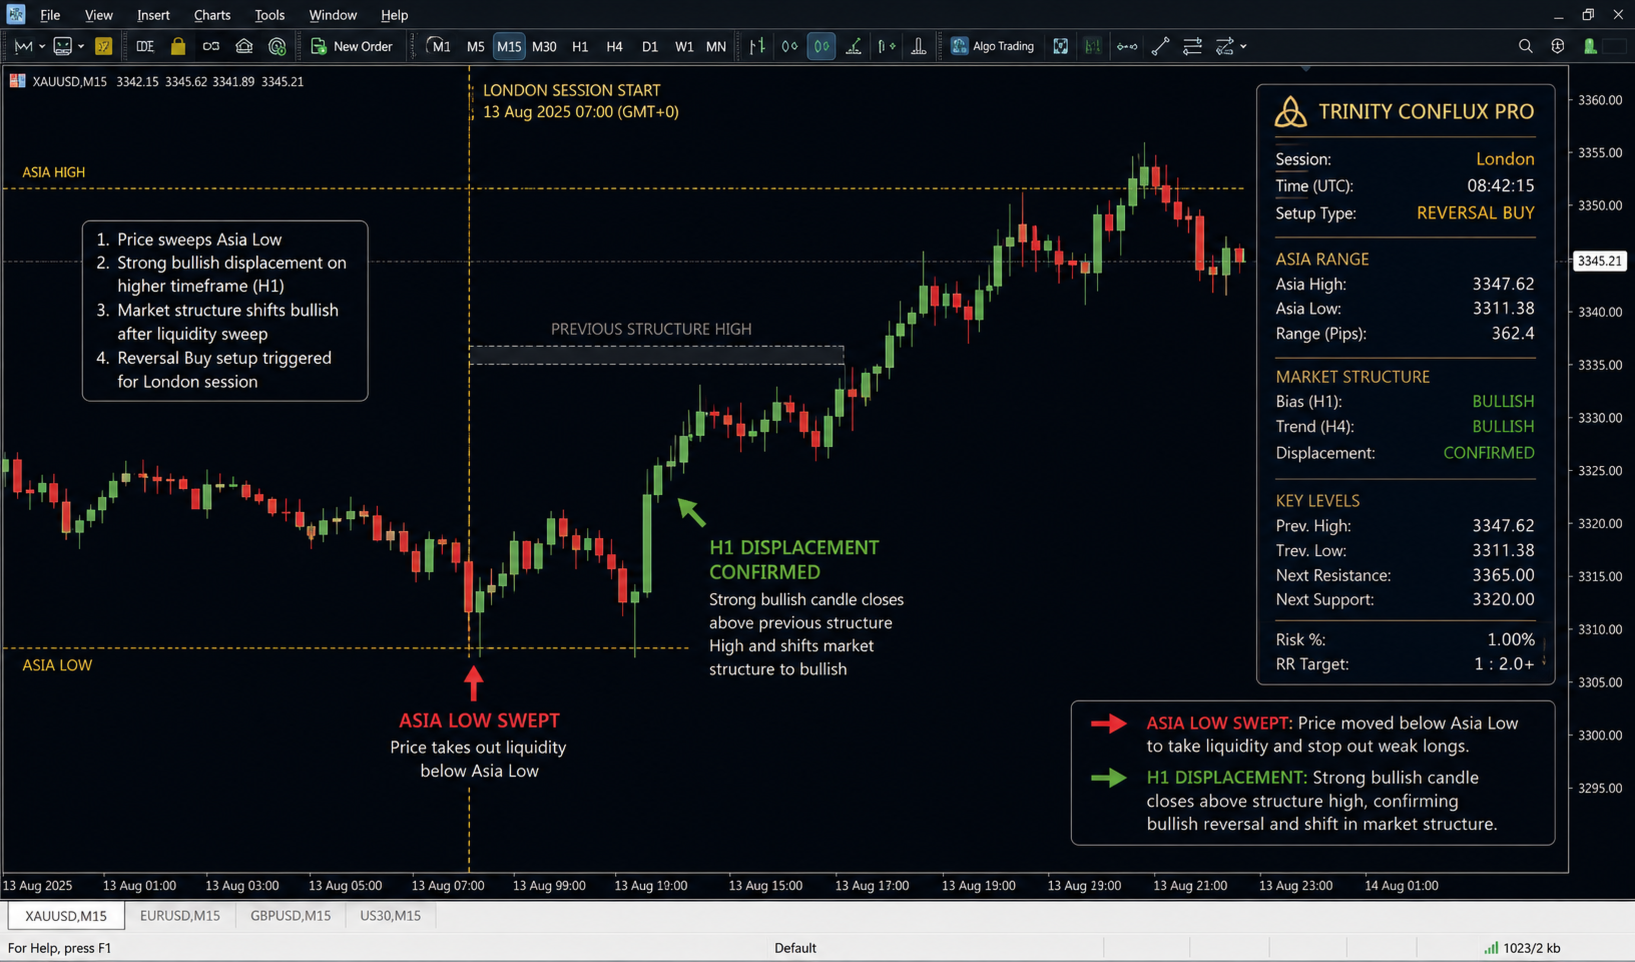
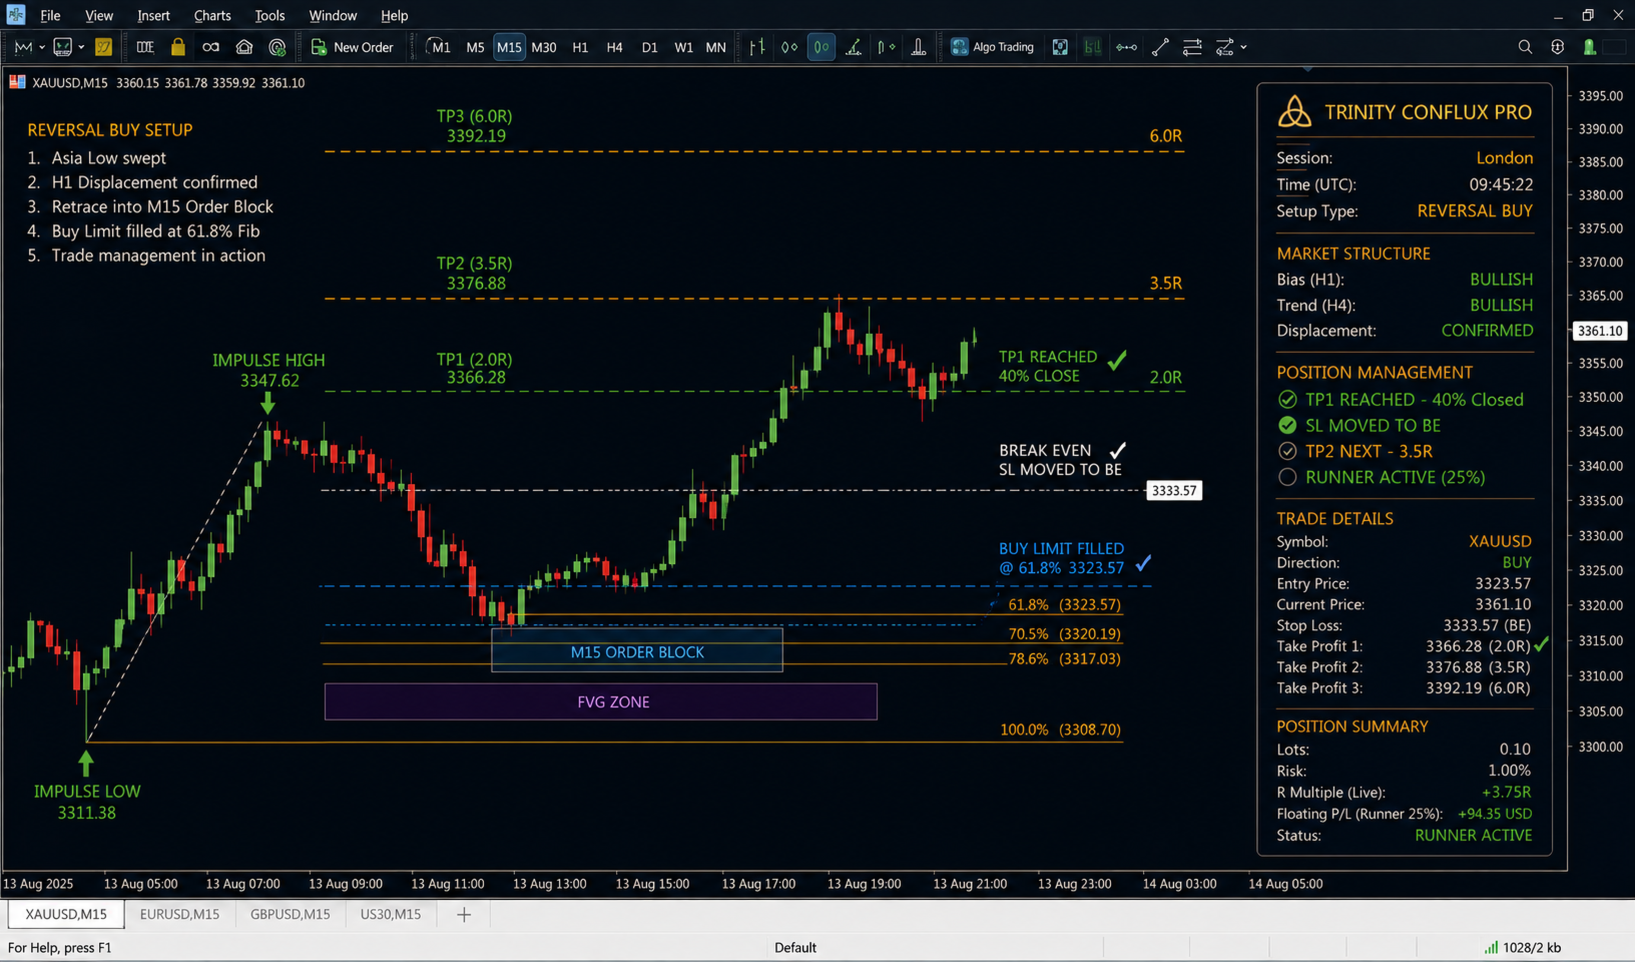
REVERSAL does not mean trading against H4. It means the session is expected to reverse a liquidity manipulation and resume the institutional direction. Example: H4 BUY, London trades down, raids Asia Low, enters H4 discount, then reverses upward. Setup is REVERSAL BUY, trade direction remains BUY.
CONTINUATION means the session continues the established institutional direction after accumulation or retracement. Example: H4 BUY, London expands bullish, New York retraces into aligned POI, M15 confirms renewed expansion. Setup is CONTINUATION BUY.
Premium/Discount Framework
The EA uses institutional dealing ranges with strict entry location rules:
For BUY: Protected H4 low → expansion H4 high. Equilibrium = 50%. Entry must be in discount zone: Entry < EQ - 0.05 × H4 ATR.
For SELL: Expansion H4 low → protected H4 high. Entry must be in premium zone: Entry > EQ + 0.05 × H4 ATR.
Trades around equilibrium are rejected because institutional location is poor.
Point of Interest Detection
H4 POIs
The EA recognizes Order Blocks, Fair Value Gaps, OB+FVG overlaps, Breaker Blocks, and Mitigation Blocks. However, it never scans hundreds of old historical zones. A H4 POI is eligible only if causally associated with meaningful structure.
Bullish OB: Last bearish candle immediately preceding bullish displacement sequence that produced valid structural break.
Bearish OB: Last bullish candle immediately preceding bearish displacement sequence producing break.
FVG: Standard three-candle imbalance requiring minimum gap of 0.05 times H4 ATR.
Mitigation: Zone becomes meaningfully mitigated after price trades through 50%.
POI Priority:
-
OB + FVG overlap causing structural displacement
-
Causal unmitigated OB
-
Causal unmitigated FVG
-
Confirmed breaker
-
Confirmed mitigation block
Fibonacci Anticipation Entry
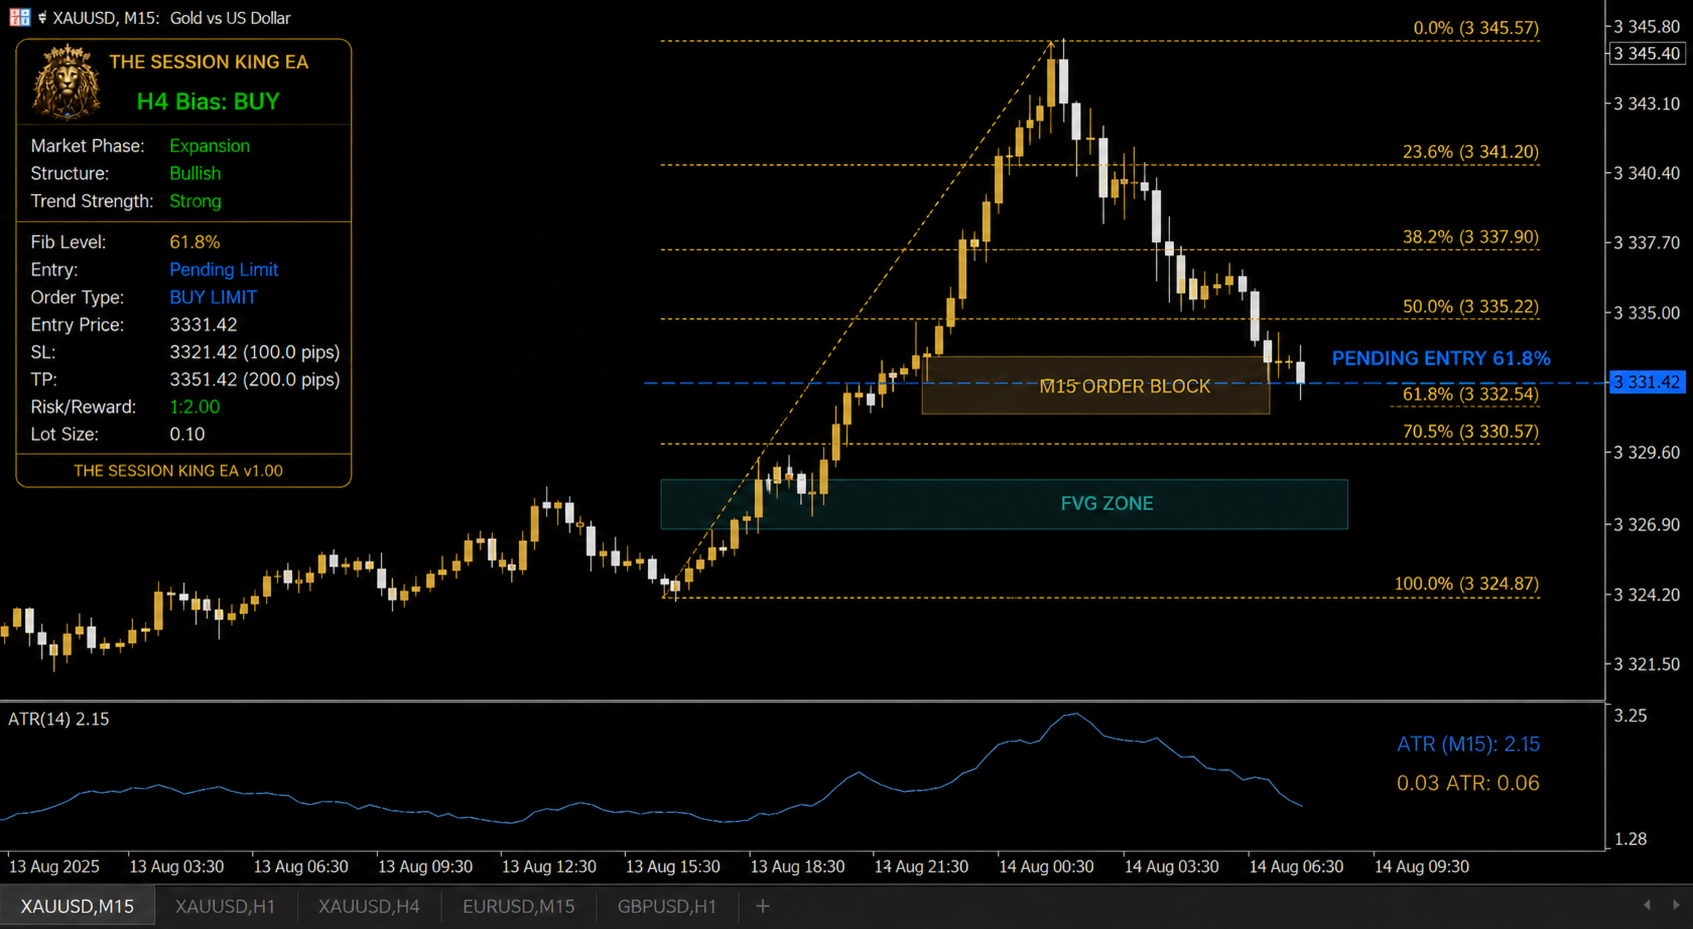
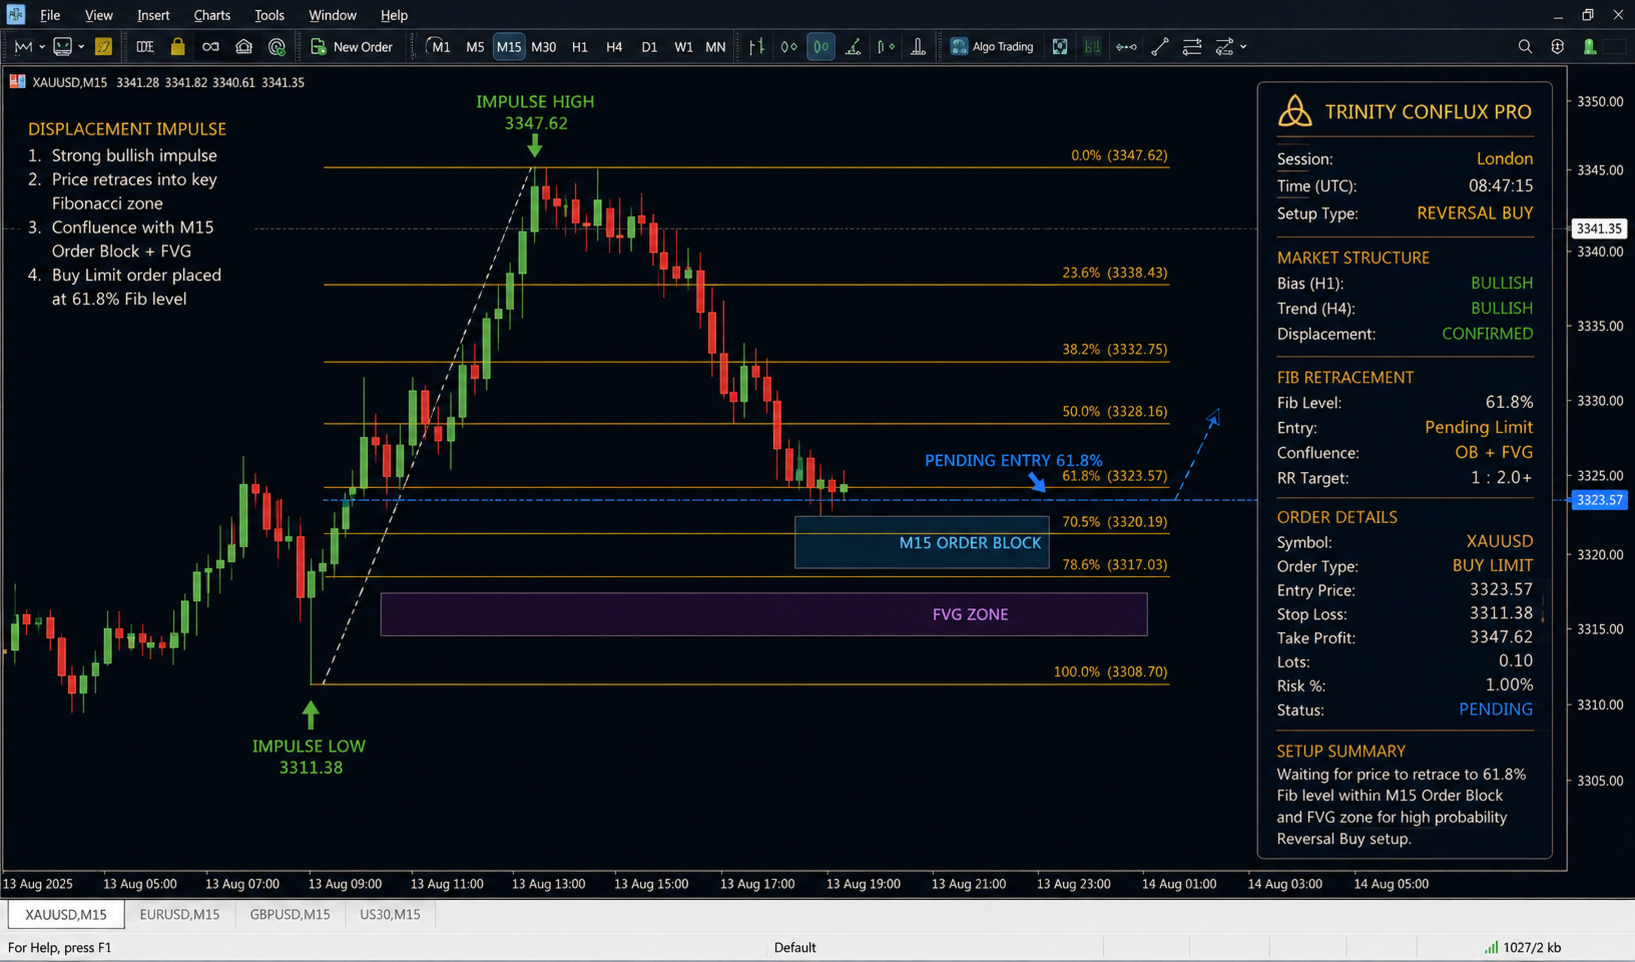
The EA uses a unique Fibonacci anticipation methodology placing pending limit orders at institutional retracement levels. Fibonacci anchors to completed M15 displacement impulse causing BOS.
For BUY: Low of impulse → high of impulse
For SELL: High → low
Entry Priority:
-
61.8% - Preferred institutional retracement level
-
50.0% - Second choice if 61.8% not inside POI
-
70.5% - Third choice if neither 61.8 nor 50 lies inside POI
If none lie inside valid causal POI, the EA returns WAIT.
Strongest Confluence: 61.8 Fibonacci + OB/FVG overlap + H1/H4 aligned POI.
Pending Order Protocol
Orders placed only after all conditions met. Expiration occurs at first of:
-
8 completed M15 bars (approximately 2 hours)
-
Session end
-
H1 invalidation
-
H4 bias neutralization
-
Execution POI invalidation
-
Opposite structural displacement
Structural Stop Loss
H1 Structural SL (When Valid):
-
H1 confirmation created genuinely protected swing
-
For BUY: protected H1 low
-
For SELL: protected H1 high
-
Minimum distance: 0.50 × H1 ATR
-
If closer, escalates to H4
H4 Structural SL (When Required):
-
Trade executes from major H4 POI
-
H1 swing is internal without protected status
-
H1 stop is abnormally tight
-
Adverse liquidity sits immediately beyond H1 stop
-
H1 structural stop would not truly invalidate H4 thesis
SL Buffer: Add 0.20 × ATR of selected stop timeframe (outside structure).
For BUY: SL below structural invalidation
For SELL: SL above structural invalidation
No M15 swing stops. No arbitrary fixed-point SL.
Risk-Reward and Trade Management
Minimum RR: 2.00R
-
Risk = ABS(Entry - SL)
-
For BUY: RewardDistance = ObjectiveAbove - Entry
-
For SELL: RewardDistance = Entry - ObjectiveBelow
-
AvailableRR = RewardDistance / Risk ≥ 2.00
Targets:
-
TP1 (2.0R): Close 40%
-
TP2 (3.5R): Close 35%
-
TP3 (6.0R): Runner 25%
Break Even: After TP1 confirmed, move remaining SL to entry plus costs (0.05 × M15 ATR buffer). Trailing disabled.
Trade Frequency and Safety
Maximum Filled Trades:
-
2 per symbol per trading day
-
1 per session
Optional: Stop new trading after 2 consecutive full SL losses. Preserves selectivity, prevents overtrading.
Professional Dashboard
Real-time display includes:
-
Current Session (with timestamps)
-
Previous Session liquidity
-
H4 Bias (BUY/SELL/NEUTRAL)
-
Setup Type (REVERSAL/CONTINUATION/WAIT)
-
Session State (ACCUMULATION/MANIPULATION/EXPANSION/RETRACEMENT/REVERSAL/CONTINUATION/UNDEFINED)
-
Daily Liquidity Draw Target
-
H4 Premium/Discount Location
-
H1 Confirmation Status
-
M15 Execution Status
-
Fibonacci Entry Level
-
Structural SL Timeframe and Price
-
Available Risk-Reward Ratio
-
Final Decision with Primary Reason
Wait Reason System: Instead of thousands of rejection messages, displays one primary reason: "WAIT — H4 neutral after CHoCH", "WAIT — no Fib level inside POI", "WAIT — only 1.63R available", etc.
Event and Trade Logging
Every trade contains unique Setup ID: XAUUSD-20260318-NYAM-REV-BUY-001
This ID remains attached to pending order, position, partials, close, and journal records.
Complete logging for each candidate setup: date/time, session, H4 bias, setup classification, liquidity event, H4 dealing range, H4 POI, H1 confirmation event, M15 displacement/BOS, execution POI, Fib anchors/selected level, entry, stop timeframe, SL, targets, available RR, decision.
Key Hard Conditions
Mandatory (failure means no trade):
-
H4 bias defined
-
H4 not in neutral CHoCH transition
-
Setup direction equals H4 direction
-
Institutional POI/location valid
-
BUY in H4 discount, SELL in H4 premium
-
Session classified REVERSAL or CONTINUATION
-
H1 institutional confirmation
-
M15 displacement + full-close BOS
-
Valid M15 causal POI
-
Fib entry inside POI
-
Structural H1/H4 SL identified
-
≥ 2R to valid forward objective
-
Pending order not stale
-
No existing trade from same setup
What Makes THE SESSION KING Different
| Feature | Conventional EAs | THE SESSION KING |
|---|---|---|
| Timeframe Hierarchy | Conflicting signals | Strict H4 → H1 → M15 chain |
| Entry Method | Market orders, chasing | Anticipated Fib limit orders |
| Stop Loss | M15 swings or fixed | Structural H1/H4 only |
| Setup Classification | None or arbitrary | REVERSAL vs CONTINUATION |
| POI Detection | Scans hundreds of zones | Causal, recent, prioritized |
| Premium/Discount | Rarely used | Mandatory for every trade |
| Risk-Reward | Often < 2R | Minimum 2R |
| Trade Frequency | Often overtrades | Max 2/day, 1/session |
| Decision Clarity | Confusing signals | BUY, SELL, or WAIT |
Technical Specifications
Timeframes: D1 (liquidity map only), H4 (institutional direction), H1 (session confirmation), M15 (execution only)
Indicators: ATR (Period 14) on each timeframe
Pivot Strength: 2 on all timeframes
BOS Minimum Close Penetration:
-
H4: 0.03 × H4 ATR
-
H1: 0.03 × H1 ATR
-
M15: 0.02 × M15 ATR
Displacement Requirements:
-
H1: Single-candle body ≥ 0.90 × H1 ATR, body/range ≥ 0.60 OR two-candle combined ≥ 1.30 × H1 ATR
-
M15: Single-candle body ≥ 0.75 × M15 ATR, body/range ≥ 0.60 OR two-candle combined ≥ 1.10 × M15 ATR
FVG Minimum Size:
-
H4: 0.05 × H4 ATR
-
H1: 0.04 × H1 ATR
-
M15: 0.03 × M15 ATR
Mitigation: 50% of zone for both OB and FVG
Equal High/Low Tolerance: 0.15 × ATR
Fibonacci Levels: 50.0%, 61.8%, 70.5% (priority: 61.8 → 50.0 → 70.5)
Pending Order Expiry: 8 M15 bars or session end
Risk Per Trade: 0.50% default (configurable up to 1.00%)
Supported Instruments: XAUUSD optimized, compatible with major forex pairs
Spread Filter: Configurable, default 40 points
Slippage: Configurable, default 30 points
Important Disclaimer
Past performance does not guarantee future results. THE SESSION KING is a sophisticated trading tool requiring proper understanding of its methodology. The EA executes trades based on probabilistic institutional concepts. No Expert Advisor can guarantee profits, and all trading involves substantial risk of loss. Users should demo test thoroughly before live deployment and only trade with risk capital they can afford to lose.