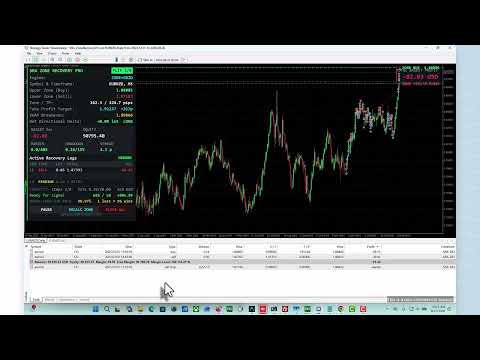
Zone Recovery Pro MT5
- エキスパート
- バージョン: 1.0
- アクティベーション: 5

SRA Zone Recovery Pro is a non-directional hedged-recovery Expert Advisor. It implements a published Zone Recovery / bi-directional Martingale architecture in full: a bounded price channel, opposing stop orders at each boundary, and an exact lot recurrence that sizes every recovery leg so the whole basket resolves at one money target on either side of the channel.
PLEASE READ FIRST — WHAT THIS EA IS
This EA uses hedging and a Martingale lot progression. Position size increases with each recovery step by design — that is the mechanism, not a side effect. It converts many small wins into a smooth equity curve while concentrating risk into rare, large losses. It is not risk-free, it is not "no-loss", and no setting removes that trade-off. Every risk control below exists to bound that tail, not to eliminate it. Do not run it on capital you cannot afford to lose, and do not judge it by win rate.
HOW IT WORKS
An initial position opens on a mean-reversion signal (Bollinger band touch + RSI extreme, filtered to a non-trending regime by ADX). A take-profit is set one TP distance away, and an opposing stop order is armed at the far edge of the recovery zone Z. If price crosses that boundary, the hedge fills and the EA re-solves the basket exit; a new opposing order is armed at the complementary boundary. The volume of every recovery leg is computed from the live open positions, so the basket target is preserved through slippage, partial fills, gapped stop fills, commission and swap.
THREE ENGINE MODES
On startup and on the dashboard the EA prints your break-even win rate: with a win of W per basket and a loss of L when the circuit breaker fires, you need L / (L + W) of baskets to reach target simply to break even. For typical settings this is between 93% and 99%. This is the honest measure of whether a configuration can work, and it is why win rate alone tells you nothing. Configure so this figure is comfortably below 100%, not just under it.
DASHBOARD
A dark on-chart HUD that auto-scales to your chart: live zone boundaries, take-profit target, exactly solved breakeven, net directional delta, basket PnL (floating plus already-booked), equity, margin / drawdown / spread against their caps, a table of every active leg plus the armed pending order, capacity usage, and the break-even hurdle. Three buttons: PAUSE (stop new baskets, keep managing open ones), RECALC ZONE, and CLOSE ALL (two-click confirm). Optional chart theme with zone / target / breakeven levels drawn as labelled lines, plus a floating total-profit card.
REQUIREMENTS
1. General
Hedged Martingale recovery systems produce a high proportion of winning baskets and infrequent large losses. A high win rate is a property of the exit rule, not evidence of profitability. To hold a fixed target across repeated oscillations, volume must grow geometrically, and geometric growth against finite capital fails at some depth — the caps and the equity stop bound that failure, they do not prevent it. Past performance and backtested results do not predict future results. Trade only capital you can afford to lose.
PLEASE READ FIRST — WHAT THIS EA IS
This EA uses hedging and a Martingale lot progression. Position size increases with each recovery step by design — that is the mechanism, not a side effect. It converts many small wins into a smooth equity curve while concentrating risk into rare, large losses. It is not risk-free, it is not "no-loss", and no setting removes that trade-off. Every risk control below exists to bound that tail, not to eliminate it. Do not run it on capital you cannot afford to lose, and do not judge it by win rate.
HOW IT WORKS
An initial position opens on a mean-reversion signal (Bollinger band touch + RSI extreme, filtered to a non-trending regime by ADX). A take-profit is set one TP distance away, and an opposing stop order is armed at the far edge of the recovery zone Z. If price crosses that boundary, the hedge fills and the EA re-solves the basket exit; a new opposing order is armed at the complementary boundary. The volume of every recovery leg is computed from the live open positions, so the basket target is preserved through slippage, partial fills, gapped stop fills, commission and swap.
THREE ENGINE MODES
- Zone Recovery — the classic bounded-channel recovery engine described above.
- Grid Martingale — a bi-directional averaging ladder at fixed or ATR-scaled spacing, with VWAP breakeven and a money basket target, using a decaying multiplier (1.5 → 1.2 → 1.0).
- Hybrid — both engines feeding one basket, one target, one risk budget. In Concurrent mode the zone engine holds the two boundaries while the grid engine averages the dominant side; each zone flip automatically compensates for whatever the grid layer has added. In Sequential mode the zone ladder runs first and then hands the basket to a grid workout.
- Equity circuit breaker — hard drawdown stop as a percentage of balance; closes every basket and optionally halts the EA.
- Account-wide caps — maximum lots per order, maximum total open volume, and maximum margin usage are a single pooled budget shared by all baskets, not per-basket allowances.
- Forward margin projection — before the first entry the EA simulates the recurrence several steps ahead under your broker's margin regime (net / max-side / gross, auto-detected) and refuses to start a basket it could not finish.
- Graceful degradation — when a cap binds, the basket stops compounding and is re-solved for breakeven instead of target. The EA reports this state rather than silently breaking the guarantee.
- ATR zone sizing — Z = max(floor, multiplier × ATR), so the channel scales with volatility.
- Zone widening per flip — the boundary expands on each reversal to break oscillation churn.
- Partial de-gridding — offsets an old losing leg against a new winning one, but only after proving the remaining basket still meets its target.
- Friction handling — spread allowance in every price solve, real commission recovered from deal history, accrued swap re-solved on a timer, and optional pre-funding of expected carry so a basket held over a weekend does not exit below target.
- Filters — maximum spread, trading sessions, days of week, Friday flat-out, and an economic-calendar news filter.
- Broker-side protection — real SL/TP are placed on every ticket at the basket exit and flipped on each inversion, so the basket still resolves if the terminal disconnects.
- Restart safe — basket state persists, and an orphaned basket is adopted and managed after a restart or a terminal crash.
On startup and on the dashboard the EA prints your break-even win rate: with a win of W per basket and a loss of L when the circuit breaker fires, you need L / (L + W) of baskets to reach target simply to break even. For typical settings this is between 93% and 99%. This is the honest measure of whether a configuration can work, and it is why win rate alone tells you nothing. Configure so this figure is comfortably below 100%, not just under it.
DASHBOARD
A dark on-chart HUD that auto-scales to your chart: live zone boundaries, take-profit target, exactly solved breakeven, net directional delta, basket PnL (floating plus already-booked), equity, margin / drawdown / spread against their caps, a table of every active leg plus the armed pending order, capacity usage, and the break-even hurdle. Three buttons: PAUSE (stop new baskets, keep managing open ones), RECALC ZONE, and CLOSE ALL (two-click confirm). Optional chart theme with zone / target / breakeven levels drawn as labelled lines, plus a floating total-profit card.
REQUIREMENTS
- Hedging account — mandatory. The EA refuses to initialise on a netting account; the strategy is undefined there.
- Liquid, range-prone majors. The source architecture recommends AUD/NZD, EUR/GBP, EUR/CHF and explicitly warns against high-beta instruments (GBP/JPY, XAU/USD, indices, crypto) where trend persistence overruns the ladder. The EA warns on startup if it detects one, and if the symbol has negative swap on both sides.
- Low spread and commission. Every leg pays them, and the tail is where they compound.
- Any timeframe — the chart period does not affect the logic; signal and ATR timeframes are separate inputs.
1. General
- Engine mode — Zone Recovery / Grid / Both / Hybrid
- Magic base — grid baskets use +1 and +2
- Max deviation, Order send retries, Wait between retries — execution robustness
- Verbose journal logging, Show on-chart dashboard
- Panel X / Y / font size / max leg rows / fonts — 0 font size = auto-scale to chart
- Apply the design chart theme, Hide EA indicators in the visual tester
- Draw zone / TP / breakeven on the chart, Floating total-profit card, Price chip offset
- Allowed initial direction — long and short, long only, short only
- Use BB / RSI / ADX regime filter — disable to enter on every re-arm
- Signal timeframe, Bollinger period / deviation, RSI period, RSI levels for buy and sell
- ADX period, ADX must be BELOW this — the range-regime gate
- Evaluate signal on closed bar only
- Zone sizing mode — fixed pips, or max(floor, multiplier × ATR)
- Fixed zone Z, ATR floor, ATR timeframe / period / multiplier, Hard cap on Z
- R2R = TP / Z — the damping dial. R2R = 1.0 gives a pure doubling sequence; R2R ≥ 2.0 damps lot expansion sharply. This is the single most important risk parameter.
- Friction expansion coefficient (µ) — safety margin on each computed leg
- TP tracks the widened zone — keeps R2R constant as the zone expands
- Base lot mode — fixed lot, or one minimum lot per X of capital
- Fixed base lot, Capital per one min-lot step
- Hard cap per single order, Hard cap total open volume, Max recovery steps per basket
- Action when a cap is hit — manage to breakeven, close immediately, or hold and alert
- Basket profit target mode — L1 × TP × pip value, fixed money, or percent of balance
- Fixed money target, Percent-of-balance target
- Extra close cost per lot, Extra spread allowance — 0 = automatic from live spread
- Re-solve exit every N seconds — keeps the exit correct as swap accrues
- Pre-fund N days of carry into the exit — 0 disables
- Real stop orders at boundaries — off = the EA triggers hedges itself
- Bar-close confirm — requires a candle close beyond the boundary (forces virtual mode)
- Bar-close confirmation timeframe
- Broker-side SL/TP safety net
- Re-anchor exit if fill slips more than X pips
- Widen Z on each flip, Widen percent per flip, Max cumulative widen multiple
- Partial de-gridding, Minimum net money of the closed pair
- Use equity circuit breaker, Max drawdown percent of balance, Halt EA after circuit breaker
- Cooldown after basket close, Max projected margin usage percent
- Hedged margin model — auto, net, max-side, or gross
- Steps ahead to pre-validate
- Max spread to open, Also block boundary hedges on spread
- Session filter with start / end hour, Day-of-week switches
- Force close all on Friday, Friday close hour
- Economic calendar filter, Minimum importance, Block minutes before / after, News also blocks hedges
- Open long AND short ladders at start
- Grid spacing S, Scale spacing by ATR, ATR spacing multiplier
- Multiplier steps 2-3 / 4-5 / 6+ — the decaying Martingale progression
- Max ladder levels, Basket money target
- Widen spacing with depth, Spacing widen percent per level
- How the two engines combine — concurrent (both at once) or sequential (zone then grid)
- Concurrent: max grid legs per basket, keep N spacings clear of the boundary
- Sequential: hand over after N zone steps
- Phase-2 exit target — breakeven or the grid basket target
- Use decayed multiplier, Phase-2 spacing multiplier, Max averaging legs in phase 2
- Backtest on real ticks, multi-year, with your broker's real spread and commission.
- Judge on net profit divided by maximum equity drawdown. Ignore win rate, ignore profit factor over a short window, and ignore how smooth the curve looks between the gaps.
- Require the test to contain at least 30 circuit-breaker events. A backtest with two or three has measured nothing about the tail.
- Read the startup journal — it prints pip value, margin regime, geometry, a full-depth margin projection, and your break-even win rate.
- Forward test on demo before committing capital.
Hedged Martingale recovery systems produce a high proportion of winning baskets and infrequent large losses. A high win rate is a property of the exit rule, not evidence of profitability. To hold a fixed target across repeated oscillations, volume must grow geometrically, and geometric growth against finite capital fails at some depth — the caps and the equity stop bound that failure, they do not prevent it. Past performance and backtested results do not predict future results. Trade only capital you can afford to lose.