Arcane Fibonacci Indicator Pro
- Indicatori
-
Gabriel Alejandro Sanchez Lledo
 Programador +20 años de experiencia- Trader profesional - Developer
 - Versione: 2.0
- Attivazioni: 5
🦉 Arcane Fibonacci Indicator v2.0
**The most intelligent Fibonacci tool on the MQL5 marketplace.**
Automatic swing detection · OTE zone · Smart Money Order Blocks · FVG alignment · Confluence scoring 0–100% · Non-repainting arrows · Professional dark dashboard
⚡ WHY Arcane Fibonacci Indicator v2.0 IS DIFFERENT?
Every other Fibonacci indicator draws lines and leaves you to figure out which levels matter.
**Arcane Fibonacci Indicator v2.0 tells you EXACTLY which levels to trade — and scores each one from 0 to 100%.**
It combines two frameworks that institutional traders use together — Fibonacci retracement/extension and Smart Money Concepts (ICT methodology) — into a single, automated engine. Every Fibonacci level is validated against real Order Blocks and Fair Value Gaps before being scored. Only levels with institutional backing receive high scores. Only the highest-scoring setups produce a signal arrow.
The result: fewer signals, much higher quality. Exactly how professional desks operate.
🏦 THE FOUR ANALYTICAL PILLARS
1. AUTO SWING DETECTION ENGINE
OWL automatically identifies the most recent significant swing high and swing low on your chart — no manual drawing required. Up to 3 swing pairs are detected simultaneously, with the most recent (and relevant) swing always displayed prominently.
The swing direction (Bullish or Bearish) determines how Fibonacci levels are drawn:
- **Bullish swing** (impulse UP): Fibonacci retracements draw downward from swing high — showing pullback zones to buy
- **Bearish swing** (impulse DOWN): Fibonacci retracements draw upward from swing low — showing pullback zones to sell
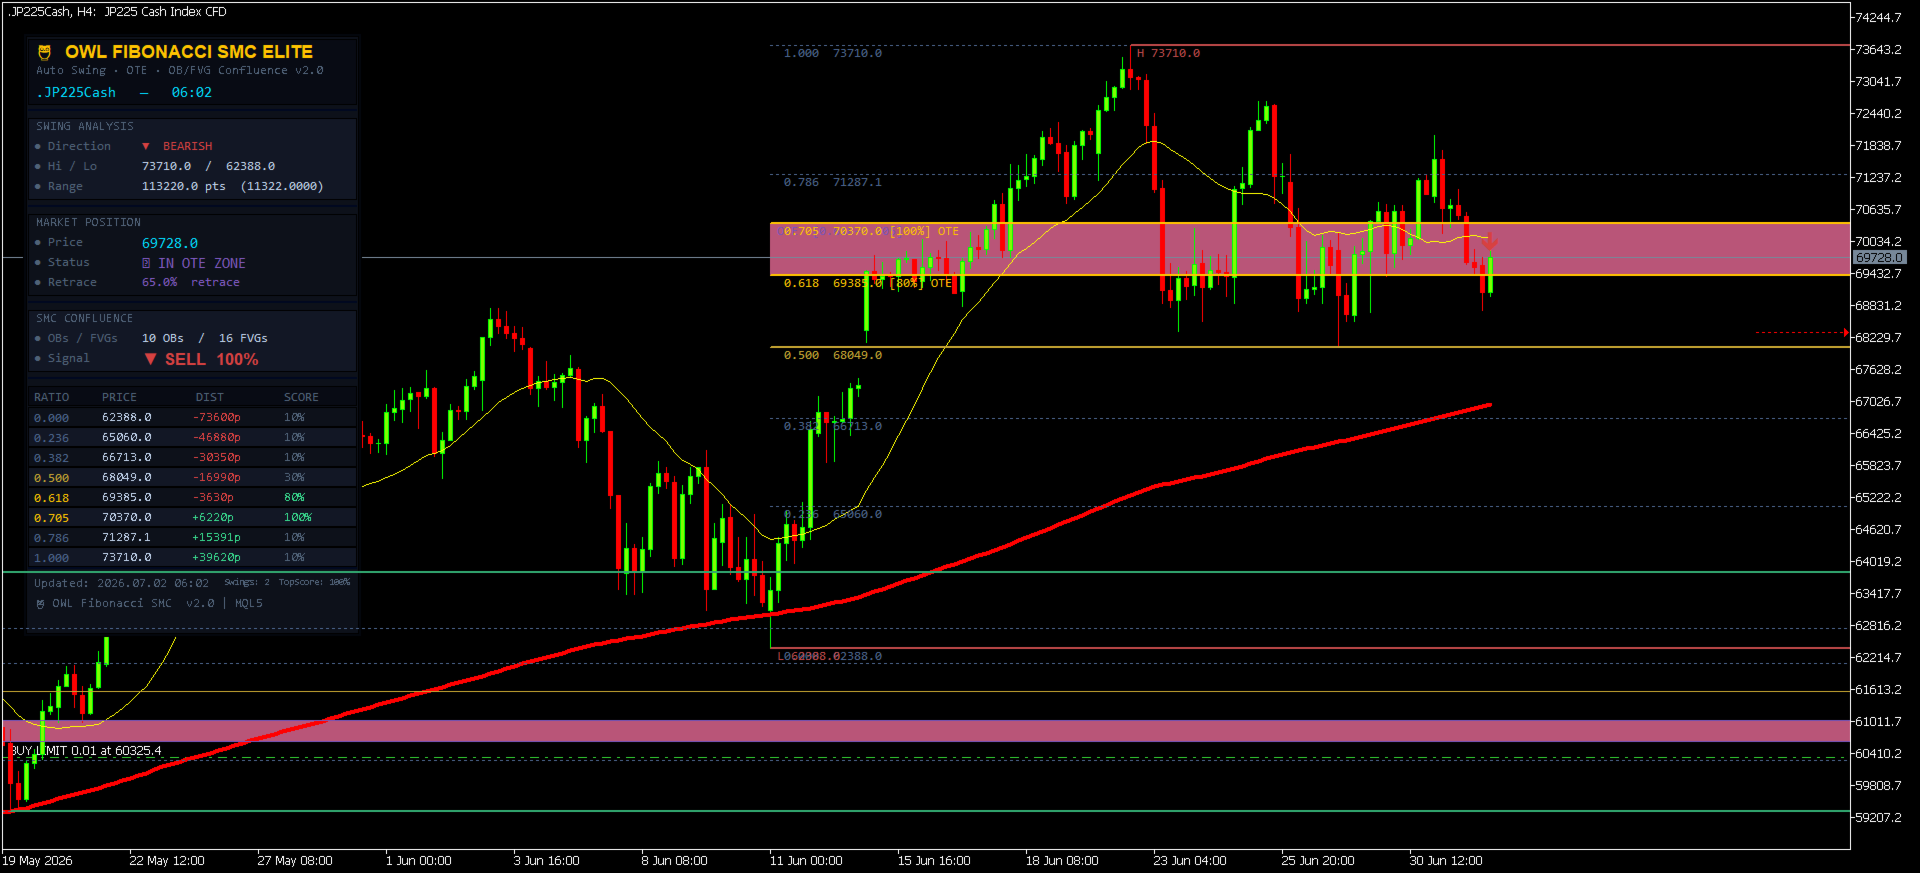
2. OTE ZONE — OPTIMAL TRADE ENTRY
The OTE Zone (0.618 to 0.705 Fibonacci range) is automatically highlighted as a filled zone on your chart. This is the exact zone Michael Huddleston (ICT) identified as the highest-probability entry area — where institutions place their orders during pullbacks.
The dashboard shows live OTE status:
- Price above OTE → Awaiting entry
- **Price IN OTE ZONE → Optimal entry area active**
- Price below OTE → Move passed
3. SMC CONFLUENCE ENGINE — ORDER BLOCKS + FAIR VALUE GAPS
This is what separates OWL from every other Fibonacci indicator:
**Order Block Detection**: Automatically finds the last bullish or bearish candle before a major breakout move — the exact zone where institutional buy/sell orders were placed. Displayed as semi-transparent boxes on the chart.
**Fair Value Gap Detection**: Automatically identifies 3-candle price gaps (imbalances) that price is magnetically attracted to fill. Displayed as lighter transparent boxes on the chart.
**Alignment Scoring**: When a Fibonacci level falls INSIDE an Order Block or FVG, the confluence score for that level increases dramatically. This is the institutional confirmation that the level is real — not just a mathematical coincidence.
4. CONFLUENCE SCORING SYSTEM (0–100%)
Every Fibonacci level receives an individual score calculated from multiple factors:
| Factor | Score Bonus |
|--------|------------|
| Base (any level) | +10% |
| Key level (0.500, 0.618, 0.705, 1.618) | +20% |
| OTE zone (0.618 or 0.705) | +20% |
| Aligns with active Order Block | +30% |
| Aligns with active Fair Value Gap | +20% |
| Both OB AND FVG alignment | +10% bonus |
| OTE + OB or FVG alignment | +10% bonus |
| **Maximum score** | **100%** |
Levels scoring 80%+ are highlighted in gold. Levels scoring 60–79% are highlighted in amber. Low-score levels remain dimmed.
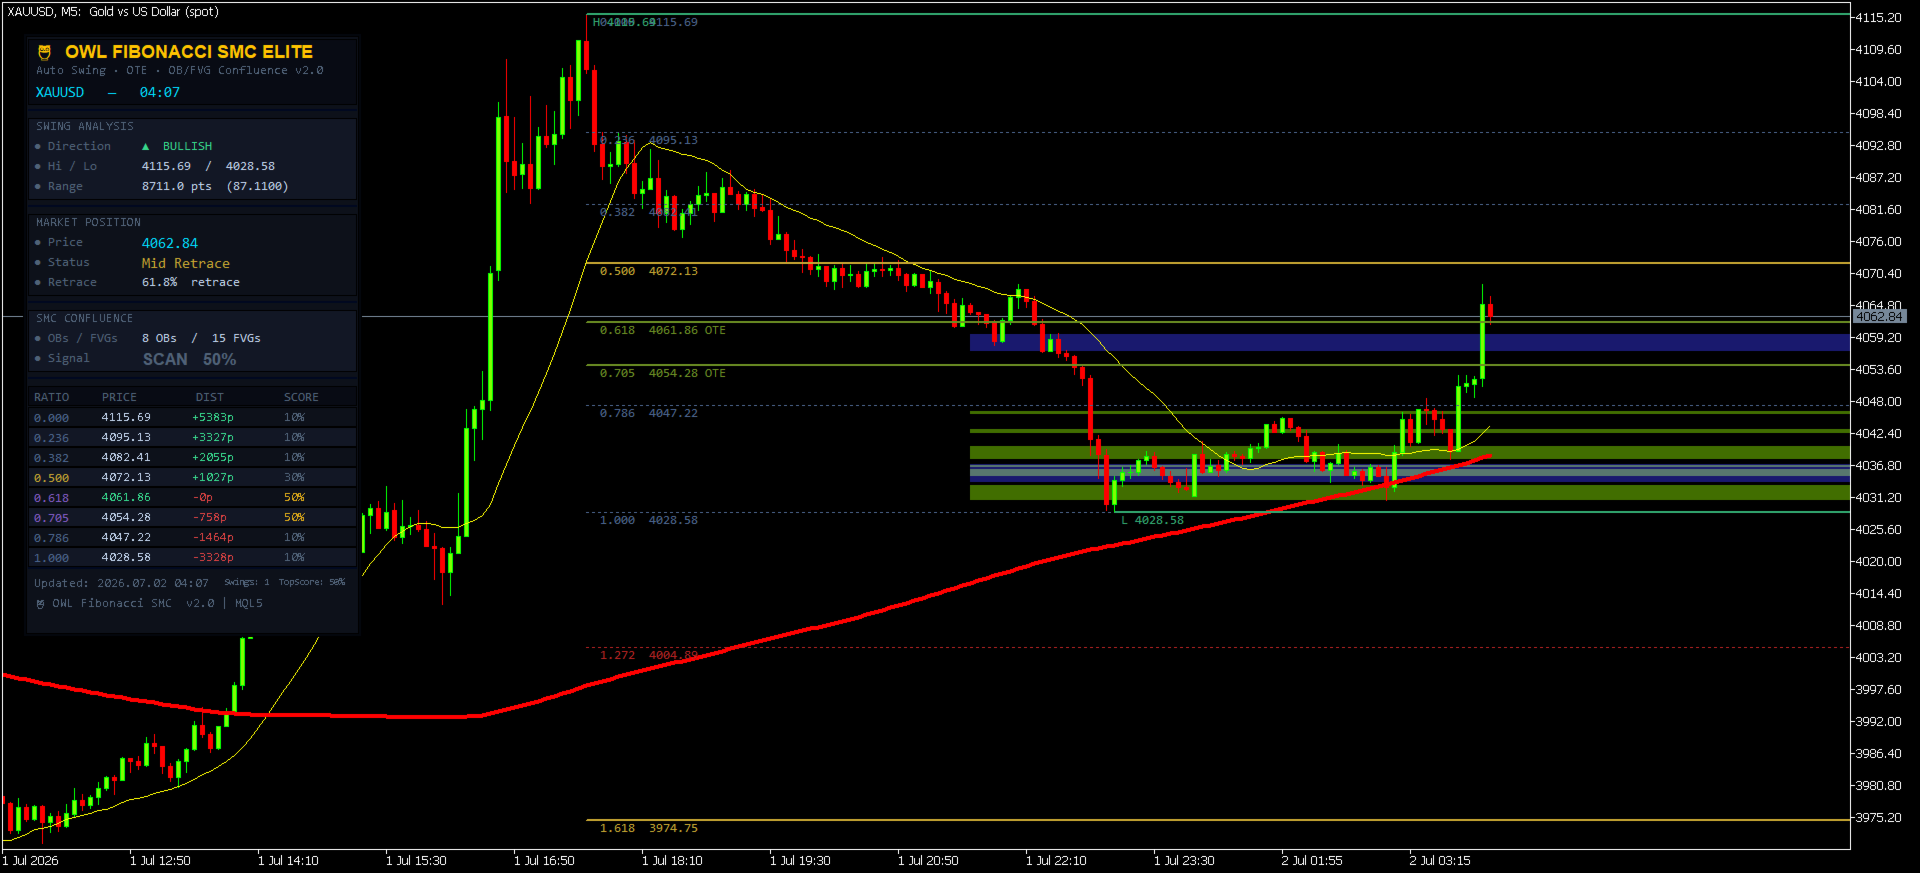
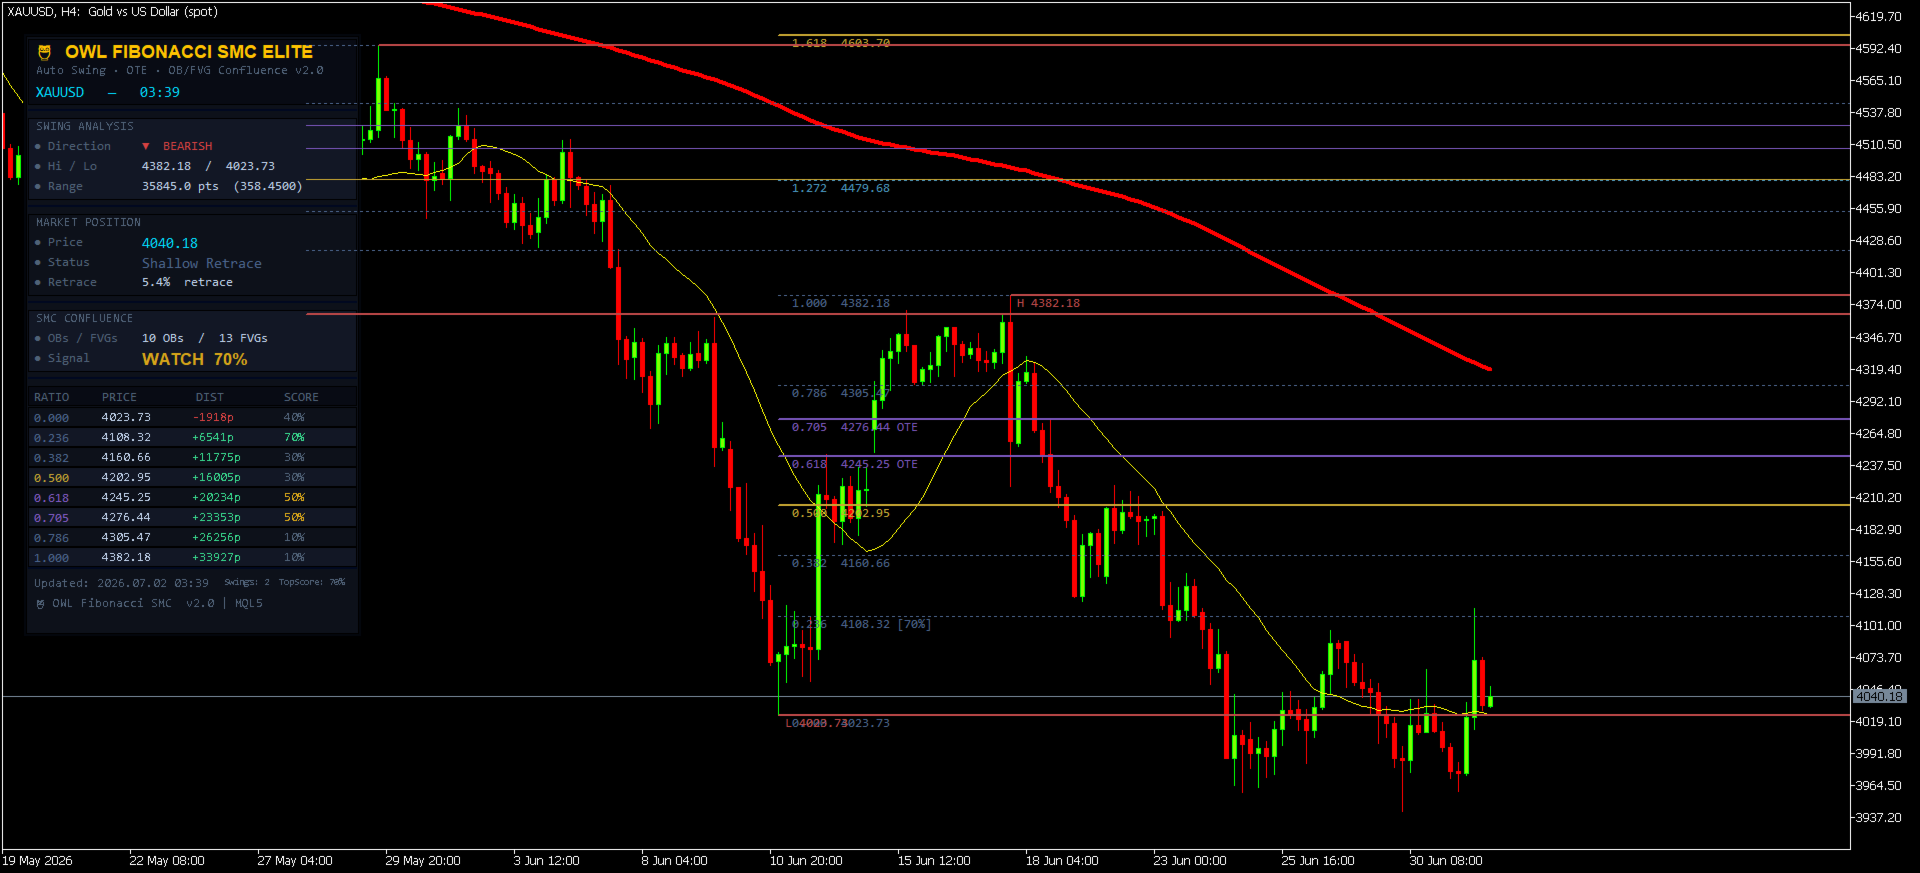
📊 PROFESSIONAL DARK DASHBOARD
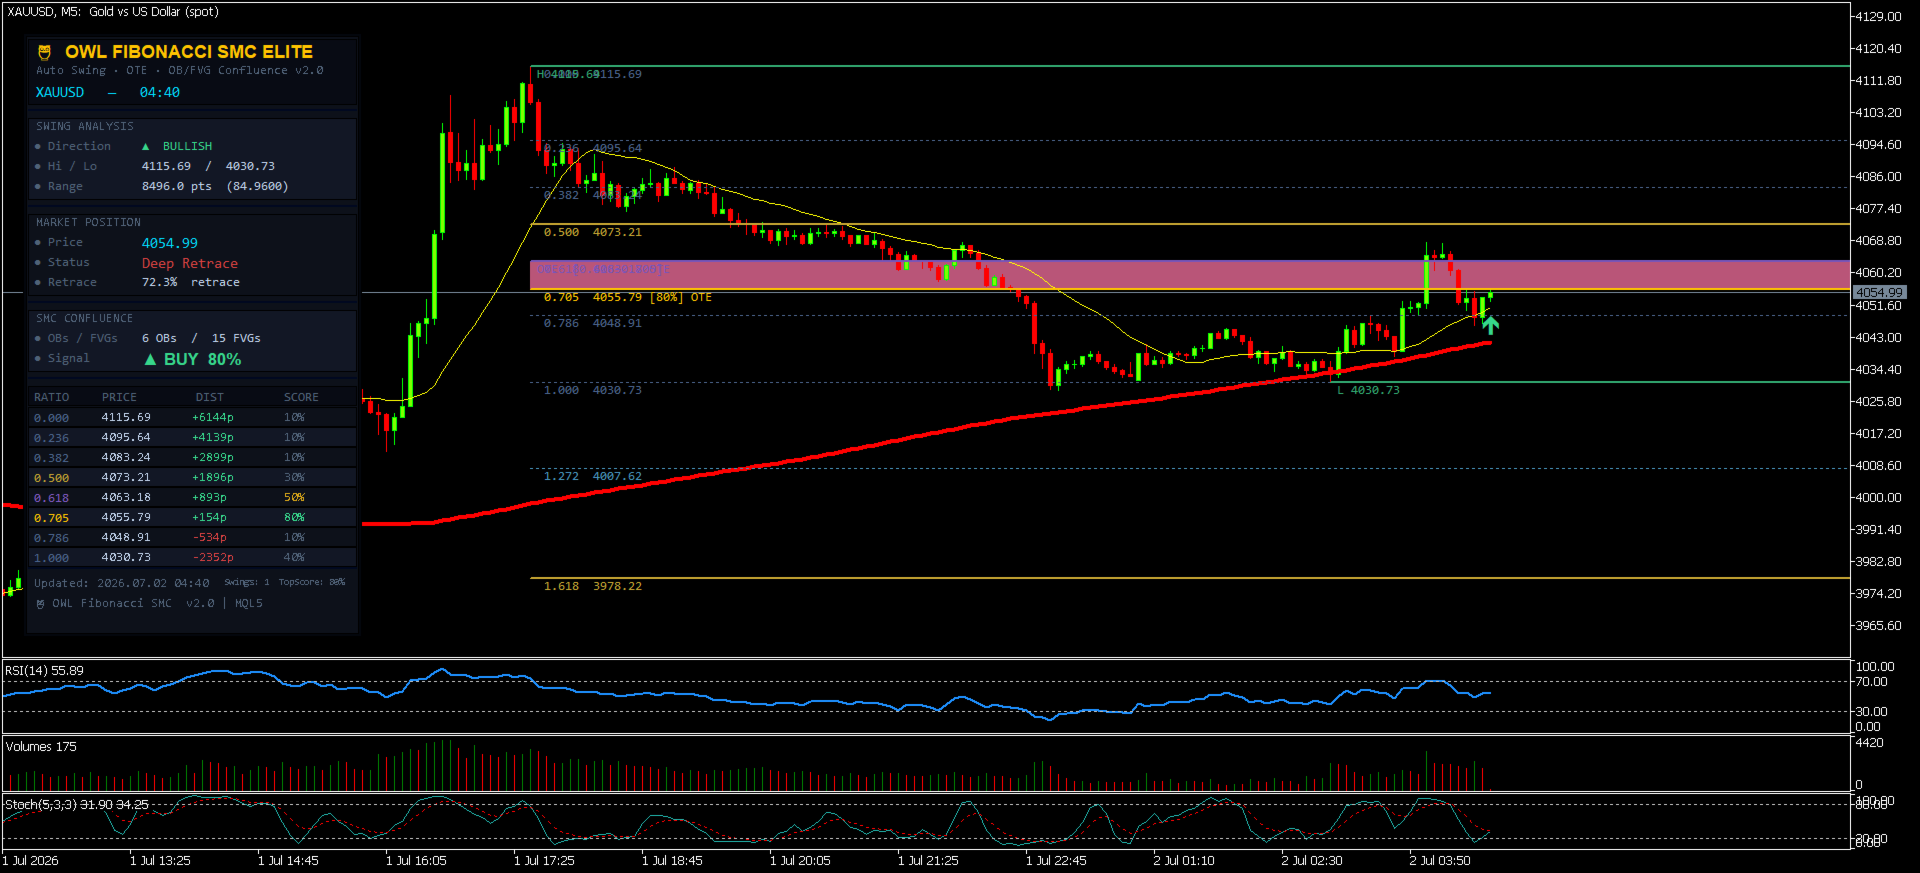
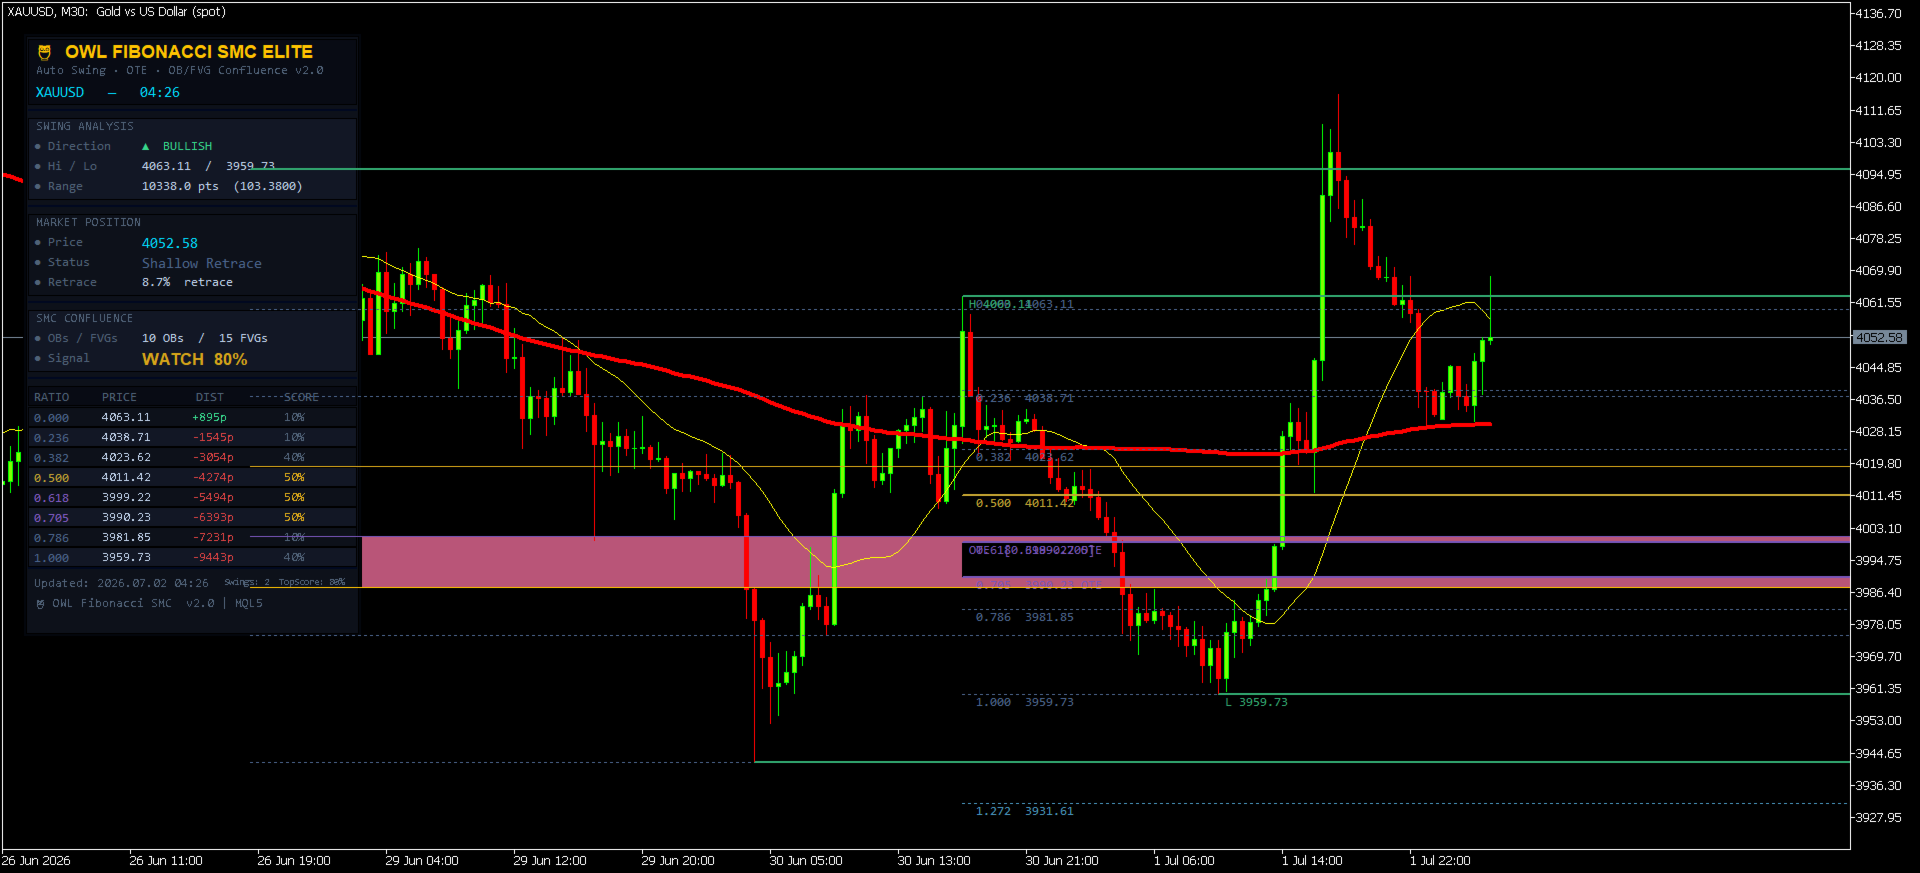
The 🦉 branded dark panel gives you a complete institutional briefing at a glance, organized into five sections:
🔲 SWING ANALYSIS
- Direction: **▲ BULLISH** or **▼ BEARISH** (colour-coded live)
- Swing High / Low prices
- Range in points and price units
🔲 MARKET POSITION
- **Live price** updated every tick
- Status: Above High / Below Low / **IN OTE ZONE** / Shallow / Mid / Deep Retrace
- Retracement % from swing (0% = at high, 100% = at low for bullish)
🔲 SMC CONFLUENCE
- Active Order Blocks and Fair Value Gaps count
- **Signal**: ▲ BUY XX% / ▼ SELL XX% / WATCH XX% / SCAN XX%
🔲 FIBONACCI LEVEL TABLE
8-row live table showing for each active level:
- **RATIO**: 0.236 through 2.618 — colour-coded by type
- **PRICE**: Exact level price — highlighted in green when price is near
- **DIST**: Distance from current price in points (+ = above, - = below)
- **SCORE**: Confluence score 0–100% — green/amber/dim based on quality
🔲 FOOTER
- Last update timestamp
- Swing count + top score summary
🎯 BUY/SELL SIGNAL ARROWS
Signal arrows appear on the chart **only when three conditions are met simultaneously**:
1. Price is within the OTE zone (0.618–0.705 with tolerance)
2. The OTE zone score meets your minimum threshold (default 60%)
3. The current bar has opened
**Zero Repaint Guarantee**: Arrows are placed using the bar open price — a value that is fixed the moment the bar opens and **never changes**. Only one arrow is visible at any time. Historical arrows clear on each new bar so you always see the current setup only.
Arrow colours:
- **🟢 Green ▲** = BUY signal (bullish swing, price in OTE, institutional confirmation)
- **🔴 Red ▼** = SELL signal (bearish swing, price in OTE, institutional confirmation)
⚙️ COMPLETE INPUT PARAMETER GUIDE
MAIN SETTINGS
| Parameter | Default | Range | Description |
|-----------|---------|-------|-------------|
| **InpSwingLB** | 20 | 5–100 | Bars each side to confirm a swing. Higher = fewer but stronger swings. Lower = more swings, more noise. |
| **InpMaxSwings** | 2 | 1–3 | How many swing pairs to display simultaneously. 1 = cleanest, 3 = full historical context |
| **InpOBLookback** | 60 | 10–200 | How many bars to scan for Order Blocks and FVGs. Match to your trading timeframe. |
| **InpMinScore** | 60 | 0–100 | Minimum confluence score required to show a signal arrow. 60 = balanced, 75 = selective, 85 = only elite |
RETRACEMENT LEVELS
Toggle any Fibonacci retracement level on or off. **0.618** and **0.705** are the OTE levels and are recommended always-on. **0.382** and **0.500** are key institutional reference levels.
EXTENSION LEVELS
Toggle extension levels (>1.000). **1.272** and **1.618** are the most respected institutional targets. Enable **InpShowExt** to show all extensions.
VISUAL SETTINGS
| Parameter | Description |
|-----------|-------------|
| **InpShowOTE** | Show/hide the OTE zone fill (highly recommended ON) |
| **InpShowOBs** | Show/hide Order Block boxes on chart |
| **InpShowFVGs** | Show/hide Fair Value Gap boxes |
| **InpShowLabels** | Show price labels and score tags on each Fib line |
| **InpShowArrows** | Show/hide signal arrows |
| **InpColBull/Bear** | Customize bullish and bearish Fib line colours |
| **InpColOTE** | OTE zone fill colour (default: institutional purple) |
| **InpLineW** | Line thickness 1–3 |
DASHBOARD
| Parameter | Default | Description |
|-----------|---------|-------------|
| **InpShowDash** | true | Show/hide dashboard panel |
| **InpDashX** | 23 | Horizontal position from left edge |
| **InpDashY** | 33 | Vertical position from top edge |
ALERTS
| Parameter | Description |
|-----------|-------------|
| **InpAlertArrow** | Popup alert when a BUY or SELL arrow fires |
| **InpAlertOTE** | Alert when price enters the OTE zone (max every 5 minutes) |
| **InpAlertPush** | Send push notifications to MetaTrader mobile app |
📱 HOW TO USE — STEP BY STEP
STEP 1: INITIAL CONFIGURATION
The default settings are calibrated for **H1 and H4 timeframes** on major pairs (EURUSD, GBPUSD, XAUUSD, BTCUSD). For other setups, adjust:
**For scalping (M1–M5):**
- InpSwingLB = 8–12
- InpOBLookback = 30
- InpMinScore = 55
**For day trading (M15–H1):**
- InpSwingLB = 15–25 *(default)*
- InpOBLookback = 50–80 *(default)*
- InpMinScore = 60 *(default)*
**For swing trading (H4–Daily):**
- InpSwingLB = 30–50
- InpOBLookback = 100–150
- InpMinScore = 70
STEP 2: READING THE CHART
**What you see on the chart:**
- **Purple filled zone**: OTE zone (0.618–0.705) — your primary entry area
- **Green semi-transparent boxes**: Bullish Order Blocks (institutional buy zones)
- **Red semi-transparent boxes**: Bearish Order Blocks (institutional sell zones)
- **Blue semi-transparent boxes**: Bullish Fair Value Gaps (price magnets)
- **Dark pink boxes**: Bearish Fair Value Gaps
- **Horizontal lines**: Fibonacci levels, colour-coded by type and score
- **H / L labels**: Swing high and swing low anchor points
- **▲ ▼ Arrows**: Entry signals at high-confluence OTE levels
STEP 3: READING THE DASHBOARD
Open the dashboard and go through it top to bottom:
1. **Swing Analysis**: Confirm the direction. If it shows ▲ BULLISH, you're looking for BUY setups. If ▼ BEARISH, you're looking for SELL setups.
2. **Market Position**: Watch the Status row. When it shows **▶ IN OTE ZONE**, price has entered your primary entry area. The Retrace % tells you exactly where in the swing you are.
3. **SMC Confluence**: Check the Signal row. **▲ BUY XX%** means an arrow has fired with that confluence score. **WATCH XX%** means conditions are approaching but not met. **SCAN XX%** means no qualified setup.
4. **Fibonacci Table**: Find levels scoring 70%+ (shown in green). These are your highest-probability price zones. Levels shown in gold (80%+) have both OB and FVG alignment — the strongest setups.
STEP 4: EXECUTING A TRADE
**BUY SETUP CHECKLIST:**
- [ ] Dashboard shows ▲ BULLISH direction
- [ ] Price is IN OTE ZONE (Status row, 0.618–0.705 retrace range)
- [ ] One or more Fibonacci levels score 65%+ in the table
- [ ] A green OB box is near the OTE zone
- [ ] A green ▲ arrow has appeared on the chart
- [ ] RSI or Stochastic is oversold (optional confluence from your other indicators)
**Execution**: Place a limit BUY order at or near the 0.618 Fibonacci level. Your Stop Loss goes below the swing low (0 line). Take profits at swing high (1.000 line), 1.272, and 1.618 for extensions.
**SELL SETUP CHECKLIST:**
- [ ] Dashboard shows ▼ BEARISH direction
- [ ] Price is IN OTE ZONE (0.618–0.705 retrace measured from low UP)
- [ ] One or more Fibonacci levels score 65%+ in the table
- [ ] A red OB box is near the OTE zone
- [ ] A red ▼ arrow has appeared on the chart
**Execution**: Place a limit SELL order at or near the 0.618 Fibonacci level. Stop Loss goes above swing high. Take profits at swing low (1.000), 1.272, and 1.618 extensions.
STEP 5: RISK MANAGEMENT
- **Maximum risk per trade**: 1–2% of account capital
- **Recommended R:R**: Minimum 1:2 (TP1) to 1:4 (TP3 at 1.618)
- **Position sizing**: Calculate based on distance from entry to swing low/high SL
- **Best session**: London open (08:00–12:00 UTC) and London/NY overlap (13:00–17:00 UTC) for highest institutional participation
💡 PROFESSIONAL TIPS
Tip 1: The Confluence Stack
The highest probability trades occur when you have ALL FOUR factors aligned:
- ✅ Price in OTE zone (0.618–0.705)
- ✅ Order Block in OTE area (OB box overlaps OTE zone)
- ✅ Fair Value Gap pointing to the same level
- ✅ Swing direction matches higher timeframe trend
When all four align, score reaches 90%+ and the trade is institutional-grade.
Tip 2: Multi-Timeframe Confirmation
Use OWL on two timeframes simultaneously:
- **Higher TF (H4/Daily)**: Identify the primary swing direction and OTE zone
- **Lower TF (M15/H1)**: Time your entry precisely when the score fires
Tip 3: Score as a Filter, Not a Signal
Don't treat the arrow as a "click and trade" signal. Use the score as a quality filter:
- Score 80–100%: Highest conviction. Can enter at market when OTE reached.
- Score 65–79%: Good setup. Wait for a confirming candle close inside OTE.
- Score 50–64%: Moderate. Reduce position size or skip.
- Score < 50%: Avoid. Not enough institutional backing.
Tip 4: Order Block Quality
Fresh (unmitigated) OBs are far more powerful than tested ones. If an OB box is near your entry AND it has never been retested since its formation, the probability of a reaction increases significantly.
Tip 5: Fair Value Gap as Target
When entering a BUY at a bullish OTE level, check if there's a Bearish FVG above the entry — this is often your first take-profit target, since price seeks to fill the imbalance.
Tip 6: Session Timing
The OTE setups work best during:
- **London Open (08:00–10:00 UTC)**: New York institutional hours begin
- **London/NY Overlap (13:00–17:00 UTC)**: Maximum liquidity, sharpest moves
- Avoid OTE entries during Asian session (00:00–07:00 UTC) — lower participation
🔧 TECHNICAL SPECIFICATIONS:
| Specification | Details |
|--------------|---------|
| **Platform** | MetaTrader 5 |
| **Build** | 3000+ |
| **Indicator Type** | Chart window (overlaid on price) |
| **Arrow Buffers** | 2 (Buy + Sell) |
| **Repaint** | ❌ Zero repaint — arrows set at bar open price |
| **Arrows on chart** | Maximum 1 at any time |
| **DLL required** | ❌ No |
| **External files** | ❌ No |
| **Strategy Tester** | ✅ Fully compatible |
| **Works on** | All symbols (Forex, Gold, Indices, Crypto, Stocks) |
| **Works on** | All timeframes M1 through Monthly |
| **Dashboard** | Dark professional panel, 333px wide |
| **Dashboard update** | Live price every tick |
| **Signal update** | Once per bar (new-bar gate) |
| **CPU load** | Minimal — heavy analysis runs once per bar only |
❓ FREQUENTLY ASKED QUESTIONS
**Q: Does work on cryptocurrency and gold?**
A: Yes. it works on any symbol available in your MetaTrader 5 broker — Forex pairs, XAUUSD (Gold), BTCUSD, indices (US30, NAS100, SP500), stocks, and commodities. The Fibonacci and SMC methodology is universal.
**Q: Why are there no arrows even though price is near the OTE zone?**
A: The OTE score may be below your InpMinScore threshold. Check the dashboard → Fibonacci Table for the score of the 0.618 and 0.705 rows. If the score is low, no OB or FVG is aligned with those levels. Lower InpMinScore to 45–50 to see arrows in lower-confluence environments, or wait for the OB/FVG alignment to form naturally.
**Q: How many swings should I display at once?**
A: Start with InpMaxSwings = 1 for a clean chart, focusing on the most recent swing only. Use 2 swings to see if older structure confirms the current setup. Use 3 only for historical analysis.
**Q: The swing detection picks a very small swing. How do I fix this?**
A: Increase InpSwingLB (e.g., from 20 to 35). A higher lookback requires more bars on each side to qualify as a swing, filtering out minor fluctuations and keeping only major structural swings.
**Q: Is this indicator repainting?**
A: No. Arrows are placed using `open[0]` — the price at which the current bar opened, which is permanently fixed and never changes. The `ArrayInitialize` call on each new bar clears old arrows to keep exactly one visible at all times, but the current bar's signal, once placed, uses a fixed price.
**Q: Can I use it with my Expert Advisor?**
A: Yes. Read Buffer 0 (BUY signal) and Buffer 1 (SELL signal) using `iCustom()`. A non-EMPTY_VALUE at index 0 indicates an active signal.
**Q: What's the difference between an Order Block and an FVG in Arcane?**
A: An **Order Block** is the specific candle before a major move — the zone where institutions placed large orders. An **FVG** (Fair Value Gap) is a price gap left between three candles that price hasn't returned to fill. Both are institutional footprints. When a Fibonacci level aligns with BOTH, it's the highest-conviction setup available.
🔄 VERSION HISTORY
**v2.0 (Current) — Complete Rewrite**
- ✅ Fixed: `Wipe()` was O(n²) — replaced with `ObjectsDeleteAll()`
- ✅ Fixed: Dashboard rebuilt every bar — now Create/Update pattern (OnInit only)
- ✅ Fixed: Swing direction logic mismatch between comment and code
- ✅ Fixed: `posRatio` division-by-zero guard on zero range
- ✅ Fixed: Alert throttle now per-symbol (not per-level, preventing spam)
- ✅ Fixed: Chart and dashboard object namespaces now fully separated
- ✅ Fixed: Fib level table rows previously shared `g_oc` counter with chart objects
- ✅ New: SMC Order Block detection (volume-weighted, most-recent-first)
- ✅ New: Fair Value Gap detection and chart visualization
- ✅ New: Confluence scoring 0–100% per Fibonacci level
- ✅ New: Non-repainting arrows placed at bar open price
- ✅ New: Single arrow only — `ArrayInitialize` clears history on each bar
- ✅ New: Score-coloured Fibonacci lines (gold = 80%+, amber = 60–79%)
- ✅ New: Live price update every tick in dashboard
- ✅ New: OTE active status in dashboard
**v1.0 (Original)**
- Basic auto swing detection
- Retracement and extension levels
- OTE zone fill
- Dashboard with swing info and Fib table
---
## ⚠️ RISK DISCLAIMER
Trading financial instruments carries substantial risk of loss. OWL Fibonacci SMC Elite is a technical analysis tool designed to assist experienced traders in identifying high-probability setups using Fibonacci and ICT/Smart Money Concepts methodology. It does not guarantee profits. Past performance does not guarantee future results.
Always use proper risk management:
- Never risk more than 1–2% of capital per trade
- Always use a Stop Loss placed beyond the swing structure
- Test on a demo account before using on a live account
- OWL is a decision-support tool, not a fully automated trading system
---
*© 2026 ARCANE Trading Systems. All rights reserved. Arcane Fibonacci Indicator v2.0 is built exclusively for MetaTrader 5 and distributed through the MQL5 Marketplace.