StrengthBubbleV9
- Indicatori
-
Yuxin Lyu
 A forex trader of more than 10 years experiences.
 - Versione: 9.3
- Attivazioni: 5
Pre-Purchase Notice: This indicator performs best on zero-spread accounts or fixed-spread accounts — i.e., broker accounts that do not widen spreads during news events. Prefer to use the Exness Zero-spread account.
DeltaVolumeBubble — Volume Bubble Indicator
A visualization tool distilled from Order Flow Delta. Using bubble size × color, it lets you instantly read the true bull-bear battle behind every single candlestick.
🎯 What Problem Does This Indicator Solve?
Price can deceive you, but capital flow cannot.
Traditional candlesticks only tell you "where price went", but never tell you "who was driving it". DeltaVolumeBubble maps the Delta (net difference between aggressive buy orders vs. aggressive sell orders) from order flow directly onto each candlestick, presented through intuitive bubbles——
- 🟢 Green Bubble = Aggressive buyers dominate (bulls are pushing)
- 🔴 Red Bubble = Aggressive sellers dominate (bears are dumping)
- ⚪ Larger Bubble = More intense bull-bear battle, greater net dominant volume
No more staring at dense order flow data tables. One glance across the chart and you instantly know which side the money is on.
🧩 Two Core Components — Simplified by Design
This indicator strips away complex, redundant displays and retains only two visual components with the highest decision-making value:
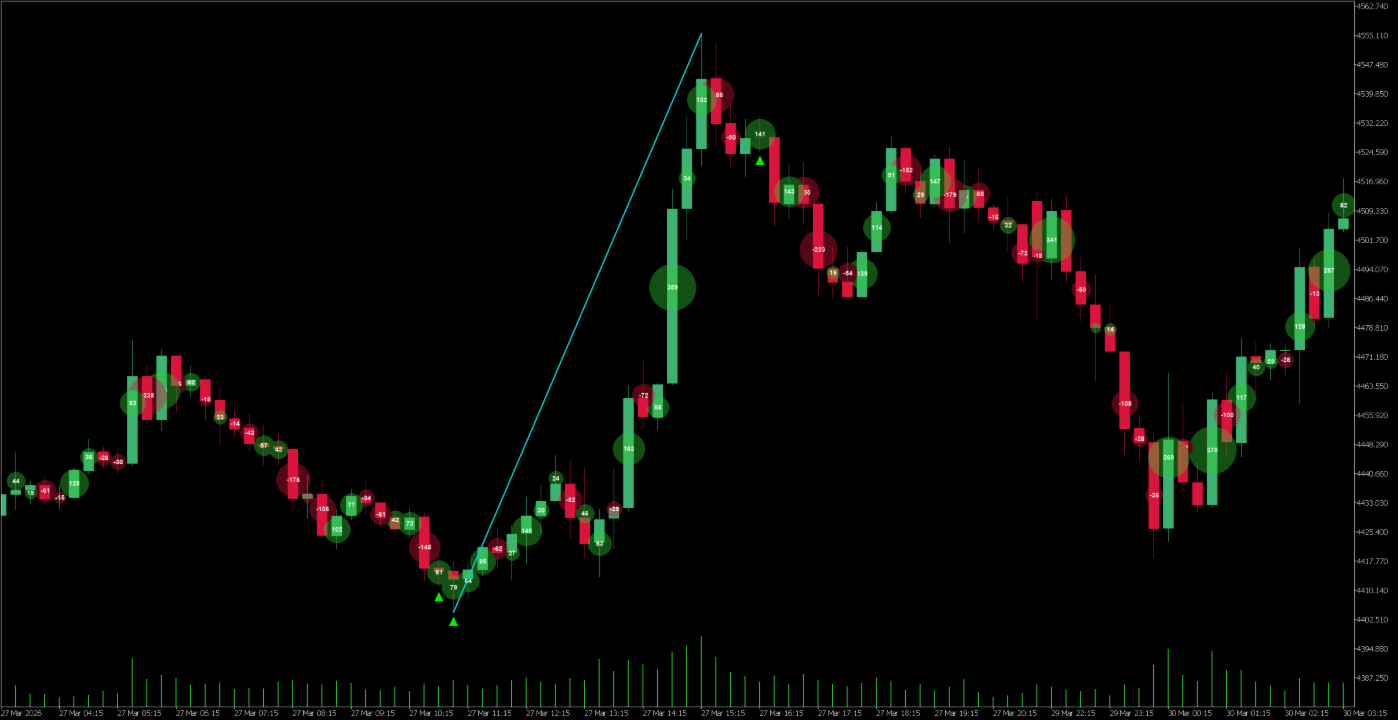
Component 1: Volume Bubble
The bubble at the center of each candlestick is the visualization of the net dominant volume — the result of the battle between market buy orders and market sell orders within that candle.
| Application | What You Can See |
|---|---|
| Single-candle bull/bear strength identification | Green = buy-side dominated, Red = sell-side dominated |
| Volume exhaustion detection | Bubbles progressively shrinking across consecutive candles → trend momentum is drying up |
| Effort vs. Result identification | Large bubble + small candle body → big capital entered but price barely moved → potential reversal signal |
| True vs. false breakout confirmation | Does the breakout candle's bubble color align with its direction? Bullish candle with negative Delta / Bearish candle with positive Delta → beware of liquidity grabs |
Component 2: Divergence Triangle
When "Bullish candle + Negative Delta" or "Bearish candle + Positive Delta" occurs, a small triangle marker appears near the candle's high or low.
Price went up, but sellers were actually in control; or price went down, but buyers were actually absorbing the selling. — This is price-delta divergence, and it carries a meaningful probability of being an early signal that the trend is about to reverse.
📐 Use Cases
| Trading Style | How to Use |
|---|---|
| Left-side trading (Counter-trend) | At key support/resistance levels, watch for volume exhaustion + divergence triangles → gauge reversal probability with greater confidence, stop catching falling knives blindly |
| Right-side trading (Trend-following) | When a breakout occurs, observe the breakout candle's bubble color and size → confirm whether it's a genuine breakout or a fake breakout after a liquidity grab |
| Price action trading | Use as an additional confirmation layer for naked chart trading — when Pin Bars, engulfing patterns, and other formations appear, verify with bubbles whether real capital is backing the move |
💡 Recommended observation timeframes: 15-minute & 30-minute — the optimal balance between noise and information.
⚙️ Core Parameters Overview
| Parameter | Default | Function | Tuning Suggestions |
|---|---|---|---|
| MaxBars | 100 | Maximum number of candles to calculate | 100 is sufficient for scalping/intraday; maximum recommended ≤ 500 to avoid tick calculation overload |
| MinDeltaThreshold | 0 | Minimum Delta threshold for bubble display | Don't like a screen full of bubbles? Set to 50–100 to filter out noise |
| DivDeltaMin | 10 | Minimum Delta filter for divergence triangles | Set to 50+ to retain only "institutional-level" price-delta divergences |
| SizeMult | 2.5 | Bubble size multiplier | Increase for 4K screens; reduce to 1.5 for smaller screens or dense candles to avoid overlap |
| Transparency | 120 | Bubble transparency (0–255) | Lower value = more transparent; ensures bubbles don't obscure the candlesticks themselves |
| ShowDeltaValue | True | Whether to display Delta numerical values | Minimalists can set to False — rely purely on color + size for intuitive judgment |
| TriangleOffset | — | Distance between divergence triangle and candle | Increase if the triangle feels too close or cramped |
⚠️ Important Reminder
This is NOT a "signal appears, enter blindly" indicator.
Do not place a trade simply because you see a large bubble on a single candlestick. Its value lies in — combining it with price action, market structure, and key levels to provide additional confirmation from the order flow dimension for your trading decisions.
It is recommended not to run this indicator alongside other computation-heavy indicators or EAs in the same chart window, to ensure smooth performance.
Summary
Candlesticks tell you where price went. Volume Bubbles tell you — who was pushing it.