Multiple Timeframe Filtered MA Crossover EA
- Experts
- Versione: 1.0
- Attivazioni: 7

NOTE: The EA is designed to trade the same signal engine as the companion indicator. If you want to see signals on a chart before committing capital, purchase and configure the indicator first(Multiple Timeframe Filtered Moving Average Crossover Indicator), or try the free version of the indicator as well (Multiple Timeframe Filtered Moving Average Crossover Signals) verify it fires the way you expect on the symbols and timeframes you trade, then replicate those settings in the EA. The two are configured independently — nothing is shared between them — so consistency is your responsibility when you publish both on the same chart.
The EA is the trading companion of our published indicator, "Multiple Timeframe Filtered Moving Average Crossover Indicator." If you already own or are considering the indicator, understand this: the indicator tells you when a signal fires; the EA takes that same signal and executes it according to rules you control. The strategy logic — the crossover engine, the MA validation stack, the MTF RSI/MACD/Price filters, the trading-period rules — is identical between the two. This document describes the EA's additional layer: how it opens trades, manages them across three take-profit tiers, trails stops, sizes lots and protects the account.
What the EA does that the indicator does not
The indicator is a signal tool. The EA is a signal-to-execution pipeline. When a signal fires and you have trading enabled, the EA:Opens up to three positions in one trade group, each with its own lot size and its own exit strategy.
-
Applies TP1 with either a fixed risk-reward ratio, the previous HTF candle's close or high/low, or a live exit at the next HTF candle close.
-
Attaches a trailing stop to TP2 and TP3, driven by moving averages you configure. TP2 and TP3 each trail on their own independent MA.
-
Gates the trailing until TP1 has closed in profit. If TP1 has not yet closed, or closed at a loss, the remaining positions keep only their initial stop loss. This is the "TP1 must win first" rule and it is one of the EA's most important behaviours.
-
Enforces lot sizing that scales down when the account is in drawdown if you enable recovery mode.
-
Can halt trading if the account has lost more than a percentage of the initial balance, and can block new trades for the rest of the day if the daily drawdown limit has been breached.
Everything is switch-controlled. You can run one, two or three tiers, or disable trading entirely and use the EA as an alerting tool exactly like the indicator.
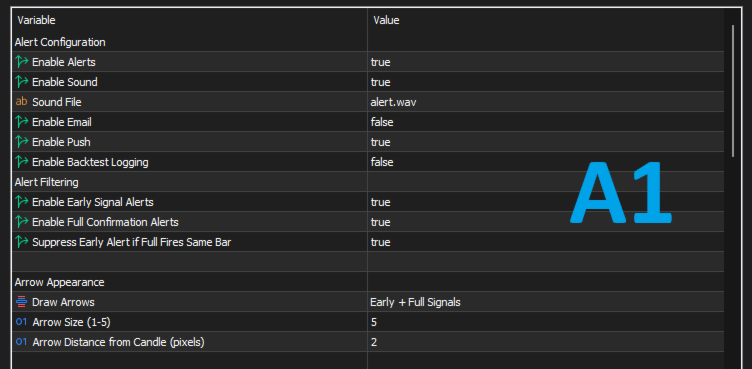
Alert Configuration — Image A1
Identical to the indicator. Pop-up alert, sound, email, and mobile push are each independently togglable. Alerts fire on Early signals, Full signals, or both, with an option to suppress the Early alert when a Full signal fires on the same bar in the same direction. Backtest logging writes one line per candidate crossover to the Experts log so you can audit signals bar by bar during optimization.
Arrow Appearance — as with the indicator, arrows are drawn on the chart only in On Close or Confirmed mode. Intrabar signals fire alerts but never draw arrows. You can disable arrows entirely for the cleanest chart.
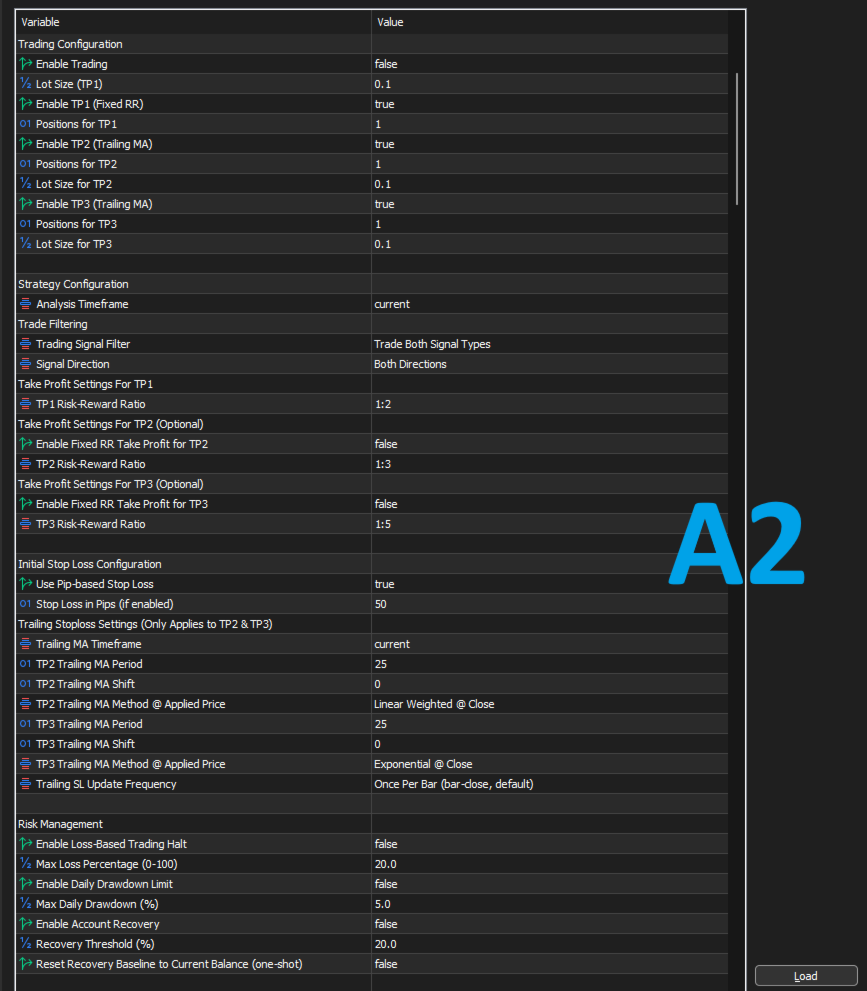
Trading Configuration — Image A2
The core of the EA.
-
Enable Trading — master switch. Off, the EA alerts only.
-
Lot Size (TP1), Lot Size for TP2, Lot Size for TP3 — each tier has its own volume. This lets you size TP1 for a quick scalp and TP2/TP3 for the runners.
-
Enable TP1 / TP2 / TP3 — individually toggle each tier. You can run any combination. A "TP1 only" configuration gives you a single-position EA with a fixed-RR exit.
-
Positions for TP1 / TP2 / TP3 — how many orders to open per tier. Useful if your broker limits volume per order, or if you want the visual separation of multiple tickets.
-
Analysis Timeframe — the timeframe the crossover and validation logic runs on. Default is the chart timeframe.
Trade Filtering, Take Profit, Stop Loss & Trailing — Image A2 (continued)
-
Trading Signal Filter — Early only, Full only, or Both. Some traders want the aggressive Early entries; others only want the Fully-confirmed ones. The EA respects whichever you choose.
-
Signal Direction — Long only, Short only, or Both.
-
TP1 Risk-Reward Ratio — 1:1 through 1:7. The SL used for this calculation is either pip-based or signal-based, described below.
-
Enable Fixed RR Take Profit for TP2 / TP3 — optional. When off, TP2 and TP3 have no fixed take profit and rely purely on the trailing MA. When on, they take profit at the specified ratio if price reaches it before the trailing MA does.
-
TP2 / TP3 Risk-Reward Ratio — 1:1 through 1:7, independent per tier.
-
Use Pip-based Stop Loss / Stop Loss in Pips — the initial SL is placed at a fixed distance from entry, in pips. Disable and the SL is placed 10 points beyond the signal candle's low (buy) or high (sell).
-
Trailing MA Timeframe — the timeframe for the TP2 and TP3 trailing MAs. It can differ from the analysis timeframe.
-
TP2 Trailing MA Period / Shift / Method @ Applied Price — the MA that TP2 uses as its trailing stop. The Method @ Applied Price dropdown gives you the full menu: Simple, Exponential, Smoothed or Linear Weighted, each applied to Close, Open, High, Low, Median Price (HL/2), Typical Price (HLC/3) or Weighted Close (HLCC/4). 28 combinations in one dropdown.
-
TP3 Trailing MA — same controls, independent of TP2. Typically you run a slower MA on TP3 to let it ride the larger trend.
-
Trailing SL Update Frequency — Once Per Bar (default, lower CPU) or Every Tick (live, higher CPU). The MA value only refreshes per bar in the default mode; switch to Every Tick for the tightest possible trailing response.
Risk Management — Image A2 (continued)
-
Enable Loss-Based Trading Halt — once the account has lost the configured percentage of the initial balance, the EA stops opening new trades. Existing positions continue to be managed. The halt is not cleared until the EA is reloaded.
-
Max Loss Percentage — 0 to 100.
-
Enable Daily Drawdown Limit — once the account has lost the configured percentage from the start-of-day balance, the EA blocks new trades for the rest of the calendar day. The block clears automatically at the first bar of the next day.
-
Enable Account Recovery / Recovery Threshold — above this drawdown level, the EA begins scaling lots downward linearly toward 10% of the base lot at 100% drawdown. This is a defensive mechanism, not a martingale. It never increases lots after losses.
-
Reset Recovery Baseline to Current Balance — a one-shot switch. Set it to true, reload the EA, then set it back to false. The recovery baseline is re-seeded to the current balance. The baseline is stored per account and per symbol, so multiple accounts and symbols on the same terminal never interfere.
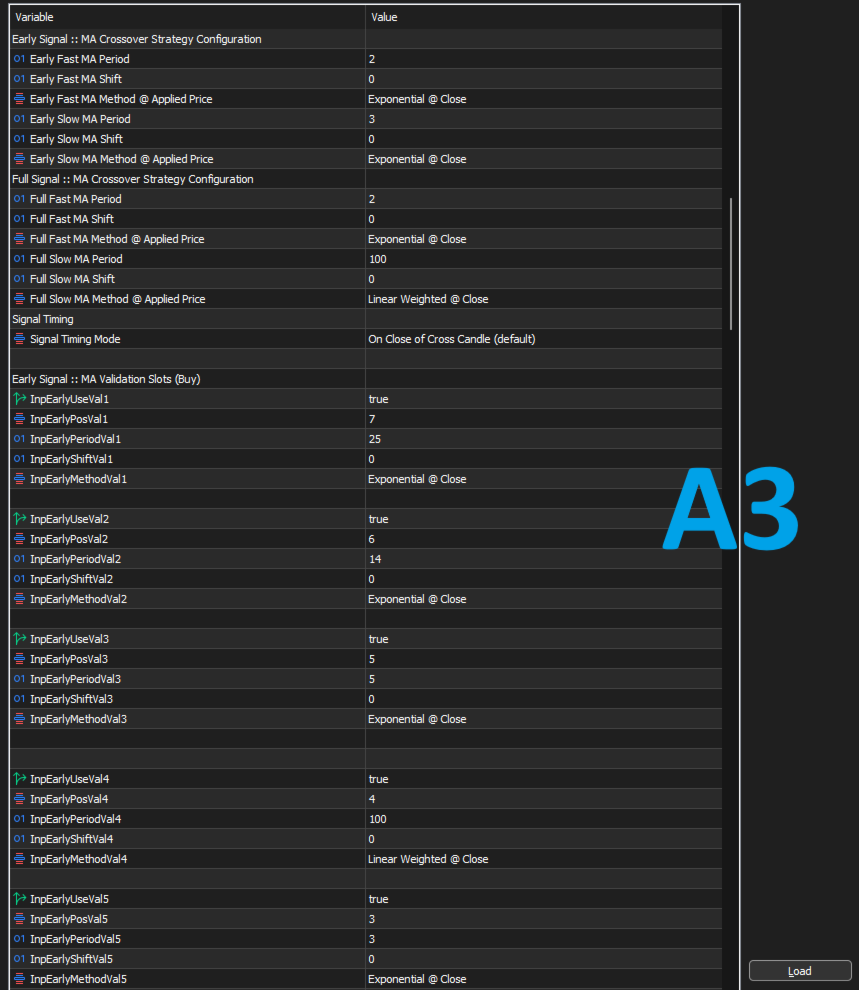
Early & Full MA Crossover Configuration — Image A3
The crossover engine is identical to the indicator. Each side — Early and Full — has:
-
Fast MA Period, Fast MA Shift, Fast MA Method @ Applied Price
-
Slow MA Period, Slow MA Shift, Slow MA Method @ Applied Price
You choose the period, the shift (offset), and the method-plus-applied-price from the 28-option dropdown. No more being limited to what the developer decided to hard-code. If your strategy trades a 7-period LWMA on Typical Price crossing a 21-period Smoothed MA on Median Price, you configure exactly that, on both the Early and Full sides.
Signal Timing Mode — Intrabar, On Close, or One Candle After Close (Confirmed). Intrabar is the fastest but repaints. On Close is the default. Confirmed requires the cross to have occurred on the previous closed candle and still hold on the current closed candle.
MA Validation Slots — Image A3 (continued)
The validation stack is what separates a crossover from a confirmed crossover. Under Early and again under Full, you have 11 slots. Each slot has four inputs:
-
Use Slot — on or off.
-
Position (0–11) — where this MA sits in the stack. Sort order is descending by position number, so slot with position 11 is the top of the stack.
-
Period / Shift / Method @ Applied Price — the MA's own configuration.
A Buy signal requires the enabled stack to be in strictly descending value order: each MA must have a strictly greater value than the MA below it. A Sell signal requires the same in reverse. If the order does not match, the signal is rejected before any trade is attempted.
For example: position 3 = EMA 14, position 2 = EMA 5, position 1 = EMA 25 means a Buy passes only when EMA14 > EMA5 > EMA25 is true at the moment of the cross. Any other alignment and the signal is discarded.
Disabled slots default to position 0 and are simply skipped, so an unused slot never interferes with the chain.
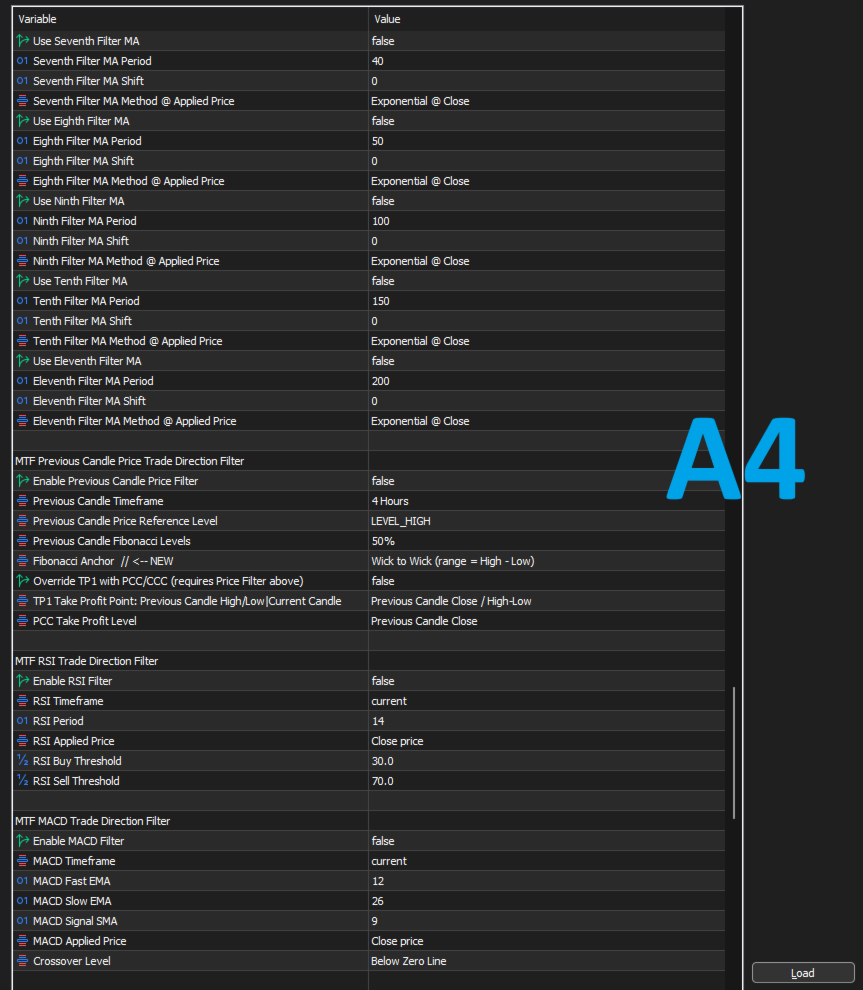
MTF MAs Trade Direction Filter — Image A4
This is the higher-timeframe trend filter. Up to eleven filter MAs can be stacked, each with its own period, shift, method @ applied price.
-
Enable MTF EMAs Trade Direction Filter — master on/off.
-
MA Filter Mode — Include Price (chain starts with price, then the MAs) or MAs Only (chain starts with the first MA).
-
Filter Timeframe — the timeframe all filter MAs are evaluated on. Common choice: H1 or H4 while trading M5.
If the filter timeframe says downtrend and the signal is a Buy, the signal is silently discarded. This is what allows you to trade a fast engine in the direction of a slower trend.
MTF Previous Candle Price Trade Direction Filter — Image A4 (continued)
This filter is the one-candle theory, implemented. The most recent closed candle on a higher timeframe defines a reference range. The signal only passes if the current price sits inside a zone built from that candle.
-
Previous Candle Timeframe — typically H4, D1 or W1. Must be higher than the analysis timeframe; the EA refuses to load otherwise.
-
Fibonacci Anchor — Wick to Wick (range = High − Low) or Body to Body (range = body top − body bottom).
-
Fibonacci Levels — 23.6%, 38.2%, 50%, 61.8%, 78.6%, 100%, 107%, 117%, 123.6%. The 107% level is the stop-hunt zone: many traders place stops just past the candle's opposite extreme, and 107% catches the sweep.
-
Price Reference Level — Open, High, Low or Close of that previous candle.
The zone is the range between the Fibonacci price and the reference price. Buy requires the previous candle to be bullish; Sell requires it to be bearish. If the direction agrees and price is inside the zone at the moment of the cross, the signal passes. A prior dip past the level does not disqualify a later cross — the check is stateless.
Override TP1 with PCC/CCC — when enabled, the TP1 exit no longer uses risk-reward. It uses either:
-
Previous Candle Close / High-Low (the PCC mode) — TP1 exits at the previous HTF candle's close or its high (buy) / low (sell).
-
Current Candle Close (the CCC mode) — TP1 exits at the close of the current HTF candle, five seconds before the next candle opens. The EA tracks the expiration per ticket and closes it automatically.
MTF RSI Filter — Image A4 (continued)
-
RSI Timeframe — the RSI is evaluated on a completely different timeframe from the chart.
-
RSI Period, RSI Applied Price — standard RSI configuration.
-
RSI Buy Threshold — Buy signals pass only if RSI is at or below this level (default 30).
-
RSI Sell Threshold — Sell signals pass only if RSI is at or above this level (default 70).
MTF MACD Filter — Image A4 (continued)
-
MACD Timeframe, Fast EMA, Slow EMA, Signal SMA, Applied Price — full MACD configuration on any timeframe.
-
Crossover Level — Below Zero (momentum reversal from a low) or Above Zero (continuation in an established trend).
The EA requires an actual MACD crossover on the filter timeframe at the moment of the signal, plus the crossover occurring on the correct side of the zero line.
Trading Period Rules — Image A5
Restrict trading to specific sessions or hours.
-
Execute Trades Only During Specific Periods — master on/off.
-
Stop Trading During Major Holidays — suppresses New Year, Christmas, US Independence Day, and US Thanksgiving.
-
Trading Period By Asset Category — Crypto/Binary (with weekends-only mode), Forex (six sessions plus three overlap periods), Stocks/Indices (NY, London, Germany, Tokyo, with first-hour options), Commodities (CME, ICE, London Gold, New York Gold), or Custom (day-by-day schedule with your own timezone offset).
All session times are internally converted from the chart's server time to UTC, so the filters follow your broker's DST transitions without any manual reconfiguration.
What you receive
Full position management from the moment a signal fires. Three TP tiers with independent sizes and exit rules. Trailing stops that engage only after TP1 has proven itself. Recovery-aware lot sizing. Loss-based halt. Daily drawdown limiter.
The same clean-chart design as the indicator. Only arrows are drawn. The MAs you configure for validation, filtering or trailing never clutter the chart.
Complete configurability. Every MA in the system — crossover, validation, filter, trailing — is defined by period, shift, and method-plus-applied-price. There are no preset MA pairs you are forced into.
Two-stage or single-stage trading. Run Early and Full together for an aggressive-plus-confirmed system, or pick one side for a simpler strategy.
Works alongside the indicator. Attach both on the same chart and you see the arrows from the indicator while the EA executes on its own internally-computed signals. As long as both use the same configuration, the arrows and the trades line up.
Who this is for
You have ever built a crossover rule you liked. You hand the EA the strategy you already trust — through the validation stack and the filters — and it applies that strategy mechanically on every signal, with the same SL rule, the same TP ladder, the same trailing logic, every time.