Halfway Back Trend
- Indicateurs
-
Ich Khiem Nguyen
 🚀 TRADEZ AVEC EXNESS — ACCÉDEZ AUX AVANTAGES ALPHAONCHART
Vous recherchez un environnement de trading pratique et souhaitez bénéficier d'outils supplémentaires et d'un accompagnement ?
Inscrivez-vous chez Exness via le lien ci-dessous pour accéder au programme d'avantages AlphaOnChart : - Version: 1.0
- Activations: 10
Midpoint Retracement and Trend Continuation Strategy for MT5
Systematic 50% Equilibrium Retracement Mapping and Trend Resumption Validation
Core Concept and Value Proposition
Timing entries during corrective market pullbacks presents persistent execution challenges: entering too early during a correction risks exposure to deeper structural drawdowns before price finds support, while hesitating often results in missing the reversal pivot entirely and chasing an extended move at unfavorable risk-to-reward locations. Corrective wicks around equilibrium levels frequently shake out undisciplined positions, while uncertainty regarding structural validity causes hesitation at prime continuation points.
HalfwayBackTrend addresses this structural timing problem directly on the chart. The algorithm measures the primary impulse swing to dynamically project the 50 percent equilibrium zone, tracking order flow until price confirms rejection and directional velocity resumes. Rather than guessing the depth of a correction, the system signals entries only when price respects the midpoint structure and momentum confirms trend resumption on closed bars. Shallow consolidations and overextended, failed pullbacks are systematically filtered out.
The system is optimized for active trading sessions across high-liquidity symbols (major Forex pairs, Gold, stock index CFDs) characterized by clean structural swings and consistent volume across multiple timeframes.
Algorithmic Logic and Trade Validation
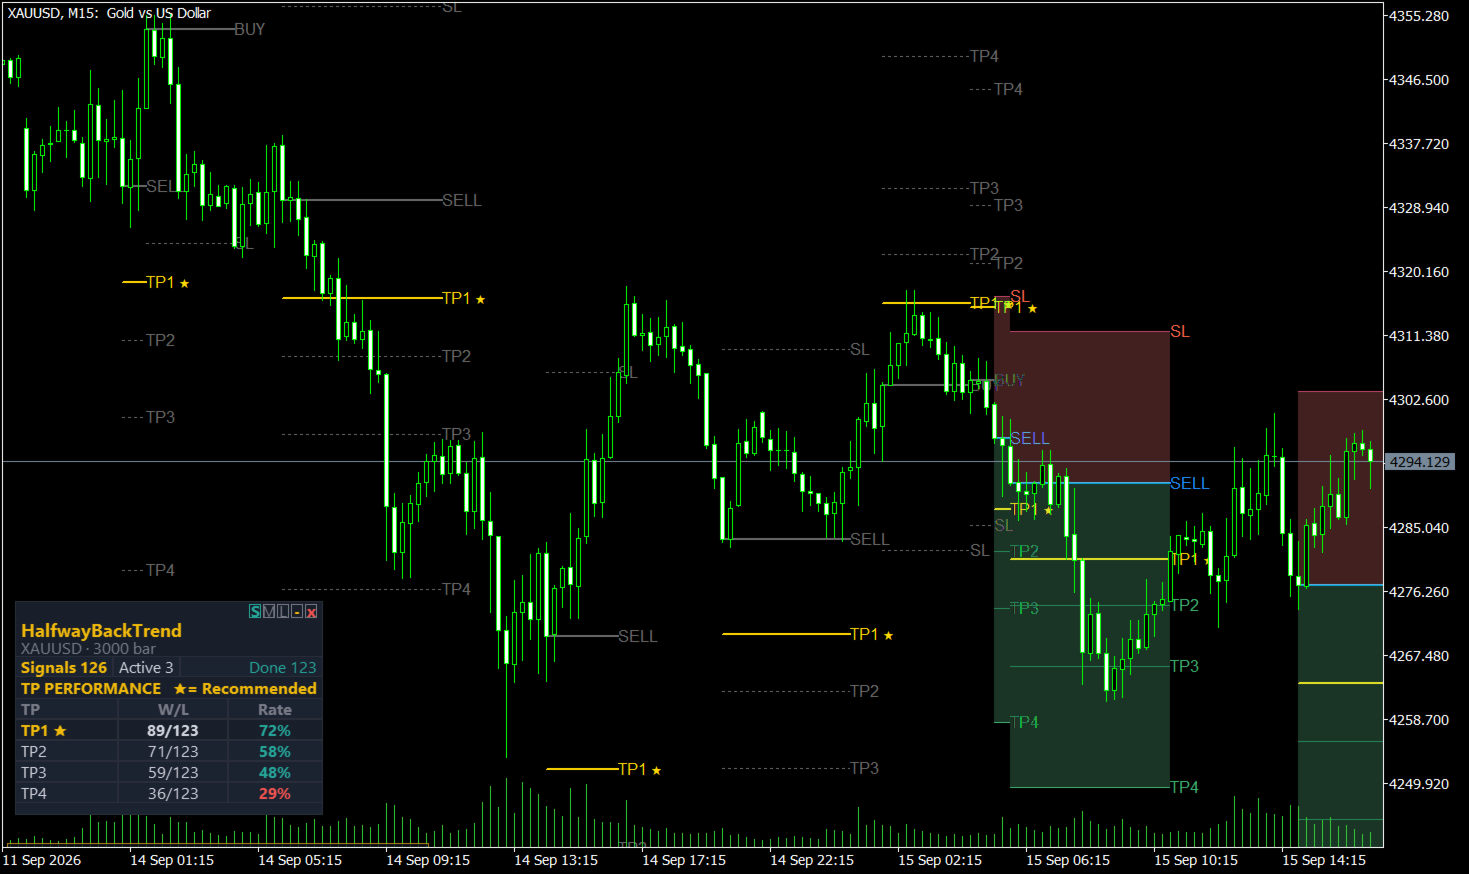
Visual BUY Confirmation (Bullish Midpoint Continuation):
- Structural Context: An established upward trend impulse is validated, followed by a corrective pullback into the 50% equilibrium zone.
- Trigger Bar: Price prints a decisive bullish expansion candle rejecting lower levels and confirming renewed upward momentum. A green arrow appears on the chart.
- Execution Reference: The trade execution trigger confirms strictly upon candle close; the open of the subsequent bar serves as the execution reference.
Visual SELL Confirmation (Bearish Midpoint Continuation):
- Structural Context: An established downward trend impulse is validated, followed by a corrective retracement into the 50% equilibrium zone.
- Trigger Bar: Price prints a decisive bearish expansion candle rejecting higher levels and confirming renewed downward momentum. A red arrow appears on the chart.
- Execution Reference: The trade execution trigger confirms strictly upon candle close; the open of the subsequent bar serves as the execution reference.
Strict Closed-Bar Calculation:
- All signal calculations, equilibrium levels, and target projections are locked strictly upon the close of the setup bar.
- Once a candle completes, the signal markers and price levels lock permanently; they do not recalculate, shift, or disappear on historical bars.
Risk Management Architecture and Target Ladder
Every validated setup automatically projects a disciplined trade management framework directly onto the chart:
- Protective Stop Loss: Systematically anchored beyond the recent structural swing high or swing low, incorporating a volatility buffer to give trades adequate breathing room against routine market noise.
- TP1 (0.5R): Rapid risk-mitigation milestone designed for early partial scaling and risk neutralization.
- TP2 (0.8R): Standard milestone designed to capture balanced continuation momentum during regular market swings.
- TP3 (1.2R): Swing target configured to capture extended momentum phases.
- TP4 (2.0R): Macro expansion target engineered to track sustained, high-momentum trend runs.
- Lifecycle Tracking: Real-time on-chart indicators monitor setup progression (Active, TP Hit, SL Hit).
Integrated Functional Modules
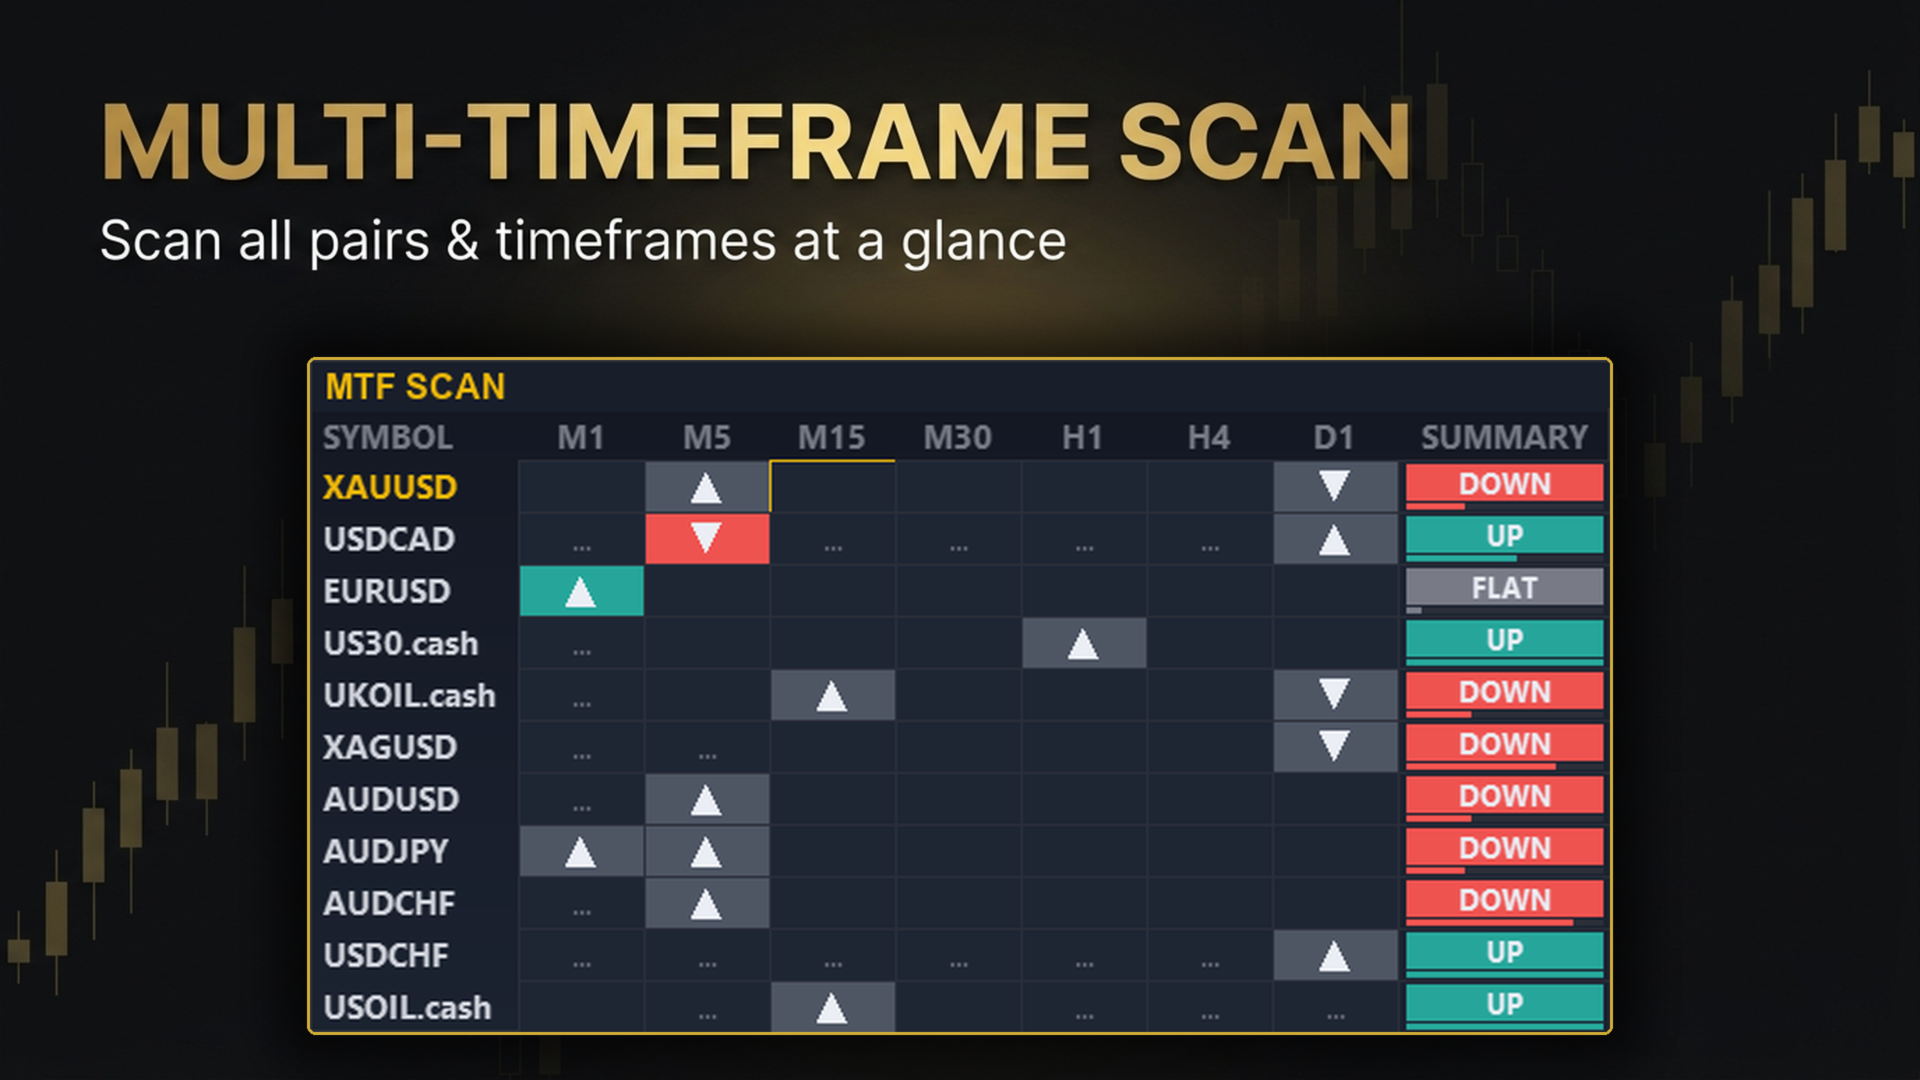
1. Multi-Symbol and Multi-Timeframe Scanner
Monitors multiple instruments simultaneously across M15, M30, H1, H4, and D1 without opening multiple charts:
- Active Signal Discovery: Scans and highlights active BUY and SELL setups as midpoint retracements confirm.
- Signal Status Tracking: Displays the lifecycle phase of each tracked signal (Active, approaching TP, approaching SL).
- Timeframe Confluence: Alerts when higher-timeframe trend alignment reinforces lower-timeframe equilibrium triggers.
- Market Bias Summary: Delivers an UP, DOWN, or FLAT reading based on structural trend evaluation.
- One-Click Switching: Click any cell on the scanner dashboard to immediately redirect your active chart to that symbol and timeframe.
2. Noise Filtering (Signal Brake Engine)
- Suppresses alternating BUY/SELL signals in tight, sideways consolidation ranges.
- Restricts new same-direction signals while an existing setup is actively unfolding.
- Enforces a minimum structural R-distance between triggers to prevent signal clustering.
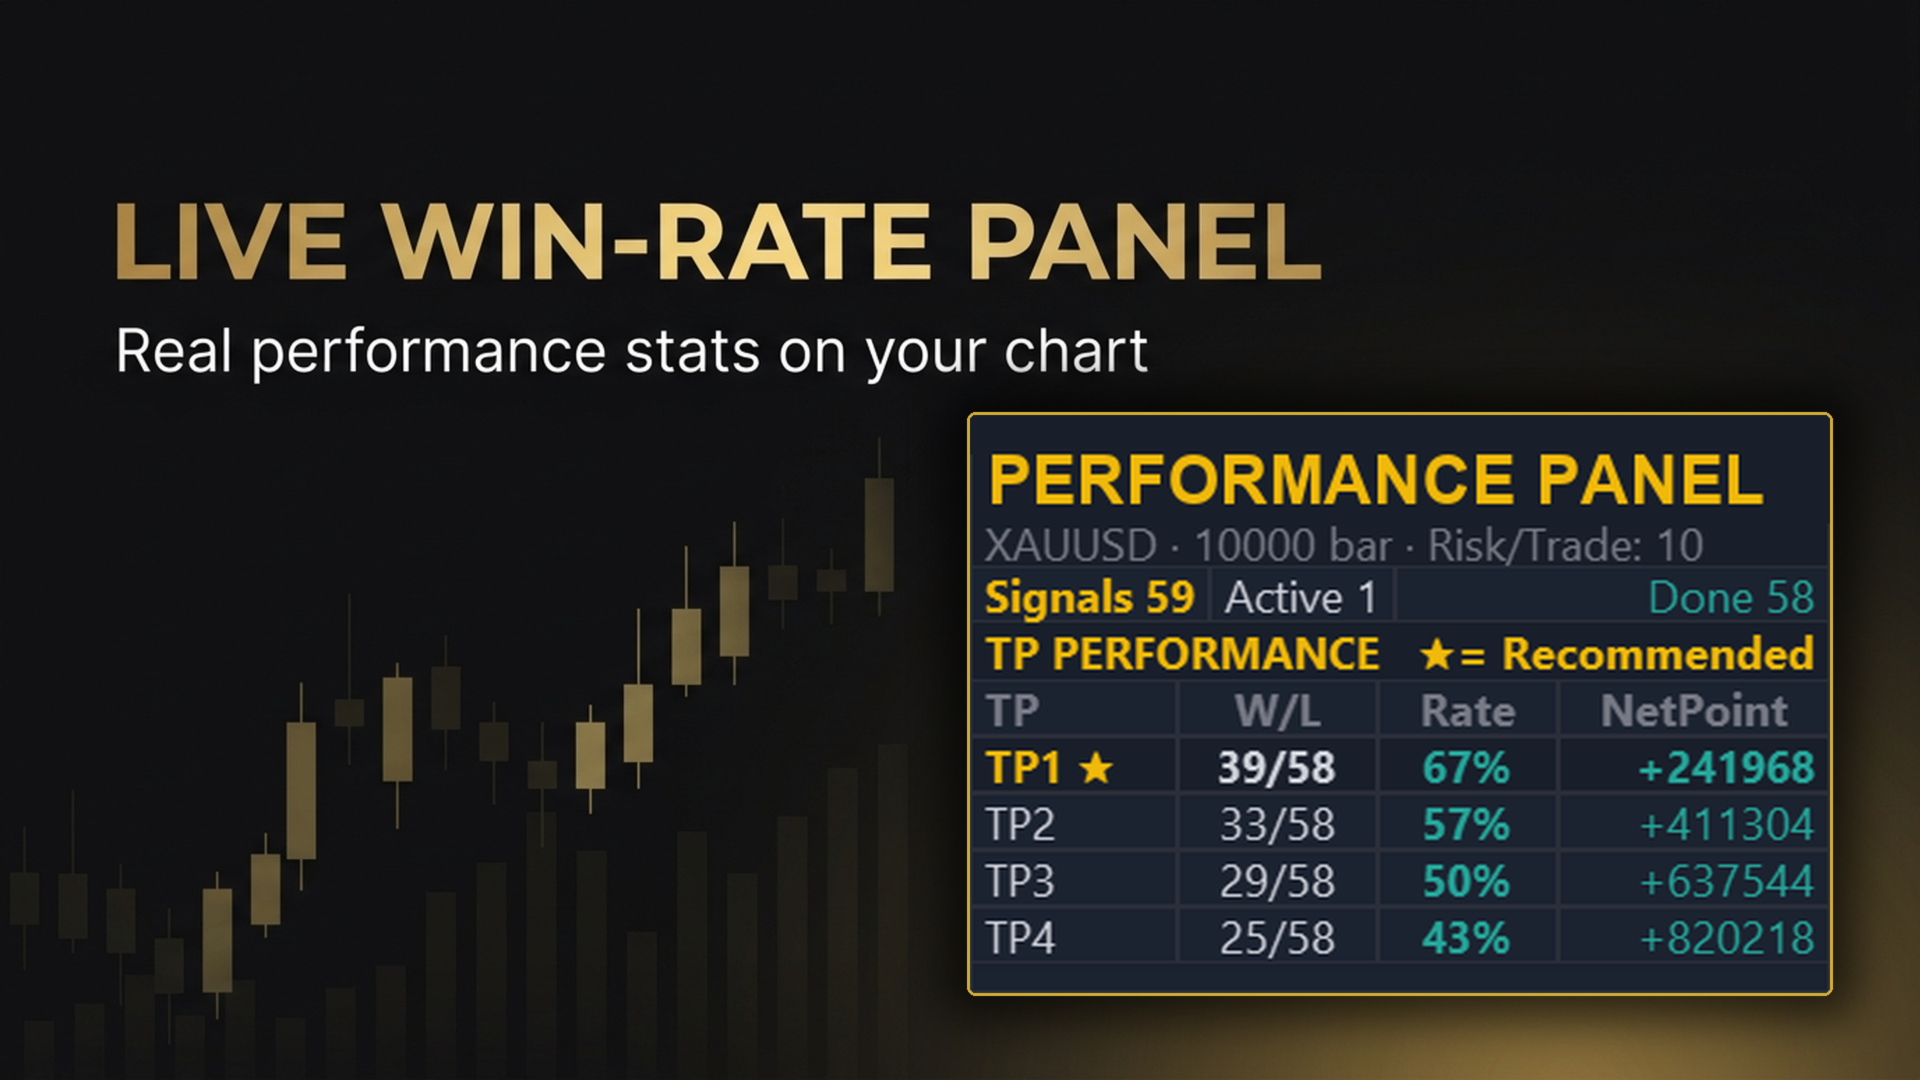
3. On-Chart Historical Backtest Panel
Provides an immediate statistical summary of past signal outcomes directly on your chart:
- Reports hit-rate performance across all target tiers (TP1, TP2, TP3, and TP4).
- Displays total setup count and sample size over the configured historical lookback.
- Highlights optimal historical target levels for the selected asset.
- Note: Backtest metrics represent past price behavior for the active symbol and settings. Past performance does not guarantee future results.
4. Multi-Channel Alert Suite
- Standard MT5 desktop visual pop-ups.
- Audible sound notifications (.wav).
- Instant mobile push notifications via MetaQuotes ID.
5. Optimized Chart Interface
- Three size presets: Small (S), Medium (M), and Large (L).
- One-click minimize and expand controls to keep chart space clutter-free.
- Draggable interface panel that retains its position across timeframe changes.
Recommended Usage and Operating Specifications
- Supported Instruments: Highly liquid assets such as major Forex pairs, Gold (XAUUSD), and stock index CFDs.
- Recommended Timeframes: M15, M30, H1, and H4 provide the cleanest impulse definitions and reliable closed-bar equilibrium reactions.
- Platform Compatibility: Fully compatible with MetaTrader 5 on both Hedging and Netting account types.
Support and Free Demo Testing
A functional demo version is available to evaluate directly inside the MetaTrader 5 Strategy Tester prior to purchase.
If you have questions regarding indicator logic, settings, or chart configuration, please send a direct message via my MQL5 profile or comment on the product page.