NR Grid DCA Scalping
- Experts
- 버전: 1.2
- 활성화: 5

📣 EA STRATEGY OVERVIEW
The EA strategy is a hybrid combination of Grid, DCA (Dollar Cost Averaging), and Martingale.
- Optimal Entry Point: The EA utilizes a multi-indicator signal filter matrix (including MA, TEMA, TRIX, Bollinger Bands, RSI, MACD, Stochastic, Parabolic SAR...) to select the initial entry point only when the market reaches overbought/oversold conditions or trend exhaustion.
- Handling Adverse Price Movements: The system automatically calculates the grid distance (Grid Step) and scales up the position volume (Lots) according to your flexible customizable settings.
- Ultimate Goal: Bring the average price (Average Price) as close as possible to the current market price and wait for a retracement so the system can close the entire grid for profit.
🚨 "EXTREME WARNING": THIS EA IS NOT FOR THE FAINT OF HEART OR THOSE DREAMING OF "LOW CAPITAL - LOW RISK - HIGH REWARD"!
Face the truth: If you choose to play the Grid, DCA, and Martingale system, NEVER dream of "risk-free consistent profits" or "hoping for steady daily profits".
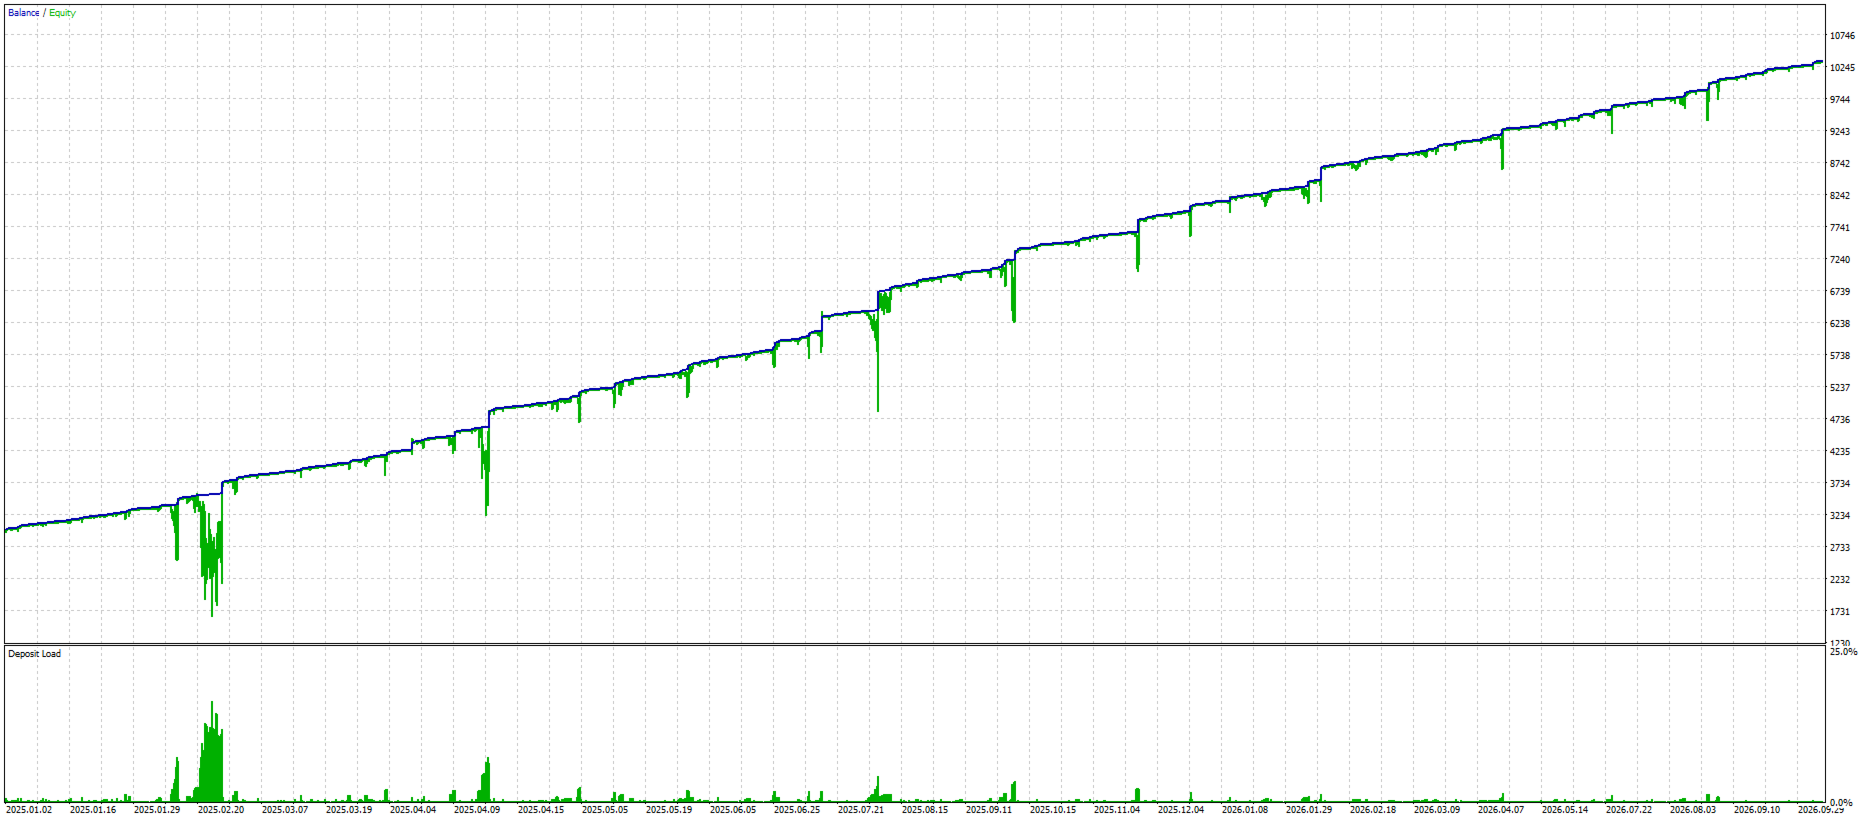
If you decide to deploy this EA on a live account, you must possess nerves of steel: Stay calm when facing deep drawdowns of -75% to -80% during strong one-way trend storms. Right from the moment you deposit funds, you must adopt the mindset of "I am fully prepared to restart," treating a "blown account" as an inevitable cost in a high-probability game.
- ⛔ If drawdowns at that level cause you sleepless nights, panic, or feel like the end of the world — close this article immediately and seek a safer solution.
- 💮 If you accept the rules of the game: "High rewards require enduring heavy hits. You believe you will receive rewards commensurate with the risks you are willing to take," then let the EA algorithm do its job.
⚖️ WHAT DOES NR GRID DCA SCALPER OFFER?
There are no pink clouds or sugarcoated promises here. This EA is purely a computational tool for you to find an edge you deem sufficient to enter trades regardless of whether you are trading with or against the trend shown on the candlestick chart:
- ✅ Multi-Layer Signal Filter Matrix: Gives you total confidence that the EA does not enter trades blindly. Unless your configured indicator setup confirms simultaneously, the Robot would rather watch opportunities pass than charge into danger.
- 💡 Grid Step & Lots Algorithm: Offers multiple methods to calculate grid distances and scale lot sizes, tailored to your account's drawdown capacity and risk tolerance.
- 🎯 Group Trailing SL/TP Mechanism: Automatically trails the Stop Loss for the entire grid when a retracement passes the activation threshold, locking in profits in case the market reverses. If you are lucky enough, you may occasionally capture startling "TakeProfit GAP" surges.
- 🛡️ Stop Loss Mechanism: If you are not aggressive enough, you can set a Stop Loss for the entire grid or use BreakEven ("closes the entire grid as soon as the price crosses the BreakEven Price"). Personally, I never use Stop Loss because the core philosophy of this EA is "DCA to the end."
- Information Panel: Displays the most brutal real-time metrics directly on your chart — Drawdown (%), separate Buy/Sell Profit, Real-Time Balance & Equity. Nothing is hidden. It even displays motivational "doping quotes" during scary drawdown periods.
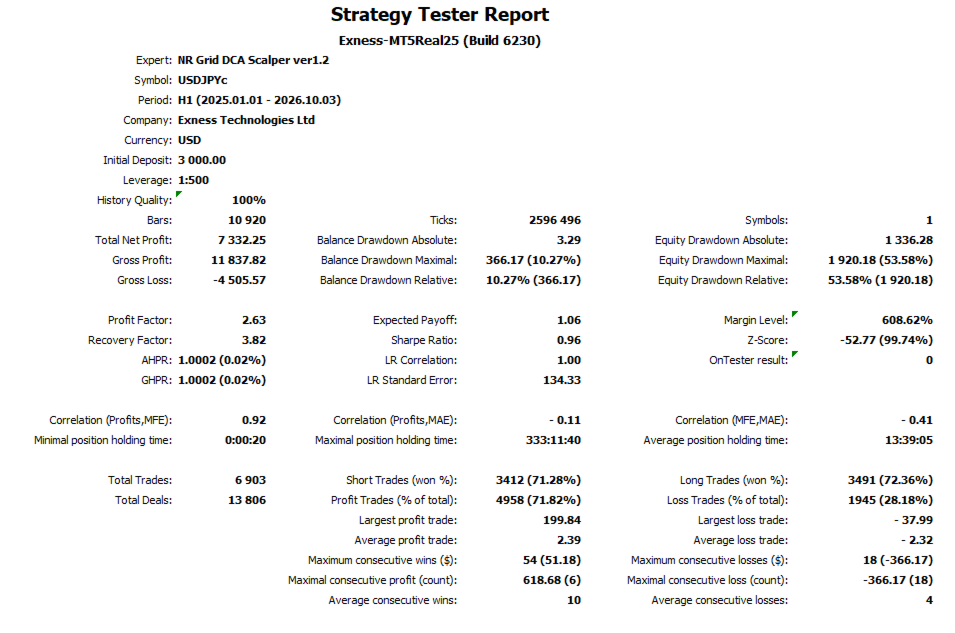
🏅: I blew up at least 3 accounts ($1,000 each) when I first coded this EA. Afterward, I used a demo account for 6 months (Feb - Aug 2025) to refine a setup that "gives me a trading edge." Since Sept 2025, I have been running it on a live account — "making decent returns ✌️ while fully realizing the EXTREME WARNING of running this EA." Therefore, if you do not have a strong heart, do not use this EA ( ❗ do not even try backtesting it, as the impressive results might tempt you to ignore the "EXTREME WARNING," which is dangerous). Currently, I want to use this EA to earn some extra income, and if you feel you accept being "lured" into taking this risk, welcome to the setup guide below.
📖 NR GRID DCA SCALPER: USER MANUAL
📌 Recommended Operational Configuration
- 1. Account Type & Infrastructure:
- Applicable ONLY to Hedge accounts.
- Standard or Micro accounts are both acceptable as long as you have sufficient capital.
- Lower Spread -> Earlier Execution -> Earlier Exit -> Lower Risk. Thus, lower spreads are always better.
- Server Infrastructure (VPS): Running the EA on a Virtual Private Server (VPS with Ping latency < 10ms) is strongly recommended. This minimizes risks from internet disconnection/power outages and reduces Slippage when scaling grid orders or closing the entire grid during high volatility.
- 2. Capital Requirements:
- Cent Account: Minimum $100 (equivalent to 10,000 cents) starting with minimum lots. This capital is sufficient to learn how the EA operates live in the market.
- Standard / Raw Account: Minimum $1,000, starting with minimum lots.
- Recommended: "Cent Account: Minimum $3,000 (equivalent to 300,000 cents)".
- 3. Symbol Selection (Trading Pairs):
- Recommended: In theory, range-bound pairs with stable volatility (Sideway) such as (EURUSD, AUDCAD, NZDCAD). In practice, I backtest and live-trade mostly on (USDJPY, CADJPY). Please backtest to verify your preferred pairs.
- Highly Restricted: Pairs with narrow sideway ranges but long one-way trends (GBPJPY). Gold (XAUUSD) can also be traded, but my heart is not strong enough for gold volatility.
⚙️ PARAMETER SETTINGS
🏷️ A. FIRST TRADE SETTING (Initial Order Entry Conditions)
Select conditions (indicators, candle patterns) for the EA to open the first order for Grid Buy or Grid Sell.
- Signal Select: Select indicator combinations (A~F: preset combinations, Z: custom combination selected under "B. INDICATOR SETTING").
- First trade type:
- Seperate : Opens Buy orders on Buy signals, Sell orders on Sell signals independently.
- Simultan : Allows opening both Buy and Sell orders simultaneously when a Buy or Sell signal occurs.
- Select Bar Type: Select confirmation candlestick pattern for initial entry.
- Bar Timeframe: Confirmation timeframe (e.g., PERIOD_M5 ), waiting timeframe for new bars in "Run on Bar" mode.
- Bar Direction: Candle pattern check direction ( Foward or Reverse ).
- Bar Shift: Shift bar count from current candle (1~9) in Reverse mode.
- High of LastBar: Minimum body height of the last candle in the pattern (in Points).
🏷️ B. INDICATOR OPTIONS (Technical Indicator Settings)
Each indicator has an ON/OFF toggle and parameters. If you select SignalSelect = Z. Custom , the system evaluates all indicators set to true :
⚠️ Indicator Combination Logic (AND Logic): The EA strictly applies a 100% consensus rule. All indicators set to true must simultaneously confirm the same direction (Buy or Sell) for the EA to open the first trade. Do not enable too many indicators at once, as they may negate each other and prevent trade execution.
- MA Setting: Trend settings and Signal settings (Buy/Sell determined by Fast MA crossing Slow MA).
- TEMA Setting: Buy/Sell determined by price position above/below TEMA line.
- TRIX Setting: Buy/Sell determined when TRIX crosses UP Level or DN Level.
- BB Setting: Buy/Sell determined when price pierces Bollinger Bands and bandwidth (BBW) stays within %min-%max limits.
- RSI Setting: Buy/Sell determined when RSI is above Buy Level or below Sell Level.
- MACD Setting: Buy/Sell determined when main line crosses signal line and histogram orientation.
- CCI Setting: Buy/Sell determined when CCI is above Buy Level or below Sell Level.
- STOCH Setting: Buy/Sell determined when %K crosses %D above Buy Level or below Sell Level.
- PSAR Setting: Buy/Sell determined when Parabolic SAR flips upward or downward.
🏷️ C. GRID SETTING (Grid Distance Settings)
Choose the grid distance calculation method for scaling orders when price moves against the position.
- The EA divides the grid into 5 Stages. For example, if "Maximum trade = 25", each stage contains 5 trades. Each stage uses a "Grid Ratio" multiplier when incremental mode is enabled.
- Maximum trade: Maximum trades allowed per grid (e.g., "Maximum trade = 25" allows 25 Buy trades and 25 Sell trades, managed independently).
- Grid Type: Grid spacing calculation method:
- Fix Step: Fixed grid step.
- Inc Step: Grid step increases proportionally per stage.
- Gridsize Fix Step: Fixed grid step auto-calculated from total grid size.
- Gridsize Inc Step: Incremental grid step auto-calculated from total grid size.
- Grid Step: Base grid distance (in Points) between trades (e.g., 70 ).
- Fix Step: Fixed distance = Grid Step.
- Inc Step: Incremental distance = Grid Step * Grid Ratio.
- Grid Total: Total grid span (in Points). Spacing is auto-calculated based on Maximum trade (used for Gridsize Fix Step / Gridsize Inc Step ).
- Grid Ratio: Multiplier to expand grid step across stages (e.g., "1.0, 1.5, 2.5, 3.5, 5.0" ). Trades within the same stage share equal grid spacing.
🏷️ D. LOTSIZE SETTING (Lot Volume Scaling Settings)
Select volume scaling algorithms for grid progression.
- Start lots: Initial order volume (e.g., 0.01 ).
- Maximum lots: Maximum cap volume per single trade (e.g., 10.0 ).
- Type of lots: Volume progression method:
- Add : Adds Addition portion to subsequent trade volume.
- Mul : Multiplies subsequent volume by Multiplier Coeff .
- Step : Multiplies volume per stage using Stage Coeff ( Stage1 Coeff ~ Stage5 Coeff ).
- Expo : Multiplies volume by x Coeff . x Coeff is auto-calculated based on ( Start lots, Maximum lots, Maximum trade ).
- 🚨 EXTREME RISK WARNING: Expo mode scales lots exponentially. Later grid orders expand dramatically. Use only if thoroughly backtested with high account margin tolerance.
- Position Per Group: Number of trades sharing identical lot size in each group. Used when Type of lots = Add, Mul, Expo .
- Stage1 Coeff ~ Stage5 Coeff: Specific lot multiplier per stage when Type of lots = Step .
🏷️ E. SL-TP SETTING (Stop Loss & Take Profit Settings)
Define target Take Profit (TP) or Stop Loss (SL) locations.
- Use StopLoss: ON/OFF: Enable/Disable Stop Loss protection for the grid.
- StopLoss Type Select:
- BreakEven : Calculates SL based on BreakEven (BE) price. SL is set once price crosses BE.
- From Last Trade : Calculates SL distance relative to the last trade ( Coeff SL Buy / Coeff SL Sell ).
- SLTP_Base: Base unit distance for SL/TP calculation (in Points).
- Coeff SL Buy / Coeff SL Sell: Multiplier * SLTP_Base = SL distance for Buy/Sell grid.
- Stage1 TP_Coeff ~ Stage5 TP_Coeff: Multiplier * SLTP_Base = TP distance calculated from Average Price corresponding to each stage.
🏷️ F. TRAILING SETTING (Dynamic Trailing Stop / TP)
- Use Trailing: ON/OFF: Enable/Disable Trailing Stop Loss for the grid.
- Trail TP TYPE: Target TP calculation reference: from Average Price ( From Avg Coeff ) or initial trade ( From First Trade ).
- Trail TP_Coeff: Multiplier * SLTP_Base = TP target distance from Average Price.
- Trail SL TYPE: Trailing execution type:
- Real: Places actual hard SL on the server.
- Virtual: Hidden SL managed internally by the EA, closing trades via market execution when hit.
- Trail Start: Minimum grid trades required to activate Trailing Stop Loss (e.g., 10 trades).
- Trail Trig / Trail Stop / Trail Step: Distance parameters for trigger, trailing distance, and step size.
🏷️ G. OTHER SETTING (General Settings)
- Mode Run: Execution frequency ( Run on Bar : New candle open, Run on Tick : Every tick, Run on Time : Delay timer in seconds).
- Delay time(s): Execution delay timer (seconds) under Run on Time .
- Magic Number: EA identification code to prevent conflicts between multiple EA instances.
- Slippage: Maximum allowed price slippage (in Points).
- Max Spread: Maximum allowable Spread (in Points) for trade entry.
- Start Run EA from: Historical calculation / EA start date ( YYYY.MM.DD ) for panel tracking.
🏷️ H. PANEL SETTING (Display Panel Customization)
Customize real-time dashboard panel on the chart:
- Start Point X / Start Point Y: Panel origin X/Y coordinates (top-left).
- Panel Width / Panel Height: Main Panel dimensions.
- Row Height / Row Spacing: Row dimensions and spacing.
- Button Width / Button Height: Dimensions for panel collapse/expand toggle buttons ( + / - ).
⚠️ RISK WARNING & DISCLAIMER
-
High Risk Warning: Foreign exchange (Forex), cryptocurrency (Crypto), and leveraged financial instruments carry a very high level of risk and may not be suitable for all investors. High financial leverage can work against you as well as for you. Before starting to trade, you must carefully consider your investment objectives, experience, and risk appetite.
-
Past Performance Does Not Guarantee Future Results: All information, analysis, data, or backtest results of this Expert Advisor (EA) are for general reference only and do not constitute investment advice. Past performance of any trading system is not a guarantee of future results.
-
No Profit Guarantee: Trading always involves the risk of capital loss. We make no commitments or guarantees that this EA will achieve profits similar to historical test results or live accounts. You can completely lose a portion or all of your initial capital, therefore never invest money that you cannot afford to lose.
-
User Responsibility: You acknowledge and agree that you are solely responsible for all trading decisions, configurations, risk management, and financial losses incurred when using this software. The developer/provider shall not be held liable for any legal or financial damages arising from the use of this EA.