Grid Hope EA
- Experts
-
AL MOOSAWI ABDULLAH JAFFER BAQER
 To trade successfully we need to go through the proven path that others had gone and reached!
Here are 17 quotes from such successful investors:
1- Limit your size in any position so that fear does not become the prevailing instinct guiding your judgment.
Joe Vidich - 버전: 3.12
- 업데이트됨: 27 10월 2026
- 활성화: 5
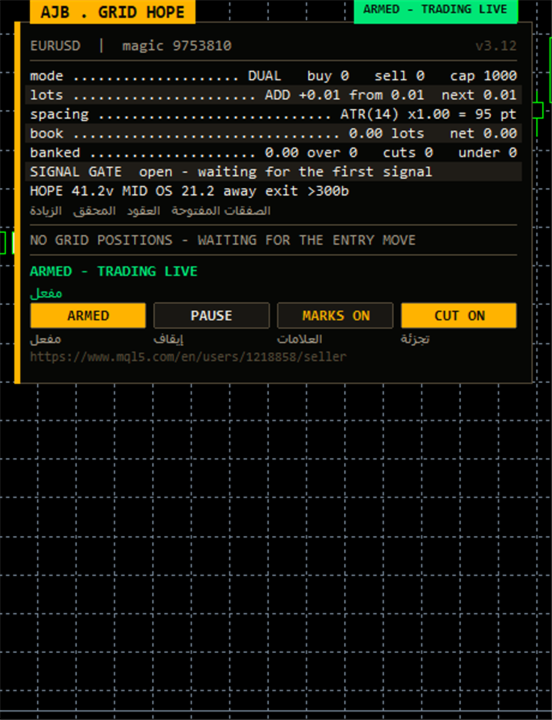
- Hope Pulse panel row: the live stochastic reading, its zone (OVERSOLD / MID / OVERBOUGHT), a slope arrow, the points still missing to the next trigger and the bars counted since the line left an extreme zone
- Private memory for every copy, keyed by account, symbol and magic numbers, plus a lock that stops two charts from sharing one magic number
- Margin test rebuilt: each new level is priced by the terminal and checked against the real free margin, with a safety buffer
- Netting accounts get a cap on the margin of the merged position, so stop-out pressure is watched before a level is sent
- Free to try: every input works in the Strategy Tester with your own broker's data
Watch it in the Strategy Tester first. Load Grid Hope EA in the MetaTrader 5 tester, enable visual mode and start a run on the symbol you care about. You will see the stochastic leave its extreme band, an arrow appear on that candle, the Hope Pulse row count down the distance to the next trigger, and the ladder grow and shrink on real broker history. No purchase is needed to form your own opinion.
A classic grid opens its first order whenever it happens to be switched on. Grid Hope EA asks for a reason before it commits: a stochastic oscillator has to return from an exhausted area, from oversold back up or from overbought back down. Only then is the opening level of a cycle placed. From that moment a seasoned management layer runs the position: distances that breathe with volatility, compact profitable closures, and gradual trimming of the heaviest old orders, so a ladder can be dismantled piece by piece rather than waiting for one big turn.
THE IDEA BEHIND "HOPE"
Extreme stochastic readings describe a market that has stretched too far in one direction. Entering such a zone tells you little; the useful moment is when the reading climbs or falls back out of it, because the stretch has started to release. Grid Hope EA reacts only to that exit, never to the entry, and only on closed candles, so a tick spike inside a bar cannot fire it. You choose whether the %K main line or the %D signal line is read, the smoothing method and the two zone levels. The oscillator only decides when a cycle may start; the grid engine owns everything that follows.
WHAT CHANGED IN VERSION 3.12
The Hope Pulse row. A new line on the panel reports the stochastic value right now, names the zone it sits in, draws an arrow for its direction of travel, prints how many points remain before the line crosses the next trigger level, and counts the candles since the last exit from an extreme zone. Instead of guessing why nothing is opening, you can read it: MID with a long distance means patience, a small number of points means a cycle may arm soon.
Separation between copies. All runtime data, from level counters and anchors to the retry list and pending closing plans, lives under a key built from the account, the symbol and both magic numbers. If you try to attach a second copy with a magic number that is already running, the lock refuses it and explains why, so instances never overwrite each other.
Margin and stop-out safety. Before adding a level, the EA asks the terminal for the exact margin that order would need and compares it, plus a buffer, with the free margin actually available. Larger balances are no longer blocked by a rough estimate, and smaller ones are not pushed toward stop-out by an optimistic one. On netting accounts the margin of the combined position is capped as a percent of equity.
HOW A CYCLE UNFOLDS
Arming. On closed candles the EA looks for the chosen stochastic line leaving oversold upward (buy side) or overbought downward (sell side). A minimum gap in bars between accepted signals stops a nervous session from starting cycle after cycle, and a signal can stay valid for a few bars while spread and safety checks catch up.
Building. When price travels away from the anchor, further levels are added. Both directions may run side by side with separate anchors and counters, or a single direction can be traded. Spacing is either a fixed number of points or ATR multiplied by a factor, clamped between a floor and a ceiling, and can be frozen for the whole cycle.
Banking. A scanner tests combinations of the oldest and newest orders on each side and closes a set the moment its net result, swap and commission included, clears the target. When an old order is too large to retire at once, slicing removes a fraction of it, paid for by profit already sitting in newer orders. Each pullback chips away at the biggest exposure.
Protecting. The reopen guard rejects closures that would be followed almost instantly by a new order at the same price, a silent way grids lose money to commission. Every closing deal is confirmed in history, failed legs move to a retry queue, and a plan is cancelled when positions changed between the scan and the send.
Optional hedge cycle (off by default). Keeps an equal buy and sell pair on a selected symbol and retires both legs in matching slices, funded by a capped surcharge on closures the grid makes anyway. A timer checks both legs and repairs the pair if one disappears.
READING THE PANEL
The panel lists the symbol and magic number, the run state (ARMED, SCAN ONLY or PAUSED), trade mode, ATR distance, lot step, banked profit, open volume and floating result, the next planned closure for each side with a button to fire it by hand, the table of open orders, and the Hope Pulse row. Buttons switch between armed and scan only, pause or resume, toggle chart marks and toggle slicing. Drag it, minimise it or dock it to any corner; an Arabic translation can appear under each English label. During non-visual optimisation all drawing is skipped for speed.
QUICK GUIDE TO THE HOPE PULSE ROW
OVERSOLD with an up arrow and few points left: the line is close to leaving the lower zone, a buy cycle may arm soon.
OVERBOUGHT with a down arrow and few points left: the same situation on the sell side.
MID with a large distance: nothing is stretched, no new cycle will start for now; open ladders are still managed normally.
Bars since exit growing high: the last signal is old; with SignalValidBars small it can no longer arm a cycle.
RISK CONTROLS IN YOUR HANDS
There is no stop loss and no automatic close-all. The EA protects the account by declining to add levels when a limit is met, not by liquidating at the worst price. You set levels per grid, orders per side, the biggest single lot, a minimum margin level, the largest floating loss as a percent of balance, a spread ceiling and the netting margin cap. Several of these ship switched off or set wide, so set them to your own comfort before trading real money. Scan only mode displays every decision without sending a single order.
GETTING STARTED
1. Enable algorithmic trading under Tools, Options, Expert Advisors.
2. Run the Strategy Tester in visual mode on your symbol with your broker's real spreads and follow the Hope Pulse row across several weeks of history.
3. Open a demo chart; EURUSD H1 or XAUUSD H1 are easy places to begin.
4. Drag Grid Hope EA from the Navigator onto the chart and tick Allow Algo Trading on the Common tab.
5. In Inputs set RunMode to scan only, keep InitialLotSize at 0.01 and leave EnableHedgeCycle off.
6. Give each chart a unique EAMagicNumber and HedgeMagicNumber; the lock will tell you if one is taken.
7. Set MinMarginLevelPercent, MaxAccountRiskPercent, MaxGridLevels and MaxTotalOrders to limits you are comfortable with.
8. If signals feel too rare, move the oversold and overbought levels closer to the middle; if too frequent, push them outward or raise SignalBarsDelay.
9. Watch the planned closures for a session, then arm the EA when its choices make sense to you.
10. Look at the panel daily; a long MID reading only means the EA is waiting for a stretched market.
ALL INPUTS, ONE BY ONE
Grid levels
TradeMode: run buy and sell grids together, or only one side.
GridSpacePoints: level distance in points when spacing is fixed.
GridSpaceMultiplier: stretches each following gap by this factor; 1.0 keeps gaps equal.
MaxGridLevels: maximum levels in one grid.
UpDirectionIsBuy: when true, an upward signal arms the buy grid.
EAMagicNumber: identifies grid orders and forms part of the private memory key protected by the lock.
GridOrderComment: text written on grid orders.
OneOrderPerBar: never more than one new level per candle.
Lot ladder
InitialLotSize: volume of the first level.
LotSizingMode: later lots grow by a fixed addition or by a multiplier.
LotMultiplier: growth factor per level in multiply mode.
LotAddStep: volume added per level in additive mode; 0 reuses the starting lot.
MaxOrderVolume: upper limit for any one order.
UseAutoLot: scales the starting lot with balance.
AutoLotBaseBalance: balance at which the starting lot equals InitialLotSize.
AutoLotAllowDecrease: lets the auto lot shrink below the starting value.
ATR spacing
GridSpacingMode: fixed points or ATR based distance.
ATRTimeframe: timeframe used for ATR.
ATRPeriod: number of bars in the ATR average.
ATRSpacingFactor: distance equals ATR multiplied by this.
ATRBarShift: candle that supplies ATR; 1 is the last closed one.
ATRMinSpacingPts: smallest allowed distance in points; 0 disables it.
ATRMaxSpacingPts: largest allowed distance in points; 0 disables it.
ATRFreezeOnStart: keeps the opening distance until the cycle ends.
Profit target
DesiredProfitPerClosure: base money amount each closure tries to bank.
ProfitMultiplier: final factor from 1.00 to 2.00 on that target.
ProfitTargetMode: fixed amount, or a target that scales with volume and depth.
ProfitVolumePower: how strongly closing volume raises a scaled target; 0 ignores it.
ProfitDepthBonus: extra target for each additional open level.
ProfitMaxMultiple: ceiling of a scaled target as a multiple of the base.
ProfitMaxReachFraction: safety cap keeping the target reachable within part of one grid step.
Fragment scanner
UseMultiLegScan: checks multi order combinations before the simple pair.
MaxOldestLegs: how many old orders one closure may include.
MaxNewestLegs: how many recent orders one closure may include.
ScanPriority: ranking rule when several combinations qualify.
NeverBankLessThanPair: a combination must also beat the simple pair target.
RequireCloseVolumeExceedsTarget: recent volume must be larger than the old volume being closed.
MinCloseVolumeRatio: minimum ratio between closing and targeted volume.
Target slicing
EnableTargetSlicing: trims part of an old order when a full close is out of reach.
FragProfitWeightPower: how quickly required profit rises with the size of the closing lot.
FragMinSlicePercent: smallest trim as a percent of the order being reduced.
FragAllowMultiCloser: several recent orders may jointly pay for one trim.
FragPreferFullClosure: chooses a full close whenever both options qualify.
Reopen guard
ReopenGuard: blocks closures that would immediately reopen the same level.
ReopenGuardCushion: required distance as a fraction of one grid step.
Account protection
MinMarginLevelPercent: no new levels below this margin level; 0 disables it.
MaxAccountRiskPercent: no new levels once floating loss exceeds this percent of balance; 0 disables it.
NetMaxMarginPercent: on netting accounts, caps the net position margin as a percent of equity.
MaxTotalOrders: hard limit on grid orders per side.
Execution and verification
RunMode: start armed or in scan only.
CloseSequence: order in which closing legs are sent.
MaxSlippagePoints: slippage tolerance in points.
MaxSpreadPoints: trading pauses while spread exceeds this.
MinSecondsBetweenClosures: minimum wait between two closures on one side.
CloseAttemptsPerLeg: sends per leg before it goes to the retry queue.
VerifyTimeoutSeconds: how long an unconfirmed leg keeps being checked.
DeferWhenMarketClosed: waits for the session instead of halting when quotes are missing.
MarketClosedRetrySeconds: retry spacing while orders are refused.
AutoResumeAfterSeconds: lifts a halt automatically after this time; 0 leaves it to the panel button.
AbortIfBookChanged: discards a plan if positions changed after the scan.
UseFullCommission: counts commission on both opening and closing.
CommissionPerLot: backup commission when history shows none.
CloseOrderComment: text written on closing deals.
Hedge cycle
EnableHedgeCycle: switches the hedge cycle on.
HedgeSymbols: comma separated list; listing a symbol twice gives it extra turns.
HedgeSymbolRotation: how the next cycle's symbol is chosen.
HedgeMaxSymbolsInTester: limits the rotation during testing only.
HedgeCycleLots: volume on each leg of the pair.
HedgeSliceLots: volume removed from each leg per slice.
HedgeFragmentBonus: amount added on top of the slice cost.
HedgeBonusIsPercent: true treats that amount as a percent of slice cost, false as money.
HedgeMaxSurcharge: money limit on the surcharge per closure; 0 means unlimited.
HedgeMaxSurchargePercent: highest percent the hedge may raise any closure target.
HedgeMagicNumber: identifies hedge legs and must differ from EAMagicNumber.
HedgeReopenOnFinish: starts a new cycle when one completes.
HedgeStartRequiresTrade: waits until the grid holds a position before the first cycle.
HedgeIntegritySeconds: interval for comparing the two legs.
HedgeAutoRepair: fixes a lone leg automatically.
HedgeNakedAction: what the repair does.
HedgeMaxSpreadPoints: hedge orders wait above this spread; 0 skips the check.
HedgeSlippagePoints: slippage tolerance for hedge orders.
HedgeAttemptsPerLeg: sends per hedge leg.
HedgeVerifyTimeout: checking time for an unconfirmed hedge leg.
HedgeCommissionPerLot: backup commission for hedge cost.
HedgeOrderComment: text written on hedge deals.
Weekly cash day
WeeklyCashDay: holds back new cycles and slices around your withdrawal day.
CashDayOfWeek: that day, 0 Sunday, 1 Monday and onward.
CashCutoffHour: server hour after which no slice fires on that day.
Panel and chart
ShowPanel: displays the panel.
PanelX: horizontal distance from the chart edge.
PanelY: vertical distance from the chart edge.
PanelFontSize: base text size.
ShowArabic: adds an Arabic line under each English label.
ShowChartMarks: draws levels and planned closures on the price chart.
MaxTableRows: order rows shown per grid.
PanelCorner: chart corner where the panel docks.
Entry trigger
EntryTriggerMode: wait for the stochastic signal, or place the first level at once.
SignalBarShift: candle used for the signal; 1 is the last closed one.
SignalBarsDelay: candles required between accepted signals; 0 accepts every one.
SignalValidBars: candles a signal remains usable; 0 limits it to its own bar.
SignalAllowBuy: lets signals arm buy cycles.
SignalAllowSell: lets signals arm sell cycles.
SignalReverse: flips the signal direction.
Hope signal
InpStoK: %K period of the stochastic.
InpStoD: %D period.
InpStoSlowing: slowing applied to %K.
InpStoMethod: moving average method used in the calculation.
InpStoLine: which line is read, 0 for %K main, 1 for %D signal.
InpStoOversold: lower zone level; crossing back above it arms a buy.
InpStoOverbought: upper zone level; crossing back below it arms a sell.
InpShowSignalArrows: marks every candle where a signal armed a cycle.
Debug
DebugMode: writes detailed messages to the Experts journal for troubleshooting.
PLAIN TALK ABOUT RISK
Grid trading manages exposure; it does not foresee price. Grid Hope EA is selective about when a cycle opens and then works toward short cycles and steadily lighter old orders, but a strong one-way move against an open grid can still build a large position and a deep floating loss. Size the lot for the worst move you can imagine on your symbol, test on your broker's history, and study the tester results before risking real funds. Past or simulated results do not guarantee future results. It works on any symbol and timeframe and needs no DLLs or extra files.
If Grid Hope EA turns out to be useful in your trading, a short review describing your honest experience would be appreciated. It helps other traders judge the product and points me to what deserves work next.