Menemani Smart Traders MT4
- 유틸리티
- 버전: 1.10
- 업데이트됨: 11 7월 2026
- 활성화: 5

MENEMANI Smart TRaders | Semi-Automated Supply/Demand, FVG & Order Block Trading Assistant. Available for MetaTrader 5 and MetaTrader 4 (two separate Market products — install the build that matches your terminal).
MENEMANI Smart TRaders is a professional trading assistant (utility EA) that scans, scores, and visualizes institutional price zones — then lets you execute a complete pending-order plan from a single dashboard. You stay in control: the EA never opens a trade on its own. You pick the zone; it handles distribution, protection, and monitoring.
Three zone engines, one workflow
· UFO Zones (Supply–Demand, Seiden methodology) — RBR / DBR / RBD / DBD base zones with a 10-point quality score.
· FVG Zones (Fair Value Gap, ICT concept) — 3-candle imbalance gaps with a 6-component score.
· OB Zones (Order Block) — the last opposite candle before a BOS-confirming displacement, fully scored like FVG.
Every zone carries a hover tooltip: timeframe, zone type, score/grade, volume, touches, and mitigation status. A High/Medium/Low probability filter keeps only the setups worth your attention.
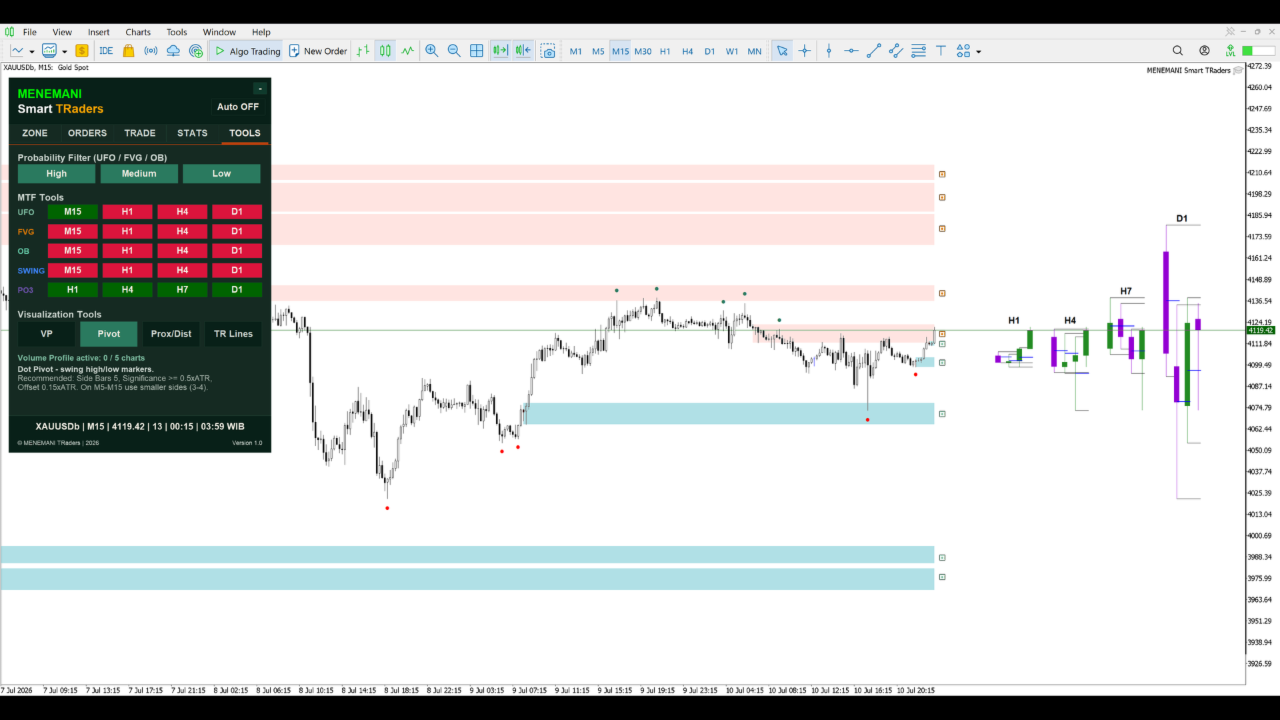
Multi-timeframe by design
· Scan UFO, FVG, OB, and Swing/Pivot structure on the chart TF plus three configurable higher timeframes (HTF-1/2/3).
· PO3 HTF candles (including a synthetic 7-hour session candle aggregated from H1) and Swing Liquidity mapping for top-down context.
· Toggle every layer per timeframe from the TOOLS tab — no re-attaching, no reloading.
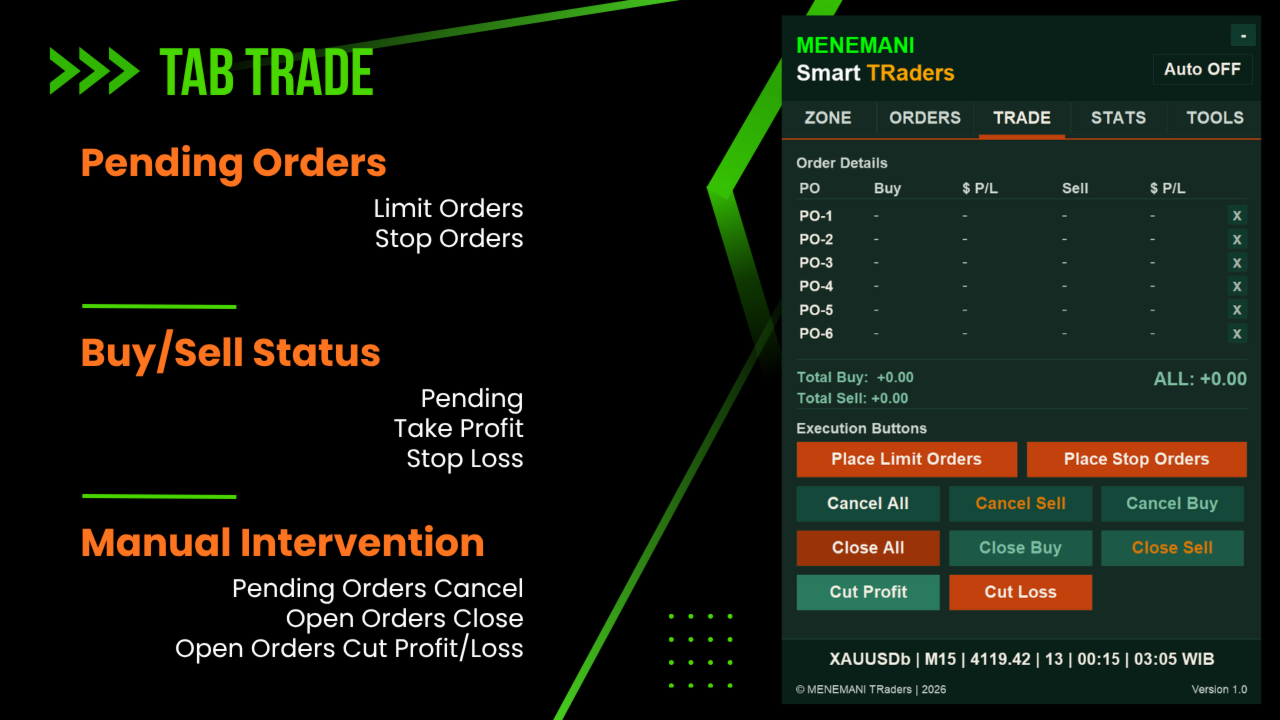
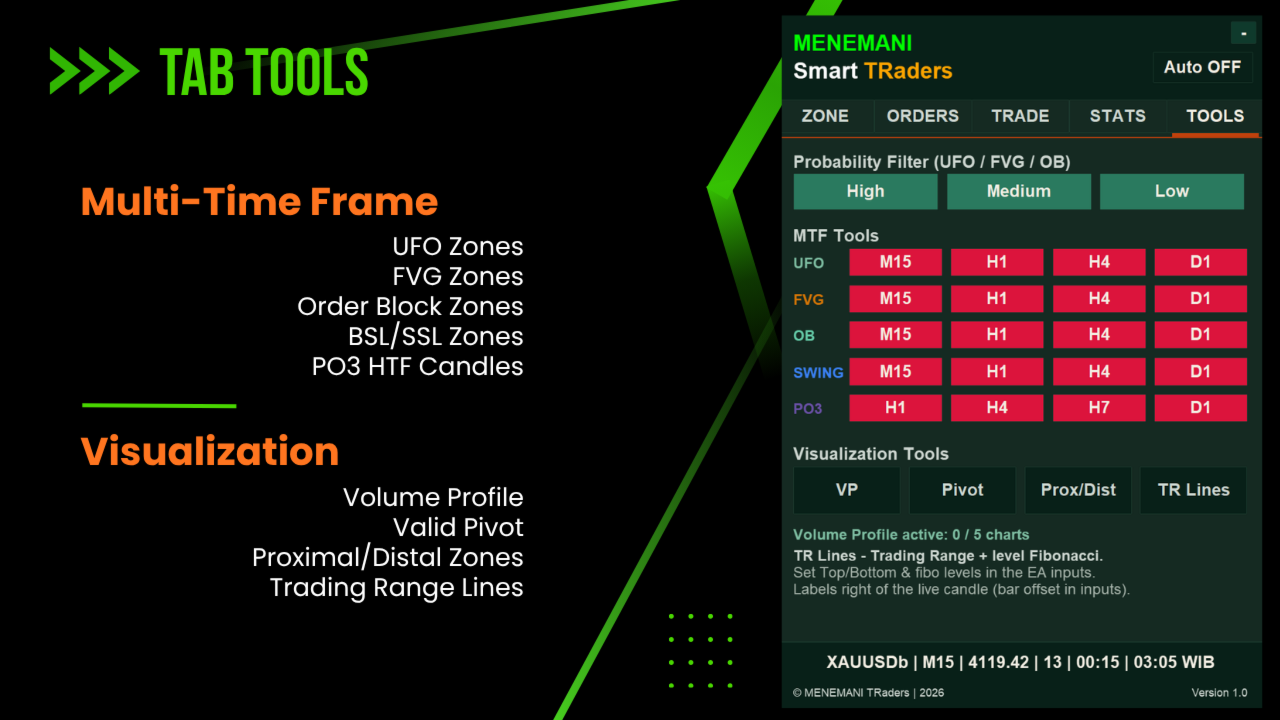
The 5-tab dashboard
· ZONE — trading style (Scalping or Intraday/Swing), draggable ceiling/floor, live Cut Loss / Stop Loss / Take Profit and RR preview.
· ORDERS — up to 6 pending-order slots per side, lot-based or fixed-USD-risk sizing, Total Risk Exposure and Profit/Risk monitors.
· TRADE — one-click Place / Cancel / Close, Cut Profit / Cut Loss buttons, per-slot cancel ("x"), live status per slot (Pending / Open / TP / SL).
· STATS — net P/L, profit factor, win rate, averages, Sharpe ratio, filterable by style and scope, with 20-column CSV export for journaling.
· TOOLS — per-TF toggles for UFO · FVG · OB · Swing · PO3, plus Volume Profile, Dot Pivot, Trading Range lines, and proximal/distal labels.
Three-layer protection
1. Cut Loss — early EA-managed exit (percentage of zone width for Scalping).
2. Silent Stop Loss — managed internally by the EA, never sent to the broker's server.
3. Broker Stop Loss — conventional server-side SL as a disconnect safety net.
Intraday/Swing protection can be pip-based or % of Daily ATR based.
Built for multi-chart operation
Run 5–10 charts simultaneously — different pairs or the same pair on different timeframes. Each instance is fully independent (magic-number isolation), draws only its own objects, cleans up completely on removal, and is engineered to stay light: batched order scanning, throttled panel redraws, and zero freezing or flickering.
What this EA is (and is not)
This is a semi-automated trading assistant. It does not make trading decisions, does not martingale, does not grid blindly, and does not promise profits. Zone selection, direction, sizing, and risk are always yours. Test on a demo account first and apply disciplined risk management.
Quick start
1. Attach to a chart, enable Algo/Auto Trading, keep Show dashboard = true.
2. Pick your style on ZONE (Scalping or Intraday/Swing).
3. Enable the zone layers you want on TOOLS; use the probability filter.
4. Click the toggle (¤) on your chosen buy/sell zone.
5. Verify ceiling/floor, CL/SL/TP, and RR; drag lines to fine-tune.
6. Enable slots and sizing on ORDERS, execute from TRADE, review on STATS.
Platform notes
· MT5 build: all 21 native timeframes supported for zone scanning.
· MT4 build: identical feature set (including the H7 session candle) on the 9 native MT4 timeframes (M1, M5, M15, M30, H1, H4, D1, W1, MN1). Closed-trade TP/SL status and original pending-order metadata in the CSV export are reconstructed on a best-effort basis due to MT4 history limitations.
· Recommended: Windows 10/11 or a low-latency Windows VPS for 24-hour operation.
SUPPORT
For setup help and questions, please use the Comments tab on this product page or send a private message through mql5.com.
DISCLAIMER
MENEMANI Smart TRaders is a trading-assistant tool only. Trading carries financial and other risks. All trading decisions and outcomes are the trader's sole discretion and responsibility. Past performance does not guarantee future results.