Discussing the article: "Making a dashboard to display data in indicators and EAs"
Thanks for sharing.
This implementation of the class has a big drawback if there is a need to inherit it.
1. There is no default constructor and the parametric one sets important parameters by size. For example, if you need to calculate the size of the panel based on its parameters in the descendant of the class, then this logic will have to be implemented either outside the class, or in the class, but with the calculation in a separate function, which somewhat beats the logic, because the call of the parametric constructor, without the default one, will be in the initialisation list. Perhaps a better solution would be to move the initialisation from the constructor to a class function.
2. The section with parameters is declared as private, which does not allow the descendant to implement, for example, a different colour scheme or change the size of the header
3. I understand that the work is not finished, but some functions are not implemented, for example SetButtonClose(On/Off), SetButtonMinimize(On/Off).
With the availability of the source code, it is not a problem to finalise it, but still...
Thank you for sharing.
This implementation of the class has a big drawback if there is a need to inherit it.
1. There is no default constructor and the parametric one sets important parameters by size. For example, if you need to calculate the size of the panel based on its parameters in the descendant of the class, then this logic will have to be implemented either outside the class, or in the class, but with the calculation in a separate function, which somewhat beats the logic, because the call of the parametric constructor, without the default constructor, will be in the initialisation list. Perhaps a better solution would be to move the initialisation from the constructor to a class function.
2. The section with parameters is declared as private, which does not allow the descendant to implement, for example, a different colour scheme or change the size of the header
3. I realise that the work is not finished, but some functions are not implemented, for example SetButtonClose(On/Off), SetButtonMinimize(On/Off).
With the availability of the source code, it is not a problem to finalise it, but still...
The article is a tutorial. In it, the panel covers the minimum needs.
1. The descendant has its own constructor, in its initialisation list must be the parent's constructor. In it you specify the required dimensions.
2. I haven't even thought about colour schemes) As well as the size of the header.
3. Such methods are declared in the public section. It is strange that they are not implemented. I remember exactly that I was testing their enabling/disabling.... I had to rewrite this class from scratch from memory, because its first version was destroyed by Windows when it ran out of space on the disc. I must have forgotten to restore them then. Thanks, I'll fix it.
Yes, with the availability of source code - all the cards are in the readers' hands. That's what tutorial articles are aimed at.
The article is instructional. In it, the panel covers the minimum needs.
1. The descendant has its own constructor, its initialisation list should contain the parent's constructor. In it you specify the required dimensions.
2. I haven't even thought about colour schemes) As well as the size of the header.
3. Such methods are declared in the public section. It is strange that they are not implemented. I remember exactly that I was testing their enabling/disabling.... I had to rewrite this class from scratch from memory, because its first version was destroyed by Windows when it ran out of space on the disc. I must have forgotten to restore them then. Thanks, I'll fix it.
Yes, with the availability of source code - all the cards are in the readers' hands. That's what tutorial articles are aimed at.
1. Yes, but simply when the ancestor constructor is called in the initialisation list, the calculation of parameters to be passed into it must be carried out somewhere. Especially if it is not the most primitive.
For example, calculation of X, Y position for the initial display in the bottom right corner, calculation of height depending on the expected number of table rows.... This will require 3 additional class functions, not all of them in one piece of code in its constructor with the subsequent call of the ancestor constructor. It looks more like a crutch, although it works. Well it's not very pretty code when you can make the class architecture more accommodating to further changes. (Of course, this is a remark from the notes of a perfectionist).
2. Small embellishments make the product more qualitative. But your code in general is beautiful and your solutions are interesting, it is pleasant to read it.
3. I sympathise, data loss is always very unpleasant, so a reliable backup is our everything.
Thank you, we are waiting for new articles.
Check out the new article: Making a dashboard to display data in indicators and EAs.
Author: Artyom Trishkin
Thanks for very nice tutorial
I modified it to dark look and further looking to change colors of title and data too
Also I created a function to add text in easy way
void DrawData(int cell, string title, string data, color clr ) {
   dashboard.DrawText(title,  dashboard.CellX(cell,0)+2,   dashboard.CellY(cell,0)+2, clr);
   dashboard.DrawText(data,   dashboard.CellX(cell,1)+2,   dashboard.CellY(cell,1)+2,90, clr);
   ChartRedraw(ChartID());
}
but just finding it difficult to change colors of these texts, not sure what is wrong, as colors looks dull, here is modified DrawText function
//+------------------------------------------------------------------+
//| Display a text message at the specified coordinates              |
//+------------------------------------------------------------------+
void CDashboard::DrawText(const string text,const int x,const int y,const color clr,const int width=WRONG_VALUE,const int height=WRONG_VALUE)
  {
//--- Declare variables to record the text width and height in them
   int w=width;
   int h=height;
//--- If the width and height of the text passed to the method have zero values,
//--- then the entire working space is completely cleared using the transparent color
   if(width==0 && height==0)
      this.m_workspace.Erase(0x00FFFFFF);
//--- Otherwise
   else
     {
      //--- If the passed width and height have default values (-1), we get its width and height from the text
      if(width==WRONG_VALUE && height==WRONG_VALUE)
         this.m_workspace.TextSize(text,w,h);
      //--- otherwise,
      else
        {
         //--- if the width passed to the method has the default value (-1) - get the width from the text, or
         //--- if the width passed to the method has a value greater than zero, use the width passed to the method, or
         //--- if the width passed to the method has a zero value, use the value 1 for the width
         w=(width ==WRONG_VALUE ? this.m_workspace.TextWidth(text)  : width>0  ? width  : 1);
         //--- if the height passed to the method has a default value (-1), get the height from the text, or
         //--- if the height passed to the method has a value greater than zero, use the height passed to the method, or
         //--- if the height passed to the method has a zero value, use value 1 for the height
         h=(height==WRONG_VALUE ? this.m_workspace.TextHeight(text) : height>0 ? height : 1);
        }
      //--- Fill the space according to the specified coordinates and the resulting width and height with a transparent color (erase the previous entry)
      this.m_workspace.FillRectangle(x,y,x+w,y+h,0x00FFFFFF);
     }
//--- Display the text to the space cleared of previous text and update the working space without redrawing the screen
   this.m_workspace.TextOut(x,y,text,::ColorToARGB(clr,this.m_alpha));
   this.m_workspace.Update(false);
  }
Arpit T # :
//--- Display the text to the space cleared of previous text and update the working space without redrawing the screen
   this .m_workspace. TextOut (x,y,text,:: ColorToARGB (clr, this .m_alpha ));
   this .m_workspace.Update( false );
The highlighted color is the transparency of the panel itself, not the text. For text, it is better to set the transparency (or rather, opacity) to the default value of 255 - completely opaque text. But you can “play around” with the opacity value by entering regular numeric values from 0 to 255 instead of this.m_alpha. 0 is a completely transparent color, 255 is a completely opaque color.
The highlighted color is the transparency of the panel itself, not the text. For text, it is better to set the transparency (or rather, opacity) to the default value of 255 - completely opaque text. But you can “play around” with the opacity value by entering regular numeric values from 0 to 255 instead of this.m_alpha. 0 is a completely transparent color, 255 is a completely opaque color.
Thank you all is good now
void DrawData(int cell, string title, string data, color clr ) {
   dashboard.DrawText(title,  dashboard.CellX(cell,0)+2,   dashboard.CellY(cell,0)+2, clr);
   dashboard.DrawText(data,   dashboard.CellX(cell,1)+2,   dashboard.CellY(cell,1)+2,90, clr);
   ChartRedraw(ChartID());
}
the highlighted code was making problem, I removed and all good.
well done work dark is nice
Thanks
Here is the modified constructor for dark look in dashboard.mqh if you wish to use that theme
//+------------------------------------------------------------------+
//| Constructor                                                      |
//+------------------------------------------------------------------+
CDashboard::CDashboard(const uint id,const int x,const int y, const int w,const int h,const int wnd=-1) :
                        m_id(id),
                        m_chart_id(::ChartID()),
                        m_program_type((ENUM_PROGRAM_TYPE)::MQLInfoInteger(MQL_PROGRAM_TYPE)),
                        m_program_name(::MQLInfoString(MQL_PROGRAM_NAME)),
                        m_wnd(wnd==-1 ? GetSubWindow() : wnd),
                        m_chart_w((int)::ChartGetInteger(m_chart_id,CHART_WIDTH_IN_PIXELS,m_wnd)),
                        m_chart_h((int)::ChartGetInteger(m_chart_id,CHART_HEIGHT_IN_PIXELS,m_wnd)),
                        m_mouse_state(MOUSE_STATE_NOT_PRESSED),
                        m_x(x),
                        m_y(::ChartGetInteger(m_chart_id,CHART_SHOW_ONE_CLICK) ? (y<79 ? 79 : y) : y),
                        m_w(w),
                        m_h(h),
                        m_x_dock(m_x),
                        m_y_dock(m_y),
                        m_header(true),
                        m_butt_close(true),
                        m_butt_minimize(true),
                        m_butt_pin(true),
                        m_header_h(18),

                        //--- Panel header implementation
                        m_header_alpha(255),
                        m_header_alpha_c(m_header_alpha),
                        m_header_back_color(clrBlack),
                        m_header_back_color_c(m_header_back_color),
                        m_header_fore_color(clrSnow),
                        m_header_fore_color_c(m_header_fore_color),
                        m_header_border_color(clrSnow),
                        m_header_border_color_c(m_header_border_color),
                        m_title("Dashboard"),
                        m_title_font("Calibri"),
                        m_title_font_size(-100),

                        //--- close button
                        m_butt_close_back_color(clrBlack),
                        m_butt_close_back_color_c(m_butt_close_back_color),
                        m_butt_close_fore_color(clrSnow),
                        m_butt_close_fore_color_c(m_butt_close_fore_color),

                        //--- collapse/expand button
                        m_butt_min_back_color(clrBlack),
                        m_butt_min_back_color_c(m_butt_min_back_color),
                        m_butt_min_fore_color(clrSnow),
                        m_butt_min_fore_color_c(m_butt_min_fore_color),

                        //--- pin button
                        m_butt_pin_back_color(clrBlack),
                        m_butt_pin_back_color_c(m_butt_min_back_color),
                        m_butt_pin_fore_color(clrSnow),
                        m_butt_pin_fore_color_c(m_butt_min_fore_color),

                        //--- Panel implementation
                        m_alpha(255),
                        m_alpha_c(m_alpha),
                        m_fore_alpha(255),
                        m_fore_alpha_c(m_fore_alpha),
                        m_back_color(clrBlack),
                        m_back_color_c(m_back_color),
                        m_fore_color(clrSnow),
                        m_fore_color_c(m_fore_color),
                        m_border_color(clrSnow),
                        m_border_color_c(m_border_color),
                        m_font("Calibri"),
                        m_font_size(-100),

                        m_minimized(false),
                        m_movable(true)
  {
//--- Set the permission for the chart to send messages about events of moving and pressing mouse buttons,
//--- mouse scroll events, as well as graphical object creation/deletion
   ::ChartSetInteger(this.m_chart_id,CHART_EVENT_MOUSE_MOVE,true);
   ::ChartSetInteger(this.m_chart_id,CHART_EVENT_MOUSE_WHEEL,true);
   ::ChartSetInteger(this.m_chart_id,CHART_EVENT_OBJECT_CREATE,true);
   ::ChartSetInteger(this.m_chart_id,CHART_EVENT_OBJECT_DELETE,true);

//--- Set the names of global terminal variables to store panel coordinates, collapsed/expanded state and pinning
   this.m_name_gv_x=this.m_program_name+"_id_"+(string)this.m_id+"_"+(string)this.m_chart_id+"_X";
   this.m_name_gv_y=this.m_program_name+"_id_"+(string)this.m_id+"_"+(string)this.m_chart_id+"_Y";
   this.m_name_gv_m=this.m_program_name+"_id_"+(string)this.m_id+"_"+(string)this.m_chart_id+"_Minimize";
   this.m_name_gv_u=this.m_program_name+"_id_"+(string)this.m_id+"_"+(string)this.m_chart_id+"_Unpin";

//--- If a global variable does not exist, create it and write the current value,
//--- otherwise - read the value from the terminal global variable into it
//--- X coordinate
   if(!::GlobalVariableCheck(this.m_name_gv_x))
      ::GlobalVariableSet(this.m_name_gv_x,this.m_x);
   else
      this.m_x=(int)::GlobalVariableGet(this.m_name_gv_x);
//--- Y coordinate
   if(!::GlobalVariableCheck(this.m_name_gv_y))
      ::GlobalVariableSet(this.m_name_gv_y,this.m_y);
   else
      this.m_y=(int)::GlobalVariableGet(this.m_name_gv_y);
//--- Collapsed/expanded
   if(!::GlobalVariableCheck(this.m_name_gv_m))
      ::GlobalVariableSet(this.m_name_gv_m,this.m_minimized);
   else
      this.m_minimized=(int)::GlobalVariableGet(this.m_name_gv_m);
//--- Collapsed/not collapsed
   if(!::GlobalVariableCheck(this.m_name_gv_u))
      ::GlobalVariableSet(this.m_name_gv_u,this.m_movable);
   else
      this.m_movable=(int)::GlobalVariableGet(this.m_name_gv_u);

//--- Set the flags for the size of the panel exceeding the size of the chart window
   this.m_higher_wnd=this.HigherWnd();
   this.m_wider_wnd=this.WiderWnd();

//--- If the panel graphical resource is created,
   if(this.m_canvas.CreateBitmapLabel(this.m_chart_id,this.m_wnd,"P"+(string)this.m_id,this.m_x,this.m_y,this.m_w,this.m_h,COLOR_FORMAT_ARGB_NORMALIZE))
     {
      //--- set the canvas font and fill the canvas with the transparent color
      this.m_canvas.FontSet(this.m_title_font,this.m_title_font_size,FW_BOLD);
      this.m_canvas.Erase(0x00FFFFFF);
     }
//--- otherwise - report unsuccessful object creation to the journal
   else
      ::PrintFormat("%s: Error. CreateBitmapLabel for canvas failed",(string)__FUNCTION__);

//--- If a working space of a graphical resource is created,
   if(this.m_workspace.CreateBitmapLabel(this.m_chart_id,this.m_wnd,"W"+(string)this.m_id,this.m_x+1,this.m_y+this.m_header_h,this.m_w-2,this.m_h-this.m_header_h-1,COLOR_FORMAT_ARGB_NORMALIZE))
     {
      //--- set the font for the working area and fill it with the transparent color
      this.m_workspace.FontSet(this.m_font,this.m_font_size);
      this.m_workspace.Erase(0x00FFFFFF);
     }
//--- otherwise - report unsuccessful object creation to the journal
   else
      ::PrintFormat("%s: Error. CreateBitmapLabel for workspace failed",(string)__FUNCTION__);
  }
Hello.
In this way.
CDashboard *dashboard = NULL; a pointer variable to a future new, dynamically created, object of the class is declared and immediately initialised with the value NULL.
And just an instance of the class is declared this way:
CDashboard dashboard;
But in this case, you can't declare and create an instance this way - the class has no constructor without formal parameters.
So, when declaring an instance in this way, you must specify all the necessary parameters of the class object, which must be passed to the class constructor:
CDashboard dashboard(InpUniqID, InpPanelX, InpPanelY, 200, 250);
------------------------
In the example of working with the class, first an empty pointer to the future object is created in the indicator, and then, in OnInit(), a panel object is created, where the pointer to the created object is written to the pointer variable:
//--- Create panel object
   dashboard=new CDashboard(InpUniqID,InpPanelX,InpPanelY,200,250);
   if(dashboard==NULL)
     {
      Print("Error. Failed to create dashboard object");
      return INIT_FAILED;
     }
Then, in OnDeinit(), the object is deleted in memory using this pointer:
//--- If the panel object exists - delete it
   if(dashboard!=NULL)
      delete dashboard;
If we were to simply create a new object via the new operator without writing the pointer to the created object to a variable, we would not be able to delete it afterwards, which would result in a memory leak.
So, in brief, in the example in the article
- declare a variable-pointer to the future class object and initialise it with NULL value,
- create a new class object and write the pointer to it into the previously created dashboard variable,
- when accessing the created object we use the pointer variable and a point ( dashboard.AnyMethod() )
- at the end of work delete the dynamically created class object by the pointer to it.
If the necessary instance of the class (CDashboard dashboard) had been created immediately, no pointers to it would have been needed - it would have been accessed in the same way using the "point" operator. And there would be no need to delete it when the work was finished - the terminal subsystem does it by itself. But it would be the only instance of the class in the programme.
Dynamic creation allows you to create new objects of the required class on the fly and refer to them by pointer. That's why dynamic creation of a class object was used in the example. Simplified, without covering some points.
- Free trading apps
- Over 8,000 signals for copying
- Economic news for exploring financial markets
You agree to website policy and terms of use
Check out the new article: Making a dashboard to display data in indicators and EAs.
In this article, we will create a dashboard class to be used in indicators and EAs. This is an introductory article in a small series of articles with templates for including and using standard indicators in Expert Advisors. I will start by creating a panel similar to the MetaTrader 5 data window.
In this article, I will create a dashboard that can display data specified by the developer. Such a panel will be convenient for visually displaying data on a chart and for visual debugging, since looking at the necessary values on the panel is more convenient than tracking them in the debugger. I mean cases when the strategy is being debugged depending on some data values.
I will make the panel in the form of a prototype of the terminal data window and fill it with the same data:
Fig. 1. Data window and dashboard
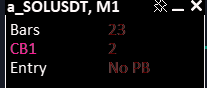
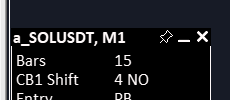
Our custom panel will allow us to add any required amount of the necessary data to it, sign it, as well as display and update readings from the program code.
It should be possible to move the panel around the chart with the mouse, dock it in the desired chart position, as well as collapse/expand it. For the convenience of placing the data on the panel, it will be possible to display a table with the specified number of rows and columns. The data from this table can be displayed in the journal (X and Y coordinates of each table cell) and obtained programmatically in order to indicate the index of the row and column where this data should be located, or simply print the coordinates and enter the required ones into the code, right when displaying text and data. The first method is more convenient due to its complete automation. The panel will also have an active close button, but we delegate its handling to the control program, since only the program developer should decide how to react to pressing the close button. When a button is clicked, a custom event will be sent to the program event handler. The developer can process it at their own discretion.
Author: Artyom Trishkin