Confirmed MACD Divergence with Netting

MACD Divergence Expert Advisor MACD Divergence Expert Advisor

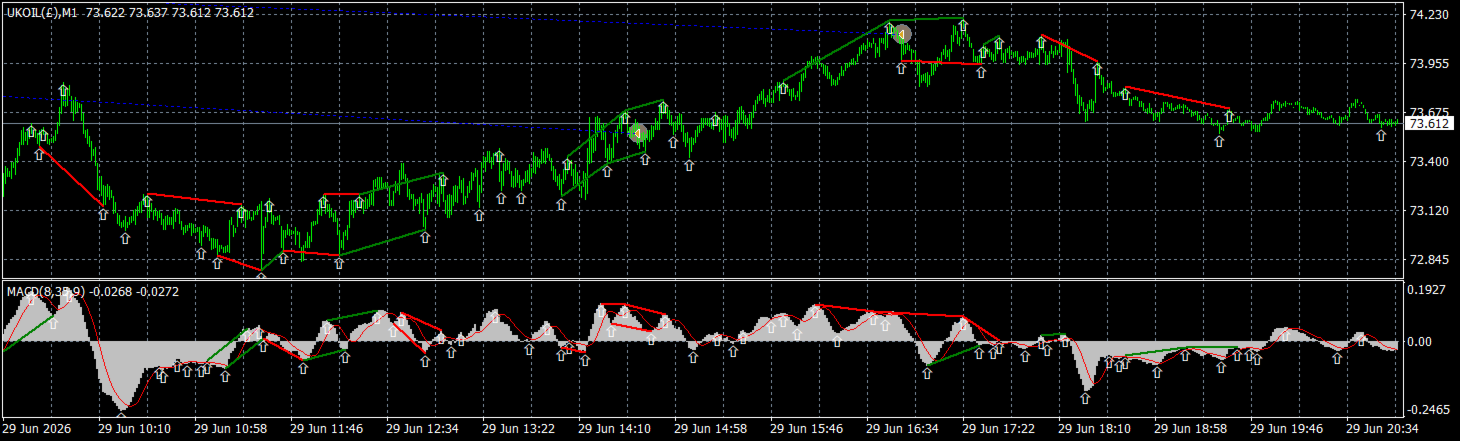
This Expert Advisor trades MACD divergence between price swing trends and MACD swing trends.

MACD divergence is based on the idea that price movement and momentum should usually move together. The MACD indicator measures the relationship between faster and slower moving averages, helping to show whether bullish or bearish momentum is strengthening or weakening. A divergence occurs when price makes a new high or low, but the MACD fails to confirm that move. For example, if price makes a higher high while MACD makes a lower high, buying momentum may be weakening even though price is still rising. This can warn that a reversal or pull-back may be developing. Similarly, if price makes a lower low while MACD makes a higher low, selling pressure may be weakening. MACD divergence is useful because it can highlight potential turning points before they become obvious from price alone, giving traders an early signal that the current trend may be losing strength. However, divergence is not a guarantee of reversal, so it is usually strongest when combined with additional filters such as trend structure, price action, volatility, risk controls, and confirmation rules.

Following identification of a MACD Divergence, several confirmation rules are available to filter out the lowest quality signals. This adviser utilises our propriety TradeNet algorithm to net trades and mange exposure.

Important: MACD Divergence signals should not be constituted as financial advice. Always validate settings in the MT4 Strategy Tester and then on a demo account before using real capital.

Strategy overview

MACD divergence trading looks for disagreement between price direction and MACD direction. The EA searches for recent price peaks/troughs and corresponding MACD peaks/troughs. It then compares the two-point price trend with the two-point MACD trend.

A signal is only generated when:

  1. A valid price swing pair exists (e.g. two peaks or two troughs).
  2. A valid MACD swing pair exists.
  3. The price and MACD trend lines overlap enough in time.
  4. The price and MACD swing endpoints are close enough in time.
  5. The selected divergence type is enabled.
  6. Any enabled confirmers approve the signal.
  7. Trade exposure and risk rules allow the order.

Divergence types

The EA supports four divergence patterns.

Regular bearish divergence

Trade signal: SELL

Price structure: Price makes higher peaks

MACD structure: MACD makes lower peaks

Meaning: Price is rising, but momentum is weakening.

Regular bullish divergence

Trade signal: BUY

Price structure: Price makes lower troughs

MACD structure: MACD makes higher troughs

Meaning: Price is falling, but downside momentum is weakening.

Hidden bearish divergence

Trade signal: SELL

Price structure: Price makes lower peaks

MACD structure: MACD makes higher peaks

Meaning: Downtrend continuation signal.

Hidden bullish divergence

Trade signal: BUY

Price structure: Price makes higher troughs

MACD structure: MACD makes lower troughs

Meaning: Uptrend continuation signal.

Signal flow

The EA follows this high-level flow:

New bar ↓ Detect price peaks/troughs and MACD peaks/troughs ↓ Build price trend and MACD trend from the two most recent matching markers ↓ Check divergence structure, overlap, alignment, and enabled divergence types ↓ Generate any BUY / SELL signals ↓ Run enabled confirmers ↓ Calculate optional stop loss and take profit ↓ Use TradeNet to net existing positions and manage exposure limits

Input parameters

MACD Settings & Signals

MACDFast

Type: int

Default: 12

Description: Fast EMA period used in the MACD calculation.

Strategy effect: Lower values make MACD more responsive but noisier. Higher values smooth it but may delay signals. Must be greater than 0 and less than MACDSlow .

MACDSlow

Type: int

Default: 26

Description: Slow EMA period used in the MACD calculation.

Strategy effect: Higher values make the MACD baseline slower and smoother. Must be greater than MACDFast .

MACDSignal

Type: int

Default: 9

Description: Signal-line period used by the MACD indicator.

Strategy effect: Used by the MACD signal-line confirmer and the MACD values used for peak/trough detection.

MACDPrice

Type: ENUM_APPLIED_PRICE

Default: PRICE_CLOSE

Description: Price source used for MACD, such as close, open, high, low, median, typical, or weighted price.

Strategy effect: Changing this can materially change where MACD peaks/troughs form.

DetectBullishDivergence

Type: bool

Default: true

Description: Enables regular bullish divergence detection.

Strategy effect: If disabled, the EA will not detect or trade regular bullish BUY setups.

DetectBearishDivergence

Type: bool

Default: true

Description: Enables regular bearish divergence detection.

Strategy effect: If disabled, the EA will not detect or trade regular bearish SELL setups.

DetectHiddenBullishDivergence

Type: bool

Default: true

Description: Enables hidden bullish divergence detection.

Strategy effect: If disabled, the EA will not detect or trade hidden bullish continuation BUY setups.

DetectHiddenBearishDivergence

Type: bool

Default: true

Description: Enables hidden bearish divergence detection.

Strategy effect: If disabled, the EA will not detect or trade hidden bearish continuation SELL setups.

Peak / Trough & Trend Detection

effect.

SearchBars

Type: int

Default: 5

Description: Number of bars searched on either side of a candidate candle when deciding whether that candle is a peak or trough.

Strategy effect: Smaller values detect more local swings and create more signals. Larger values require more significant swings but add delay because a peak/trough can only be confirmed after enough future bars have formed. Must be at least 1 .

MaxSwingAlignmentBars

Type: int

Default: 5

Description: Maximum allowed bar distance between the matching price and MACD swing endpoints. It checks both start markers and end markers.

Strategy effect: Lower values require price and MACD swing points to occur very close together in time. Higher values allow looser matching but may pair swings that are less directly related. Cannot be negative.

MinProminencePoints

Type: double

Default: 0.0

Description: Minimum local prominence, in broker points, required for a price peak/trough.

Strategy effect: Higher values require price swing points to stand out more from neighbouring bars. This reduces noisy swings but may remove valid early signals. Cannot be negative.

MinMACDProminence

Type: double

Default: 0.0

Description: Minimum local prominence required for a MACD peak/trough. This is an absolute MACD-value difference, not broker points.

Strategy effect: Higher values require MACD swing points to stand out more clearly. Too high a value may remove many valid divergence signals. Cannot be negative.

MinTrendOverlapRatio

Type: double

Default: 0.75

Description: Minimum required time-overlap ratio between the price trend and MACD trend. Value must be between 0 and 1 .

Strategy effect: Higher values require the price and MACD trends to cover a more similar time window. Lower values allow looser matching.

Confirmation Settings

Confirmers are optional filters applied after a divergence signal is generated. A trade is only allowed if every enabled confirmer confirms the signa.

UsePriceBarConfirmer

Type: bool

Default: true

Description: Requires the previous completed candle to agree with the trade direction. For BUY, close must be above open. For SELL, close must be below open.

Strategy effect: Simple momentum filter. Can remove trades where the immediate previous candle disagrees with the signal, but may also reject early reversal entries.

UseMACDMomentumConfirmer

Type: bool

Default: true

Description: Requires MACD main-line momentum to move in the trade direction between the two most recent completed bars.

Strategy effect: For BUY, MACD main at shift 1 must be greater than shift 2. For SELL, MACD main at shift 1 must be less than shift 2. This can reduce counter-momentum entries but may delay reversal trades.

UsePriceChangeConfirmer

Type: bool

Default: true

Description: Enables a prior price-move filter.

Strategy effect: Confirms BUY only after price has fallen enough over the lookback window; confirms SELL only after price has risen enough. Intended to ensure the divergence appears after a meaningful prior move.

PriceChangeConfirmationBars

Type: int

Default: 30

Description: Lookback length for the price-change confirmer. Uses completed candles only.

Strategy effect: Higher values measure a longer prior move. Must be at least 1 when the confirmer is enabled.

PriceChangeConfirmationMinMovePoints

Type: double

Default: 100.0

Description: Minimum price move, in broker points, required over PriceChangeConfirmationBars .

Strategy effect: Higher values make the filter stricter. For BUY, old close minus recent close must be at least this value in points. For SELL, recent close minus old close must be at least this value in points. Cannot be negative when enabled.

UseMACDDivergenceQualityConfirmer

Type: bool

Default: true

Description: Enables the divergence quality score filter.

Strategy effect: Scores the quality of the price/MACD divergence structure and only allows trades above the threshold.

MACDDivergenceQualityThreshold

Type: double

Default: 60.0

Description: Minimum quality score required to confirm the signal. Score range is 0 to 100 .

Strategy effect: Higher values make the EA more selective. Must be between 0 and 100 when enabled.

MACDDivergenceQualityTargetPriceSwingPoints

Type: double

Default: 100.0

Description: Price swing size, in broker points, that earns a full price-swing score.

Strategy effect: Higher values require larger price separation between the two price swing markers to receive full quality credit. Must be greater than 0 when enabled.

MACDDivergenceQualityTargetMACDSwing

Type: double

Default: 0.005

Description: MACD swing size that earns a full MACD-swing score.

Strategy effect: Higher values require stronger MACD separation between the two MACD swing markers. Must be greater than 0 when enabled.

MACDDivergenceQualityTargetAlignmentBars

Type: int

Default: 10

Description: Bar distance used to score how closely price and MACD swing endpoints align.

Strategy effect: Lower values reward tighter alignment. Higher values make the quality score more forgiving. Cannot be negative when enabled.

MACDDivergenceQualityTargetSwingSeparationBars

Type: int

Default: 15

Description: Swing-point separation that earns a full separation score.

Strategy effect: Helps avoid very short, noisy divergence structures. Higher values reward wider, slower-developing setups. Must be greater than 0 when enabled.

UseMACDSignalConfirmer

Type: bool

Default: true

Description: Enables confirmation using the relationship between MACD main and MACD signal lines.

Strategy effect: Adds an extra MACD confirmation layer. Can be used in direction mode or recent-crossover mode.

MACDSignalConfirmationMode

Type: MACD_SIGNAL_CONFIRMATION_MODE

Default: MACD_SIGNAL_CONFIRMATION_RECENT_CROSSOVER

Description: Selects how the MACD signal-line confirmer works.

Strategy effect: MACD_SIGNAL_CONFIRMATION_DIRECTION checks whether MACD main is above/below the signal line on the most recently completed bar. MACD_SIGNAL_CONFIRMATION_RECENT_CROSSOVER requires a recent bullish/bearish crossover.

MACDSignalCrossoverConfirmationBars

Type: int

Default: 5

Description: Number of completed bars searched for a MACD main/signal-line crossover when recent-crossover mode is used.

Strategy effect: Higher values allow older crossovers to confirm the signal. Lower values require fresher confirmation. Must be at least 1 when the confirmer is enabled.

Trade Settings

LotSize

Type: double

Default: 1

Description: Requested trade size. The broker's minimum lot, maximum lot, and lot step are applied by TradeNet .

Strategy effect: Larger values increase both profit and loss. Must be greater than 0 .

NetType

Type: NETTYPE

Default: NETTYPE_ADVISOR

Description: Controls whether new trades net against existing opposite positions.

Strategy effect: NETTYPE_NONE : do not net; open new trades independently. NETTYPE_ADVISOR : net only positions for this EA's MagicNumber . NETTYPE_ALL : net against all open market positions for the symbol.

ExposureCalc

Type: EXPOSURECALC

Default: EXPOSURECALC_ADVISOR

Description: Controls which open positions count toward the MaxExposure limit.

Strategy effect: EXPOSURECALC_ADVISOR : count only this EA's positions. EXPOSURECALC_ALL : count all open market positions for the symbol.

MaxExposure

Type: double

Default: 10

Description: Maximum allowed absolute open exposure for the symbol. Use -1 for unlimited.

Strategy effect: Prevents the EA from increasing exposure above the limit. A value of 0 prevents new exposure. Must be -1 or zero/positive.

SlippagePoints

Type: int

Default: 3

Description: Maximum allowed execution slippage in broker points for order send/close operations.

Strategy effect: Higher values make execution more permissive. Lower values can increase failed orders in fast markets. Cannot be negative.

MagicNumber

Type: int

Default: 123456

Description: Identifier applied to orders opened by this EA.

Strategy effect: Important when using advisor-level netting/exposure. Use a unique value for each EA instance or strategy.

Risk Management Settings

UseStopLoss

Type: bool

Default: false

Description: Enables automatic stop-loss placement based on the signal price trend.

Strategy effect: For BUY, stop loss is below the lowest price marker plus buffer. For SELL, stop loss is above the highest price marker plus buffer and spread adjustment.

StopBufferPoints

Type: double

Default: 20

Description: Extra buffer, in broker points, added beyond the trend high/low used for the stop loss.

Strategy effect: Higher values place stops farther away and reduce stop-outs, but increase risk per trade. Cannot be negative when stop loss is enabled.

UseTakeProfit

Type: bool

Default: false

Description: Enables automatic take-profit placement based on stop-loss distance.

Strategy effect: Requires a valid stop-loss calculation.

RiskRewardRatio

Type: double

Default: 2

Description: Reward multiple used to calculate take profit from stop-loss distance.

Strategy effect: Example: if risk distance is 100 points and ratio is 2 , take profit is placed 200 points from entry. Must be greater than 0 when take profit is enabled.

Misc

CooldownBars

Type: int

Default: 5

Description: Minimum number of bars after a successfully booked trade before another trade can be placed.

Strategy effect: Higher values reduce trade frequency. Cooldown is only updated when TradeNet.trade() reports that a trade was booked or an existing position was reduced. Cannot be negative.

Notes on points, spread, and broker execution

  • Parameters ending in Points use the broker's MODE_POINT , not necessarily a pip.
  • The EA's stop-loss calculation for SELL trades includes spread because chart highs/lows are bid-based while SELL stop losses are triggered on ask price.
  • TradeNet normalises lots using the broker's minimum lot, maximum lot, and lot step.
  • TradeNet normalises entry, stop-loss, and take-profit prices to the broker's digit precision before order submission.
  • Invalid stop-loss or take-profit distances are rejected before sending the order.
  • Only market orders ( OP_BUY and OP_SELL ) are used for netting and exposure calculations.

Practical tuning guidance

The inputs fall into three categories.

Detection inputs

These decide whether a divergence exists:

SearchBars MaxSwingAlignmentBars MinProminencePoints MinMACDProminence MinTrendOverlapRatio DetectBullishDivergence DetectBearishDivergence DetectHiddenBullishDivergence DetectHiddenBearishDivergence

Use these to control the shape and strictness of the divergence pattern itself.

Confirmation inputs

These decide whether an already-detected divergence is strong enough to trade:

UsePriceBarConfirmer UseMACDMomentumConfirmer UsePriceChangeConfirmer UseMACDDivergenceQualityConfirmer UseMACDSignalConfirmer

More confirmers usually reduce trade count. They can reduce bad trades, but they may also delay or remove profitable early entries.

Execution and risk inputs

These control position size, exposure, stop loss, take profit, slippage, and cooldown:

LotSize NetType ExposureCalc MaxExposure SlippagePoints MagicNumber UseStopLoss StopBufferPoints UseTakeProfit RiskRewardRatio CooldownBars

These do not change the signal itself, but they have a major effect on realised drawdown, account usage, and execution behaviour.

Suggested validation process

Before using the EA live:

  1. Run MT4 Strategy Tester over several market regimes.
  2. Test with realistic spread, commission, swap, and slippage assumptions.
  3. Confirm that the broker's lot size, tick value, and margin model match the intended risk sizing.
  4. Review the Experts and Journal logs for rejected orders, invalid stops, exposure blocks, and confirmer rejections.
  5. Forward-test on a demo account before using real capital.

Current default profile

The current defaults are relatively selective:

MACD: 12 / 26 / 9 SearchBars: 5 MaxSwingAlignmentBars: 5 MinTrendOverlapRatio: 0.75 PriceChangeConfirmer: on, 30 bars / 100 points MACDDivergenceQualityConfirmer: on, threshold 60 MACDSignalConfirmer: on, recent crossover within 5 completed bars StopLoss: off TakeProfit: off CooldownBars: 5

Important: These defaults should be treated as a starting point for testing, not as a guaranteed optimal configuration for all symbols, timeframes, or brokers.
Usage Guide

It is recommended that this EA is run on the standard chart for your chosen symbol with the MACD indicator added. The MACD indicator parameters should be set to match the MACDFast , MACDSlow and MACDSignal parameters set for the expert advisor. Saving this template as MACDDivergence_EA.tpi will reload this setup whenever you use the advisor.

Note: If the Expert Advisor MACD settings differ from the indicator MACD settings, the advisor will execute its strategy but the trend lines won't be shown on the MACD indicator.

필터:
리뷰 없음
리뷰 답변