Discussing the article: "MQL5 Trading Tools (Part 17): Exploring Vector-Based Rounded Rectangles and Triangles"
Thank you for this article! It's very helpful and detailed.
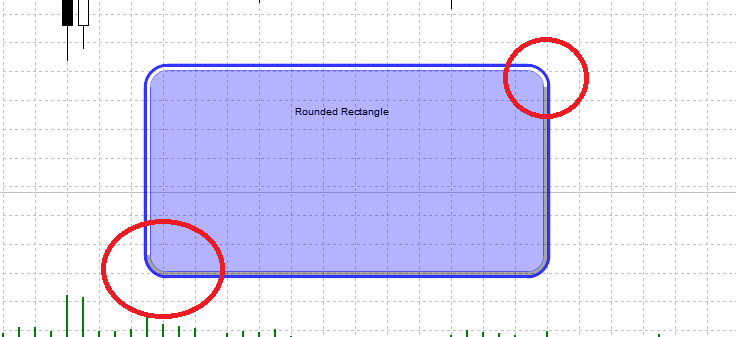
I'm trying to add a beveled edges effect (3D lighting - white on top/left, black on bottom/right) to my rounded rectangle.
I've successfully implemented the beveled effect on straight edges, but I'm having trouble connecting them at the corners.
See the red circles in the image below where lines meet.
Any suggestions?
P.S. - Article ideas for future:
Drop shadow & Glow effects - how to add depth to UI elements
Gradient fills - creating 3D appearance with color transitions
Anti-aliasing techniques - smoothing edges for professional look
Inner shadows - enhancing 3D beveled effects
Texture & noise patterns - adding realism to flat shapes
I'm trying to add a beveled edges effect (3D lighting - white on top/left, black on bottom/right) to my rounded rectangle.
I've successfully implemented the beveled effect on straight edges, but I'm having trouble connecting them at the corners.
See the red circles in the image below where lines meet.
Any suggestions?
//+------------------------------------------------------------------+
//| BEVELED EDGES EFEKTS
//+------------------------------------------------------------------+
void DrawBeveledEdges(int posX, int posY, int width, int height, int radius, int scaleFactor)
  {
   color lightColor = clrWhite;
   uint lightARGB = ColorToARGBWithOpacity(lightColor, 20);

   color darkColor = clrBlack;
   uint darkARGB = ColorToARGBWithOpacity(darkColor, 35);

   int bevelWidth = 3 * scaleFactor;

// ===== BRIGHT SIDE (TOP-LEFT) =====

// Upper horizontal part
   for(int y = 0; y < bevelWidth; y++)
     {
      for(int x = radius; x < width - radius; x++)
        {
         rectangleHighResCanvas.PixelSet(posX + x, posY + y, lightARGB);
        }
     }

// Left vertical part
   for(int x = 0; x < bevelWidth; x++)
     {
      for(int y = radius; y < height - radius; y++)
        {
         rectangleHighResCanvas.PixelSet(posX + x, posY + y, lightARGB);
        }
     }

// Top-left ARC - ONLY light color
   for(int dy = -radius; dy <= 0; dy++)
     {
      for(int dx = -radius; dx <= 0; dx++)
        {
         double dist = MathSqrt((double)(dx*dx + dy*dy));

         if(dist >= radius - bevelWidth && dist <= radius + 1)
           {
            int pixX = posX + radius + dx;
            int pixY = posY + radius + dy;

            if(pixX >= posX && pixY >= posY)
               rectangleHighResCanvas.PixelSet(pixX, pixY, lightARGB);
           }
        }
     }

// Top-right ARC - ONLY light color (top right corner)
   for(int dy = -radius; dy <= 0; dy++)
     {
      for(int dx = 0; dx <= radius; dx++)
        {
         double dist = MathSqrt((double)(dx*dx + dy*dy));

         if(dist >= radius - bevelWidth && dist <= radius + 1)
           {
            int pixX = posX + width - radius + dx;
            int pixY = posY + radius + dy;

            if(pixX < posX + width && pixY >= posY)
               rectangleHighResCanvas.PixelSet(pixX, pixY, lightARGB);
           }
        }
     }

// ===== DARK EDGE (BOTTOM-RIGHT) =====

// Apakšējā horizontālā daļa
   for(int y = height - bevelWidth; y < height; y++)
     {
      for(int x = radius; x < width - radius; x++)
        {
         rectangleHighResCanvas.PixelSet(posX + x, posY + y, darkARGB);
        }
     }

// Right vertical part
   for(int x = width - bevelWidth; x < width; x++)
     {
      for(int y = radius; y < height - radius; y++)
        {
         rectangleHighResCanvas.PixelSet(posX + x, posY + y, darkARGB);
        }
     }

// Bottom-right ARC - ONLY dark color
   for(int dy = 0; dy <= radius; dy++)
     {
      for(int dx = 0; dx <= radius; dx++)
        {
         double dist = MathSqrt((double)(dx*dx + dy*dy));

         if(dist >= radius - bevelWidth && dist <= radius + 1)
           {
            int pixX = posX + width - radius + dx;
            int pixY = posY + height - radius + dy;

            if(pixX < posX + width && pixY < posY + height)
               rectangleHighResCanvas.PixelSet(pixX, pixY, darkARGB);
           }
        }
     }

// Bottom-left ARC - ONLY dark color (bottom left corner)
   for(int dy = 0; dy <= radius; dy++)
     {
      for(int dx = -radius; dx <= 0; dx++)
        {
         double dist = MathSqrt((double)(dx*dx + dy*dy));

         if(dist >= radius - bevelWidth && dist <= radius + 1)
           {
            int pixX = posX + radius + dx;
            int pixY = posY + height - radius + dy;

            if(pixX >= posX && pixY < posY + height)
               rectangleHighResCanvas.PixelSet(pixX, pixY, darkARGB);
           }
        }
     }
  }
//+------------------------------------------------------------------+
P.S. - Article ideas for future:
Drop shadow & Glow effects - how to add depth to UI elements
Gradient fills - creating 3D appearance with color transitions
Anti-aliasing techniques - smoothing edges for professional look
Inner shadows - enhancing 3D beveled effects
Texture & noise patterns - adding realism to flat shapes
You are missing trading opportunities:
- Free trading apps
- Over 8,000 signals for copying
- Economic news for exploring financial markets
Registration
Log in
You agree to website policy and terms of use
If you do not have an account, please register
Check out the new article: MQL5 Trading Tools (Part 17): Exploring Vector-Based Rounded Rectangles and Triangles.
In this article, we explore vector-based methods for drawing rounded rectangles and triangles in MQL5 using canvas, with supersampling for anti-aliased rendering. We implement scanline filling, geometric precomputations for arcs and tangents, and border drawing to create smooth, customizable shapes. This approach lays the groundwork for modern UI elements in future trading tools, supporting inputs for sizes, radii, borders, and opacities.
The vector-based approach to rendering rounded rectangles and triangles uses mathematical descriptions of shapes—points, lines, and curves—rather than pixel grids, enabling scalable, resolution-independent graphics that remain sharp at any size. Unlike raster methods, which can produce jagged edges (aliasing) when scaled, vector techniques calculate precise boundaries and fills using equations for arcs and tangents, making them ideal for UI elements in MQL5, where smooth visuals enhance usability without performance loss. Rounded corners are achieved by replacing sharp vertices with circular arcs, whose radii control the curvature. Borders involve offset paths or thickened edges, and supersampling further refines the output by rendering at higher resolutions before downsampling to eliminate artifacts.
We plan to implement high-resolution canvases with supersampling, precompute geometries for arcs and tangents in triangles, use scanline filling for both shapes to ensure precise interiors, and add customizable borders with vector-based straight edges and corner arcs. We will handle user inputs for dimensions, radii, opacities, and colors to create flexible, anti-aliased shapes suitable for modern trading interfaces. In brief, here is a visual representation of our objectives.
Author: Allan Munene Mutiiria