Mochamad Briend Mega Bayu Angkasa / Profil
- Informations
|
2 années
expérience
|
0
produits
|
0
versions de démo
|
|
0
offres d’emploi
|
0
signaux
|
0
les abonnés
|
Mochamad Briend Mega Bayu Angkasa
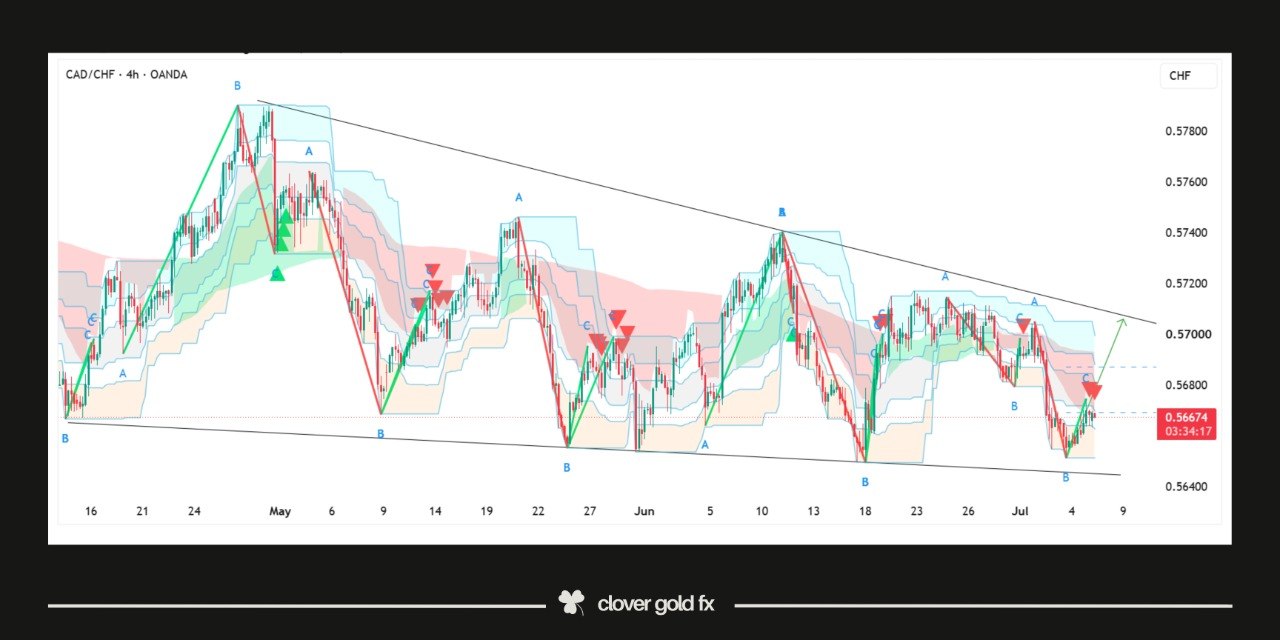
📈 **CADCHF Technical Outlook – Bullish**
Current Price: **0.5693**
CADCHF is showing signs of bullish momentum as buyers continue defending key support levels. The current price action suggests that the market may continue higher if bullish momentum remains intact.
**Technical Levels**
🔹 Current Price: **0.5693**
🔹 Support: **0.5688**
🔹 Resistance: **0.5696**
A confirmed breakout above **0.5696** could strengthen the bullish bias and open the way for further upside. However, a move below **0.5688** would invalidate the short-term bullish scenario and require a fresh technical assessment.
⚠️ This analysis is based on technical price action only and is not financial advice. Always use proper risk management before entering any trade.
Current Price: **0.5693**
CADCHF is showing signs of bullish momentum as buyers continue defending key support levels. The current price action suggests that the market may continue higher if bullish momentum remains intact.
**Technical Levels**
🔹 Current Price: **0.5693**
🔹 Support: **0.5688**
🔹 Resistance: **0.5696**
A confirmed breakout above **0.5696** could strengthen the bullish bias and open the way for further upside. However, a move below **0.5688** would invalidate the short-term bullish scenario and require a fresh technical assessment.
⚠️ This analysis is based on technical price action only and is not financial advice. Always use proper risk management before entering any trade.
Mochamad Briend Mega Bayu Angkasa
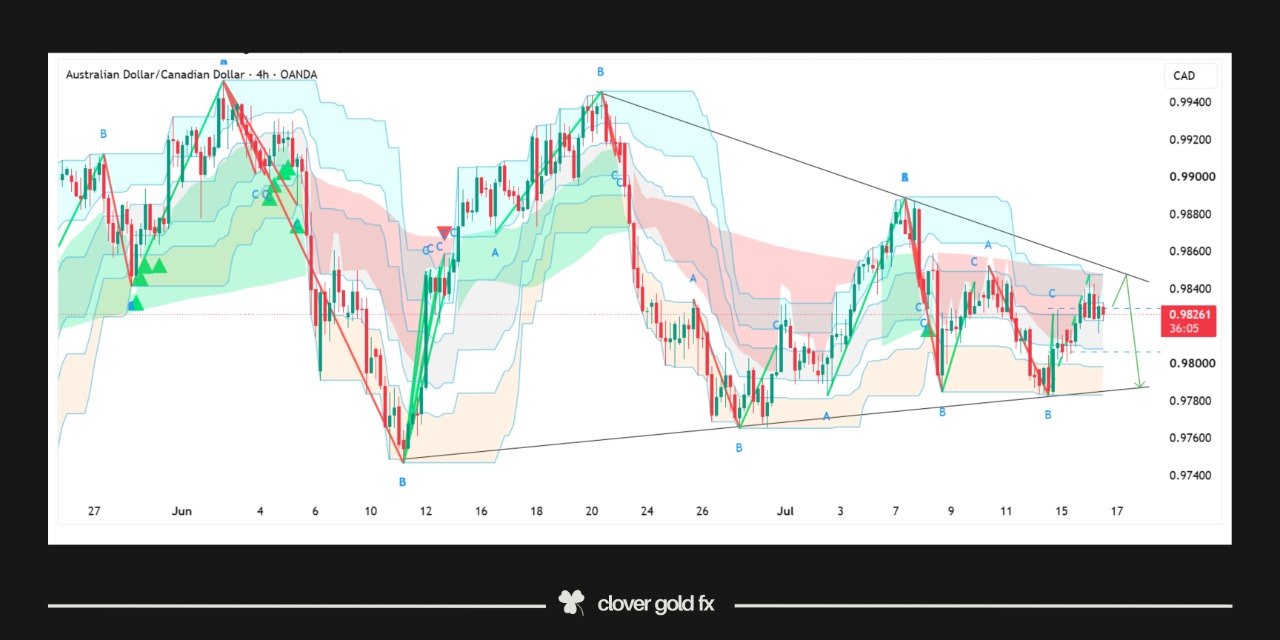
**AUD/CAD | Technical Outlook – Bullish 📈**
AUD/CAD is showing signs of strengthening as buyers continue to defend key support, maintaining a constructive market structure. The recent price action suggests growing bullish momentum, with the potential for further upside if the pair sustains above the current support zone.
As long as the bullish structure remains intact, the outlook favors continuation toward the next resistance level. A confirmed breakout above resistance could attract additional buying interest and reinforce the upward trend.
🔹 Trend: Bullish
🔹 Bias: Buy on pullback / Breakout confirmation
🔹 Key Support: Recent swing low & demand zone
🔹 Key Resistance: Previous swing high
Stay patient and wait for technical confirmation before entering a position. Consistent execution and disciplined risk management remain the foundation of long-term trading success.
AUD/CAD is showing signs of strengthening as buyers continue to defend key support, maintaining a constructive market structure. The recent price action suggests growing bullish momentum, with the potential for further upside if the pair sustains above the current support zone.
As long as the bullish structure remains intact, the outlook favors continuation toward the next resistance level. A confirmed breakout above resistance could attract additional buying interest and reinforce the upward trend.
🔹 Trend: Bullish
🔹 Bias: Buy on pullback / Breakout confirmation
🔹 Key Support: Recent swing low & demand zone
🔹 Key Resistance: Previous swing high
Stay patient and wait for technical confirmation before entering a position. Consistent execution and disciplined risk management remain the foundation of long-term trading success.
Mochamad Briend Mega Bayu Angkasa
**USD/JPY | Technical Outlook – Bearish 📉**
USD/JPY continues to trade under bearish pressure after failing to sustain momentum above key resistance. The market structure remains in a clear downtrend, with lower highs and lower lows confirming sellers' control.
As long as price stays below the resistance zone, the downside bias remains valid. A break below the nearest support could accelerate bearish momentum toward the next demand area.
🔹 Trend: Bearish
🔹 Bias: Sell on rally / Breakdown confirmation
🔹 Key Resistance: Previous swing high & dynamic resistance
🔹 Key Support: Recent swing low
Always wait for confirmation and apply proper risk management before entering any trade.
*This analysis is for educational purposes only and should not be considered financial advice.*
#USDJPY #Forex #ForexTrading #TechnicalAnalysis #PriceAction #Bearish #TradingView #SmartMoneyConcept #SMC #ICT #DayTrading #SwingTrading #RiskManagement #FXMarket
USD/JPY continues to trade under bearish pressure after failing to sustain momentum above key resistance. The market structure remains in a clear downtrend, with lower highs and lower lows confirming sellers' control.
As long as price stays below the resistance zone, the downside bias remains valid. A break below the nearest support could accelerate bearish momentum toward the next demand area.
🔹 Trend: Bearish
🔹 Bias: Sell on rally / Breakdown confirmation
🔹 Key Resistance: Previous swing high & dynamic resistance
🔹 Key Support: Recent swing low
Always wait for confirmation and apply proper risk management before entering any trade.
*This analysis is for educational purposes only and should not be considered financial advice.*
#USDJPY #Forex #ForexTrading #TechnicalAnalysis #PriceAction #Bearish #TradingView #SmartMoneyConcept #SMC #ICT #DayTrading #SwingTrading #RiskManagement #FXMarket
Mochamad Briend Mega Bayu Angkasa
📈 **GBPJPY Technical Analysis**
GBPJPY continues to maintain a bullish market structure, with buyers driving the trend through a series of higher highs and higher lows. Recent pullbacks have found strong support, indicating that buying interest remains intact and the overall momentum favors further upside.
As long as price holds above the key support zone, the bullish bias remains valid. Traders should focus on buying opportunities after healthy retracements and confirmation from bullish price action. A break below the most recent higher low would be the first sign that the current bullish momentum is losing strength.
**Bias:** Bullish 📈
**Strategy:** Buy on pullbacks with confirmation.
**Invalidation:** Break and close below key support.
⚠️ *This analysis is for educational purposes only and is not financial advice.*
#GBPJPY #Forex #TechnicalAnalysis #Bullish #PriceAction #MarketStructure #ForexTrading #SwingTrading #DayTrading #TradingView #RiskManagement #BuySetup
GBPJPY continues to maintain a bullish market structure, with buyers driving the trend through a series of higher highs and higher lows. Recent pullbacks have found strong support, indicating that buying interest remains intact and the overall momentum favors further upside.
As long as price holds above the key support zone, the bullish bias remains valid. Traders should focus on buying opportunities after healthy retracements and confirmation from bullish price action. A break below the most recent higher low would be the first sign that the current bullish momentum is losing strength.
**Bias:** Bullish 📈
**Strategy:** Buy on pullbacks with confirmation.
**Invalidation:** Break and close below key support.
⚠️ *This analysis is for educational purposes only and is not financial advice.*
#GBPJPY #Forex #TechnicalAnalysis #Bullish #PriceAction #MarketStructure #ForexTrading #SwingTrading #DayTrading #TradingView #RiskManagement #BuySetup
Mochamad Briend Mega Bayu Angkasa
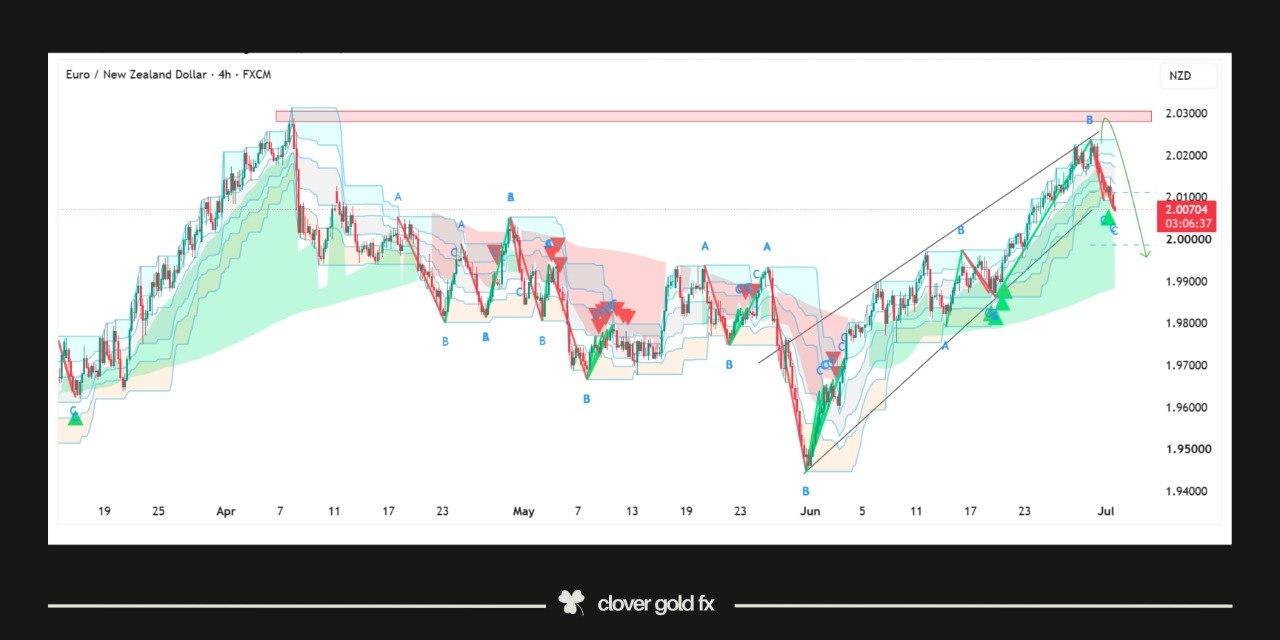
📉 **EURNZD Technical Analysis**
EURNZD remains in a bearish trend as sellers continue to dominate the market structure. Price is forming lower highs and lower lows, while recent retracements have struggled to break above key resistance, reinforcing the downside bias.
As long as price remains below the major resistance zone, the bearish outlook stays intact. Traders should look for selling opportunities on pullbacks with strong bearish confirmation, while a break above the latest lower high could signal a potential shift in momentum.
**Bias:** Bearish 📉
**Strategy:** Sell on pullbacks with confirmation.
**Invalidation:** Break and close above key resistance.
⚠️ *This analysis is for educational purposes only and is not financial advice.*
#EURNZD #Forex #TechnicalAnalysis #Bearish #PriceAction #MarketStructure #ForexTrading #SwingTrading #DayTrading #TradingView #RiskManagement #SellSetup
EURNZD remains in a bearish trend as sellers continue to dominate the market structure. Price is forming lower highs and lower lows, while recent retracements have struggled to break above key resistance, reinforcing the downside bias.
As long as price remains below the major resistance zone, the bearish outlook stays intact. Traders should look for selling opportunities on pullbacks with strong bearish confirmation, while a break above the latest lower high could signal a potential shift in momentum.
**Bias:** Bearish 📉
**Strategy:** Sell on pullbacks with confirmation.
**Invalidation:** Break and close above key resistance.
⚠️ *This analysis is for educational purposes only and is not financial advice.*
#EURNZD #Forex #TechnicalAnalysis #Bearish #PriceAction #MarketStructure #ForexTrading #SwingTrading #DayTrading #TradingView #RiskManagement #SellSetup
Mochamad Briend Mega Bayu Angkasa
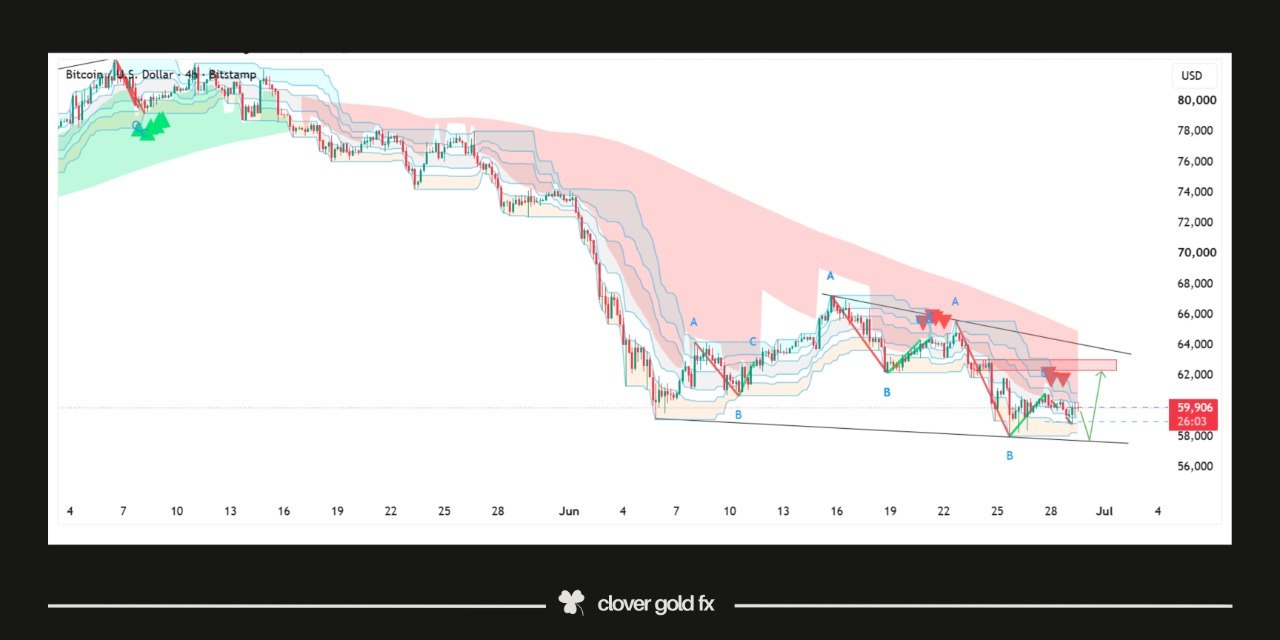
🚀 **BTC Technical Analysis**
BTC continues to trade with a bullish market structure, supported by strong buying momentum and consistent higher highs and higher lows. Buyers remain in control, while recent pullbacks have been met with renewed demand, suggesting the uptrend is still healthy.
As long as price holds above the key support zone, the bullish outlook remains valid. Traders should monitor for continuation patterns and breakout confirmations before targeting higher resistance levels. A break below the most recent higher low would be the first signal that bullish momentum is weakening.
**Bias:** Bullish 📈
**Strategy:** Buy on pullbacks with confirmation.
**Invalidation:** Break and close below key support.
⚠️ *This analysis is for educational purposes only and is not financial advice.*
#BTC #Bitcoin #Crypto #TechnicalAnalysis #Bullish #PriceAction #CryptoTrading #MarketStructure #TradingView #SwingTrading #DayTrading #RiskManagement
BTC continues to trade with a bullish market structure, supported by strong buying momentum and consistent higher highs and higher lows. Buyers remain in control, while recent pullbacks have been met with renewed demand, suggesting the uptrend is still healthy.
As long as price holds above the key support zone, the bullish outlook remains valid. Traders should monitor for continuation patterns and breakout confirmations before targeting higher resistance levels. A break below the most recent higher low would be the first signal that bullish momentum is weakening.
**Bias:** Bullish 📈
**Strategy:** Buy on pullbacks with confirmation.
**Invalidation:** Break and close below key support.
⚠️ *This analysis is for educational purposes only and is not financial advice.*
#BTC #Bitcoin #Crypto #TechnicalAnalysis #Bullish #PriceAction #CryptoTrading #MarketStructure #TradingView #SwingTrading #DayTrading #RiskManagement
Mochamad Briend Mega Bayu Angkasa
📉 **US30 Technical Analysis**
US30 remains under bearish pressure as sellers continue to control the overall market structure. Price is forming lower highs and lower lows, confirming that the downtrend is still intact. Recent pullbacks have been rejected near resistance, indicating that selling momentum remains dominant.
As long as price stays below the key resistance zone, the bearish outlook remains valid. Traders should watch for continuation signals after retracements rather than chasing the market at current levels. A confirmed break above the latest lower high would be the first indication that bearish momentum is beginning to weaken.
**Bias:** Bearish 📉
**Strategy:** Sell on pullbacks with proper confirmation.
**Invalidation:** Break and close above key resistance.
⚠️ *This analysis is for educational purposes only and is not financial advice.*
#US30 #DowJones #TechnicalAnalysis #PriceAction #Bearish #MarketStructure #SMC #DayTrading #SwingTrading #TradingView #RiskManagement
US30 remains under bearish pressure as sellers continue to control the overall market structure. Price is forming lower highs and lower lows, confirming that the downtrend is still intact. Recent pullbacks have been rejected near resistance, indicating that selling momentum remains dominant.
As long as price stays below the key resistance zone, the bearish outlook remains valid. Traders should watch for continuation signals after retracements rather than chasing the market at current levels. A confirmed break above the latest lower high would be the first indication that bearish momentum is beginning to weaken.
**Bias:** Bearish 📉
**Strategy:** Sell on pullbacks with proper confirmation.
**Invalidation:** Break and close above key resistance.
⚠️ *This analysis is for educational purposes only and is not financial advice.*
#US30 #DowJones #TechnicalAnalysis #PriceAction #Bearish #MarketStructure #SMC #DayTrading #SwingTrading #TradingView #RiskManagement
Mochamad Briend Mega Bayu Angkasa
📉 AUDJPY Weekly Technical Outlook
AUDJPY is showing signs of weakness after failing to maintain bullish momentum near a key resistance zone. Sellers are beginning to gain control as price struggles to create new highs, increasing the probability of a deeper corrective move.
🔹 Trend Bias: Bearish
🔹 Current Price: 114.50
🔹 Key Resistance: 115.00 – 115.50
🔹 Key Support: 114.00 → 113.00 → 112.50
🔹 Market Structure: Potential Lower High Formation
🔹 Momentum: Bearish pressure building below resistance
As long as price remains below the 115.00 resistance area, downside opportunities remain favored. A break below 114.00 could accelerate selling pressure and expose lower liquidity zones toward 113.00 and 112.50.
Market participants should watch for bearish confirmations, including rejection candles, liquidity sweeps, and market structure breaks on lower timeframes.
📊 Trading Plan
✅ Bearish below 115.00
🎯 Target 1: 114.00
🎯 Target 2: 113.00
🎯 Target 3: 112.50
❌ Invalidation: Daily close above 115.50
Patience is key. Let the market confirm the bearish continuation before committing to the move.
AUDJPY is showing signs of weakness after failing to maintain bullish momentum near a key resistance zone. Sellers are beginning to gain control as price struggles to create new highs, increasing the probability of a deeper corrective move.
🔹 Trend Bias: Bearish
🔹 Current Price: 114.50
🔹 Key Resistance: 115.00 – 115.50
🔹 Key Support: 114.00 → 113.00 → 112.50
🔹 Market Structure: Potential Lower High Formation
🔹 Momentum: Bearish pressure building below resistance
As long as price remains below the 115.00 resistance area, downside opportunities remain favored. A break below 114.00 could accelerate selling pressure and expose lower liquidity zones toward 113.00 and 112.50.
Market participants should watch for bearish confirmations, including rejection candles, liquidity sweeps, and market structure breaks on lower timeframes.
📊 Trading Plan
✅ Bearish below 115.00
🎯 Target 1: 114.00
🎯 Target 2: 113.00
🎯 Target 3: 112.50
❌ Invalidation: Daily close above 115.50
Patience is key. Let the market confirm the bearish continuation before committing to the move.
Mochamad Briend Mega Bayu Angkasa
📉 USDJPY Weekly Technical Outlook
USDJPY is showing signs of exhaustion near the psychological resistance zone around 160.00, with sellers beginning to defend the highs aggressively.
🔹 Current Price: 159.70
🔹 Market Bias: Bearish
🔹 Major Resistance: 160.00 – 160.50
🔹 Key Support: 159.00
🔹 Bearish Targets: 158.00 → 157.00 → 156.50
Price remains vulnerable to a corrective move lower after repeated failures to establish a strong breakout above the 160.00 area. The market is approaching a critical resistance zone where profit-taking and potential intervention concerns could increase selling pressure.
A sustained rejection below 160.00 may trigger a deeper retracement toward the 158.00 region, while a break below 159.00 would strengthen the bearish outlook for the remainder of the week.
📊 Trade what the chart shows, not what emotions tell you.
USDJPY is showing signs of exhaustion near the psychological resistance zone around 160.00, with sellers beginning to defend the highs aggressively.
🔹 Current Price: 159.70
🔹 Market Bias: Bearish
🔹 Major Resistance: 160.00 – 160.50
🔹 Key Support: 159.00
🔹 Bearish Targets: 158.00 → 157.00 → 156.50
Price remains vulnerable to a corrective move lower after repeated failures to establish a strong breakout above the 160.00 area. The market is approaching a critical resistance zone where profit-taking and potential intervention concerns could increase selling pressure.
A sustained rejection below 160.00 may trigger a deeper retracement toward the 158.00 region, while a break below 159.00 would strengthen the bearish outlook for the remainder of the week.
📊 Trade what the chart shows, not what emotions tell you.
Mochamad Briend Mega Bayu Angkasa
📈 XAUUSD Weekly Technical Outlook
Gold remains firmly bullish this week, maintaining its position above key support levels and continuing to print higher highs and higher lows on the higher timeframes.
🔹 Trend Structure: Bullish
🔹 Market Sentiment: Buyers remain in control
🔹 Key Focus: Breakout continuation above recent resistance
🔹 Momentum: Strong bullish momentum supported by sustained buying pressure
As long as price holds above the major support zone, the path of least resistance remains to the upside. A successful breakout and daily close above resistance could open the door for the next bullish leg toward higher targets.
Risk management remains essential, especially around high-impact economic events and USD-related news releases.
📊 Trade the trend, respect the levels, and let the market confirm the direction.
Gold remains firmly bullish this week, maintaining its position above key support levels and continuing to print higher highs and higher lows on the higher timeframes.
🔹 Trend Structure: Bullish
🔹 Market Sentiment: Buyers remain in control
🔹 Key Focus: Breakout continuation above recent resistance
🔹 Momentum: Strong bullish momentum supported by sustained buying pressure
As long as price holds above the major support zone, the path of least resistance remains to the upside. A successful breakout and daily close above resistance could open the door for the next bullish leg toward higher targets.
Risk management remains essential, especially around high-impact economic events and USD-related news releases.
📊 Trade the trend, respect the levels, and let the market confirm the direction.
Mochamad Briend Mega Bayu Angkasa
CADCHF is showing strong bearish pressure heading into this week. 📉
Price failed to maintain bullish momentum near the 0.6660 resistance zone and started forming lower highs, signaling possible continuation toward the 0.6540 support area.
Weak buyer reaction and sustained selling pressure continue to favor the bearish structure.
Key levels:
🔴 Resistance: 0.6640 – 0.6660
🟢 Support: 0.6540 – 0.6560
The market always leaves clues before the move happens.
Stay disciplined, trust the structure, and manage the risk. ✨
Price failed to maintain bullish momentum near the 0.6660 resistance zone and started forming lower highs, signaling possible continuation toward the 0.6540 support area.
Weak buyer reaction and sustained selling pressure continue to favor the bearish structure.
Key levels:
🔴 Resistance: 0.6640 – 0.6660
🟢 Support: 0.6540 – 0.6560
The market always leaves clues before the move happens.
Stay disciplined, trust the structure, and manage the risk. ✨
: