Writing an Expert Advisor Using the MQL5 Object-Oriented Programming Approach
Samuel Olowoyo | 12 July, 2010
Introduction
In the first article, we took a journey through the basic steps of creating, debugging and testing an Expert Advisor in MQL5.
Everything we did was very simple and interesting; however, the new MQL5 language has much more to offer. In this article, we will consider the Object Oriented approach to doing what we did in the first article. Most people think this is difficult, but I want to assure you that by the time you finish reading through this article, you will be able to write your own Expert Advisor which is object oriented based.
We will not repeat some of the things we have learned in the first article, so I suggest that you first of all read through the article if you have not already done so.
1. The Object-Oriented Paradigm
One of the things that make the new MQL5 much more powerful and robust than MQL4 is its OOP (Object Oriented Programming) approach.
It is recommended in OOP that an object should not expose any of its implementation details. This way, its implementation can be changed without changing the code that uses the object. This means that a class allows a programmer to hide (and also prevents changes to) how the class he has written is implemented.
To get things clearer, let us dwell a bit on the terms "class" and "object" just mentioned.
- CLASS. A class is more like an expanded concept of a data structure but instead of holding data only, it holds both data and functions.A class can contain several variables and functions, which are called the members of the class. It is an encapsulation of data members and functions that manipulate the data. A class is much more powerful, in that you can wrap up all your Expert Advisors functions in a class. You will only be making reference to the functions anytime you need them in your EA code. By the way, this is what this article is all about.
- OBJECT. An object is an instance of a class. Once a class has been created, to use the class, we must declare an instance of the class. This is called an object. In other words, to create an object you need a class.
1.1. DECLARING A CLASS
A class, basically, contains the description of the members (properties and functions/methods) of an object you want to create from the class. Let us look at an example…
If we want to create an object that will have doors, sits, tyres, weight, etc. and that can also start, changegear, stop and horn; then we need to write a class for it. The doors, sits, tyres, weight, start, changegear, stop and horn
will be the members of the class.
Of course, you will observe that, these members are categorized; some are just what our object will have (properties) while the others are what our object will do (actions – functions/methods). To declare our class, we need to think of a very good and descriptive name for it. In this case, we will call our class CAR. Our CAR class will have the properties and functions stated above as its members.
To declare a class, we start by typing the keyword class followed by the name of the class followed by a pair of braces that contains the members of the class.
So, the basic format of a class is as shown below:class class_name
{
access_keyword_1:
members1;
access_keyword_2:
members2;
...
};
Here, class_name is a valid identifier for the class we want to write, members1 and members2 are the data members of the class.
The access_keyword specifies the access right to the members of our class. An access_keyword can be private, protected or public. Remember that we are trying to write a class that can be used by ourselves and others without actually exposing the implementation details. That is why access rights are necessary.
There may be some members of our class we don’t want access to from outside of our class. These are declared within the private access section using the private or protected keyword. Other members that we want access to from outside of our class will then be declared within the public access section using the public keyword. Now, our new CAR class will now look like below:
class CAR
{
  private:
    int        doors;
    int        sits;
    int        tyres;
    double     weight;

  public:
    bool       start();
    void       changegear();
    void       stop();
    bool       horn();
  ...
};
Our CAR class is declared using the keyword class. This class contains
eighth members with four members having private access and four members having public access. The four members in the private section are data members. Three are of integer (int) data type and one a double data type. These members cannot be accessed by any other function that is declared outside of this class.
The four members in the public section are function members. Two return bool data type and two return void type. These are the members that are accessible to any object of this class whenever it is created by anyone using our class. Once an object of our class is created, these members will be readily available for use.
As you will rightly observed, the access keywords (private, public, protected) are always followed by a colon. The class declaration also ended with a semi-colon. The members are declared using their correct data type.
It should be noted that once you declare a class, all members of the class are given private access rights unless it is explicitly specified as we did above. For example, in the class declaration below:
class CAR
{
    int        doors;
    int        sits;
    int        tyres;
    double     weight;

  public:
    bool       start();
    void       changegear();
    void       stop();
    bool       horn();
  ...
};
All the four members declared above the public access keyword automatically have private access.
For our class to be used, an object of the class must first of all be created. Now, let us create an object which is a type of our class. To do this we will use our class name followed by the name we want to give the object.
CAR Honda;
Or we can create another object
CAR Toyota;
Honda or Toyota is now a type of a CAR and can now have access to all the member functions of our CAR class provided the member functions are declared within the public access section. We will come back to this later.
You can see that we can create as many objects of this class as we want. This is one of the benefits of Object Oriented programming.
At this point, let us consider in details, the format of a class in MQL5.
class class_name
{
  private:
    members1;
    members2;
    members3;

  public:
    class_name()  //Constructor;
    ~class_name() //Destructor;
    Members4();
    Members5();

  protected:
    members6;
    members7;
};
This is a declaration of a class where class_name is the name of the class. This class has nine members, but out of this nine, two are special members.
The Constructor:
The constructor (represented as class_name()) is a special function that is called automatically when a new object of the type of the class is created. So in this case, when you create an object of the type of this class
class_name object;
the constructor, class_name(), is called automatically. The name of the constructor must match the name of the class, that is why we named the constructor as class_name(). In MQL5, a constructor does not take any input parameters and has no return type. Memory allocations and initialization of the class members are normally done when the constructor is called. Constructors cannot be called explicitly as if they were regular member functions. They are only executed when a new object of that class is created. A class in MQL5 can only have one constructor.
The Destructor:
The second special member is represented as ~class_name(). This is the class destructor written with a tide (~) before the class name. It is called automatically when a class object is destroyed. All members of the class that needs to be de-initialized are de-initialized at this stage and it does not really matter whether you explicitly declared the destructor or not.
Data Members:
Members of a class can be any legal data type, the class type or the struct type. In other words, when declaring member variables of a class, you can use any legal data type (int, double, string, etc), an object of another class or a type of a structure (for example, the MQL5 MqlTradeRequest, etc)
Function Members:
These are members of the class which are used for modifying the data members and executing the major functions/ methods of the class. The return type for the function members can be of any legal return type (bool, void, double, string, etc).
Private:
Members declared within this section are only accessible by the function members of the class. They cannot be accessed by any other function outside of the class.
Protected:
Members declared within this section are accessible to the function members of the class and also can be accessed by the member functions of other classes that are derived from this class. This means that we can also create a new class from this class. In this case, the new class derived from this class (which will now become the base class) will be able to access the protected members of the base class. This is the concept of inheritance in OOP. We will soon discuss it, just relax…
Public:
Members
declared within this section are available for usage outside of the class by an
object of the class. This is where to declare some of the functions that will
be needed to use the class in other programs.
Now that we have looked at the basic format of a class, I hope you are not bored yet because we still have some other interesting aspect of classes we need to look at before we finally jump into creating a class wrapper for our Expert Advisor.
1.2. INHERITANCE
Let’s say we want to make another class from this initial class base_class. The format for deriving a new class from an initial class is as follows:
The Base Class:
class base_class
{
  private:
    members1;
    members2;
    members3;

  public:
    class_name()  //Constructor;
    ~class_name() //Destructor;
    Members4();
    Members5();

  protected:
    members6;
    members7;
};
The Derived Class:
class new_class : access_keyword base_class
{
  private:
    members8;

  public:
    new_class()  //Constructor;
    ~new_class() //Destructor;
    Members9();
};
A few explanations here before we proceed to explain the details. The
class new_class is derived from the class base_class using the colon and an access_keyword as shown above. Now, the new_class derived/made from base_class can access (or inherit) both the public and protected members of base_class but cannot access (or not inherit) the private members of the base_class. The new_class can also implement new member methods/functions different from the base_class. In other words, the new_class can also have its own data and function members apart from the ones it inherits from the base_class.
If the public keyword is used in creating the derived class, it means that the public and protected members of the base class will be inherited as public and protected members of the derived class. If the Protected keyword is used, public and protected members of base class will be inherited as protected members of the derived class. If the private keyword is used, the public and protected members of base class will be inherited as private members of the derived class.
It is important to note that when a new object of the new_class (the derived class) is created, the constructor of the base_class is called first before the constructor of the new_class; while when the object is destroyed, the destructor of the new_class (the derived class) is called first before the destructor of the base_class.
To better understand this concept of inheritance, let us go back to our initial class CAR.
class CAR
{
  protected:
    int        doors;
    int        sits;
    double     weight;

  public:
    bool       start();
    void       changegear();
    void       stop();
    bool       horn();

  private:
    int        tyres;
};
We can derive another class SALOON from this class. Notice that I have declared three of the data members of the class CAR as protected. This is to enable our new class SALOON inherit these members.
Also, I want you to understand that the order in which you place the access keywords does not matter. What matters is that all members declared under an access keyword belong to that keyword.
class SALOON : public CAR
{
  private:
    int        maxspeed;

  public:
    void       runathighspeed();
};
Our derived class SALOON has two members and at the same time inherits seven members (protected and public members) from the base class CAR. This means that once an object of SALOON is created, it will be able to access the public member functions of CAR which are start(), changegear(), stop() and horn() together with its own public member function runathighspeed(). This is the concept of inheritance.
Just as some characters/behaviours (methods) of our father/parents (base class) show up in us, their children (derived class), because we inherit those behaviours (methods/functions) from them either genetically or otherwise. Sorry, I am not a medical personnel, but I believe you quite grasp the picture I am trying to paint. By the way, MQL5 does not support multiple inheritance, so no need to talk about it.
Hmm!!! I hope the black cloth covering the mystical thing called OOP or CLASS is being removed little by liitle… don't get tired, if you feel at this point you are still not very clear with what we are discussing, you may need to relax, take a cup of coffee and then come back and start from the beginning. It is not as mysterious as you think…
If you are now back at this point, I assume you are following my explanation. I want you to tell me how many more classes you can derive from our base class CAR? Please I need you answer. I am serious. Name them and write their declarations and mail them to me. If you can name them all, I will take you out for launch… (am I kidding?)
Now that you are set for more, let’s continue…
It is true that when I write, I write like my Dad. His hand writings are very neat and highly stylish just like mine. I guess it is something I inherit from him, but guess what; he uses his left hand to write while I use my right hand and when you see the writings you can hardly differentiate because they look similar. What is the problem here? I inherit good hand-writing from my father but I do not write with my left hand like my father. This means that even though it’s what I inherit and it looks similar but the way I do mine is different from my father. Does this make sense to you? This is an idea of what is called Polymorphism in OOP.
A derived class (myself, as in the example above) inherits a member function (writefine() – for my handwritng) from a base class (my Dad) but it (I) implements the function (writefine() ) in a different way from the base class (My Dad).
Back to our CAR class, and the derived class SALOON;
class CAR
{
  protected:
    int        doors;
    int        sits;
    double     weight;

  public:
    bool               start();
    virtual void       changegear(){return(0);}
    void               stop();
    bool               horn();

  private:
    int        tyres;
};
class SALOON : public CAR
{
  private:
    int        maxspeed;

  public:
    void               runathighspeed();
    virtual  void       changegear(){gear1=reverse; gear2=low; gear3=high;}
  };

class WAGON : public CAR
{
  private:
    bool               hasliftback;

  public:
   virtual  void       changegear(){gear1=low; gear2=high; gear3=reverse;}
};
Let us look at a few changes we have made here. First, we have declared a new derived class from CAR named WAGON with two members. We have also modified the member function changegear() to become a virtual function in the base class. Why did we make changegear() a virtual function. It is simply because we want any class that inherits the function from the base class to be able to implement it in its own way.
In other words, virtual member functions of a class are member functions that can be overridden or implemented differently in any class derived from the class where they are declared. The member function body can then be replaced with a new set of implementation in the derived class. Even though, we may not use the word virtual again in the derived classes, it is good programming practice to always use it in the derived classes.
From the examples above, classes SALOON and WAGON implements the function changegear() in their own ways.
1.3. DEFINING CLASS METHODS (MEMBER FUNCTIONS)
Since we have known, to some extent, how to declare classes; let's move further by discussing how to define the member functions of a class. After we have declared the class, the next thing is to define the member functions of our class. Let us look at our CAR class again
class CAR
{
  protected:
    int        doors;
    int        sits;
    double     weight;

  public:
    void       CAR() // Constructor
    bool       start();
    void       changegear();
    void       stop();
    bool       horn(){press horn;}

  private:
    int        tyres;
};

 void CAR::CAR()
{
 // initialize member variables here
}

bool CAR::start()
{
 // car start procedure here
}

void CAR::changegear()
{
// car changegear procedure here
}

void CAR::stop()
{
// car stop procedure here
}
In defining the member functions, we have used a double colon (::) operator called the scope operator. This is written just like normal functions, the only difference is the class name and the scope operator that is added. You will also observe that one of the functions was already defined within the class (member function horn()). A member function can be defined in the class declaration or outside the class declaration as you have seen it here.
I think it will be of importance if we can review the concept of functions a little before we proceed.
1.4. FUNCTIONS
By the way, what is a function?
Sometimes in a house where you have three kids, rather than just one of them doing all the works in the house; one was asked to be washing the plates every day after supper, one was asked to be doing the sweeping while the third was given the
task of arranging the beds every morning.
There are some works to be done in the house, instead of giving all the works to one child, we divided it among the three of them. This will make the task very easy and light for each one of them rather than been a burden to just one of them. Also, if one of the kids did not do his/her task, we quickly know which one of them to flog. This is the idea behind functions.
Most times we want to write a code that will do many tasks. This is where functions come in. We can decide to break the task into smaller tasks and then write a function to perform each of the smaller tasks. A function is a code-block that performs or implements a set of operations. It is a group of statements that is executed
whenever it is called from some point in a program.
A function can be defined as follows:
Return_type function_name (parameters1,parameters2,…)
{
  Expressions; //(actions to carry out by the function)
}
- Return_type: the data type returned by the function (must be a valid data type or void if it returns nothing)
- Function_name: the name of the function (must be a valid name) which will be used for calling the function
- Parameters: parameters are valid data type variables which will act within the function as a local variable. If a function has more than one parameter, they are separated by commas.
- Expressions: the body of the function that contains block of statements
Example of a function:
int doaddition (int x, int y)
{
 return (x+y);
}
The function return type is integer (int), doaddition is the function name and int x and int y are the parameters. What the function does is to add any two input parameters supplied it and return the result. So if we supply the function with two integer variables 2 and 3, the function will do the addition and return 5 as the result.
int doaddition(2,3) // returns 5
For more information about functions, please consult the MQL5 Reference manual.
Now enough of the theories let us get down to work.
The
essence of this article is to teach you how you can write a class for your
Expert Advisor using the Object Oriented approach presented in MQL5.
It is now time for action…
2. Writing an Expert Advisor
At this point, we will be making reference to the Expert Advisor we created in the first article. If you have not read the article, please go and do so now so that most of the things we shall be discussing from this point on will not be strange to you. However, I may still revise a few things that may be necessary.
Before you can write your class, you need to sit down and develop your trading strategy first. We have already done this in the first article. The next thing is to select those functionalities we want to delegate to our class. These functionalities will determine the member variables of our class. Just a recap of our trading strategy from the first article.
What our EA will do:
- It will monitor a particular indicator, and when a certain condition is met (or certain conditions are met), it will place a trade (either a Short/Sell or Long/Buy), depending on the present condition that has been met.
The above is called a trading strategy. Before you can write an EA, you must first develop the strategy that you want to automate into the EA. So in this case, let us modify the above statement so that it reflects the strategy we want to develop into an EA.
- We will use an indicator called Moving Average with a period of 8 ( You can choose any period, but for the purpose of our strategy, we will use 8)
- We want our EA to place a Long (Buy) trade when the Moving Average-8 (for the sake of our discussion, I will refer to it as MA-8) is increasing upwards and the price is close above it and it will place a Short (Sell) when MA-8 is decreasing downwards and the price is close below it.
- We are also going to use another indicator called Average Directional Movement (ADX) with period 8 also to help us determine whether the market is trending or not. We are doing this because we only want to enter the trade when the market is trending and relax when the market is ranging (that is, not trending). To achieve this, we will only place our trade (Buy or Sell) when above conditions are met and the ADX value is greater than 22. If ADX is greater than 22 but decreasing, or ADX is less than 22, we will not trade, even though the condition B has been met.
- We want to also protect ourselves by setting a Stop loss of 30 pips, and for our Profit target; we will target a profit of 100 pips.
- We also want our EA to look for Buy/Sell opportunities only when a new bar has been formed and we will also make sure we open a Buy position if the Buy conditions are met and we do not already have one opened, and open a Sell position when the Sell conditions are met and we do not already have one opened.
In addition, we want to make sure that we are able to control the percent of our Free Margin that can be used in placing a trade and also to ensure that we check available free margin before placing any trade. Our EA will only place a trade if available margin is enough for the trade.
Now you understand what we want to do. The functions we want to delegate to our class are:
- Check for Buy and Sell conditions
- Place Buy/Sell depending on the result of the conditions checked
Basically, this is all we want our EA to do. These two functionalities are the major functions but there are still more. For example, in checking for Buy/Sell positions, the indicators must be used. This means obtaining the values of the indicators must also be in our class. So, we include:
- Get all the indicator handles (at the EA OnInit section)
- Get all indicator buffers (at the EA OnTick section)
- Release all indicator handles (at the EA OnDeinit section)
In getting the indicator values, our class will need to know the MA and ADX periods, the chart period and symbol (currency pair we are working with), so we must also include:
- Get ADX and MA periods, and other important parameters like the chart period and symbol.
Also for the checking of free margin before placing a trade, we will include
- Check Free Margin/percentage of account to use for trade
With this we already have an idea of what variables and functions should be in our class.
Okay, I have done the thinking for you; it is time to write some code.
2.1. Writing a class
Let us begin by launching the MetaEditor (I believe you already know this). Once the MetaEditor is opened, let us start a new MQL document by clicking the New toolbar or Ctrl+N. In the wizard window, select "Include" and click the NEXT button.

Figure 1. Starting a new MQL5 document
Type the name of the file as shown below and click finish:

Figure 2. Naming a new document
We selected include because our class is going to be an include file which will be included in our EA code once we are ready to use it. That is why you do not have room to enter input parameters.
As usual, the editor provides you with a skeleton of what it thinks you want to do.
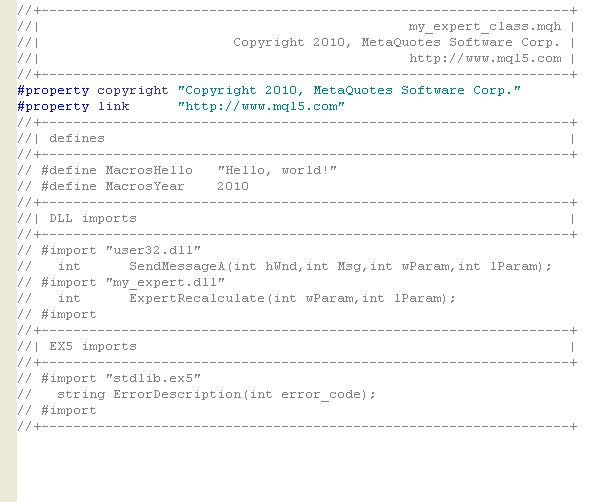
To begin, please delete everything below the "#property link …" code line. You should now have something like this.
//+------------------------------------------------------------------+
//|                                              my_expert_class.mqh |
//|                        Copyright 2010, MetaQuotes Software Corp. |
//|                                              http://www.mql5.com |
//+------------------------------------------------------------------+
#property copyright "Copyright 2010, MetaQuotes Software Corp."
#property link      "http://www.mql5.com"
Now let us write the declaration of our class, we shall call our class, MyExpert.
//+------------------------------------------------------------------+
//| CLASS DECLARATION                                                |
//+------------------------------------------------------------------+
class MyExpert
{
Let’s analyze the class declaration. The declaration starts with the name of the class. Next we declared the private members of the class.
The Private Members:
//+------------------------------------------------------------------+
//| CLASS DECLARATION                                                |
//+------------------------------------------------------------------+
class MyExpert
{
//--- private members
private:
   int               Magic_No;   // Expert Magic Number
   int               Chk_Margin; // Margin Check before placing trade? (1 or 0)
   double            LOTS;       // Lots or volume to Trade
   double            TradePct;   // Percentage of Account Free Margin to trade
   double            ADX_min;    // ADX Minimum value
   int               ADX_handle; // ADX Handle
   int               MA_handle;  // Moving Average Handle
   double            plus_DI[];  // array to hold ADX +DI values for each bars
   double            minus_DI[]; // array to hold ADX -DI values for each bars
   double            MA_val[];   // array to hold Moving Average values for each bars
   double            ADX_val[];  // array to hold ADX values for each bars
   double            Closeprice; // variable to hold the previous bar closed price
   MqlTradeRequest   trequest;    // MQL5 trade request structure to be used for sending our trade requests
   MqlTradeResult    tresult;     // MQL5 trade result structure to be used to get our trade results
   string            symbol;     // variable to hold the current symbol name
   ENUM_TIMEFRAMES   period;      // variable to hold the current timeframe value
   string            Errormsg;   // variable to hold our error messages
   int               Errcode;    // variable to hold our error codes
As explained earlier, these private member variables are not accessible by any function outside of the class. Most of the variables are very clear in their declarations so I won’t waste time talking about them.
However, you will remember in our discussion, that we stated that member variables can be any legal data type, structure or class.
I believe you can see this in action here with the declaration of the MqlTradeRequest and MqlTradeResults types.
The Constructor
//--- Public member/functions
public:
   void              MyExpert();                                  //Class Constructor
The constructor does not take any input parameters; please bear this in mind when writing your own class.
The member functions
//--- Public member/functions
public:
   void              MyExpert();                                 //Class Constructor
   void              setSymbol(string syb){symbol = syb;}         //function to set current symbol
   void              setPeriod(ENUM_TIMEFRAMES prd){period = prd;} //function to set current symbol timeframe/period
   void              setCloseprice(double prc){Closeprice=prc;}   //function to set prev bar closed price
   void              setchkMAG(int mag){Chk_Margin=mag;}          //function to set Margin Check value
   void              setLOTS(double lot){LOTS=lot;}               //function to set The Lot size to trade
   void              setTRpct(double trpct){TradePct=trpct/100;}   //function to set Percentage of Free margin to use for trading
   void              setMagic(int magic){Magic_No=magic;}         //function to set Expert Magic number
   void              setadxmin(double adx){ADX_min=adx;}          //function to set ADX Minimum values
We have defined these member functions to allow us set the important variables that will be needed by our class to perform its function. Without using these functions, these variables will not be available for our class to use. As you will also notice, we had already declare a corresponding variable in our class that will hold these values once they are set by these functions.
Another thing to note is that we have defined these member functions within the class declaration. As I explained earlier, it is allowed. It means we won't need to define them again when defining other member functions as you will see very soon.
Just like normal functions, they have parameters of the correct data type depending on the return values of each function. I believe this should not be strange to you.
void              doInit(int adx_period,int ma_period);         //function to be used at our EA intialization
void              doUninit();                                  //function to be used at EA de-initializatio
bool              checkBuy();                                  //function to check for Buy conditions
bool              checkSell();                                 //function to check for Sell conditions
void              openBuy(ENUM_ORDER_TYPE otype,double askprice,double SL,
                         double TP,int dev,string comment="");   //function to open Buy positions
void              openSell(ENUM_ORDER_TYPE otype,double bidprice,double SL,
                          double TP,int dev,string comment="");  //function to open Sell positions
We only declare these member functions but we did not define them. This is because we will be doing that later. These are functions that will manipulate most of the values store in the member variables of our class and at the same time they form the functions for the major role of our class. We will discuss them later.
The Protected members
These members will be inherited by any class that is derived from our class. It is not really necessary if you don't intend to derive any other class from this class. You can as well place them as private members. I am only doing this to let you understand the various issues we have discussed earlier about classes.
//--- Protected members
protected:
   void              showError(string msg, int ercode);   //function for use to display error messages
   void              getBuffers();                       //function for getting Indicator buffers
   bool              MarginOK();                         //function to check if margin required for lots is OK
These three functions are also very important though internal to our class. The showError will display our errors and the getBuffers will be used to get indicator buffers. MarginOK check if there is enough free margin to open a position.
Once you have finished with the declaration of the class, don't forget the semi-colon. It is very important.
}; // end of class declarationThe next thing to do immediately after declaring the class is to define the member functions that have not been defined in the declaration section.
//+------------------------------------------------------------------+
// Definition of our Class/member functions
//+------------------------------------------------------------------+

//+------------------------------------------------------------------+
//|  This CLASS CONSTRUCTOR
//|  *Does not have any input parameters
//|  *Initilizes all the necessary variables
//+------------------------------------------------------------------+
void MyExpert::MyExpert()
  {
//initialize all necessary variables
   ZeroMemory(trequest);
   ZeroMemory(tresult);
   ZeroMemory(ADX_val);
   ZeroMemory(MA_val);
   ZeroMemory(plus_DI);
   ZeroMemory(minus_DI);
   Errormsg="";
   Errcode=0;
  }
This is our class constructor. Here we used the double colon (::) (the scope operator) between the class name and the member function name. What we are trying to say is this:
Though we are defining this member function outside of the class declaration, but it is still in the scope of the class. It is a member of the class whose name comes before the two colons (scope operator).
It does not have any input parameters. It is at this point we initialize most of the necessary member variables and we use the ZeroMemory function to accomplish this.
void ZeroMemory(
void & variable // reset variable
);
This function resets the values of variables passed to it. In this case we use it to reset the values of our structure types (MqlTradeRequest and MqlTradeResult) and our arrays.
The showError function:
//+------------------------------------------------------------------+
//|  SHOWERROR FUNCTION
//|  *Input Parameters - Error Message, Error Code
//+------------------------------------------------------------------+
void MyExpert::showError(string msg,int ercode)
  {
   Alert(msg,"-error:",ercode,"!!"); // display error
  }
This is a protected member function which is used to display all errors encountered during the operations of any object of our class. It takes two arguments/parameters – Error description and error code.
The getBuffers function:
//+------------------------------------------------------------------+
//|  GETBUFFERS FUNCTION
//|  *No input parameters
//|  *Uses the class data members to get indicator's buffers
//+------------------------------------------------------------------+
void MyExpert::getBuffers()
  {
   if(CopyBuffer(ADX_handle,0,0,3,ADX_val)<0 || CopyBuffer(ADX_handle,1,0,3,plus_DI)<0
      || CopyBuffer(ADX_handle,2,0,3,minus_DI)<0 || CopyBuffer(MA_handle,0,0,3,MA_val)<0)
     {
      Errormsg="Error copying indicator Buffers";
      Errcode = GetLastError();
      showError(Errormsg,Errcode);
     }
  }
This function is used to copy all our indicators buffers to the arrays we have specified in the member variables using the respective indicator handle.
The CopyBuffer function was explained in the first article. The getBuffers function does not have any input parameters because we are using the values from the member variables of the class.
We used our internal error function here to display any error that may occur in the process of copying the buffers.
The MarginOK function:
//+------------------------------------------------------------------+
//|  MARGINOK FUNCTION
//| *No input parameters
//| *Uses the Class data members to check margin required to place a trade
//|  with the lot size is ok
//| *Returns TRUE on success and FALSE on failure
//+------------------------------------------------------------------+
bool MyExpert::MarginOK()
  {
   double one_lot_price;                                                        //Margin required for one lot
   double act_f_mag     = AccountInfoDouble(ACCOUNT_FREEMARGIN);                //Account free margin
   long   levrage       = AccountInfoInteger(ACCOUNT_LEVERAGE);                 //Leverage for this account
   double contract_size = SymbolInfoDouble(symbol,SYMBOL_TRADE_CONTRACT_SIZE);  //Total units for one lot
   string base_currency = SymbolInfoString(symbol,SYMBOL_CURRENCY_BASE);        //Base currency for currency pair
                                                                                //
   if(base_currency=="USD")
     {
      one_lot_price=contract_size/levrage;
     }
   else
     {
      double bprice= SymbolInfoDouble(symbol,SYMBOL_BID);
      one_lot_price=bprice*contract_size/levrage;
     }
// Check if margin required is okay based on setting
   if(MathFloor(LOTS*one_lot_price)>MathFloor(act_f_mag*TradePct))
     {
      return(false);
     }
   else
     {
      return(true);
     }
  }
This function is actually doing two jobs. It checks to make sure that we have enough free margin to place the trade and also checks to make sure we don’t use more than a specified percentage of the free margin available to place the trade. In this way we can control how much money we use for each trade.
We use the AccountInfoDouble() function together with the ENUM_ACCOUNT_INFO_DOUBLE identifier to get the Free Margin for the account. We also use the AccountInfoInteger() function together with the ENUM_ACCOUNT_INFO_INTEGER identifier to get the Leverage for the account. The AccountInfoInteger() and AccountInfoDouble() are account functions used to get the details of the current account using the EA.
double  AccountInfoDouble(
   int  property_id      // identifier of the property
   );
We also used the symbol properties functions SymbolInfoDouble() and SymbolInfoString() to get the contract size and base currency for the current symbol (currency pair) respectively. The SymbolInfoDouble() function takes the symbol name and an ENUM_SYMBOL_INFO_DOUBLE identifier as parameters while the SymbolInfoString() function takes the symbol name and an ENUM_SYMBOL_INFO_STRING identifier as parameters. The results of these functions are stored in the declared variables for each data type.
double  SymbolInfoDouble(
   string  name,        // symbol
   int     prop_id      // identifier of the property
   );
The calculation we have done here is very simple.
To get the required margin for placing a trade, we consider two situations:
- The base currency is USD (USD/CAD, USD/CHF, USD/JPY, etc.)
Margin required = Contract size per lot /Leverage
2. The base currency is not USD (EUR/USD, etc)
Margin required = current price of symbol * contract size per lot/Leverage.
We now decide to check if the margin required to trade the specified lot size or volume is greater than the percentage of free margin you want to use for a trade. If margin required is less the function returns TRUE and the trade is placed, otherwise, it return FALSE and the trade will not be placed.
The doInit function:
//+-----------------------------------------------------------------------+
// OUR PUBLIC FUNCTIONS                                                   |
//+-----------------------------------------------------------------------+

//+------------------------------------------------------------------+
//| DOINIT FUNCTION
//| *Takes the ADX indicator's Period and Moving Average indicator's
//| period as input parameters
//| *To be used in the OnInit() function of our EA
//+------------------------------------------------------------------+
void MyExpert::doInit(int adx_period,int ma_period)
  {
//--- Get handle for ADX indicator
   ADX_handle=iADX(symbol,period,adx_period);
//--- Get the handle for Moving Average indicator
   MA_handle=iMA(symbol,period,ma_period,0,MODE_EMA,PRICE_CLOSE);
//--- What if handle returns Invalid Handle
   if(ADX_handle<0 || MA_handle<0)
     {
      Errormsg="Error Creating Handles for indicators";
      Errcode=GetLastError();
      showError(Errormsg,Errcode);
     }
// Set Arrays as series
// the ADX values arrays
   ArraySetAsSeries(ADX_val,true);
// the +DI value arrays
   ArraySetAsSeries(plus_DI,true);
// the -DI value arrays
   ArraySetAsSeries(minus_DI,true);
// the MA values arrays
   ArraySetAsSeries(MA_val,true);
  }
This is a public function we intend to use in the OnInit() function of our EA which we
will write soon and it is going to do two things.
First, it will set the handles for our indicators and also perform the array-set-as-series action on the array variables. It has two input parameters which will be supplied from within our EA code.
The doUninit function:
//+------------------------------------------------------------------+
//|  DOUNINIT FUNCTION
//|  *No input parameters
//|  *Used to release ADX and MA indicators handleS                                                                |
//+------------------------------------------------------------------+
void MyExpert::doUninit()
  {
//--- Release our indicator handles
   IndicatorRelease(ADX_handle);
   IndicatorRelease(MA_handle);
  }
This
function is also a public member function which will be used in the UnDeInit function of our EA to release all handles for the indicators we have used. It
does not have any input parameters.
The checkBuy function:
//+------------------------------------------------------------------+
//| CHECKBUY FUNCTION
//| *No input parameters
//| *Uses the class data members to check for Buy setup based on the
//|  the defined trade strategy
//| *Returns TRUE if Buy conditions are met or FALSE if not met
//+------------------------------------------------------------------+
bool MyExpert::checkBuy()
  {
/*
    Check for a Long/Buy Setup : MA increasing upwards,
    previous price close above MA, ADX > ADX min, +DI > -DI
*/
   getBuffers();
//--- Declare bool type variables to hold our Buy Conditions
   bool Buy_Condition_1=(MA_val[0]>MA_val[1]) && (MA_val[1]>MA_val[2]); // MA Increasing upwards
   bool Buy_Condition_2=(Closeprice>MA_val[1]);         // previous price closed above MA
   bool Buy_Condition_3=(ADX_val[0]>ADX_min);          // Current ADX value greater than minimum ADX value
   bool Buy_Condition_4=(plus_DI[0]>minus_DI[0]);       // +DI greater than -DI
//--- Putting all together
   if(Buy_Condition_1 && Buy_Condition_2 && Buy_Condition_3 && Buy_Condition_4)
     {
      return(true);
     }
   else
     {
      return(false);
     }
  }
This function will be used to check if a buy condition has been set or not. That is why its return type is bool. It means that it will return a TRUE or a FALSE. This is where we defined our Buy trade strategy. If a buy condition is met based on the strategy we have defined, it will return TRUE; however, if the Buy condition is not met it will return FALSE. When using this function in our code, we will then place a buy if it returns TRUE.
The first thing we have done here is to call the internal member function getBuffers(), which will copy all the array values needed by the checkBuy function to the corresponding array variables.
The conditions coded here had been explained in the first article.
The checkSell function:
//+------------------------------------------------------------------+
//| CHECKSELL FUNCTION
//| *No input parameters
//| *Uses the class data members to check for Sell setup based on the
//|  the defined trade strategy
//| *Returns TRUE if Sell conditions are met or FALSE if not met
//+------------------------------------------------------------------+
bool MyExpert::checkSell()
  {
/*
    Check for a Short/Sell Setup : MA decreasing downwards,
    previous price close below MA, ADX > ADX min, -DI > +DI
*/
   getBuffers();
//--- Declare bool type variables to hold our Sell Conditions
   bool Sell_Condition_1=(MA_val[0]<MA_val[1]) && (MA_val[1]<MA_val[2]);  // MA decreasing downwards
   bool Sell_Condition_2=(Closeprice <MA_val[1]);                         // Previous price closed below MA
   bool Sell_Condition_3=(ADX_val[0]>ADX_min);                            // Current ADX value greater than minimum ADX
   bool Sell_Condition_4=(plus_DI[0]<minus_DI[0]);                        // -DI greater than +DI

//--- Putting all together
   if(Sell_Condition_1 && Sell_Condition_2 && Sell_Condition_3 && Sell_Condition_4)
     {
      return(true);
     }
   else
     {
      return(false);
     }
  }
Just
like the checkBuy, this function will be used to check if a Sell condition has
been set or not. That is why its return type is also bool. It means that it
will return a TRUE or a FALSE. This is
where we defined our Sell trade strategy. If a sell condition is met based on
the strategy we have defined, it will return TRUE; however, if the sell
condition is not met it will return FALSE.
When using this function in our code, we will then place a sell if it returns TRUE. Just like in checkBuy, we called the internal function getBuffers() first. The conditions coded here had also been explained in the first article.
The openBuy function:
//+------------------------------------------------------------------+
//| OPENBUY FUNCTION
//| *Has Input parameters - order type, Current ASK price, Stop Loss,
//|  Take Profit, deviation, comment
//| *Checks account free margin before pacing trade if trader chooses
//| *Alerts of a success if position is opened or shows error
//+------------------------------------------------------------------+
void MyExpert::openBuy(ENUM_ORDER_TYPE otype,double askprice,double SL,double TP,int dev,string comment="")
  {
//--- do check Margin if enabled
   if(Chk_Margin==1)
     {
      if(MarginOK()==false)
        {
         Errormsg= "You do not have enough money to open this Position!!!";
         Errcode =GetLastError();
         showError(Errormsg,Errcode);
        }
      else
        {
         trequest.action=TRADE_ACTION_DEAL;
         trequest.type=otype;
         trequest.volume=LOTS;
         trequest.price=askprice;
         trequest.sl=SL;
         trequest.tp=TP;
         trequest.deviation=dev;
         trequest.magic=Magic_No;
         trequest.symbol=symbol;
         trequest.type_filling=ORDER_FILLING_FOK;
         // send
         OrderSend(trequest,tresult);
         // check result
         if(tresult.retcode==10009 || tresult.retcode==10008) //Request successfully completed
           {
            Alert("A Buy order has been successfully placed with Ticket#:",tresult.order,"!!");
           }
         else
           {
            Errormsg= "The Buy order request could not be completed";
            Errcode =GetLastError();
            showError(Errormsg,Errcode);
           }
        }
     }
   else
     {
      trequest.action=TRADE_ACTION_DEAL;
      trequest.type=otype;
      trequest.volume=LOTS;
      trequest.price=askprice;
      trequest.sl=SL;
      trequest.tp=TP;
      trequest.deviation=dev;
      trequest.magic=Magic_No;
      trequest.symbol=symbol;
      trequest.type_filling=ORDER_FILLING_FOK;
      //--- send
      OrderSend(trequest,tresult);
      //--- check result
      if(tresult.retcode==10009 || tresult.retcode==10008) //Request successfully completed
        {
         Alert("A Buy order has been successfully placed with Ticket#:",tresult.order,"!!");
        }
      else
        {
         Errormsg= "The Buy order request could not be completed";
         Errcode =GetLastError();
         showError(Errormsg,Errcode);
        }
     }
  }
This is the function that opens a buy position whenever it is called in our EA. It has, as input parameters, most of the variables that will be needed to place the trade; and some of the variables will be provided by our EA code. You will notice, as explained in the first article, that we have used the MqlTraderequest type variables here.
We will not need to use them in our EA code. Before a trade is placed, we want to confirm if the user wants to check margin, if the value of Chk_Margin (which will be obtained from the EA) is 1, then we call the MarginOK() function to do that for us. The result of this function determines the next step to take. However, if the user does not want to check margin, then we just continue and place the trade.
The openSell function:
//+------------------------------------------------------------------+
//| OPENSELL FUNCTION
//| *Has Input parameters - order type, Current BID price, Stop Loss,
//|  Take Profit, deviation, comment
//| *Checks account free margin before pacing trade if trader chooses
//| *Alerts of a success if position is opened or shows error
//+------------------------------------------------------------------+
void MyExpert::openSell(ENUM_ORDER_TYPE otype,double bidprice,double SL,double TP,int dev,string comment="")
  {
//--- do check Margin if enabled
   if(Chk_Margin==1)
     {
      if(MarginOK()==false)
        {
         Errormsg= "You do not have enough money to open this Position!!!";
         Errcode =GetLastError();
         showError(Errormsg,Errcode);
        }
      else
        {
         trequest.action=TRADE_ACTION_DEAL;
         trequest.type=otype;
         trequest.volume=LOTS;
         trequest.price=bidprice;
         trequest.sl=SL;
         trequest.tp=TP;
         trequest.deviation=dev;
         trequest.magic=Magic_No;
         trequest.symbol=symbol;
         trequest.type_filling=ORDER_FILLING_FOK;
         // send
         OrderSend(trequest,tresult);
         // check result
         if(tresult.retcode==10009 || tresult.retcode==10008) //Request successfully completed
           {
            Alert("A Sell order has been successfully placed with Ticket#:",tresult.order,"!!");
           }
         else
           {
            Errormsg= "The Sell order request could not be completed";
            Errcode =GetLastError();
            showError(Errormsg,Errcode);
           }
        }
     }
   else
     {
      trequest.action=TRADE_ACTION_DEAL;
      trequest.type=otype;
      trequest.volume=LOTS;
      trequest.price=bidprice;
      trequest.sl=SL;
      trequest.tp=TP;
      trequest.deviation=dev;
      trequest.magic=Magic_No;
      trequest.symbol=symbol;
      trequest.type_filling=ORDER_FILLING_FOK;
      //--- send
      OrderSend(trequest,tresult);
      //--- check result
      if(tresult.retcode==10009 || tresult.retcode==10008) //Request successfully completed
        {
         Alert("A Sell order has been successfully placed with Ticket#:",tresult.order,"!!");
        }
      else
        {
         Errormsg= "The Sell order request could not be completed";
         Errcode =GetLastError();
         showError(Errormsg,Errcode);
        }
     }
  }
Just like the openBuy function, this function opens a sell position whenever it is called in our EA. It has, as input parameters, most of the variables that will be needed to place the trade; and some of the variables will be provided by our
EA code.
Just as we did when opening a Buy position, before a trade is placed, we want to confirm if the user wants to check margin, if the value of Chk_Margin (which will be obtained from the EA) is 1, then we call the MarginOK() function to do that for us.
The result of this function determines the next step to take. However, if the user does not want to check margin, then we just continue and place the trade.
Now we have finished the declaration and definition of our class and the member functions, however, we have left out some other tasks which we intend to handle in our EA code. These include checking of available bars, checking of new bars and checking for available opened positions. They will be handled in our EA code.
To see a list of the all the functions and methods of our class, click on the functions command/menu on the MetaEditor as shown below. The function displays all the member functions including the Destructor which we did not explicitly declared in our code.
The protected members are pointed by green arrows while the Constructor and destructor are pointed by blue arrows.

Figure 3. Our class member functions showing the class destructor
So what's next?
Did I hear you say, debug? Maybe you are right. It is always good to test and see if your code has errors otherwise you will be disappointed when you release it to the public. The problem here is that this is just an include file, it is not an expert adviser code or script or indicator code which can be attached to the chart. At this point you have two options (from my experience),
- you either risk pressing the debug button on your editor so that the debugger will report any error in your code with the exception of a ‘no executable file produced’ error, which will be displayed because an .mqh file cannot be compiled into an .ex5 file. OR
- Go ahead and write the code for the EA that will use your class. Once you start debugging the EA, the included file will be checked along with it. In fact, this is the best and most acceptable way to do it.
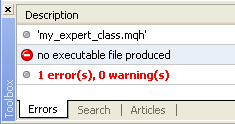
Figure 4. .mqh files cannot be compiled
2.2. WRITING THE EXPERT ADVISOR
I guess your editor is still opened. Start a new document again but this time select Expert Advisor. (Please see the first article for details). But this time, name your EA ‘my_oop_ea’ .
This is where you should be now:
Now we are ready to write our OOP based EA.
The first thing we are going to do here is to include the class we have just written using the #include preprocessor command. Include the class just immediately after the last preprocessor property command
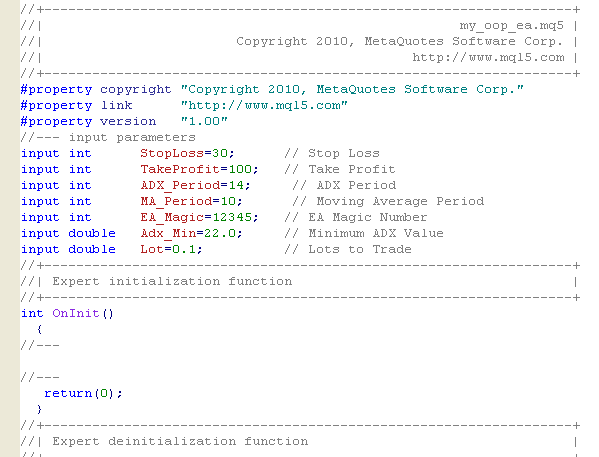
//+------------------------------------------------------------------+
//|                                                    my_oop_ea.mq5 |
//|                        Copyright 2010, MetaQuotes Software Corp. |
//|                                              http://www.mql5.com |
//+------------------------------------------------------------------+
#property copyright "Copyright 2010, MetaQuotes Software Corp."
#property link      "http://www.mql5.com"
#property version   "1.00"
// Include  our class
#include <my_expert_class.mqh>
There are two ways of including a file,
// Include  using angle brackets
#include <my_expert_class.mqh>
// Include  using quotations
#include "my_expert_class.mqh"
When we use the angle bracket (< ... >), it means that the file to be included will be taken from the standard include directory (that is, include folder inside the MQL5 directory). The current directory (which is the Experts folder inside the MQL5 directory will not be considered as a possible place to look for the file). However, if the file is enclosed in quotation marks (" ... "), the file will be considered to be in the current directory (which is the Experts folder) and the standard directory (Include folder) will not be checked.
If your class is saved in the Include folder (standard directory) and you use the quotation marks instead of angle brackets or vice versa, you will get an error when compiling the code.

Figure 5. An error message displayed when include file cannot be found
EA INPUT PARAMETERS
//--- input parameters
input int      StopLoss=30;      // Stop Loss
input int      TakeProfit=100;   // Take Profit
input int      ADX_Period=14;    // ADX Period
input int      MA_Period=10;     // Moving Average Period
input int      EA_Magic=12345;   // EA Magic Number
input double   Adx_Min=22.0;     // Minimum ADX Value
input double   Lot=0.2;          // Lots to Trade
input int      Margin_Chk=0;     // Check Margin before placing trade(0=No, 1=Yes)
input double   Trd_percent=15.0; // Percentage of Free Margin To use for Trading
Most of the input parameters here are not new. Let’s discuss the new ones.
We have introduced an integer variable to hold a value of 1 if we want to use margin check or 0 if we don’t. We have also declared another variable to hold the maximum percentage of Free margin to be used in opening a position. These values will later be used in our class object when created.
Immediately after the input parameters, we define other two parameters (STP and TKP) which we want to be able to manipulate (to cater for 5 and 3 digit prices) since we cannot change the values of the input variables. Then we create an object of our class for use within our EA code.
//--- Other parameters
int STP,TKP;   // To be used for Stop Loss & Take Profit values
// Create an object of our class
MyExpert Cexpert;
As explained earlier, to create an object of a class, you use the class name followed by the name of the object you wish to create. Here we have created an object Cexpert which is a type of MyExpert class. Cexpert can now be used to access all the public member functions of the class MyExpert.
EA INITIALIZATION SECTION
//+------------------------------------------------------------------+
//| Expert initialization function                                   |
//+------------------------------------------------------------------+
int OnInit()
  {

//--- Run Initialize function
   Cexpert.doInit(ADX_Period,MA_Period);
//--- Set all other necessary variables for our class object
   Cexpert.setPeriod(_Period);     // sets the chart period/timeframe
   Cexpert.setSymbol(_Symbol);     // sets the chart symbol/currency-pair
   Cexpert.setMagic(EA_Magic);    // sets the Magic Number
   Cexpert.setadxmin(Adx_Min);    // sets the ADX miniumm value
   Cexpert.setLOTS(Lot);          // set the Lots value
   Cexpert.setchkMAG(Margin_Chk); // set the margin check variable
   Cexpert.setTRpct(Trd_percent); // set the percentage of Free Margin for trade
//--- Let us handle brokers that offers 5 digit prices instead of 4
   STP = StopLoss;
   TKP = TakeProfit;
   if(_Digits==5 || _Digits==3)
     {
      STP = STP*10;
      TKP = TKP*10;
     }
//---
   return(0);
  }
At this point, we called the doInit function of our class and pass the ADX and MA period variables to it. Next we set all the other variables that will be needed by the object we have just created so that it will be stored in the object's member variables using the functions we already described when writing our class.
The next line of codes shouldn't be strange, we just decide to adjust our Stop Loss and Take Profit values for three and five-digit prices.
EA DEINITIALIZATION SECTION
//+------------------------------------------------------------------+
//| Expert deinitialization function                                 |
//+------------------------------------------------------------------+
void OnDeinit(const int reason)
  {
//--- Run UnIntilialize function
   Cexpert.doUninit();
  }
We called the doUninit function of the class so as to release all the indicator handles that must have been created in the EA initialization function.
EA ONTICK SECTION
//+------------------------------------------------------------------+
//| Expert tick function                                             |
//+------------------------------------------------------------------+
void OnTick()
  {
//--- Do we have enough bars to work with
   int Mybars=Bars(_Symbol,_Period);
   if(Mybars<60) // if total bars is less than 60 bars
     {
      Alert("We have less than 60 bars, EA will now exit!!");
      return;
     }

//--- Define some MQL5 Structures we will use for our trade
   MqlTick latest_price;      // To be used for getting recent/latest price quotes
   MqlRates mrate[];          // To be used to store the prices, volumes and spread of each bar
/*
     Let's make sure our arrays values for the Rates
     is store serially similar to the timeseries array
*/
// the rates arrays
   ArraySetAsSeries(mrate,true);
The first thing we do here is to check for total available bars. If it is enough for our EA to trade, it will otherwise it will not trade until we have enough bars (that is, 60 bars). Then we declared two variables of the MQL5 structure (MqlTick and MqlRates). And lastly, we use the ArraySetAsSeries function on the rates array.
//--- Get the last price quote using the MQL5 MqlTick Structure
   if(!SymbolInfoTick(_Symbol,latest_price))
     {
      Alert("Error getting the latest price quote - error:",GetLastError(),"!!");
      return;
     }

//--- Get the details of the latest 3 bars
   if(CopyRates(_Symbol,_Period,0,3,mrate)<0)
     {
      Alert("Error copying rates/history data - error:",GetLastError(),"!!");
      return;
     }

//--- EA should only check for new trade if we have a new bar
// lets declare a static datetime variable
   static datetime Prev_time;
// lest get the start time for the current bar (Bar 0)
   datetime Bar_time[1];
// copy time
   Bar_time[0] = mrate[0].time;
// We don't have a new bar when both times are the same
   if(Prev_time==Bar_time[0])
     {
      return;
     }
//copy time to static value, save
   Prev_time = Bar_time[0];
Here, we used the SymbolInfoTick function to get the latest price quote and used CopyRates to get the last rates for the past three bars (present bar inclusive). The next lines of code check if we have a new bar. We declared two datetime variables, one is a static variable (Prev_Time) and the other is Bar_Time.
If we have a new bar, the bar time is stored in the static variable Prev_Time so that we will be able to compare its value with the value of Bar_Time in the next tick. In the next tick, if the Prev_Time equals Bar_Time, then it is still the same bar whose time was stored. So our EA will relax.
If however Bar_Time is not equal to Prev_Time, then we have a new bar. We decide to store the new bar start time in the static datetime variable, Prev_Time and our EA can now proceed to check for new BUY or SELL opportunities.
//--- we have no errors, so continue
//--- Do we have positions opened already?
    bool Buy_opened = false, Sell_opened=false; // variables to hold the result of the opened position

    if (PositionSelect(_Symbol) ==true)  // we have an opened position
    {
         if (PositionGetInteger(POSITION_TYPE) == POSITION_TYPE_BUY)
         {
            Buy_opened = true;  //It is a Buy
         }
         else if(PositionGetInteger(POSITION_TYPE) == POSITION_TYPE_SELL)
         {
            Sell_opened = true; // It is a Sell
         }
    }
We decide to check if we already have an opened position. We just want to be sure we opened a buy trade when there is no Buy opened and a sell trade when there is no sell opened.
// Copy the bar close price for the previous bar prior to the current bar, that is Bar 1
   Cexpert.setCloseprice(mrate[1].close);  // bar 1 close price
//--- Check for Buy position
   if(Cexpert.checkBuy()==true)
     {
      // Do we already have an opened buy position
      if(Buy_opened)
        {
         Alert("We already have a Buy Position!!!");
         return;    // Don't open a new Buy Position
        }
      double aprice = NormalizeDouble(latest_price.ask,_Digits);              // current Ask price
      double stl    = NormalizeDouble(latest_price.ask - STP*_Point,_Digits); // Stop Loss
      double tkp    = NormalizeDouble(latest_price.ask + TKP*_Point,_Digits); // Take profit
      int    mdev   = 100;                                                    // Maximum deviation
      // place order
      Cexpert.openBuy(ORDER_TYPE_BUY,aprice,stl,tkp,mdev);
     }
Now we are back to the object we created, why? Because we have been able to make all the necessary checks that is necessary for our object to do its work.
The first thing we do is to get the closed price for the previous bar using our objects member function setCloseprice.
Then we call the checkBuy function to find out if a condition for buy is set, if it returns TRUE, then we want to be sure we don't have an already opened buy position. If we don't have an already opened buy position, then we prepare the required variables to be used for our order (the order type, the current ASK price, stop loss, take profit and maximum deviation) and call the openBuy function. See how easy it is to use the class we have written.
//--- Check for any Sell position
   if(Cexpert.checkSell()==true)
     {
      // Do we already have an opened Sell position
      if(Sell_opened)
        {
         Alert("We already have a Sell position!!!");
         return;    // Don't open a new Sell Position
        }
      double bprice=NormalizeDouble(latest_price.bid,_Digits);                 // Current Bid price
      double bstl    = NormalizeDouble(latest_price.bid + STP*_Point,_Digits); // Stop Loss
      double btkp    = NormalizeDouble(latest_price.bid - TKP*_Point,_Digits); // Take Profit
      int    bdev=100;                                                         // Maximum deviation
      // place order
      Cexpert.openSell(ORDER_TYPE_SELL,bprice,bstl,btkp,bdev);
     }
This is the same as what we have done above. Since we are checking for a sell, we called the checkSell function and if it returns TRUE and we don't already have a sell position opened, we prepare the required variables to place our order (the order type, the current ASK price, stop loss, take profit and maximum deviation) and then call the openSell function.
Pretty easy, isn't it? We have finished writing the codes. Now it is time to debug our code. If you don't know how to use the debugger, please read the first article for a better understanding.
When you press F5 or press the debug button, the included file (our class) will be included and checked, and if there is any error, it will report it. Once you see the error, you need to go back to the code and correct the error.
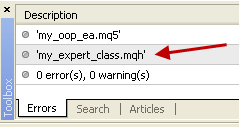
Figure 6. Our include file is included when debugging the main EA code
If everything is okay you have done well. It is now time to test our EA using the strategy tester. We need to compile our EA before testing it with the Strategy Tester. To do this, click on the Compile button or press F7 on your computer keyboard.
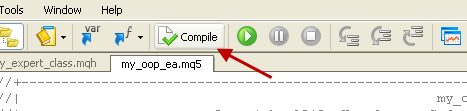
Figure 7. Click the Compile menu button to compile our code
From the trading terminal menu bar, go to View --> Strategy Tester or press CONTROL+R to start the strategy tester. (For details of how to use the tester, please read the first article).
For you to be able to test the EA with the strategy tester, you must first of all compile it. If you don't compile it, you will get an error when you select the Expert Advisor on the settings bar of the strategy tester. (I just discover this in the new version of the terminal.)
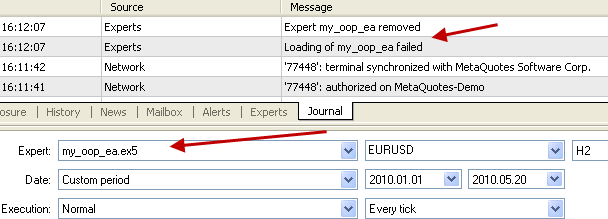
Figure 8. The code of EA should be compiled before its use in the Strategy Tester
Find below the results of the Strategy tester for our OOP based Expert Advisor.
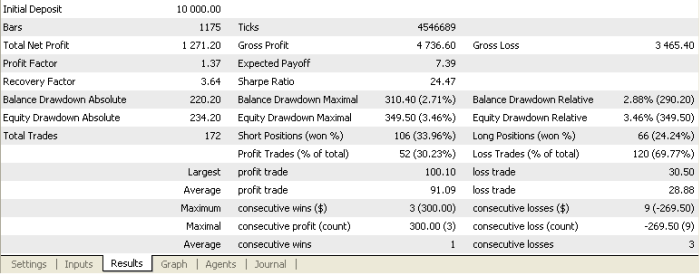
Figure 9. The trade results for our Object Oriented Expert Advisor
The Graph:
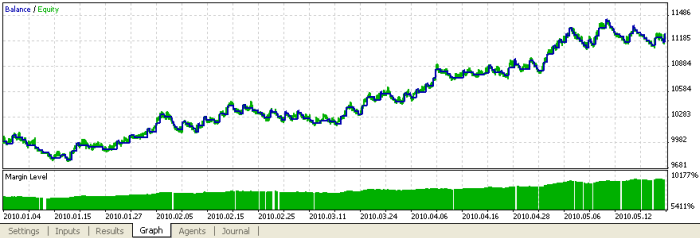
Figure 10. The graph results for our Object Oriented Expert Advisor
The trade activity report/journal:
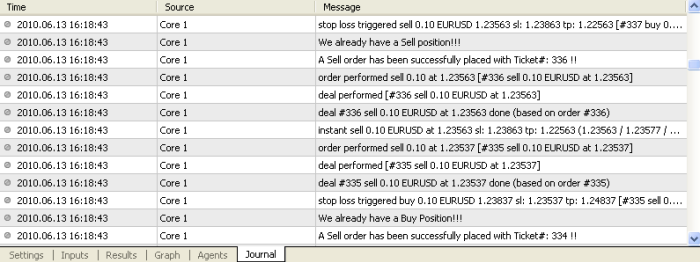
Figure 11. The trade activity results for our Object Oriented Expert Advisor
The chart for the test:
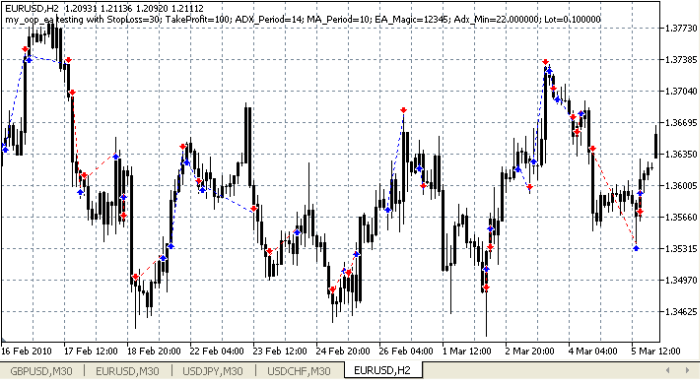
Figure 12. The trade chart results for our Object Oriented Expert Advisor
Conclusion
In this article we have discussed, to some level, the basics of a class and how to use it in writing a simple Expert Advisor. We have not delved too much into the advanced areas of classes but what we have discussed in this article is enough to help you develop yourself to a level you will be able to write your own object oriented Expert Advisor code.
We have also discussed about how we can check for free margin such that our EA does not trade when the free margin available is not enough for the position we want to open.
You will now agree with me that the new MQL5 language has much more to offer and you don't have to be a programming
guru to take advantage of this new language. That is the main reason behind writing the step-by-step guides.