An attempt at developing an EA constructor
Vladimir Karputov | 23 December, 2021
Contents
- Introduction
- 1. EA functionality after using the constructor
- 2. Constructor general algorithm
- 3. Adding the standard indicator — handling the Indicators Code.mq5 file
- 4. Adding a custom indicator
- 5. We catch the transaction (simplified code)
- 6. Creating an EA (position opening signals) using the constructor
- 7. Creating an EA (pending order signals) using the constructor
- Conclusion
Introduction
From the very start, my objective was to use the Standard Library. My first task was to implement the simplest functionality: include the CTrade trading class and execute the Buy or Sell method. I have chosen the Standard Library because it yields a short and concise code. The short code below executed in the form of a script opens a BUY position with the volume of 1.0 lot:
//+------------------------------------------------------------------+
//|                                                     Open Buy.mq5 |
//|                         Copyright © 2018-2021, Vladimir Karputov |
//+------------------------------------------------------------------+
#property copyright "Copyright © 2018-2021, Vladimir Karputov"
#property version   "1.001"
//---
#include <Trade\Trade.mqh>
CTrade         m_trade;                      // trading object
//+------------------------------------------------------------------+
//| Script program start function                                    |
//+------------------------------------------------------------------+
void OnStart()
  {
//---
   m_trade.Buy(1.0); // open Buy position, volume 1.0 lot
  }
Gradually, the requirements became more and more complicated and I came across trading errors almost every time when writing a new Expert Advisor (EA). So my desire to write correct code became more and more intense. Finally, a very important article The checks a trading robot must pass before publication in the Market came out. By the time this article was published, I was already aware of the need for reliable control functions over the execution of trading orders. From that moment on, I began to gradually acquire proven functions that can be easily added to the EA using copy->paste.
Since the work of EAs almost always involves using indicators, I started obtaining the functions for the correct indicator handle creation, as well as for receiving indicator data.
NB: MQL5 style implies that the indicator handle is created ONCE. As a rule, this is done in OnInit.
Since about version 2.XXX, I started maintaining two development branches — the normal procedural code and the code in the form of a class (the main objective of the class is implementing multicurrency EAs).
During the course of my work, the constructor gradually received the most popular settings:
- Stop Loss and Take Profit,
- Trailing,
- lot calculation as a risk percentage or as a constant/minimum lot,
- control of the time interval, inside which the trading is carried out,
- presence of only one position on the market,
- reversing trading signals,
- forced closing of positions in case an opposite signal appears...
Each input entailed creating code blocks and new functions.
For daily use, I decided to collect all the most popular functions and the full set of inputs into Trading engine 3.mq5 EA. In fact, this is a ready-made EA that frees us from a lot of routine work. All we have to do is add/remove functions or change the interaction between code blocks in each particular case.
1. EA functionality after the constructor
The EA created by the constructor immediately features multiple settings, which can be combined to create unique strategies. The version 4.XXX applies the following rules:
- the current symbol is used (a symbol of the chart the EA is launched on)
- Take Profit, Stop Loss and Trailing are set in Points in the inputs. Points — current symbol point size in the quote currency, for example for 'EURSD' 1.00055-1.00045=10 points.
The 'points' can always be seen on the symbol chart by dragging the Crosshair tool:
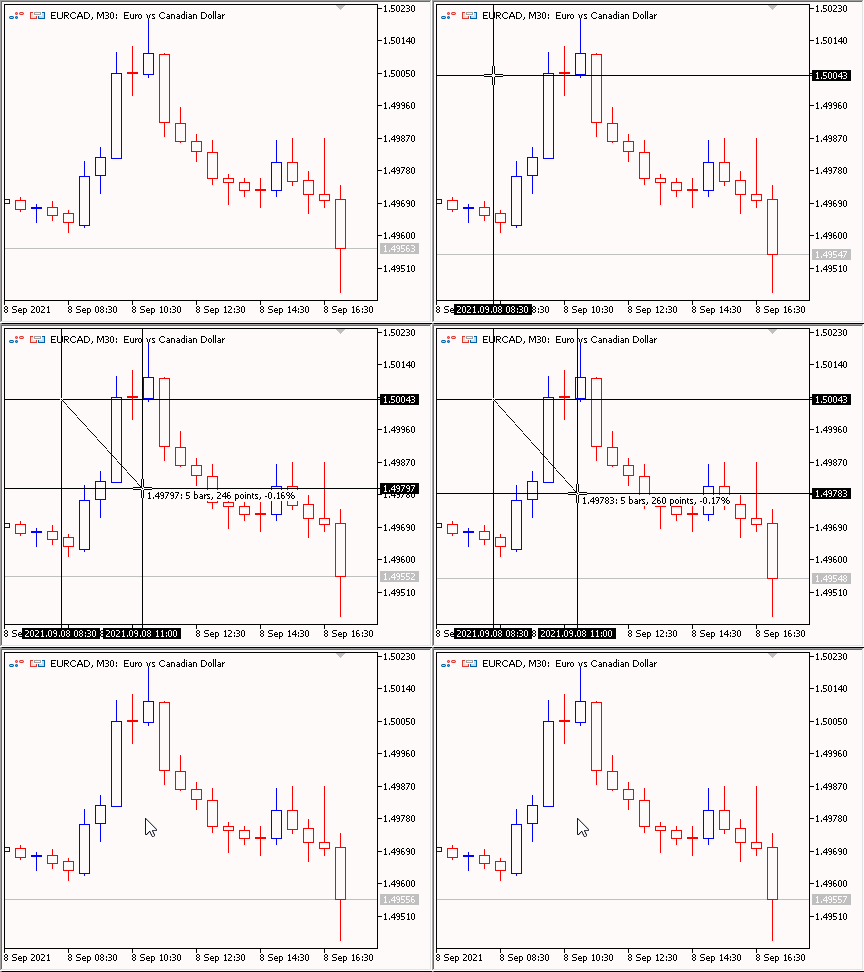
Fig. 1. Points
Below are the inputs of the EA that is created by using the constructor:
- Trading settings
- Working timeframe. A working timeframe may differ from the chart timeframe the EA is launched on. This is a timeframe the indicator is created on (if another timeframe is not explicitly specified in the indicator). It is also used to track the moment of a new bar creation (in case a trading signal should be detected only when a new bar appears or if Trailing is to be launched only when a new bar appears).
- Stop Loss (0 – disabled).
- Take Profit (0 – disabled).
- Trailing on ... — check the trailing ability at each tick (bar #0 (at every tick)) or only when a new bar appears (bar #1 (on a new bar)).
- Search signals on ... — search for a trading signal at each tick (bar #0 (at every tick)) or only when a new bar appears (bar #1 (on a new bar)).
- Trailing Stop (min distance from price to Stop Loss) — minimal distance between the price and the position Stop Loss. Trailing is activated only if the position is profitable and the price moves away from the open price by Trailing Stop + Trailing Step. The trailing operation is displayed in the TrailingStop code images.
- Trailing Step.
- Position size management (lot calculation).
- Money management lot: Lot OR Risk — lot calculation system. The lot can be constant ( Money management= Constant lot, the lot size is set in The value for "Money management") or dynamic - risk % per deal ( Money management= Risk in percent for a deal, the risk % is set in The value for "Money management"). You can also set a constant lot equal to the minimum one ( Money management= Lots Min).
- The value for "Money management"
- Trade mode
- Trade mode: Allowed only BUY positions, Allowed only SELL positions and Allowed BUY and SELL positions
- DEMA — custom indicator parameters. This is where you eventually set your indicator and its parameters
- DEMA: averaging period
- DEMA: horizontal shift
- DEMA: type of price
- Time control — working time period. The time period, within which it is allowed to search for trading signals
- Use time control — flag, enable/disable Time control
- Start Hour — period start hours
- Start Minute — period start minutes
- End Hour — period end hours
- End Minute — period end minutes
- Pending Order Parameters — parameters related to pending orders
- Pending: Expiration, in minutes (0 -> OFF) — pending order lifetime (0 — disabled).
- Pending: Indent — pending order indent from the current price (when the pending order price is not set explicitly)
- Pending: Maximum spread (0 -> OFF) — maximum spread (0 — disabled). If the current spread exceeds the specified one, the pending order is not set (the EA waits for the spread to decrease)
- Pending: Only one pending — enabled/disabled flag. Only one pending order is allowed in the market
- Pending: Reverse pending type — enabled/disabled flag. Pending order reverse
- Pending: New pending -> delete previous ones — if a pending order is to be set, then all other pending orders are preliminarily deleted
- Additional features
- Positions: Only one — enabled/disabled flag. Only one position is allowed in the market
- Positions: Reverse — enabled/disabled flag. Trading order reverse
- Positions: Close opposite — enabled/disabled flag. If there is a trading order, all positions are preliminarily closed so that the order can be executed
- Print log — enabled/disabled flag. Display extended information on operations and errors
- Coefficient (if Freeze==0 Or StopsLevels==0) — ratio considering the Stop Level
- Deviation — specified slippage
- Magic number — EA unique ID
2. Constructor general algorithm
The SPosition array is declared at the global program level (in the EA header). It consists of STRUCT_POSITION structures. During the launch, the array has a zero size. After handling a trading signal, the array also returns to zero.
From OnTick, the SearchTradingSignals function is called. If the signal is present (the market has no open positions), the function forms a trading order (a single STRUCT_POSITION structure is created for each trading order in the array). The presence of a trading order is checked in OnTick — the SPosition array size is checked: if it exceeds zero, there is a trading order, which is sent for execution to OpenBuy or OpenSell. Control over the trading request execution is done in OnTradeTransaction:
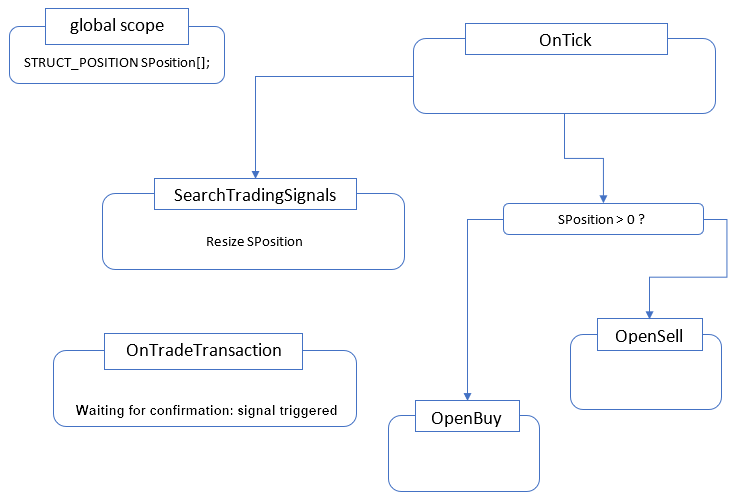
Fig. 2. General algorithm (simple)
It is always assumed that the EA works on the current symbol — the one whose chart the EA is placed on. Example: If the EA is placed on USDPLN, it works on USDPLN.
2.1. STRUCT_POSITION structure
This structure is the heart of the EA. It performs two roles at once: the structure features the fields the trading order is set in (setting is performed in SearchTradingSignals). The structure also features the fields for managing the execution of a trading order (control is done in OnTradeTransaction).
//+------------------------------------------------------------------+
//| Structure Positions                                              |
//+------------------------------------------------------------------+
struct STRUCT_POSITION
  {
   ENUM_POSITION_TYPE pos_type;              // position type
   double            volume;                 // position volume (if "0.0" -> the lot is "Money management")
   double            lot_coefficient;        // lot coefficient
   bool              waiting_transaction;    // waiting transaction, "true" -> it's forbidden to trade, we expect a transaction
   ulong             waiting_order_ticket;   // waiting order ticket, ticket of the expected order
   bool              transaction_confirmed;  // transaction confirmed, "true" -> transaction confirmed
   //--- Constructor
                     STRUCT_POSITION()
     {
      pos_type                   = WRONG_VALUE;
      volume                     = 0.0;
      lot_coefficient            = 0.0;
      waiting_transaction        = false;
      waiting_order_ticket       = 0;
      transaction_confirmed      = false;
     }
  };
Some fields are responsible for the trading order itself, while others handle its execution. The structure contains the constructor — the STRUCT_POSITION() special function. It is called when creating the structure object and used to initialize the structure elements.
Trading order fields:
- pos_type — position type to be opened (can be POSITION_TYPE_BUY or POSITION_TYPE_SELL)
- volume — position volume. If the volume is 0.0, it will be taken from the 'Position size management (lot calculation)' group of inputs
- lot_coefficient — if the ratio exceeds 0.0, the position volume is multiplied by the ratio
Fields of the trading order execution control
- waiting_transaction — flag indicating that a trading order has ben executed successfully and it is necessary to wait for confirmation
- waiting_order_ticket — index of the order obtained when executing a trading order
- transaction_confirmed — flag indicating that a trading order execution has been confirmed
After enabling the flag in transaction_confirmed, a trading order is removed from the structure. Thus, if an EA operation involves no trading order, the structure has a zero size. Find out more about the structure fields and control in the ' We catch the transaction (simplified code)' section.
Why exactly do I use such an algorithm?
At first, it may seem that it is enough to check the Buy method for true or false and, in case of true, assume that the trading order has been executed. In many cases, this approach actually works. But sometimes returning true does not guarantee the result. This is mentioned in the documentation about Buy and Sell methods:
Note
A successful completion of the method does not always mean a successful execution of a trading operation. It is necessary to check the result of trade request (trade server return code) using ResultRetcode() and value returned by ResultDeal().
The presence of the entry in the trading history may serve as the final and accurate confirmation of the trade operation execution. Therefore, the following algorithm has been selected: if the method is executed successfully, check ResultDeal (deal ticket), check ResultRetcode (request execution result code) and save ResultOrder (order ticket). The order ticket is found in OnTradeTransaction.
3. Adding the standard indicator — handling the Indicators Code.mq5 file
For more convenience, the ready-made code blocks (declaring the variables for storing handles, inputs, creating handles) are gathered in the Indicators Code.mq5 EA. The indicator inputs and variables for storing handles are located in the EA "header", handle creation is set in OnInit. Keep in mind that the names of variables for storing handles are formed as follows: 'handle_' + 'indicator', for example 'handle_iStdDev'. The entire handling of Indicators Code.mq5 boils down to copy-paste operations.
NB: MQL5 style implies that the indicator handle is created ONCE. As a rule, this is done in OnInit.
3.1. Example of adding iRVI (Relative Vigor Index, RVI) indicator
Create the Add indicator.mq5 EA. In MetaEditor, run MQL Wizard, for example by clicking ![]() and select Expert Advisor (template)
and select Expert Advisor (template)
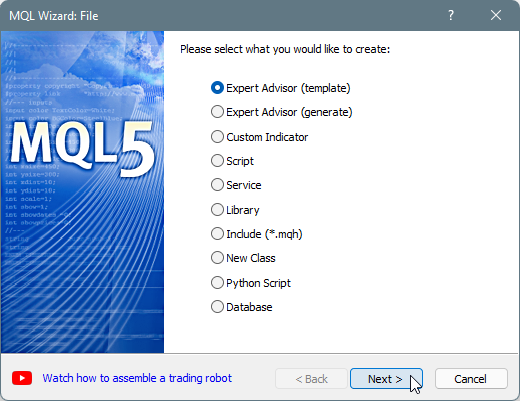
Fig. 3. MQL Wizard -> Expert Advisor (template)
I highly recommend adding at least one input at the next step
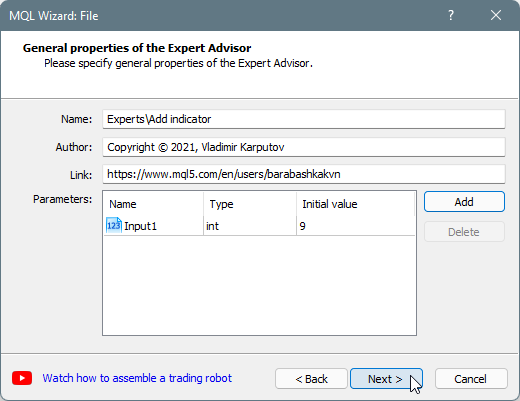
Fig. 4. Expert Advisor (template) -> Add parameter
This allows to automatically add the strings for the input block to the code:
//--- input parameters
input int      Input1=9;
MQL Wizard has created an empty EA. Now let's add iRVI (Relative Vigor Index, RVI) indicator to it. In Indicators Code.mq5, search for handle_iRVI (via ctrl + F). The search yields the variable the handle is stored in:
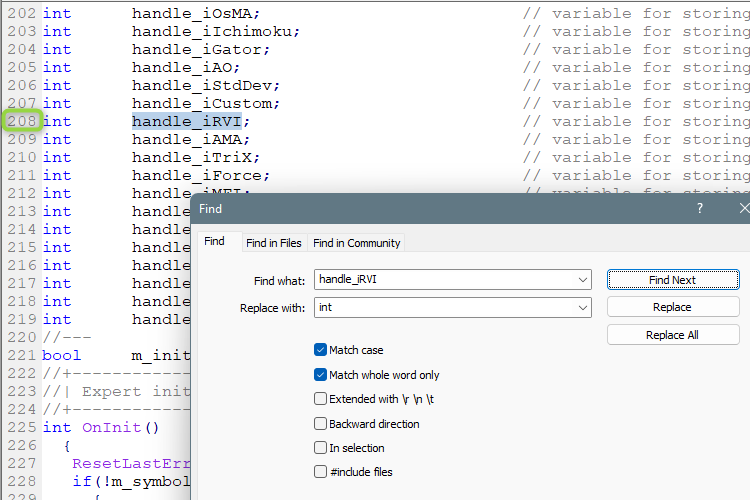
Fig. 5. handle RVI
Copy the newly found string and insert it into 'Add indicator' EA header:
//--- input parameters
input int      Input1=9;
//---
int      handle_iRVI;                           // variable for storing the handle of the iRVI indicator
//+------------------------------------------------------------------+
//| Expert initialization function                                   |
//+------------------------------------------------------------------+
int OnInit()
Resume the search and find the handle creation block:
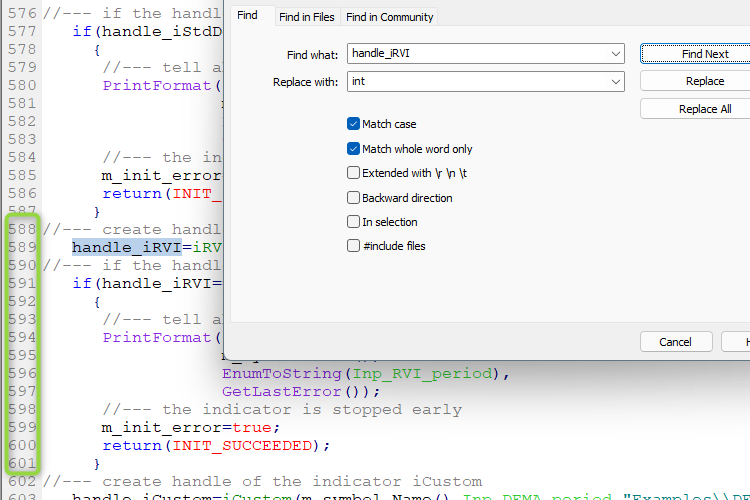
Fig. 6. handle iRVI
Copy the newly found strings and insert them into 'Add indicator' EA in OnInit:
//+------------------------------------------------------------------+
//| Expert initialization function                                   |
//+------------------------------------------------------------------+
int OnInit()
  {
//--- create handle of the indicator iRVI
   handle_iRVI=iRVI(m_symbol.Name(),Inp_RVI_period,Inp_RVI_ma_period);
//--- if the handle is not created
   if(handle_iRVI==INVALID_HANDLE)
     {
      //--- tell about the failure and output the error code
      PrintFormat("Failed to create handle of the iRVI indicator for the symbol %s/%s, error code %d",
                  m_symbol.Name(),
                  EnumToString(Inp_RVI_period),
                  GetLastError());
      //--- the indicator is stopped early
      m_init_error=true;
      return(INIT_SUCCEEDED);
     }
//---
   return(INIT_SUCCEEDED);
  }
Now let's add the indicator inputs. In Indicators Code.mq5, middle-click on, say, Inp_RVI_period to get to the input block right away:

Fig. 7. handle iRVI
Copy the strings and insert them to the inputs:
#property version   "1.00"
//--- input parameters
input group             "RVI"
input ENUM_TIMEFRAMES      Inp_RVI_period                = PERIOD_D1;      // RVI: timeframe
input int                  Inp_RVI_ma_period             = 15;             // RVI: averaging period
//---
int      handle_iRVI;                           // variable for storing the handle of the iRVI indicator
//+------------------------------------------------------------------+
//| Expert initialization function                                   |
//+------------------------------------------------------------------+
Compiling yields the following errors: m_symbol and m_init_error. This is an expected behavior since these variables are present in the code obtained after the constructor operation, while 'Add indicator' EA has been created solely to demonstrate handling the Indicators Code.mq5 file.
4. Adding a custom indicator
Let's add MA on DeMarker custom indicator. First, it is a custom indicator, second, it uses group. Similar to the previous section, create the 'Add custom indicator' EA. After that, copy the inputs from the custom indicator and insert them to the EA:
#property version   "1.00"
//--- input parameters
input group             "DeMarker"
input int                  Inp_DeM_ma_period    = 14;             // DeM: averaging period
input double               Inp_DeM_LevelUP      = 0.7;            // DeM: Level UP
input double               Inp_DeM_LevelDOWN    = 0.3;            // DeM: Level DOWN
input group             "MA"
input int                  Inp_MA_ma_period     = 6;              // MA: averaging period
input ENUM_MA_METHOD       Inp_MA_ma_method     = MODE_EMA;       // MA: smoothing type
//---
In Indicators Code.mq5, find the handle_iCustom variable for storing the custom indicator handle and insert it to the EA:
//+------------------------------------------------------------------+
//|                                         Add custom indicator.mq5 |
//|                              Copyright © 2021, Vladimir Karputov |
//|                      https://www.mql5.com/en/users/barabashkakvn |
//+------------------------------------------------------------------+
#property copyright "Copyright © 2021, Vladimir Karputov"
#property link      "https://www.mql5.com/en/users/barabashkakvn"
#property version   "1.00"
//--- input parameters
input group             "DeMarker"
input int                  Inp_DeM_ma_period    = 14;             // DeM: averaging period
input double               Inp_DeM_LevelUP      = 0.7;            // DeM: Level UP
input double               Inp_DeM_LevelDOWN    = 0.3;            // DeM: Level DOWN
input group             "MA"
input int                  Inp_MA_ma_period     = 6;              // MA: averaging period
input ENUM_MA_METHOD       Inp_MA_ma_method     = MODE_EMA;       // MA: smoothing type
//---
int      handle_iCustom;                        // variable for storing the handle of the iCustom indicator
//+------------------------------------------------------------------+
//| Expert initialization function                                   |
//+------------------------------------------------------------------+
int OnInit()
Find the custom indicator handle creation block in OnInit() of Indicators Code.mq5 and insert it to the EA:
int      handle_iCustom;                        // variable for storing the handle of the iCustom indicator
//+------------------------------------------------------------------+
//| Expert initialization function                                   |
//+------------------------------------------------------------------+
int OnInit()
  {
//--- create handle of the indicator iCustom
   handle_iCustom=iCustom(m_symbol.Name(),Inp_DEMA_period,"Examples\\DEMA",
                          Inp_DEMA_ma_period,
                          Inp_DEMA_ma_shift,
                          Inp_DEMA_applied_price);
//--- if the handle is not created
   if(handle_iCustom==INVALID_HANDLE)
     {
      //--- tell about the failure and output the error code
      PrintFormat("Failed to create handle of the iCustom indicator for the symbol %s/%s, error code %d",
                  m_symbol.Name(),
                  EnumToString(Inp_DEMA_period),
                  GetLastError());
      //--- the indicator is stopped early
      m_init_error=true;
      return(INIT_SUCCEEDED);
     }
//---
   return(INIT_SUCCEEDED);
  }
//+------------------------------------------------------------------+
//| Expert deinitialization function                                 |
Here we have some work to do. We need to set the timeframe (InpWorkingPeriod), the path to the indicator (we assume that it is stored in the root of the Indicators folder) and the inputs:
//+------------------------------------------------------------------+
//| Expert initialization function                                   |
//+------------------------------------------------------------------+
int OnInit()
  {
//--- create handle of the indicator iCustom
   handle_iCustom=iCustom(m_symbol.Name(),InpWorkingPeriod,"MA on DeMarker",
                          "DeMarker",
                          Inp_DeM_ma_period,
                          Inp_DeM_LevelUP,
                          Inp_DeM_LevelDOWN,
                          "MA",
                          Inp_MA_ma_period,
                          Inp_MA_ma_method);
//--- if the handle is not created
   if(handle_iCustom==INVALID_HANDLE)
     {
      //--- tell about the failure and output the error code
      PrintFormat("Failed to create handle of the iCustom indicator for the symbol %s/%s, error code %d",
                  m_symbol.Name(),
                  EnumToString(InpWorkingPeriod),
                  GetLastError());
      //--- the indicator is stopped early
      m_init_error=true;
      return(INIT_SUCCEEDED);
     }
//---
   return(INIT_SUCCEEDED);
  }
5. We catch the transaction (simplified code)
NB: This is a simplified version of the EA. Many functions have shorter code compared to a full-fledged constructor.
If there are no positions in the market opened by this EA, set the trading request to open BUY position. Confirmation of opening the position is printed from OnTradeTransaction and OnTick. Searching and writing a trade order in the SearchTradingSignals function:
//+------------------------------------------------------------------+
//| Search trading signals                                           |
//+------------------------------------------------------------------+
bool SearchTradingSignals(void)
  {
   if(IsPositionExists())
      return(true);
//---
   int size_need_position=ArraySize(SPosition);
   if(size_need_position>0)
      return(true);
   ArrayResize(SPosition,size_need_position+1);
   SPosition[size_need_position].pos_type=POSITION_TYPE_BUY;
   if(InpPrintLog)
      Print(__FILE__," ",__FUNCTION__,", OK: ","Signal BUY");
   return(true);
  }
If the market has no positions opened by the EA and the SPosition array size is zero, increase the array size by one. Thus, we create a single STRUCT_POSITION structure object. This, in turn, call the STRUCT_POSITION() constructor. After calling the constructor, the structure elements are initialized (for example, volume — the position volume is set to 0.0, thus, it will be taken from the 'Position size management (lot calculation)' group of inputs). Now it only remains to set the trading order type into the structure. In this case, it can be interpreted as: "Open BUY position".
After setting the trading order, the SPosition array consists of a single structure and the structure elements have the following values:
| Element | Value | Note |
|---|---|---|
| pos_type | POSITION_TYPE_BUY | set in SearchTradingSignals |
| volume | 0.0 | initialized in the structure constructor |
| lot_coefficient | 0.0 | initialized in the structure constructor |
| waiting_transaction | false | initialized in the structure constructor |
| waiting_order_ticket | 0 | initialized in the structure constructor |
| transaction_confirmed | false | initialized in the structure constructor |
5.1. We get to OnTick on a new tick
OnTick general principle:
//+------------------------------------------------------------------+
//| Expert tick function                                             |
//+------------------------------------------------------------------+
void OnTick()
  {
//---
   int size_need_position=ArraySize(SPosition);
   if(size_need_position>0)
     {
      for(int i=size_need_position-1; i>=0; i--)
        {
         if(SPosition[i].waiting_transaction)
           {
            if(!SPosition[i].transaction_confirmed)
              {
               if(InpPrintLog)
                  Print(__FILE__," ",__FUNCTION__,", OK: ","transaction_confirmed: ",SPosition[i].transaction_confirmed);
               return;
              }
            else
               if(SPosition[i].transaction_confirmed)
                 {
                  ArrayRemove(SPosition,i,1);
                  return;
                 }
           }
         if(SPosition[i].pos_type==POSITION_TYPE_BUY)
           {
            SPosition[i].waiting_transaction=true;
            OpenPosition(i);
            return;
           }
         if(SPosition[i].pos_type==POSITION_TYPE_SELL)
           {
            SPosition[i].waiting_transaction=true;
            OpenPosition(i);
            return;
           }
        }
     }
//--- search for trading signals only at the time of the birth of new bar
   if(!RefreshRates())
      return;
//--- search for trading signals
   if(!SearchTradingSignals())
      return;
//---
  }
At the start of OnTick, check the SPosition array size (this is the STRUCT_POSITION structure array). If the array size exceeds zero, start traversing to zero with two scenarios available:
- if the waiting_transaction structure flag is true (trading order has been prepared, need to wait for confirmation), check the transaction_confirmed flag
- if false, the transaction has not been confirmed yet (for instance, this may happen if the trading order has been sent, a new tick has arrived, while OnTradeTransaction still has no confirmation). Print the appropriate message and exit by return — wait for a new tick in the hope that the information is updated on the new tick
- if true, the transaction has been confirmed. Remove the structure from the array and exit by return
-
if the waiting_transaction structure flag is false (the trading order has just been specified and has not been executed yet), enable the waiting_transaction flag and redirect the order to OpenPosition. The code block can be simplified down to
         SPosition[i].waiting_transaction=true;
         OpenPosition(i);
         return;
but I have left it this way for easier understanding of the full form of the EA constructor:
         if(SPosition[i].pos_type==POSITION_TYPE_BUY)
           {
            if(InpCloseOpposite)
              {
               if(count_sells>0)
                 {
                  ClosePositions(POSITION_TYPE_SELL);
                  return;
                 }
              }
            if(InpOnlyOne)
              {
               if(count_buys+count_sells==0)
                 {
                  SPosition[i].waiting_transaction=true;
                  OpenPosition(i);
                  return;
                 }
               else
                 {
                  ArrayRemove(SPosition,i,1);
                  return;
                 }
              }
            SPosition[i].waiting_transaction=true;
            OpenPosition(i);
            return;
           }
         if(SPosition[i].pos_type==POSITION_TYPE_SELL)
           {
            if(InpCloseOpposite)
              {
               if(count_buys>0)
                 {
                  ClosePositions(POSITION_TYPE_BUY);
                  return;
                 }
              }
            if(InpOnlyOne)
              {
               if(count_buys+count_sells==0)
                 {
                  SPosition[i].waiting_transaction=true;
                  OpenPosition(i);
                  return;
                 }
               else
                 {
                  ArrayRemove(SPosition,i,1);
                  return;
                 }
              }
            SPosition[i].waiting_transaction=true;
            OpenPosition(i);
            return;
           }
Let's continue the tracking. Let me remind you the code block:
         if(SPosition[i].pos_type==POSITION_TYPE_BUY)
           {
            SPosition[i].waiting_transaction=true;
            OpenPosition(i);
            return;
           }
The trading order has just been set into the structure (in the SearchTradingSignals function) and the waiting_transaction flag is set to false. Thus, set the waiting_transaction flag to true and pass the i parameter to the OpenPosition function. This is the structure serial number in the OpenPosition array. Since the trading order type is POSITION_TYPE_BUY, pass the structure serial number to the OpenBuy function.
5.2. OpenBuy function
The function objective is to pass the preliminary tests, send a trading request for opening BUY and track the result right away.
The first check - SYMBOL_VOLUME_LIMIT
| SYMBOL_VOLUME_LIMIT | The maximum allowed total volume of an open position and pending orders in one direction (either buy or sell) for this symbol. For example, if the limit is 5 lots, you may have an open position of 5 lots and place a Sell Limit order of 5 lots as well. But in this case you cannot place a pending Buy Limit order (since the total volume in one direction will exceed the limit) or place a Sell Limit order above 5 lots. |
If the check is not passed, remove the structure element from the SPosition array.
The second check - margin
Get the free margin remaining after a trading operation (FreeMarginCheck) and the margin necessary for a trading operation (MarginCheck). After that, be sure to leave the sum at least equal to FreeMarginCheck for safety:
if(free_margin_check>margin_check) If the check is not passed, print the free_margin_check variable and remove the structure element from the SPosition array.
The third check - bool result of the Buy operation
If the Buy method returns false, print the error and set waiting_transaction to false (the most common reason is error 10004, requote). Thus, an attempt to re-open the BUY position will be made on a new ticket. If the result is true (below is the code block, in which the Buy method has returned true)
         if(m_trade.ResultDeal()==0)
           {
            if(m_trade.ResultRetcode()==10009) // trade order went to the exchange
              {
               SPosition[index].waiting_transaction=true;
               SPosition[index].waiting_order_ticket=m_trade.ResultOrder();
              }
            else
              {
               SPosition[index].waiting_transaction=false;
               if(InpPrintLog)
                  Print(__FILE__," ",__FUNCTION__,", ERROR: ","#1 Buy -> false. Result Retcode: ",m_trade.ResultRetcode(),
                        ", description of result: ",m_trade.ResultRetcodeDescription());
              }
            if(InpPrintLog)
               PrintResultTrade(m_trade,m_symbol);
           }
         else
           {
            if(m_trade.ResultRetcode()==10009)
              {
               SPosition[index].waiting_transaction=true;
               SPosition[index].waiting_order_ticket=m_trade.ResultOrder();
              }
            else
              {
               SPosition[index].waiting_transaction=false;
               if(InpPrintLog)
                  Print(__FILE__," ",__FUNCTION__,", OK: ","#2 Buy -> true. Result Retcode: ",m_trade.ResultRetcode(),
                        ", description of result: ",m_trade.ResultRetcodeDescription());
              }
            if(InpPrintLog)
               PrintResultTrade(m_trade,m_symbol);
           }
then check ResultDeal (deal ticket).
If the deal ticket is zero, check ResultRetcode (request execution reslut code). The resulting return code is 10009 (for example, the trading order was sent to an external trading system, like exchange, therefore the deal ticket is zero). Set waiting_transaction to true, while waiting_order_ticket is to contain ResultOrder (order ticket). Otherwise (the return code is not 10009), waiting_transaction is set to false and the error message is printed.
If the deal ticket is not zero (for example, the execution is performed on the same trade server), perform the similar return code checks and write the values to waiting_transaction and waiting_order_ticket.
5.3. OnTradeTransaction
If the trading order has been successfully sent, wait for the confirmation that the deal has been performed and recorded in the trading history. In OnTradeTransaction, we work with the trans variable (the structure of the MqlTradeTransaction type). The structure has only two strings of interest — deal and type:
struct MqlTradeTransaction
  {
   ulong                         deal;             // Deal ticket
   ulong                         order;            // Order ticket
   string                        symbol;           // Symbol name
   ENUM_TRADE_TRANSACTION_TYPE   type;             // Trading transaction type
   ENUM_ORDER_TYPE               order_type;       // Order type
   ENUM_ORDER_STATE              order_state;      // Order state
   ENUM_DEAL_TYPE                deal_type;        // Deal type
   ENUM_ORDER_TYPE_TIME          time_type;        // Order type by lifetime
   datetime                      time_expiration;  // Order expiration time
   double                        price;            // Price
   double                        price_trigger;    // Stop Limit order trigger price
   double                        price_sl;         // Stop Loss level
   double                        price_tp;         // Take Profit level
   double                        volume;           // Volume in lots
   ulong                         position;         // Position ticket
   ulong                         position_by;      // Opposite position ticket
  };
As soon as OnTradeTransaction gets TRADE_TRANSACTION_DEAL_ADD (adding a deal to history), perform the check: attempt to select a deal in history via HistoryDealSelect. If failed to select, print the error. If the deal exists in trading history, iterate over the SPosition array in a loop. In the loop, only have a look at the structures having the waiting_transaction set to true, while waiting_order_ticket is equal to the ticket of the order of a selected deal. If a match is found, set transaction_confirmed to true. This means the trading order has been executed and confirmed.
//+------------------------------------------------------------------+
//| TradeTransaction function                                        |
//+------------------------------------------------------------------+
void OnTradeTransaction(const MqlTradeTransaction &trans,
                        const MqlTradeRequest &request,
                        const MqlTradeResult &result)
  {
//--- get transaction type as enumeration value
   ENUM_TRADE_TRANSACTION_TYPE type=trans.type;
//--- if transaction is result of addition of the transaction in history
   if(type==TRADE_TRANSACTION_DEAL_ADD)
     {
      ResetLastError();
      if(HistoryDealSelect(trans.deal))
         m_deal.Ticket(trans.deal);
      else
        {
         Print(__FILE__," ",__FUNCTION__,", ERROR: ","HistoryDealSelect(",trans.deal,") error: ",GetLastError());
         return;
        }
      if(m_deal.Symbol()==m_symbol.Name() && m_deal.Magic()==InpMagic)
        {
         if(m_deal.DealType()==DEAL_TYPE_BUY || m_deal.DealType()==DEAL_TYPE_SELL)
           {
            int size_need_position=ArraySize(SPosition);
            if(size_need_position>0)
              {
               for(int i=0; i<size_need_position; i++)
                 {
                  if(SPosition[i].waiting_transaction)
                     if(SPosition[i].waiting_order_ticket==m_deal.Order())
                       {
                        Print(__FUNCTION__," Transaction confirmed");
                        SPosition[i].transaction_confirmed=true;
                        break;
                       }
                 }
              }
           }
        }
     }
  }
Get to OnTick on a new tick. The structure having true in transaction_confirmed is removed from the SPosition array. Thus, a trading order has been issued and tracked till it appears in the trading history.
6. Creating an EA (position opening signals) using the constructor
Before developing any EA, we should think about its trading strategy. Let's consider a simple strategy based on iDEMA (Double Exponential Moving Average, DEMA) indicator. This is a default strategy set in the constructor. An attempt to find an open signal is made only when a new bar appears, while the trading signal itself is an indicator going up or down sequentially:
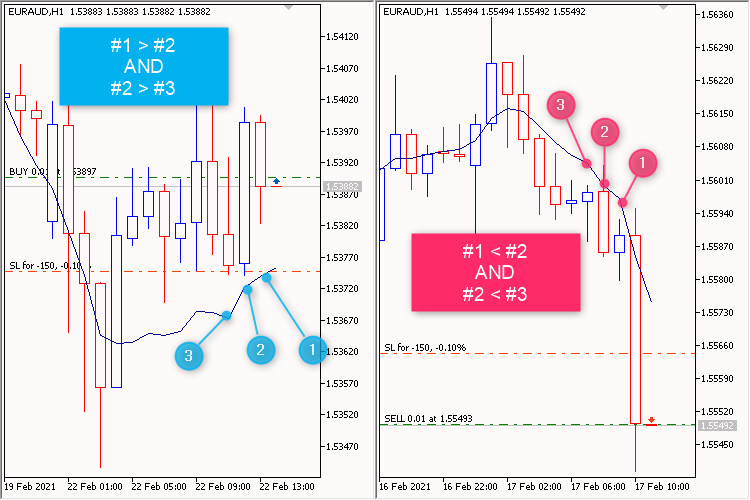
Fig. 8. DEMA Strategy
Keep in mind that any strategy can be greatly modified by adjusting the parameters. For example, we may disable Trailing while leaving Take Profit and Stop Loss intact. Or vice versa: disable Take Profit and Stop Loss, while Trailing remains. We may also restrict trading directions by allowing only BUY or SELL. It is also possible to enable Time control and limit trading at night or, on the contrary, set up trading at night time only. A trading system can also be drastically changed by adjusting parameters from the Additional features group.
In general, the backbone of a trading strategy is built in the SearchTradingSignals function, while all other parameters are meant for "probing" the market in search of optimal approaches.
So let's create a new file to be an EA blank (perform the steps indicated in Figures 3 and 4). At step 4, specify a unique name for your EA. Let it be iDEMA Full EA.mq5. As a result, we get the following workpiece:
//+------------------------------------------------------------------+
//|                                                iDEMA Full EA.mq5 |
//|                              Copyright © 2021, Vladimir Karputov |
//|                      https://www.mql5.com/en/users/barabashkakvn |
//+------------------------------------------------------------------+
#property copyright "Copyright © 2021, Vladimir Karputov"
#property link      "https://www.mql5.com/en/users/barabashkakvn"
#property version   "1.00"
//--- input parameters
input int      Input1=9;
//+------------------------------------------------------------------+
//| Expert initialization function                                   |
//+------------------------------------------------------------------+
int OnInit()
  {
//---

//---
   return(INIT_SUCCEEDED);
  }
//+------------------------------------------------------------------+
//| Expert deinitialization function                                 |
//+------------------------------------------------------------------+
void OnDeinit(const int reason)
  {
//---

  }
//+------------------------------------------------------------------+
//| Expert tick function                                             |
//+------------------------------------------------------------------+
void OnTick()
  {
//---

  }
//+------------------------------------------------------------------+
Now copy the entire code from Trading engine 3.mq5 and insert it instead of the strings. Now it is time to edit the "EA header". The resulting "header" looks as follows:
//+------------------------------------------------------------------+
//|                                                iDEMA Full EA.mq5 |
//+------------------------------------------------------------------+
//|                                             Trading engine 3.mq5 |
//|                              Copyright © 2021, Vladimir Karputov |
//|                      https://www.mql5.com/en/users/barabashkakvn |
//+------------------------------------------------------------------+
#property copyright "Copyright © 2021, Vladimir Karputov"
#property link      "https://www.mql5.com/en/users/barabashkakvn"
#property version   "4.003"
#property description "barabashkakvn Trading engine 4.003"
#property description "Take Profit, Stop Loss and Trailing - in Points (1.00055-1.00045=10 points)"
/*
   barabashkakvn Trading engine 4.003
*/
#include <Trade\PositionInfo.mqh>
Make the "header" look as follows:
//+------------------------------------------------------------------+
//|                                                iDEMA Full EA.mq5 |
//|                              Copyright © 2021, Vladimir Karputov |
//|                      https://www.mql5.com/en/users/barabashkakvn |
//+------------------------------------------------------------------+
#property copyright "Copyright © 2021, Vladimir Karputov"
#property link      "https://www.mql5.com/en/users/barabashkakvn"
#property version   "1.001"
#property description "iDEMA EA"
#property description "Take Profit, Stop Loss and Trailing - in Points (1.00055-1.00045=10 points)"
/*
   barabashkakvn Trading engine 4.003
*/
#include <Trade\PositionInfo.mqh>
Now if we compile this, there will be no errors. The obtained EA is even able to trade.
6.1. SearchTradingSignals function
This is the main function responsible for checking the availability of trading orders. Let's consider this function block by block.
No more than one position per bar:
   if(iTime(m_symbol.Name(),InpWorkingPeriod,0)==m_last_deal_in) // on one bar - only one deal
      return(true);
Checking the trading time range:
   if(!TimeControlHourMinute())
      return(true);
Receiving data from the indicator. The indicator data are passed to the dema array. With the help of ArraySetAsSeries, the reverse indexing order is set for it (the [0] array element is to correspond to the rightmost bar on the chart). The data is received via the iGetArray custom function:
   double dema[];
   ArraySetAsSeries(dema,true);
   int start_pos=0,count=6;
   if(!iGetArray(handle_iCustom,0,start_pos,count,dema))
     {
      return(false);
     }
   int size_need_position=ArraySize(SPosition);
   if(size_need_position>0)
      return(true);
BUY position open signal. If necessary (the InpReverse variable stores the Positions: Reverse input value), a trading signal can be reversed. If there is a limitation concerning trading direction (the InpTradeMode variable stores Trade mode: input value), it will be considered:
//--- BUY Signal
   if(dema[m_bar_current]>dema[m_bar_current+1] && dema[m_bar_current+1]>dema[m_bar_current+3])
     {
      if(!InpReverse)
        {
         if(InpTradeMode!=sell)
           {
            ArrayResize(SPosition,size_need_position+1);
            SPosition[size_need_position].pos_type=POSITION_TYPE_BUY;
            if(InpPrintLog)
               Print(__FILE__," ",__FUNCTION__,", OK: ","Signal BUY");
            return(true);
           }
        }
      else
        {
         if(InpTradeMode!=buy)
           {
            ArrayResize(SPosition,size_need_position+1);
            SPosition[size_need_position].pos_type=POSITION_TYPE_SELL;
            if(InpPrintLog)
               Print(__FILE__," ",__FUNCTION__,", OK: ","Signal SELL");
            return(true);
           }
        }
     }
The code block for a SELL signal is similar.
7. Creating an EA (pending order signals) using the constructor
The EA's name will be iDEMA Full EA Pending.mq5. Open iDEMA Full EA.mq5 and save it under the new name.
A trading strategy is always developed first followed by the code. Let's slightly change the strategy used in the section 6. Create the EA (position open signals) using the constructor. BUY position open signal is replaced with Buy Stop pending order one, while SELL position open signal is replaced with Sell Stop pending order. The following parameters are used for the pending orders:
- Pending: Expiration, in minutes (0 -> OFF) -> 600
- Pending: Indent — pending order indent from the current price (when the pending order price is not set explicitly) -> 50
- Pending: Maximum spread (0 -> OFF). If the current spread exceeds the specified one, the pending order is not set (the EA waits for the spread to decrease) -> 12
- Pending: Only one pending — enabled/disabled flag. Only one pending order is allowed in the market -> true
- Pending: Reverse pending type — enabled/disabled flag. Pending order reverse -> false
- Pending: New pending -> delete previous ones — if a pending order is to be set, then all other pending orders are preliminarily deleted -> true
The SearchTradingSignals function looks as follows:
//+------------------------------------------------------------------+
//| Search trading signals                                           |
//+------------------------------------------------------------------+
bool SearchTradingSignals(void)
  {
   if(iTime(m_symbol.Name(),InpWorkingPeriod,0)==m_last_deal_in) // on one bar - only one deal
      return(true);
   if(!TimeControlHourMinute())
      return(true);
   double dema[];
   ArraySetAsSeries(dema,true);
   int start_pos=0,count=6;
   if(!iGetArray(handle_iCustom,0,start_pos,count,dema))
     {
      return(false);
     }
   int size_need_pending=ArraySize(SPending);
   if(size_need_pending>0)
      return(true);
//---
   if(InpPendingOnlyOne)
      if(IsPendingOrdersExists())
         return(true);
   if(InpPendingClosePrevious)
      m_need_delete_all=true;
//--- BUY Signal
   if(dema[m_bar_current]>dema[m_bar_current+1] && dema[m_bar_current+1]>dema[m_bar_current+3])
     {
      if(!InpReverse)
        {
         if(InpTradeMode!=sell)
           {
            ArrayResize(SPending,size_need_pending+1);
            SPending[size_need_pending].pending_type=ORDER_TYPE_BUY_STOP;
            if(InpPrintLog)
               Print(__FILE__," ",__FUNCTION__,", OK: ","Signal BUY STOP");
            return(true);
           }
        }
      else
        {
         if(InpTradeMode!=buy)
           {
            ArrayResize(SPending,size_need_pending+1);
            SPending[size_need_pending].pending_type=ORDER_TYPE_SELL_STOP;
            if(InpPrintLog)
               Print(__FILE__," ",__FUNCTION__,", OK: ","Signal SELL STOP");
            return(true);
           }
        }
     }
//--- SELL Signal
   if(dema[m_bar_current]<dema[m_bar_current+1] && dema[m_bar_current+1]<dema[m_bar_current+3])
     {
      if(!InpReverse)
        {
         if(InpTradeMode!=buy)
           {
            ArrayResize(SPending,size_need_pending+1);
            SPending[size_need_pending].pending_type=ORDER_TYPE_SELL_STOP;
            if(InpPrintLog)
               Print(__FILE__," ",__FUNCTION__,", OK: ","Signal SELL STOP");
            return(true);
           }
        }
      else
        {
         if(InpTradeMode!=sell)
           {
            ArrayResize(SPending,size_need_pending+1);
            SPending[size_need_pending].pending_type=ORDER_TYPE_BUY_STOP;
            if(InpPrintLog)
               Print(__FILE__," ",__FUNCTION__,", OK: ","Signal BUY STOP");
            return(true);
           }
        }
     }
//---
   /*if(InpPendingOnlyOne)
      if(IsPendingOrdersExists())
         return(true);
   if(InpPendingClosePrevious)
      m_need_delete_all=true;
   int size_need_pending=ArraySize(SPending);
   ArrayResize(SPending,size_need_pending+1);
   if(!InpPendingReverse)
      SPending[size_need_pending].pending_type=ORDER_TYPE_BUY_STOP;
   else
      SPending[size_need_pending].pending_type=ORDER_TYPE_SELL_STOP;
   SPending[size_need_pending].indent=m_pending_indent;
   if(InpPendingExpiration>0)
      SPending[size_need_pending].expiration=(long)(InpPendingExpiration*60);
   if(InpPrintLog)
      Print(__FILE__," ",__FUNCTION__,", OK: ","Signal BUY STOP");*/
//---
   return(true);
  }
Note that we not set the pending order price to the SPending structure. This means the current price plus indent are to be used.
We received a trading signal, which triggered (a pending order was placed) only when the spread became lower than the specified one:
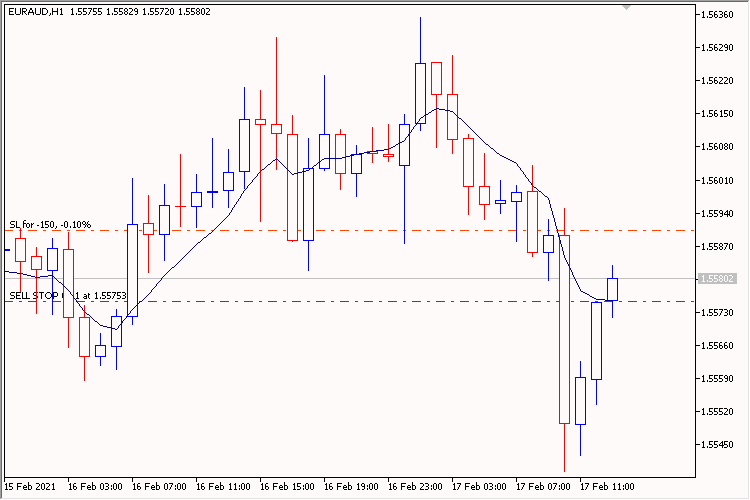
Fig. 9. iDEMA Full EA Pending
Files attached to the article:
| Name | File type | Description |
|---|---|---|
| Indicators Code | EA | Variables for storing handles, indicator inputs, indicator creation blocks |
| Add indicator.mq5 | EA | Example of working with Add indicator.mq5 — adding a standard indicator |
| Add custom indicator.mq5 | EA | Example of adding a custom indicator |
| Trading engine 4.mq5 | EA | Constructor |
| iDEMA Full EA.mq5 | EA | EA created with the help of the constructor — position open signals |
| iDEMA Full EA Pending.mq5 | EA | EA created with the help of the constructor — pending order placement signals |
Conclusion
I hope that this set of trading functions will help you create more reliable Expert Advisors ready for the constantly changing market trading conditions. Never hesitate to experiment with the parameters. You are able to drastically change your strategy by enabling some parameters, while disabling others.