
パネルを改善してみましょう(CAppDialog / CWndClientからの継承、背景の色の変更、透明性の追加)

目次
- 概論
- 移動時の透明パネル
- 仕組み
- これで実装に着手できます
- "OnDialogDragStart"ハンドラ:パネル移動の開始
- "OnDialogDragProcess"ハンドラ:パネルの移動の続行
- "OnDialogDragEnd"ハンドラ:パネル移動の終了
- パネルにボタンを追加し、パネルを移動するときにボタンを透明にする
- パネルに2つのボタンを追加する:パネルの背景とタイトルの色を制御する
- CAppDialogからの継承
- CWndClientからの継承
- 新しいプロジェクトどのようにパネルの研究に役立つか?
- まとめ
概論
CAppDialogクラスに基づくパネルには、パネルを構成するコントロール要素のプロパティ(「背景色」や「フレーム色」など)に直接アクセスするための十分なメソッドがありません。したがって、すべてのパネルは均一にグレーで作成されます。
コントロールの色を変更する方法がないので、デザインへのアイディアを活かすことができません。もちろん、メソッドを継承して追加することで、この問題を解決できます。しかし、このためには、生成されたコードをかなり修正する必要があります。パネルコントロール要素の「背景色」および「フレーム色」のプロパティにアクセスする、より簡単で速い方法はあるでしょうか?
移動時の透明パネル
始めにCAppDialogクラスに基づくパネル(これはコード "Live panel.mq5"の動作例)に対して何ができるかをお見せしましょう。

このアニメーションでは、パネルを移動すると、外側の境界線だけがパネルから残っていることを表しています。移動するとき、外側のフレームは、色を任意の順序でさらに変化させます。移動が完了すると、フォームは再び正常になり、作業領域が表示されます。
すべての作業はCDialogクラスで行われます。これは[data folder] \\ MQL5 \\ Include \\ Controls \\Dialog.mqhファイルにあります。
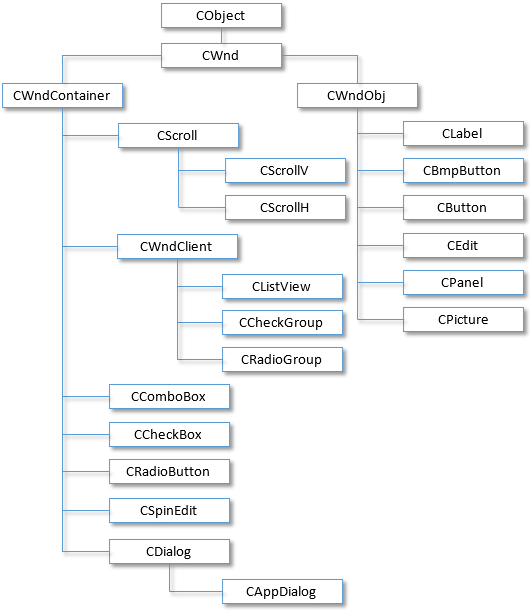
パネルがどのようなオブジェクトで構成されているか(これらのオブジェクトはprivateセクションのCDialogクラスで宣言されています)、またそれらがグラフィック要素にどのように視覚的に具体化されているかを思い出してみてください。//+------------------------------------------------------------------+ //| Class CDialog | //| Usage: base class to create dialog boxes | //| and indicator panels | //+------------------------------------------------------------------+ class CDialog : public CWndContainer { private: //--- dependent controls CPanel m_white_border; // the "white border" object CPanel m_background; // the background object CEdit m_caption; // the window title object CBmpButton m_button_close; // the "Close" button object CWndClient m_client_area; // the client area object protected:

移動時のパネルを透明にする際、4つのポイントを考慮する必要があります。
1. 私たちは "Border"と"Back"(クラスCPanelのm_white_borderオブジェクトとm_backgroundオブジェクトによって作成される)と "Client"要素(クラスCWndClientのm_client_areaオブジェクトによって作成される)のグラフィック要素に着目します。どのように作成され、どの色が指定されているかは、関数CDialog :: CreateWhiteBorder、CDialog :: CreateBackground、およびCDialog :: CreateClientAreaでそれぞれ確認できます。
2. 作成時のパネルには、一意の名前、つまりすべてのグラフィックオブジェクトの名前の前に置かれるデジタルプレフィックス(プレフィックスの下の数字は03082です)が表示されます。

3. CDialogクラスには、3つのドラッグ・アンド・ドロップ・ハンドラーがあります。
| ドラッグアンドドロップ処理 | |
|---|---|
| OnDialogDragStart | コントロール要素の "DialogDragStart"イベントの仮想イベントハンドラ |
| OnDialogDragProcess | コントロール要素の "DialogDragProcess"イベントの仮想イベントハンドラ |
| OnDialogDragEnd | コントロール要素の "DialogDragEnd"イベントの仮想イベントハンドラ |
4. 『任意の複雑さのレベルのグラフィカルなパネルを作成する方法』の記事の抜粋で、「パネルオブジェクトをバイパスします(ここではExtDialog -パネルクラスのオブジェクト)。
   int total=ExtDialog.ControlsTotal();
   for(int i=0;i<total;i++)
     {
      CWnd*obj=ExtDialog.Control(i);
...
なぜ、サイクルを回る時、オブジェクトobjへのポインタがCWnd型で宣言されているのでしょうか?
それはCWndは他のすべての子クラスの起源となる基本クラスであるからです。
色を扱うには2つのマクロが必要です。パネルを移動させるにはCDialogクラスから3つの関数を再定義する必要があります。
//+------------------------------------------------------------------+
//|                                                   Live panel.mq5 |
//|                        Copyright 2018, MetaQuotes Software Corp. |
//|                                              http://www.mql5.com |
//+------------------------------------------------------------------+
#property copyright "Copyright 2018, MetaQuotes Software Corp."
#property link      "http://www.mql5.com"
#property version   "1.000"
#property description「移動時にパネルの透明性が変わる」
#include <Controls\Dialog.mqh>
#define XRGB(r,g,b)    (0xFF000000|(uchar(r)<<16)|(uchar(g)<<8)|uchar(b))
#define GETRGB(clr)    ((clr)&0xFFFFFF)
//+------------------------------------------------------------------+
//| Class CLivePanel                                                 |
//| Usage: main dialog of the Controls application                   |
//+------------------------------------------------------------------+
class CLivePanel : public CAppDialog
  {
public:
                     CLivePanel(void);
                    ~CLivePanel(void);
   //--- create
   virtual bool      Create(const long chart,const string name,const int subwin,const int x1,const int y1,const int x2,const int y2);
   //--- handlers of drag
   virtual bool      OnDialogDragStart(void);
   virtual bool      OnDialogDragProcess(void);
   virtual bool      OnDialogDragEnd(void);

  };
パネルの作業(イベントの作成、削除、転送)の標準的な部分はスキップしますが、移動のハンドラについて詳しく説明したいと思います。
"OnDialogDragStart"ハンドラ:パネル移動の開始
接頭辞を取得し、次にサイクルでパネル内のすべてのオブジェクトをバイパスし、「Border」、「Back」または「Client」という名前の接頭辞を探します。
//+------------------------------------------------------------------+
//| Start dragging the dialog box                                    |
//+------------------------------------------------------------------+
bool CLivePanel::OnDialogDragStart(void)
  {
   string prefix=Name();
   int total=ExtDialog.ControlsTotal();
   for(int i=0;i<total;i++)
     {
      CWnd*obj=ExtDialog.Control(i);
      string name=obj.Name();
      //---
      if(name==prefix+"Border")
        {
         CPanel *panel=(CPanel*) obj;
         panel.ColorBackground(clrNONE);
         ChartRedraw();
        }
      if(name==prefix+"Back")
        {
         CPanel *panel=(CPanel*) obj;
         panel.ColorBackground(clrNONE);
         ChartRedraw();
        }
      if(name==prefix+"Client")
        {
         CWndClient *wndclient=(CWndClient*) obj;
         wndclient.ColorBackground(clrNONE);
         wndclient.ColorBorder(clrNONE);
         ChartRedraw();
        }
     }
   return(CDialog::OnDialogDragStart());
  }
オブジェクトが見つかると、clrNONEカラーを使用し、背景色を削除します(メソッド "ColorBackground")とフレーム(メソッド"ColorBorder")。このようにして、フォームの透明性が実現されます。
"OnDialogDragProcess"ハンドラ:パネルの移動の続行
"Back"オブジェクトのみを探索し、色を動的に変更します(2つのXRGBマクロとGETRGBマクロを使用)。
//+------------------------------------------------------------------+
//| Continue dragging the dialog box                                 |
//+------------------------------------------------------------------+
bool CLivePanel::OnDialogDragProcess(void)
  {
   string prefix=Name();
   int total=ExtDialog.ControlsTotal();
   for(int i=0;i<total;i++)
     {
      CWnd*obj=ExtDialog.Control(i);
      string name=obj.Name();
      if(name==prefix+"Back")
        {
         CPanel *panel=(CPanel*) obj;
         color clr=(color)GETRGB(XRGB(rand()%255,rand()%255,rand()%255));
         panel.ColorBorder(clr);
         ChartRedraw();
        }
     }
   return(CDialog::OnDialogDragProcess());
  }
"OnDialogDragEnd"ハンドラ:パネル移動の終了
私たちは背景と境界線の色を "Border"、 "Back"または "Client"というオブジェクトに戻します。
//+------------------------------------------------------------------+
//| End dragging the dialog box                                      |
//+------------------------------------------------------------------+
bool CLivePanel::OnDialogDragEnd(void)
  {
   string prefix=Name();
   int total=ExtDialog.ControlsTotal();
   for(int i=0;i<total;i++)
     {
      CWnd*obj=ExtDialog.Control(i);
      string name=obj.Name();
      //---
      if(name==prefix+"Border")
        {
         CPanel *panel=(CPanel*) obj;
         panel.ColorBackground(CONTROLS_DIALOG_COLOR_BG);
         panel.ColorBorder(CONTROLS_DIALOG_COLOR_BORDER_LIGHT);
         ChartRedraw();
        }
      if(name==prefix+"Back")
        {
         CPanel *panel=(CPanel*) obj;
         panel.ColorBackground(CONTROLS_DIALOG_COLOR_BG);
         color border=(m_panel_flag) ? CONTROLS_DIALOG_COLOR_BG : CONTROLS_DIALOG_COLOR_BORDER_DARK;
         panel.ColorBorder(border);
         ChartRedraw();
        }
      if(name==prefix+"Client")
        {
         CWndClient *wndclient=(CWndClient*) obj;
         wndclient.ColorBackground(CONTROLS_DIALOG_COLOR_CLIENT_BG);
         wndclient.ColorBorder(CONTROLS_DIALOG_COLOR_CLIENT_BORDER);
         ChartRedraw();
        }
     }
   return(CDialog::OnDialogDragEnd());
  }
パネルにボタンを追加し、パネルを移動するときにボタンを透明にする
この例は、"Live panel and Button.mq5"コードに含まれています。
ボタンを操作するには、初めにEAのボタンクラスに接続し、その位置とサイズを担当するマクロを追加します。
#property description "移動時にパネルの透明性が変わる"
#property description "しかし、この際追加されたボタンはそのまま残る"
#include <Controls\Dialog.mqh>
#include <Controls\Button.mqh>
#define XRGB(r,g,b)    (0xFF000000|(uchar(r)<<16)|(uchar(g)<<8)|uchar(b))
#define GETRGB(clr)    ((clr)&0xFFFFFF)
//+------------------------------------------------------------------+
//| defines                                                          |
//+------------------------------------------------------------------+
//--- indents and gaps
#define INDENT_LEFT                         (11)      // indent from left (with allowance for border width)
#define INDENT_TOP                          (11)      // indent from top (with allowance for border width)
#define CONTROLS_GAP_X                      (5)       // gap by X coordinate
//--- for buttons
#define BUTTON_WIDTH                        (100)     // size by X coordinate
#define BUTTON_HEIGHT                       (20)      // size by Y coordinate
//+------------------------------------------------------------------+
//| Class CLivePanelAndButton                                        |
//| Usage: main dialog of the Controls application                   |
//+------------------------------------------------------------------+
class CLivePanelAndButton : public CAppDialog
また、ボタンを操作するには、CButtonクラスのオブジェクトを宣言する必要があります。
//+------------------------------------------------------------------+
//| Class CLivePanelAndButton                                        |
//| Usage: main dialog of the Controls application                   |
//+------------------------------------------------------------------+
class CLivePanelAndButton : public CAppDialog
  {
private:
   CButton           m_button1;                       // the button object

public:
                     CLivePanelAndButton(void);
ボタンを作成する手順です。
   virtual bool      OnDialogDragEnd(void);

protected:
   //--- create dependent controls
   bool              CreateButton1(void);

  };
"CreateButton1"コードは、ボタンの作成後に作成するパネルにボタンを追加することを忘れないでください。
//+------------------------------------------------------------------+
//| Create the "Button1" button                                      |
//+------------------------------------------------------------------+
bool CLivePanelAndButton::CreateButton1(void)
  {
//--- coordinates
   int x1=INDENT_LEFT;        // x1            = 11  pixels
   int y1=INDENT_TOP;         // y1            = 11  pixels
   int x2=x1+BUTTON_WIDTH;    // x2 = 11 + 100 = 111 pixels
   int y2=y1+BUTTON_HEIGHT;   // y2 = 11 + 20  = 32  pixels
//--- create
   if(!m_button1.Create(0,"Button1",0,x1,y1,x2,y2))
      return(false);
   if(!m_button1.Text("Button1"))
      return(false);
   if(!Add(m_button1))
      return(false);
//--- succeed
   return(true);
  }
上記の例のパネルにボタンを追加すると、結果は次のようになります。

ご覧のように、パネルを移動すると透明になりますが、追加されたコントロール(ボタン)は不透明のままです。ここでは、移動時にパネルが透明な背景であればいい場合や、ボタンも一緒に透明になった方がいい場合など、好みによったコードの作成方法があります。2つ目の選択肢を取り上げて、パネルを動かすときにボタンも透明にしましょう。
これは"Live panel and transparent Button.mq5"コードを使用して行います。
単純なまたは組み合わせた制御要素がパネルに追加されると、作成するオブジェクトがm_client_areaオブジェクトに追加されます(m_client_areaオブジェクトはCDialogクラスで宣言されていることを思い出してください)。したがって、パネル移動が検出された場合、〜m_client_areaに追加されるすべてのオブジェクトのサイクルを整理する必要があります。これは、最初のハンドラ"OnDialogDragStart"(パネルの移動を開始)を使用すると便利です。
//+------------------------------------------------------------------+
//| Start dragging the dialog box                                    |
//+------------------------------------------------------------------+
bool CLivePaneTransparentButton::OnDialogDragStart(void)
  {
   string prefix=Name();
   int total=ExtDialog.ControlsTotal();
   for(int i=0;i<total;i++)
     {
      CWnd*obj=ExtDialog.Control(i);
      string name=obj.Name();
      //---
      if(name==prefix+"Border")
        {
         CPanel *panel=(CPanel*) obj;
         panel.ColorBackground(clrNONE);
         ChartRedraw();
        }
      if(name==prefix+"Back")
        {
         CPanel *panel=(CPanel*) obj;
         panel.ColorBackground(clrNONE);
         ChartRedraw();
        }
      if(name==prefix+"Client")
        {
         CWndClient *wndclient=(CWndClient*) obj;
         wndclient.ColorBackground(clrNONE);
         wndclient.ColorBorder(clrNONE);
         //---
         int client_total=wndclient.ControlsTotal();
         for(int j=0;j<client_total;j++)
           {
            CWnd*client_obj=wndclient.Control(j);
            string client_name=client_obj.Name();
            if(client_name=="Button1")
              {
               CButton *button=(CButton*) client_obj;
               button.ColorBackground(clrNONE);
               ChartRedraw();
              }
           }
         ChartRedraw();
        }
     }
   return(CDialog::OnDialogDragStart());
  }
初回の移動検出時に、パネルとボタンが透明になります。
私たちの2番目のハンドラは "OnDialogDragProcess"(パネルの移動を続行)は変更しません。しかし、第3のハンドラ"OnDialogDragEnd"(パネルの移動終了)はボタンの色を返す必要がある為、変更をします。
//+------------------------------------------------------------------+
//| End dragging the dialog box                                      |
//+------------------------------------------------------------------+
bool CLivePaneTransparentButton::OnDialogDragEnd(void)
  {
   string prefix=Name();
   int total=ExtDialog.ControlsTotal();
   for(int i=0;i<total;i++)
     {
      CWnd*obj=ExtDialog.Control(i);
      string name=obj.Name();
      //---
      if(name==prefix+"Border")
        {
         CPanel *panel=(CPanel*) obj;
         panel.ColorBackground(CONTROLS_DIALOG_COLOR_BG);
         panel.ColorBorder(CONTROLS_DIALOG_COLOR_BORDER_LIGHT);
         ChartRedraw();
        }
      if(name==prefix+"Back")
        {
         CPanel *panel=(CPanel*) obj;
         panel.ColorBackground(CONTROLS_DIALOG_COLOR_BG);
         color border=(m_panel_flag) ? CONTROLS_DIALOG_COLOR_BG : CONTROLS_DIALOG_COLOR_BORDER_DARK;
         panel.ColorBorder(border);
         ChartRedraw();
        }
      if(name==prefix+"Client")
        {
         CWndClient *wndclient=(CWndClient*) obj;
         wndclient.ColorBackground(CONTROLS_DIALOG_COLOR_CLIENT_BG);
         wndclient.ColorBorder(CONTROLS_DIALOG_COLOR_CLIENT_BORDER);
         //---
         int client_total=wndclient.ControlsTotal();
         for(int j=0;j<client_total;j++)
           {
            CWnd*client_obj=wndclient.Control(j);
            string client_name=client_obj.Name();
            if(client_name=="Button1")
              {
               CButton *button=(CButton*) client_obj;
               button.ColorBackground(CONTROLS_BUTTON_COLOR_BG);
               ChartRedraw();
              }
           }
         ChartRedraw();
        }
     }
   return(CDialog::OnDialogDragEnd());
  }
これで"Live panel and transparent Button.mq5"コードで、パネル移動時のパネルとボタンの色の変化を完全に実装しました。

パネルに2つのボタンを追加する:パネルの背景とタイトルの色を制御する
この例は、"Live panel and button Clicks.mq5"コードに含まれており、これは前のコード"Live panel and transparent Button.mq5"を基に作成されています。ここではパネル移動イベントではなく、ボタンのクリックイベントを「キャッチ」します。またパネルには2つのボタンがあり、1つはパネルの背景色を変更する役割を果たし、2つ目はパネルのヘッダーの色を変更するボタンです。
パネルに追加されたコントロールに関連付けられたイベントをキャッチするには、 イベントハンドラを宣言しハンドラを書く必要があります。
//+------------------------------------------------------------------+
//| Class CLivePaneButtonClicks                                      |
//| Usage: main dialog of the Controls application                   |
//+------------------------------------------------------------------+
class CLivePaneButtonClicks : public CAppDialog
  {
private:
   CButton           m_button1;                       // the button object
   CButton           m_button2;                       // the button object

public:
                     CLivePaneButtonClicks(void);
                    ~CLivePaneButtonClicks(void);
   //--- create
   virtual bool      Create(const long chart,const string name,const int subwin,const int x1,const int y1,const int x2,const int y2);
   //--- chart event handler
   virtual bool      OnEvent(const int id,const long &lparam,const double &dparam,const string &sparam);

protected:
   //--- create dependent controls
   bool              CreateButton1(void);
   bool              CreateButton2(void);
   //--- handlers of the dependent controls events
   void              OnClickButton1(void);
   void              OnClickButton2(void);

  };
//+------------------------------------------------------------------+
//| Event Handling                                                   |
//+------------------------------------------------------------------+
EVENT_MAP_BEGIN(CLivePaneButtonClicks)
ON_EVENT(ON_CLICK,m_button1,OnClickButton1)
ON_EVENT(ON_CLICK,m_button2,OnClickButton2)
EVENT_MAP_END(CAppDialog)
//+------------------------------------------------------------------+
//| Constructor                                                      |
//+------------------------------------------------------------------+
ハンドラはEvents"や"Macro of event handling mapブロック("Defines.mqh"ファイル)から書かれている"OnEvent"メソッドのようなものではありません。(詳細については、任意の複雑さのレベルのグラフィカルなパネルを作成する方法の記事をご参照ください)。
ハンドラは次のようになります。
- CLivePaneButtonClicksクラスのOnEventハンドラ。
- コントロール要素に"m_button1"のクリックがある場合、"OnClickButton1"ハンドラを呼び出します。
- コントロール要素に"m_button2"のクリックがある場合、"OnClickButton2"ハンドラを呼び出します。
- 親クラスCAppDialogのOnEventイベントを返します。
ハンドラ "OnClickButton1"と "OnClickButton2"
両方のハンドラで整理されたパネルを構成するすべてのオブジェクトのループをバイパスします(これらは仕組みの項目で紹介しています)。この場合、"ExtDialog"オブジェクトパネルのすべてのオブジェクトで行います。結果として、CWndContainer :: ControlsTotal()メソッドが呼び出されます。
//+------------------------------------------------------------------+
//| Event handler                                                    |
//+------------------------------------------------------------------+
void CLivePaneButtonClicks::OnClickButton1(void)
  {
   string prefix=Name();
   int total=ExtDialog.ControlsTotal();
   for(int i=0;i<total;i++)
     {
      CWnd*obj=ExtDialog.Control(i);
      string name=obj.Name();
      //---
      if(name==prefix+"Client")
        {
         CWndClient *wndclient=(CWndClient*) obj;
         color clr=(color)GETRGB(XRGB(rand()%255,rand()%255,rand()%255));
         wndclient.ColorBackground(clr);
         ChartRedraw();
         return;
        }
     }
  }
//+------------------------------------------------------------------+
//| Event handler                                                    |
//+------------------------------------------------------------------+
void CLivePaneButtonClicks::OnClickButton2(void)
  {
   string prefix=Name();
   int total=ExtDialog.ControlsTotal();
   for(int i=0;i<total;i++)
     {
      CWnd*obj=ExtDialog.Control(i);
      string name=obj.Name();
      //---
      if(name==prefix+"Caption")
        {
         CEdit *edit=(CEdit*) obj;
         color clr=(color)GETRGB(XRGB(rand()%255,rand()%255,rand()%255));
         edit.ColorBackground(clr);
         ChartRedraw();
         return;
        }
     }
  }
"OnClickButton1"ハンドラでは、prefix +"Client"(これはCWndClientクラスのオブジェクトになります)と、 "OnClickButton2"ハンドラでは、prefix + "Caption"というヘッダーオブジェクト(これはCEditクラスのオブジェクトになります)を持つクライアント領域オブジェクトを探します。いずれの場合も、見つかったオブジェクトの背景色をランダムに選択します。結果は次のようになります。

CAppDialogからの継承
実装スキームは、使用されている標準ライブラリ(\\ MQL5 \\ Experts \\ Examples \\ Controls \\と\\ MQL5 \\ Indicators \\ Examples \\ Panels \\ SimplePanel \\)と異なります。つまり"MyAppDialog.mqh"プラグインファイルでCAppDialogから継承された"CMyAppDialog"クラスが作成されます。このクラスは、フォームとタイトルの色を管理するための3つのメソッドしか実装していません。追加されたコントロール要素、OnEventハンドラ、およびボタン(追加されたコントロール)のクリックハンドラを作成する方法はありません。
CButtonクラスのオブジェクト(追加されたコントロール要素、2つのボタン)は、"MyAppWindow.mq5"実行ファイルで作成されます。また、"MyAppWindow.mq5ファイルで、OnChartEventハンドラでは、ボタンのクリックイベントが捕捉され、色の変更メソッドが呼び出されます。
私達のクラスでは、次の3つのメソッドを追加します。
- CMyAppDialog::ColorBackground — 背景の色を設定する。
- void CMyAppDialog::ColorCaption — ヘッダーの色を変更する。
- color CMyAppDialog :: ColorCaption - ヘッダーの色を取得する。
オブジェクトのプロパティにアクセスするためのアルゴリズムは、前のコードと似ています。サイクルでは、パネルを構成するすべてのオブジェクトを回り、オブジェクト名を関連付けます。背景の色を取得するというもう一つのメソッドが足りませんが、これは簡単な手段で行うことはできません。
//+------------------------------------------------------------------+
//|                                                  MyAppDialog.mqh |
//|                        Copyright 2018, MetaQuotes Software Corp. |
//|                                              http://www.mql5.com |
//+------------------------------------------------------------------+
#property copyright "Copyright 2018, MetaQuotes Software Corp."
#property link      "http://www.mql5.com"
#property version   "1.00"
#property description "CAppDialogから継承するCMyAppDialogクラス"
#property description "背景の色とヘッダーを設定するメソッドを追加"
#include <Controls\Dialog.mqh>
//+------------------------------------------------------------------+
//| Class CLivePanelTwoButtons                                       |
//| Usage: main dialog of the Controls application                   |
//+------------------------------------------------------------------+
class CMyAppDialog : public CAppDialog
  {
public:
   void              ColorBackground(const color clr);
   color             ColorCaption(void);
   void              ColorCaption(const color clr);
// --- コンストラクタとデストラクタ
public:
                     CMyAppDialog(void){};
                    ~CMyAppDialog(void){};
  };
//+------------------------------------------------------------------+
// | 背景色を設定する                                                  |
//+------------------------------------------------------------------+
void CMyAppDialog::ColorBackground(const color clr)
  {
   string prefix=Name();
   int total=ControlsTotal();
   for(int i=0;i<total;i++)
     {
      CWnd*obj=Control(i);
      string name=obj.Name();
      //---
      if(name==prefix+"Client")
        {
         CWndClient *wndclient=(CWndClient*) obj;
         wndclient.ColorBackground(clr);
         ChartRedraw();
         return;
        }
     }
//---
  }
//+------------------------------------------------------------------+
// | ヘッダーの色を設定する                                             |
//+------------------------------------------------------------------+
void CMyAppDialog::ColorCaption(const color clr)
  {
   string prefix=Name();
   int total=ControlsTotal();
   for(int i=0;i<total;i++)
     {
      CWnd*obj=Control(i);
      string name=obj.Name();
      //---
      if(name==prefix+"Caption")
        {
         CEdit *edit=(CEdit*) obj;
         edit.ColorBackground(clr);
         ChartRedraw();
         return;
        }
     }
//---
  }
//+------------------------------------------------------------------+
// | ヘッダーの色を取得する                                             |
//+------------------------------------------------------------------+
color CMyAppDialog::ColorCaption(void)
  {
   string prefix=Name();
   int total=ControlsTotal();
   color clr=clrNONE;
   for(int i=0;i<total;i++)
     {
      CWnd*obj=Control(i);
      string name=obj.Name();
      //---
      if(name==prefix+"Caption")
        {
         CEdit *edit=(CEdit*) obj;
         clr=edit.ColorBackground(clr);
         return clr;
        }
     }
// --- 色を返す
   return clr;
  }
//+------------------------------------------------------------------+
"MyAppWindow.mq5" - 実行ファイル。このファイルでは、XRGBマクロとGETRGBマクロが色を生成するように宣言されています。OnInitでは、パネルが作成され、ボタンが追加され、パネル自体が起動します。
//+------------------------------------------------------------------+
//|                                                  MyAppWindow.mq5 |
//|                        Copyright 2018, MetaQuotes Software Corp. |
//|                                              http://www.mql5.com |
//+------------------------------------------------------------------+
#property copyright "Copyright 2018, MetaQuotes Software Corp."
#property link      "http://www.mql5.com"
#property version   "1.00"
#property description "CMyAppDialogクラスに基づくMyAppWindowアプリケーション"
#property description "背景の色とヘッダーを設定するボタンを追加する"
#include "MyAppDialog.mqh"
#include <Controls\Button.mqh>
// --- 色を扱うマクロ
#define XRGB(r,g,b)    (0xFF000000|(uchar(r)<<16)|(uchar(g)<<8)|uchar(b))
#define GETRGB(clr)    ((clr)&0xFFFFFF)
//+------------------------------------------------------------------+
//| defines                                                          |
//+------------------------------------------------------------------+
//--- indents and gaps
#define INDENT_LEFT                         (11)      // indent from left (with allowance for border width)
#define INDENT_TOP                          (11)      // indent from top (with allowance for border width)
#define CONTROLS_GAP_X                      (5)       // gap by X coordinate
//--- for buttons
#define BUTTON_WIDTH                        (100)     // size by X coordinate
#define BUTTON_HEIGHT                       (20)      // size by Y coordinate
//---
CMyAppDialog         AppWindow;
CButton              m_button1;                       // the button object
CButton              m_button2;                       // the button object
//+------------------------------------------------------------------+
//| Expert initialization function                                   |
//+------------------------------------------------------------------+
int OnInit()
  {
//--- create application dialog
   if(!AppWindow.Create(0,"CMyAppDialog: change Back and Caption colors",0,40,40,380,344))
      return(INIT_FAILED);
//--- create dependent controls
   if(!CreateBackButton())
      return(false);
   if(!CreateCaptionButton())
      return(false);
//--- run application
   AppWindow.Run();
//--- succeed
   return(INIT_SUCCEEDED);
  }
//+------------------------------------------------------------------+
//| Expert deinitialization function                                 |
//+------------------------------------------------------------------+
void OnDeinit(const int reason)
  {
//---
   Comment("");
//--- destroy dialog
   AppWindow.Destroy(reason);
  }
//+------------------------------------------------------------------+
//| Expert chart event function                                      |
//+------------------------------------------------------------------+
void OnChartEvent(const int id,         // event ID
                  const long& lparam,   // event parameter of the long type
                  const double& dparam, // event parameter of the double type
                  const string& sparam) // event parameter of the string type
  {
// --- 最初にボタンイベントを処理します
   if((StringFind(sparam,"Back")!=-1) && id==(CHARTEVENT_OBJECT_CLICK))
     {
      Print(__FUNCSIG__," sparam=",sparam);
      AppWindow.ColorBackground(GetRandomColor());
     }
   if((StringFind(sparam,"Caption")!=-1) && id==(CHARTEVENT_OBJECT_CLICK))
     {
      Print(__FUNCSIG__," sparam=",sparam);
      AppWindow.ColorCaption(GetRandomColor());
     }
// --- 残りのイベントはCMyAppDialogクラスのメソッドを処理します
   AppWindow.ChartEvent(id,lparam,dparam,sparam);
  }
//+------------------------------------------------------------------+
//| Create the "Button1" button                                      |
//+------------------------------------------------------------------+
bool CreateBackButton(void)
  {
//--- coordinates
   int x1=INDENT_LEFT;        // x1            = 11  pixels
   int y1=INDENT_TOP;         // y1            = 11  pixels
   int x2=x1+BUTTON_WIDTH;    // x2 = 11 + 100 = 111 pixels
   int y2=y1+BUTTON_HEIGHT;   // y2 = 11 + 20  = 32  pixels
//--- create
   if(!m_button1.Create(0,"Back",0,x1,y1,x2,y2))
      return(false);
   if(!m_button1.Text("Back"))
      return(false);
   if(!AppWindow.Add(m_button1))
      return(false);
//--- succeed
   return(true);
  }
//+------------------------------------------------------------------+
//| Create the "Button2"                                             |
//+------------------------------------------------------------------+
bool CreateCaptionButton(void)
  {
//--- coordinates
   int x1=INDENT_LEFT+2*(BUTTON_WIDTH+CONTROLS_GAP_X);   // x1 = 11  + 2 * (100 + 5) = 221 pixels
   int y1=INDENT_TOP;                                    // y1                       = 11  pixels
   int x2=x1+BUTTON_WIDTH;                               // x2 = 221 + 100           = 321 pixels
   int y2=y1+BUTTON_HEIGHT;                              // y2 = 11  + 20            = 31  pixels
//--- create
   if(!m_button2.Create(0,"Caption",0,x1,y1,x2,y2))
      return(false);
   if(!m_button2.Text("Caption"))
      return(false);
   if(!AppWindow.Add(m_button2))
      return(false);
//--- succeed
   return(true);
  }
//+------------------------------------------------------------------+
// | ランダムに色を取得する                                             |
//+------------------------------------------------------------------+
color GetRandomColor()
  {
   color clr=(color)GETRGB(XRGB(rand()%255,rand()%255,rand()%255));
   return clr;
  }
//+------------------------------------------------------------------+
メインファイルには、OnChartEventイベントハンドラもあります。これは確かにすべてのイベントをパネルに送りますが、しかしいずれかのボタンでクリックイベントが検出された場合(CHARTEVENT_OBJECT_CLICK)パネルクラスメソッドを呼び出します(AppWindow.ColorBackgroundまたはAppWindow.ColorCaption)。
パネルクラスが含まれているmq5とmqhの2つのファイルから成る結びが動作します。
CWndClientからの継承
この例では、CWndClientからの継承を分析し、"CWndClient"クラスのオブジェクトを作成します。このオブジェクトには、次のような機能が含まれます。
- "CMyWndClient"オブジェクトの作成 - パネルのクライアント領域。
- クライアント領域に2つのボタンを追加するオブジェクトを作成します。
- 追加されたボタンのクリックハンドラ(クライアント領域の背景色とパネルタイトルの色を変更します)。
- さらに、クライアント領域に水平スクロールが置かれる(CWndClientクラスは複合コントロールの "クライアント領域"であり、スクロールバー領域を作成するための基本クラスであることを覚えていると思います)。
- したがって、水平スクロール(クライアント領域に追加されたボタンを移動する)のクリックハンドラもあります。
MyWndClient.mq5とMyWndClient.mqhファイルを詳しく見てみましょう。
標準ライブラリ(\\ MQL5 \\ Experts \\ Examples \\ Controls \\と\\ MQL5 \\ Indicators \\ Examples \\ Panels \\ SimplePanel \\)の例との違いは、添付ファイル内にCWndClient 10クラスから継承したクラスがあることです。パネル作成の全サイクルは次のようになります。
- パネルが作成されます(CAppDialogクラスのAppWindowオブジェクトはCreateメソッドを呼び出します)。
- クライアント領域が作成されます(CMyWndClientクラスのClientAreaオブジェクトはプラグインファイルMyWndClient.mqhからCreateメソッドを呼び出します)。
- 作成されたクライアント領域がパネルに追加されます(実際には、パネルのクライアント領域の上にあります)。
CAppDialog           AppWindow;
CMyWndClient         ClientArea;
//+------------------------------------------------------------------+
//| Expert initialization function                                   |
//+------------------------------------------------------------------+
int OnInit()
  {
//--- create application dialog
   bool result_create=false;
   if(!InpTwoButtonsVisible)
     {
      //--- after creation of the panel, one button will be visible
      result_create=AppWindow.Create(0,"CAppDialog with CMyWndClient",0,40,40,360,344);
     }
   else
     {
      //--- after creation of the panel, will two buttons are visible
      result_create=AppWindow.Create(0,"CAppDialog with CMyWndClient",0,40,40,420,344);
     }
   if(!result_create)
      return(INIT_FAILED);
//--- create the panel
   PrintFormat("Application Rect: Height=%d  Width=%d",AppWindow.Rect().Height(),AppWindow.Rect().Width());
   CRect inner_rect=ClientArea.GetClientRect(GetPointer(AppWindow));
   PrintFormat("Client Area: Height=%d  Width=%d",inner_rect.Height(),inner_rect.Width());
   ClientArea.Create(0,"MyWndClient",0,0,0,inner_rect.Width(),inner_rect.Height());
   AppWindow.Add(ClientArea);
// --- オーナーをインストールする
   ClientArea.SetOwner(GetPointer(AppWindow));
// --- 不可視を隠す
   ClientArea.HideInvisble(HideInvisble);
//--- run application
   AppWindow.Run();
//--- succeed
   return(INIT_SUCCEEDED);
  }
実行可能ファイルには2つの入力パラメータがあります。
- パネルの幅 ー 通常の幅または幅広のパネルを作成する。
- 不可視を隠す ー 非表示のコントロール要素を表示または非表示にします。
パネルを作成する場合、入力パラメータはパネルの幅"の1つのみ考慮されます。これは、通常の幅のパネルを作成する方法です。
//+------------------------------------------------------------------+
//| Expert initialization function                                   |
//+------------------------------------------------------------------+
int OnInit()
  {
//--- create application dialog
   bool result_create=false;
   if(!InpTwoButtonsVisible)
     {
      //--- after creation of the panel, one button will be visible
      result_create=AppWindow.Create(0,"CAppDialog with CMyWndClient",0,40,40,360,344);
     }
   else
     {
      //--- after creation of the panel, will two buttons are visible
      result_create=AppWindow.Create(0,"CAppDialog with CMyWndClient",0,40,40,420,344);
     }
   if(!result_create)
      return(INIT_FAILED);
//--- create the panel

そして、幅広のパネルです
。
//+------------------------------------------------------------------+
//| Expert initialization function                                   |
//+------------------------------------------------------------------+
int OnInit()
  {
//--- create application dialog
   bool result_create=false;
   if(!InpTwoButtonsVisible)
     {
      //--- after creation of the panel, one button will be visible
      result_create=AppWindow.Create(0,"CAppDialog with CMyWndClient",0,40,40,360,344);
     }
   else
     {
      //--- after creation of the panel, will two buttons are visible
      result_create=AppWindow.Create(0,"CAppDialog with CMyWndClient",0,40,40,420,344);
     }
   if(!result_create)
      return(INIT_FAILED);
//--- create the panel

パネル作成コードは、指定した幅のみ異なります(360と420)、2つのボタンを作成する場合、この幅は考慮されません。次の2枚の画像を比較してみてください。次にこれらを入れ替えてみてください。

"Caption"ボタンは、通常の幅のパネルの境界線の外側にあります。クライアント領域の境界を超えていることがわかります。コントロール要素が境界を超えて追加されると、これはユーザーから強制的に隠されます(ただし、削除または破棄はされません)。コントロール要素を非表示にするかどうかを判断する手順は、コントロール要素がクライアント領域に追加されたときにWndContainer ::Addメソッドの呼び出し時に実行されます。この例ではAddButton2でAddメソッドが呼び出されます。
//+------------------------------------------------------------------+
//| Create the "Button2"                                             |
//+------------------------------------------------------------------+
bool CMyWndClient::AddButton2(void)
  {
...
   if(!Add(m_button2))
     {
      Print("Add(m_button2) --> false");
      return(false);
     }
//--- succeed
   return(true);
  }
//+------------------------------------------------------------------+
//| Add control to the group (by reference)                          |
//+------------------------------------------------------------------+
bool CWndContainer::Add(CWnd &control)
  {
//--- add by pointer
   return(Add((CWnd*)GetPointer(control)));
  }
一貫して最も重要なものとして、コントロール要素を非表示にするかどうかをここで決定します
//+------------------------------------------------------------------+
//| Add control to the group (by pointer)                            |
//+------------------------------------------------------------------+
bool CWndContainer::Add(CWnd *control)
  {
//--- check of pointer
   if(control==NULL)
      return(false);
//--- correct the coordinates of added control
   control.Shift(Left(),Top());
 //--- "projecting" the group flag "visibility" to the added element
   if(IS_VISIBLE && control.IsVisible())
     {
      //--- element will be "visible" only if the group is "visible" and the element is completely "within" this group
      control.Visible(Contains(control));
     }
   else
      control.Hide();
//--- "projecting" the group flag "enabled" to the added element
   if(IS_ENABLED)
      control.Enable();
   else
      control.Disable();
//--- adding
   return(m_controls.Add(control));
  }
オブジェクトの可視性の設定は、コントロール要素がクライアント領域に追加されたときにのみ作成されます。これは、パネルを折りたたんで展開した後にわかる欠点です。
例えば、両方の入力パラメータを "false"に設定し、パネルを折りたたんで展開します。その結果、パネルを作成した後、"Caption"ボタンが作成されますが、ボタンはクライアント領域外にあるためクライアント領域への追加時に隠れる為、視覚的に見えません。しかし、パネルが折り畳まれ展開された後、追加された要素の可視性はチェックされなくなるので、Captionボタンが表示されます。

このファイルには、クライアント領域のCWndClientクラスの継承クラスがあります。このファイルにはすべての機能が含まれています。
- クライアント領域を作成。
- コントロール要素の作成と追加。
- パネル展開イベントの処理。
- 水平スクロールバーのクリックイベントの処理。
- ボタンクリックのイベントの処理(クライアント領域の背景色とヘッダーの色を変更する)。
パネルクラスはCWndClientクラスから継承されているため、CWndClientクラスは結合コントロール要素"クライアント領域"を提供し、スクロールバーで領域を作成する基本クラスでもあるため、クライアント領域で水平スクロールバーをオンにします。
//+------------------------------------------------------------------+
// | パネルの作成                                                      |
//+------------------------------------------------------------------+
bool CMyWndClient::Create(const long chart,const string name,const int subwin,const int x1,const int y1,const int x2,const int y2)
  {
//---
   if(!CWndClient::Create(chart,name,subwin,x1,y1,x2,y2))
      return(false);
//--- enable horizontal scrollbar
   if(!HScrolled(true))
      return(false);
   m_scroll_h.MaxPos(5);
   m_scroll_h.CurrPos(5);
   Print("CurrPos: ",m_scroll_h.CurrPos());
   if(!AddButton1())
スクロールを移動することができたので、グラデーションの数を設定します(最大位置値、そしてすぐにスクロールを右端に移す)。
水平スクロールは、パネル展開イベントを捕捉するためにも使用されます。この目的のために、m_scroll_hオブジェクトの為のON_SHOWイベントを「捕捉」し、OnShowScrollHハンドラを呼び出します。
//+------------------------------------------------------------------+
//| Event Handling                                                   |
//+------------------------------------------------------------------+
EVENT_MAP_BEGIN(CMyWndClient)
ON_EVENT(ON_CLICK,m_button1,OnClickButton1)
ON_EVENT(ON_CLICK,m_button2,OnClickButton2)
ON_EVENT(ON_SHOW,m_scroll_h,OnShowScrollH)
EVENT_MAP_END(CWndClient)
EVENT_MAP_BEGINは"Events"や"Macro of event handling map"ブロック("Defines.mqh"ファイル)から書かれているOnEventメソッドのようなものではありません(詳細については、任意の複雑さのレベルのグラフィカルなパネルを作成する方法の記事をご参照ください)。
OnShowScrollHハンドラ内で内部フラグm_hide_invisbleの値をチェックし (このフラグはCMyWndClient :: HideInvisbleメソッドを介して、MyWndClient.mq5ファイルの入力変数 "不可視を隠す"の値を受け取ります)、要素を非表示にする必要がない場合は終了します。
//+------------------------------------------------------------------+
// | ボタンを隠す/表示するスクロールが出現しました                         |
//+------------------------------------------------------------------+
void CMyWndClient::OnShowScrollH(void)
  {
   if(!m_hide_invisble)
      return;
   int total=CWndClient::ControlsTotal();
   for(int i=0;i<total;i++)
     {
      CWnd*obj=Control(i);
      string name=obj.Name();
      //---
      if(StringFind(name,"Button")!=-1)
        {
         CButton *button=(CButton*)obj;
         button.Visible(Contains(GetPointer(button)));
         ChartRedraw();
        }
     }
  }
目に見えない要素を隠したい場合は、クライアント領域のすべてのオブジェクトのサイクルで、名前が「Button」であるオブジェクトを検索し、 強制的に可視性のチェック/割り当てをします。
水平スクロールをクリックすると、クライアント領域に追加された2つのボタンを移動できます。これを行うには、OnScrollLineRightとOnScrollLineLeftのハンドラ(水平スクロールのボタンをクリックするためのハンドラ)をオーバーライドします。。水平スクロールの右ボタンをクリックした場合は、ボタン(ShiftButtonメソッド)を一歩m_scroll_sizeに移動します。左ボタンをクリックした場合は、ボタンをステップ"-m_scroll_size"へ一歩移動します。つまり、負のオフセットを設定します。
//+------------------------------------------------------------------+
//| Event handler                                                    |
//+------------------------------------------------------------------+
bool CMyWndClient::OnScrollLineRight(void)
  {
   Print(__FUNCTION__);
   ShiftButton(GetPointer(m_button1),m_scroll_size);
   ShiftButton(GetPointer(m_button2),m_scroll_size);
   return(true);
  }
//+------------------------------------------------------------------+
//| Event handler                                                    |
//+------------------------------------------------------------------+
bool CMyWndClient::OnScrollLineLeft(void)
  {
   Print(__FUNCTION__);
   ShiftButton(GetPointer(m_button1),-m_scroll_size);
   ShiftButton(GetPointer(m_button2),-m_scroll_size);
   return(true);
  }
CMyWndClient :: ShiftButtonメソッドでは、ボタンの座標を持つオブジェクトを取得し、座標シフトを設定し、ボタンを移動し、ボタンの表示/非表示を強制的にチェックします。
//+------------------------------------------------------------------+
// | 左または右にシフト(Shiftに応じて)                                 |
//+------------------------------------------------------------------+
bool CMyWndClient::ShiftButton(CButton *button,const int shift)
  {
   Print(__FUNCTION__);
// --- ボタンを移動する
   CRect rect=button.Rect();
   rect.Move(rect.left+shift,rect.top);
   button.Move(rect.left,rect.top);
   button.Visible(Contains(GetPointer(button)));
   return(true);
  }
このようになります(「見えないものを隠す」オプションがtrueに設定されていることを忘れないでください)。

新しいプロジェクトどのようにパネルの研究に役立つか?
何かを書くためには、コードを学ぶ必要があります。パネルを作成する場合、クラスの学習には非常に時間がかかる場合があります。これは主に、クラス構造の視覚的表現がないためです。また、標準ライブラリのどのクラスがパネルを作成するのかを理解するのは非常に難しいです。
幸いにも、MetaEditorでずっと前に新しいプロジェクトが提供されています。
このプロジェクトは、拡張子 "MQPROJ"を持つ別個のファイルであり、プログラム設定、コンパイルパラメータ、および使用されるすべてのファイルに関する情報を格納します。プロジェクトを便利に使用するために、ナビゲータに別のタブが用意されています。これは、リソース、ヘッダなどを含む使用されるすべてのファイルをカテゴリーごとに表示します。
別に作成されたタブの説明を見てください。『これは、リソース、ヘッダなどを含む使用されるすべてのファイルをカテゴリーごとに表示します。』!まさにこれは私たちが必要とするものです!
最後の "Live panel and button Clicks.mq5"ファイルからプロジェクトを作成してみましょう。これを行うには、"Live panel and button Clicks.mq5ファイルを右クリックし、ドロップダウンメニューで「ソースファイルから新規プロジェクト」という項目を選択します。

その結果、新しいプロジェクトが作成され、「ナビゲータ」ウィンドウに「プロジェクト」タブが開き、使用されているすべてのファイルが表示されます。

また "Wnd.mqh"(CWndクラス)、"Dialog.mqh(CDialogクラスとCAppDialogクラス)、Button.mhq(CButtonクラス)です。このタブから、必要なクラスに行くのが便利です。MetaEditorエディタのタブからいくよりもこの方がはるかに便利です。たとえば、私は様々なファイルからの小さな "動物園"を持っています。たとえば、ここからDialog.mqhへのタブからの検索で問題があるとします。

まとめ
この記事では、パネルコントロールの「背景色」、「フレームカラー」、および「ヘッダーカラー」のプロパティにアクセスする非常に珍しい方法を紹介しました。個人的には、私は以前にこういったものは見ませんでした。すべてのパネル要素は親クラスCWndから継承されているため、作成されるパネルのクラスであるオブジェクトはすべてのコントロール要素のコンテナとなっています。つまり、すべてのコントロール要素をサイクルで繰り返すことで、必要なプロパティを取得/設定できます。
| ファイル名 | コメント |
|---|---|
| Live panel.mq5 | 追加されたコントロール要素のないパネル。移動時に透明になる |
| Live panel and Button.mq5 | ボタンが追加されたパネル。パネル移動時に透明になるが、ボタンはそのままの色が残る |
| Live panel and transparent Button.mq5 | ボタンが追加されたパネル。移動時に、パネルとボタンの両方が透明になる |
| Live panel and button Clicks.mq5 | 2つのボタンを持つパネル。ボタンのクリックを処理する:パネルとタイトルの背景色を生成する |
| MyAppWindow.mq5とMyAppDialog.mqh | CAppDialogからの継承によるパネル作成の例 |
| MyWndClient.mq5とMyWndClient.mqh | CWndClientから継承してパネルを作成する例 - クライアント領域のクラスから |
MetaQuotes Ltdによってロシア語から翻訳されました。
元の記事: https://www.mql5.com/ru/articles/4575
警告: これらの資料についてのすべての権利はMetaQuotes Ltd.が保有しています。これらの資料の全部または一部の複製や再プリントは禁じられています。
この記事はサイトのユーザーによって執筆されたものであり、著者の個人的な見解を反映しています。MetaQuotes Ltdは、提示された情報の正確性や、記載されているソリューション、戦略、または推奨事項の使用によって生じたいかなる結果についても責任を負いません。
 任意のインジケータの計算部分をEAのコードに転送する方法
 チャート上で選択したシグナルの取引を分析する方法
 マルチモジュールEAの作成
 選択した基準による最適化結果の可視化
- 無料取引アプリ
- 8千を超えるシグナルをコピー
- 金融ニュースで金融マーケットを探索
こんにちは、ウラジミール。あなたはウィンドウに追加のClientAreaを追加しました。そして、CMyWndClient::ShiftButtonメソッドを使ってボタンをスクロールしています。これはあまり便利ではありません。また、ボタン以外にも多くのUI要素が存在します。つまり、各要素のメソッドを書いて、スクロール・ハンドラで呼び出すのを忘れないようにするのは大変なことなのだ。それなら、ClientAreaを スクロールする方が簡単ではないだろうか?そうすれば、そこに含まれるすべてのUI要素が自動的にスクロールされる。ハンドラでClientAreaのスクロールだけを 指定すればいいのだ。
こんにちは、ウラジミール。あなたはウィンドウに追加のClientAreaを追加しました。そして、CMyWndClient::ShiftButtonメソッドを使ってボタンをスクロールしています。これはあまり便利ではありません。また、ボタン以外にも多くのUI要素が存在します。つまり、要素ごとにメソッドを書いて、スクロール・ハンドラでそれを忘れずに呼び出すのは大変なことなのだ。それなら、ClientAreaを スクロールする方が簡単ではないだろうか?そうすれば、そこに含まれるすべてのUI要素が自動的にスクロールされる。ハンドラでClientAreaのスクロールだけを 指定すればいいのだ。
そのような例を書いてください。誰もがそのような実装に興味を持つと思います。
そのような例を書いてください。誰もがそのような実装に興味を持つと思います。
少し考えてわかった。チャート・オブジェクト(この場合は ClientAreaと ボタン)の部分的な非表示が不可能なので、このようなスクロールは実装できない。他のUIでは実装方法が異なる。他のUIでは、スクロール 範囲に入る矩形領域が表示され、それ以外はすべて非表示になる。だから混乱するのだ。