
How to create a graphical panel of any complexity level

Table of Contents
- Introduction
- Creating a panel base on CAppDialog
- What AppWindow can do
- The structure of the CAppDialog object
- The scheme of the inheritance of objects
- Where to find the main constants for creating objects and how to redefine them using #undef
- How to add new controls: two buttons
- How nested controls are moved and drawn
- Adding CAppDialog to the group of controls via CDialog
- How to override the behavior of standard controls
- How to read built-in macros of event processing type
- Create your own panel — it's easy!
Introduction
Even now most programmers, who develop indicators and Expert Advisors for the MetaTrader 5 platform, do not use the available graphical interface creation capabilities in their applications. I believe this is because Panels and Dialogs classes of the Standard Library only provide a brief technical description of methods. The language reference provides code examples with comments for many graphical controls. But you cannot start creating your own panels without a complete understanding of their structure and idea.
I tried to understand how the panels are arranged. Now, I want to share the obtained knowledge with other developers. I started with a simple application, which creates a graphical panel based on the CAppDialog class. Then I modified it in steps and analyzed results obtained.
The article provides all the necessary details of the CAppDialog class operation: how to create a panel, what minimum required set of functions is needed, and how to add additional elements (such as buttons). We will analyze the objects the panel consists of, and the order they should be created in. I will also show what constants are used in the creation of a panel and how to change them.
Creating a panel base on CAppDialog
We'll begin with some background information.
CAppDialog is a class of the combined "Application Dialog" control. The CAppDialog class visually unites groups of functionally connected dissimilar elements within one MQL5 application.
The minimum code, which creates a panel, is shown below:
//+------------------------------------------------------------------+
//|                                              LearnCAppDialog.mq5 |
//|                        Copyright 2018, MetaQuotes Software Corp. |
//|                                             https://www.mql5.com |
//+------------------------------------------------------------------+
#property copyright "Copyright 2018, MetaQuotes Software Corp."
#property link      "https://www.mql5.com"
#property version   "1.00"
#include <Controls\Dialog.mqh>

CAppDialog AppWindow;
//+------------------------------------------------------------------+
//| Expert initialization function                                   |
//+------------------------------------------------------------------+
int OnInit()
  {
//--- create application dialog
   if(!AppWindow.Create(0,"AppWindow",0,20,20,360,324))
      return(INIT_FAILED);
//--- run application
   AppWindow.Run();
//--- succeed
   return(INIT_SUCCEEDED);
  }
//+------------------------------------------------------------------+
//| Expert deinitialization function                                 |
//+------------------------------------------------------------------+
void OnDeinit(const int reason)
  {
//--- destroy dialog
   AppWindow.Destroy(reason);
  }
//+------------------------------------------------------------------+
//| Expert chart event function                                      |
//+------------------------------------------------------------------+
void OnChartEvent(const int id,         // event ID
                  const long& lparam,   // event parameter of the long type
                  const double& dparam, // event parameter of the double type
                  const string& sparam) // event parameter of the string type
  {
   AppWindow.ChartEvent(id,lparam,dparam,sparam);
  }
//+------------------------------------------------------------------+
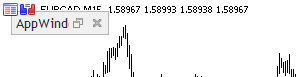
The result of execution of the LearnCAppDialog.mq5 Expert Advisor is the created control panel:

The LearnCAppDialog.mq5 Expert Advisor contains a minimum set of commands required for creating a panel and for its operation. Take the following steps:
- Declaring an instance of the CAppDialog class at the global program level:
#include <Controls\Dialog.mqh>

CAppDialog AppWindow;
//+------------------------------------------------------------------+
//| Expert initialization function                                   |
//+------------------------------------------------------------------+
- Creating the AppWindow panel and launching the panel:
int OnInit()
  {
//--- create application dialog
   if(!AppWindow.Create(0,"AppWindow",0,20,20,360,324))
      return(INIT_FAILED);
//--- run application
   AppWindow.Run();
//--- succeed
   return(INIT_SUCCEEDED);
  }
- Passing ChartEvent events to the AppWindow panel :
//+------------------------------------------------------------------+
//| Expert chart event function                                      |
//+------------------------------------------------------------------+
void OnChartEvent(const int id,         // event ID
                  const long& lparam,   // event parameter of the long type
                  const double& dparam, // event parameter of the double type
                  const string& sparam) // event parameter of the string type
  {
   AppWindow.ChartEvent(id,lparam,dparam,sparam);
  }
And the last extremely important step:
- Destroying a control by calling the Destroy method
void OnDeinit(const int reason)
  {
//--- destroy dialog
   AppWindow.Destroy(reason);
  }
If we do not provide panel destroying, then each change of a timeframe or symbol will lead to addition of new elements on top of existing ones.
What AppWindow can do
A CAppDialog based panel can theoretically process the following events:
//+------------------------------------------------------------------+
//| Events                                                           |
//+------------------------------------------------------------------+
#define ON_CLICK                (0)   // clicking on control event
#define ON_DBL_CLICK            (1)   // double clicking on control event
#define ON_SHOW                 (2)   // showing control event
#define ON_HIDE                 (3)   // hiding control event
#define ON_CHANGE               (4)   // changing control event
#define ON_START_EDIT           (5)   // start of editing event
#define ON_END_EDIT             (6)   // end of editing event
#define ON_SCROLL_INC           (7)   // increment of scrollbar event
#define ON_SCROLL_DEC           (8)   // decrement of scrollbar event
#define ON_MOUSE_FOCUS_SET      (9)   // the "mouse cursor entered the control" event
#define ON_MOUSE_FOCUS_KILL     (10)  // the "mouse cursor exited the control" event
#define ON_DRAG_START           (11)  // the "control dragging start" event
#define ON_DRAG_PROCESS         (12)  // the "control is being dragged" event
#define ON_DRAG_END             (13)  // the "control dragging end" event
#define ON_BRING_TO_TOP         (14)  // the "mouse events priority increase" event
#define ON_APP_CLOSE            (100) // "closing the application" event
These events are included in the Events block of the file [data folder]\MQL5\Include\Controls\Defines.mqh. So, the events include a click, a double click, editing start and finish, getting focus, dragging (beginning, process and finish), panel showing and hiding. Examples of working with these events are provided in the examples of the Panels and Dialogs section. The ON_CHANGE event is handled in the CRadioGroup example, ON_SCROLL_INC and ON_SCROLL_DEC are handled in CScrollV.
The structure of the CAppDialog object
Launch the LearnCAppDialog.mq5 Expert Advisor on an empty chart, press Ctrl+B and click "All" to see all objects the panel consists of:
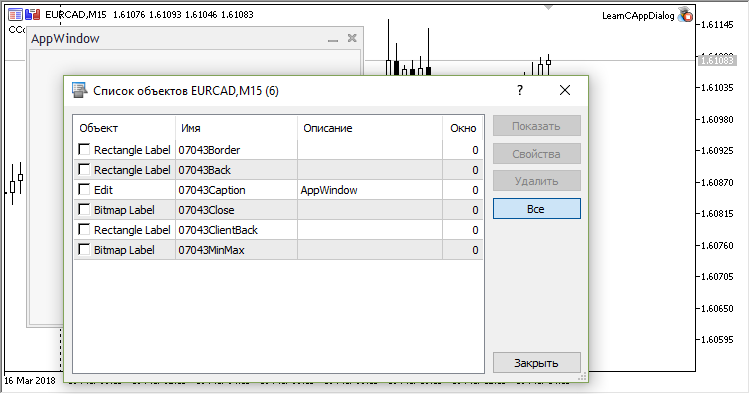
Objects from the Panels and Dialogs section of the Standard Library are created and applied in the following order. A "Border" object is created first, inside it the panel background is added as a "Back" object. Then the client area "ClientBack" is applied over the background. Child controls can be added inside the client area. The Caption object with the name of the panel and two control buttons are added to the upper part of the panel.

The process can be represented schematically to see the order of creation of these objects:
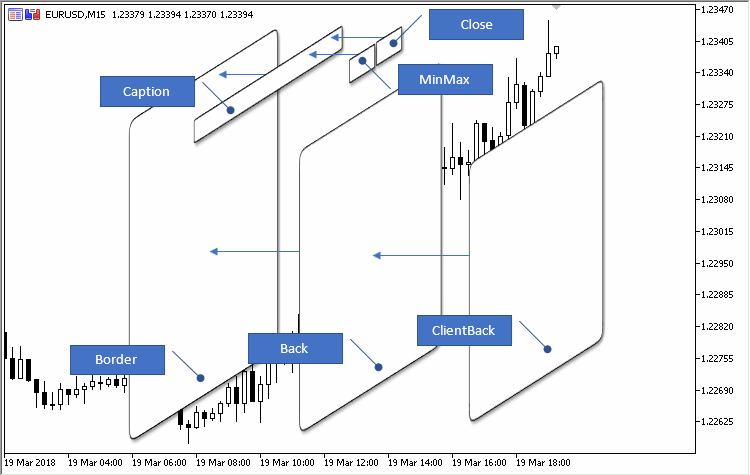
The Border object is OBJ_RECTANGLE_LABEL with the white border color set (default for all panels). So, the Border object is used for purely aesthetic purposes: it displays a white border, while the body of the Border object will be hidden behind the Back object.
The scheme of the inheritance of objects
It may seem that the Panels and Dialogs section has too many classes with extensive relations and inheritance structure. But the hierarchy is very simple. So, if you understand what CAppDialog consists of and how it is created, understanding other classes will also be easy. Here is the inheritance scheme of all classes from the Standard Library:
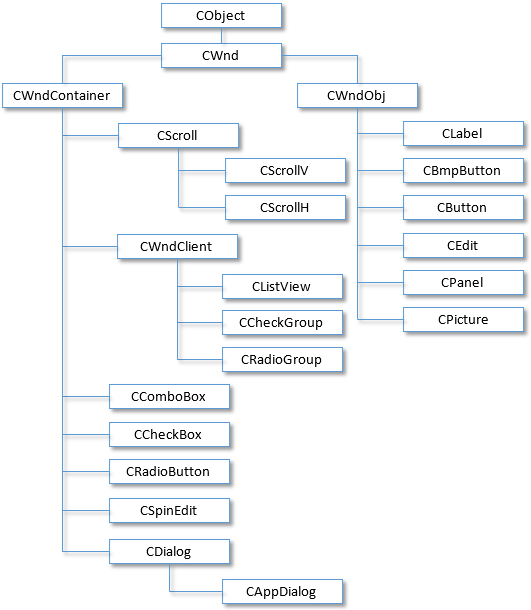
The AppWindow panel in the LearnCAppDialog.mq5 Expert Advisor consists of six objects, each of which performs its specific task.

A CAppDialog based panel can be created from an Expert Advisor or from an indicator. However, the creation of the panel may differ depending on the type of the program (Expert Advisor or indicator) which creates the panel and the subwindow the program is running in:
- If a program is an Expert Advisor (the type of the running program is PROGRAM_EXPERT), then the panel is ONLY created in the main window (the window index is "0") and only using the CAppDialog::CreateExpert method.
- If a program is an indicator (the type of the running program is PROGRAM_INDICATOR), then the number of the window, in which the program is running is checked:
- if it is the main window (the window number is 0), the panel is created using the CAppDialog::CreateIndicator method
- if it is a subwindow, the panel is created using the CAppDialog::CreateExpert method
The specific feature of the CAppDialog::CreateIndicator method is that the panel does the following automatically during creation:
- is adjusted to the window width
- adjusts the window height to fit the panel
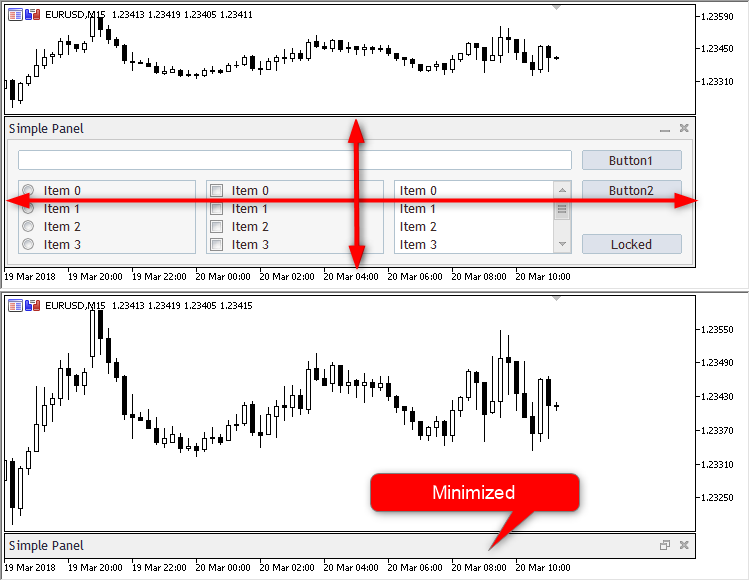
An example of the indicator panel [data folder]\MQL5\Indicators\Examples\Panels\SimplePanel\SimplePanel.mq5 after creation and minimizing:
CreateExpert creates a panel in the main window (the window number is 0) and implies that the program creating the panel is an Expert Advisor.
There is an exception to these rules: a panel can be created in the main window from an indicator. In this case the CreateIndicator method for panel creation will be applied.
Where to find the main constants for creating objects and how to redefine them using #undef
The code will be implemented in the AppWindowEditDefine.mq5 Expert Advisor.
The basic constants of the panel and its controls are located in the file [data folder]\MQL5\Include\Controls\Defines.mqh, which is connected in the CWnd class:
//+------------------------------------------------------------------+
//|                                                          Wnd.mqh |
//|                   Copyright 2009-2017, MetaQuotes Software Corp. |
//|                                              http://www.mql5.com |
//+------------------------------------------------------------------+
#include "Rect.mqh"
#include "Defines.mqh"
#include <Object.mqh>
class CDragWnd;
The hierarchy of inheritance is as follows:
- CWnd
- CWndContainer
- CDialog
- CAppDialog
We are especially interested in the following group of constants:
//+------------------------------------------------------------------+
//| Drawing styles and colors                                        |
//+------------------------------------------------------------------+
//--- common
#define CONTROLS_FONT_NAME                  "Trebuchet MS"
#define CONTROLS_FONT_SIZE                  (10)
//--- Text
#define CONTROLS_COLOR_TEXT                 C'0x3B,0x29,0x28'
#define CONTROLS_COLOR_TEXT_SEL             White
#define CONTROLS_COLOR_BG                   White
#define CONTROLS_COLOR_BG_SEL               C'0x33,0x99,0xFF'
//--- Button
#define CONTROLS_BUTTON_COLOR               C'0x3B,0x29,0x28'
#define CONTROLS_BUTTON_COLOR_BG            C'0xDD,0xE2,0xEB'
#define CONTROLS_BUTTON_COLOR_BORDER        C'0xB2,0xC3,0xCF'
//--- Label
#define CONTROLS_LABEL_COLOR                C'0x3B,0x29,0x28'
//--- Edit
#define CONTROLS_EDIT_COLOR                 C'0x3B,0x29,0x28'
#define CONTROLS_EDIT_COLOR_BG              White
#define CONTROLS_EDIT_COLOR_BORDER          C'0xB2,0xC3,0xCF'
//--- Scrolls
#define CONTROLS_SCROLL_COLOR_BG            C'0xEC,0xEC,0xEC'
#define CONTROLS_SCROLL_COLOR_BORDER        C'0xD3,0xD3,0xD3'
//--- Client
#define CONTROLS_CLIENT_COLOR_BG            C'0xDE,0xDE,0xDE'
#define CONTROLS_CLIENT_COLOR_BORDER        C'0x2C,0x2C,0x2C'
//--- ListView
#define CONTROLS_LISTITEM_COLOR_TEXT        C'0x3B,0x29,0x28'
#define CONTROLS_LISTITEM_COLOR_TEXT_SEL    White
#define CONTROLS_LISTITEM_COLOR_BG          White
#define CONTROLS_LISTITEM_COLOR_BG_SEL      C'0x33,0x99,0xFF'
#define CONTROLS_LIST_COLOR_BG              White
#define CONTROLS_LIST_COLOR_BORDER          C'0xB2,0xC3,0xCF'
//--- CheckGroup
#define CONTROLS_CHECKGROUP_COLOR_BG        C'0xF7,0xF7,0xF7'
#define CONTROLS_CHECKGROUP_COLOR_BORDER    C'0xB2,0xC3,0xCF'
//--- RadioGroup
#define CONTROLS_RADIOGROUP_COLOR_BG        C'0xF7,0xF7,0xF7'
#define CONTROLS_RADIOGROUP_COLOR_BORDER    C'0xB2,0xC3,0xCF'
//--- Dialog
#define CONTROLS_DIALOG_COLOR_BORDER_LIGHT  White
#define CONTROLS_DIALOG_COLOR_BORDER_DARK   C'0xB6,0xB6,0xB6'
#define CONTROLS_DIALOG_COLOR_BG            C'0xF0,0xF0,0xF0'
#define CONTROLS_DIALOG_COLOR_CAPTION_TEXT  C'0x28,0x29,0x3B'
#define CONTROLS_DIALOG_COLOR_CLIENT_BG     C'0xF7,0xF7,0xF7'
#define CONTROLS_DIALOG_COLOR_CLIENT_BORDER C'0xC8,0xC8,0xC8'
In order to change these macro substitutions, use the #undef directive:
The #undef directive is used for canceling a previously declared macro.
So, we have the following algorithm: cancel the previously declared macro; then re-declare the macro with a changed parameter. We should do the following trick for this: connect the Defines.mqh file BEFORE Dialog.mqh:
//+------------------------------------------------------------------+
//|                                          AppWindowEditDefine.mq5 |
//|                        Copyright 2018, MetaQuotes Software Corp. |
//|                                              http://www.mql5.com |
//+------------------------------------------------------------------+
#property copyright "Copyright 2018, MetaQuotes Software Corp."
#property link      "http://www.mql5.com"
#property version   "1.001"
#property description "Control Panels and Dialogs. Demonstration class CBmpButton"
#include <Controls\Defines.mqh>
cancel macros after connecting "Defines.mqh":
#undef CONTROLS_FONT_NAME
#undef CONTROLS_FONT_SIZE

#undef CONTROLS_BUTTON_COLOR
#undef CONTROLS_BUTTON_COLOR_BG
#undef CONTROLS_BUTTON_COLOR_BORDER

#undef CONTROLS_DIALOG_COLOR_BORDER_LIGHT
#undef CONTROLS_DIALOG_COLOR_BORDER_DARK
#undef CONTROLS_DIALOG_COLOR_BG
#undef CONTROLS_DIALOG_COLOR_CAPTION_TEXT
#undef CONTROLS_DIALOG_COLOR_CLIENT_BG
#undef CONTROLS_DIALOG_COLOR_CLIENT_BORDER
Write input parameters:
input string   font_name                  = "Trebuchet MS";
input int      font_size                  = 10;

input color    button_color               = C'0x3B,0x29,0x28';
input color    button_color_bg            = C'0xDD,0xE2,0xEB';
input color    button_color_border        = C'0xB2,0xC3,0xCF';

input color    dialog_color_border_light  = White;
input color    dialog_color_border_dark   = C'0xB6,0xB6,0xB6';
input color    dialog_color_bg            = C'0xF0,0xF0,0xF0';
input color    dialog_color_caption_text  = C'0x28,0x29,0x3B';
input color    dialog_color_client_bg     = C'0xF7,0xF7,0xF7';
input color    dialog_color_client_border = C'0xC8,0xC8,0xC8';
The most interesting part: we again declare macros, and this time we use input parameters for their values:
#define CONTROLS_FONT_NAME                font_name
#define CONTROLS_FONT_SIZE                font_size

#define CONTROLS_BUTTON_COLOR             button_color
#define CONTROLS_BUTTON_COLOR_BG          button_color_bg
#define CONTROLS_BUTTON_COLOR_BORDER      button_color_border

#define CONTROLS_DIALOG_COLOR_BORDER_LIGHT dialog_color_border_light
#define CONTROLS_DIALOG_COLOR_BORDER_DARK dialog_color_border_dark
#define CONTROLS_DIALOG_COLOR_BG          dialog_color_bg
#define CONTROLS_DIALOG_COLOR_CAPTION_TEXT dialog_color_caption_text
#define CONTROLS_DIALOG_COLOR_CLIENT_BG   dialog_color_client_bg
#define CONTROLS_DIALOG_COLOR_CLIENT_BORDER dialog_color_client_border

#include <Controls\Dialog.mqh>
#include <Controls\BmpButton.mqh>
Example:
Summing up CAppDialog
Our panel is the object of the CAppDialog class. It has inherited the ControlsTotal method (the number of controls in the container) from the CWndContainer class. Therefore we can go through all controls of the panel and apply some actions to them. These elements are declared in the private area of the parent CDialog class:
//+------------------------------------------------------------------+
//| Class CDialog                                                    |
//| Usage: base class to create dialog boxes                         |
//|             and indicator panels                                 |
//+------------------------------------------------------------------+
class CDialog : public CWndContainer
  {
private:
   //--- dependent controls
   CPanel            m_white_border;        // the "white border" object
   CPanel            m_background;          // the background object
   CEdit             m_caption;             // the window title object
   CBmpButton        m_button_close;        // the "Close" button object
   CWndClient        m_client_area;         // the client area object

protected:
The debugger allows seeing how these objects are created:
//+------------------------------------------------------------------+
//| Create a control                                                 |
//+------------------------------------------------------------------+
bool CDialog::Create(const long chart,const string name,const int subwin,const int x1,const int y1,const int x2,const int y2)
  {
//--- call method of parent class
   if(!CWndContainer::Create(chart,name,subwin,x1,y1,x2,y2))
      return(false);
//--- create dependent controls
   if(!m_panel_flag && !CreateWhiteBorder())
      return(false);
   if(!CreateBackground())
      return(false);
   if(!CreateCaption())
      return(false);
   if(!CreateButtonClose())
      return(false);
   if(!CreateClientArea())
      return(false);
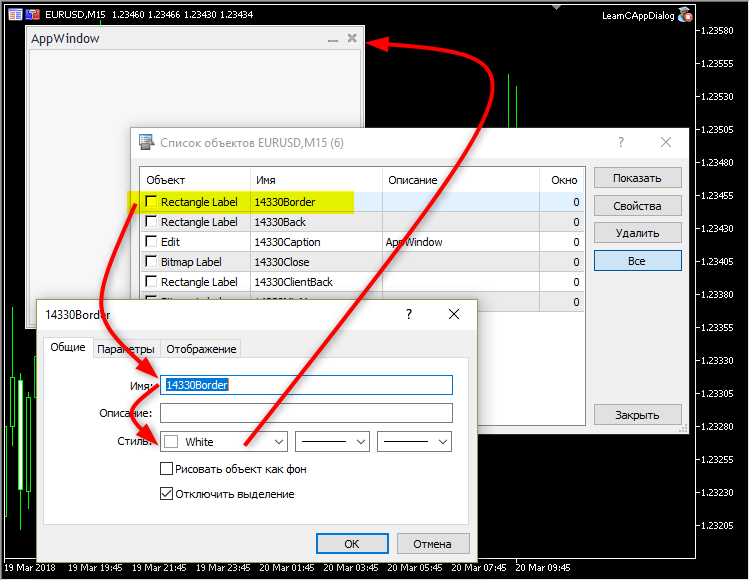
as well as how names are assigned to them: m_white_border -> "29437Border", m_background -> "29437Back", m_caption -> "29437Caption", m_button_close -> "29437Close", m_client_area -> "29437Client". In these names, the number of "29437" is the identifier of the panel for its lifetime.
Thus, we can change some properties of panel elements. For example, we can change the color of the m_client_area and m_background objects:
//+------------------------------------------------------------------+
//|                                            LearnCAppDialog_1.mq5 |
//|                        Copyright 2018, MetaQuotes Software Corp. |
//|                                             https://www.mql5.com |
//+------------------------------------------------------------------+
#property copyright "Copyright 2018, MetaQuotes Software Corp."
#property link      "https://www.mql5.com"
#property version   "1.00"
#include <Controls\Dialog.mqh>

CAppDialog AppWindow;
//+------------------------------------------------------------------+
//| Expert initialization function                                   |
//+------------------------------------------------------------------+
int OnInit()
  {
//--- create application dialog
   if(!AppWindow.Create(0,"AppWindow",0,20,20,360,324))
      return(INIT_FAILED);
//---
   int total=AppWindow.ControlsTotal();
   CWndClient*myclient;
   for(int i=0;i<total;i++)
     {
      CWnd*obj=AppWindow.Control(i);
      string name=obj.Name();
      PrintFormat("%d is %s",i,name);
      //--- color
      if(StringFind(name,"Client")>0)
        {
         CWndClient *client=(CWndClient*)obj;
         client.ColorBackground(clrRed);
         myclient=client;
         Print("client.ColorBackground(clrRed);");
         ChartRedraw();
        }
      //---
      if(StringFind(name,"Back")>0)
        {
         CPanel *panel=(CPanel*) obj;
         panel.ColorBackground(clrGreen);
         Print("panel.ColorBackground(clrGreen);");
         ChartRedraw();
        }
     }
   AppWindow.Delete(myclient);
//--- run application
   AppWindow.Run();
//--- succeed
   return(INIT_SUCCEEDED);
  }
//+------------------------------------------------------------------+
//| Expert deinitialization function                                 |
//+------------------------------------------------------------------+
void OnDeinit(const int reason)
  {
//--- destroy dialog
   AppWindow.Destroy(reason);
  }
//+------------------------------------------------------------------+
//| Expert chart event function                                      |
//+------------------------------------------------------------------+
void OnChartEvent(const int id,         // event ID
                  const long& lparam,   // event parameter of the long type
                  const double& dparam, // event parameter of the double type
                  const string& sparam) // event parameter of the string type
  {
   AppWindow.ChartEvent(id,lparam,dparam,sparam);
  }
//+------------------------------------------------------------------+
Pay attention to the line: it contains the call of the CWndContainer::Delete method, which deletes an element from the group (container). After the m_client_area element is deleted from the group, an appropriate command will not be passed to the m_client_area object in case you try to move the panel. The client area will stay in its position:
However, when you close the panel, the m_client_area element will be deleted from the chart along with other elements.
In the following example, instead of CWndContainer::Delete we use the CWndContainer::Destroy method, which destroys the m_client_area object:
//+------------------------------------------------------------------+
//|                                            LearnCAppDialog_2.mq5 |
//|                        Copyright 2018, MetaQuotes Software Corp. |
//|                                             https://www.mql5.com |
//+------------------------------------------------------------------+
#property copyright "Copyright 2018, MetaQuotes Software Corp."
#property link      "https://www.mql5.com"
#property version   "1.00"
#include <Controls\Dialog.mqh>

CAppDialog AppWindow;
//+------------------------------------------------------------------+
//| Expert initialization function                                   |
//+------------------------------------------------------------------+
int OnInit()
  {
//--- create application dialog
   if(!AppWindow.Create(0,"AppWindow",0,20,20,360,324))
      return(INIT_FAILED);
//---
   int total=AppWindow.ControlsTotal();
   CWndClient*myclient;
   for(int i=0;i<total;i++)
     {
      CWnd*obj=AppWindow.Control(i);
      string name=obj.Name();
      PrintFormat("%d is %s",i,name);
      //--- color
      if(StringFind(name,"Client")>0)
        {
         CWndClient *client=(CWndClient*)obj;
         client.ColorBackground(clrRed);
         myclient=client;
         Print("client.ColorBackground(clrRed);");
         ChartRedraw();
        }
      //---
      if(StringFind(name,"Back")>0)
        {
         CPanel *panel=(CPanel*) obj;
         panel.ColorBackground(clrGreen);
         Print("panel.ColorBackground(clrGreen);");
         ChartRedraw();
        }
     }
   Sleep(5000);
   myclient.Destroy();
//--- run application
   AppWindow.Run();
//--- succeed
   return(INIT_SUCCEEDED);
  }
//+------------------------------------------------------------------+
//| Expert deinitialization function                                 |
//+------------------------------------------------------------------+
void OnDeinit(const int reason)
  {
//--- destroy dialog
   AppWindow.Destroy(reason);
  }
//+------------------------------------------------------------------+
//| Expert chart event function                                      |
//+------------------------------------------------------------------+
void OnChartEvent(const int id,         // event ID
                  const long& lparam,   // event parameter of the long type
                  const double& dparam, // event parameter of the double type
                  const string& sparam) // event parameter of the string type
  {
   AppWindow.ChartEvent(id,lparam,dparam,sparam);
  }
//+------------------------------------------------------------------+
Here's how it works: a 5-second sleep pause after the creation of the panel, and then the client area is destroyed:

How to add new controls: two buttons
Let's modify the EA from section "Creating a panel based on CAppDialog" by adding to the panel two buttons based on the CButton class and save it as AppWindowTwoButtons.mq5. Before adding the buttons (similar to designing of any panels), you must first think of their size and location. Suppose, the picture below shows the panel with buttons, which we want to create:
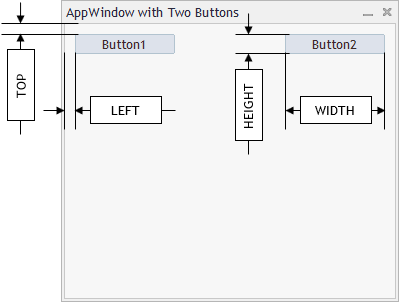
Where:
- TOP is the distance from the upper border of the client area (set by the INDENT_TOP constant)
- LEFT is the distance from the left edge of the client area (set by the INDENT_LEFT constant)
- HEIGHT is the button height (set by the BUTTON_HEIGHT constant)
- WIDTH is the button width (set by the BUTTON_WIDTH constant)
Another constant we need is the minimum horizontal indent between controls. Let's call it "CONTROLS_GAP_X".
In order to use the CButton class, we need to connect it first:
//+------------------------------------------------------------------+
//|                                          AppWindowTwoButtons.mq5 |
//|                        Copyright 2018, MetaQuotes Software Corp. |
//|                                              http://www.mql5.com |
//+------------------------------------------------------------------+
#property copyright "Copyright 2018, MetaQuotes Software Corp."
#property link      "http://www.mql5.com"
#property version   "1.001"
#property description "Control Panels and Dialogs. Demonstration class CButton"
#include <Controls\Dialog.mqh>
#include <Controls\Button.mqh>
Next, we add constants of the size and location of the buttons:
//+------------------------------------------------------------------+
//| defines                                                          |
//+------------------------------------------------------------------+
//--- indents and gaps
#define INDENT_LEFT                         (11)      // indent from left (with allowance for border width)
#define INDENT_TOP                          (11)      // indent from top (with allowance for border width)
#define CONTROLS_GAP_X                      (5)       // gap by X coordinate
//--- for buttons
#define BUTTON_WIDTH                        (100)     // size by X coordinate
#define BUTTON_HEIGHT                       (20)      // size by Y coordinate
//---
Declaring two instances of the CButton class at the global program level:
#define BUTTON_HEIGHT                       (20)      // size by Y coordinate
//---
CAppDialog           AppWindow;
CButton              m_button1;                       // the button object
CButton              m_button2;                       // the button object
//+------------------------------------------------------------------+
//| Expert initialization function                                   |
//+------------------------------------------------------------------+
int OnInit()
Declaration of buttons at a global level is a bad style, because these instances (and therefore their methods) will be seen from anywhere in the Expert Advisor. However, I've done it here deliberately in order to reduce the code amount.
OnInit() will change slightly: we add calls and verification of button creation results:
//+------------------------------------------------------------------+
//| Expert initialization function                                   |
//+------------------------------------------------------------------+
int OnInit()
  {
//--- create application dialog
   if(!AppWindow.Create(0,"AppWindow with Two Buttons",0,40,40,380,344))
      return(INIT_FAILED);
//--- create dependent controls
   if(!CreateButton1())
      return(false);
   if(!CreateButton2())
      return(false);
//--- run application
   AppWindow.Run();
//--- succeed
   return(INIT_SUCCEEDED);
  }
Let's analyze CreateButton1() to view in detail the process of button creation and linking to a panel.
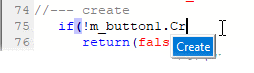
We will use the following methods of the CButton class: Create for creating the button:
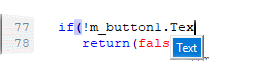
and Text for adding a text to the button (the Text method is inherited from the CWndObj class):
The button is created at this stage, but it exists separately from the panel. In order to bind them, we need to execute the CDialog::Add method, which adds the button to the client area of the panel:
   if(!AppWindow.Add(m_button1))
      return(false);
//--- succeed
   return(true);
  }
Here is the full code of button creation:
//+------------------------------------------------------------------+
//| Create the "Button1" button                                      |
//+------------------------------------------------------------------+
bool CreateButton1(void)
  {
//--- coordinates
   int x1=INDENT_LEFT;        // x1            = 11  pixels
   int y1=INDENT_TOP;         // y1            = 11  pixels
   int x2=x1+BUTTON_WIDTH;    // x2 = 11 + 100 = 111 pixels
   int y2=y1+BUTTON_HEIGHT;   // y2 = 11 + 20  = 32  pixels
//--- create
   if(!m_button1.Create(0,"Button1",0,x1,y1,x2,y2))
      return(false);
   if(!m_button1.Text("Button1"))
      return(false);
   if(!AppWindow.Add(m_button1))
      return(false);
//--- succeed
   return(true);
  }
Don't forget that we need to destroy the panel in OnDeinit() and to pass all events to a form in OnChartEvent():
//+------------------------------------------------------------------+
//| Expert deinitialization function                                 |
//+------------------------------------------------------------------+
void OnDeinit(const int reason)
  {
//---
   Comment("");
//--- destroy dialog
   AppWindow.Destroy(reason);
  }
//+------------------------------------------------------------------+
//| Expert chart event function                                      |
//+------------------------------------------------------------------+
void OnChartEvent(const int id,         // event ID
                  const long& lparam,   // event parameter of the long type
                  const double& dparam, // event parameter of the double type
                  const string& sparam) // event parameter of the string type
  {
   AppWindow.ChartEvent(id,lparam,dparam,sparam);
  }
//+------------------------------------------------------------------+
//| Create the "Button1" button                                      |
//+------------------------------------------------------------------+
How nested controls are moved and drawn
Remember, the AppWindow panel is the object of the CAppDialog class, which is the child of CDialog. CDialog itself is derived from CWndContainer:
CWndContainer is a base class for a group of controls of the Standard Library.
So, the parent CWndContainer class controls the movement of the entire group of controls, which are included in the panel.
Movement of all controls of the panel is performed in a loop in CWndContainer::Shift.
//+------------------------------------------------------------------+
//| Relative movement of the controls group                          |
//+------------------------------------------------------------------+
bool CWndContainer::Shift(const int dx,const int dy)
  {
//--- call of the method of the parent class
   if(!CWnd::Shift(dx,dy))
      return(false);
//--- loop by elements of group
   int total=m_controls.Total();
   for(int i=0;i<total;i++)
     {
      CWnd *control=Control(i);
      //--- check of pointer
      if(control==NULL)
         continue;
      //--- move the group item
      control.Shift(dx,dy);
     }
//--- succeed
   return(true);
  }
We used an example from the reference - CBmpButton (located in \MQL5\Experts\MyExp\Help\With the Panel. EN\ControlsBmpButton.mq5).
Accessing the CWndContainer::Shift method:
Adding CAppDialog to the group of controls via CDialog
Above is an example of a panel with two buttons. Remember, I mentioned that declaring buttons at a global level is not a good example? Here is a more correct example: the entire code for creating the panel and buttons is placed in the class derived from CAppDialog. An example of panel creation is shown in AppWindowTwoButtonsClass.mq5.
CAppWindowTwoButtons is a child of CAppDialog, and it contains the following methods:
| Creation | |
|---|---|
| Create | Creating the main control: the panel |
| CreateButton1 | Creating a dependent control: button #1 |
| CreateButton2 | Creating a dependent control: button #2 |
Code of AppWindowTwoButtonsClass.mq5: the code, which is now in the class, is highlighted with color:
//+------------------------------------------------------------------+
//|                                     AppWindowTwoButtonsClass.mq5 |
//|                        Copyright 2018, MetaQuotes Software Corp. |
//|                                              http://www.mql5.com |
//+------------------------------------------------------------------+
#property copyright "Copyright 2018, MetaQuotes Software Corp."
#property link      "http://www.mql5.com"
#property version   "1.000"
#property description "Control Panels and Dialogs. Demonstration class CButton"
#include <Controls\Dialog.mqh>
#include <Controls\Button.mqh>
//+------------------------------------------------------------------+
//| defines                                                          |
//+------------------------------------------------------------------+
//--- indents and gaps
#define INDENT_LEFT                         (11)      // indent from left (with allowance for border width)
#define INDENT_TOP                          (11)      // indent from top (with allowance for border width)
#define CONTROLS_GAP_X                      (5)       // gap by X coordinate
//--- for buttons
#define BUTTON_WIDTH                        (100)     // size by X coordinate
#define BUTTON_HEIGHT                       (20)      // size by Y coordinate
//---
//+------------------------------------------------------------------+
//| Class CAppWindowTwoButtons                                       |
//| Usage: main dialog of the Controls application                   |
//+------------------------------------------------------------------+
class CAppWindowTwoButtons : public CAppDialog
  {
private:
   CButton           m_button1;                       // the button object
   CButton           m_button2;                       // the button object

public:
                     CAppWindowTwoButtons(void);
                    ~CAppWindowTwoButtons(void);
   //--- create
   virtual bool      Create(const long chart,const string name,const int subwin,const int x1,const int y1,const int x2,const int y2);

protected:
   //--- create dependent controls
   bool              CreateButton1(void);
   bool              CreateButton2(void);

  };
//+------------------------------------------------------------------+
//| Constructor                                                      |
//+------------------------------------------------------------------+
CAppWindowTwoButtons::CAppWindowTwoButtons(void)
  {
  }
//+------------------------------------------------------------------+
//| Destructor                                                       |
//+------------------------------------------------------------------+
CAppWindowTwoButtons::~CAppWindowTwoButtons(void)
  {
  }
//+------------------------------------------------------------------+
//| Create                                                           |
//+------------------------------------------------------------------+
bool CAppWindowTwoButtons::Create(const long chart,const string name,const int subwin,const int x1,const int y1,const int x2,const int y2)
  {
   if(!CAppDialog::Create(chart,name,subwin,x1,y1,x2,y2))
      return(false);
//--- create dependent controls
   if(!CreateButton1())
      return(false);
   if(!CreateButton2())
      return(false);
//--- succeed
   return(true);
  }
//+------------------------------------------------------------------+
//| Global Variable                                                  |
//+------------------------------------------------------------------+
CAppWindowTwoButtons ExtDialog;
//+------------------------------------------------------------------+
//| Expert initialization function                                   |
//+------------------------------------------------------------------+
int OnInit()
  {
//--- create application dialog
   if(!ExtDialog.Create(0,"AppWindowClass with Two Buttons",0,40,40,380,344))
      return(INIT_FAILED);
//--- run application
   ExtDialog.Run();
//--- succeed
   return(INIT_SUCCEEDED);
  }
//+------------------------------------------------------------------+
//| Expert deinitialization function                                 |
//+------------------------------------------------------------------+
void OnDeinit(const int reason)
  {
//---
   Comment("");
//--- destroy dialog
   ExtDialog.Destroy(reason);
  }
//+------------------------------------------------------------------+
//| Expert chart event function                                      |
//+------------------------------------------------------------------+
void OnChartEvent(const int id,         // event ID
                  const long& lparam,   // event parameter of the long type
                  const double& dparam, // event parameter of the double type
                  const string& sparam) // event parameter of the string type
  {
   ExtDialog.ChartEvent(id,lparam,dparam,sparam);
  }
//+------------------------------------------------------------------+
//| Create the "Button1" button                                      |
//+------------------------------------------------------------------+
bool CAppWindowTwoButtons::CreateButton1(void)
  {
//--- coordinates
   int x1=INDENT_LEFT;        // x1            = 11  pixels
   int y1=INDENT_TOP;         // y1            = 11  pixels
   int x2=x1+BUTTON_WIDTH;    // x2 = 11 + 100 = 111 pixels
   int y2=y1+BUTTON_HEIGHT;   // y2 = 11 + 20  = 32  pixels
//--- create
   if(!m_button1.Create(0,"Button1",0,x1,y1,x2,y2))
      return(false);
   if(!m_button1.Text("Button1"))
      return(false);
   if(!Add(m_button1))
      return(false);
//--- succeed
   return(true);
  }
//+------------------------------------------------------------------+
//| Create the "Button2"                                             |
//+------------------------------------------------------------------+
bool CAppWindowTwoButtons::CreateButton2(void)
  {
//--- coordinates
   int x1=INDENT_LEFT+2*(BUTTON_WIDTH+CONTROLS_GAP_X);   // x1 = 11  + 2 * (100 + 5) = 221 pixels
   int y1=INDENT_TOP;                                    // y1                       = 11  pixels
   int x2=x1+BUTTON_WIDTH;                               // x2 = 221 + 100           = 321 pixels
   int y2=y1+BUTTON_HEIGHT;                              // y2 = 11  + 20            = 31  pixels
//--- create
   if(!m_button2.Create(0,"Button2",0,x1,y1,x2,y2))
      return(false);
   if(!m_button2.Text("Button2"))
      return(false);
   if(!Add(m_button2))
      return(false);
//--- succeed
   return(true);
  }
//+------------------------------------------------------------------+
Let us view the algorithm for the creation of a panel and controls based on the example of AppWindowTwoButtonsClass.mq5. All actions are performed in CAppWindowTwoButtons::Create.
- Creating the panel:
   if(!CAppDialog::Create(chart,name,subwin,x1,y1,x2,y2))
      return(false);
- Creating dependent controls:
//--- create dependent controls
   if(!CreateButton1())
      return(false);
   if(!CreateButton2())
      return(false);
- The most important moment is that when the button has been created, it is not a dependent element of our panel, but exists by itself. To make it one of the dependent elements of the panel, we should call the Add method (the CDialog::Add adds a control to the client area at the specified pointer/reference)
...
   if(!Add(m_button1))
      return(false);
...
   if(!Add(m_button2))
      return(false);
...
After that the control becomes a dependent element of the panel: all events are distributed centrally from the panel to dependent controls.
How to override the behavior of standard controls
If you minimize the panel, it will be positioned at the coordinate (10;10). The minimized panel is partially overlapped with the one-click trading panel:
Let's correct such positioning and add a check of whether the one-click trading panel is maximized. For this purpose we need to override the parent CAppDialog::Minimize method. Let us create another example: AppWindowCorrectMinimization.mq5 based on the code of AppWindowTwoButtons.mq5 from the section "Adding CAppDialog to the group of controls via CDialog".
Changes: declaring the Minimize method:
protected:
   //--- create dependent controls
   bool              CreateButton1(void);
   bool              CreateButton2(void);
   //--- override the parent method
   virtual void      Minimize(void);

  };
and writing the method body:
//+------------------------------------------------------------------+
//|                                                                  |
//+------------------------------------------------------------------+
void CAppWindowCorrectMinimization::Minimize(void)
  {
//--- a variable for checking the one-click trading panel
   long one_click_visible=-1;  // 0 - there is no one-click trading panel
   if(!ChartGetInteger(m_chart_id,CHART_SHOW_ONE_CLICK,0,one_click_visible))
     {
      //--- display the error message in Experts journal
      Print(__FUNCTION__+", Error Code = ",GetLastError());
     }
//--- the minimum indent for a minimized panel
   int min_y_indent=28;
   if(one_click_visible)
      min_y_indent=100;  // use this indent if there is a one-click trading panel in the chart
//--- getting the current indent for the minimized panel
   int current_y_top=m_min_rect.top;
   int current_y_bottom=m_min_rect.bottom;
   int height=current_y_bottom-current_y_top;
//--- сalculating the minimum indent from top for a minimized panel of the application
   if(m_min_rect.top!=min_y_indent)
     {
      m_min_rect.top=min_y_indent;
      //--- shifting the lower border of the minimized icon
      m_min_rect.bottom=m_min_rect.top+height;
     }
//--- Now we can call the method of the base class
   CAppDialog::Minimize();
  }
How to read built-in macros of event processing type
The panel can handle the following types of events (used from [data folder]\MQL5\Include\Controls\Defines.mqh" in"Events")
//+------------------------------------------------------------------+
//| Events                                                           |
//+------------------------------------------------------------------+
#define ON_CLICK                (0)   // clicking on control event
#define ON_DBL_CLICK            (1)   // double clicking on control event
#define ON_SHOW                 (2)   // showing control event
#define ON_HIDE                 (3)   // hiding control event
#define ON_CHANGE               (4)   // changing control event
#define ON_START_EDIT           (5)   // start of editing event
#define ON_END_EDIT             (6)   // end of editing event
#define ON_SCROLL_INC           (7)   // increment of scrollbar event
#define ON_SCROLL_DEC           (8)   // decrement of scrollbar event
#define ON_MOUSE_FOCUS_SET      (9)   // the "mouse cursor entered the control" event
#define ON_MOUSE_FOCUS_KILL     (10)  // the "mouse cursor exited the control" event
#define ON_DRAG_START           (11)  // the "control dragging start" event
#define ON_DRAG_PROCESS         (12)  // the "control is being dragged" event
#define ON_DRAG_END             (13)  // the "control dragging end" event
#define ON_BRING_TO_TOP         (14)  // the "mouse events priority increase" event
#define ON_APP_CLOSE            (100) // "closing the application" event
These events are handled in the CAppDialog::OnEvent method. For a better visual perception of different types of events, several macros are described in [data folder]\MQL5\Include\Controls\Defines.mqh" in the block "Macro of event handling map":
//+------------------------------------------------------------------+
//| Macro of event handling map                                      |
//+------------------------------------------------------------------+
#define INTERNAL_EVENT                           (-1)
//--- beginning of map
#define EVENT_MAP_BEGIN(class_name)              bool class_name::OnEvent(const int id,const long& lparam,const double& dparam,const string& sparam) {
//--- end of map
#define EVENT_MAP_END(parent_class_name)         return(parent_class_name::OnEvent(id,lparam,dparam,sparam)); }
//--- event handling by numeric ID
#define ON_EVENT(event,control,handler)          if(id==(event+CHARTEVENT_CUSTOM) && lparam==control.Id()) { handler(); return(true); }
//--- event handling by numeric ID by pointer of control
#define ON_EVENT_PTR(event,control,handler)      if(control!=NULL && id==(event+CHARTEVENT_CUSTOM) && lparam==control.Id()) { handler(); return(true); }
//--- event handling without ID analysis
#define ON_NO_ID_EVENT(event,handler)            if(id==(event+CHARTEVENT_CUSTOM)) { return(handler()); }
//--- event handling by row ID
#define ON_NAMED_EVENT(event,control,handler)    if(id==(event+CHARTEVENT_CUSTOM) && sparam==control.Name()) { handler(); return(true); }
//--- handling of indexed event
#define ON_INDEXED_EVENT(event,controls,handler) { int total=ArraySize(controls); for(int i=0;i<total;i++) if(id==(event+CHARTEVENT_CUSTOM) && lparam==controls[i].Id()) return(handler(i)); }
//--- handling of external event
#define ON_EXTERNAL_EVENT(event,handler)         if(id==(event+CHARTEVENT_CUSTOM)) { handler(lparam,dparam,sparam); return(true); }
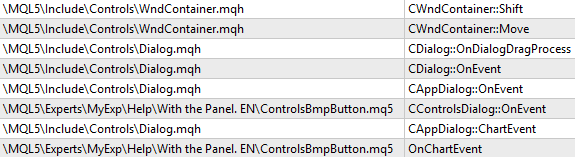
Macros from the "Events" and "Macro of event handling map" blocks make the OnEvent method look like this:
//+------------------------------------------------------------------+
//| Event Handling                                                   |
//+------------------------------------------------------------------+
EVENT_MAP_BEGIN(CControlsDialog)
ON_EVENT(ON_CLICK,m_bmpbutton1,OnClickBmpButton1)
ON_EVENT(ON_CLICK,m_bmpbutton2,OnClickBmpButton2)
EVENT_MAP_END(CAppDialog)
This is the code from CBmpButton reference, and CControlsDialog here is the instance of the CAppDialog class, which is a panel in the form of a class.
Taking into account macros from "Macro of event handling map", the OnEvent will look as follows:
bool CControlsDialog::OnEvent(const int id,const long& lparam,const double& dparam,const string& sparam) {
if(id==(ON_CLICK+CHARTEVENT_CUSTOM) && lparam==m_bmpbutton1.Id()) { OnClickBmpButton1(); return(true); }
if(id==(ON_CLICK+CHARTEVENT_CUSTOM) && lparam==m_bmpbutton2.Id()) { OnClickBmpButton2(); return(true); }
return(CAppDialog::OnEvent(id,lparam,dparam,sparam)); }
after applying the styler:
bool CControlsDialog::OnEvent(const int id,const long &lparam,const double &dparam,const string &sparam)
  {
   if(id==(ON_CLICK+CHARTEVENT_CUSTOM) && lparam==m_bmpbutton1.Id())
     {
      OnClickBmpButton1();
      return(true);
     }
   if(id==(ON_CLICK+CHARTEVENT_CUSTOM) && lparam==m_bmpbutton2.Id())
     {
      OnClickBmpButton2();
      return(true);
     }
   return(CAppDialog::OnEvent(id,lparam,dparam,sparam));
  }
The resulting code can be read as follows: if a custom event of a click on the m_bmpbutton1 element is received, then the OnClickBmpButton1() method will be called. If a custom event of a click on m_bmpbutton2 is received, then OnClickBmpButton2() will be called.
Event handling example
We use AppWindowTwoButtonsClass.mq5 as the basis and create AppWindowTwoButtonsClasssEvents.mq5 by adding button click event handlers.
The first step is to declare OnEvent, as well as OnClickButton1 and OnClickButton2.
//+------------------------------------------------------------------+
//| Class CControlsDialog                                            |
//| Usage: main dialog of the Controls application                   |
//+------------------------------------------------------------------+
class CAppWindowTwoButtons : public CAppDialog
  {
private:
   CButton           m_button1;                       // the button object
   CButton           m_button2;                       // the button object

public:
                     CAppWindowTwoButtons(void);
                    ~CAppWindowTwoButtons(void);
   //--- create
   virtual bool      Create(const long chart,const string name,const int subwin,const int x1,const int y1,const int x2,const int y2);
   //--- chart event handler
   virtual bool      OnEvent(const int id,const long &lparam,const double &dparam,const string &sparam);

protected:
   //--- create dependent controls
   bool              CreateButton1(void);
   bool              CreateButton2(void);
   //--- handlers of the dependent controls events
   void              OnClickButton1(void);
   void              OnClickButton2(void);

  };
Step 2: the OnEvent method, which has the following form due to the use of macros from "Events" and "Macro of event handling map" of the file at [data folder]\MQL5\Include\Controls\Defines.mqh:
protected:
   //--- create dependent controls
   bool              CreateButton1(void);
   bool              CreateButton2(void);
   //--- handlers of the dependent controls events
   void              OnClickButton1(void);
   void              OnClickButton2(void);

  };
//+------------------------------------------------------------------+
//| Event Handling                                                   |
//+------------------------------------------------------------------+
EVENT_MAP_BEGIN(CAppWindowTwoButtons)
ON_EVENT(ON_CLICK,m_button1,OnClickButton1)
ON_EVENT(ON_CLICK,m_button2,OnClickButton2)
EVENT_MAP_END(CAppDialog)
//+------------------------------------------------------------------+
//| Constructor                                                      |
//+------------------------------------------------------------------+
Now we need to write the bodies of OnClickButton1 and OnClickButton2. A click on button 1 will open a BUY position, and a click on button 2 will close the position.
So, let's change the text on the buttons first (changes are implemented in CreateButton1 and CreateButton2):
...
   if(!m_button1.Text("Open BUY"))
      return(false);
...
...
   if(!m_button2.Text("Close"))
      return(false);
...
Now, let us determine classes, which we need to connect: the CTrade class is needed for trading, CPositionInfo is needed for working with positions, and the type of the trading account is received from CAccountInfo:
#property description "Control Panels and Dialogs. Demonstration class CButton"
#include <Controls\Dialog.mqh>
#include <Controls\Button.mqh>
#include <Trade\PositionInfo.mqh>
#include <Trade\Trade.mqh>
#include <Trade\AccountInfo.mqh>
//+------------------------------------------------------------------+
//| defines                                                          |
In order to be able to work with these classes, we need to declare instances of these classes in the protected section of this panel:
class CAppWindowTwoButtons : public CAppDialog
  {
protected:
   CPositionInfo     m_position;                      // trade position object
   CTrade            m_trade;                         // trading object
   CAccountInfo      m_account;                       // account info wrapper

private:
   CButton           m_button1;                       // the button object
Click handling methods:
//+------------------------------------------------------------------+
//| Event handler                                                    |
//+------------------------------------------------------------------+
void CAppWindowTwoButtons::OnClickButton1(void)
  {
   if(m_account.TradeMode()==ACCOUNT_TRADE_MODE_DEMO)
      m_trade.Buy(1.0);
  }
//+------------------------------------------------------------------+
//| Event handler                                                    |
//+------------------------------------------------------------------+
void CAppWindowTwoButtons::OnClickButton2(void)
  {
   if(m_account.TradeMode()==ACCOUNT_TRADE_MODE_DEMO)
      for(int i=PositionsTotal()-1;i>=0;i--) // returns the number of current positions
         if(m_position.SelectByIndex(i)) // selects the position by index for further access to its properties
            if(m_position.Symbol()==Symbol())
               m_trade.PositionClose(m_position.Ticket()); // close a position by the specified symbol
  }
Now, the panel on a demo account acts as a trading panel: a click on the first button opens a BUY position, and a click on the second button closes all positions.
Create your own panel — it's easy!
The article features a general scheme of the inheritance of classes from the Panels and Dialogs section. The creation and management of any graphical panel based on the Standard Library is shown on the example of the CAppDialog class. Also, the example shows how to access properties of any graphical objects included in a panel, which is based on CAppDialog. Similarly, you can work with any child of the CWnd class.
Also, the article provides a few non-standard methods for changing the properties of internal panel controls based on CAppDialog. These methods help understand how graphical objects operate:
- Where the main constants for creating objects can be found and how to redefine them using #undef
- Summing up CAppDialog
I hope that these examples will help you create your own panels based on CAppDialog. Also I recommend studying some examples of creation of controls from the Panels and dialogs section.
| File name | Comment |
|---|---|
| LearnCAppDialog.mq5 | The minimum code of a panel based on CAppDialog |
| AppWindowEditDefine.mq5 | An Expert Advisor panel, which redefines constants from Defines.mqh |
| LearnCAppDialog_1.mq5 | Changes the color for objects "m_client_area" and "m_background" |
| LearnCAppDialog_2.mq5 | Instead of CWndContainer::Delete, we apply CWndContainer::Destroy to destroy the "m_client_area" object |
| AppWindowTwoButtons.mq5 | A panel with two buttons in it |
| AppWindowTwoButtonsClass.mq5 | A panel with two buttons as a class |
| AppWindowCorrectMinimization.mq5 | An example of default positioning of a panel |
| AppWindowTwoButtonsClasssEvents.mq5 | A panel with two buttons as a class. Handling button events |
Translated from Russian by MetaQuotes Ltd.
Original article: https://www.mql5.com/ru/articles/4503
 Comparing speeds of self-caching indicators
 Visualizing trading strategy optimization in MetaTrader 5
 Deep Neural Networks (Part V). Bayesian optimization of DNN hyperparameters
 How to create Requirements Specification for ordering an indicator
- Free trading apps
- Over 8,000 signals for copying
- Economic news for exploring financial markets
You agree to website policy and terms of use
Hi thanks for your amazing tutorial
I'm trying to make my own , in my panel by click on one button the other one should be disable and hide , it will be hide when i click in the area of hidden button it still work
I put my codes here if you could help me that will be great
Indicator:
Class:
Hello, I managed to make my panel successfully. Thank you very much for your amazing tutorial.
Hello Vladimir,
first i also like to thank you for your great tutorial. I found a problem in using it in a template: Just put any of your applications into a template of an empty chart. After loading this template the application will come up twice like shown in the picture. Do you have any idea how to fix this?
Thank you in advance
Why is the panel/window cannot be dragged/moved past the chart boundaries?
What is the difference with Anatoli's easyfastgui library?
Hi thanks for your amazing tutorial
I'm trying to make my own , in my panel by click on one button the other one should be disable and hide , it will be hide when i click in the area of hidden button it still work
I put my codes here if you could help me that will be great
Indicator:
Class: