

This is a user guide on setting up the MT4/MT5 to Telegram Signal Provider EA
MT4 Available here: https://www.mql5.com/en/market/product/63550
MT5 Available here: https://www.mql5.com/en/market/product/78603
The Telegram Signal Provider is an easy-to-use, fully customizable utility that enables the sending of signals to Telegram, transforming your account into a signal provider. The format of the messages is fully customizable! However, for simple usage, you can also opt for a predefined template and enable or disable specific parts of the message.
A VPS (Virtual Private Server) is recommended to guarantee a consistent 24/7 signal service.
Demo Available
Experience our Telegram Signal Provider with a free demo version.
This is an excellent opportunity to test the EA's features and compatibility with your system.
Installing the Demo Version:
- Launch MetaTrader, then click "File" in the top left corner.
- Select "Open Data Folder" from the drop-down menu.
- Navigate to your MQL4 or MQL5 directory.
- Access the 'Experts' folder within this directory.
- Use the link provided above to download the demo (.ex4 or .ex5 file) directly into the 'Experts' folder.
- Return to MetaTrader and locate 'Navigator'. Right-click and select 'Refresh' from the context menu.
- The demo should now be visible in the list. Simply drag and drop it onto your chart to initiate the setup.
Installation
Telegram bot
Create a Telegram bot that sends messages from the MT4 to the chat, channel or group.
Set Up Telegram Bot
- Go to telegram and search for @BotFather
- Send /newbot and follow the instructions wich are given by the BothFather
- Chose a name and username for your bot
- You'll get the token for your bot (Use this token to access the HTTP API)
Refer to the image below

- Load MT4 to Telegram Signal Provider EA on a chart in your MT4 terminal
- On the inputs, paste the token you got from BotFather
- DO NOT press “OK” yet as you need to insert the Chat ID first
Chat / Group ID
- Create the telegram group or channel where you want the EA to send messages.
- Add your newly created bot to the group/channel and make it an admin.
Group Info --> Manage Group --> Administrations --> ADD ADMINISTRATOR --> Your Bot --> Save - Write any message in the group/channel (like "Test"). This message is needed to get the group/channel ID.
- Replace the <Token> part in the following URL with the Token you got from BotFather.
https://api.telegram.org/bot<token>/getUpdates - Open the URL in your browser. If on the new page is only: {"ok":true, "result":[]} Send a new message to the group/channel and update your browser tab.
- Search for the part "chat":{id": and copy the ID. The ID should look something like this: -1001331311918 or this: 505931706.

- Let's test the new inputs. In the following URL Replace <token> with yout token and replace <ChatID> with your group/chat ID.
Open the URL in your browser
https://api.telegram.org/bot<token>/sendMessage?chat_id=<ChatID>&text=Installation%20was%20successfull!
You should now get the following message:
- Insert the Chat ID in the EA inputs. It's highly recommended to save a template with the "Save" button.

Allow WebRequest
Open your MT4 Terminal and go to "Tools" --> "Options" --> "Expert Advisors"
Turn on the "Allow WebRequest for listed URL:" bracket and add the following URL:
https://api.telegram.org

Your MT4 to Telegram Signal Provider is now ready to use!
In the User Interface, you can customize all the messages.
Settings
EA inputs

The first part contains the token and the chat id wich we already filled out in the previous chapter.
Advanced Mode: Select between the simple mode (false) and the advanced message customization mode (true). The basic mode offers a predefined message template, allowing you to toggle specific message parts on or off within the user interface. Conversely, the advanced mode provides complete message customization through text files, which will be detailed later in this guide.
With the custom message folder, you can specify the source of message template text files for the EA to use in advanced mode (Ignore in simple mode).
With the Delay time for new orders settings the message of a newly opend order can be delayed. With this possibility you can still make changes for a defined time to the new position before it gets send to telegram.
Using the Panel Scale, you can manually adjust the resolution of your User Interface.
The "Minimum Time for Charts to Load Before Taking Screenshot" setting allows you to define the wait time in seconds that the EA will observe after opening a new chart and before capturing the screenshot. Increasing this duration may be necessary for slower EAs or when numerous indicators need to load on the chart prior to taking the screenshot.
The "Screenshot Timeout" setting enables you to configure the duration for which the EA will attempt to send a screenshot in case of any issues.
Order Filtering:
Use the order filter to specify which orders are sent or not. These are filtered by Magic Number.
If you have multiple EA's running on your account you can choose EA orders are orders are sent to Telegram.
For multiple IDs, separate them with the “;” sign. Semicolon symbol
In this example, the EA sends only order information to Telegram if the order is taken by the EA with the ID 123456 or 99999. All other orders are ignored.
In the second section, we specify that the EA shall ignore all orders which are taken from the EA with the ID 484848.
User Interface - Simple Mode
In the upcoming section, we will delve into the user interface for the simple mode. This mode allows you to send reports and tailor the predefined message template by selectively enabling or disabling specific parts of the message. Opting for the simple mode provides more options directly in the user interface, whereas the advanced mode primarily involves message configuration through text files.
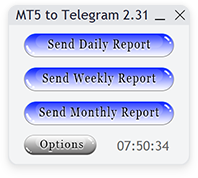
Reporting
You can choose between daily, weekly or monthly reports. Pressing one will send a report to your Telegram channel. With the “options button” you can open the settings menu
Options menu
Every Menu has its own customizable message.

- General settings for the EA
- Message settings when a new order is placed
- Message settings when an order is closed
- Message settings if partial profits are taken
- Message settings if an order is modified
- Message settings if a pending order activates
- Message settings report message
- Send different test messages
General settings
Here you can customize the EA in general.

- Allows sending messages to Telegram
- Allows sending pending order-related messages
- Set the GMT offset based on your location
- Set the profit % range for your trades to be counted as breakeven.
For example, if it's set to 0.05% then every trade in the range from -0.05% to +0.05% is counted as breakeven. If the trade makes a profit of 0.06% it's a winning trade. - The distance of a trade can be displayed in pips or points.
- You can choose between balance and equity. If you choose equity for example and the "Show Money" settings for a new order is turned on, it shows the equity in the message.
- Set the screenshot width in pixels. If the value is 0 the screenshot is taken from the whole chart width.
- Set the screenshot height in pixels. If the value is 0 the screenshot is taken from the whole chart height.
- Select the template wich is applied to the chart for the screenshot.
- Select the language for your telegram messages.
New Order
Allows you to customize the message sent when a new order is placed


- Allows sending new order message to Telegram
- Allows sending a screenshot of the chart on wich the new order is placed
- Select the period on wich the screenshot will be taken from
- Allows sending the order ticket of the placed order
- Allows sending the lot size of the placed order
- Allows sending the stop-loss price of the placed order
- Send the calculated stop loss pips of the placed order
- Allows sending the take-profit price of the placed order
- Send the calculated take profit pips of the placed order
- Send the risk/reward ratio of placed order (TP pips / SL pips)
- Allows sending the current balance/equity of the account
- Allows sending the possible loss (if SL is placed)
- Allows sending the possible gain (if TP is placed)
- Allows sending the current free margin of the account
- Allows sending the free margin level of the account
- Allows sending the comment of the placed order
- Specify a personalized text to be appended at the end of the message
Close Order
In the close order settings, you can customize the message which is sent when an order is closed or deleted.


- Allows sending the close order message to Telegram
- Sends a chart screenshot on which the order was closed
- Select the draw trade type method of the closed order
Example: The order is placed with a 30 pip stop, later it's increased to 50 pips and when the trade is in profit the stop is moved to breakeven (0 pips)
Initial SL/TP: The closed order is drawn with the initial set SL and TP. If the order is placed without any TP or SL, it takes the next modified SL or TP. In the example, the closed order is drawn with the 30 pip stop-loss.
Max Range: The closed order is drawn with the SL and TP which had the max amount of pips. In the example, the order is drawn with the 50 pip stop-loss.
Last Value: The closed order is drawn with the SL and TP it had when it was closed. In the example, the closed order is drawn without any SL as its 0 pips - Allows sending the order ticket of the closed order
- Allows sending the entry price of the closed order
- Allows sending the close price of the closed order
- Allows sending the profit of the closed order (in the account currency)
- Sending the profit of the closed order (as a percentage of the account balance/equity)
- Allows sending the profit pips of the closed order
- Allows sending the lot size of the closed order
- Allows sending the duration of the closed order (how long the order was running)
- Allows sending the new balance after the order was closed
- Allows sending the reason for the close of the order.
For example, if it was closed due to takeprofit hit or if it was closed manually. - Specify a personalized text to be appended at the end of the message
Partial Close
Customize the message which is sent when an order is partially closed.


- Allows sending the partial close message to Telegram
- Allows sending the order ticket of the partially closed order. It’s going to send the old ticket as well as the new ticket (MT4 creates a new ticket if an order is closed partially)
- Allows sending what percentage of the original order was closed
- Allows sending of how many times the original order was partly closed
- Allows sending the profit of the partially closed order (in the account currency)
- Allows sending the profit of the partially closed order (in percentage of the balance/equity)
- Allows sending the profit pips of the partially closed order
- Allows sending the lot size of the partially closed order
- Allows sending the duration of the partially closed order (how long the order was running)
- Allows sending the new balance after the order was partially closed
- This is the text where the number of the “Show Closed %” is displayed (if its state is ON).
It’s important that the text contains the “%” sign. This is the placeholder for the later inserted number - Specify a personalized text to be appended at the end of the message
Modification
In the order modification settings, you can customize the message which is sent if an order is modified


- Allows sending the order modification message to Telegram
- Allows sending the order ticket of the modified order
- Allows sending the old price of the modified order
- Allows sending the possible loss/gain (in pips)
- Allows sending the possible loss/gain (in the account currency)
- Allows sending the possible loss/gain (as a percentage of the account balance)
Pending Activation
In the pending activation settings, you can customize the message which is sent if a pending order is activated.


- Allows sending the pending order activation message to Telegram
- Allows sending the pending order activation as a new order message.
To turn this option on, the "Send Pending" option in the general section needs to be turned off.
Also by turning on the "Send Pending" option, this option is automatically turned off. - Allows sending the order ticket of the activated order
History Report
In the history report settings, you can customize the report message.


- Allows sending the daily report every day at the set report time (does not affect the “Send Daily Report” button in the main menu
- Allows sending the weekly report once per week at the set day and report time (does not affect the “Send Weekly Report” button in the main menu
- Allows sending the monthly report at the end of every month at the set report time (does not affect on the “Send Monthly Report” button in the main menu
- Sets the time on which the automatic reports are sent
- Sets the day for the weekly report
- Allows sending the reports even there are no closed orders at this time
- Allows sending the order type in the report
- Allows sending the profit pips of the order in the report
- Allows sending the profit as a percentage of the order with the report
- Allows combining of partially closed orders in the report to the original order
- Allows sending the total amount of pips gained in this period
- Allows sending the total gained profit in the account currency
- Allows sending the total gained profit in percentage
- Allows sending the total numbers. Shows trades that were winners, losers or breakeven
- Allows sending the win rate of the reporting period
- Allows sending a list of all running trades
- Allows sending a list of all open pending orders
- The text which is displayed at the end of the closed trades if the “Merge Partials” button is turned on
- Specify a personalized text to be appended at the end of the message
Test Messages
In the test messages menu, you can send a “test” message of a new order, closed order, modified order and a pending activation. With the help of these messages, you can easily customize your settings and instantly test them without opening/closing real orders.

Advanced Mode
Upon selecting the advanced customization mode, message customization primarily occurs through text files and placeholders. While the user interface and some settings remain accessible, they are identical to those in the simple mode and will not be reiterated here.
After activating the advanced mode, the EA automatically generates the necessary text file templates. To locate these, you have two options for accessing the Terminal folder:
- Press Windows+R, type `%appdata%`, navigate to "MetaQuotes\Terminal".
- In MetaTrader, click "File" and then "Open Data Folder". Navigate up one directory to reach the Terminal folder.
You can then find the template folder by following this path: "Terminal Data Path\Common\Files\TelegramSignalProvider\CustomMsg".

In the Template Folder, you'll find the essential files for message customization. It's important to copy this folder, rename it (e.g., "MsgTemplate_Gold"), and then paste it. This step is crucial because the EA will overwrite any modifications made directly to the original Template folder. Once you've created your folder, input its name in the EA settings so the EA knows where to source the message templates. Within this new folder, you'll find seven distinct text files corresponding to different trading signals:
- Info.txt: Guidelines on message customization and general placeholders.
- NewOrderMsg.txt: Template for new order signals.
- CloseOrderMsg.txt: Template for close order signals.
- PartCloseOrderMsg.txt: Template for partial close order signals.
- ModiOrderMsg.txt: Template for modified order signals.
- PendActMsg.txt: Template for pending action signals.
- ReportMsg.txt: Template for report signals.
You can tailor each message to your preference. This guide will specifically explore the `NewOrderMsg.txt` file, demonstrating the functionalities of different sections and how you can customize your message. In the image below, the text file is displayed with green-marked sections indicating the customizable areas. The remaining text provides guidance and instructions for message customization.

Placeholders: Our system utilizes placeholders to dynamically insert values into messages. You can find universally applicable placeholders in the `Info.txt` file. Simply place these placeholders where needed in your message, and the EA will automatically substitute them with the relevant values. For instance, `{balance}` will be replaced with the current value of your account balance.
Text Placeholders: At the beginning of the file, you'll encounter text placeholders enclosed in special brackets. These sections of text will be displayed or omitted based on certain conditions. For example, the text `<sl>SL: {sl_price} [{sl_pips} {distance_txt}]</sl>` will only appear if a Stop Loss is set. If there's no Stop Loss, the EA omits everything between `<sl>` and `</sl>`.
Functions: Enhance your messages with custom functions. Take, for example, the ordertype emoji function showcased here. You can assign specific emojis or text for each order type. When using the relevant placeholder, such as `{order_type_emoji}`, the EA inserts the appropriate emoji/text based on the trade type (e.g., Buy, Sell, etc.).
Message Boundaries: The start and end of your message are defined by ">> Message start (...):" and ">> Message end (...):". Ensure your customized message is placed within these markers.
It's crucial to only alter the text between the start and end lines of the message, as well as the values within the functions. Modifying other parts of the text could result in incorrect parameter interpretation by the EA.
Emojis in Custom Messages:
To incorporate emojis into your custom messages, you need to use their Unicode representation. You can find the appropriate Unicode codes for various emojis in the following comprehensive list: Unicode Emoji List  --> 😎hello😎 -->
Customizing Pip Size through CSV File Configuration
The pip size is automatically calculated by our proprietary algorithm. However, we understand that this automated setting may not suit every user's needs. Therefore, we provide the option to manually define the pip size. This is accomplished through a CSV file, which can be found under your Terminal's data path at: MQL4 (or MQL5) // Files // Symbol // symbol.csv.
If you are unsure where to locate your data path, simply go to your Terminal, click on "File" in the upper-right corner, and then select "Open."
This CSV file contains all the symbols on which your Expert Advisor (EA) has been applied. If the symbol you wish to define is not listed, you can easily add it at the bottom of the file, following the existing format. The CSV file is structured as follows:
| Symbol | Point | Pip |
|---|---|---|
| EURUSD | 0.00001 | 0.00010 |
| USDCAD | 0.00001 | 0.00010 |
| EURJPY | 0.001 | 0.010 |
Please note that the "Point" data is only displayed for reference. If you alter these values, they will be overwritten. Here you can adjust the Pip size. Importantly, the Pip size must not be smaller than the Point size!
After making your changes, save and close the CSV file. Your modifications will automatically be applied.
Product Link
MT4 to Telegram Signal Provider: https://www.mql5.com/en/market/product/63550
MT5 to Telegram Signal Provider: https://www.mql5.com/en/market/product/78603
For any inquiries contact the developer: https://www.mql5.com/en/users/lukiroth


