

In any market, the law of supply and demand is the key principle behind the moves of the certain asset. All the movements of price that are occuring, whether the price is going up or down, are initiated by fluctuations in supply and demand.
Supply and demand basics
At first, we have to understand what actually makes the supply and demand? When the demand for a certain instrument rises, it means that there is lot more buyers than sellers in the market. If there is less demand , i.e. there are more sellers than buyers, the price is set to go down. Please read the following article to get more info about trading tips of Supply and Demand strategy.
Supply And Demand Indicator
Supply and Demand Multi Timeframe Indicator is one of many supply and demand indicators available. This Forex Indicator is used for highlighting the supply and demand zones on the charts. The supply zones are in maroon color and the demand zone is shown in the green color. The main feature of current indicator is the ability to show zones of several timeframes on the same chart. You can see the chart with such zones below.
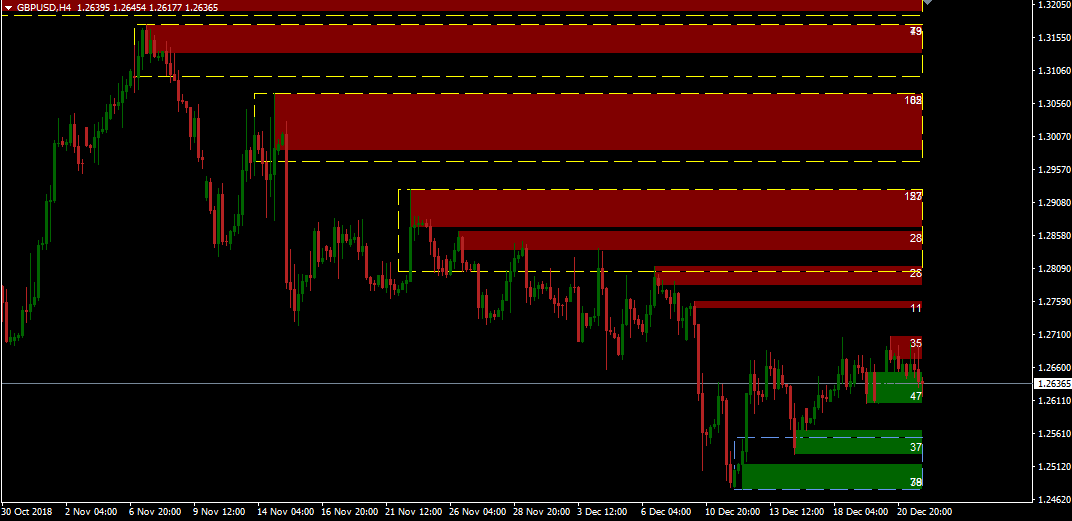
The main idea here is multiple zones. The zone means that we are talking not about just one line or price, like support or resistance, but we consider the whole area between two price levels. Also the feature of displaying zones of higher timeframe (yellow and blue zones) definitely adds chances for higher probability trades.
Top 5 Supply and Demand tips
#1: Great reversal points
The main advantage of using this indicator is showing decent points where price tends to change direction.
Accumulation of several zones in one place, especially if these are zones of higher timeframe increases the probability to get a winning trade.
#2: Accurate Stop Loss
The most appropriate way to place a stop loss is to put it beyond the Supply and Demand zone.
In case you enter a sell in a supply zone, place your stop loss a few pips above this zone. Similarly, if you enter a buy in a demand zone, place you stop loss a few pips below the demand zone.
#3: Supply and demand zones as take profit targets
In case if you already have an opened buy trade and you are not sure when to exit then the next supply zone will be a good target. Vice versa is for sell trades.
Price is likely to run out of steam at the opposite zone at least for a little bit so that will be a smart decision to lock profits.
#4: Trailing Stops placement
The Supply and Demand Multitimeframe Indicator is able to help you in trailing of your stop loss as well. When your goal is to hold position as long as possible then zone by zone stop movement will be the best idea.
If price goes in your favour and new zones keep on forming then just trail your stop beyond the edge of each of newly formed zone so it will keep your profits safe. For example, in an uptrend, you can use the demand zones as your trailing stops and lock your profits as the price moves up.
#5: Watch out for Traps
The last, but not the least feature - use the demand and supply zones to protect your trading from traps. Demand zones are essentially large support level zones and therefore the potential for sellers getting caught out with bear traps is there.
The demand zones are reflecting the support level zones. So the sellers have a bigger chance of getting caught out with bear traps here. A bear trap in its sense is when a seller thinks that a support level is going to break. So, once the price is starting to break the support level, the seller starts selling on the breakout. However, usually the price quickly reverses and spikes up.
Taking into account the bear traps will definitely help you to get out of losing trade. Moreover, you will be able to change the direction quickly, thus capturing the profits from the uptrend.
In order to use this indicator, please click on the following link.


