How to Install Demo
- Open the MT4/MT5 platform Select ‘File’ from the main menu
- Click on ‘Open Data Folder’ to bring up a new folder panel
- Select the ‘MQL4/5’ folder, followed by the ‘Experts’ folder
- Drag and drop (or Copy) your EA file(s) into this folder
- Restart MetaTrader for your changes to take affect
Setup and User Guide for Discord To MT4 and Discord To MT5
1. Download Discord To MT4/5 v1.0.1 and extract the files
2. Run DaneTrades_Discord_MT45_V_1.0.1.exe
3. To get your Discord Token log in on the Discord website via Google Chrome Browser
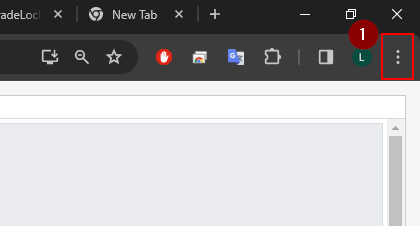
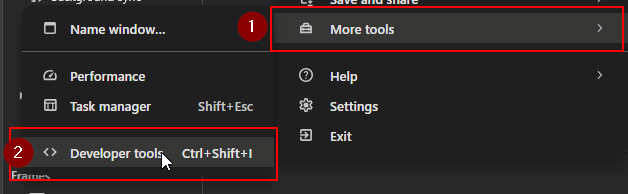
4. Click the three dots in the top right corner of the browser window, choose More tools, then Developer tools.
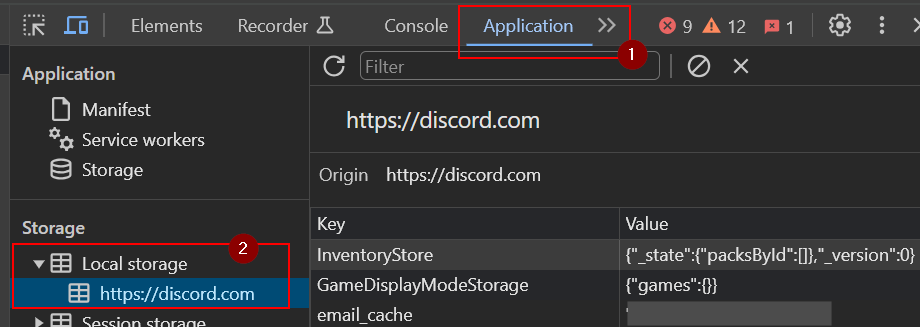
5. Go to the Application tab, click the down arrow next to Local storage in the Storage section, find and click on the Discord URL.
6. Click Toggle device toolbar and In the Filter field, type token.
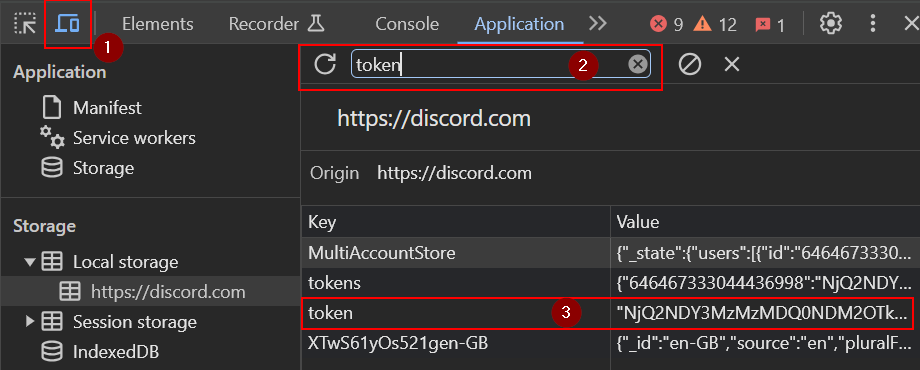
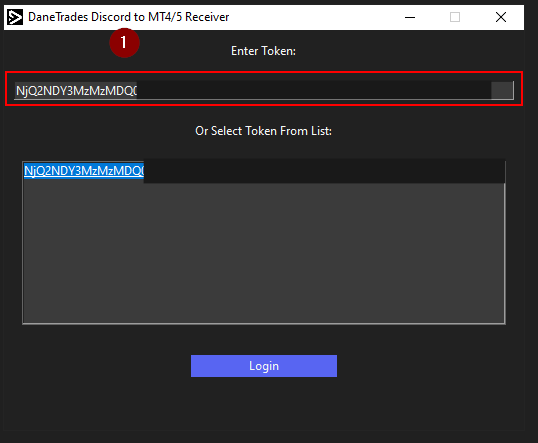
7. Copy and Paste this token into the Discord To MT4/5 Application and select Login. (The token will be saved for future use)
8. In Discord go to the channel you want to copy signals from and Right Click and Select Copy Channel ID
9. Copy the Channel ID into the Discord To MT4/5 Application (Channel IDs are remembered in the history list)
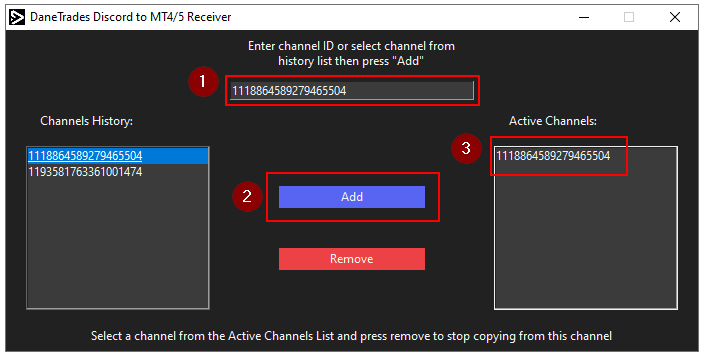
10. Any Channel IDs in the Active Channel list will have their signals copied. Remove Channel ID from the Active Channel list to stop copying signals from the Channel
Please keep the program running and copying at all times while using the EA
Enable Discord To MT4/MT5 Receiver EA
You must first enable the Copier by pressing the ‘Enable’ on the bottom right of the panel.
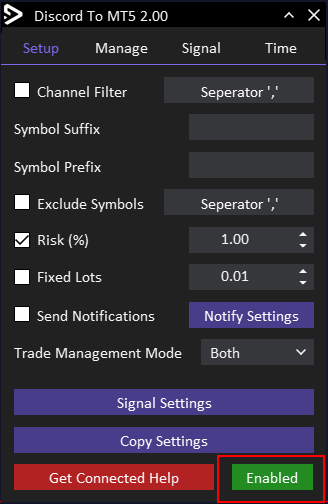
Setup Tab
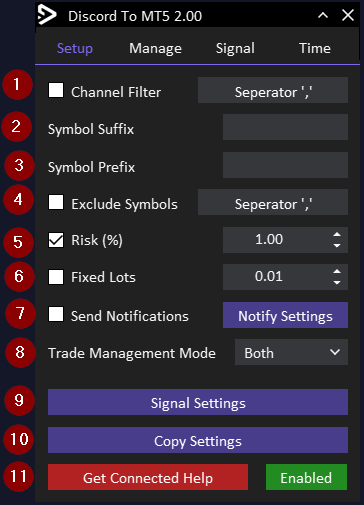
- Channel Filter - Any Channel ID in the Filter will have signals copied. Any Channel ID not included will be ignored
- Symbol suffix for example '.i' to make GBPUSD.i
- Symbol Prefix for example 'x' to make xGBPUSD
- Exclude symbols seperated by , (XAUUSD, SPX500)
- Risk per trade in % of balance
- Fixed lots per trade
- Send notifications. Tick to enable. Click on Notify settings to open more notification settings
- Trade Management Mode. Both = Trade Managed from either the signal or the manage tab. From Signal = trade managed by signal from telegram. Manual = Trades can be managed by 'Manage Tab' or manually. Will ignore modifications sent from signal
- Signal Settings - Opens the signal settings window
- Copy settings - choose which signals to copy
- Help to get connected to telegram
Signal Settings

- Open Signal Settings
- Symbol Mapping - If symbol names are not the same in the signal as your broker then you need to map it. GOLD is already mapped to XAUUSD by default so this does not need to be added. The format is ['Symbol From Signal' = 'Symbol in broker']. Then use ',' (Comma) as a separator. For example [BRENT = OIL],[SP500 = US500].
- Delay Taking signals by increasing this timer
- When receiving a signal you can add a few pips to the values to make them unique. Good for prop firms.
- If the Signal contains entry prices on their market orders then enabling this allows you to set a slippage amount and turn the order into a pending if the entry price in the signal is too far away from the current price on your broker.
- If price is outside the slippage amount it will be turned into a pending order.
- Max slippage for the Entry Price. If the price in the signal is too far away from the price on your broker it will either be ignored or turned into a pending (see above)
- How much of the Risk will be allocated to TP1. For example you risk 1% overall. TP1 is set to 50%. TP1 lot size will be half of the risk amount 1%. So will be 0.5%.
- How much of the Risk will be allocated to TP2. For example you risk 5 lots. TP2 is set to 20%. TP2 lot size will be 25% of the 5 risk lots. So will be 1 lot for TP2
- How much of the Risk will be allocated to TP3. For example you risk 1% overall. TP3 is set to 25%. TP3 lot size will be 25% of the risk amount 1%. So will be 0.25%.
- Ignore Signals with no SL - Signals will not be copied if they do not contain stop losses
Setup Notifications
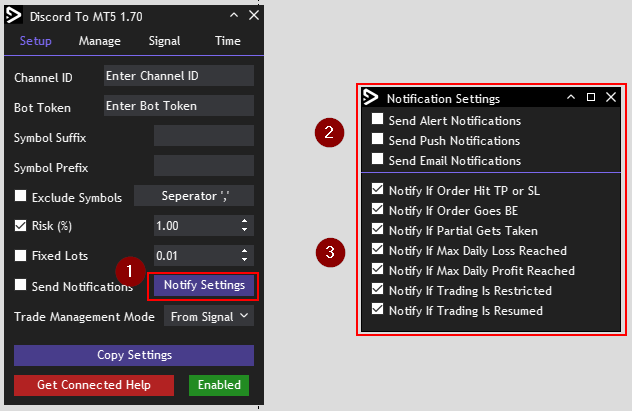
First Setup Notifications for Email and Push following this link
- Notify Settings button opens the notification window
- Choose to get notified via Alert, push or Email
- Actions to get notified for
- Send Alert - Sends alert on the terminal
- Send Push - Sends notification to mobile setup in tools > Options
- Send Email - Sends email to email setup in Tools > Options
Copy Settings
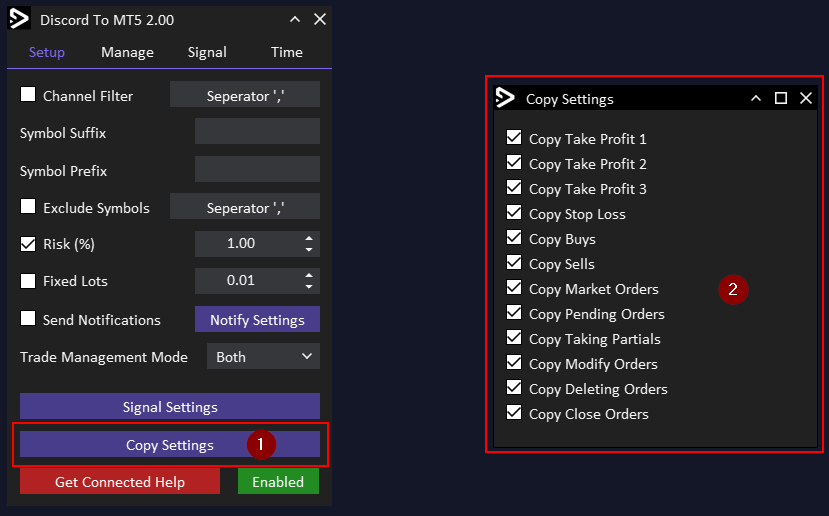
1. Opens the copy settings window
2. Choose which part of the signal you want to copy
Manage Tab
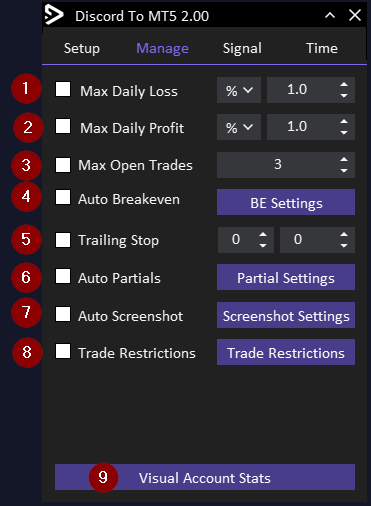
- Max Daily Loss - Once loss has been reached no more trades can be opened
- Max Daily Profit - Once Profit has been reached no more trades can be opened
- Max Open Trades - Max number of trades allowed open at once
- Auto Breakeven - Set when to go breakeven. Choose from On TP1 Close, On TP2 Close, Pips or RR
- Trailing stop - How many pips behind price for stop loss
- Auto Partials - Auto partial settings. Enable to use
- Auto Screenshot Settings - Enable to use
- Trade Restriction Settings - Enable to use
- Open Visual Account Stats Window
Partial Settings
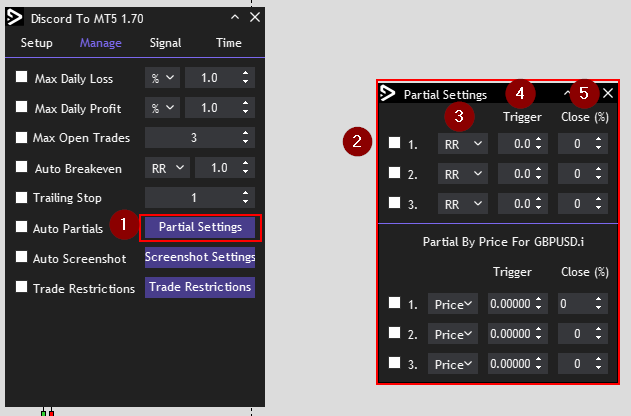
- Click on Partial Settings to Open Partial Settings WIndow
- Choose up to 3 Partials by ticking the box
- Set to use RR or Pips
- Trigger - How many pips or RR away from the open before partial is taken
- Close % - How much of the position to close. 100% is all the position
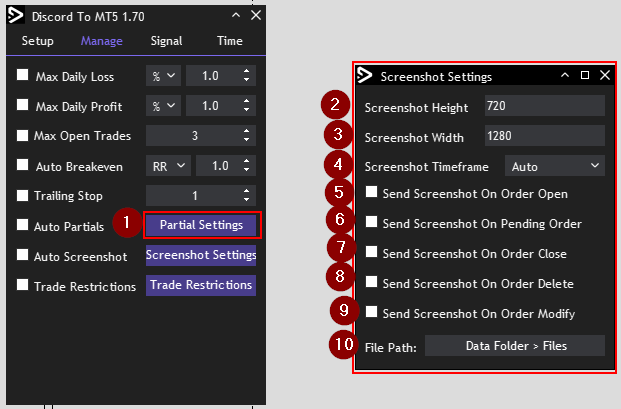
Auto Screenshot Settings
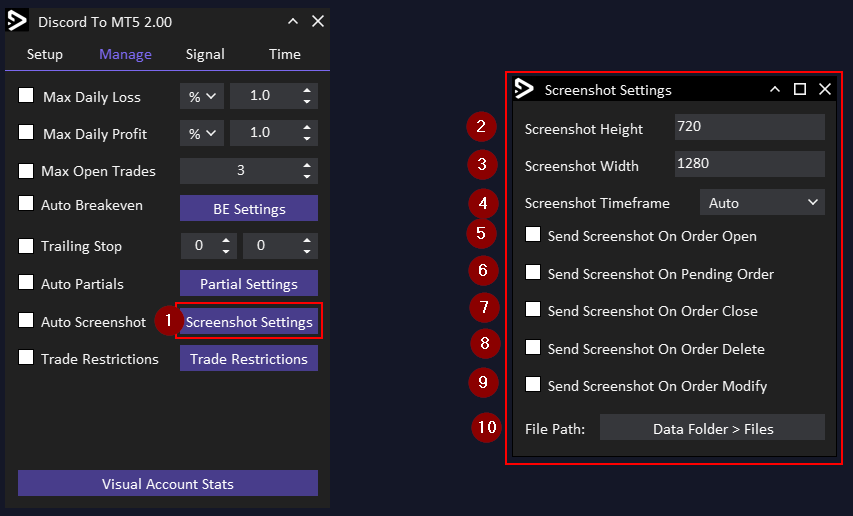
- Open Auto Screenshot settings
- Screenshot Height in Pixels
- Screenshot Width in Pixels
- Screenshot timeframe - Auto = The current timeframe the EA is loaded on
- Send Screenshot on trade open
- Send Screenshot on pending order
- Send Screenshot on trade close
- Send Screenshot on pending order delete
- Send screenshot on trade modify
- File path of the screenshot. Can be found in data folder of MetaTrader. Go to File > Data Folder > MQL4(5) > Files
Trade Restriction Settings
- Open the trade restriction settings window
- Max Trades in the month before trading will be restricted
- M ax Trades in the Week before trading will be restricted
- M ax Trades in the Day before trading will be restricted
- M ax Trades in the Hour before trading will be restricted
- ax Trades in the Minute(s) before trading will be restricted
- Configure how long the Minutes window is. Max is 59 minutes
- Count all trades or only losing trades
- Restrict the current symbol or all symbols
- Current stats to see how far/close you are to a restriction
- Restricted time - Wat time a restriction was enabled. Allowed Time - See what time the restriction will be removed
Account Statistics - History Graph
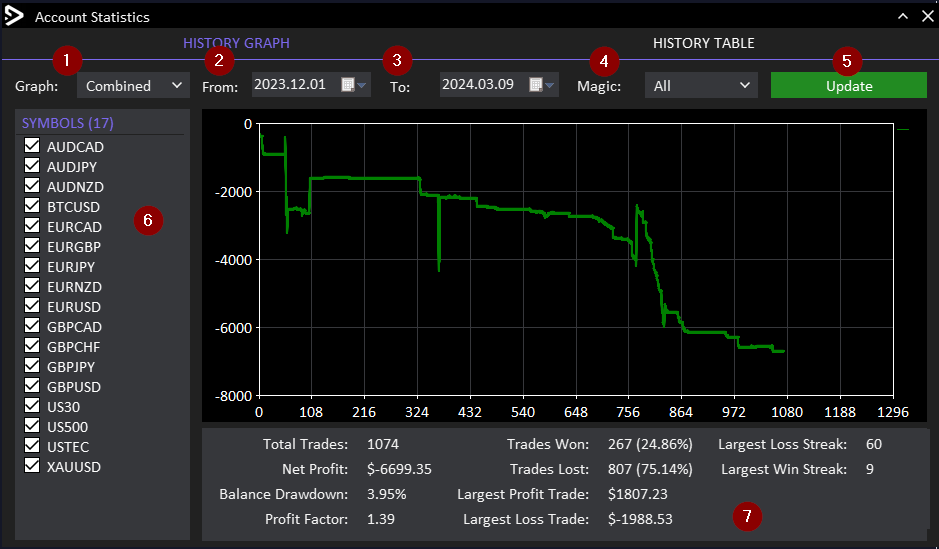
- Graph mode. Combined - Merge all balance curves into one. Individual - Each symbol will have its own balance curve
- Calendar From date. Select when the trading history will begin from. The trades before this will be filtered out
- Calendar To date. Select when the trading history will end on. The trades after this will be filtered out
- Magic Number Filter. Trades without this magic number will be filtered out
- Update button to apply filters and refresh the graph
- All trading symbols in Account History will appear here. Filter by checking/unchecking
- Account statistics according to the current filters
Account Statistics - History Table
The account History Table tab summarises all the trades and stats via symbol. You can sort the columns by clicking on them. The data is shown for the entire account and is not affected by the filters.
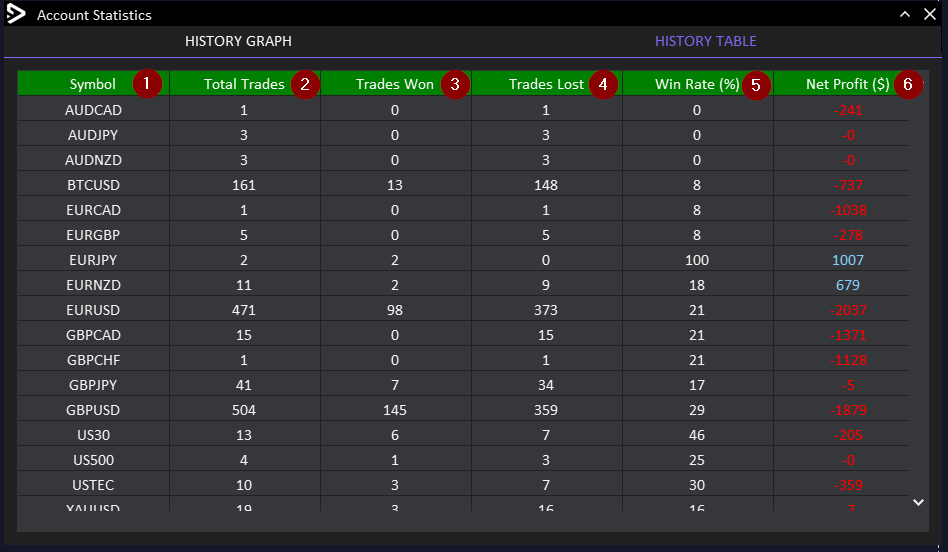
- Symbol
- Total Trades
- Trades Won
- Trades Lost
- Win Rate
- Net Profit ($)
Signal Tab
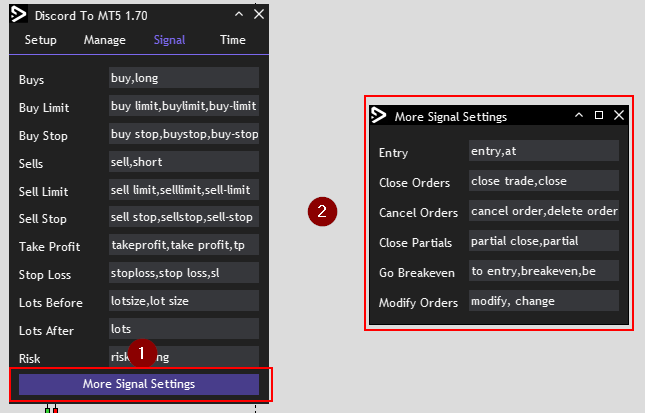
Customise what words/phrases will be used for each part of the signal. This is how you can pick up any signal no matter which language is used. The default should be good enough for most people
- Open more signal settings
- More signal settings
Time Tab
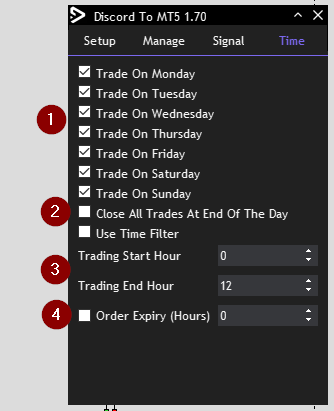
- Choose what days to trade on.
- Close all trades at the end of the day
- Use time filter - Only trade between the start and end hour
- Order expiry - How long pending orders remain active in hours
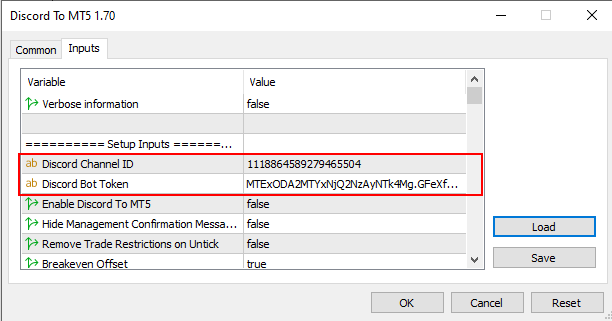
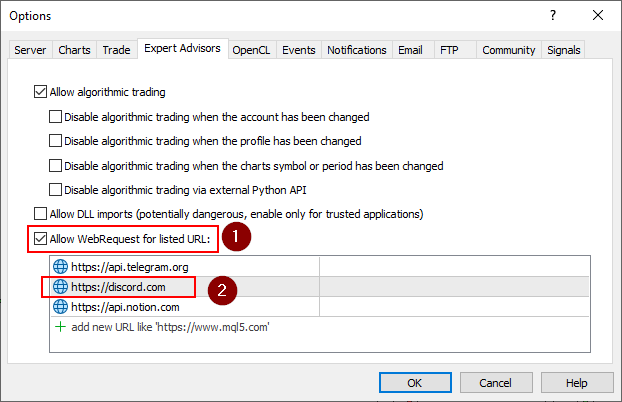
(NOT REQUIRED - OLD METHOD) How To Setup The Discord To MT4/MT5 Receiver EA using Bot Token and Chat ID
On Metatrader go to Tools > Options > Expert Advisors > Allow WebRequests and add the URL https://Discord.com
(NOT REQUIRED - OLD METHOD) COPY FROM SOMEONE ELSES DISCORD
If you are copying signals from someone else’s Discord they will need to give you their Bot Token. Alternatively, if you are an admin of their Discord you will also be able to follow the instructions below to create a Bot Token for the Discord. You can get the Channel ID by right clicking on the channel the signals are in and click Copy Channel ID. Copy these both into the Discord to MT5/MT4 to get connected.
If they do not have a bot token with the correct permissions. You can send them the guide below for them to set it up.
(NOT REQUIRED - OLD METHOD) COPY FROM OWN DISCORD
Create and Setup a Discord Bot
- Log into your Discord account and click on ‘Advanced’ in the sidebar. Then activate ‘Developer Mode’. Then click on ‘Discord API’.
- Activate ‘Developer Mode’ in your Discord account and then click on ‘Discord API’
- In the Developer Portal, click on ‘Applications’ in the sidebar on the left. Log in to your account again and then click on ‘New Application’.
- Click on ‘Applications’ and then ‘New Application’.
- Give your bot a name and then click on ‘Create’.
- Click on ‘Bot’ in the left sidebar, then click on reset token. Take note of the token, as this will be needed for the EA later.
- Scroll down and enable Message Content Intent
- Click ‘OAuth2’ in the left sidebar and URL Generator. Under Scope, Tick ‘Bot’. Scroll down and tick Send Messages and Read Message History under bot permissions.
- At the bottom copy the generated URL and paste it into the browser. Authenticate it to your discord room. The bot is now added to your discord.
- Right Click on the Channel you want to copy signals from and select “copy Channel ID”.
- Right click on the Channel you wish to take signals from and go to Settings > Permissions > Add Members or Role and add the bot to the channel.
- Enter the Channel ID and Bot Token from step 4 into the EA as shown in screenshot. You can use the interface or paste it into the inputs.