

Introduction
In this article, I will introduce the Expert-Advisor and review all the parameters of the product.
It is recommended that you read through the entire document before you start creating a strategy so that you understand how it all works.
Recommended Broker & VPS
My broker & VPS recommendation.
- Broker : myx.trading/broker
- Cashback : myx.trading/cashback
- VPS : myx.trading/vps
Timeframe
Which timeframe to use for EA Builder PRO?
The timeframe used does not matter because the algorithm works on tick, not on bar.
The choice of timeframes for the indicators is made directly in the settings.
Note: If the selected indicator use "PERIOD_CURRENT", it will use the timeframe of your EA Builder PRO.
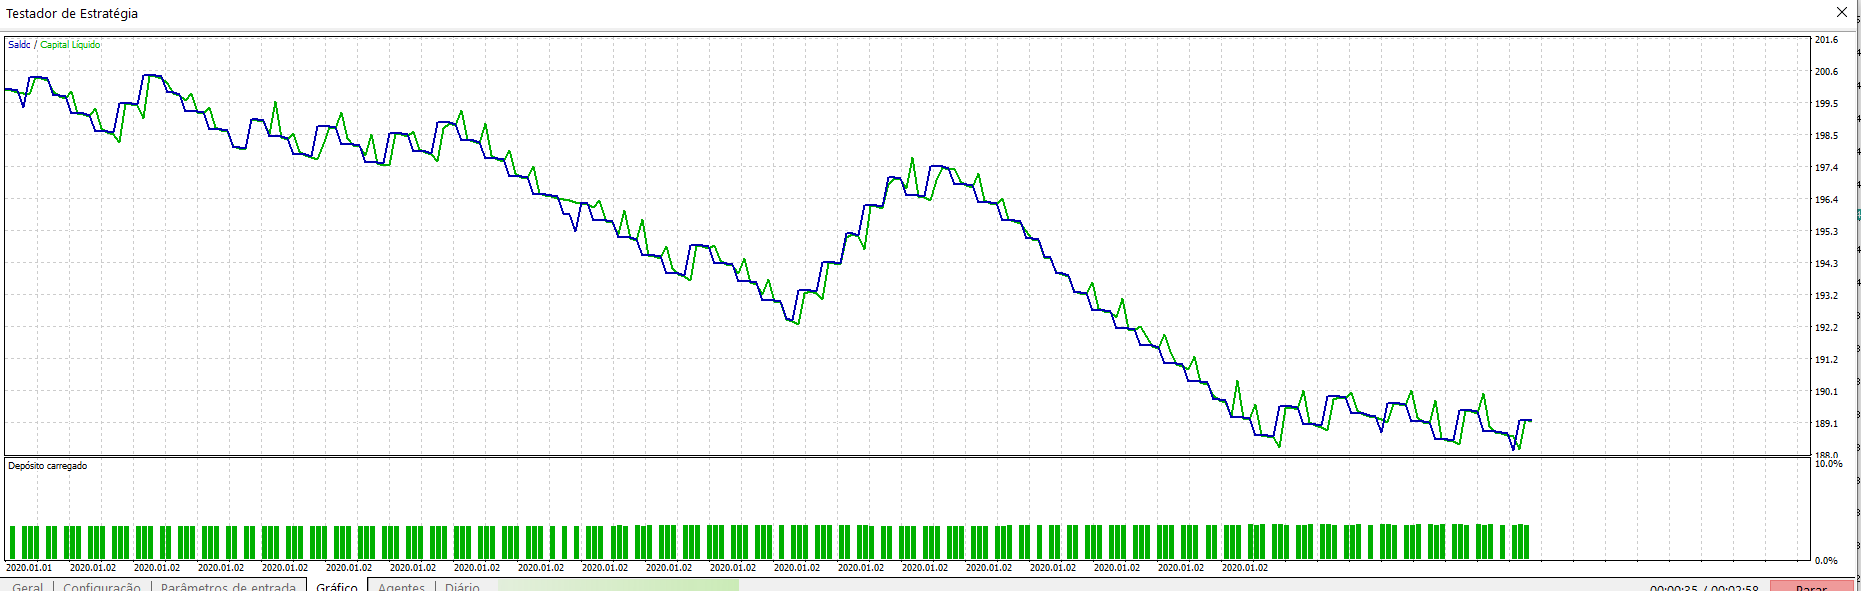
Strategy tester
EA Builder Pro does a lot of calculations at each tick based on the indicators used, which can make testing a long process.
How to speed up testing?
A simple way to speed up testing is to set Display informations on chart & Display indicators to false when you are using the strategy tester.
You can also disable the visual testing

Genetic optimization
I have set a custom max based on max relative drawdown (maximum balance drawdown as a percentage. In the process of trading, a balance may have numerous drawdowns, for each of which the relative drawdown value in percents is calculated) & profits.
Result = (profits / relative drawdown in %)
For example:
- If the test made 1542 profits and a relative drawdown of 38% the result will be (1542/38) ≃ 40.57
- If the test made 2050 profits and a relative drawdown of 88% the result will be (2050/88) ≃ 23.30
As you can see, the second test made more profits but since the relative drawdown is higher, the result will be lower. This allows you to sort the tests according to risk.
Parameters
EA settings
- Buy enabled: Allows the EA to buy.
- Sell enabled: Allows the EA to sell.
- Maximum spread to open a trade: [0=Off] Defines a minimum spread to open a new position. If at the time of opening an order the spread is equal to or greater than this value, the order will be ignored. To disable, set it to 0.
- Algorithm timing: Defines the algorithm timing. You can select between on_tick, on_M1_new_bar or on_current_timeframe_new_bar. on_tick will be the most precise, especially if you use indicators on the current bar, but will take more calculations and can slow down the testing process.
- Order filling type: You can modify the order filling type, more info here. It's recommended to use "auto".
- Order comment: Define the order comment.
- Withdraw profits on tester: Simulate a profit withdrawal on the strategy tester. As soon as all trades are closed, the EA will withdraw profits to go back at its initial balance. Withdrawal profits are counted as profit.
Display informations on chart
- Display informations on chart: Displays informations as a comment on the chart.
- Display indicators: Displays the indicators used on the chart or in the tester (if possible).
The Magic Number
- Magic number: The Magic Number is an identifier for the orders. The expert advisor will only recognize orders that have been opened with this magic number.
Note: If you are using several EAs at the same time, you must use a different magic number for each one.
Push notifications
- Push notifications enabled: Allows the EA to send notifications on the mobile app. The notifications are mainly the opening and closing of cycles by EA.
Note: If you are not familiar with push notifications, here are some articles to read:
iOS
- https://www.metatrader5.com/en/mobile-trading/iphone/help/push
- https://www.metatrader5.com/en/mobile-trading/iphone/help/settings/settings_messages
Android
- https://www.metatrader5.com/en/mobile-trading/android/help/push
- https://www.metatrader5.com/en/mobile-trading/android/help/messages
Trading hours (local server time)
- Trading hours enabled [false = always trading]: Allows EA to use trading hours. If false, it will always trade.
- Trading start hour: Start hour if trading hours is enabled.
- Trading start minute: Start minute if trading hours is enabled.
- Trading stop hour: Stop hour if trading hours is enabled.
- Trading stop minute: Stop minute if trading hours is enabled.
- Close trade after trading hours: Allows the EA to close all trades at the end of trading hours every day.
Note: Your local server time can be found on the market watch: https://www.metatrader5.com/en/terminal/help/trading/market_watch.
Note 2: Push notifications don't work on strategy tester.
Friday closing (local server time)
- Close all trades on Friday: Allows EA to use trading hours. If false, this will have no effect.
- Friday closing hour: Friday closing hour.
- Friday closing minute: Friday closing minute.
Note: Your local server time can be found on the market watch: https://www.metatrader5.com/en/terminal/help/trading/market_watch
Limitation on orders
- Maximum orders: Number of orders the EA can have open at the same time based on the current pair and magic number.
- Maximum total orders: Number of total orders on the account, for all pair and all magics.
- Maximum orders per side: Number of orders the EA can have open at the same time per side (Buy or Sell).
- Minimum timeframe between 2 cycles: Minimum timeframe between 2 cycles (Buy and Sell are independant). For example: If the EA opens a buy cycle and the minimum timeframe is 30min, the next possible Buy signal will be at the next 30min candle but a sell signal is still possible on the same candle.
Initial lot
- Initial lot type: Set how to calculate the initial lot.
| manual_initial_lot | The initial lot will always be the same, defined by the Initial lot value. |
| risk_for_initial_lot | The initial lot will be determined by the lowest value between Virtual SL, Visible SL & ATR SL. The risk is in percentage. For example: using a 5% risk for initial lot means that the SL of this order (and only this order) will cost you 5% of your balance. Note: If no SL are set, the value will be taken from Initial lot. |
| balance_per_initial_lot | It is an auto-lot system based on two value: Initial lot & Balance per initial lot. The calcul is simple: Initial lot * (account balance / Balance per initial lot) For example: Initial lot = 0.01 & Balance per initial lot = 100 & account balance = 550. 0.01 * (550/100) = 0.055 and will be rounded to 0.06 |
- Initial lot: Initial lot depending on Initial lot type.
- Balance per initial lot: Balance per initial lot depending on Initial lot type.
- Risk percentage for initial lot: Risk percentage for the initial lot depending on Initial lot type.
Lots calculation
- Lot calculation type for additional order: Set how to calculate additional order lots.
| addition_step | Every new orders will have a lot size incremented by Lot incrementation multiplied by the initial lot. For example: Initial lot = 0.01 and Lot incrementation = 0.02 Order 1: 0.01 Order 2: 0.01 + 1 * 0.02 = 0.03 Order 3: 0.01 + 2 * 0.02 = 0.05 Order 4: 0.01 + 3 * 0.02 = 0.07 Order 5: 0.01 + 4 * 0.02 = 0.09 Order 6: 0.01 + 5 * 0.02 = 0.11 Order 7: 0.01 + 6 * 0.02 = 0.13 etc.. |
| multiplier_step | Every new orders will have a lot size multiplied by Lot multiplier from previous order lot size. For example: Initial lot = 0.01 and Lot multiplier = 2 Order 1: 0.01 Order 2: 0.01 * 2 = 0.02 Order 3: 0.02 * 2 = 0.04 Order 4: 0.04 * 2 = 0.08 Order 5: 0.08 * 2 = 0.16 Order 6: 0.16 * 2 = 0.32 Order 7: 0.32 * 2 = 0.64 etc.. |
| only_initial | Every new orders will have the same lot size than the initial order. For example: Initial lot = 0.01 Order 1: 0.01 Order 2: 0.01 Order 3: 0.01 Order 4: 0.01 Order 5: 0.01 Order 6: 0.01 Order 7: 0.01 etc.. |
- Maximum lot: Set a maximum lot for an order.
- Lot incrementation: Set lot incrementation for addition_step.
- Lot multiplier: Set lot multiplier for multiplier_step.
Take profit & Stop Loss
- Global closing type: Set closing type.
| independent | Each order has its own TP & SL. |
| average | Set TP & SL with an average price based on orders prices and lots. For example: if the average price of 5 buy orders based on lot is 1.52361, TP is 100 points and SL is 200. TP will be at 1.52361 + 0.00100 = 1.52461 SL will be at 1.52361 - 0.00200 = 1.52161 |
| relative_average | Set TP & SL with an average price based on orders prices and lots divided by the number of orders. For example: if the average price of 5 buy orders based on lot is 1.52361, TP is 100 points and SL is 200. TP will be at 1.52361 + (0.00100 / 5) = 1.52381 SL will be at 1.52361 - (0.00200 / 5) = 1.52321 |
Visible TP & SL are placed directly in the orders for a faster execution.
- Visible TP [0=Off]: Set Visible take-profit in points. 0 will disable it.
- Visible SL [0=Off]: Set Visible stop-loss in points. 0 will disable it.
Invisible TP & SL are not placed in the orders, only the EA knows it.
- Invisible TP [0=Off]: Set invisible take-profit in points. 0 will disable it.
- Invisible SL [0=Off]: Set invisible stop-loss in points. 0 will disable it.
- ATR timeframe: Set the ATR timeframe.
- ATR period: Set the ATR period.
- ATR bar entry: Set the ATR bar entry.
- ATR TP multiplier [0=Off]: Set the ATR multiplier for take-profit. 0 will disable it.
- ATR SL multiplier [0=Off]: Set the ATR multiplier for stop-loss. 0 will disable it.
Trailing stop & Breakeven
- Trailing start: Set the trailing start point in points.
- Trailing distance [0=Off]: Set the trailing distance in points. 0 disable it.
- Minimum orders to set TP to breakeven [0=Off]: Minimum orders to set the take-profit to open price. 0 disable it.
Securities
- Equity TP [0=Off]: Close & stop trades if equity goes above this level. 0 disable it.
- Equity SL [0=Off]: Close & stop trades if equity goes below this level. 0 disable it.
- Drawdown SL [0=Off]: Close trades if the drawdown goes above this percentage level. 0 disable it.
- Free margin SL [0=Off]: Close & stop trades if free margin goes below this level. 0 disable it.
- Margin SL [0=Off]: Close & stop trades if margin goes above this level. 0 disable it.
- Level margin SL [0=Off]: Close & stop trades if margin level goes below this percentage. 0 disable it.
Note: The EA will close all open orders and stop activity until the until the limit is no longer exceeded.
For example: If you set an equity TP to 1000, if your equity reaches 1000, all trades are closed by the EA and as long as your equity is above, the EA will not trade anymore. You'll have to withdraw money or change the settings to trade again.
- Maximum security orders per side [0=Off]: Security orders are orders open in the opposite direction of the main order and use the same settings. 0 disable it.
- Maximum active orders before closing first [0=Off]: If I have more than X orders, it will close the most distant one. 0 disable it.
- Minimum active orders before activating percent profit [0=Off]: Percent profit will close all (buy or sell) orders if the profit reaches the percentage of balance. 0 disable it.
- Percentage of profits: Set the percentage for the option above.
- Minimum active orders before activating loss covering [0=Off]: Amount of opened orders in one side (buy or sell) to enabled loss covering system.
- Loss covering type: Set the type of loss covering.
| tp | close the first order with the last one with a TP of an average price of both. |
| balance_percent | close the first order with the last one with when the profits of both are above the percentage of the balance set. |
- Close with a percent profit: Set the percentage of loss covering only if you select balance_percent
- Close with a TP: Set the take-profit of loss covering only if you select tp
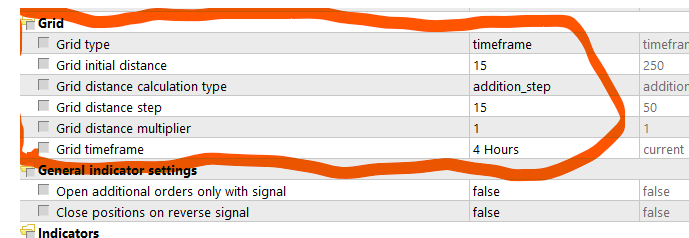
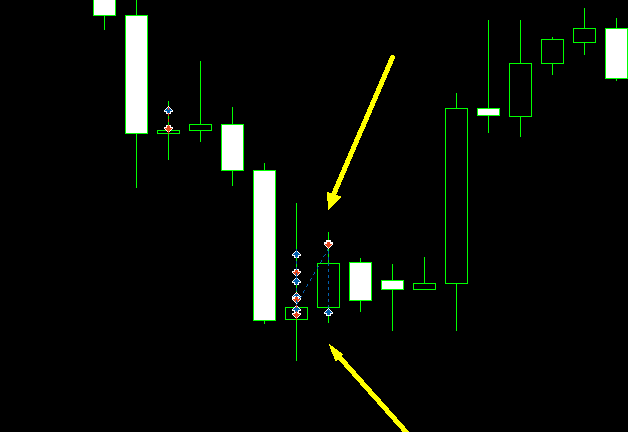
Grid
- Grid type: Select the grid type. By grid, i mean the opening of new orders in addition to the initial order.
| timeframe | Each new order will be spaced with, at least, the selected timeframe |
| distance | Each new order will be spaced with, at least, the selected distance |
| timeframe_and_distance | Each new order will be spaced with, at least, the select distance & timeframe |
| none | No grid orders |
- Grid initial distance: Select the initial distance between grid orders, in points (if grid type is distance or timeframe_and_distance).
- Grid distance calculation type: Select the calculation type of distance for new grid orders.
| addition_step | A new distance (Grid distance step) will be added each new orders new distance = Grid initial distance + (number orders * Grid distance step) |
| multiplier_step | The distance will be multiplid each new orders by Grid distance multiplier new distance = Grid initial distance * (Grid distance multiplier ^ number orders) |
| only_initial | The distance will remain the same as Grid initial distance |
- Grid distance step: Select the step for addition_step, in points.
- Grid distance multiplier: Select the multiplier for multiplier_step.
- Grid timeframe: Select the timeframe for timeframe and timeframe_and_distance.
General indicator settings
- Open additional orders only with signal: EA can add a new grid order only if the signal is still valid.
- Close positions on reverse signal: Close every opposite position when a signal occurs.
- Close positions is the signal is not active: Close positions if the signal is not active.
Indicators
- Enable Pivots as supports and resistances : Use this indicator as a signal.
- Enable RSI : Use this indicator as a signal.
- Enable MFI : Use this indicator as a signal.
- Enable Moving Average : Use this indicator as a signal.
- Enable Bollinger Bands : Use this indicator as a signal.
- Enable Stochastic : Use this indicator as a signal.
- Enable ATR : Use this indicator as a signal.
- Enable Envelopes : Use this indicator as a signal.
- Enable CCI : Use this indicator as a signal.
- Enable ADX: Use this indicator as a signal.
- Enable WPR : Use this indicator as a signal.
- Enable Parabolic SAR : Use this indicator as a signal.
- Enable MACD : Use this indicator as a signal.
- Enable Ichimoku : Use this indicator as a signal.
- Enable Fractal Adaptive Moving Average : Use this indicator as a signal.
- Enable Volume : Use this indicator as a signal.
- Enable Price change : Use this indicator as a signal.
- Enable High and low : Use this indicator as a signal.
- Enable Random : Use this indicator as a signal.
Note: It is necessary to configure the chosen indicators in the parameters below.
Note2: If all indicators are unused (set to false), the signal will be always true (for buy and sell).
List of timeframes
Here is the list of timeframes available for the indicators: https://www.mql5.com/en/docs/constants/chartconstants/enum_timeframes
What is bar entry?
Bar entry is the parameter available on each indicator that will allow us to choose the bar to be used.
Let's take the simple example of RSI:
- If I choose "current_bar", I will use the value of the RSI at the current bar
- If I choose "closed_bar", I will use the value of the RSI at the last closed bar
- If I choose "bar_6", I will use the value of the RSI at the sixth closed bar

Let's take the another example with RSI:
- If I choose the value of RSI cross up 30 at current_bar, it will be compared with the closed_bar
- If I choose the value of RSI cross up 30 at closed_bar, it will be compared with bar_2
- If I choose the value of RSI cross up 30 at bar_6, it will be compared with bar_7
What is applied price & applied volume?
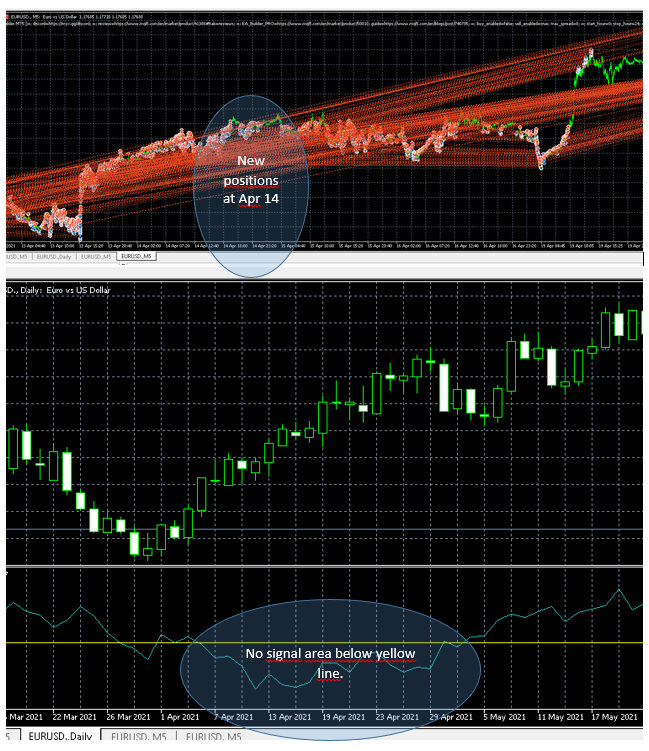
Calculations of technical indicators require price values and/or values of volumes, on which calculations will be performed. There are 7 predefined identifiers from the ENUM_APPLIED_PRICE enumeration, used to specify the desired price base for calculations. More info: https://www.mql5.com/en/docs/constants/indicatorconstants/pricesPivot points settings
Pivot Points are always very useful for trading, this is a simple way to have some idea of where the market is heading during the day.
The indicator provides the first three supports and resistances.
Resistance 3 = High + 2*(Pivot - Low)
Resistance 2 = Pivot + (R1 - S1)
Resistance 1 = 2 * Pivot - Low
Pivot Point = ( High + Close + Low )/3
Support 1 = 2 * Pivot - High
Support 2 = Pivot - (R1 - S1)
Support 3 = Low - 2*(High - Pivot)
It uses the data from the previous bar.

- Enable Pivot line: Enable the Pivot point line on the strategy. If false, it will only use supports & resistances 1, 2, 3 for the for activated timeframes.
- Enable daily pivots: Enable Pivot points on daily timeframe.
- Enable weekly pivots: Enable Pivot points on weekly timeframe.
- Enable monthly pivots: Enable Pivot points on monthly timeframe.
- Distance minimum for activation: Minimum distance in points to Support, Resistance or Pivot point to activate signal.
- Distance maximum for activation: Maximal distance in points to Support, Resistance or Pivot point to activate signal.
- Pivots Supports and resistances bar entry: Select the bar entry for Pivot points.
RSI settings
- RSI timeframe: Select the timeframe for RSI
- RSI period: Select the period for RSI
- RSI applied price: Select the RSI applied price
- RSI bar entry: Select the RSI bar entry
- Buy if RSI: Select the Buy signal for RSI
- the value: Select the value for Buy signal (If necessary)
- Sell if RSI: Select the Sell signal for RSI
- the value : Select the value for Sell signal (If necessary)
MFI settings
- MFI timeframe: Select the timeframe for MFI
- MFI period: Select the period for MFI
- MFI applied volume: Select the MFI applied volume
- MFI bar entry: Select the MFI bar entry
- Buy if MFI: Select the Buy signal for MFI
- the value: Select the value for Buy signal (If necessary)
- Sell if MFI: Select the Sell signal for MFI
- the value: Select the value for Sell signal (If necessary)
More info: https://www.mql5.com/en/docs/indicators/imfi
Moving Average settings
- Moving Average 1 timeframe: Select the timeframe for Moving Average 1
- Moving Average 1 period: Select the period for Moving Average 1
- Moving Average 1 MA shift: Select the Moving Average 1 shift
- Moving Average 1 method: Select the Moving Average 1 method
- Moving Average 1 applied price: Select the Moving Average 1 applied price
- Moving Average 1 bar entry: Select the Moving Average 1 bar entry
- Moving Average 2 timeframe: Select the timeframe for Moving Average 2
- Moving Average 2 period: Select the period for Moving Average 2
- Moving Average 2 MA shift: Select the Moving Average 2 shift
- Moving Average 2 method: Select the Moving Average 2 method
- Moving Average 2 applied price: Select the Moving Average 2 applied price
- Moving Average 2 bar entry: Select the Moving Average 2 bar entry
- Buy if price: Select the Buy signal for Moving Average
- Sell if price: Select the Sell signal for Moving Average
More info: https://www.mql5.com/en/docs/indicators/ima
Bollinger Bands settings
- Bollinger Bands timeframe: Select the timeframe for Bollinger Bands
- Bollinger Bands period: Select the period for Bollinger Bands
- Bollinger Bands applied price: Select the Bollinger Bands applied price
- Bollinger Bands ma shift: Select the Bollinger Bands moving average shift
- Bollinger Bands bar entry: Select the Bollinger Bands bar entry
- Bollinger Bands deviation: Select the Bollinger Bands deviation
- Buy if price: Select the Buy signal for Bollinger Bands
- Sell if price: Select the Sell signal for Bollinger Bands
Stochastic settings
- Stochastic timeframe: Select the timeframe for Stochastic
- K period: Select the period for K
- D period: Select the period for D
- Slowing: Select the Stochastic slowing
- Stochastic method: Select the Stochastic method
- Stochastic applied price: Select the Stochastic applied price
- Stochastic bar entry: Select the Stochastic bar entry
- Buy if Stochastic: Select the Buy signal for Stochastic
- the value: Select the value for Buy signal (If necessary)
- Sell if Stochastic: Select the Sell signal for Stochastic
- the value: Select the value for Sell signal (If necessary)
ATR & ADX settings
- ATR timeframe: Select the timeframe for ATR
- ATR period: Select the ATR period
- ATR bar entry: Select the ATR bar entry
- Buy if ATR: Select the Buy signal for ATR
- the value: Select the value for Buy signal (If necessary)
- Sell if ATR: Select the Sell signal for ATR
- the value: Select the value for Sell signal (If necessary)
Envelopes settings
- Envelopes timeframe: Select the timeframe for Envelopes
- Envelopes period: Select the period for Envelopes
- Envelopes applied price: Select the Envelopes applied price
- Envelopes deviation: Select the Envelopes deviation
- Envelopes ma shift: Select the Envelopes moving average shift
- Envelopes method: Select the Envelopes method
- Envelopes bar entry: Select the Envelopes bar entry
- Buy if price: Select the Buy signal for Envelopes
- Sell if price: Select the Sell signal for Envelopes
More info: https://www.mql5.com/en/docs/indicators/ienvelopes
CCI settings
- CCI timeframe: Select the timeframe for CCI
- CCI period: Select the period for CCI
- CCI applied price: Select the CCI applied price
- CCI bar entry: Select the CCI bar entry
- Buy if: Select the Buy signal for CCI
- the value: Select the value for Buy signal (If necessary)
- Sell if: Select the Sell signal for CCI
- the value: Select the value for Sell signal (If necessary)
More info: https://www.mql5.com/en/docs/indicators/icci
Williams' Percent Range settings
- WPR timeframe: Select the timeframe for WPR
- WPR calculation period: Select the period for WPR
- WPR bar entry: Select the WPR bar entry
- Buy if: Select the Buy signal for WPR
- the value: Select the value for Buy signal (If necessary)
- Sell if: Select the Sell signal for WPR
- the value: Select the value for Sell signal (If necessary)
More info: https://www.mql5.com/en/docs/indicators/iwpr
Parabolic SAR settings
- SAR timeframe: Select the timeframe for Parabolic SAR
- SAR step: Select the Parabolic SAR step
- SAR maximum: Select the Parabolic SAR maximum
- SAR bar entry: Select the Parabolic SAR bar entry
- Buy if: Select the Buy signal for Parabolic SAR
- Sell if: Select the Sell signal for Parabolic SAR
More info: https://www.mql5.com/en/docs/indicators/isar
MACD settings
- MACD timeframe: Select the timeframe for MACD
- MACD fast EMA period: Select the period for fast EMA
- MACD slow EMA period: Select the period for slow EMA
- MACD signal period: Select the period for MACD signal
- MACD applied price: Select the MACD applied price
- MACD bar entry: Select the MACD bar entry
- Buy if: Select the Buy signal for MACD
- the value: Select the value for Buy signal (If necessary)
- Sell if: Select the Sell signal for MACD
- the value: Select the value for Sell signal (If necessary)
Ichimoku settings
- Ichimoku timeframe: Select the timeframe for Ichimoku
- Ichimoku Tenken-sen period: Select the Tenken-sen period
- Ichimoku Kijun-sen period: Select the Kijun-sen period
- Ichimoku Senkou Span B period: Select the Senkou Span B period
- Ichimoku bar entry: Select the Ichimoku bar entry
- Buy if: Select the Buy signal for Ichimoku
- Sell if: Select the Sell signal for Ichimoku
More info: https://www.mql5.com/en/docs/indicators/iichimoku
Fractal Adaptive Moving Average settings
- FrAMA timeframe: Select the timeframe for Fractal Adaptive Moving Average.
- FrAMA period: Select the period for Fractal Adaptive Moving Average.
- FrAMA bar entry: Select the Fractal Adaptive Moving Average bar entry.
- FrAMA MA shift: Select the moving average shift for Fractal Adaptive Moving Average.
- FrAMA applied price: Select the applied price for Fractal Adaptive Moving Average.
- Buy if: Select the Buy signal for Fractal Adaptive Moving Average.
- Sell if: Select the Sell signal for Fractal Adaptive Moving Average.
More info: https://www.mql5.com/en/docs/indicators/ifractals
Volume settings
- Volume timeframe: Select the timeframe for Volume.
- Volume bar entry: Select the Volume bar entry.
- Buy if: Select the Buy signal for Volume.
- the value: Select the value for Buy signal (If necessary).
- Sell if: Select the Sell signal for Volume.
- the value: Select the value for Sell signal (If necessary).
High and Low Breakout settings
- High and Low timeframe : Select the timeframe for High and Low Breakout.
- High and Low total bar: Select the number of bars for High and Low Breakout.
- High and Low bar entry: Select the bar entry for High and Low Breakout.
- Buy if: Select the Buy signal for High and Low Breakout.
- Sell if: Select the Sell signal for High and Low Breakout.
Price change settings
Price change is pretty simple. You choose two different bars. It will look for a percentage variation between these bars.
- First price bar entry: Select bar entry for First Price.
- First price entry: Select price type for First Price.
- Second price bar entry: Select bar entry for Second Price.
- Second price type: Select price type for Second Price.
- Buy if: Select the Buy signal for Price Change.
- the value: Select the value in percentage for Buy signal (If necessary).
- Sell if: Select the Sell signal for Price Change.
- the value: Select the value in percentage for Sell signal (If necessary).
Random settings
Random has no settings yet. Each tick, random indicator has 50% chance to return a Buy/Sell signal.
Interested in a new indicator or feature?
If you would like to make a request for me to integrate a new indicator or feature, feel free to leave your request in an EA review.
What do you think about the EA Builder PRO?
Reviews are important for the development of EA Builder PRO, whether it is good or bad, feel free to leave a review here.
Bug report
If you think you've found a bug in EA Builder, here's the protocol to follow:
- Write a precise description of the context. (date, pair, etc..)
- Write a description of the error as precise as possible. (if necessary, attach explanatory screenshots)
- Attach the logs of the expert tab for the corresponding date.
- Attach the logs from the log tab for the corresponding date.
- Attach the .set file.
Send everything in a private message on my MQL5 profile.
If the description is clear, I will take care of the problem as soon as possible to update the version.
Conclusion
You have all the tools you need to create the perfect strategy.


