You can find the MT4 version here
You can find the MT5 version here
How to buy and activate the Trade Buddy EA on the MQL Marketplace
Demo Video
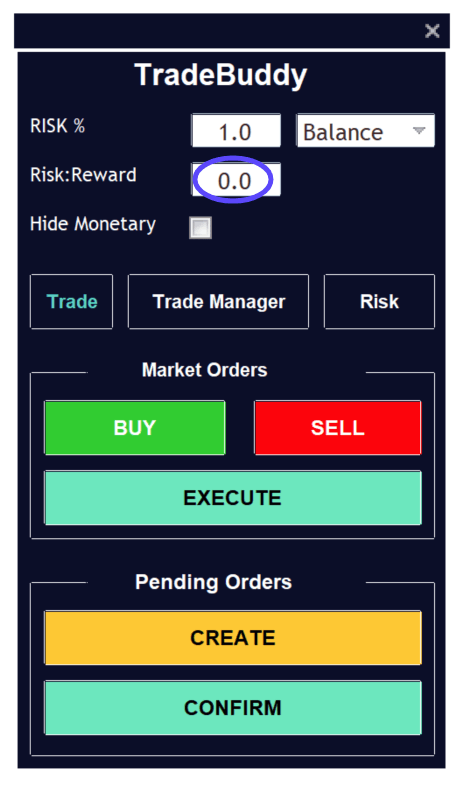
Trade Buddy Tab Overview
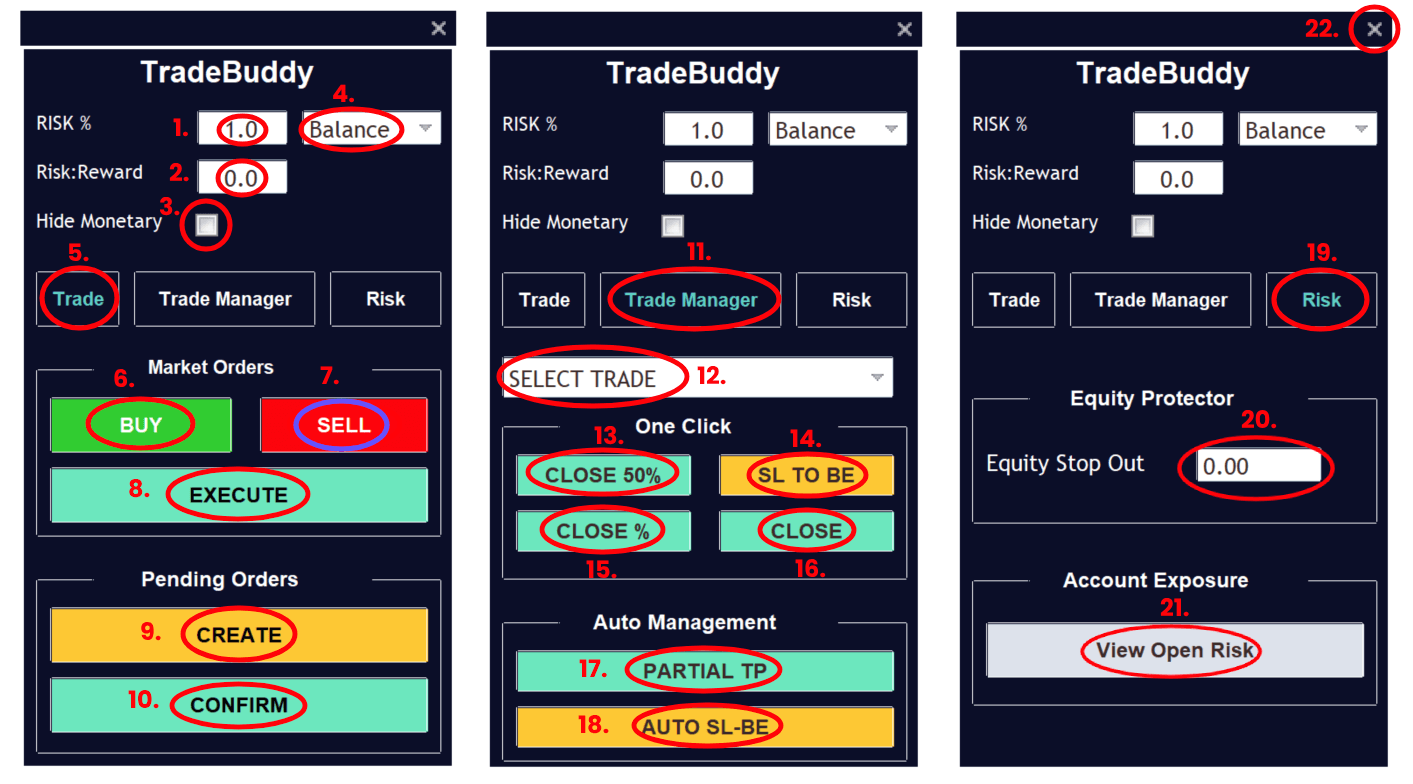
- Risk % input field - edit this to change the desired risk %
- Fixed Risk:Reward field - edit this to change the fixed R:R
- Hide Monetary tick box - tick/untick this to show or hide monetary values
- Risk based on account Balance/Equity dropdown - change this to choose the desired risk calculation method
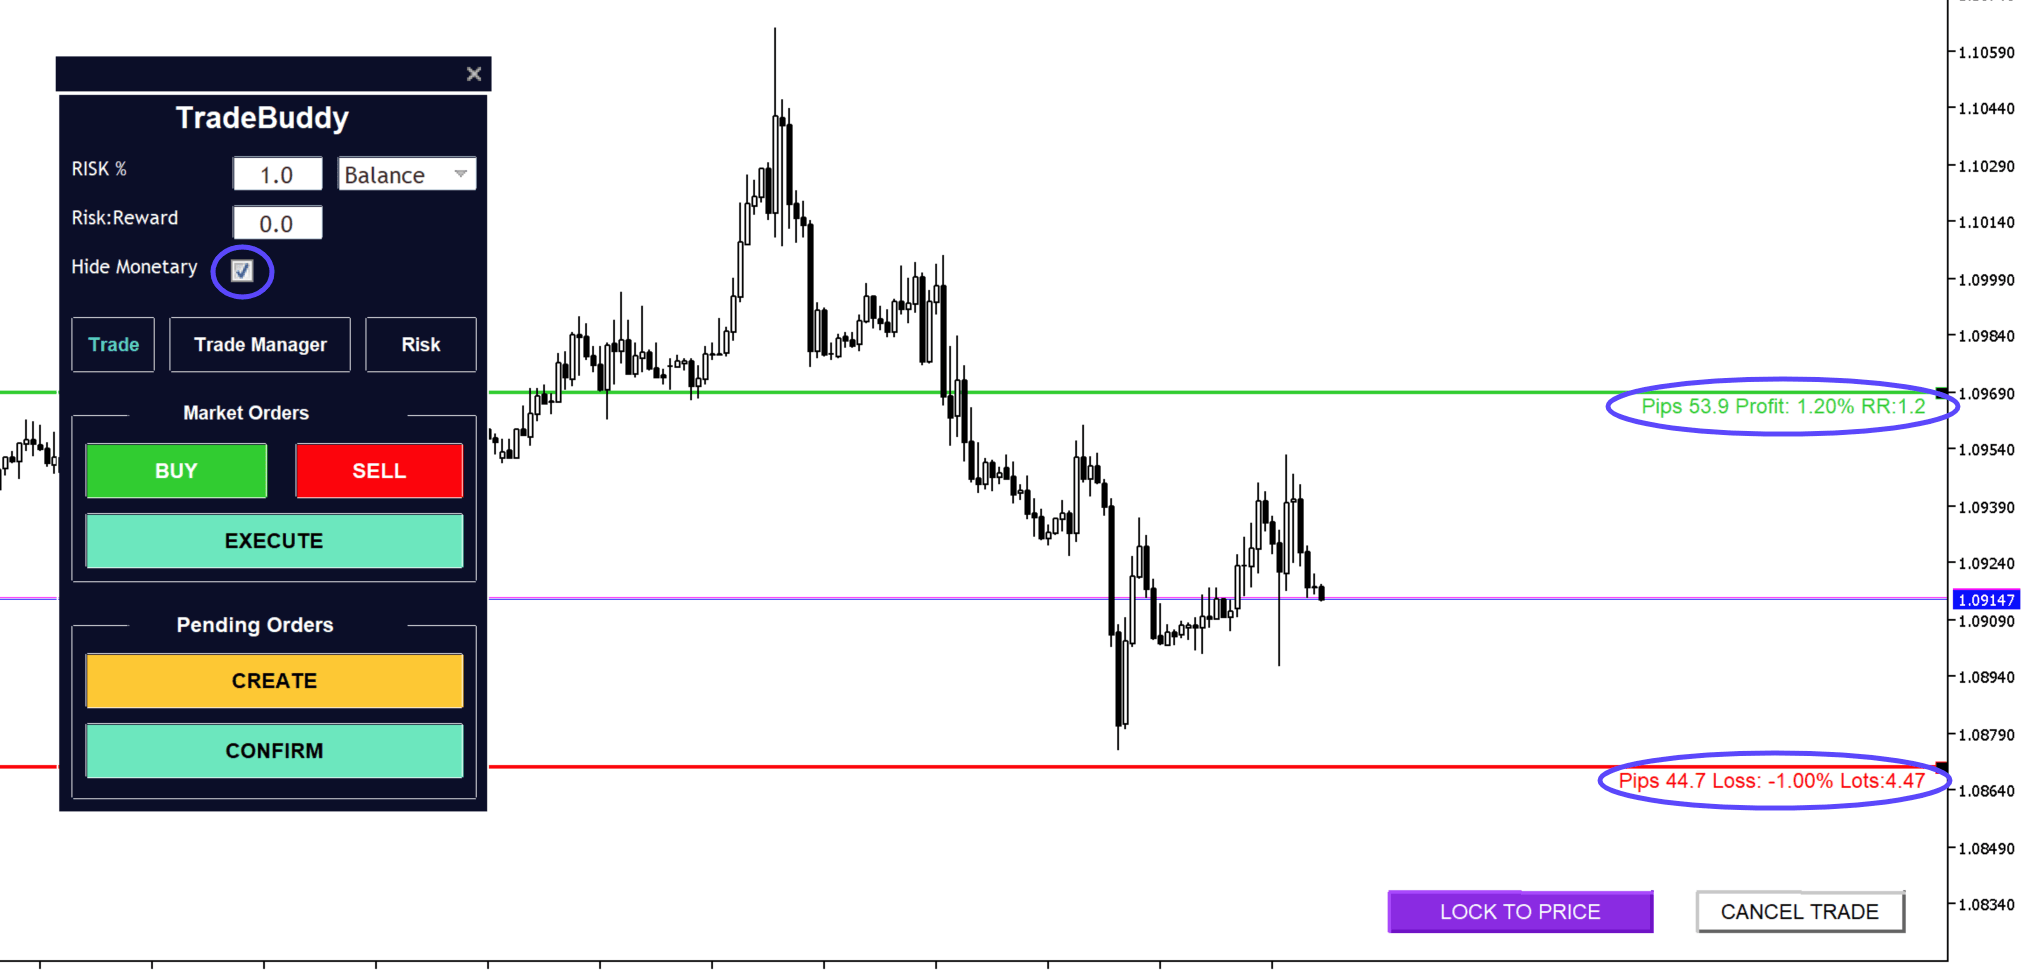
- The Trade Tab - this is where you can create and execute your orders
- Market Order - Buy button, click this to open the Market Buy calculation lines
- Market Order - Sell button, click this to open the Market Sell calculation lines
- Execute button - click this to execute your order
- Pending Order - Create button, click this to open the Pending Order calculation lines
- Pending Order - Confirm button, click this to execute your order
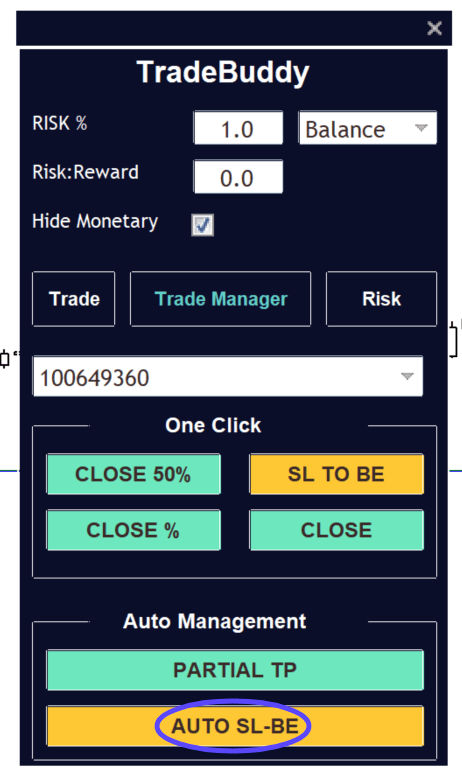
- Trade Manager Tab - this is where you can use the One Click and Automatic trade manager features
- Select Trade dropdown - choose the trade ID you want to manage, or ALL BUY/ALL SELL (to manage multiple trades at once)
- Close 50% button - close half your position(s) instantly
- SL to BE button - move your SL(s) to breakeven instantly
- Close % button - close a custom % of your position(s) instantly (percentage adjusted in settings)
- Close button - close your position(s) instantly
- Partial TP button - open the automatic Partial TP line (percentage adjusted in settings)
- Auto SL-BE button - open the automatic SL to BE line
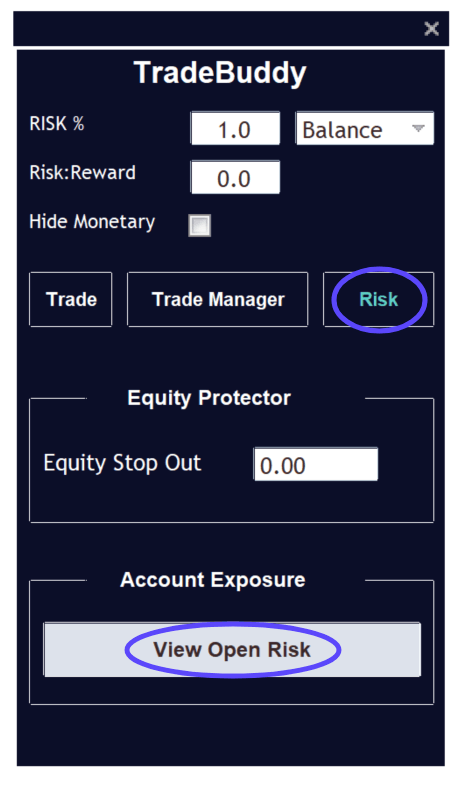
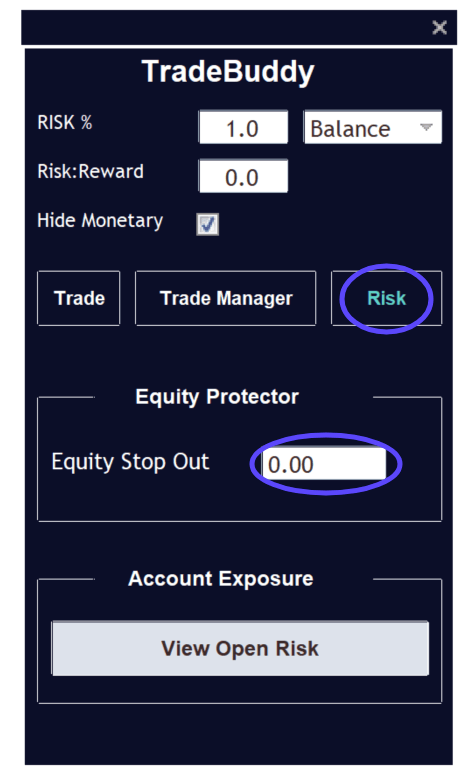
- Risk Tab - this is where you can enable the Equity Protector and open the Risk Popup
- Equity Protector field - input your desired account equity level for the Equity Protector to trigger and cut your trades
- Open Risk Popup button - click this to open the Open Risk Popup
- Close EA button - click this to close the Trade Buddy EA
Key features
Automatic Risk Calculations
Automatically calculate your risk based on account equity OR account balance
Simply enter your desired Risk % and let Trade Buddy do the rest
Your lot size will automatically calculate based on the size of your Stop Loss and your Risk % input
Eliminate the psychological pressure of trading larger accounts with the “Hide Monetary” feature. Tick this box and trade Buddy will hide the monetary amounts from the calculation lines so you can focus on trading with percentages, not monetary values
Built in Hotkeys, so you can trade with maximum efficiency. Simply press “M” to open the Market Order lines, then press “E” to execute it, or press “P” to open the Pending Order lines and then press “E” to execute it.
Automatic Trade Management
Two sections - One Click and Auto Management
The One Click section will instantly move your Stop Loss to Breakeven, close half your trade, close a custom percentage of a trade (e.g. 10%, 20% etc) and even close trades entirely
The Auto Management section will let you set a price for Trade Buddy to automatically take partial profits at or more your Stop Loss to Breakeven
These features work on single trades or ALL BUY/ALL SELL trades for each symbol, allowing you to manage multiple trades with none of the hassle
Equity Drawdown Protection
The Equity Protector feature allows you to set an account level equity cut-off. This will automatically cut all your trades when your account equity reaches your preferred cut-off amount
This makes it easier than ever to stay within prop firm drawdown limits
Using Trade Buddy Detailed Guide
Contents
1. Entering the Market
2. Hotkeys
3. Hiding Monetary Amounts
4. The Risk Popup
5. One Click Management
6. Auto Management - SL to Breakeven
7. Auto Management - Partial TP
8. The Equity Protector
9. Adjusting Trade Buddy for Crypto, Indices and Commodities
10. Adjusting Trade Buddy for Futures without Partial Lots
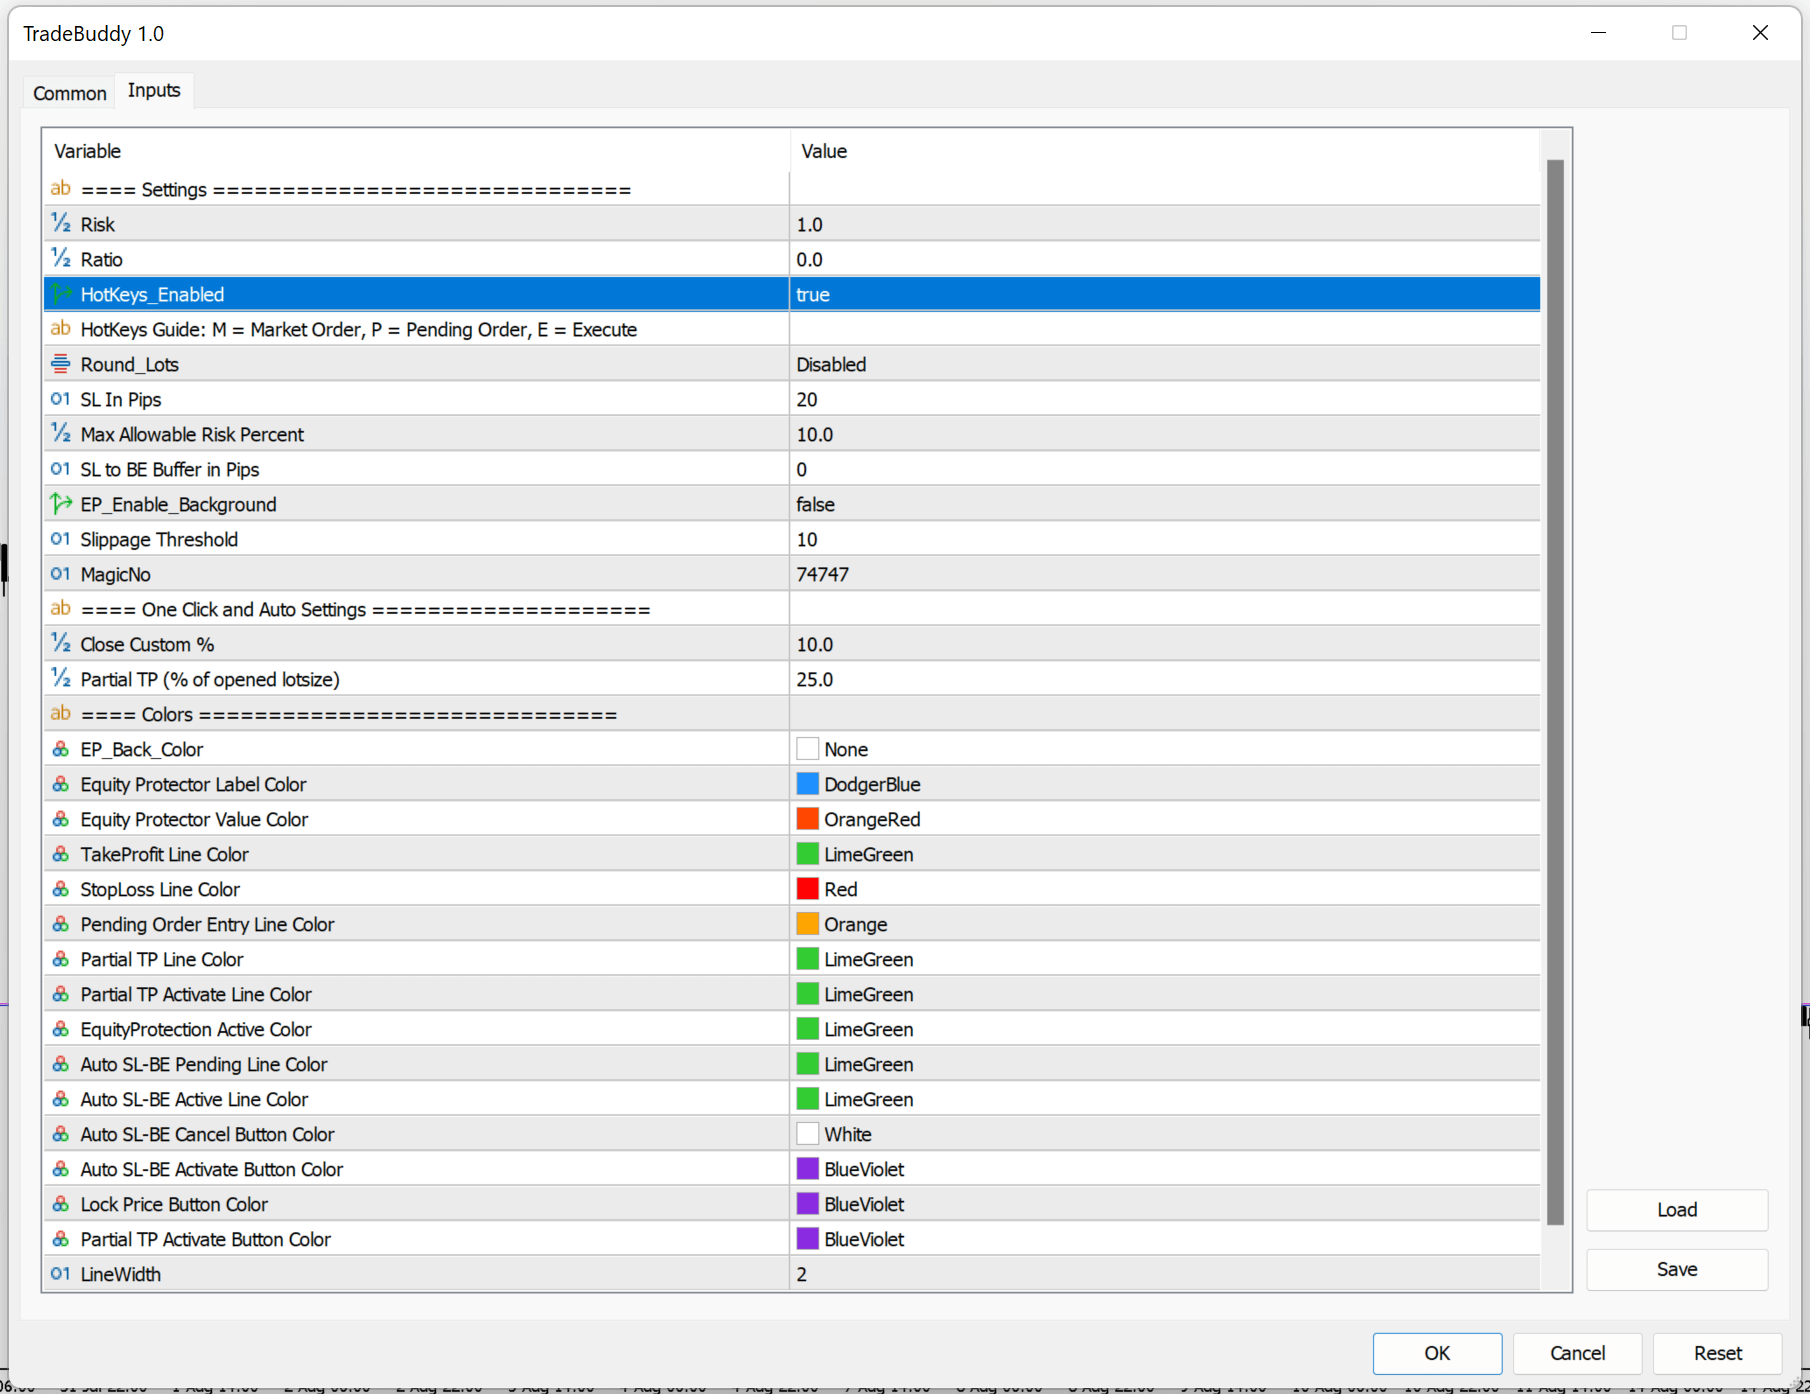
11. Settings Walkthrough
12. Adjusting the Color Scheme
1. Entering the Market
Trade Buddy makes getting into the market effortless with automated risk calculations, hotkeys and more.
Adjusting Your Risk %
To adjust your risk amount, simply change the number in the RISK % field from 1% (the default) to any amount you like.
You can also choose between the risk % being calculated based on your account Balance (the default) and the account Equity (for example, if you are letting a bunch of winners run and you want to compound your size).
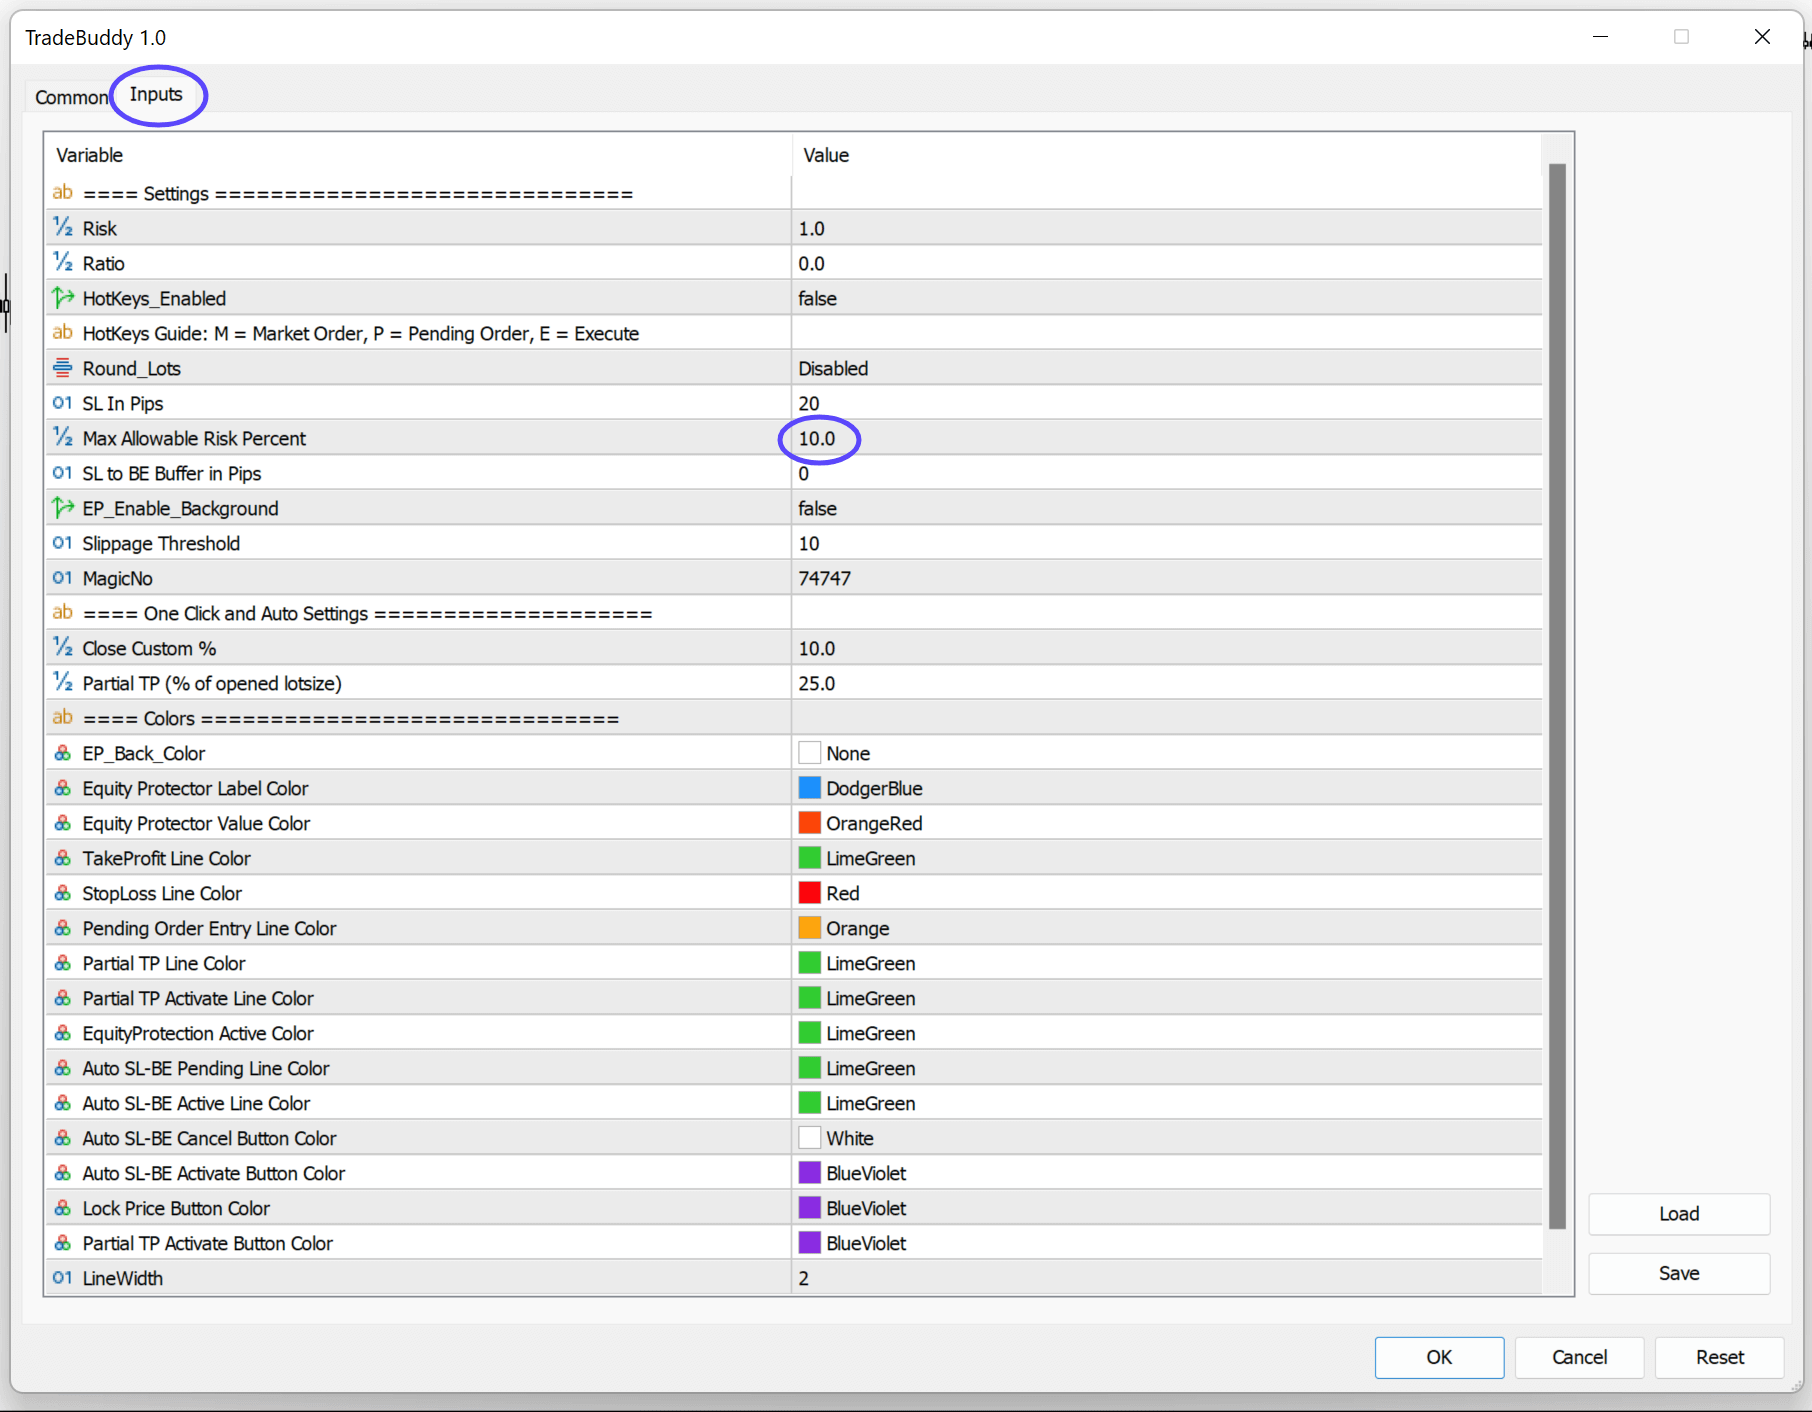
Max Allowable Risk Percent
Please note that Trade Buddy has a "Max Allowable Risk Percent" option that is set to 10% by default. This setting will prevent you enterign any amount hier than the amount entered in this setting, which helps to prevent any accidental oversizing. You can adjust this by going to Settings > Inputs > Max Allowable Risk Percent
Locking Price to a Specific Risk:Reward
If you have found with your edge you should always opt for 1.5R, 2R or even 3R, then Trade Buddy makes it easy to do so. Simply enter your desired RR into the “Risk:Reward” field and your TP and SL will stay locked to this RR whenever you move either the TP or SL. For market orders, the TP line will automatically adjust as price moves in relation to your stop loss size to help you trade as efficiently as possible.
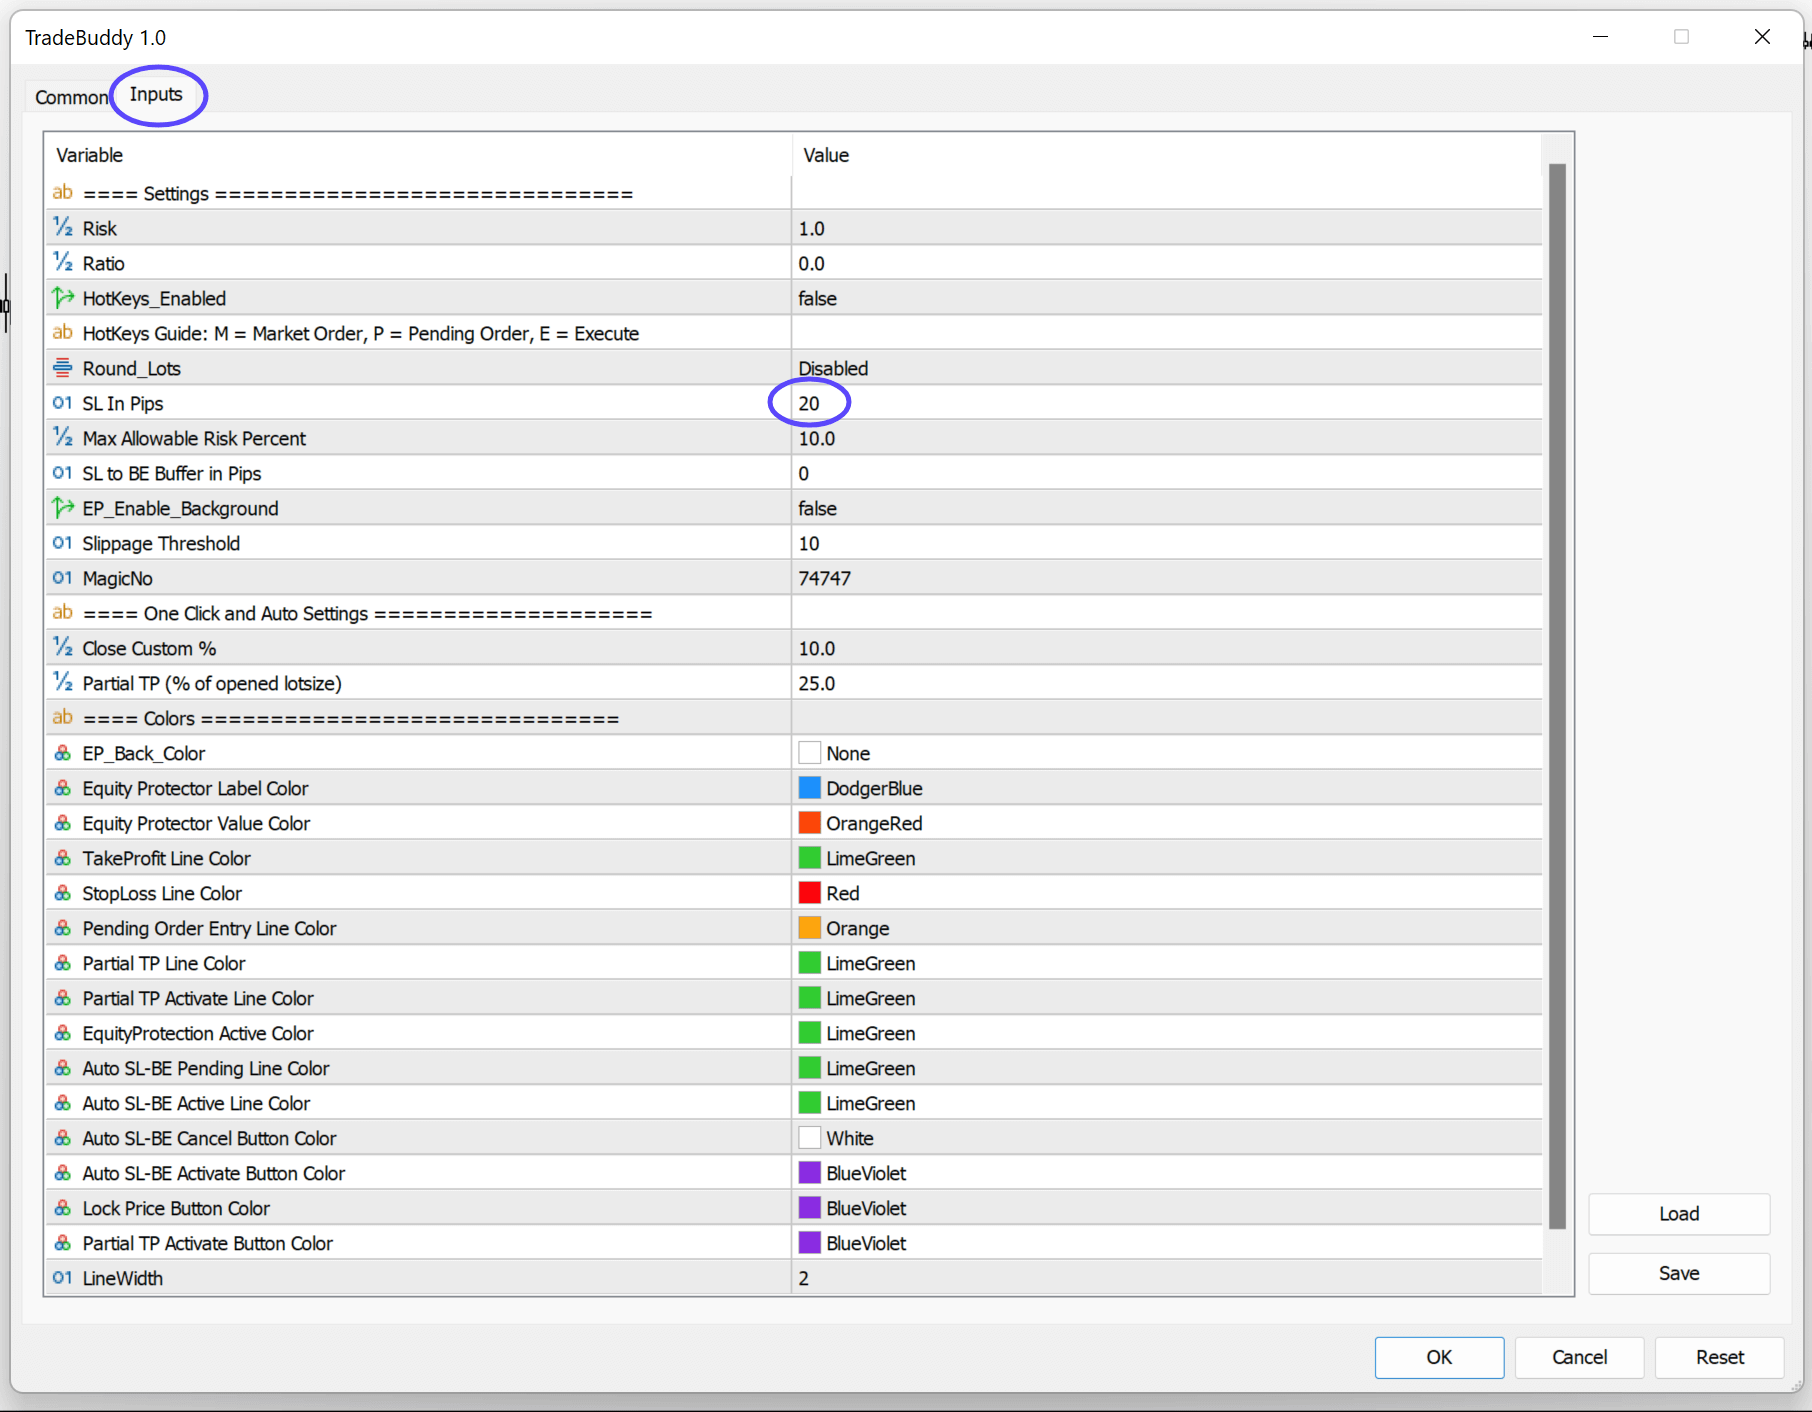
SL In Pips
By default, Trade Buddy will put your SL 20 pips away from the current price when you create any calculation lines. This can be easily adjusted by going into Settings > Inputs > “SL in Pips” and adjusting the input of 20 to whatever amount you like.
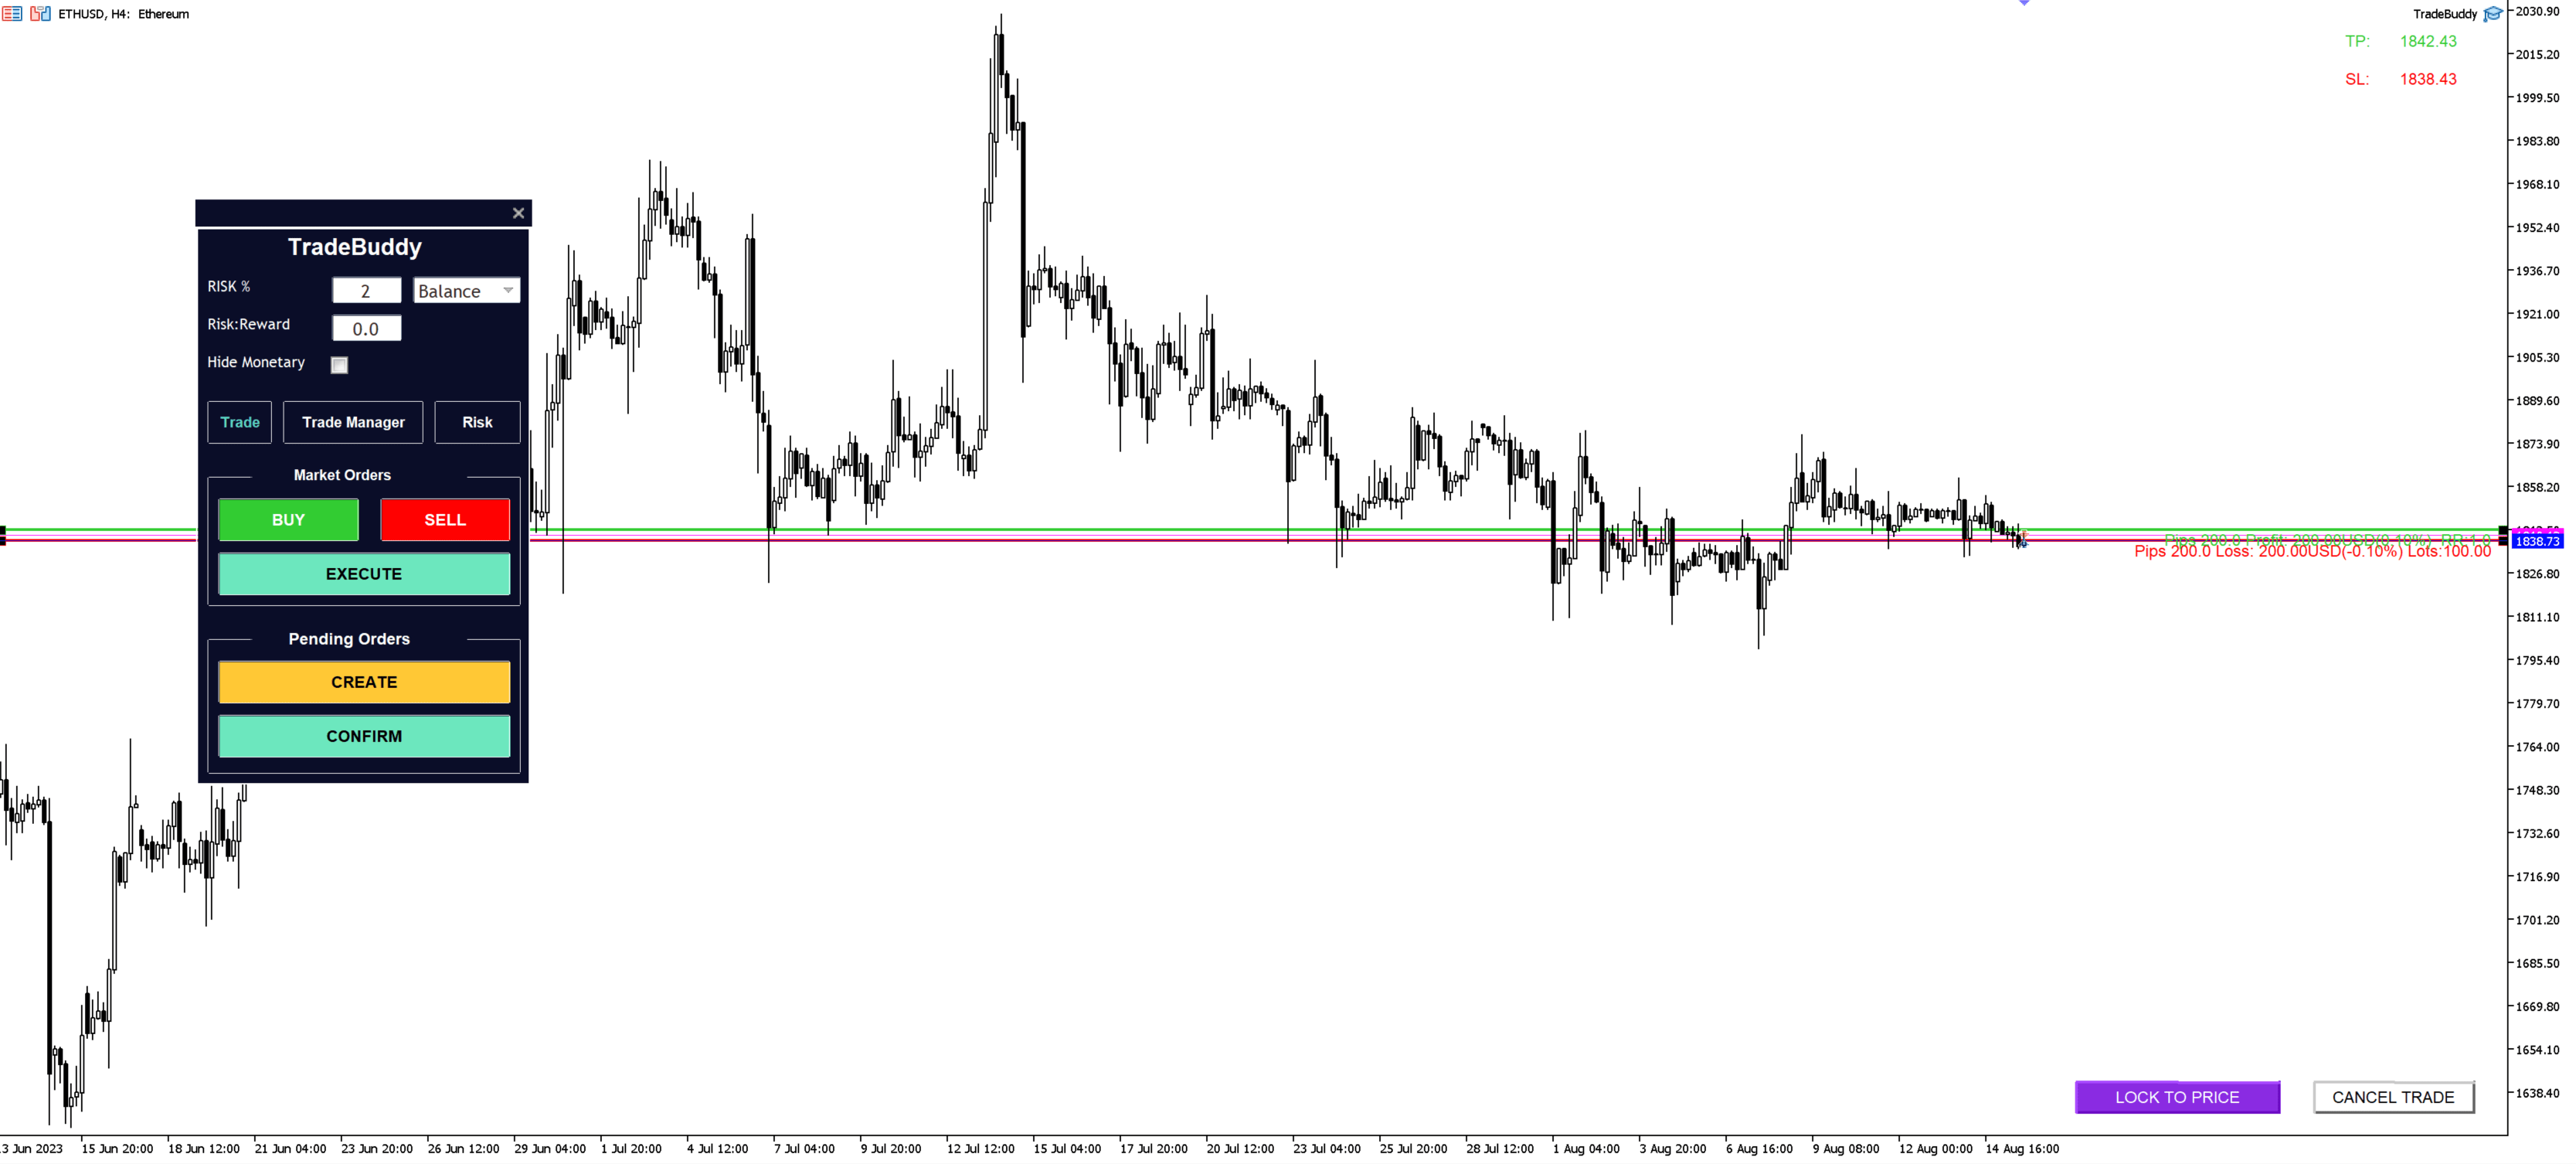
Market Orders
To enter a market order, simply click “BUY” or “SELL” in the Market Orders section of the “Trade” tab to bring up the market order calculation lines for your TP and SL. Once these appear on your screen, you can drag and drop them to your desired price point to set them and Trade Buddy will automatically calculate the lot size based on your SL in pips and the Risk % you have input at the time of execution. The line data will update live as price moves so you have a live view of the potential profits and losses of the trade you are looking to enter until you are ready to execute the trade. It will also show you the exact price of your TP and SL in the top right corner of the chart.
On the TP line you will be able to see the amount of pips your TP is away from the current price, the potential profit in both monetary values and % values and the risk reward compared to your SL (e.g. if your TP is 40 pips, and your SL is 20 pips, your RR would be 2.0)
On the SL line you will be able to see the amount of pips your SL is away from the current price, the potential loss in both monetary values and % values and the calculated lot size based on your Risk %.
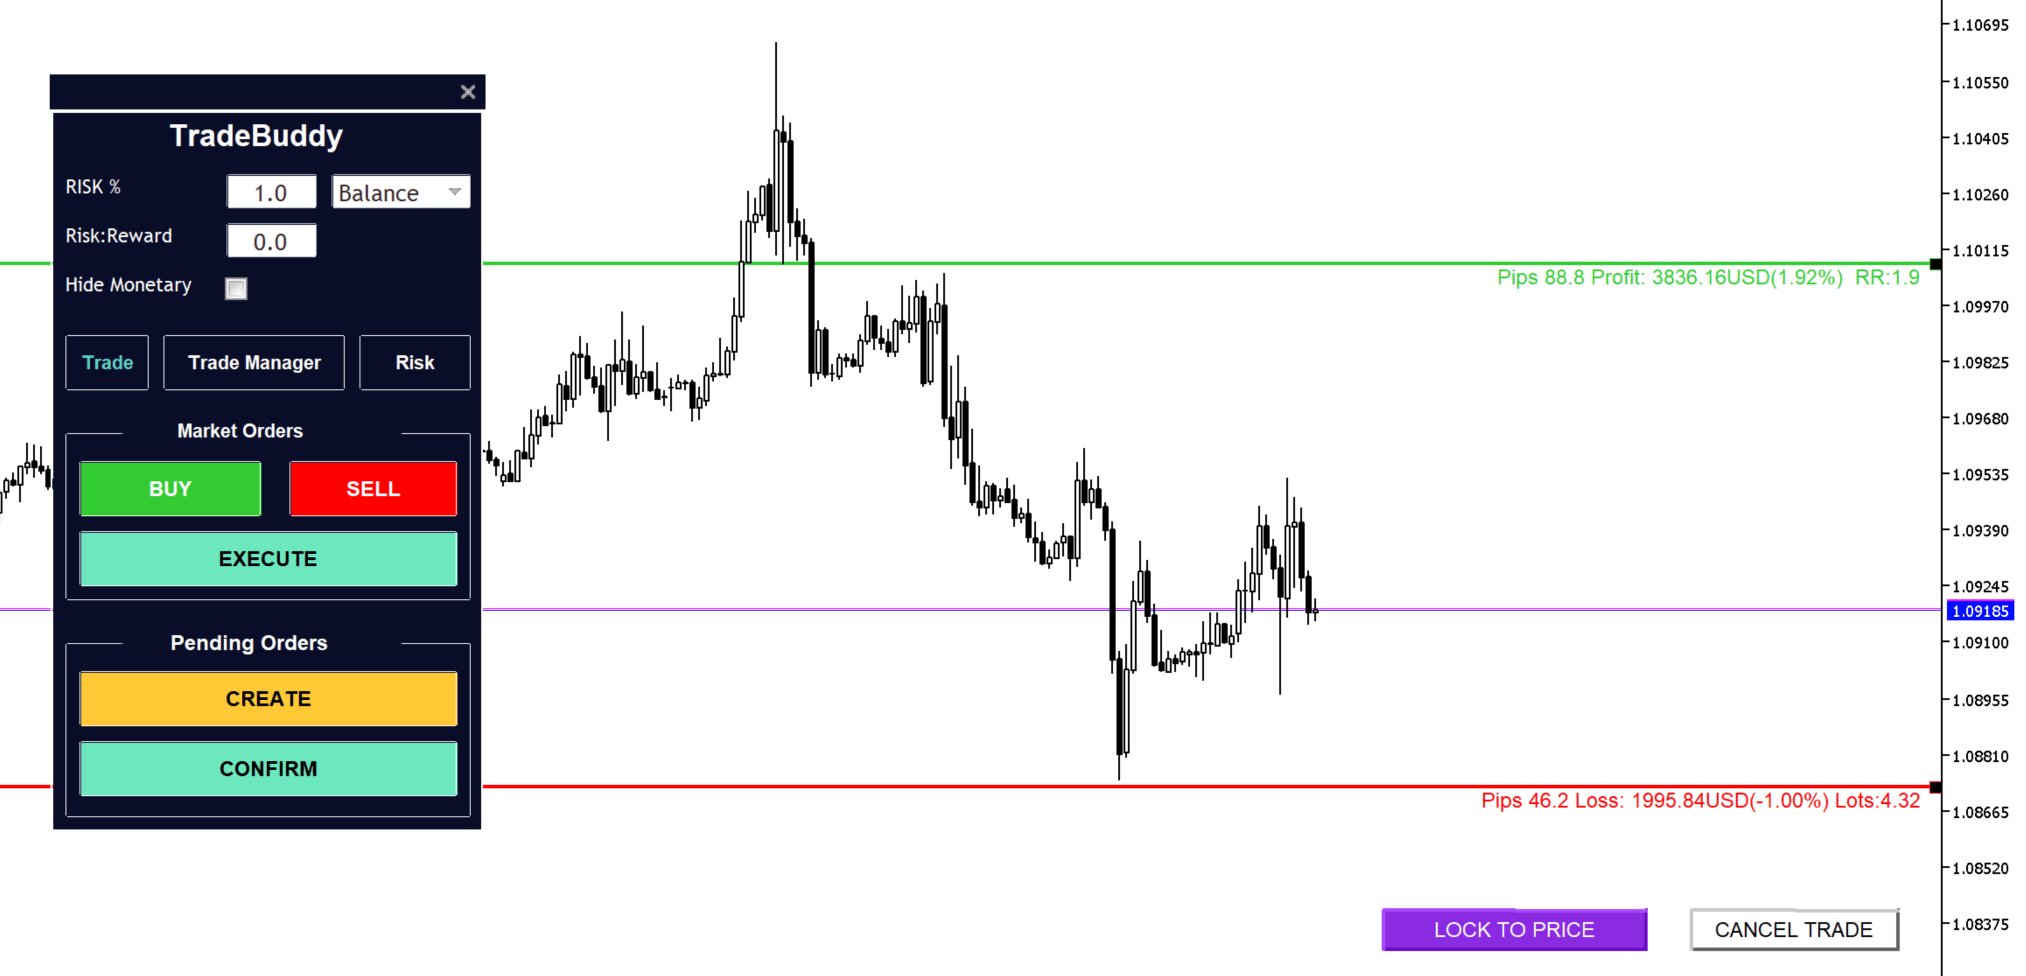
The lot size calculation for market orders is based on the current Bid/Ask price, depending on whether you are looking to go long or short. This means the calculation will be accurate based on the current spread.
For market buys, the lot size, SL in pips and TP in pips are calculated based on the current Ask price.
For market sells, the lot size, SL in pips and TP in pips are calculated based on the current Bid price.
Also, don’t worry if you click “BUY” and then decide you actually want to go short – regardless of whether you clicked “BUY” or “SELL”, Trade Buddy will automatically detect whether the trade is going to be a buy or sell depending on where your SL is in relation to the current price. For example, if your SL is above move then Trade Buddy will know you are looking to go short, and if your SL is below market then Trade Buddy will know you are looking to go long.
Market Orders - Lock to Price
When you open the market order calculation lines you will see a “LOCK TO PRICE” button in the bottom right of the chart. If you click this, it will lock your TP and SL in pips to the current price and will stay that distance away from price as it actively moves. After you use the lock to price button, it will change to an unlock button and clicking it again will stop the TP and SL from being locked to price.
![]()
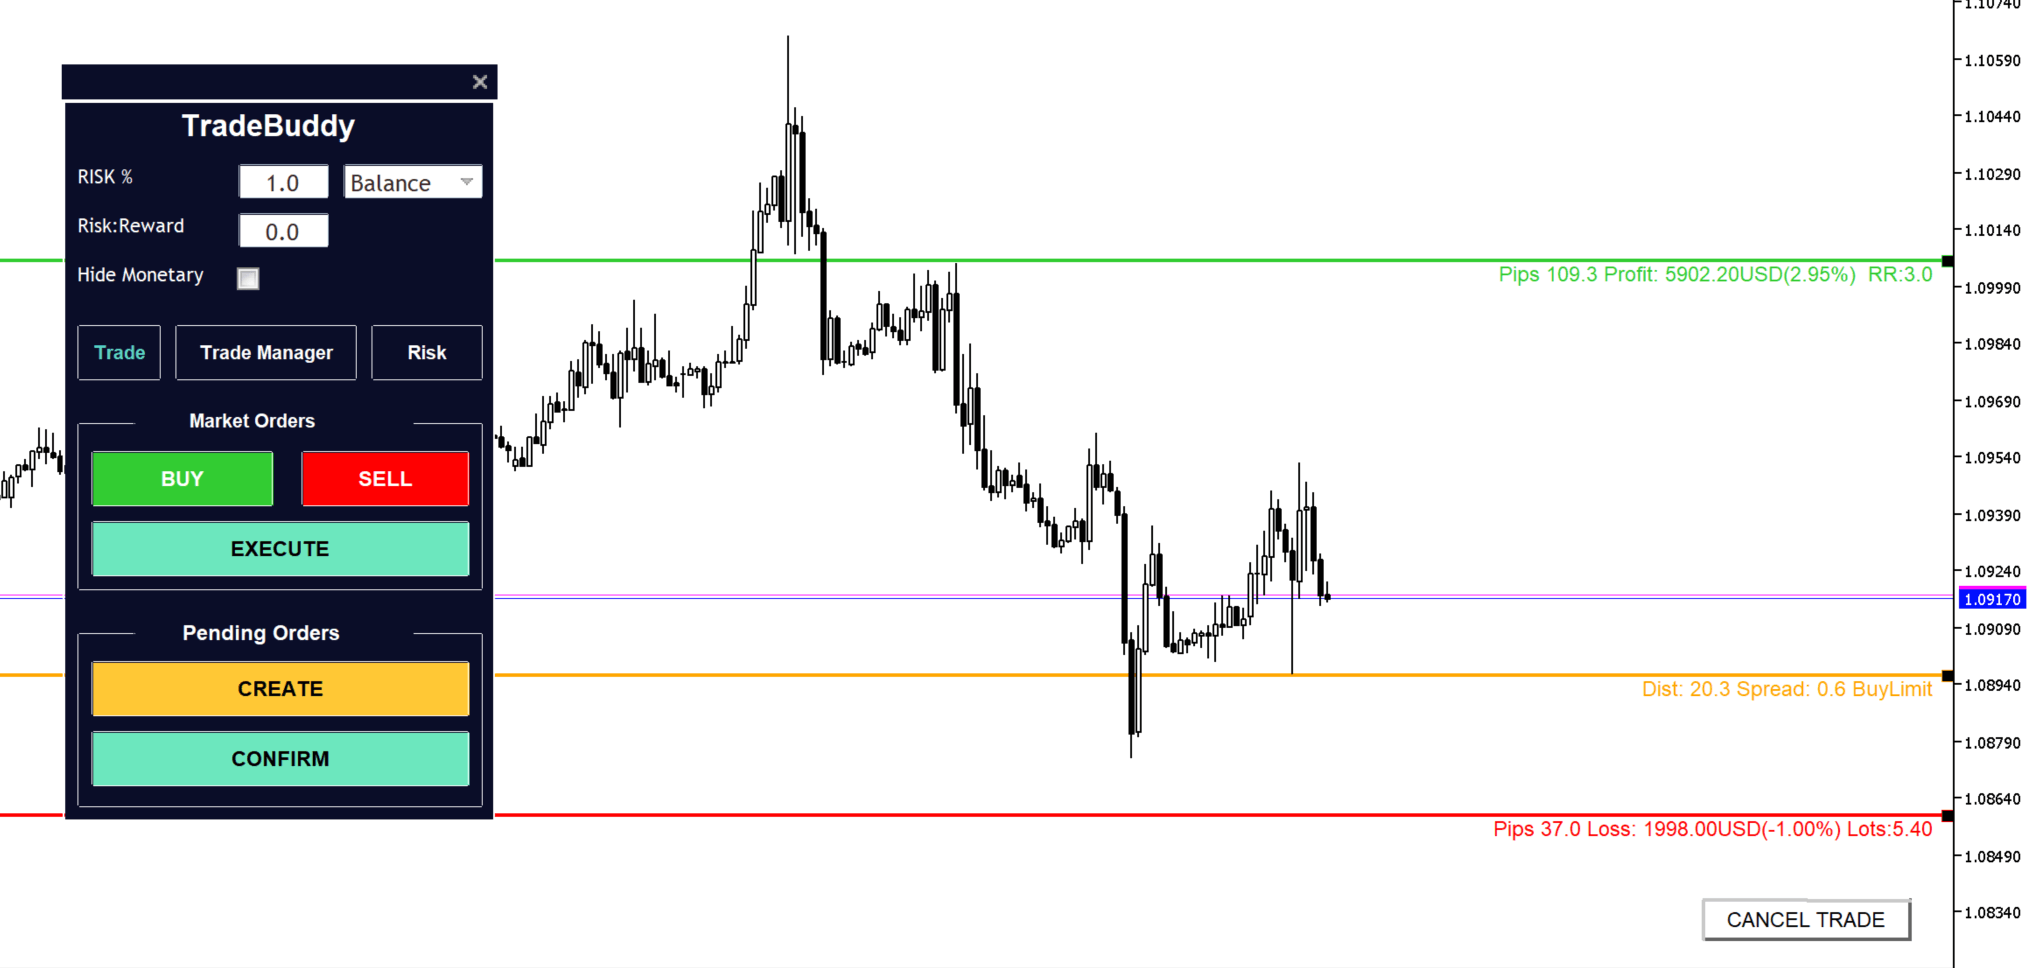
Pending Orders
To create a pending order, simply click the “CREATE” button in the Pending Orders section of the “Trade” tab to bring up the pending order calculation lines for your TP, SL and Entry line. Once these appear on your screen, you can drag and drop them to your desired price point to set them and Trade Buddy will automatically calculate the lot size based on your SL in pips and the Risk % you have input at the time of confirming the pending order. It will also show you the exact price of your TP, SL and Entry in the top right of the chart.
Trade Buddy will automatically know to enter a Buy Limit, Sell Limit, Buy Stop or Sell Stop order based on where your SL is in relation to your entry line and the current price.
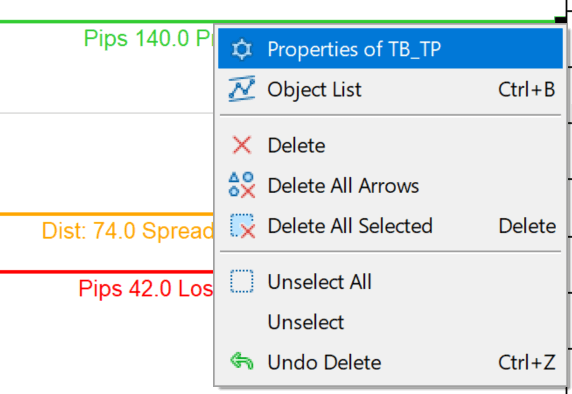
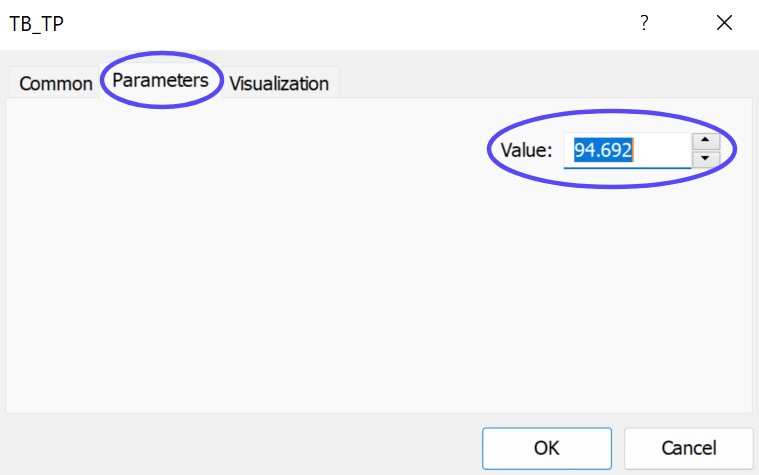
Inputting a Specific Price for TP, SL and Entry Lines
Whilst it is great to be able to easily drag and drop the calculation lines, sometimes you want to get a sniper entry and you have a specific price in mind that you want your TP, SL or Entry to be at. To do this you can right click any calculation lines that Trade Buddy makes and click “Properties of...” > Parameters > Adjust the value to the specific price you want the calculation line to be at.
2. Hotkeys
Using Trade Buddy’s hotkeys will make your entering of the market much more efficient, however, to prevent accidental entries Hotkeys are disabled by default.
The hotkeys for Trade Buddy are…
M = Open market order calculation lines
P = Open pending order calculation lines
E = Execute/Confirm market orders or pending orders
Escape = Cancel any calculation lines active on the chart
How to Enable Hotkeys
They can easily be enabled by going into Settings > Inputs > And adjusting the true/false value in the “Hotkeys_Enabled” row.
(In MT5, double click the true/false field to toggle between enabled/disabled, in MT4 click on the true/false field to choose your preferred option)
3. Hiding Monetary Amounts
Simply click on the checkbox next to “Hide Monetary Values” to enable/disable this setting.
TP / SL line data with “Hide Monetary” ticked
When ticked, your TP/SL calculation lines will only show the pips, profit/loss in %, lot size and risk:reward.
Equity Protector overlay with “Hide Monetary” ticked
When ticked the monetary rows (Current Equity, Equity Stop Out and Equity Remaining) will be hidden.
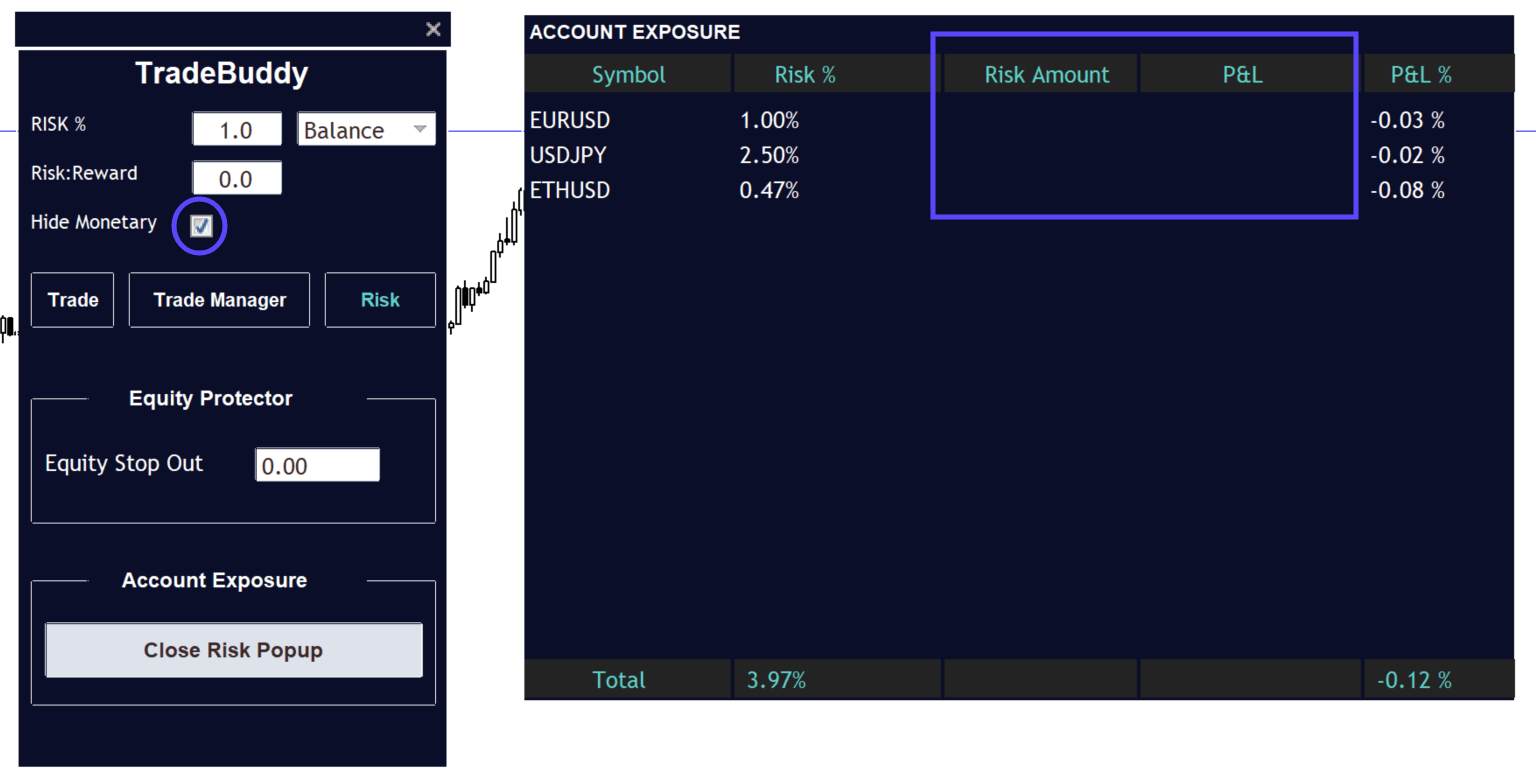
Risk Popup with “Hide Monetary” ticked
When ticked, the Risk Amount ($) and P&L ($) will be hidden.
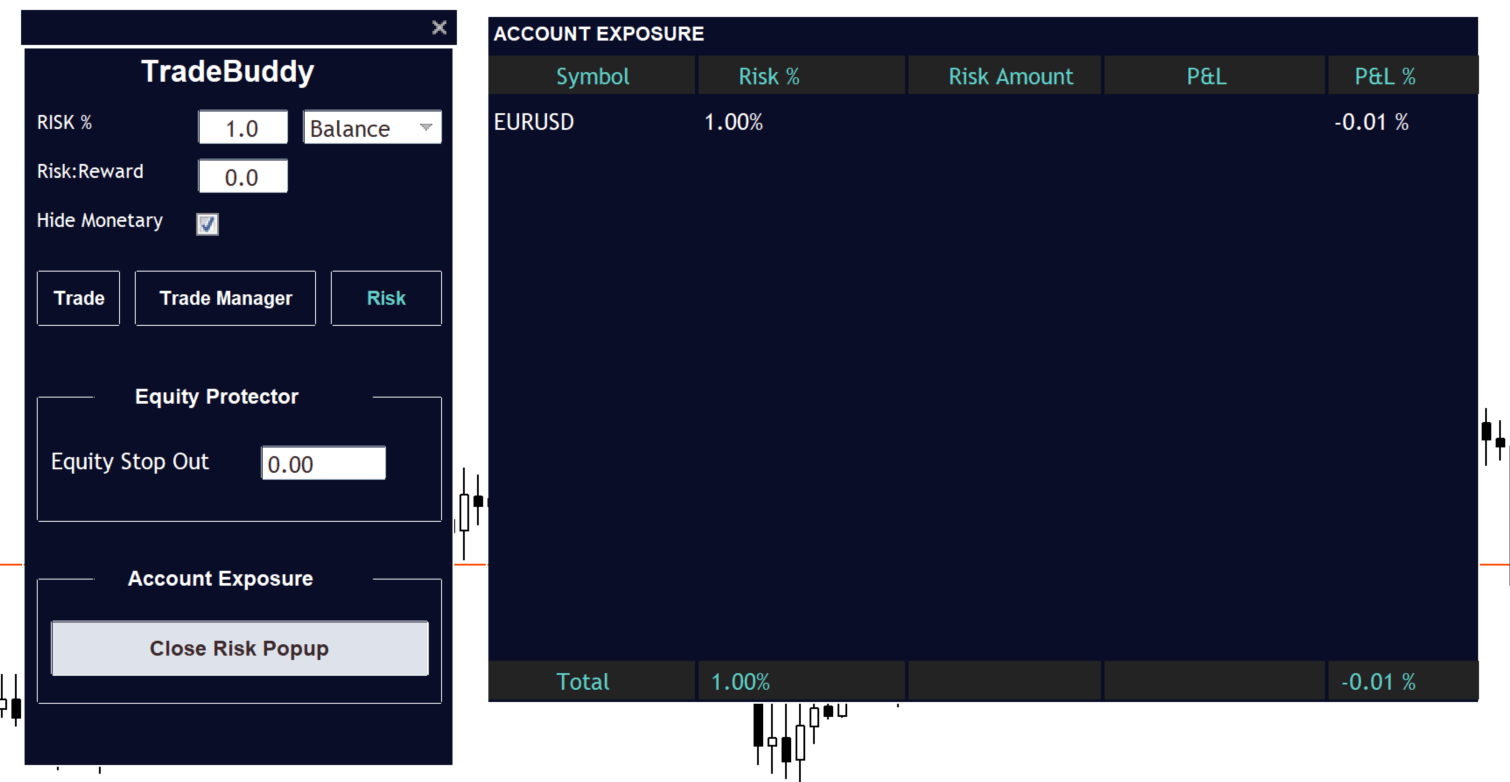
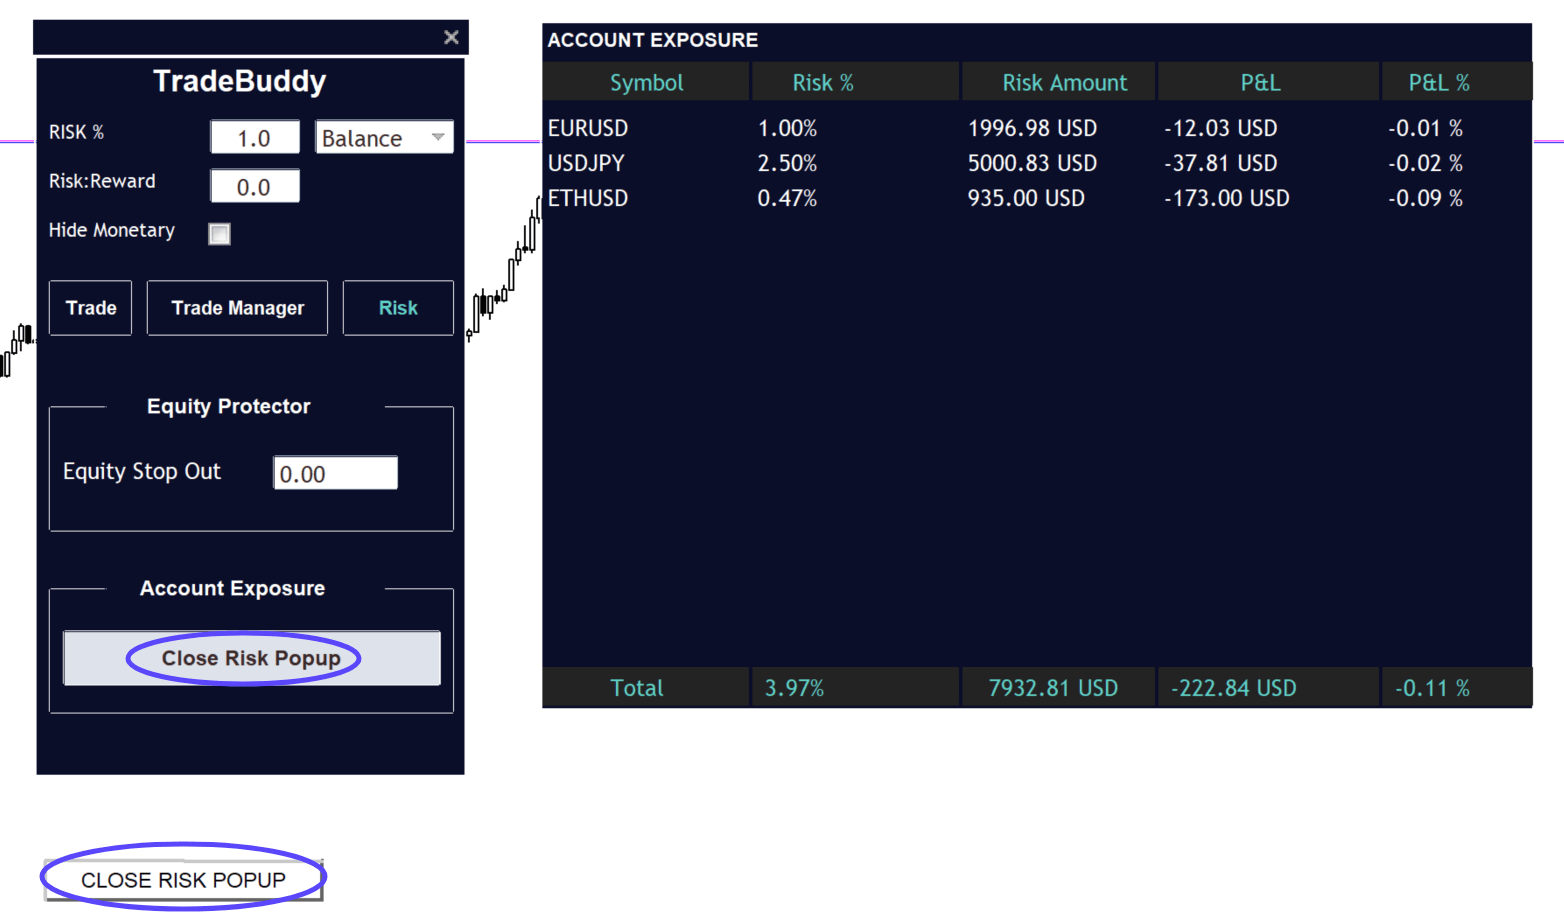
4. The Risk Popup
In the Risk Popup you will see all the symbols you have trades open against, along with your floating P&L and the risk amount based on your current stop losses. This table will update live as you adjust your trades, and as the market is moving.
At the bottom of the Risk Popup is a Totals row, where you will see your total open risk in % and monetary amounts, along with your total floating P&L. This makes it way easier to know how much exposure you currently have when trading multiple instruments at the same time.
When you want to close/hide the open Risk Popup just click the “Close Risk Popup” button in Trade Buddy, or use the “CLOSE RISK POPUP” button in the bottom left corner of your chart.
Hiding Monetary Amounts
If you tick the “Hide Monetary” box in Trade Buddy, it will also hide the monetary columns from the Risk Popup as shown below.
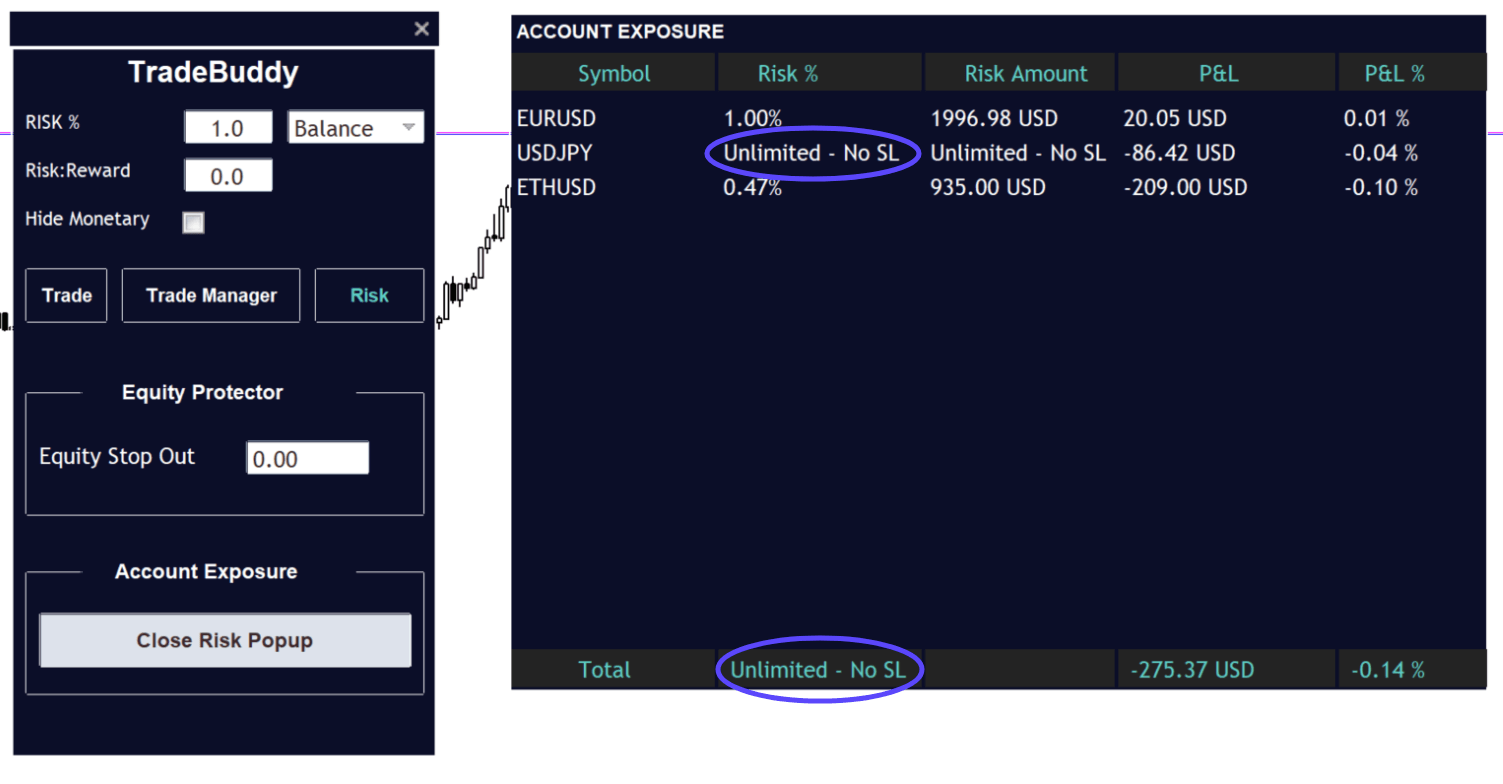
Unlimited Risk - No Stop Loss
In the event you have a trade without a stop loss, the Open Risk Popup will display “Unlimited – No SL” in the Risk % and Risk Amount column for that symbol, along with in the total at the bottom. This way you will quickly know if you have any trades running without a SL.
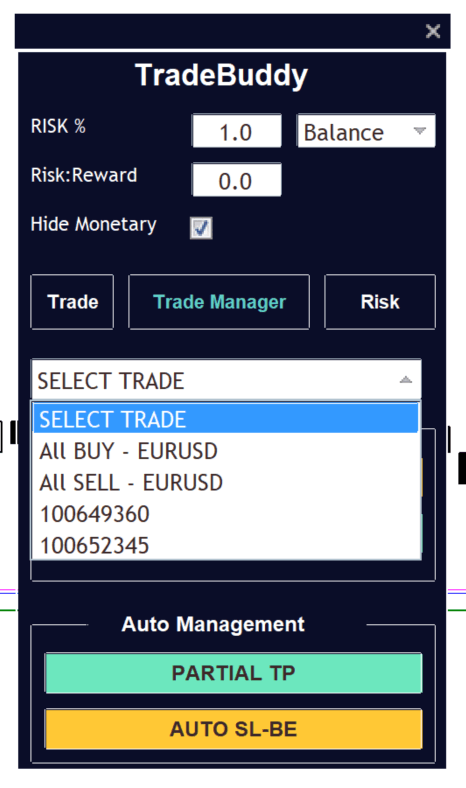
5. One Click Management
With all One Click and Auto Management features in Trade Buddy, you can select either a single trade to manage or ALL BUYs or ALL SELLs for that symbol. This makes it effortless to manage multiple positions at a time, at the click of a button.
First, choose the trade(s) you want to use any of the One Click Management tools for by using the “SELECT TRADE” dropdown. Here you will see your trade numbers for the symbol that you are currently using Trade Buddy on, along with ALL BUY and ALL SELL.
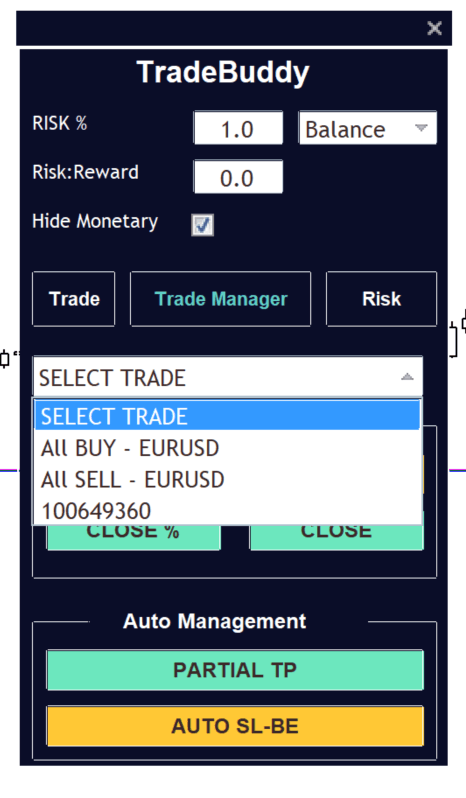
Once you have selected your trade(s), next click any of the options in the “One Click” section.
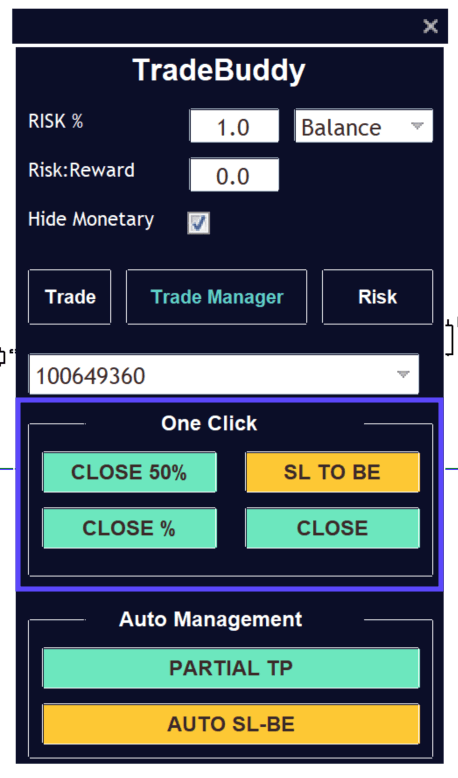
The One Click Management Tools
Close 50% – Close half the position(s)
Close % – Close a custom % of the position(s)
Close – Close a trade (or trades using ALL BUY/ALL SELL)
SL to BE – Move your SL to BE
Adjusting the Close % One Click Management Setting
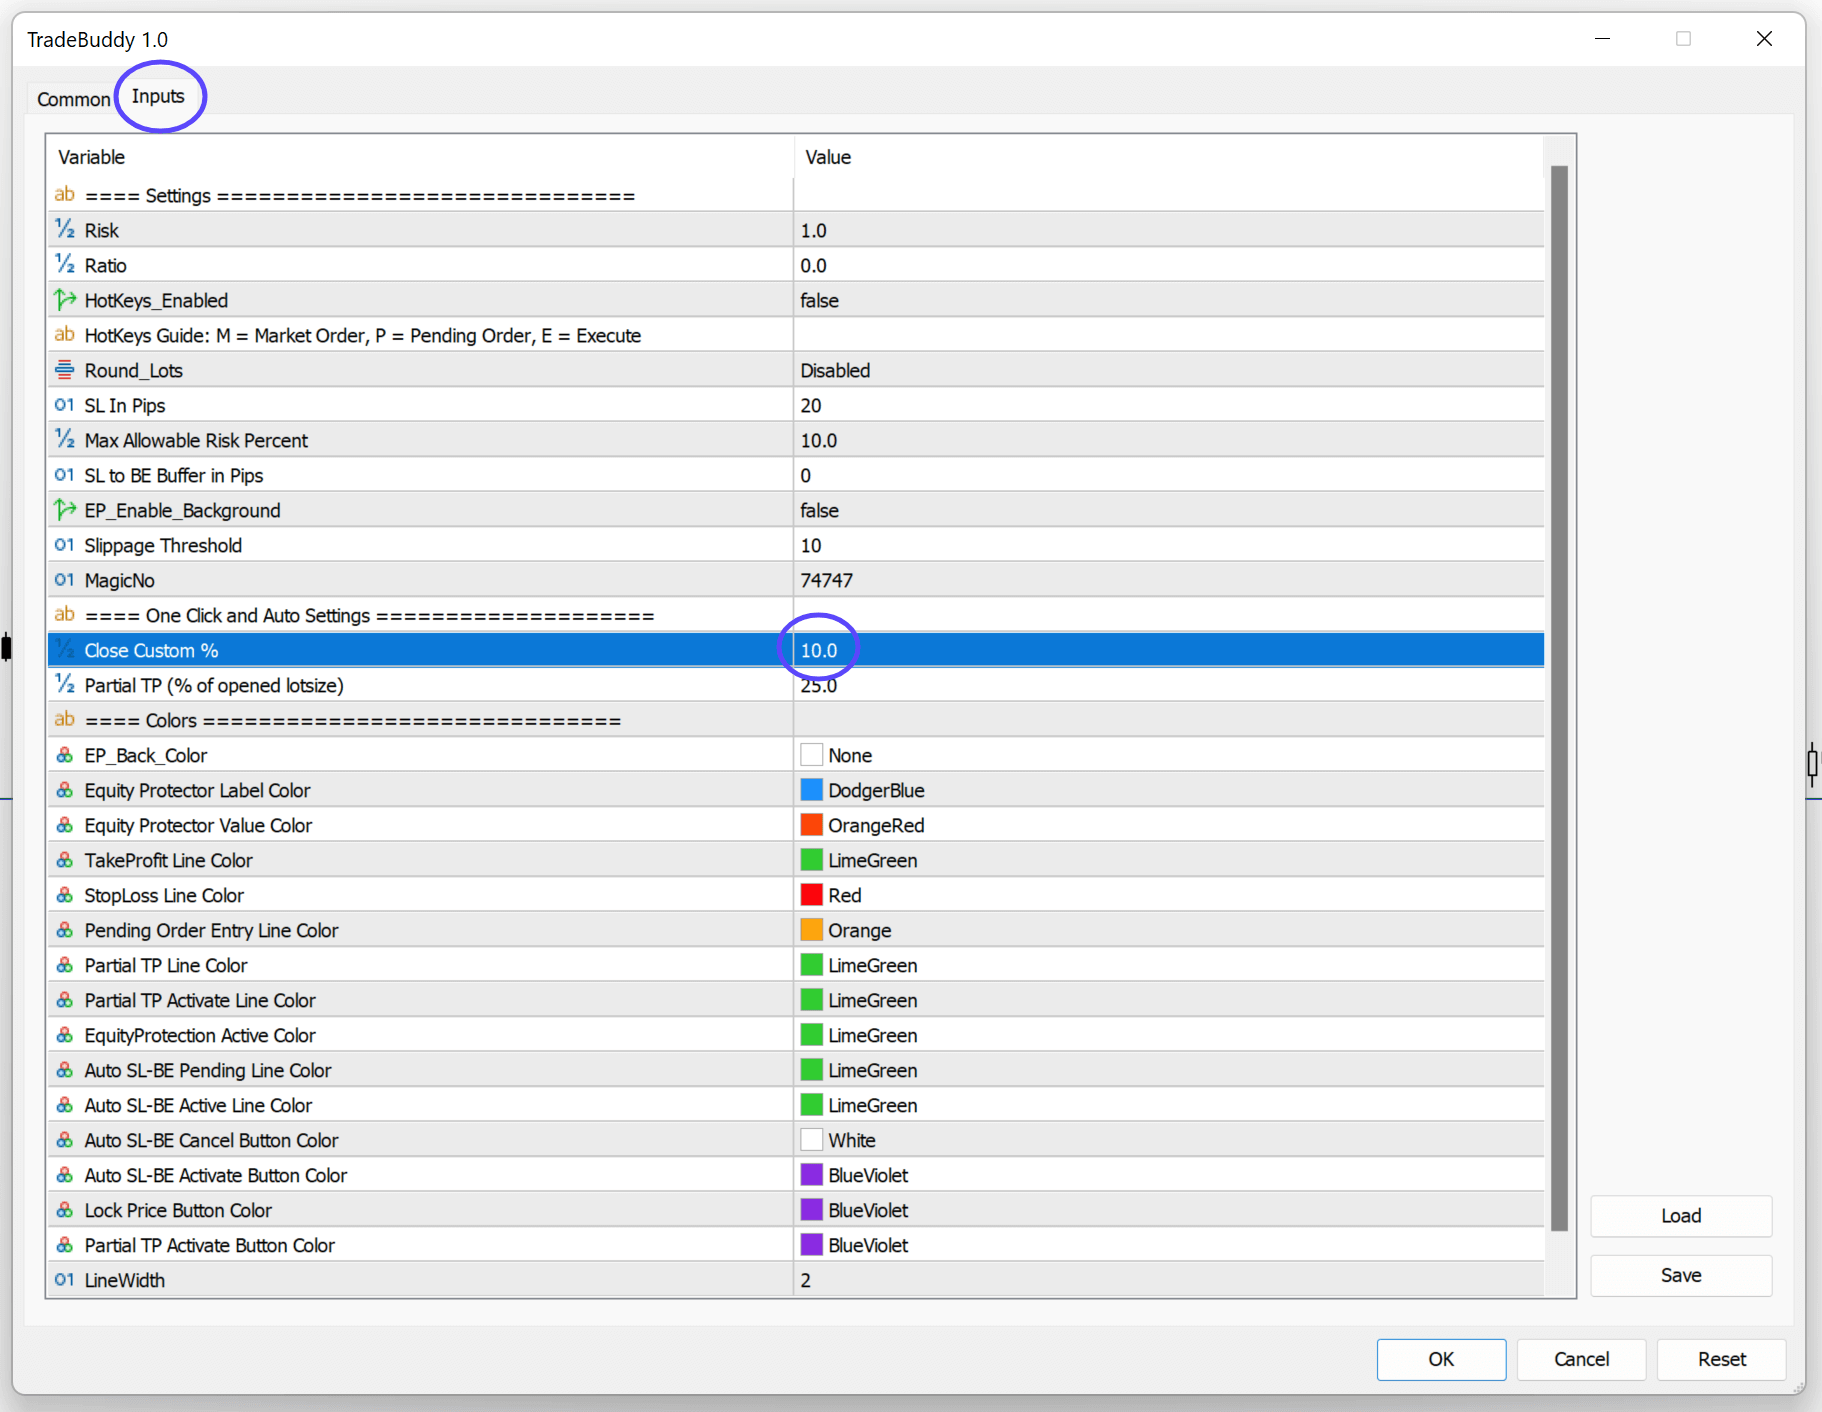
To adjust the % of your trade that the Close % function will close, go to Settings > Inputs > Close Custom % and change the value. The default is 10%.
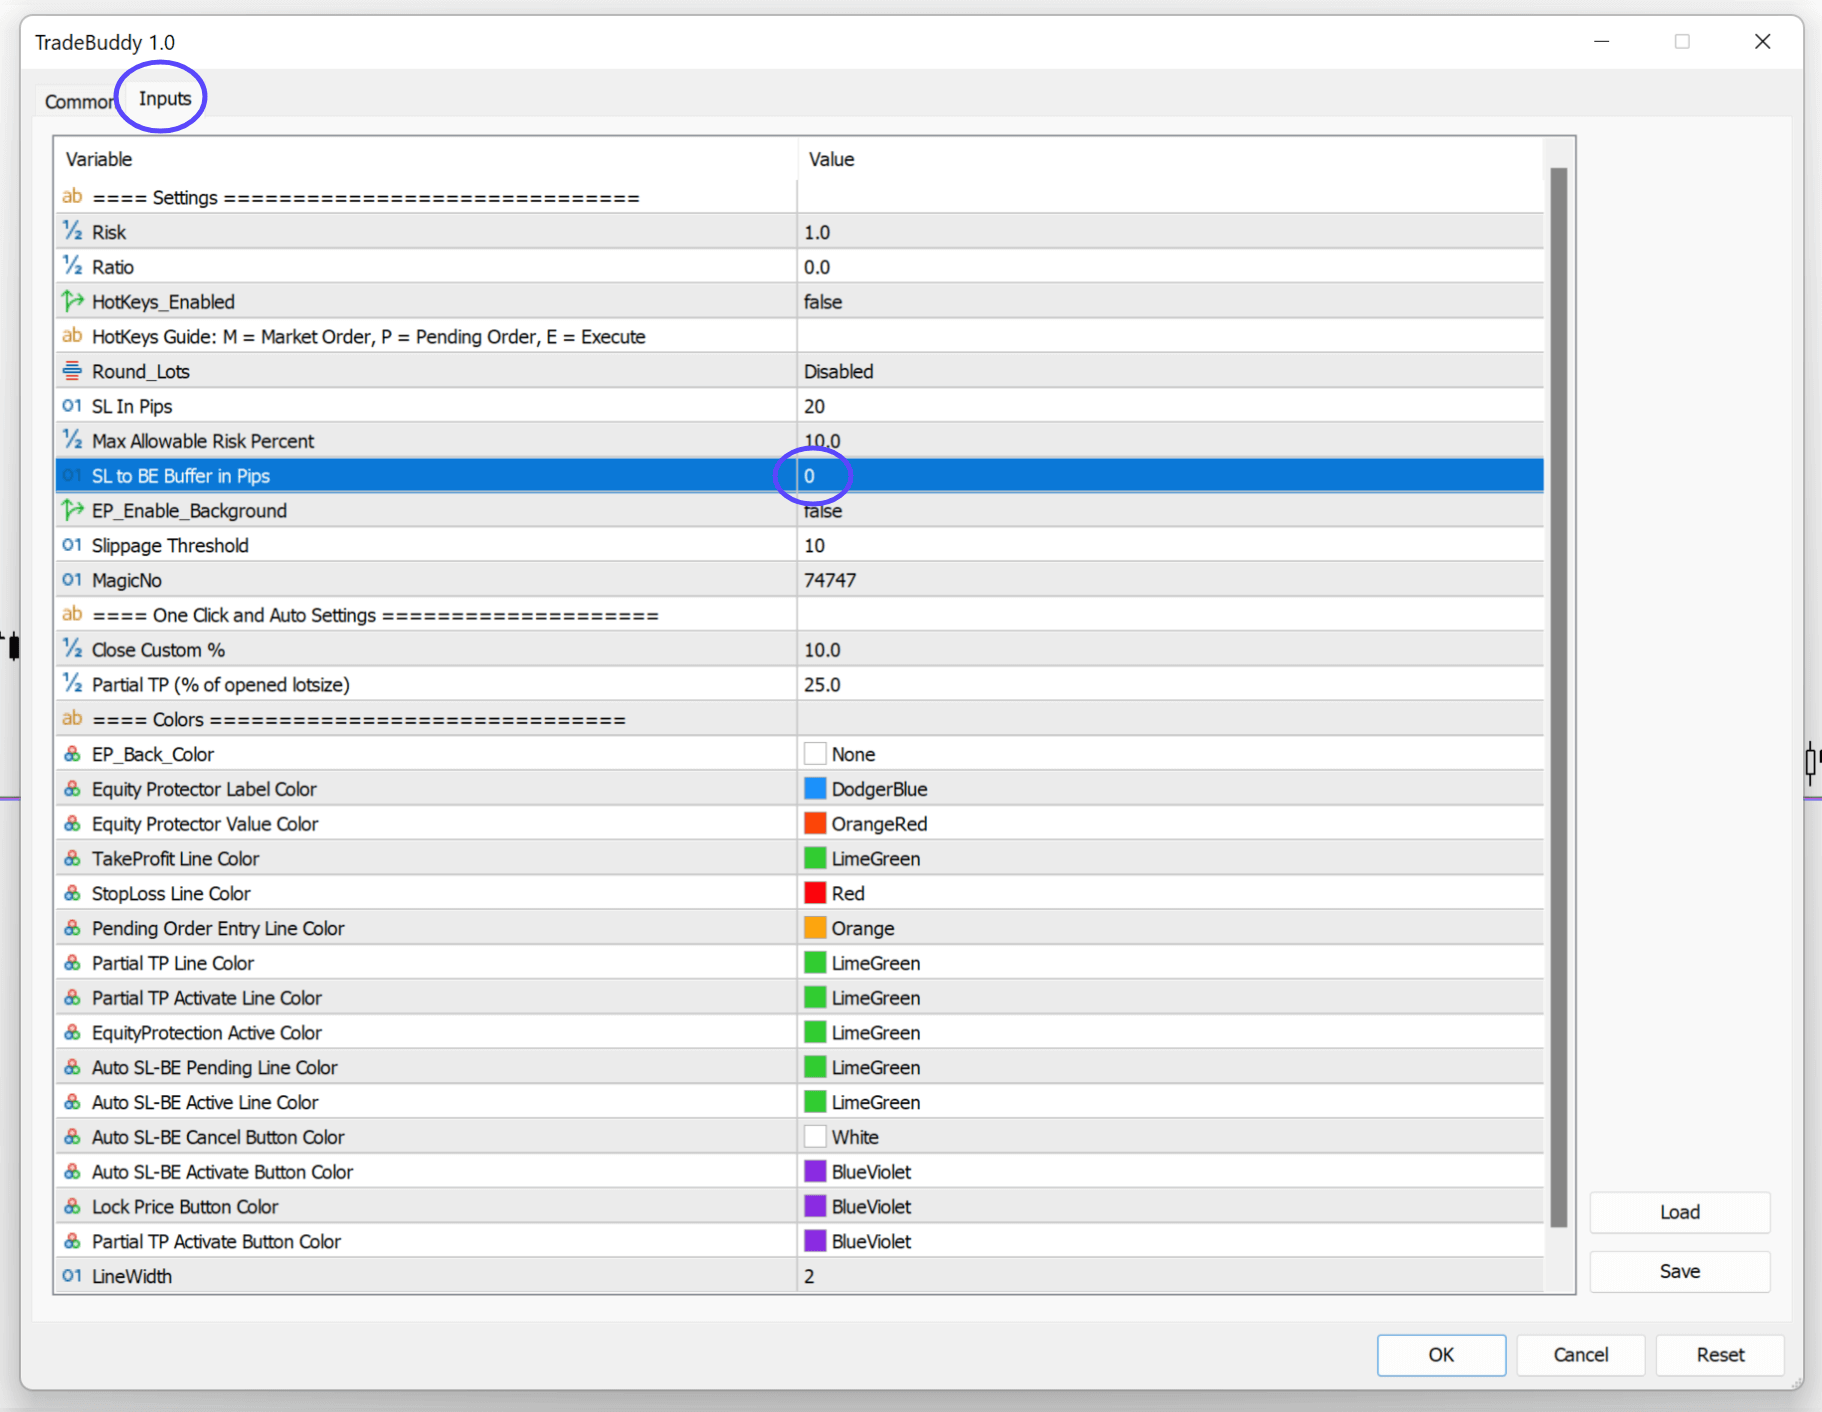
The SL to BE Buffer in Pips Setting
Sometimes you don’t want to just move your SL to BE – you want to lock in some profits.
Trade Buddy makes this easy with the “SL to BE Buffer in Pips” settings. Whatever amount of pips you input into this field will be added onto your entry price as a “buffer” and Trade Buddy will move your SL to your entry price + the SL to BE Buffer in Pips amount when you use either the One Click SL to BE function, or the Auto SL to BE function and move your SL
To adjust the SL to BE Buffer in Pips, simply go to Settings > Inputs > SL to BE Buffer in Pips

6. Auto Management - SL to Breakeven
With Trade Buddy you can automatically move your SL to Breakeven when price reaches a specific level, meaning you don’t have to spend as much time staring at the chart when you want to reduce your risk exposure.
With all One Click and Auto Management features in Trade Buddy, you can select either a single trade to manage or ALL BUYs or ALL SELLs for that symbol. This makes it effortless to manage multiple positions at a time, at the click of a button.
First, go to the Trade Manager tab and choose the trade(s) you want to set an Auto SL to BE for by using the “SELECT TRADE” dropdown. Here you will see your trade numbers for the symbol that you are currently using Trade Buddy on, along with ALL BUY and ALL SELL.

Once you have selected your trade(s), next click the Auto SL-BE button to bring up the pending Auto SL-BE line.
You are able to freely drag and drop the Auto SL-BE wherever you like, or right click > Properties > Parameters > Adjust the value to the specific price you want the Auto SL to trigger at.
Once you are happy with where your Auto SL-BE is, click the “ACTIVATE AUTO SL-BE” to activate it.
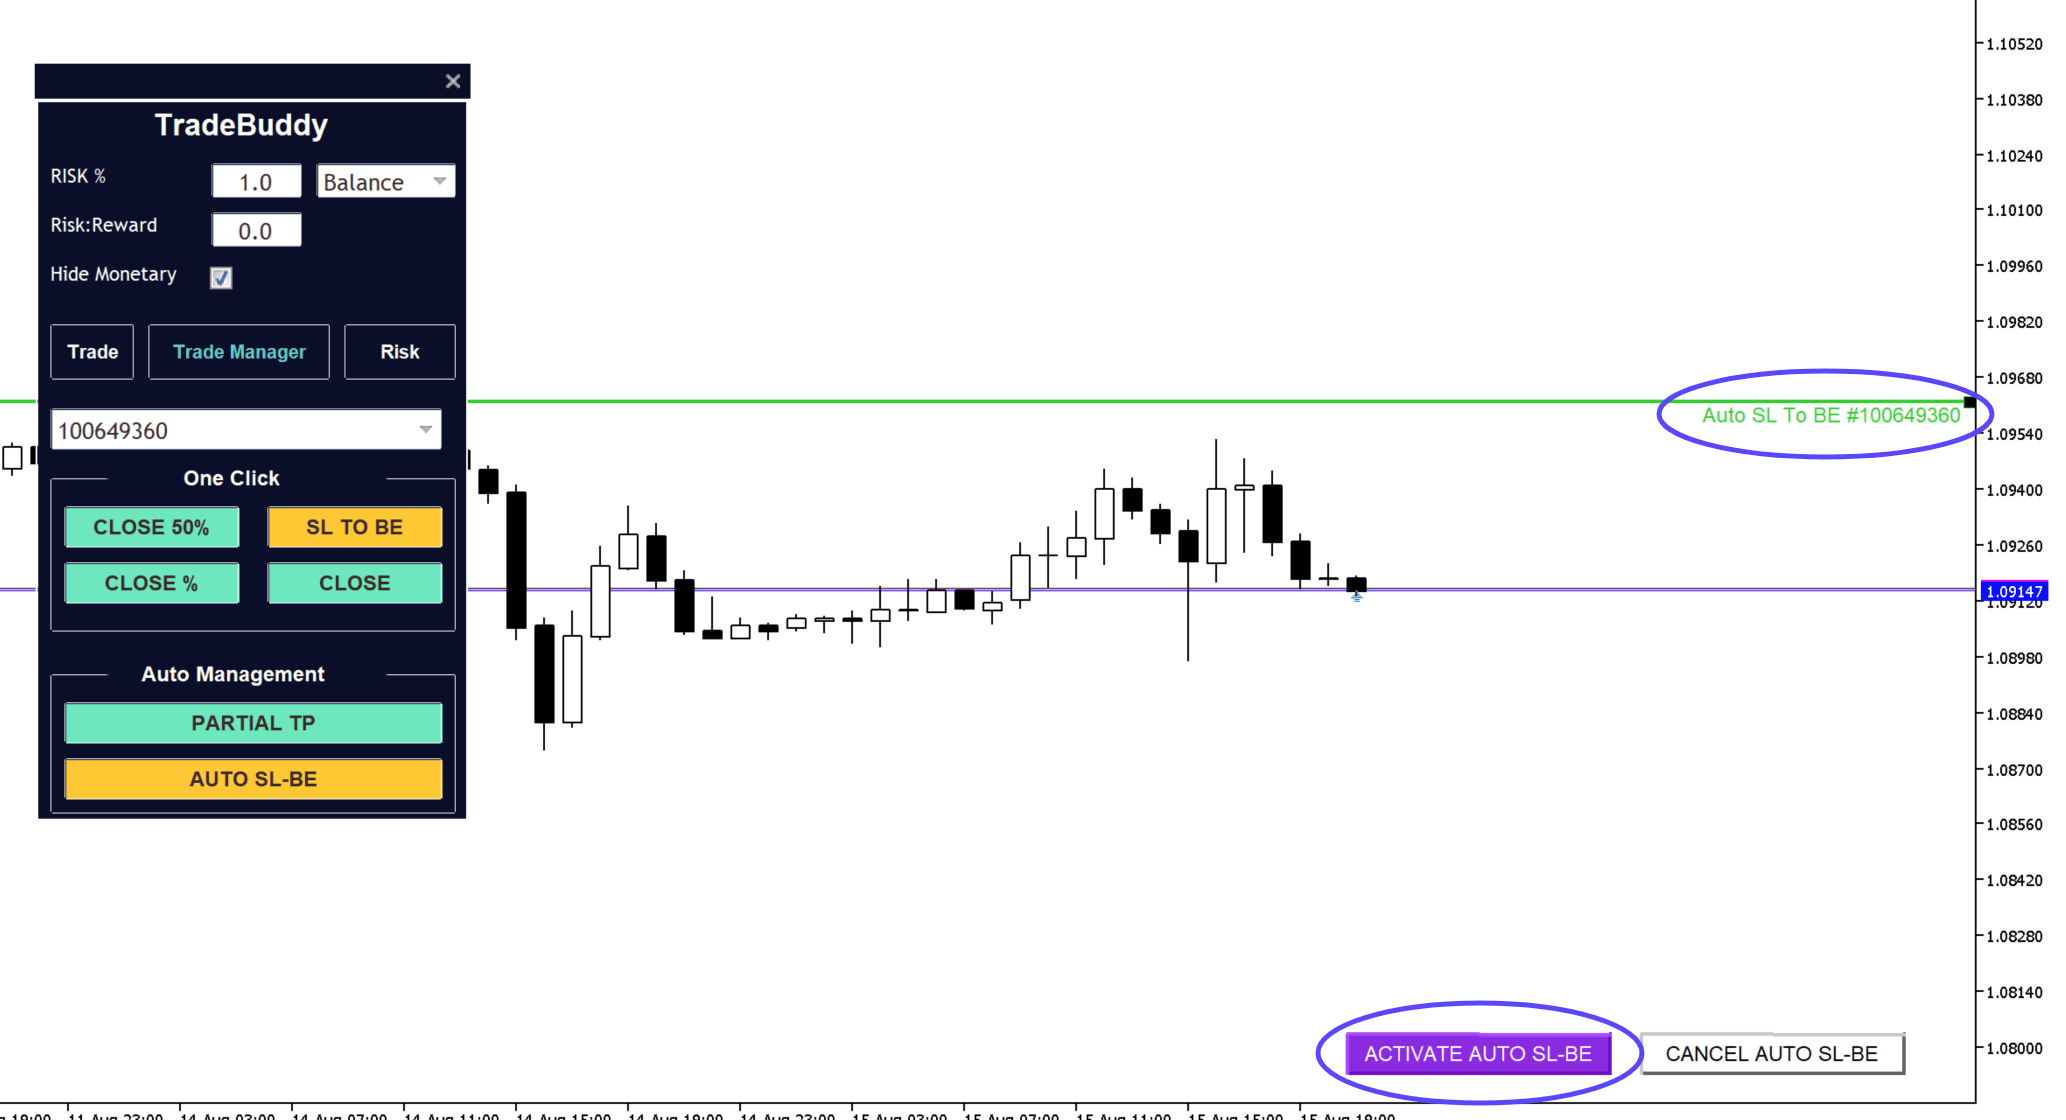
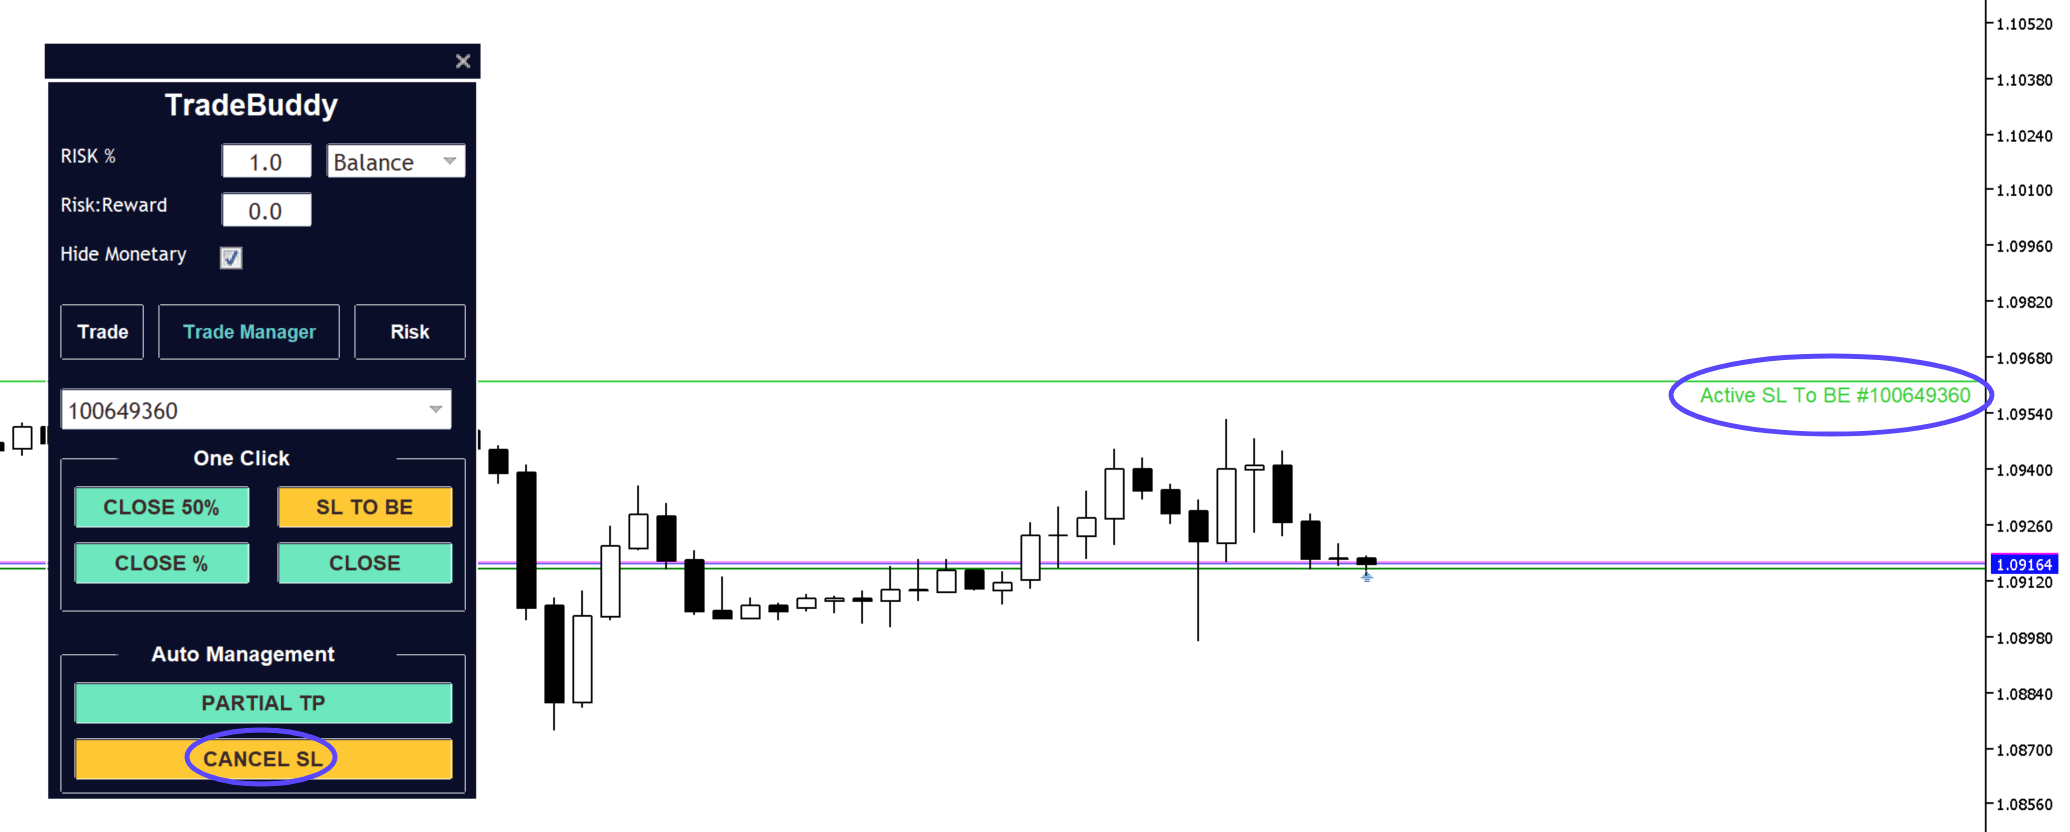
Once in an active state, the line will no longer be in a moveable state and it will show “Active SL to BE” on the line text, along with the trade number or ALL BUY/ALL sell (depending on your choice).
If you change your mind and no longer want to have an Auto SL to BE set, you will see the Auto SL-BE button text changed to “CANCEL SL”. Once you click this, it will clear the Auto SL to BE from your chart.
The SL to BE Buffer in Pips Setting
Sometimes you don’t want to just move your SL to BE – you want to lock in some profits.
Trade Buddy makes this easy with the “SL to BE Buffer in Pips” settings. Whatever amount of pips you input into this field will be added onto your entry price as a “buffer” and Trade Buddy will move your SL to your entry price + the SL to BE Buffer in Pips amount when you use either the One Click SL to BE function, or the Auto SL to BE function and move your SL
To adjust the SL to BE Buffer in Pips, simply go to Settings > Inputs > SL to BE Buffer in Pips
7. Auto Management - Partial TP
With the Trade Buddy Partial TP you can easily automate your scaling out of profitable trades.
Adjusting the % of your trade(s) that the Partial TP will close
To adjust the % of your trade that the Partial TP will close, go to Settings > Inputs > Partial TP (% of opened lotsize) and change the value. The default is 25%, a quarter of your position.

Using the Partial TP
With all One Click and Auto Management features in Trade Buddy, you can select either a single trade to manage or ALL BUYs or ALL SELLs for that symbol. This makes it effortless to manage multiple positions at a time, at the click of a button.
First, go to the Trade Manager tab and choose the trade(s) you want to set a Partial TP for by using the “SELECT TRADE” dropdown. Here you will see your trade numbers for the symbol that you are currently using Trade Buddy on, along with ALL BUY and ALL SELL.
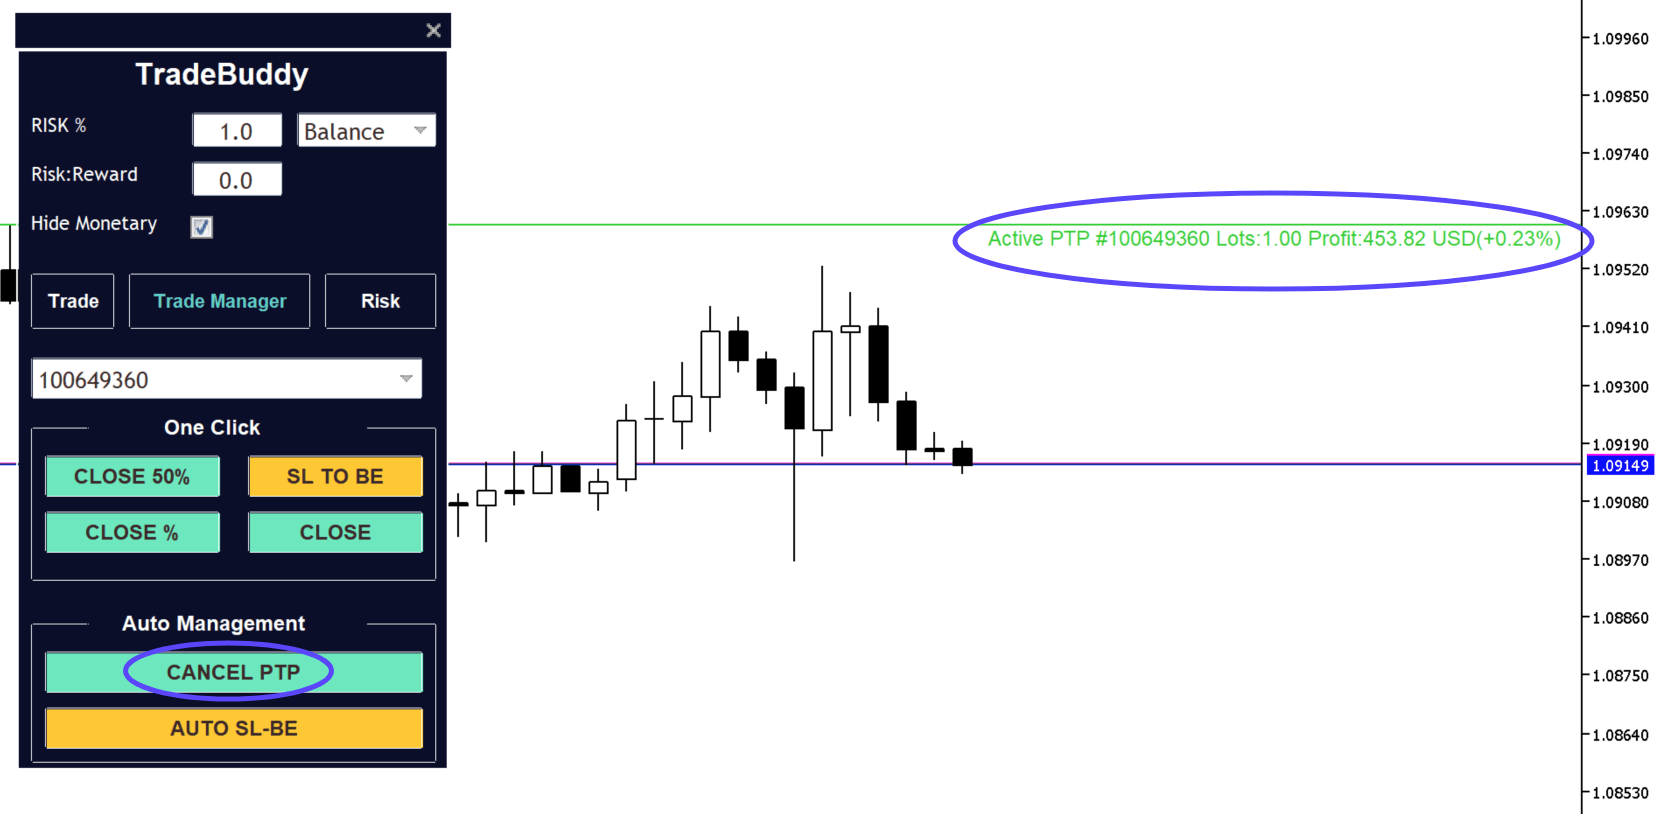
Once you have selected your trade(s), next click the Partial TP button to bring up the pending Partial TP line.
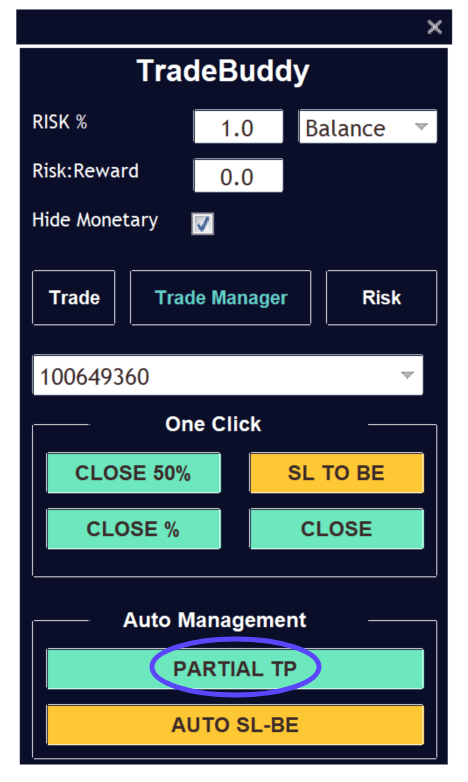
You are able to freely drag and drop the Partial TP wherever you like, or right click > Properties > Parameters > Adjust the value to the specific price you want the calculation line to be at. On the Partial TP line, it will show you the distance in pips to the Partial TP, the amount of lots that will be closed, the monetary profit and the % profit.
Once you are happy with where your Partial TP is, click the “ACTIVATE PARTIAL TP” to activate it.

Once in an active state, the line will no longer be in a moveable state and it will show “Active PTP” on the line text, along with the trade number or ALL BUY/ALL sell (depending on your choice).
If you change your mind and no longer want to have a Partial TP set, you will see the Partial TP button text changed to “CANCEL PTP”. Once you click this, it will clear the Partial TP from your chart.
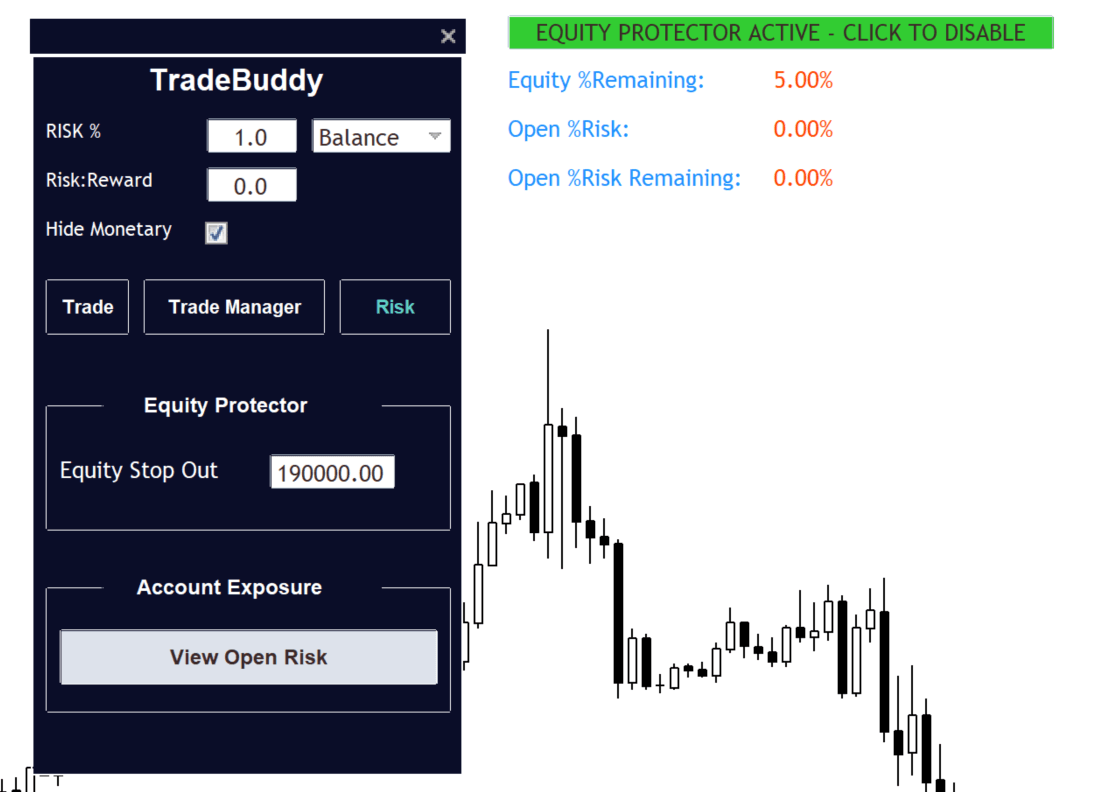
8. The Equity Protector
With the Equity Protector you input an Equity Stop Out value where if your account equity falls below this amount, Trade Buddy will cut all your trades.
This means if your account balance is $100k but you want to try and keep your equity from falling below $98k, you can set the equity protector to $98,000 and Trade Buddy will cut all your trades if your account equity falls below this amount.
Disclaimer - Please read
Please note that Trade Buddy’s “Equity Stop out” feature provides no guarantee it will be able to exit your trades at your desired input amount, as this is dependent on the market volatility and available market liquidity at the time of use which is beyond the control and scope of Trade Buddy. In trading there is always a chance you will lose more than you are prepared to risk, and you should never use the Equity Protector as an absolute drawdown limit. Trade Buddy will simply try to exit your trades when it recognises your account equity has fallen below your desired input amount, but the Equity Protector should not be used as a replacement for proper risk management practices.
Please make sure to disable the Equity Protector before changing accounts in MetaTrader (to prevent it accidentally triggering automatically if you switch to a lower equity account), and before exiting the MetaTrader terminal.
Using the Equity Protector
To set an Equity Stop Out, simply go to the “Risk” tab and then input an amount into the “Equity Stop Out” field.
Do not use this as an absolute stop out value, as with market volatility, slippage etc you are unlikely to have you trades closed at the exact moment your account equity breaches this amount. Always add a safety buffer to where you’d ideally like to cut your trades and good risk management practices in all areas of your trading.
Once you have input an amount, you will see the Equity Protector Overlay on your chart as shown below, where there are 6 rows of data to help you manage your risk in relation to your Equity Stop Out.
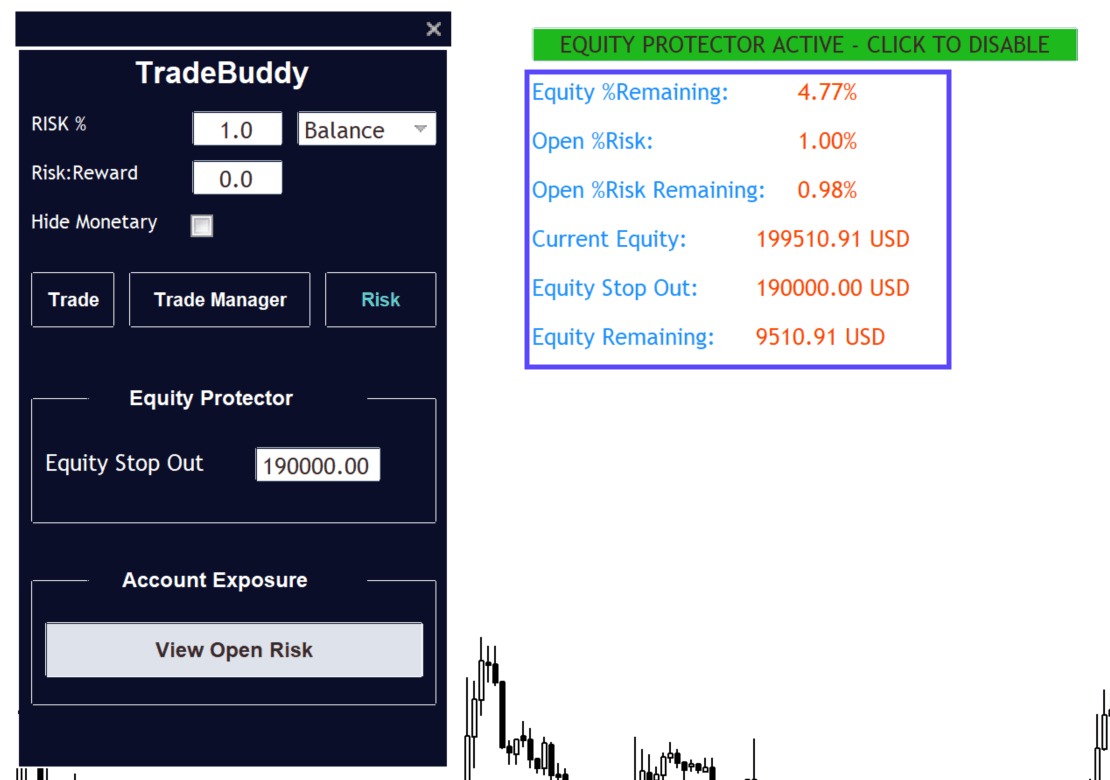
Equity %Remaining: This is how far your current account equity is from your Equity Stop Out value as a percentage
Open %Risk: This is the accumulative total of your open trades stop loss risk as a percentage
Open %Risk Remaining: This is the difference between your floating P&L and your stop loss risk as a percentage.
For example, if you have 1.98% in open risk but you are up 0.27% in profit, the Open %Risk Remaining would be 1.98% (SL risk) + 0.27% (floating profit) = 2.25%, as you are 2.25% away from your stop loss(es).
Current Equity: Your current account equity as a monetary amount
Equity Stop Out: Your input Equity Stop Out as a monetary amount
Equity Remaining: The difference between your current account equity and your Equity Stop Out input as a monetary amount
All of this data will be calculated based on all open trades in your account.
Equity Protector Triggered
Once your account equity falls below your chosen input equity, Trade Buddy will attempt to close all trades in your account and will show you a notification to advise you that this has occurred as shown below.

Disabling the Equity Protector
You can disable the Equity Protector at any point by simply clicking the Equity Protector chart overlay button that says “EQUITY PROTECTOR ACTIVE – CLICK TO DISABLE”. Alternatively, you can change the Equity Stop Out figure to 0.

Hiding Monetary Amounts
If you tick the “Hide Monetary” box in Trade Buddy, it will also hide the monetary rows from the Equity Protector chart overlay as shown below.

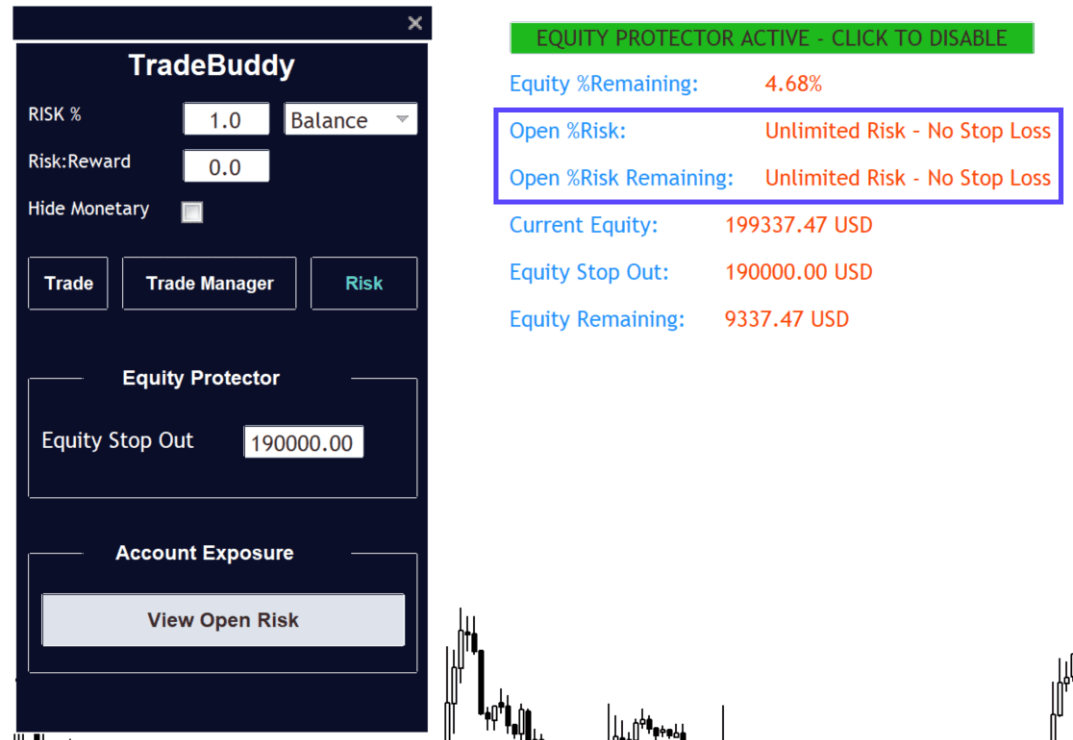
Unlimited Risk - No Stop Loss
If you have any open trades which do not have a stop loss, Trade Buddy will advise you in the Equity Protector Overlay as shown below.
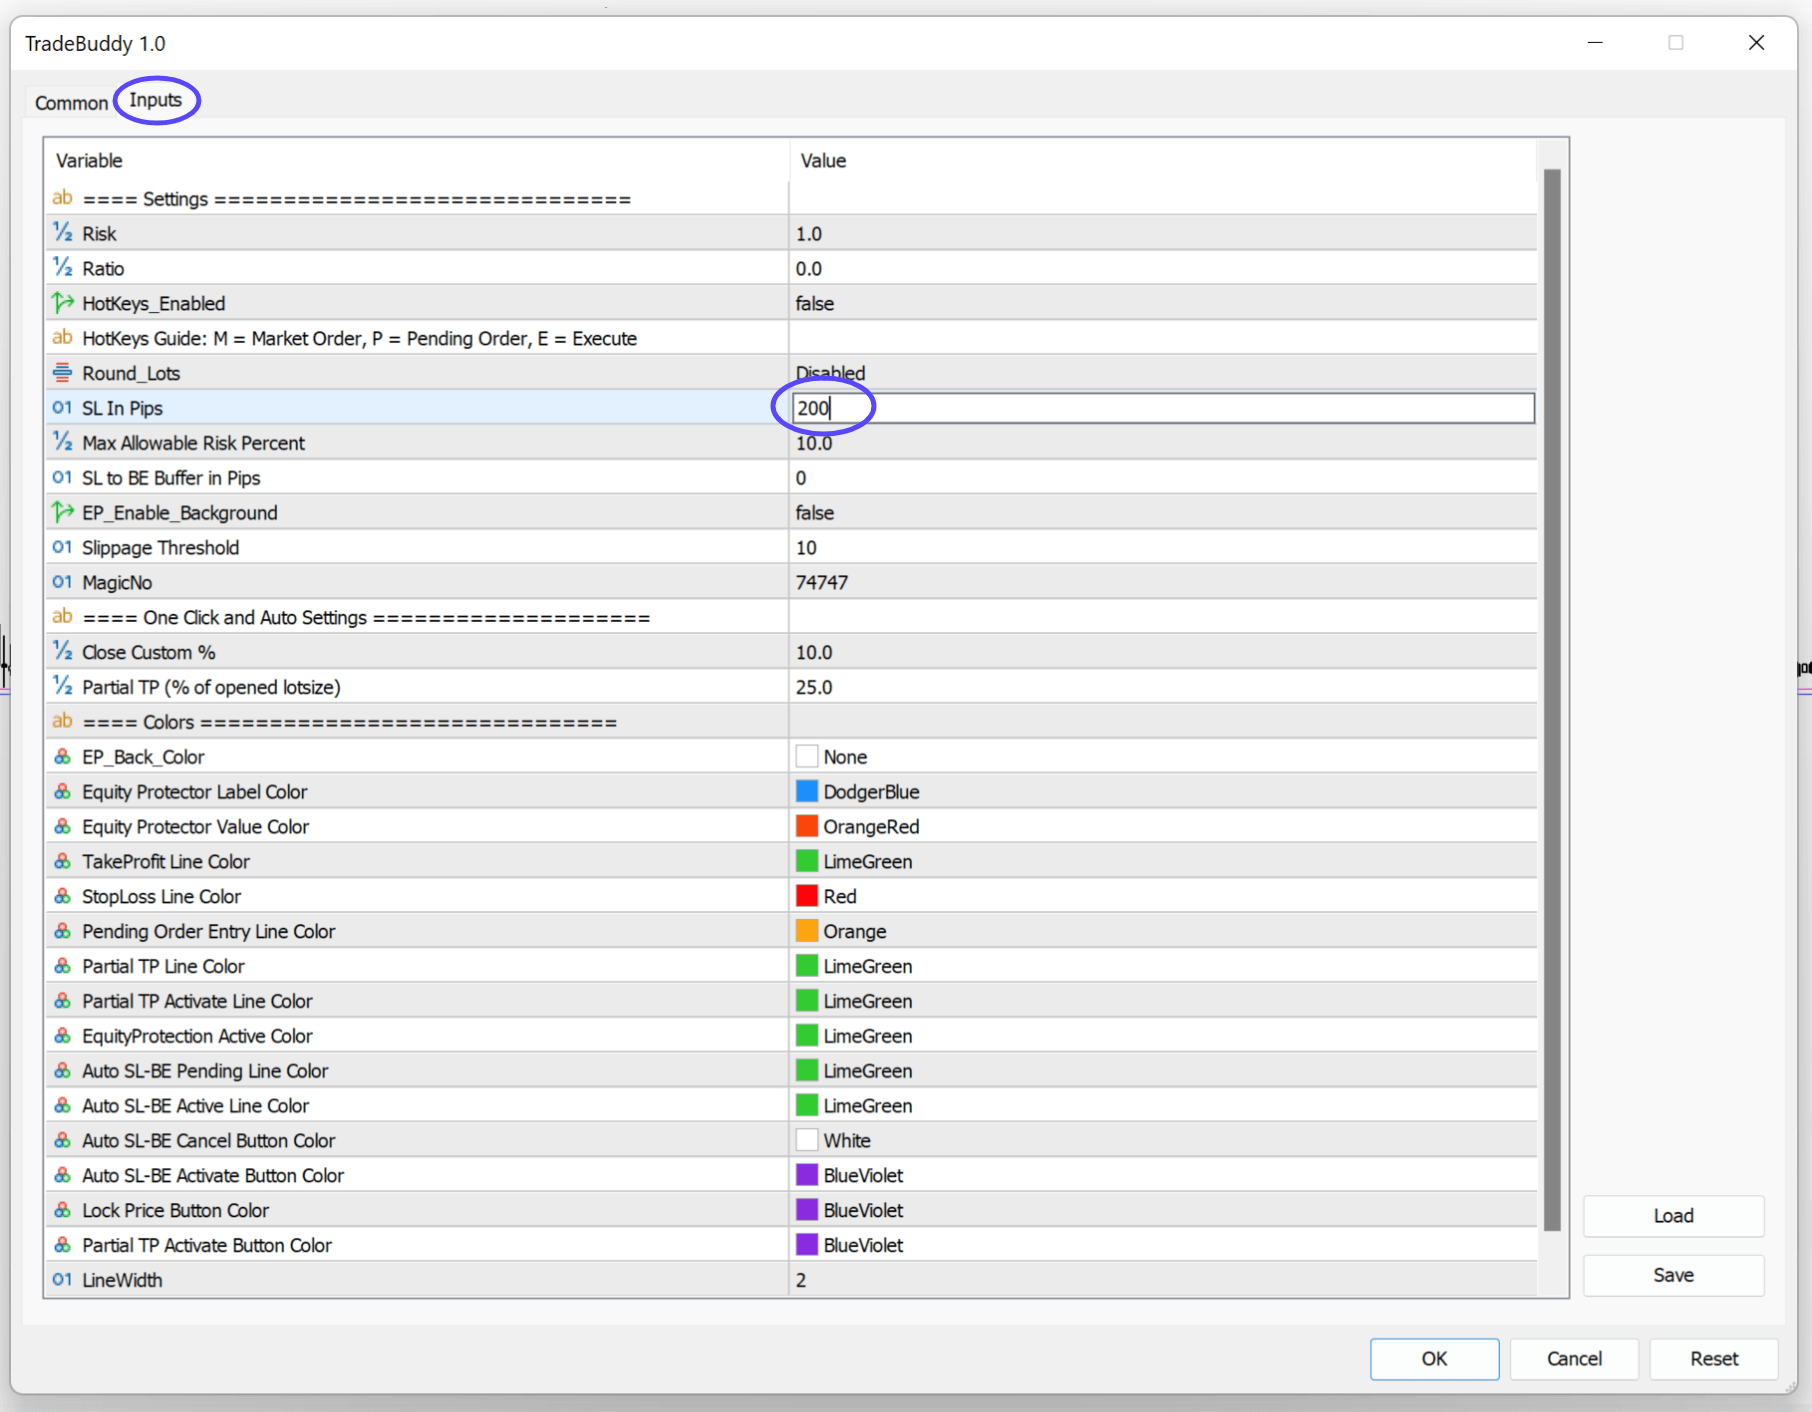
9. Adjusting Trade Buddy for Crypto, Indices and Commodities
To fix this, you simply need to adjust the default “SL In Pips” setting from “20” to a higher value such as 2000.
To do this, go to Settings > Inputs > SL In Pips and adjust the “Value” column as shown below:
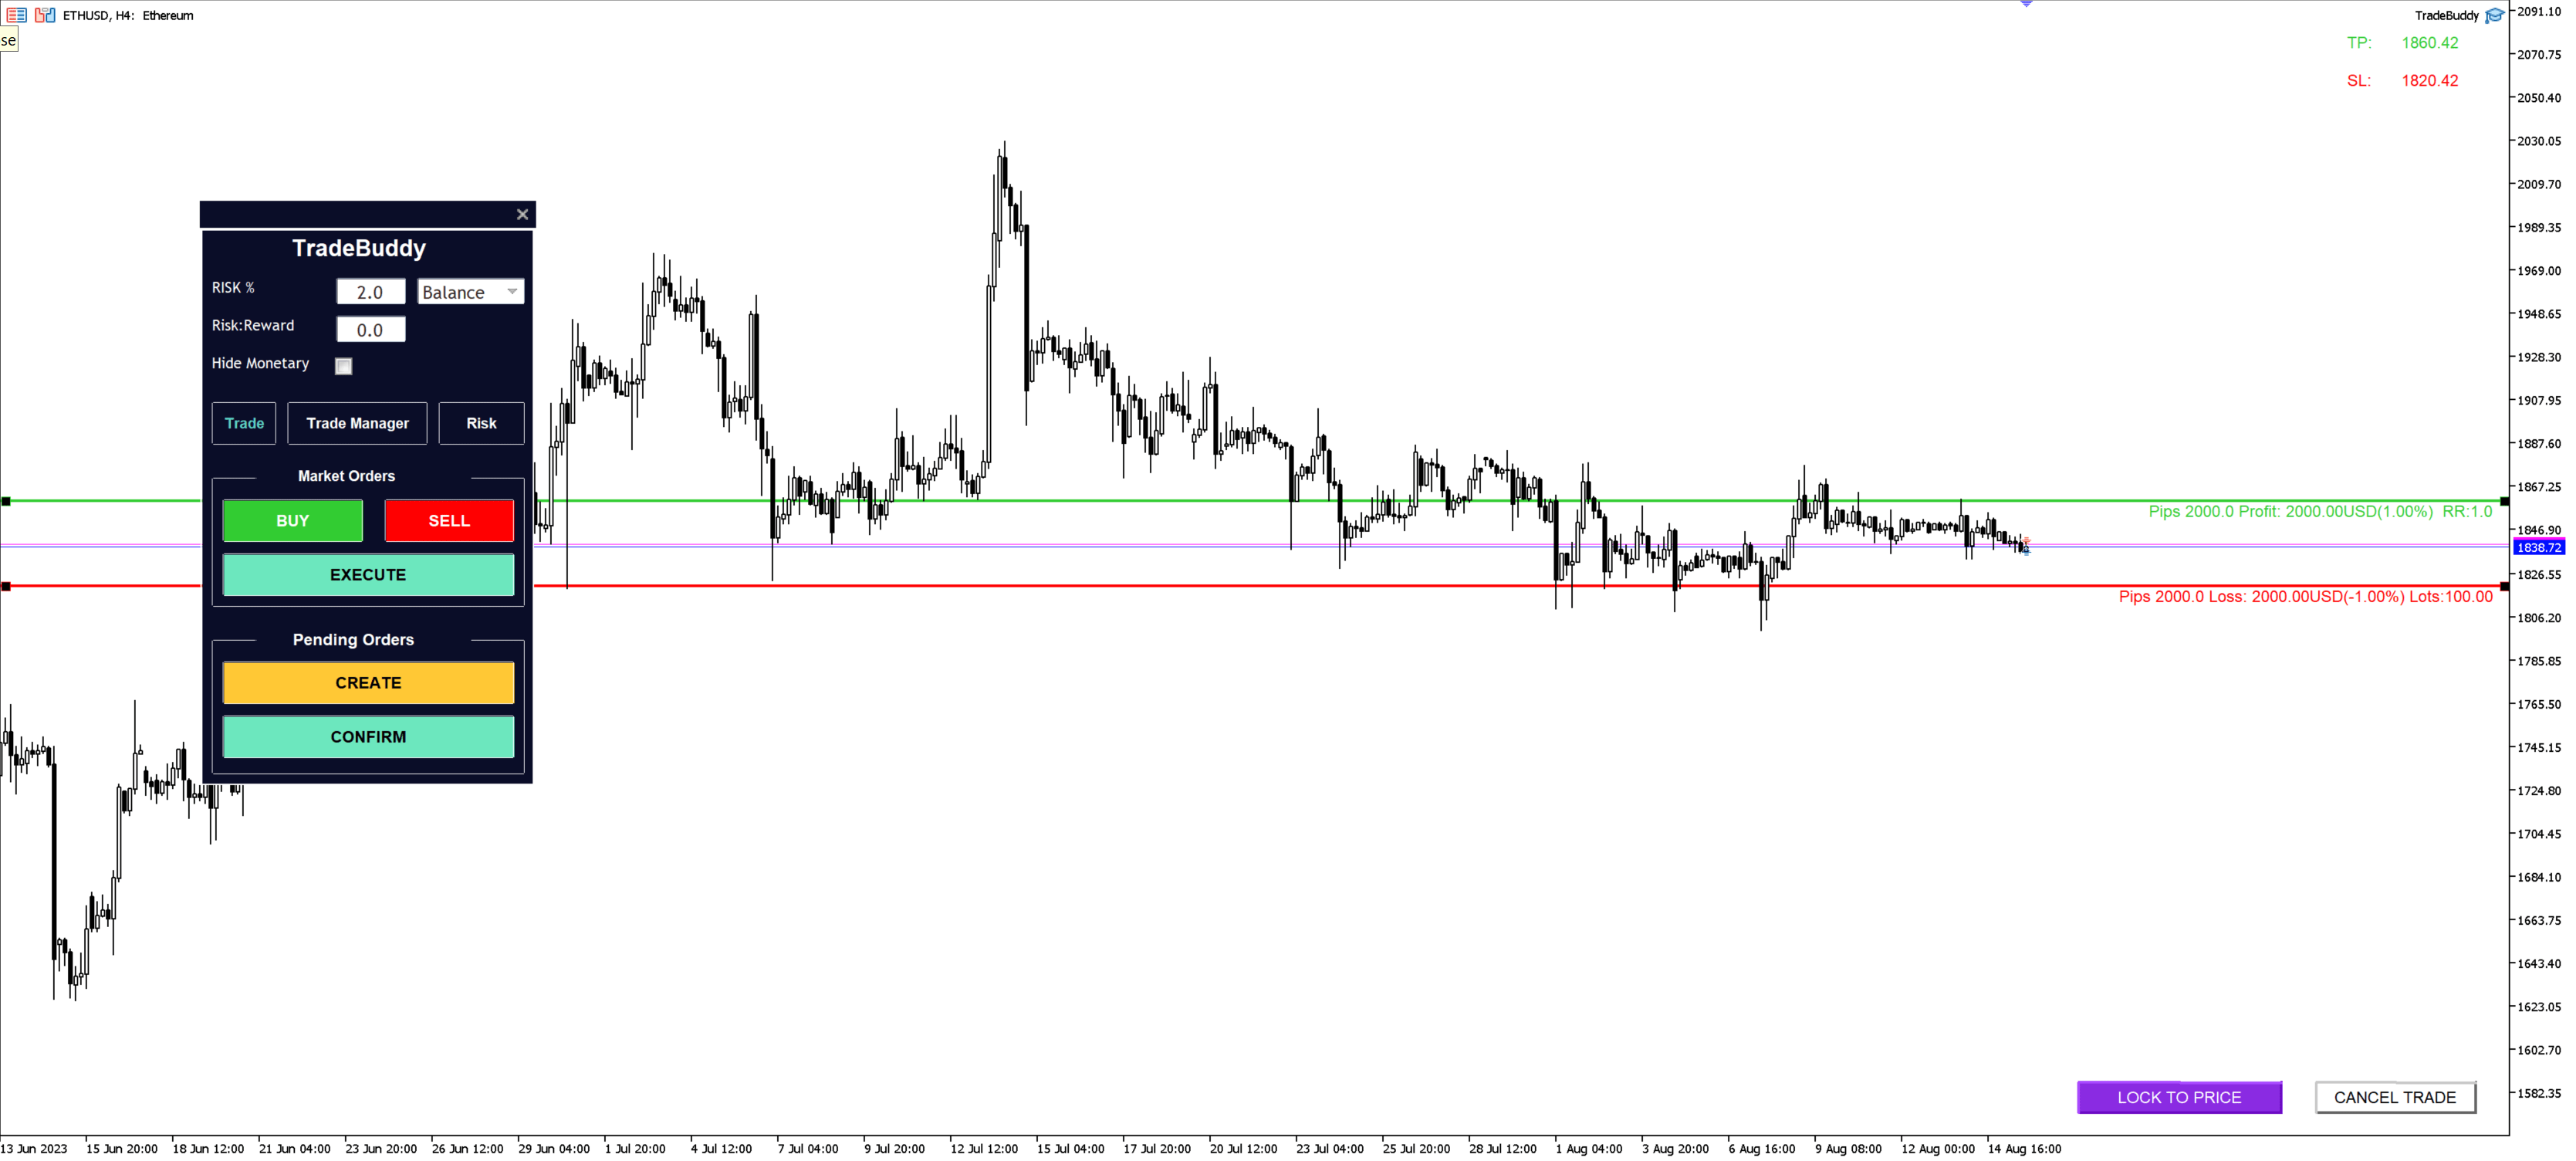
Now when you go to take a trade on the symbol, the SL and TP should no longer be too close together as shown below on ETHUSD:
10. Adjusting Trade Buddy for Futures without Partial Lots
Whilst most most symbols (e.g. Fx, Commodities etc) in MT4/MT5 will have a Volume step of 0.01, some markets will have a Volume step of 1, which means only whole lots can be traded. A good example would be the Euro Bund or other Futures markets.
To check if a symbol has a “Volume step” of 1, right click on the symbol in MT4/MT5 and then click “Specification” and you will see the following row:
![]()
By default, Trade Buddy will not be able to execute trades as it will be calculating your lot sizes to 0.01 decimal places for accuracy.
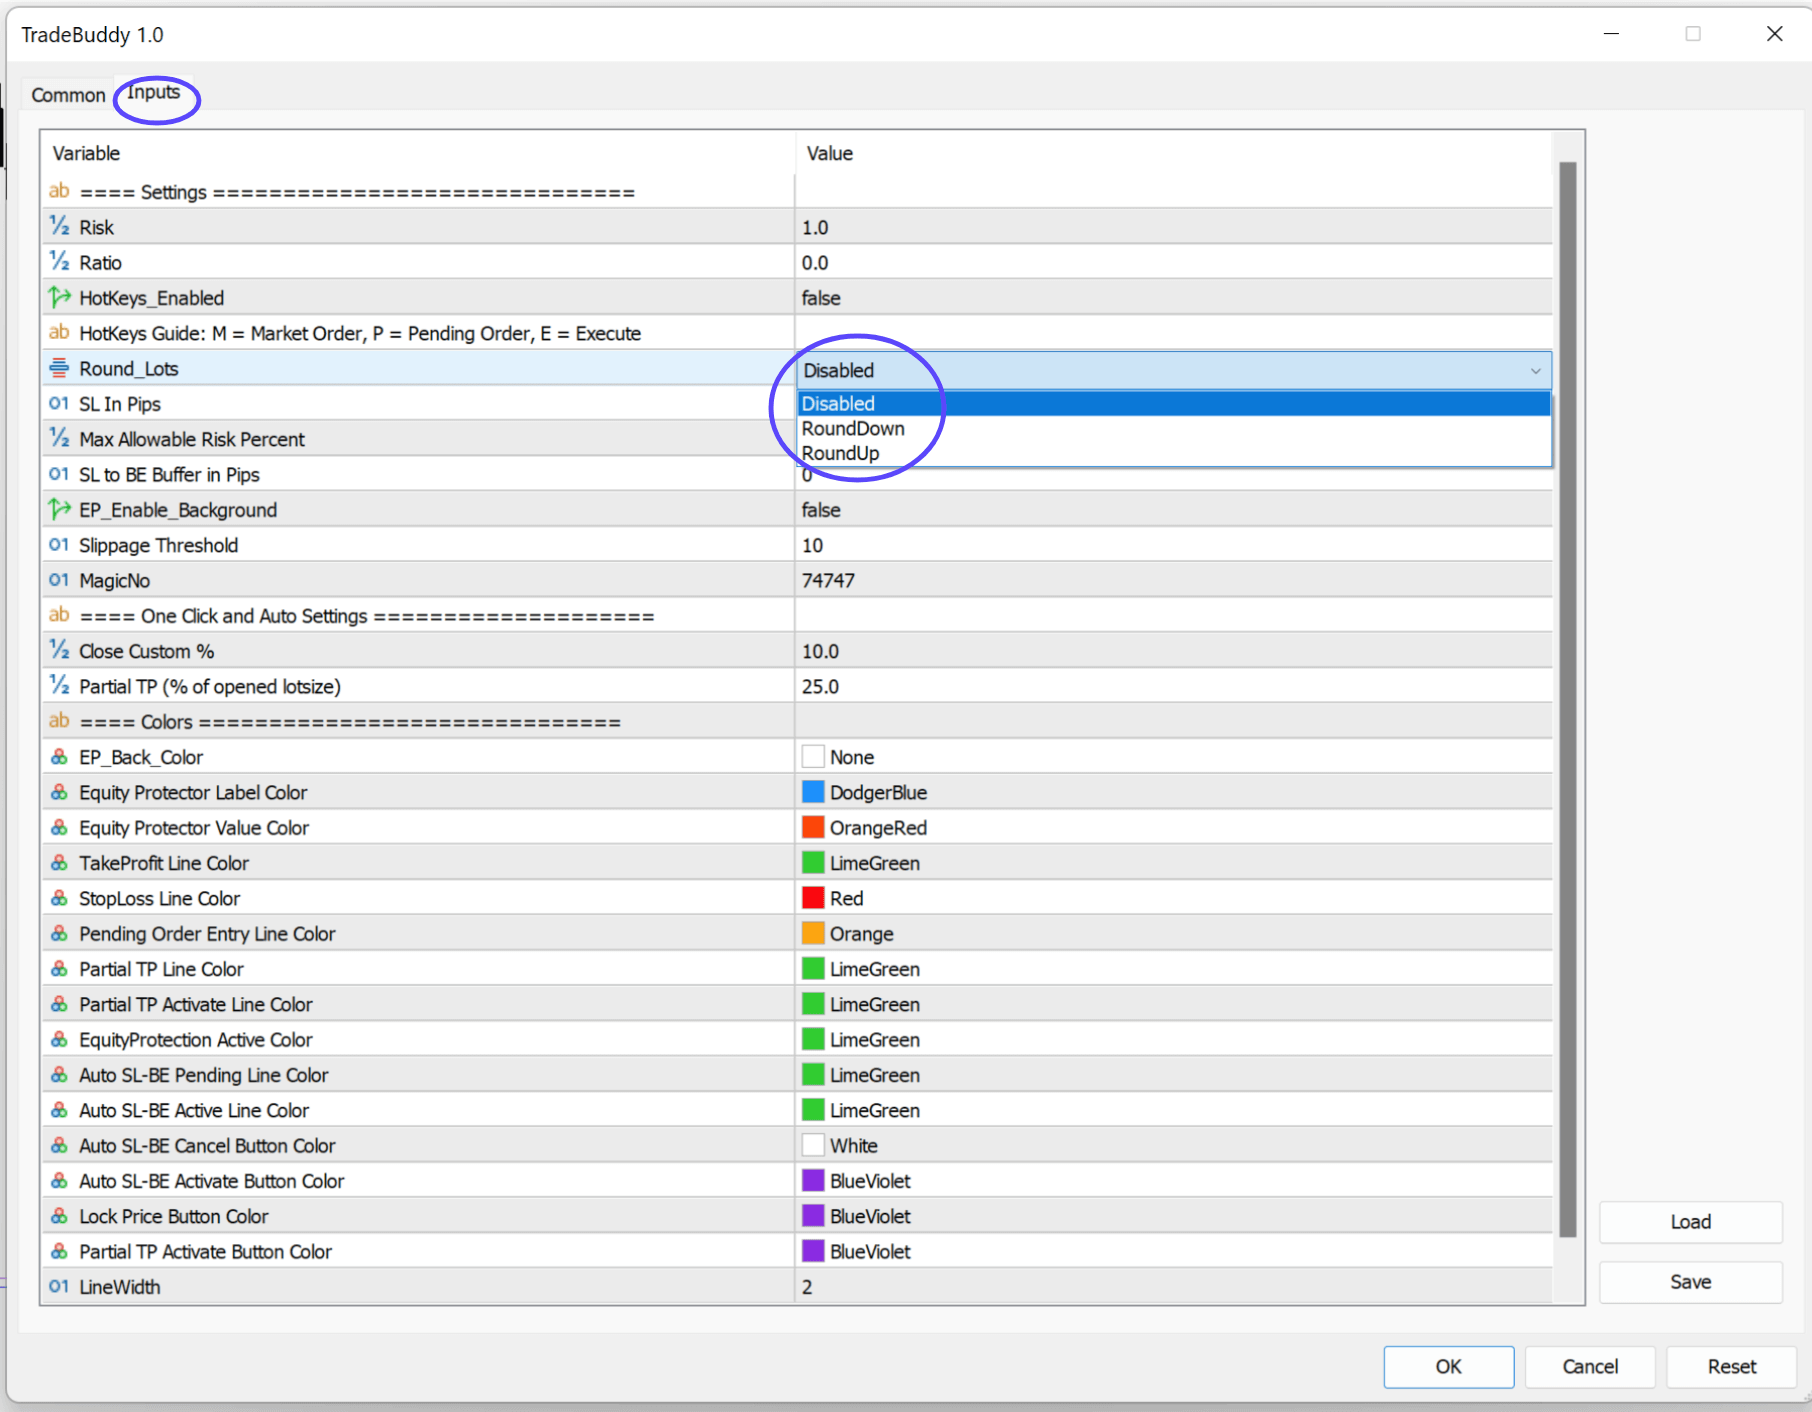
So that Trade Buddy can work with pairs that have a “Volume step” of 1, we have included a “Round_lots” setting which is disabled by default. By enabling it, it will either round your lots up (e.g. 2.10 lots would become 3 lots) or round your lots down (2.9 lots would become 2 lots). This will also work for the Auto Partial TP.
To enable this setting, go into the settings and then to the inputs, and adjust the “Round_lots” setting to either “RoundUp” or “RoundDown” depending on your preference.
Keep in mind this means your input risk will not be the same risk your trades will enter at, as the input risk of 1% might equal 6.40 lots on a trade, but if the symbol only accepts whole lots it means you will execute at either 6 lots or 7 lots. Trade Buddy will show the actual risk on the stop loss line on the chart so that you know what your actual risk is, when using rounded lots.
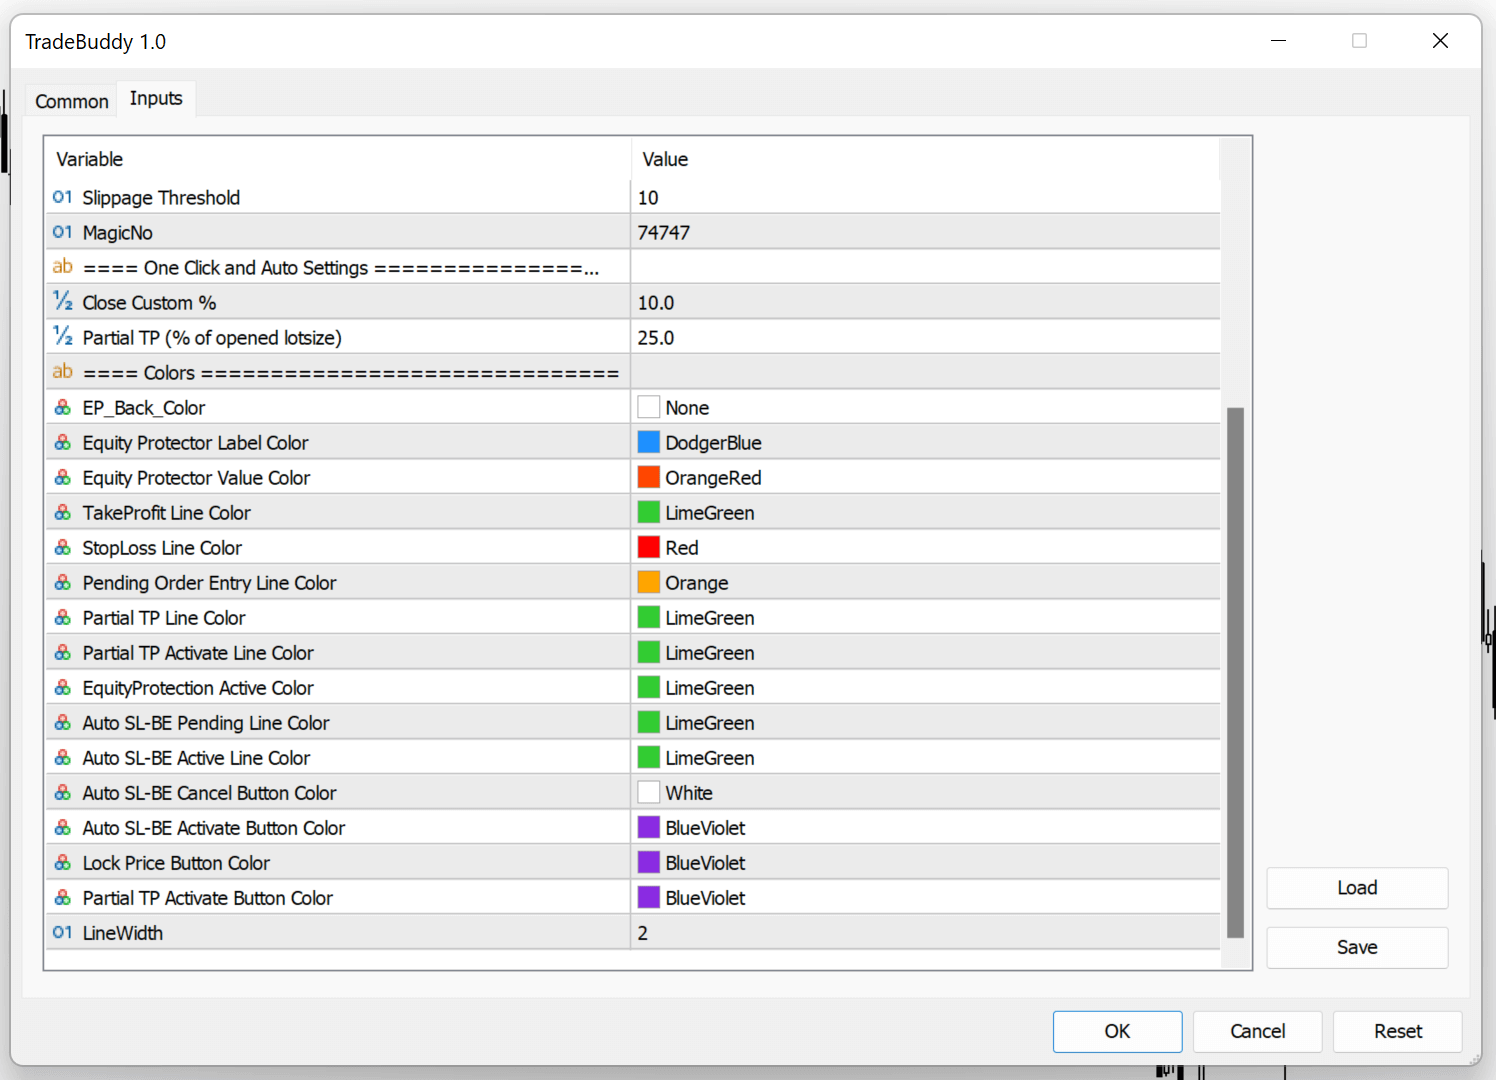
11. Settings Walkthrough
Trade Buddy has a lot of settings to allow you to adjust it to suit your needs, as shown below.

Colors = All settings in the “Colors” section adjust different colors in Trade Buddy
12. Adjusting the Colour Scheme
You can easily adjust the colors of the buttons, lines and text that Trade Buddy overlays onto your chart (such as the TP/SL lines and text and the Activate buttons for the Auto Partial TP and Auto SL).
To do this, simply go into the Settings > Inputs > and scroll down to the Colors section and you can easily adjust them to your taste.